Nancy Drew – The Deadly Device
Gameplay: This is a first person point and click game.
The main menu has new game, load game, options, help, extras, more ND and quit selections.
The options menu has voice, effects and music volume adjustments. Full screen and windowed game screen selection is here also.
Help shows the different cursors and navigation arrows used in the game. The interface description is shown at bottom of screen.
Extras have credits, outtakes and teaser. Outtakes and teaser are locked until the end of the game.
More ND shows the other Nancy Drew casual and adventure games released by Her Interactive; as well as links to Facebook, twitter, You Tube and Pinterest.
Select to play either Amateur or Master Sleuth. Amateur Sleuth has regular puzzles; hints available and detailed task list. Master Sleuth has more challenging puzzles; no hints and basic task list.
The game screen has menu at bottom left of the page. It has main menu, save game, load game, options, help and resume game links.
The cell phone is beside the menu link. It has phone, camera, settings and hints.
The phone has pictures and names of available characters that can be called. Click on the name or picture to get another frame that has a “call” button.
The camera can take 12 shots. Photos that are taken can be viewed. The focus can be zoomed in-out.
There are 4 games installed on the phone.
Settings have wallpaper selections as well as ring back and message sound tones selections.
The messages selection is shown by an envelope icon.
The power button closes the cell phone.
At the center of the bottom bar is where the items collected are seen. Use the slider tab at top of the bar to go through the items.
Right of the inventory bar are the frames for Tasks and Journal.
The tasks list has the to do things in the game. The question mark beside the task gives hints to help the gamer fulfill the task.
The journal has observations and suspects.
The game is non-linear. The walkthrough below is just one way to get through the game.
Robot charms are only for the games with bonus. The notes about them are in parentheses.
Colorado Springs, Colorado: Snow falls around the Technology of Tomorrow Today building. Niko Jovic stands by a glass cage working on the Tesla coil. The sound of a door closing and Niko’s scream are heard. Niko is murdered by electrocution.
Nancy gets a call from Victor Losset, CEO of the company. Victor gives the combination to Niko’s desk drawer. It has the case file. Nancy’s cover is that she is there doing due diligence investigation for a new investor. She is not given full access to the lab but Ellie will give her a demo of the machine that killed Niko. Victor’s prime suspect is Ryan; she built the machine that killed Niko and threatened him.
Explore Niko’s office:
Enter Niko’s office. Look around.
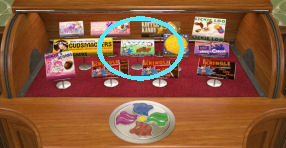
Turn right and check the intricately decorated candy machine. It is missing the opening mechanism. Yummy!
Turn around and check the nice but locked bookcase. Go to the left side of the desk and see a contraption at the corner.
Go to the right side of the desk and check a stand with a pigeon and 12 round slots. Press the metal button right of the bird and see the pigeon spread his wings. If you play with the pigeon often enough, you might win an award.
Easter Egg: If you played with the pigeon’s button a lot, you might get the Future Omelet of Secrets.
Desk: Go behind the desk.
Check the Krolmeister media player. Nancy says to fix it. There’s an empty slot on top.
Look close at left drawer. Enter the code given by Victor: 171943. Press the check button.
Read the case file:
Case file: Take and read Victor’s note on the cover of the case file. Read the case file to learn details about the other employees.
Learn that Niko Jovic is a co-owner of the company. Ellie York found his body and his death is caused by electrocution by high voltage discharge of the Tesla coil.
Mason Quinto is the day shift research assistant and Ellie York is the night shift research assistant.
Ryan Kilpatrick is the Technical Engineer that built the machine that killed Niko.
Gray Cortright is the Head of Security.
Victor Lossett is the co-owner of the company and deals only with the business side.
Read about the missing keycard and the entry before Niko’s murder. The video LBTY510258 at that time showed no one entering the lab.
Explore the halls:
Exit the office. Go forward. Do not enter the lounge at right yet. Let’s check the other areas.
Go forward. (Bonus game only – Turn left and look towards Niko’s office. See a sculpture in an alcove at left. Take the robot phone charm beside the sculpture). Go around to the left side of the balcony pass the elevator.
Bulletin board: Study the posts on the bulletin board on the wall pass the elevator at right. Note that there is a periodic table of the elements here.
Main Laboratory: Check the main lab at left. It is locked.
Check the keycard box at right edge of the door. Nancy notes that a keycard is needed.
Security office: Climb the short steps and check the gray metal door. It is closed.
Elevator: Go back to the elevator and enter. Press the up button to go to the next floor. Note the cabinet at right wall.
Exit by clicking on grill elevator door.
Research Assistant offices: Go left and enter the orange doors.
(Bonus game only – Enter through the orange door and see a small white box on the wall. Click on it to get the gummy bear phone charm).
Mason Quinto: Enter the office at right and talk to Mason, the day shift research assistant. He is not lacking in ego. Learn that he thinks Niko stole his work.
Check the whiteboard on left wall.
Ellie York – Mason won’t let you in her office.
Lounge: Go forward to the lounge pass the offices.
Tesla Coil book: Study the electronics book on the table. Learn about the Tesla coil and its parts. Learn from the notation that Ryan replaced a part in the bottom spark gap and it won’t run without the new part in place.
The multi-miniature capacitor (MMC) matrix will charge only when there is no other of a similar color rating in the same row or column.
Learn about the Faraday cage and lightning rods.
On the next page, take note of the schematic components, their icons, picture and usage.
Explore the tech workshop:
Exit the office. Go around to the other side of the balcony.
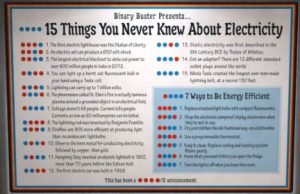
Binaries: Check the sign board on the wall. Take note of the binaries correlation to numbers on the poster – 15 Things you never knew about Electricity.
Tech workshop: Enter the double doors at left.
Go forward towards Ryan. A part flies and nearly hits Nancy.
Ryan Kilpatrick: Talk to Ryan. She builds tools that are used not in a good way.
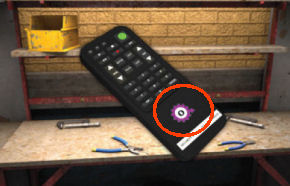
Remote control: Check the workbench on the left and see a remote control from the security office (do not remove). It has a gear sticker.
Find something to open the locked lab: Look close at the gray cabinet at right. Open the top left cabinet.
Take the white blank card from the cabinet door. Nancy says something about the blank card will help getting into the lab.
Take colored paper from the bottom shelf of the cabinet.
Check the blue tool cabinet at the corner.
Motorcycle: (Bonus – check the motorcycle at left to get the skull phone charm from the handle bar of the motorcycle). Look close at the motorcycle. Learn that Ryan is not done with it yet.
Exit the workshop and go down to the lower level via the elevator.
Night shift:
Ned: Check the message icon on the cell phone and see one from Ned. Ned will text message every so often.
Victor: Call Victor and report.
Lounge: Go to and enter the double doors left of Niko’s office. The lights flickers and goes off.
Get a call from Victor about the power outages.
Sleep: Go forward 4 times in the dark until you see the alarm clock on the table at left. Set the alarm to night.
Power off the grid:
Alarm: Nancy is woken by the alarm blaring. The lights are on.
Exit the lounge and meet Gray.
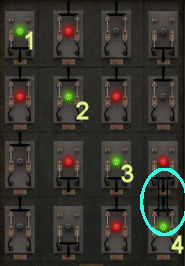
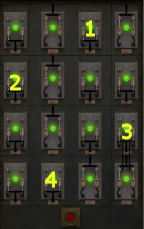
Power off the grid: Gray tells you to follow him and to power off the grid.
See the power switches. See that the bottom right switch is tied together.
Click on that switch and get evidence – band that held the switch. The band is placed in the evidence bag.
The aim of the puzzle is to get all lights to be off.
Amateur mode: Flip the switch of all 4 switches that has green light that goes from top left – diagonally to bottom right.
Amateur Master
Gray is thankful but tells Nancy to get out of the lab.
Security office:
Go right from the main lab. Enter the gray door.
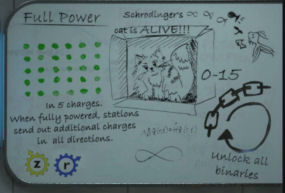
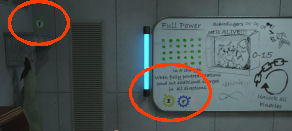
Whiteboard: Look around first. Check the whiteboard with Schrodinger’s cat.
Note the 5×6 green dots. There is a note that states “in 5 charges”.
At bottom right, it states unlock all binaries. There are 2 gear icons at bottom left.
Gray Cortright: Talk to Gray. He is not a helpful person. Exit the office.
Meet everyone at the lab:
Go to top level using the elevator. Enter the Research assistant offices behind the orange door.
Try to enter Mason’s office and Ellie stops you.
Ellie York: Talk to Ellie.
She shows a demo of the Tesla coil while Nancy is inside the Faraday cage. Bzzzzz.
Back at the office, continue to talk to Ellie.
The coil was wired with the secondary and primary coils together. Ryan says that Niko insisted. She describes Mason and Niko.
Try to enter Mason’s office again and Ellie makes a deal with Nancy. If Nancy beats Mason’s high score in Aggregation arcade game; she’ll let Nancy poke around.
Get another message from Ned.
Explore the lounge:
Exit the offices and go down the elevator. Enter the lounge left of Niko’s office.
Look around. At left, check Tesla’s portrait, the bookcase and the desk.
Turn around and check the kitchenette. See that the stove is missing the power knob.
Go left towards the bedroom. Check the bathroom.
Enter the bedroom at left. Check the alarm clock and then open the closet.
Tesla Book: Take and read about The Life and Times of Nikola Tesla. He was born on July 10, 1856 in Smiljan in Croatia from Serbian parents. Learn about the way Edison treated Tesla. Learn about Westinghouse, Marconi and Mark Twain.
Exit the bedroom. (Bonus – check the arm of the sofa at right to get the Saturn phone charm).
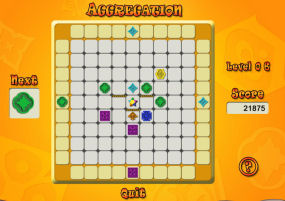
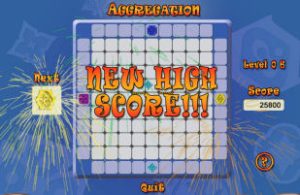
Get the high score on the Aggregation arcade game: Turn around and go to the Aggregation machine left of the door.
Mason’s high score is 22500 in Amateur mode while 31575 in Master mode. That is the score to beat.
Play the game. Click on the question mark at bottom right to learn the rules of the game
The aim of the puzzle is to remove everything from the grid by having 3 or more similar icons adjacent to or touching one another.
The icons on the edges out of the playing squares at center can be moved up-down or left-right.
The icon on the left is the next icon to be placed in the edge when the previous icon is used.
There are special icons that appear to help with the game. Good luck.
If you complete all level of Aggregation, you might win an award.
Snoop at Mason’s work area:
After winning the Aggregation arcade game, go back upstairs to Ellie. Tell her you won. She looks away from your snooping.
Enter Mason’s work room.
Look at Mason’s desk and see what Ellie meant. You can mess with the sticky notes, pencils, paper clips and markers if you want. LOL. If you mess up Mason’s desk, you might win an award.
Read the numbers on the sticky note: 153472125. This might be his keycard number.
Read the Biometrics book on top of the computer tower under the desk. Learn how Biometrics work and how to make a fake finger.
Find the password for Mason’s computer: Check the computer and see that it needs a password.
Check the whiteboard on left wall. Some of the letters are in orange colors: E E O M A N W T O L S S T H.
See 2 sets of lines at bottom left. There is an apostrophe on the first set. Ah!
If the first set is TESLA’S. The remaining set of letters can be arranged as HOMETOWN.
Based on the book at the lounge bedroom closet – Tesla came from Smiljan in Croatia.
Type in Smiljan on the computer. Press enter key.
Open the Component Designer 5.5. It’s a neat program that can make a 3-D design made of blocks.
Open the Record Repository and see a lot of work created by Mason.
Open the trash bin and see Mason’s note about Ryan (203587112 – maybe her keycard #) and the video hllw510257.
You might want to play the Component Craze arcade game. It is a timed match game.
Snoop at security booth:
Get Gray out of the security booth: Go down to the first level.
Check the alarm box on the wall by Niko’s office and right of the lounge.
Press the button and the alarm blares. Hear running footsteps. If you use this alarm several times, you might earn an award.
Go around to the other side and enter the security booth on top of the steps.
You have ample time to check out and do some puzzles in the room but in case you feel that it’s close to the time – go back to the alarm on the wall. Wait until the light blinks off and then press the red button again.
You can also save anytime and check things. Then load from a saved game and then go through the motions after you learned what to do.
Look around the security booth. Be sure to study the whiteboard on the wall.
Power on Gray’s computer:
Open the drawer of Gray’s desk. (Bonus – take the pigeon phone charm left of the tablet).
Look at the tablet and see a 5×6 grid. This is similar to the 5×6 grid on the white board that has all green circles. Remember the note that mentions 5 charges below the drawing.
The aim of the puzzle is to click on 5 points that will light up the board green. Remember there are only 5 chances to do so.
There is a reset button below the charges panel at left. The points can be clicked on in any order.
Amateur Master
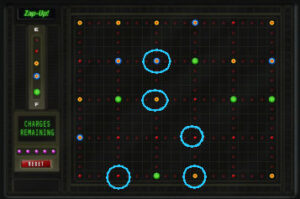
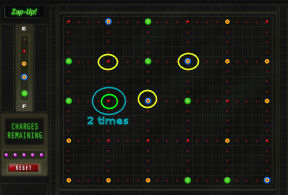
Figure out the password for Gray’s computer:
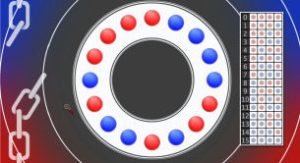
Look close at the monitor on top. After the computer is powered up, it shows a circle with the binary code-panel at right side.
The aim of the puzzle is to unlock all of the 16 binaries. The description of the puzzle is on the whiteboard.
Press red buttons in the circle and see which binaries are affected at right.
The buttons can be clicked in any order.
Investigate the login irregularity from the night of the murder:
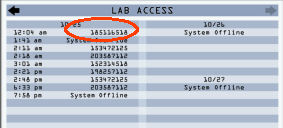
Click on Logins icon at top left. See a list of the keycard access numbers of the on the past days.
Use the arrow at top and access 10-25 the day of murder and see that at 12:04 am keycard 185116518 accessed the lab and the followed by the system override. This is when Niko was killed.
View the security video mentioned in the case file:
Case file video: Click on security icon at top left. Enter the video card number found in the case file: LBTY510258. Press enter.
Press the run arrow at top right. See Niko enter the lab and a few seconds later see lights burst inside the lab.
Figure out what the video file referenced on Mason’s computer shows:
Mason’s video: Now check the video mentioned in Mason’s note taken from his computer’s trash bin: HLLW510257. Press enter.
Press the run arrow at top right. See Ryan bypassing the lock on the door to the lab. 1034 11:34 PM.
Inquire about the humming in the lab:
Exit the security room and hear a loud humming close to the lab. Nancy says to tell Ellie.
Go upstairs to Ellie.
Snoop Ellie’s work space:
Tell Ellie about the humming by the lab and she rushes out the room.
Look around. Check the book at left side of her desk. Open A Connecticut Yankee in King Arthur’s Court book and turn the page.
See a set of numbers (maybe her keycard #) and at the bottom it says “each set = 15” (amateur) or “each set = 21” (master).
Open the drawer under the book and take memory card (Journal – Late Fall), key and reminder for passcode for the control booth.
Go to right side of desk and take the box of capacitors. Read the letter tacked on the board from Rachel. It mentions that they talk in code and insinuates that Ellie is not happy here.
Figure out the password to activate the keycard program:
Go back down and press the alarm to get Gray out of the security booth.
Enter the security booth after hearing the running footsteps.
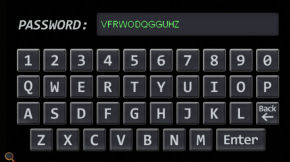
Look at the monitor again. Click on keycard icon at top left. It asks for a password.
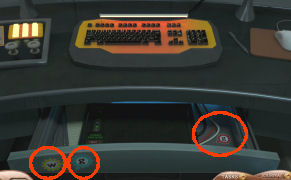
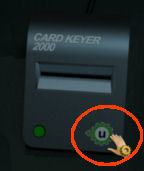
Take a look at the card keyer – keycard box on the right side of the desk. See that it has a letter inside a gear. The gear has an arrow. Hmm…
Insert the blank keycard in card keyer box.
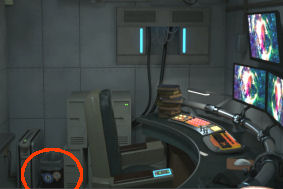
Now let’s look for more of those letters inside gears around the room.
There are 11 in this room and one is on the remote seen earlier on the workshop table.
 |
 |
 |
||
 |
 |
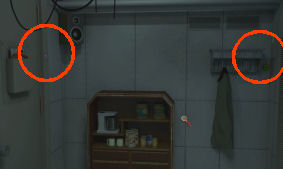 |
After noting down the letters in the gears; arrange them in clockwise order based on the position of the arrow on the gear.
Open again the keycard icon on the computer.
Enter the password obtained from the gears: v f r w o d q g g u h z. Press enter.
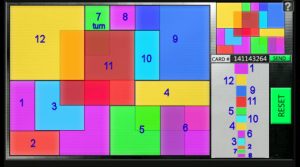
Colored squares:
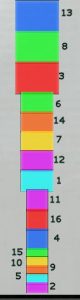
See the colored paper taken from the workshop at top right.
There are colored squares at bottom of that paper.
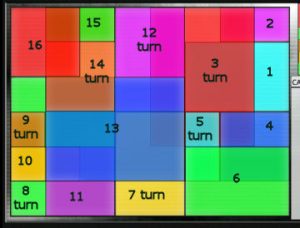
The object of the puzzle is to arrange the colored squares the similar as the colored paper clue.
One of the colored squares needs to be turned. Right click to turn the square.
When all are arranged, click on send to code the blank card in the card keyer.
Take the coded card.
Amateur Master
Use the keycard to get past a locked door:
Exit the security booth.
Go left to the lab door and look close at the keycard box at right.
Use the coded card on the box. If the coding is done correctly the light will turn green and the doors are unlocked. If not, you need to redo the colored squares puzzle.
Explore the lab (part 1):
Enter the lab and look around.
Work bench: Go forward to the work bench.
Take the beaker and the solutions notebook. It has the formula for etching solutions.
Oscillator: Check the oscillator right of the work bench.
Other machines and stations: Turn around and pan right from the stairs.
Check the mixing station and locked cabinet beside it. The chemical cabinet has a colored keypad lock.
Examine the small Tesla coil to the left of the Photolithography lab. Something must be broken.
Explore the Photolithography lab:
Enter the yellow door. Look around.
There’s a locked cabinet of photolithography supplies on the wall above the microscope. There is a cat leg left of the microscope.
Turn left and see a fume hood and an air vent on the ceiling.
Turn around and check the photolithographic etcher. Read the Manufacturing design book on top of the monitor right of the microscope.
Learn how to create your own design using the circuit designer. The design is printed and the printed sheet is used to transfer the design to a blank wafer laid on an etcher.
Check the intercom right of the door. Exit the room.
Main lab:
3-D printer: Check the 3-D printer left of the stairs. Read the blue book – Battle of the Currents on the table beside the machine.
High voltage area: Check the high voltage machines at the corner and wall. There is a cat body left of the high voltage wall.
Tesla coil room: Enter the door left of the high voltage machines.
Check the Faraday cage.
Look close at the Tesla coil base. See where the switch goes.
Pull out the drawer. Nancy says something is missing.
Turn left and look close on the floor left of the Tesla coil. There’s a hexagon on the floor.
(Bonus game only – Take the lightning phone charm at top left of the floor).
Exit the room.
Time to sleep:
We need help for all the other tasks. Time to sleep now.
Go back to the lounge at lower level. Go to the bedroom and set the alarm for daylight.
Deidre Shannon: The alarm wakes Nancy up.
The cell phone rings. It is Deidre Shannon from River Heights (Alibi in Ashes). A friend of her father asked about Nancy. She is still nasty.
You can use the bathroom, if you want. 🙂
Go to the lounge and see a cat leg on the table.
Get help:
Ryan: Exit the lounge and go to the technical workshop at top level.
Enter the blue double doors and hear Ryan scream. Talk to Ryan.
Robotic cat: Mason has left parts of the robotic cats everywhere and Ryan is trying to put it together.
Nancy says she will help collect the parts. Talk to Ryan about the time of the murder.
Help: Talk to Ryan again and ask about the media card. She will fix Niko’s media player if Nancy gets her a Koko Mallos from the candy machine.
She gives the plate for the machine.
Continue to talk to Nancy about Gray. Gray fought with Niko constantly.
Ask about the missing part of the large Tesla coil. Ryan gives the plan for the missing part.
Ask about fixing the small Tesla coil. Ryan says the circuit board is shot and to make a new one.
More talk: Talk to Ryan again.
Niko told Ryan to wire the part that killed him that way.
Ryan is not sharing her tricks on how to enter the building. 🙂
Get Koko Mallos for Ryan:
Go down to Niko’s office and the candy machine.
Place the plate Ryan gave on the candy machine.
This is a memory puzzle.
Press the yellow button at the center to start the puzzle. See colored buttons of the machine light up.
Press the colored buttons the same order as seen when the buttons light up.
Press for Amateur: blue, brown, brown, blue, brown, blue, blue.
Press fro Master: pink, blue, green, green, blue, pink, green, blue, pink.
Take the Koko Mallos candy at the center. If you eat every kind of candy in the counter, you might get an award.
Go back to Ryan and talk to her in order to give her the candy. Ryan leaves to fix the media player.
Take the cat head from the table.
Make a new circuit board for the small Tesla coil (part 1):
Review how to make a photographic etching: Go down to the lab.
Enter the photolithography lab.
Take the cat leg left of the microscope under the cabinet.
Turn right and read the book on top of the monitor again.
The items needed are: Etching solution, image and blank wafers.
Find the missing bottle of hydrofluoric acid:
Exit the photolithography lab.
Turn right from stairs and look at the mixing booth and see that there is no hydrofluoric acid on the shelf.
Unlock the supply cabinet:
Pan right to the supply cabinet at right.
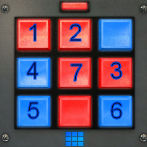
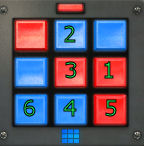
Examine the red and blue keypad.
The aim of the puzzle is to make all buttons blue.
Take the HF – clear bottle with blue cap from the shelf.
Amateur Master Prepare the etching solution:
Go back to the mixing booth left of the supply cabinet. The HF automatically goes on the shelf.
The Solutions book says to use for Amateur: 3 parts of Hydrofluoric acid (HF) + 1 part Nitric Acid (HNO3) + 4 parts Water (H2O) for silicon base wafers.
Take Hydrofluoric acid (HF) and pour some on the 3 ml graduated cylinder. Take the poured acid and empty it on the white beaker.
Take Nitric acid (HNO3) and pour some on the 4 ml graduated cylinder. Pour the 4 ml Nitric acid in graduated cylinder on to the 3 ml cylinder. Pour the remaining 1 ml of Nitric acid in the graduated cylinder into the white beaker.
Take the water (H2O) on the sink and pour some into the 4 ml graduated cylinder. Pour the 4 ml water into the white beaker.
Take the mixture in the white beaker and pour it into one of the brown bottle on the top shelf at left to get formula.
If an error is made, pour it in the Hazardous waste disposal at right.
The Solutions book says to use for Master: 2 parts of Hydrofluoric acid (HF) + 2 parts Nitric Acid (HNO3) + 1 part Water (H2O) for silicon base wafers.
Take Hydrofluoric acid (HF) and pour some on the 3 ml graduated cylinder. Pour the 3 ml into the 4 ml graduated cylinder.
Fill the 3 ml cylinder HF again. Pour the 3 ml again into the 4 ml cylinder leaving 2 ml in the 3 ml cylinder. Take this 2 ml acid and empty it on the white beaker.
Empty the 4 ml cylinder into the Hazardous waste disposal at right.
Do the same for the Nitric acid. Take Nitric acid (HNO3) and pour it on 3 ml graduated cylinder. Pour the 3 ml into the 4 ml graduated cylinder.
Fill the 3 ml cylinder HNO3 again. Pour the 3 ml again into the 4 ml cylinder leaving 2 ml in the 3 ml cylinder. Take this 2 ml acid and empty it on the white beaker.
Empty the 4 ml cylinder into the Hazardous waste disposal at right.
Take the water (H2O) on the sink and pour some on the 4 ml graduated cylinder. Pour the 4 ml water in graduated cylinder on to the 3 ml cylinder. Pour the remaining 1 ml of water in the graduated cylinder into the white beaker.
Take the mixture in the white beaker and pour it into one of the brown bottle on the top shelf at left to get formula.
If an error is made, pour it in the Hazardous waste disposal at right.
Unlock the supply cabinet in the photolithography lab:
Go back inside the photolithography lab.
Use the bin key taken from Ellie’s desk drawer on the locked cabinet above the small microscope.
Take a silicon wafer from cabinet.
Make a new circuit board for the small Tesla coil (part 2):
Make a circuit design: Look close at the monitor at right under the cabinet of the silicon wafers.
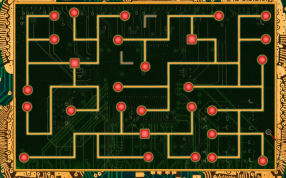
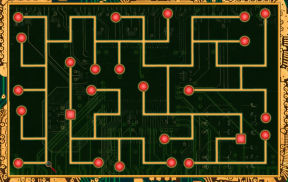
The puzzle is to connect all the circuit.
Click a circuit to turn it. All done!
Take the circuit design from the printer.
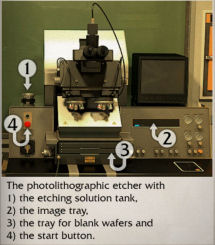
Amateur Master Use the photolithography etching machine: Turn right and look close at the photolithography etching machine.
Pour the formula in brown bottle on the tank (#1) at left.
Place the printed circuit design on the image tray (#2) below the monitor.
Place the silicon wafer on the tray for blank wafers (#3).
Press the red start button (#4).
This process takes 12 hours. So we can leave now and come back later.
Find a way to listen to the audio card:
Nancy has already given the candy to Ryan and she left to fix the media player.
Go to Niko’s office and then behind his desk.
Check the media player and see that it is fixed.
Niko’s diary: Use the audio card – Niko’s diary on top left of the media player.
Press the play-arrow button.
Entry 1 – Wednesday – Ryan threatens Niko. Entry 2 mentions needing a new coil design. Entry 3 reveals Niko’s displeasure of Mason’s work.
Investigate Ryan’s threats against Niko:
Check the lounge: Niko mentions that Ryan confronted him at the lounge and tried to give him another threatening letter.
Go to the lounge right of Niko’s office.
Take the cat leg from the table.
Go to the bedroom. Take the cat’s tail beside the lamp on the table with the alarm.
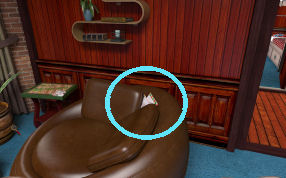
Go back to the lounge and then turn around and face towards the entry to the bedroom. Look close at the brown chair left of the entryway.
Take and read the threatening notes on gummy bear stationary. The notes go in the evidence bag.
Ryan: Go to tech workshop at top level and talk to Ryan.
Ryan explains that those notes are to warn Niko about the dangers of the item he wants her to make.
Ryan asks Nancy to leave.
Investigate Ryan:
Mason: Go to Mason in his office across the balcony. Talk to him completely. Learn about Gray, Ellie and Ryan.
See a pink cat leg on top of the file cabinet under Mason’s desk. We need to get that when he is not here.
Deidre: Get a call from Deidre after some time. She needs Nancy’s help and is now being sweet. She is charged with plagiarism and she made a deal with her professor in Criminology to help in an actual investigation. So she’s helping Nancy with her access to the database. She already read up on Nancy’s case.
Nancy asks about Ryan. It seems the video and timeline doesn’t match with the time of the murder so the police can’t charge Ryan.
Victor: Call Victor on the cell phone. Talk about Ellie and Niko’s diaries. Tell him about Ryan’s threats.
Deidre: Get a call from Deidre. She cleared Ryan of being here the night of the murder. Deidre is tracking 2 photographers that took pictures of Ryan at the award presentation beside a clock. She could not make it here in time to kill Niko. Nancy get Deidre to check other things.
Follow up with Victor about new evidence on Ryan: Call Victor and tell him Deidre’s report that clears Ryan. He is very upset about it.
Ryan: Get a text message from Ryan – apologizing. She wants to talk to Nancy.
Deidre: Get a text message from Deidre saying that Ellie waited 30 minutes before calling 911.
Ryan: Go upstairs to the tech workshop. Ryan will help Nancy in her investigation.
Escape from the photo lab:
Exit the workshop. Someone hits Nancy on the head.
Nancy wakes up at the photo lab. There is a bar at top right of screen that shows the air content of the room.
Intercom: Use the intercom right of door. Press the talk button and hear Ellie. She says she’s also locked in. She’s in the control booth. Ellie says to use the air duct.
Air duct: Turn right and see a ribbon hanging from the air vent in the ceiling.
Click on the air vent to climb up to the air duct. It’s hot in here.
Amateur: Go F, F, F, L, F (173), R, L (121), L, R, R, L, R, R (005), L and F to vent on floor.
Master: Go F, first L, F, R, F, R, L, L, L, R, R, L, L, R, L, L, R, R, far R, R, L, R, L. Go to the vent on the floor.
Track down some new leads:
Hear Gray and Mason having an argument. Mason runs away.
Explore the Tesla coil lab:
Ellie is trapped in the booth. Let’s find her.
Go to the Tesla coil lab. Climb the stairs to the control booth. Look close at the lock.
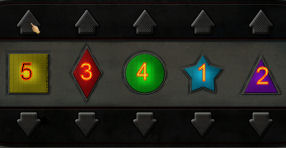
Amateur: Clues from Ellie’s notes about the passcode for the control booth:
The red shape is pressed neither first or last.
The green shape is pressed immediately after the diamond.
The yellow shape is pressed last.
The blue shape is a star.
The purple shape isn’t pressed first.
The square isn’t red. The purple shape, the diamond and the circle are pressed in order.
The triangle is pressed second.
The circle is pressed before the yellow shape.
The shapes are square, diamond, circle, star and triangle.
Based on the clues; the colors are red, green, yellow, purple and blue.
The first to be pushed is not red, green, purple or yellow color. Then the first must be blue star.
The last which is yellow is not diamond, triangle or circle. So the last one is yellow square.
The 3 in the middle are purple (2), diamond (3) and circle (4). The circle (4) is green. Purple (2) is triangle shaped leaving a red diamond.
Change the colors of the shapes first by using the arrows.
Then press the correctly colored shapes in order: blue star, purple triangle, red diamond, green circle and yellow square.
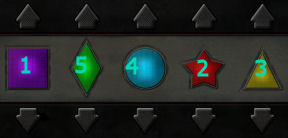
Master: Clues from Ellie’s notes about the passcode for the control booth:
The yellow shape is pressed after the purple one.
The star is pressed sometime before the circle.
The blue shape is pressed immediately before the green one and sometime after the red one.
The yellow shape is not the star or the second one pressed.
The square is pressed sometime before the triangle which is pressed sometime before the circle.
The purple shape is pressed before the star, which is pressed before the triangle.
The circle is neither red not the last shape pressed.
The diamond is pressed immediately after the blue shape which is pressed after the star.
The first to be pushed is not yellow, circle, green, blue, triangle, star or diamond.
The purple is pressed before star, triangle, circle which is not the last. So the first color is purple.
The only shape left from the clues is square. The first one is purple square.
The last square to be pushed is not yellow, star, blue, red, square, triangle, circle, blue or star.
The only color left is green. The only shape left is diamond. The last one is green diamond.
The color sequence left shows red – yellow – blue (immediately after the last green).
The shape sequence left shows star – triangle – circle.
Change the colors of the shapes first by using the arrows.
Then press the correctly colored shapes in order: purple square, red star, yellow triangle, blue circle and green diamond.
Mess with the coils:
Enter the control booth. Ellie is not here. Check the desk.
Read Ellie’s notes on Tesla Coil Safety.
Follow Ellie’s instructions:
1. Choose level – move the lever at right to either high or low.
2. Power on – left switch.
3. Charge power – middle switch.
4. Engage system – right switch.
It doesn’t work. Gray screams at Nancy. Leave the security booth after being warned. If you run several energy tests, you might win an award.
Get a call from an irate Victor and is told to not go back to the lab.
Make a new circuit board for the small Tesla coil (part 3):
Main lab: Enter the main lab.
Turn right and go forward to the high voltage wall. Pick up the cat’s body tucked to the left of the metal door.
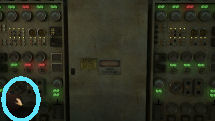
Photo lab: Go to the photo lab and take the circuit from the wafer tray.
Find Ellie:
Go upstairs to Ellie’s office. Check her desk again.
Desk: Read the note at right side of the desk and the letter from her cousin on the tack board.
The paper has titles or names.
Break into Ellie’s cellphone:
Go left from her office to be at the lounge.
Pick up the cell phone on the table and the unknown card from under the couch. Nancy wants to know who owns the card.
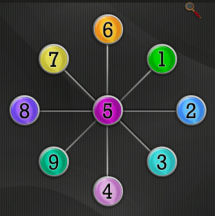
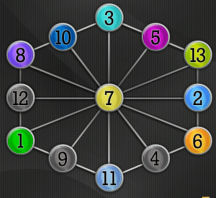
Nancy says to get the puzzle to add up correctly.
Place the numbers in the circles so that each 3 numbers on a line add up to 15 for Amateur.
The numbers must add up to 21 on the sides as well as the center lines for Master.
This clue is written on the paper in Ellie’s desk.
 |
 |
| Amateur | Master |
Find out why Mason was in the lab after hours.
See text messages between Ellie and Mason. They are working with Palo Alto and Chicago connections.
Mason’s office:
Go to Mason’s office. Take the cat’s leg under the printer at right of desk.
You can mess up his desk if you want.
Manufacture the missing part for the Tesla coil:
Make the design: Look close at Mason’s monitor. Open component design 5.5.
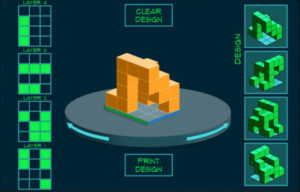
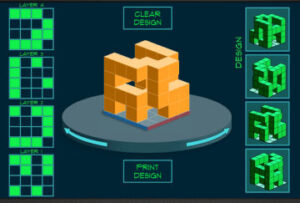
See the 4 layers squares at left and Ryan’s design at right.
Ryan’s design shows the 4 sides. The puzzle on the left is by layers from top to bottom.
Start on bottom layer and copy the arrangement of the cubes.
Take note that this is a 4×3 grid. This gives a clue on which side to place the cubes on.
Click on a square on the left to place a cube. To erase, click on the bright green cube again.
When done, click on print design. I think that’s right.
Amateur Master Main lab: Go down to the lab. Go to the 3D printer left of the stairs.
Look at the monitor on the left and see your creation done on Mason’s computer. Click on Print button.
This will take a long time to process. Come back later.
Find out who the owner of the keycard from Mason and Ellie’s office is.
Security booth: Exit the lab. Climb to security at right.
Hear Gray shredding something inside the office. Enter.
Gray: Talk to Gray completely and learn about the video and Niko.
Get Gray out of security booth: Pull the fire alarm by Niko’s office.
Hear Gray’s running footsteps. Go to and enter security.
Keycard and knob: Place the unknown car on the card keyer at right side of desk.
Pick up the knob left of the key card reader.
Open the keycard icon on monitor. It is the same card number that opened the lab before the murder: 185116518.
Shredder: Pull back and look at the shredder at left corner.
Pick up the cat’s leg from back of the trash.
Take the kill switch for the Tesla coil beside the cat’s leg. It is placed in evidence bag.
Click on the shredder and get shreds.
Find out what Gray is shredding:
Lounge: Exit the security booth. Go around to the lounge. Go to the table at left.
Place the shreds on the desk beside the tape.
Arrange the shreds to form the document. Right click to turn and left click to pick up and drop the piece of paper.
Use the tape to keep the pieces together.
The machine was placed in safe keeping. Take the shredded page.
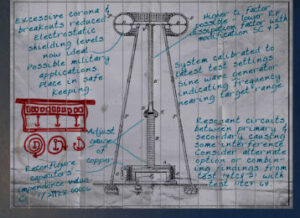
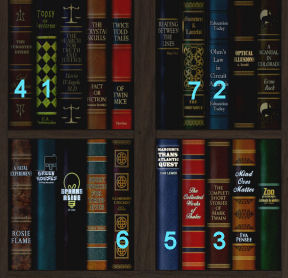
Figure out the meaning of the list of book titles from Ellie’s desk:
Look close at the bookcase on the left.
Click on the book title in order as shown below. Identify the books based on clues on the list.
Topsy the performer is the condemned elephant’s name.
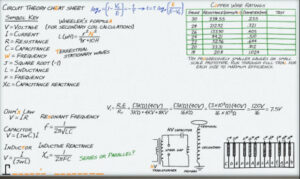
Ohm’s Law is V=IR (from Mason’s White Board).
Mark Twain is Tesla’s good friend from the book of his life.
The Tungsten Divide – Element #74 is W (Tungsten) seen at Periodic Table on board at lower level.
Marconi TransAtlantic Quest – as mentioned in the book in the bedroom closet; Marconi is the incorrect radio patent holder.
Chicago is the 1893 Columbian Expo Site mentioned in the book by the 3D printer.
Guinevere and Lancelot – Sagramor’s fellow knight is Sir Launcelot from A Connecticut Yankee in King Arthur’s Court.
Tesla’s portrait swings open and a secret compartment is seen.
Take Niko Diary 2 media card labeled Journal – mid Fall and notebook.
See what is inside Niko’s notebook:
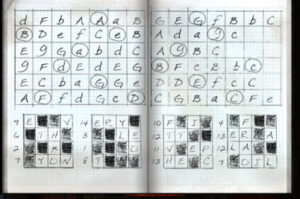
Read the notebook and learn that Niko suspects Ellie about missing research materials and that the Faraday cage is failing.
Open the next page and see letters in a graph. There are 4 of 4×4 letters below. On the left are numbers.
Using the binary code clue; click to darken some squares forming the binary code of those numbers at left.
Nancy reads the code: Play every fifth letter above on the coil.
Click on every fifth letter to circle it: A G B e g a g d B c G E F D C
Repair the small Tesla coil in the lab:
Go to the lab. Look close at the small Tesla coil left of the photo lab.
Insert the circuit made earlier on the base of the red tower.
Play Niko’s song on the small Tesla coil:
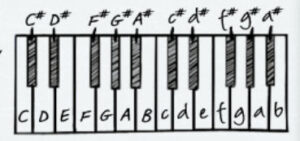
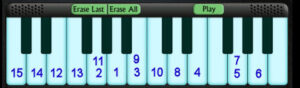
See “Touch to Start”. See piano keys.
Play Niko’s song and see the score below: A G B e g a g d B c G E F D C
Click on “play” at top right. The machine will replay the notes.
If done correctly a secret compartment opens at left.
Take the note. Niko writes: …To find the hidden knowledge, illuminate a black light under the glow.
If you create music, you might win an award.
Play Niko Diary 2:
Go to Niko’s office and play Niko Diary 2 on the media player.
Listen to Niko’s thoughts of 10-16. He discovered a new kind of energy and that his enemies are closing in. The last entry is about Ellie asking how much the discovery will be in open market.
From shredded page, find out what’s been placed in “safe keeping”:
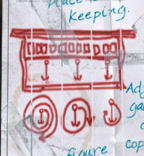
Coat rack: Study the shredded paper and see that there is a drawing in red at left side; under the word safe keeping.
Get Gray to leave the security booth by setting the alarm again. Enter the security booth when he’s gone.
Face the coat rack on left wall. Look close and see 3 coat hooks similar to the red drawing.
Using the clue below the coat rack drawing turn clockwise: the left hook 10 times, the middle hook 5 times and the right hook 3 times.
Hear a click. Click on the wood panel above the hooks. A secret compartment is opened.
See a note with letters and numbers: LBTY6510259.
See an e-mail transcript between Niko and Gray. Niko thinks Gray is leaking info online about his project. The paper goes into the evidence bag.
Check the diploma and learn that Gray has a doctorate in Theoretical Physics. Hmm…
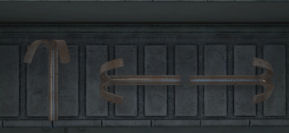
View the video referenced in Gray’s lock box:
The text looks like video labels. Click on the monitor and then security icon.
Enter the text: LBTY6510259. (Thanks, misslilo).
See a video of Niko entering the Tesla coil lab and then Gray exiting. After that the blast inside the lab occurred.
A binary code appeared at right: 11101001. We need help here.
Sleep: Go back to the bedroom pass the lounge and set the alarm for daytime – sun.
When Nancy wakes up, footsteps and banging are heard and then her door is unlocked.
Ryan and the cat:
Go upstairs to Ryan at the workshop. Talk to Ryan about being locked up and the card from the research assistants’ office.
Look at the blue tool chest at left. See an opened drawer with a black light-lamp. Take the black light.
Put together the robotic cat: Go to the workbench at left. Place the parts of the cat on the table.
Place the body, legs, head and then tail. Pet the cat and hear it make different sounds. 🙂 If you rebuild the cat, you might win an award.
Place the made part:
3D printer: Go to the main lab. Turn right and go the 3D printer left of stairs.
Open the lid at right and take out the part made from the pattern given by Ryan.
Part for Tesla Coil: Enter the Tesla Coil lab.
Pull open the bottom part. Insert the made part on the square hole. Close the drawer.