Murder, She Wrote
Case 1: A Deadly Catch – Cabot Cove, Maine
The Cornelia
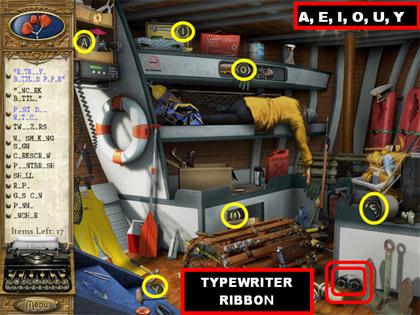
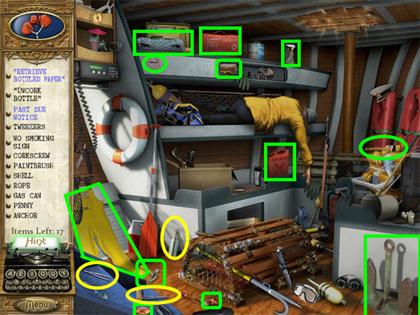
- The letters A, E, I, O, U, and Y are all highlighted in the screenshot.
- The Typewriter Ribbon is in the lower right corner.
- All the items on the list have been highlighted in the screenshot.
Retrieve Bottled Paper/ Past Due Notice
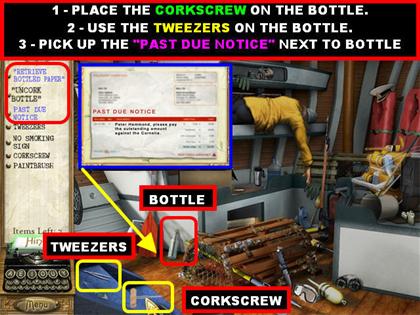
- Pick up the Corkscrew in the lower left.
- Place the Corkscrew on the Bottle in the lower left.
- Pick up the Tweezers in the lower left.
- Place the Tweezers on the bottle to eliminate the “Retrieve Bottled Paper” from the list.
- When you pulled the paper with the Tweezers you will notice that the Past Due Notice item on your list is no longer blue.
- Pick up the Past Due Notice paper next to the bottle in the lower left.
Cabot Cove Lobster Pound
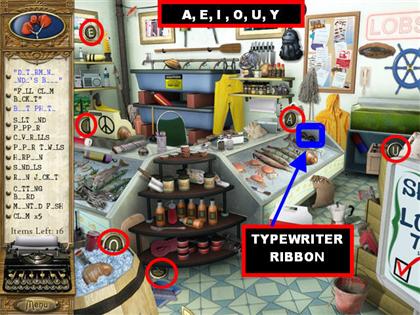
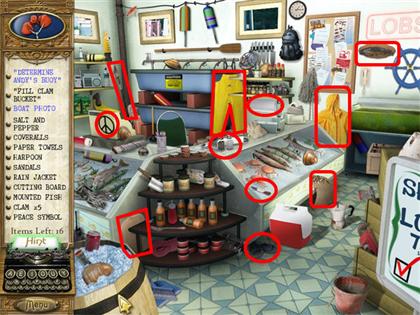
- The letters A, E, I, O, U, and Y are all highlighted in the screenshot.
- The Typewriter Ribbon is in inside the RIGHT freezer case.
Fill Clam Basket/ Find 5 Clams
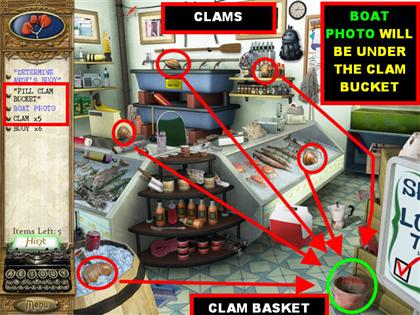
- Pick up the 5 Clams circled in the screenshot.
- Place the Clams in the Clam Bucket in the lower right.
- Boat Photo – Once the Clam Bucket has been filled and automatically removed from the game, you will be able to pick up the Boat Photo in the lower right corner.
Pick up 5 Buoys
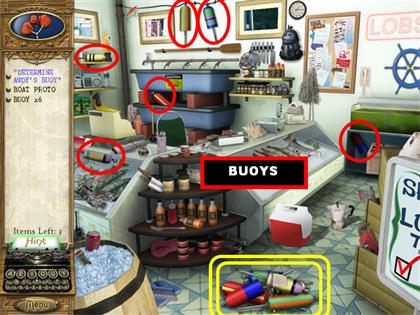
- Pick up the Buoys in the scene; they are all marked in the screenshot.
- The Buoys will pile up on the floor, click on them to trigger a mini-game.
Determine Andy’s Buoy Mini-Game
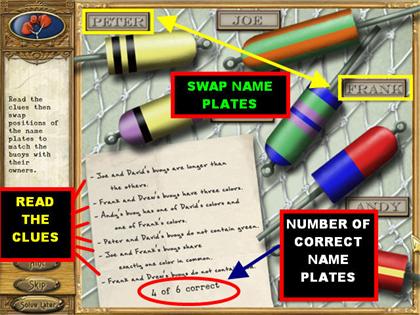
- Using the clues provided, your goal is to place the Buoys in the right spots.
- Click on 2 Buoys and they will swap places.
- Read the paper at the bottom to determine the correct order in which they should be placed.
- Look at that numbers in the lower right (0 of 6 correct) to see how many items are correct.
Buoy Solution
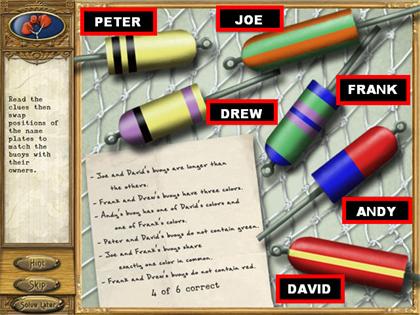
- The solution is as follows:
PETER = Yellow and Black Stripe JOE = Orange and Green DREW = Purple, Yellow, and Black FRANK = Blue, Green, Purple ANDY = Red and Blue DAVID = Red and Yellow
The My Turn
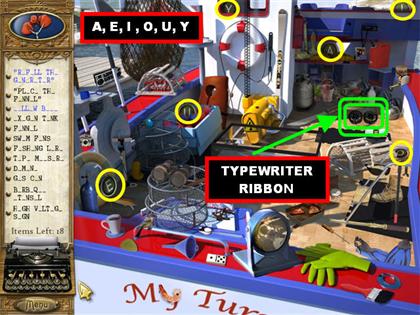
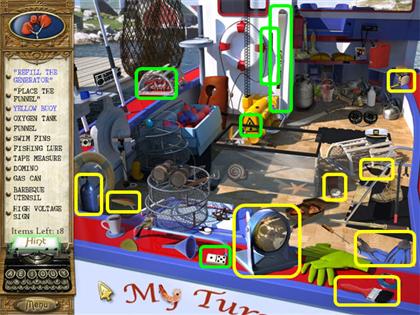
- The letters A, E, I, O, U, and Y are all highlighted in the screenshot.
- The Typewriter Ribbon is on the right side of the scene.
Funnel & Refill the Generator
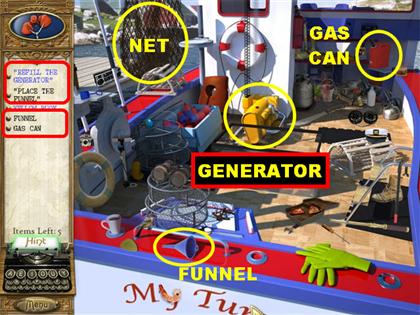
- Pick up the funnel in the lower left.
- Place the Funnel in the yellow Generator.
- Pick up the red Gas Can in the upper right.
- Place the Gas Can in the Funnel that’s in the Generator.
Yellow Buoy
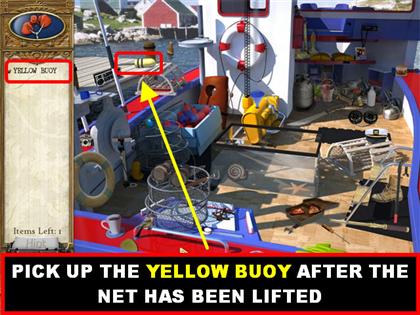
- After the Generator has been filled, the net in the upper left corner will fill up.
- Pick up the Yellow Buoy that appears in the spot in which the net was located.
Marine Research Laboratory
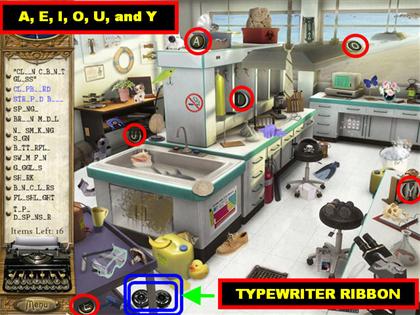
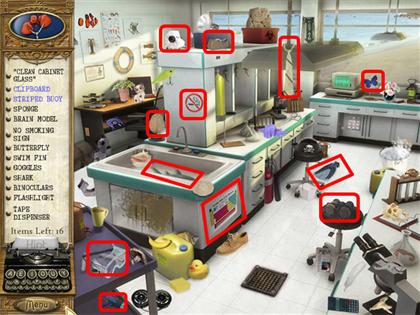
- The letters A, E, I, O, U, and Y are all highlighted in the screenshot.
- The Typewriter Ribbon is on the lower left side of the scene.
Striped Buoy/ Compare Fish Images
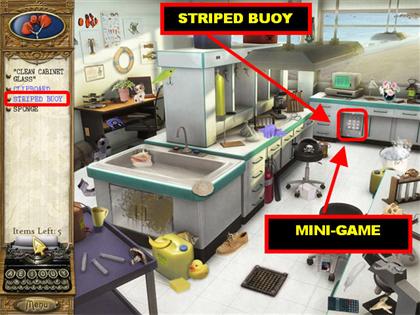
- Click on the sparkly cabinet on the upper right side, close to the window, to trigger a mini-game.
- You will be given a set of Fish images to compare.
- Find the Fish amongst the bunch that is different from the others.
- If you make a mistake and choose the wrong fish, you will be shown the one that was correct and you will have to start over.
- Identify 4 sets of fish that are different from the others to win the mini-game.
- The solutions are random but you can look at the next set of screenshots for the solutions we encountered while playing.
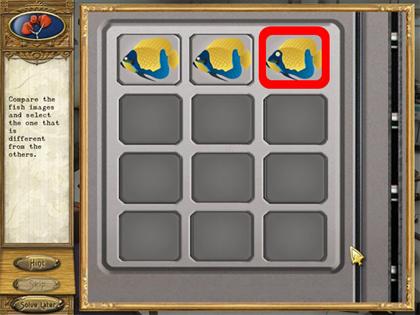
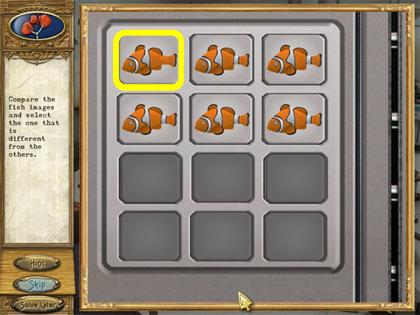
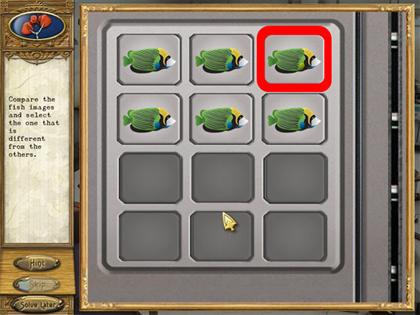
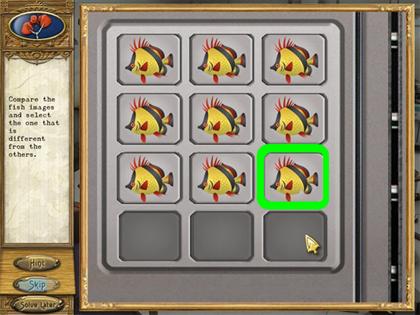
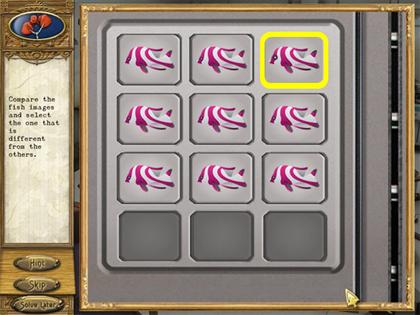
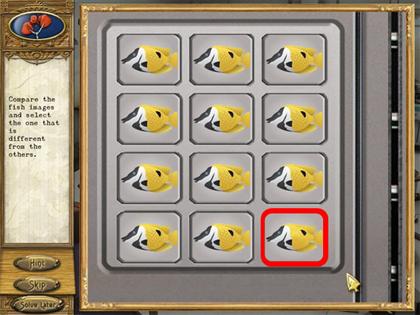
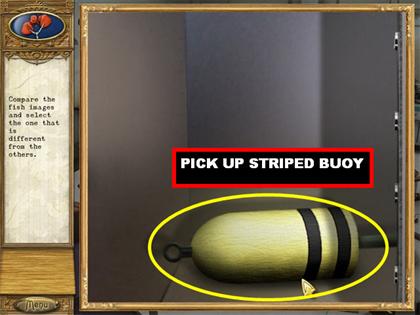
- Once you’ve completed the mini-game, the Striped Buoy will appear on the screen, click on it to take it off the list.
Clean Glass Cabinet/ Sponge
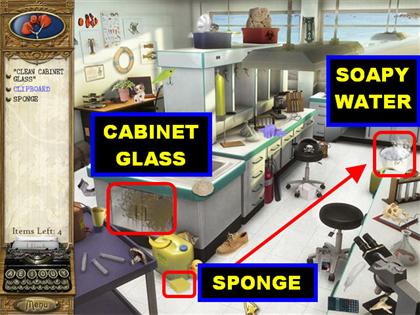
- Pick up the yellow sponge in the lower left.
- Place the sponge on the bucket of soapy water on the upper right.
- Put the Soapy Sponge on the glass cabinet in the lower left.
Clipboard
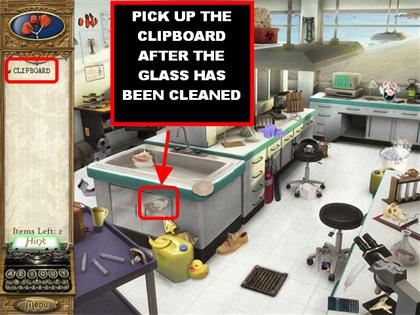
- Pick up the Clipboard that appears on the cabinet in the lower left once the glass has been cleaned.
The Cornelia
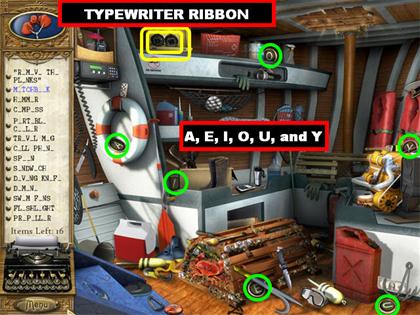
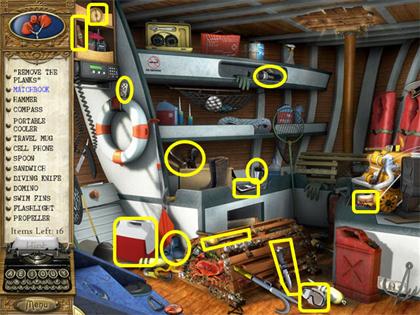
- The letters A, E, I, O, U, and Y are all highlighted in the screenshot.
- The Typewriter Ribbon is on the upper left side of the scene.
Remove the Planks – Hammer
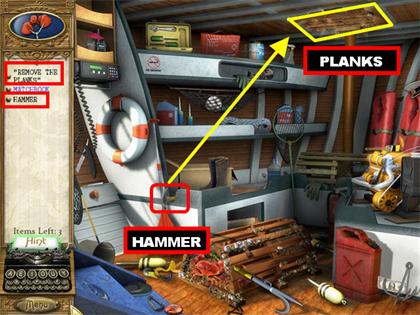
- Pick up the Hammer in the lower left.
- Place the Hammer on the planks in the ceiling.
- Keep clicking on the hammer until all boards have been removed.
Matchbook
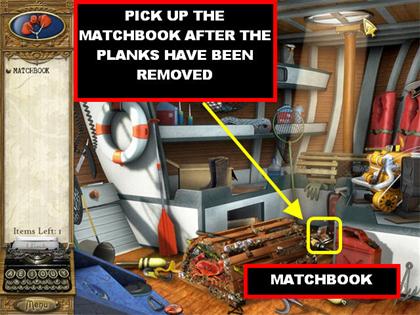
- Once the boards have been removed, a light will shine through the window.
- Pick up the Matchbook in the lower right, directly under the window.
Harborside Tavern
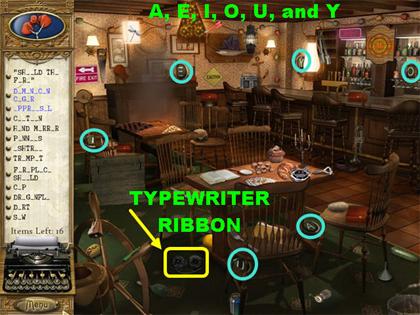
- The letters A, E, I, O, U, and Y are all highlighted in the screenshot.
- The Typewriter Ribbon is on the lower left side of the scene.
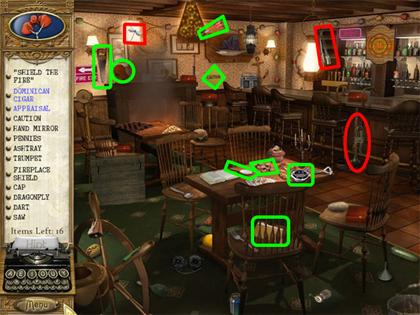
Collect 5 Cigars & Dominican Cigar
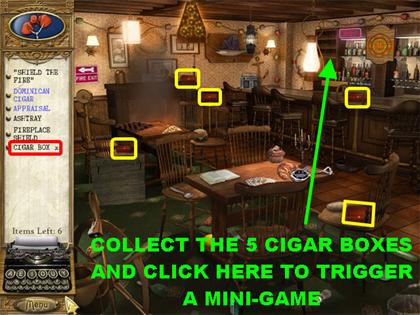
- Collect the 5 Cigar Boxes that are scattered around the scene.
- Once all the boxes have been collected click on the sparkly spot in the upper right side to trigger a mini-game.
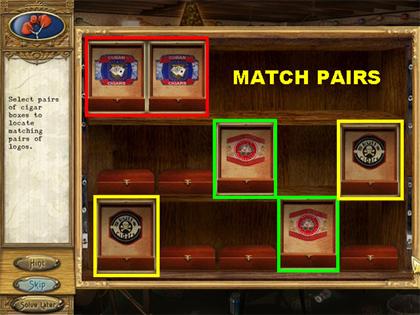
- Your goal is to pick matching cigar boxes in order to eliminate them.
- Click on 2 boxes to see the images inside of them. If the images match, both boxes will be eliminated.
- If the boxes do not match, you will have to try again.
- The boxes will switch places each time you make an incorrect match.
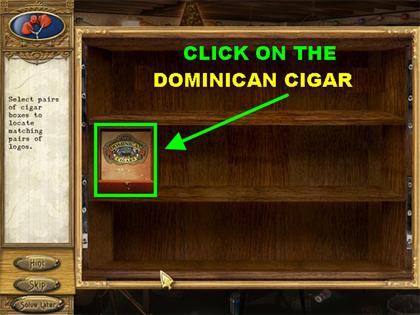
- The last remaining box will contain the Dominican Cigar.
- Pick up the Dominican Cigar to end this round.
Shield the Fire/ Fireplace Shield
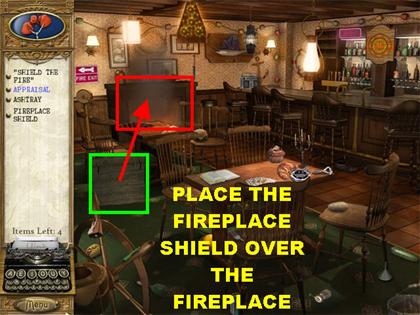
- Grab the Fireplace Shield in the lower left.
- Place the Fireplace Shield in front of the Fireplace on the left.
Appraisal
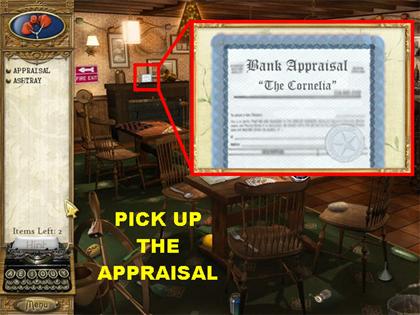
- Pick up the Appraisal that appears above the Fireplace after it’s been covered.
The My Turn
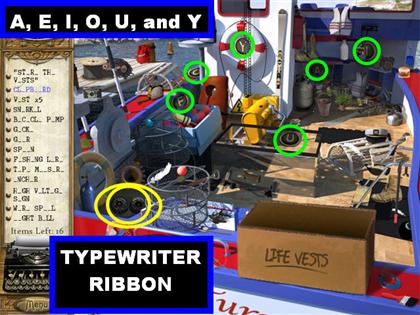
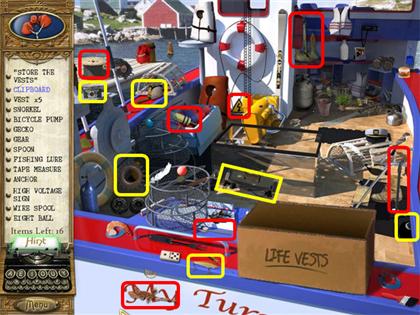
- The letters A, E, I, O, U, and Y are all highlighted in the screenshot.
- The Typewriter Ribbon is on the lower left side of the scene.
Pick up 5 Vests and Store the Vests
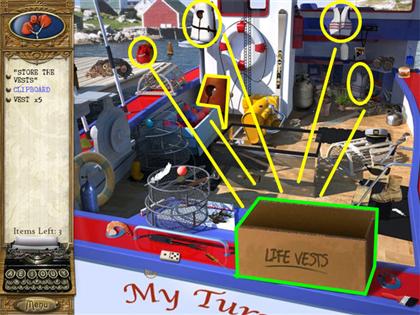
- Please look at the screenshot for the location of all the Vests.
- Place each Vest in the box marked: “LIFE VESTS” in the lower right corner.
Clipboard
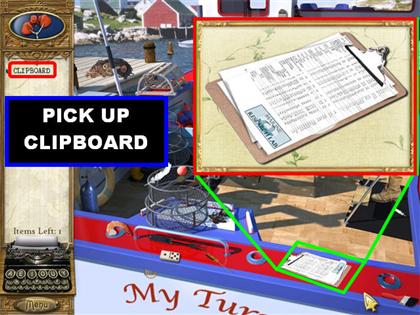
- Once all the Life Vests have been stored, the box will disappear from the screen.
- Pick up the Clipboard that appears underneath the spot in which the box was located.
Marine Research Laboratory
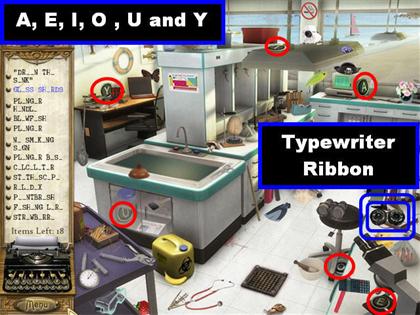
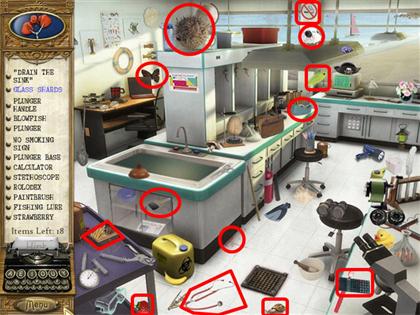
- The letters A, E, I, O, U, and Y are all highlighted in the screenshot.
- The Typewriter Ribbon is on the lower right side of the scene.
Plunger & Drain the Sink
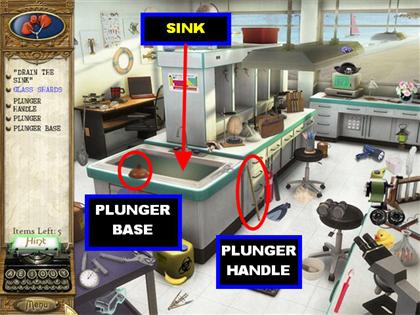
- Pick up the Plunger Handle and place it on the Plunger Base next to the sink on the left.
- The completed Plunger goes on the left side of the ground.
- Place the Plunger in the sink, to drain the water.
- Pick up the Glass Shards in the sink after it has been drained to trigger a mini-game.
Glass Shards Mini-Game
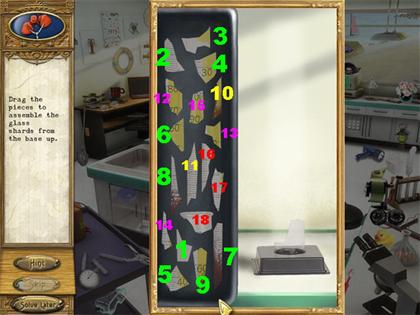
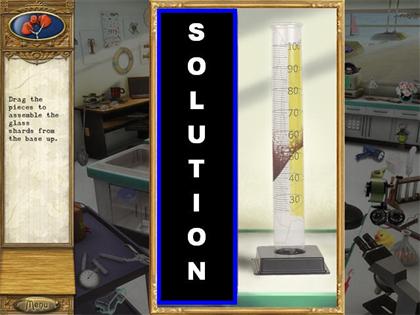
- Your goal is to reassemble the Glass Shards.
- Pick up the Glass Shard pieces on the left side of the scene and place them on the base on the right.
- Please look at the screenshot for the solution. Place the pieces in the order shown.
The Cornelia
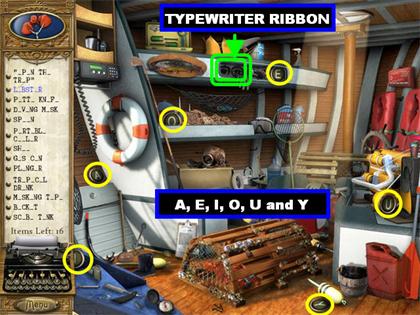
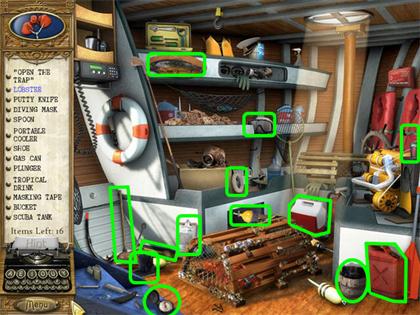
- The letters A, E, I, O, U, and Y are all highlighted in the screenshot.
- The Typewriter Ribbon is on the upper center of the scene.
Open the Trap, Putty Knife & Lobster
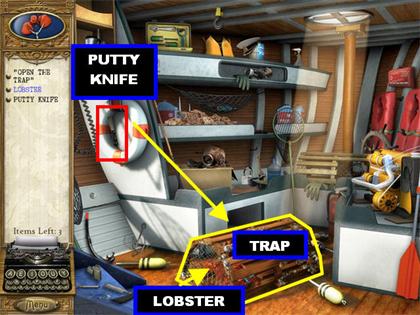
- Pick up the Putty Knife in the upper left. It is inside the round life saver on the left.
- Place the Putty Knife on the latch of the Lobster Trap several times until you can clean off the barnacles.
- Pick up the Lobster in the trap.
Cabot Cove Lobster Pound
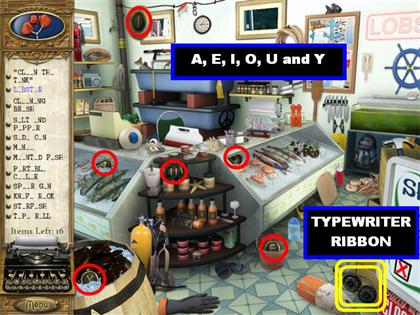
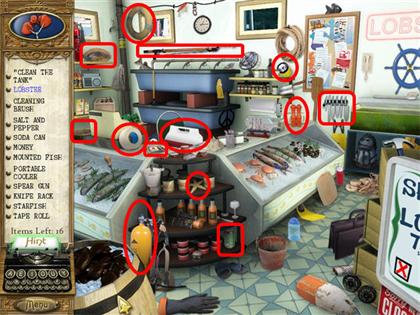
- The letters A, E, I, O, U, and Y are all highlighted in the screenshot.
- The Typewriter Ribbon is on the lower right corner.
Clean the Tank, Scrub Brush & Pick up Lobster
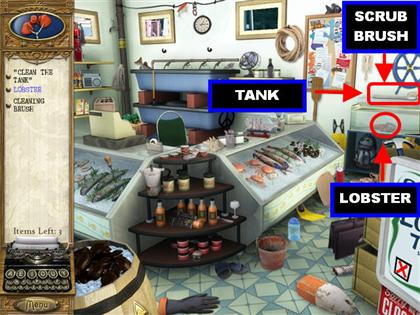
- Pick up the Scrub Brush in the upper right side.
- Place the Scrub Brush on the tank several times until the tank is clean.
- Pick up the Lobster inside the clean tank.
The My Turn
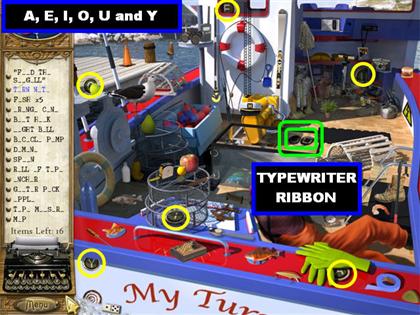
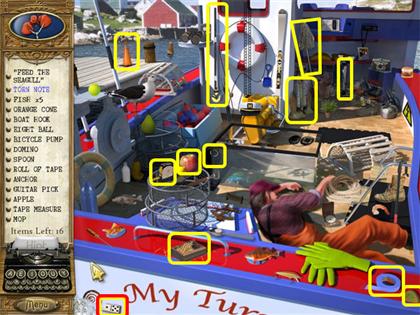
- The letters A, E, I, O, U, and Y are all highlighted in the screenshot.
- The Typewriter Ribbon is in the center right side of the scene.
5 Fish/ Feed the Seagull
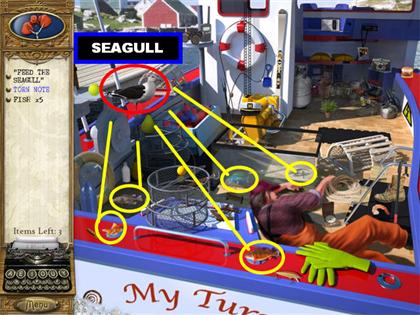
- Pick up the 5 Fish according to the screenshot.
- Give each Fish to the Seagull in the upper left.
- The Seagull will fly away after you feed him the last fish.
Torn Note
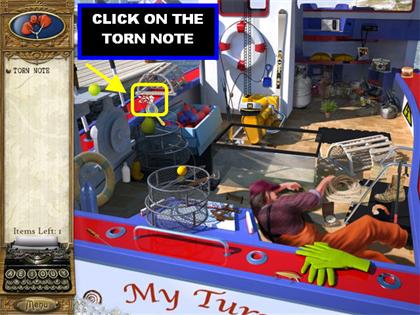
- Click on the Torn Note that appears in the spot in which the Seagull was standing to trigger a mini-game.
Reassemble the Note
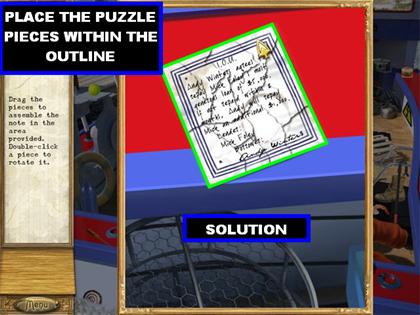
- Your goal is to reassemble the note.
- Drag a piece of paper from the bottom of the scene onto the red board.
- You want to place the note inside the CLEAR outline on the red board.
- Double-click on a piece of paper to rotate it.
- Once a piece is in the right place, it will lock itself in.
- Please look at the screenshot for the solution.
Harborside Tavern
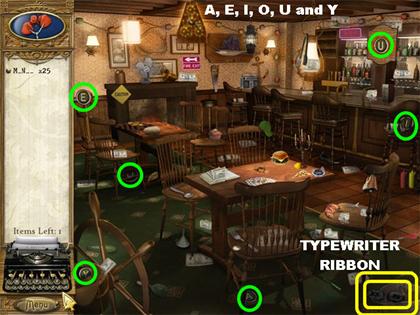
- The letters A, E, I, O, U, and Y are all highlighted in the screenshot.
- The Typewriter Ribbon is on the lower right corner.
Find 25 Money Items
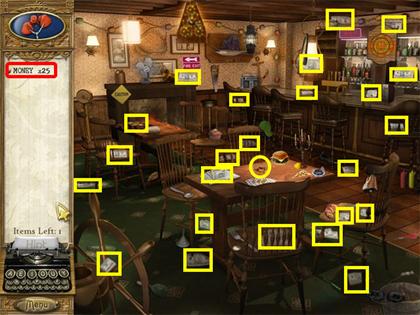
- Please look at the screenshot for the location of all the Money Items.
The Cornelia
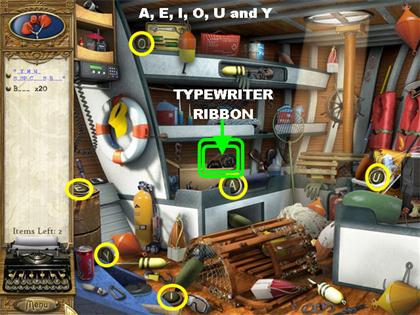
- The letters A, E, I, O, U, and Y are all highlighted in the screenshot.
- The Typewriter Ribbon is in the center of the scene.
Find 20 Buoys
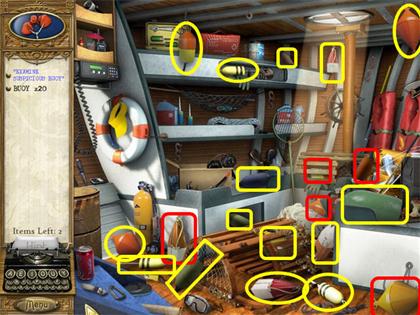
- Please look at the screenshot for the location of all the Buoys.
- Click on the sparkly Buoys on the floor to trigger a mini-game.
Reassemble the Pieces
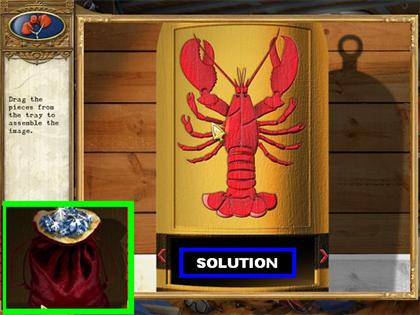
- Reassemble the Lobster by using the pieces in the lower center of the scene.
- Use the arrows on either side of the puzzle pieces to sort through all the pieces.
- Please look at the screenshot for the solution.
- Click on the diamonds that appear on the screen once the puzzle has been solved.
Harborside Tavern
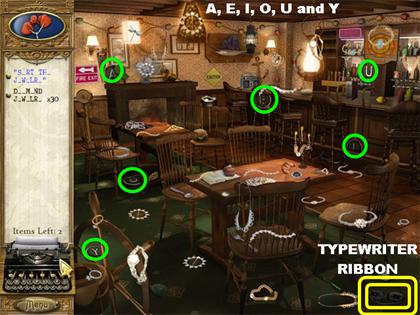
- The letters A, E, I, O, U, and Y are all highlighted in the screenshot.
- The Typewriter Ribbon is on the lower right corner.
Find Diamond Jewelry
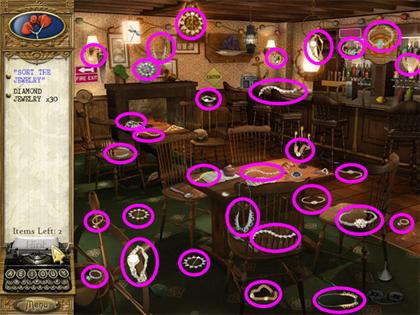
- Please look at the screenshot for the locations of all the Diamond Jewelry pieces.
Sort the Jewelry
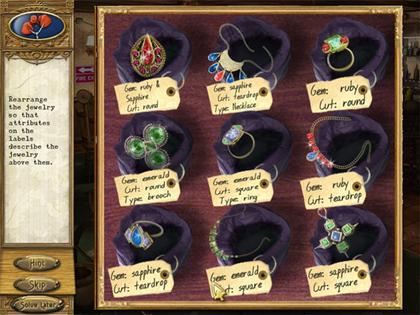
- Click on the pile of Jewelry on the table to trigger a mini-game.
- Your goal is to switch the tags around so the labels match the description of the jewelry.
- Click on 2 Jewelry Pieces to swap their locations.
- When a piece is in the right place, the tag will light up.
- Please look at the screenshot for the solution. Please note that the solution is always the same but the location of the jewels may be different for some.
Library Reading Room
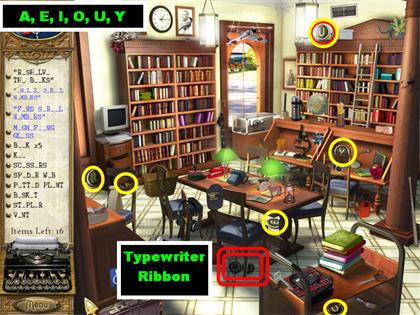
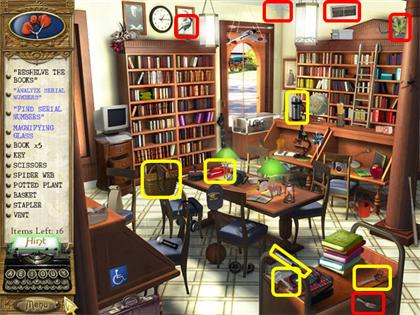
- The letters A, E, I, O, U, and Y are all highlighted in the screenshot.
- The Typewriter Ribbon is on the floor.
5 Books/ Reshelve Books
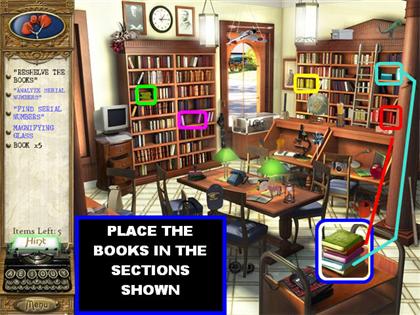
- In this section you need to Reshelve the Books.
- The books are stacked up on top of the rolling tray in the lower right.
- Pick up each Book and place it in the matching colored sections shown in the screenshot.
Magnifying Glass/ Diamonds
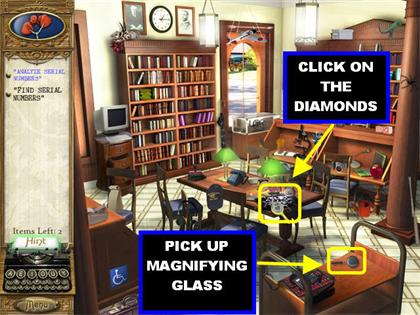
- Pick up the Magnifying Glass that appears in the spot in which you picked up the books.
- After you pick up the Magnifying Glass a sparkly spot will appear on the table, click on it to trigger a mini-game.
Find Serial Numbers
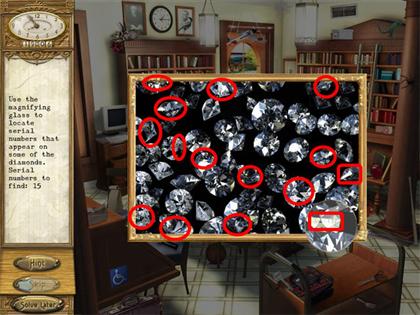
- You have to use the magnifying glass to look for the serial numbers on the diamond.
- When you find a serial number, click on it. If there are several numbers inside the magnifying glass, one click will eliminate all of them.
- The screenshot shows you the approximate locations for the serial numbers.
- You can use a hint if you get stuck in this section.
Analyze Serial Numbers
- Click on the monitor on the left to trigger a mini-game.
- You have to click on the letters at the bottom of the screen to read the description.
- You have to click on the numbers that do not meet the criteria described.
- Once all the numbers have been eliminated, the right one will start flashing.
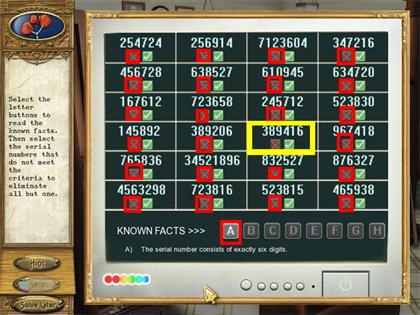
- The solution for this puzzle is “389416”.
- The solution will always be the same but the number may be in a different position than the one shown in the screenshot.
Marine Research Laboratory
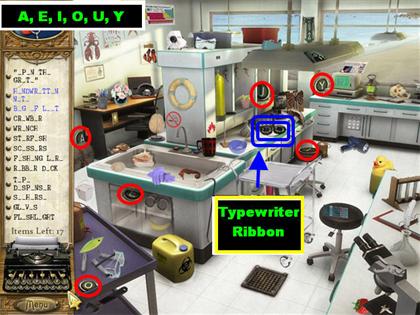
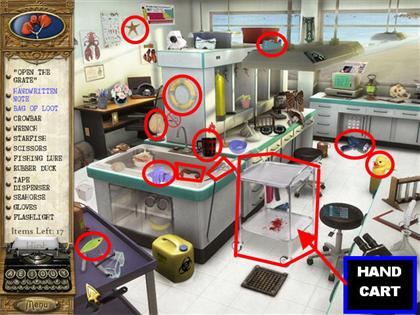
- The letters A, E, I, O, U, and Y are all highlighted in the screenshot.
- The Typewriter Ribbon is on the counter.
Handwritten Note/ Open the Grate (Pick up Loot)
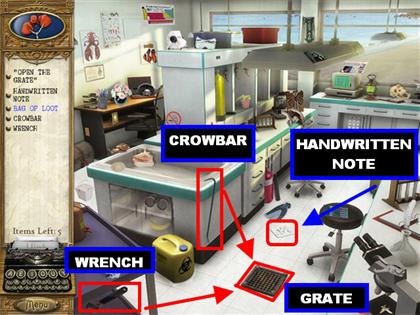
- Click on the Hand Cart next to the sink.
- Click on the Handwritten Note that is on the floor (in place of where the cart was).
- Pick up the Wrench in the lower left corner.
- Place the Wrench on the Grate on the floor to loosen the bolts.
- Pick up the Crowbar on the side of the sink.
- Place the Crowbar on the grate in the floor.
- Pick up the Bag of Loot that is in the ground after the Grate has been removed.
The My Turn
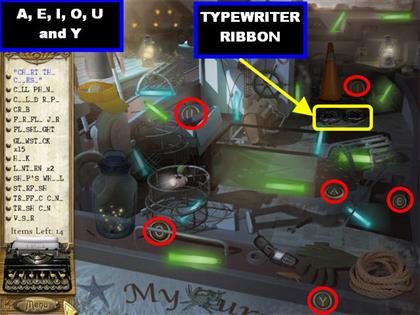
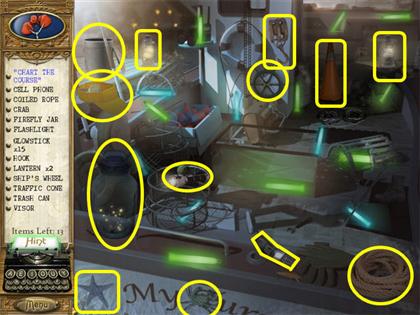
- The letters A, E, I, O, U, and Y are all highlighted in the screenshot.
- The Typewriter Ribbon is on the upper right side.
15 Glowsticks
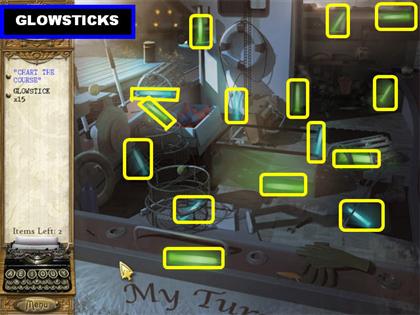
- Please look at the screenshot for the location of all the Glowsticks.
Chart the Course
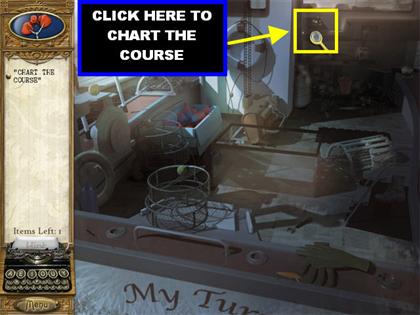
- Click on the sparkly spot in the upper right after all the Glowsticks have been found.
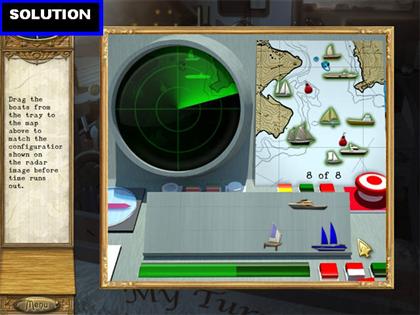
- Your goal is to place the boats from the tray onto the map by matching the configuration shown on the radar.
- If a piece is in the right place, it will lock itself in.
- If the piece is incorrect it will float back to the tray.
- Three of the pieces do not go on the map at all.
- Please look at the screenshot for a random solution. The positions of the boats may differ with each game.
Case 2: Murder in the Maples
Maple Hill Sugar Bush
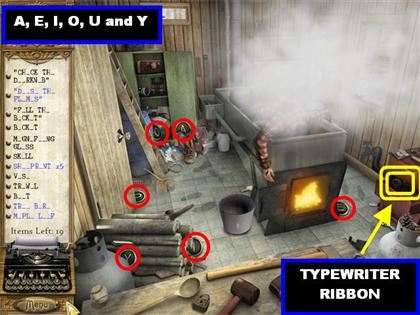
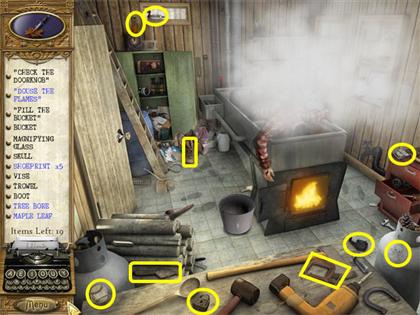
- The letters A, E, I, O, U, and Y are all highlighted in the screenshot.
- The Typewriter Ribbon is in the lower right side, inside the red drawer.
Douse Flames – Bucket
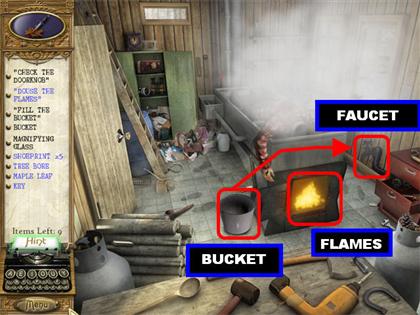
- Pick up the bucket in the center of the floor.
- Place the Bucket on the faucet on the right, close to the red drawers.
- Place the Bucket of Water on the Flames. At this point, all the items that were blue on your list will turn to regular print.
Shoeprints/ Check the Knob
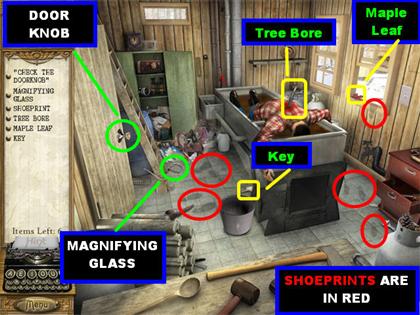
- The 5 Shoeprints are highlighted in red in the screenshot.
- The Tree Bore is sticking out of the dead man’s back.
- Please look at the screenshot for the rest of the items.
- Pick up the Magnifying Glass on the left side of the floor, close to the ladder.
- Place the Magnifying Glass on the Door Knob to trigger a mini-game.
Find 8 Differences
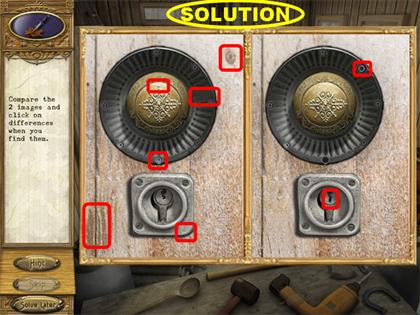
- Please look at the screenshot for the locations of all the differences.
As Ewe like it Yarn Shop
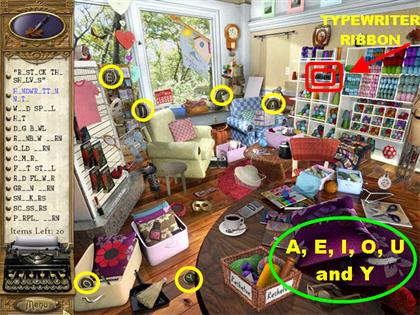
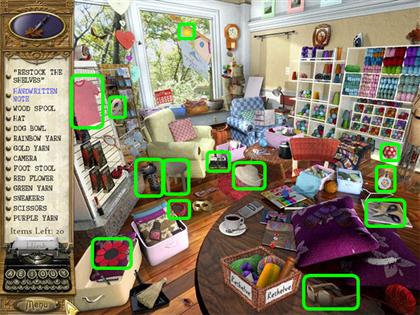
- The letters A, E, I, O, U, and Y are all highlighted in the screenshot.
- The Typewriter Ribbon is in the upper right side.
Restock the Shelves
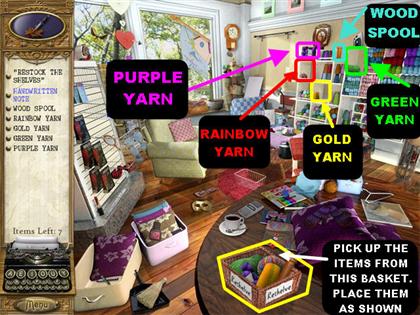
- There is a box in the lower center of the scene marked “Reshelve”.
- Take the items out of that box and place them in the spots shown in the screenshot.
Handwritten Note
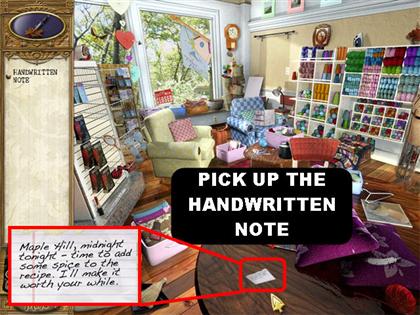
- Pick up the Handwritten Note on the table. It will appear after all the shelves have been restocked.
Nature’s Gift Foods
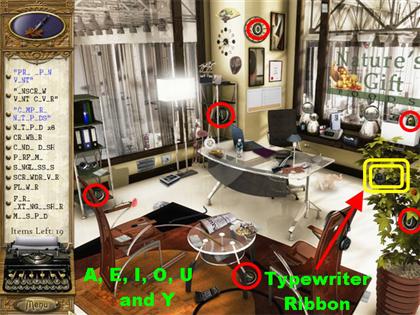
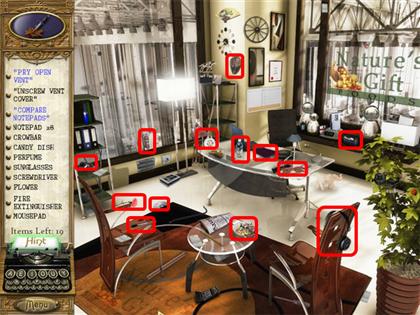
- The letters A, E, I, O, U, and Y are all highlighted in the screenshot.
- The Typewriter Ribbon is on the right, on the potted plant.
Open Vent/ Pick up 8 Notepads
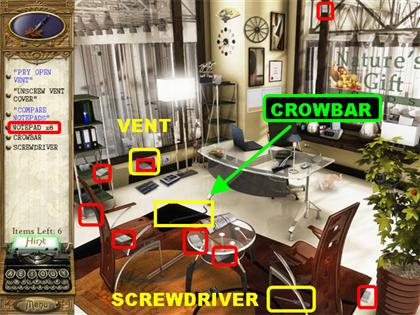
- Grab the Screwdriver in the lower right, under the chair.
- Place the Screwdriver on the Vent on the left side to “Unscrew the Vent Cover”.
- Grab the Crowbar on the black part of the floor.
- Place the Crowbar on the Vent to pry it open.
- Pick up the Notepad inside the Vent.
- All the Notepads are highlighted in red in the screenshot.
- Click on the stack of Notepads that appears on the table. You will only be able to click on this stack once all the Notepads have been collected in the scene.
Compare Notepads Mini-game
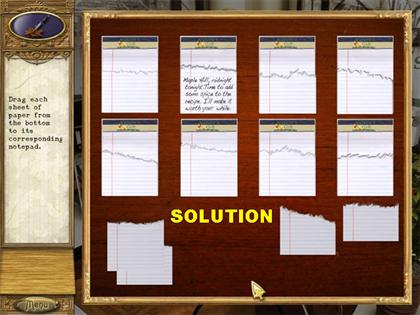
- Drag the sheets of paper onto the notepads.
- If you place the paper in the right spot, it will lock itself in place and the paper will light up.
- Not all papers will be used.
Stratton Mountain Police Department
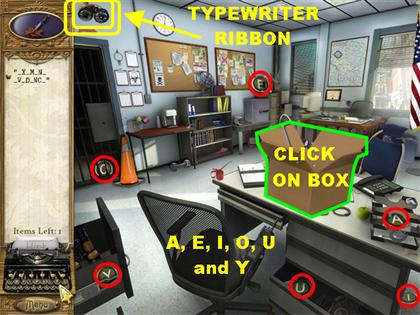
- The letters A, E, I, O, U, and Y are all highlighted in the screenshot.
- The Typewriter Ribbon is on the upper left side.
Examine Evidence
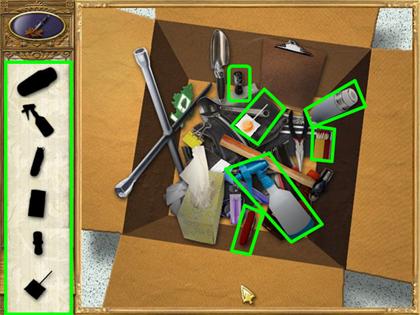
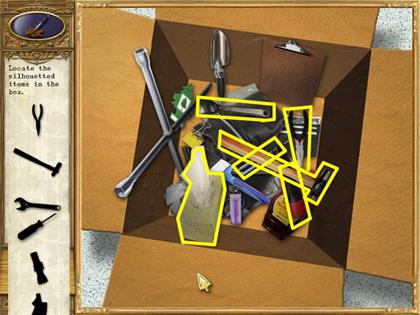
- Click on the Box on the desk for a closer view.
- Pick up the items in silhouette.
- The screenshots show you the location of the first 12 items on our list. You have to keep going until all the items have been picked up from the box.
Stratton Mountain Coffee Shop
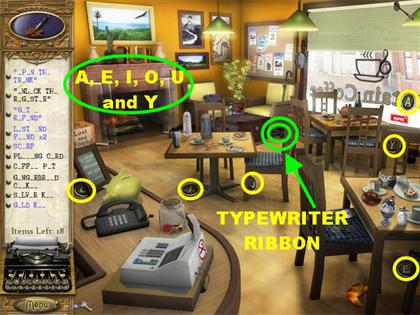
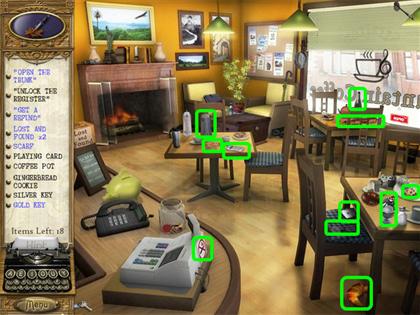
- The letters A, E, I, O, U, and Y are all highlighted in the screenshot.
- The Typewriter Ribbon is in the center of the scene.
Get a Refund/ Gold Key
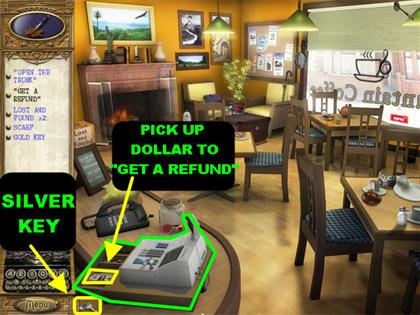
- Pick up the Silver Key in the lower left corner of the scene.
- Place the Silver Key on the Cash Register to Open it.
- Click on the Cash inside the drawer to “Get a Refund”. There is a Gold Key underneath the Cash.
Open Trunk/ Lost & Found
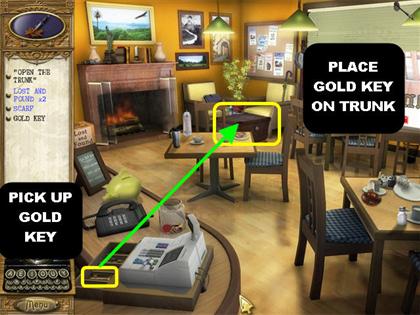
- Pick up the Gold Key inside the Drawer.
- Place the Gold key on the Trunk on the right side of the scene.
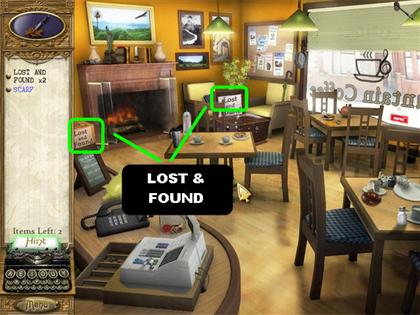
- Once the Trunk is open, click on the Lost and Found sign on the lid.
- Click on the other Lost and Found sign on the upper left side of the scene.
- Click on the Trunk for a closer view.
Select Pairs/ Find Scarf
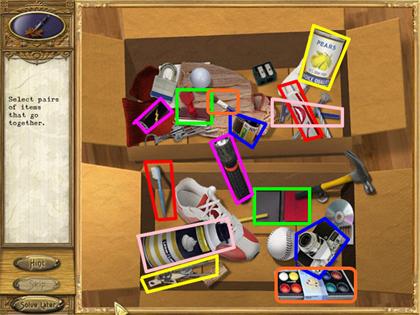
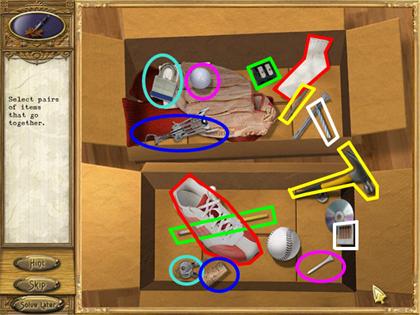
- In this section you need to collect the pairs of related items.
- Click on two related items and they will disappear from the box.
- Here is a list of related items we found while playing:Shaving Cream & Razor Flashlight & Batteries Inkpad & Stamp Toothbrush & Toothpaste Can & Can Opener Paint & Paintbrush Camera & Film Lock and Key Baseball & Baseball Glove Sock & Tennis Shoe Hammer & Nail Corkscrew & Cork Tee & Golf Ball Candle & Matches Nut & Bolt CD & CD Case
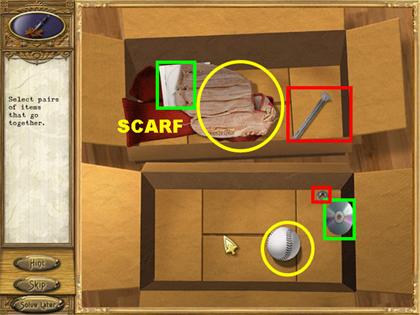
- The Scarf will be the last item left in the box, pick it up.
Maple Hill Sugar Bush
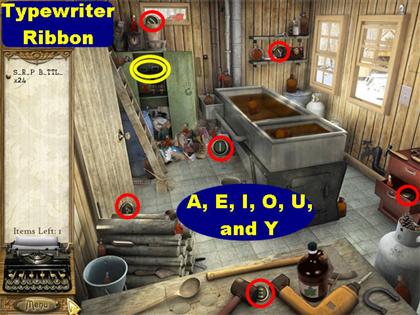
- The letters A, E, I, O, U, and Y are all highlighted in the screenshot.
- The Typewriter Ribbon is in the upper left, inside the green locker.
Pick up 24 Syrup Bottles
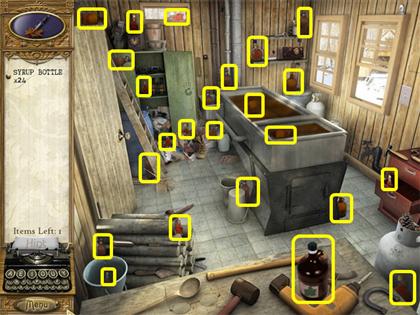
- Please look at the screenshot for the locations of the Syrup Bottles.
Stratton Mountain Police Department
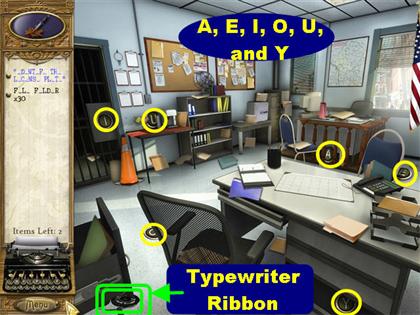
- The letters A, E, I, O, U, and Y are all highlighted in the screenshot.
- The Typewriter Ribbon is in the lower left corner.
30 File Folders
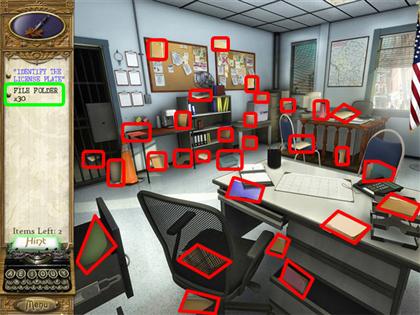
- Please look at the screenshot for the locations of the File Folders.
Identify the License Plates
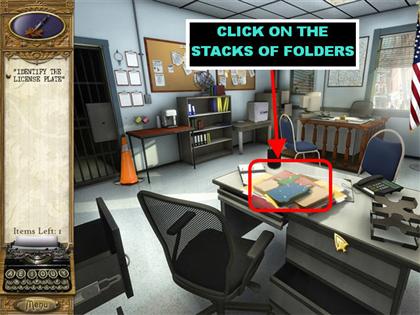
- Click on the pile of Folders on the desk to trigger a mini-game.
- Your goal is to identify the correct license plate by using the clues at the bottom.
- Click on the 8 clues at the bottom to read what they say.
- Start eliminating license plates according to the clues given.
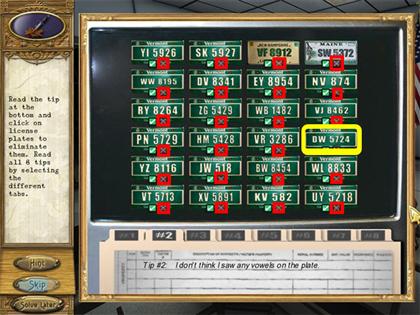
- The solution is “DW 5724”
Stratton Mountain Coffee Shop
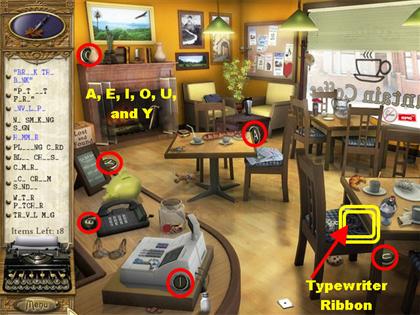
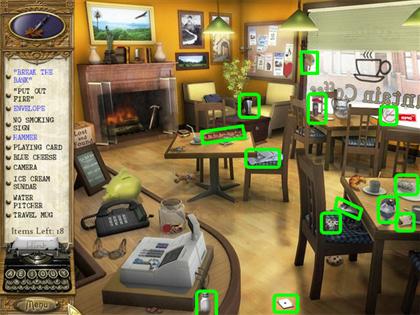
- The letters A, E, I, O, U, and Y are all highlighted in the screenshot.
- The Typewriter Ribbon is on the lower right.
Put Out Fire/Break the Bank
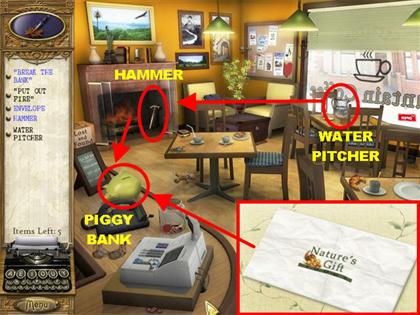
- Grab the Water Pitcher on the table by the window.
- Place the Water Pitcher in the Fireplace.
- Grab the Hammer in the Fireplace.
- Place the Hammer on the green Piggy Bank in the lower left.
- Pick up the Envelope inside the broken Piggy Bank.
Nature’s Gift Foods
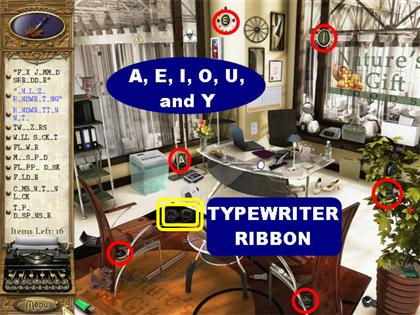
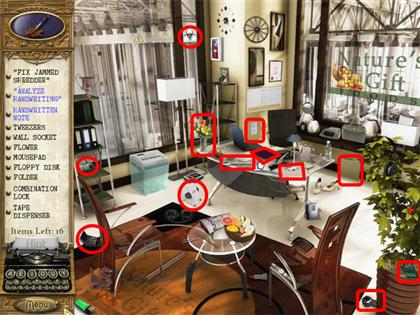
- The letters A, E, I, O, U, and Y are all highlighted in the screenshot.
- The Typewriter Ribbon is on the black part of the floor.
Fix Jammed Shredder/ Handwritten Note
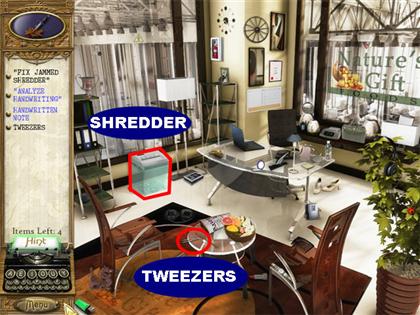
- Pick up the Tweezers in the lower left.
- Place the Tweezers in the Shredder on the left to fix it.
- Click on the Shredder to pick up the Handwritten Note.
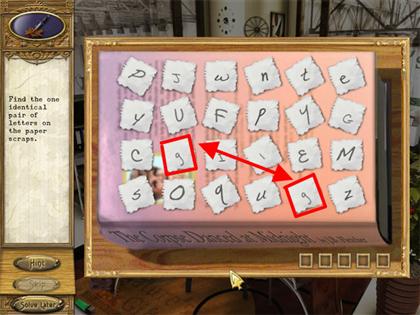
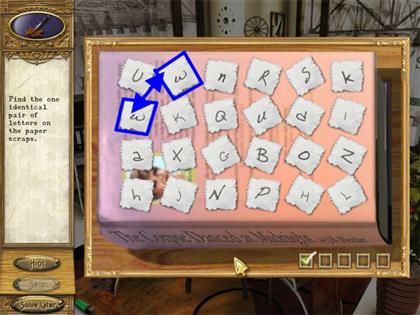
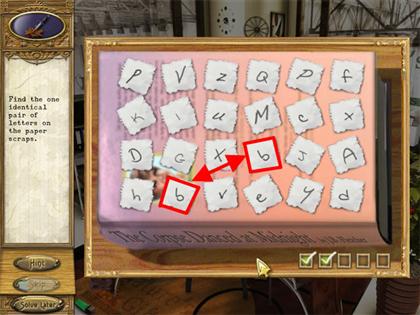
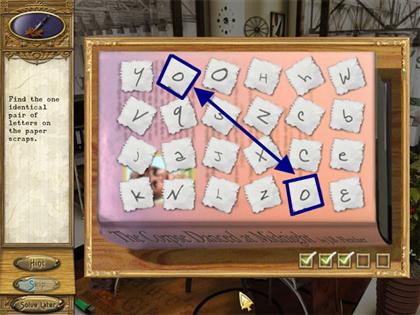
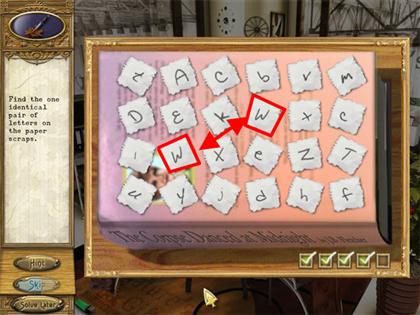
Analyze the Note
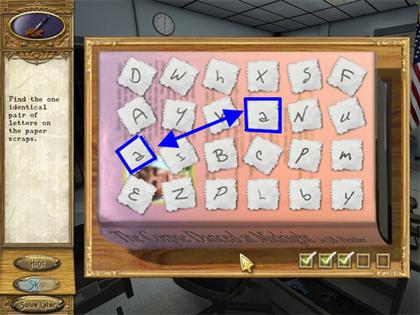
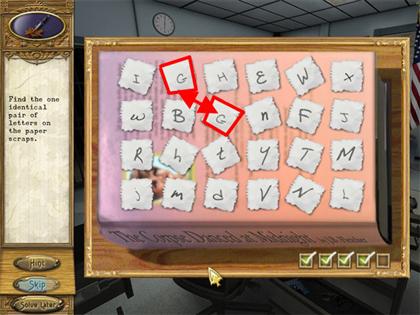
- Your goal in this puzzle is to find the identical pairs of letters in each set.
- You will have to identify 5 sets of letters to complete this game.
- Please look at the next set of screenshots for a random solution.
Maple Hill Sugar Bush
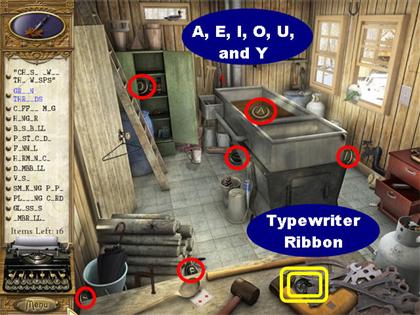
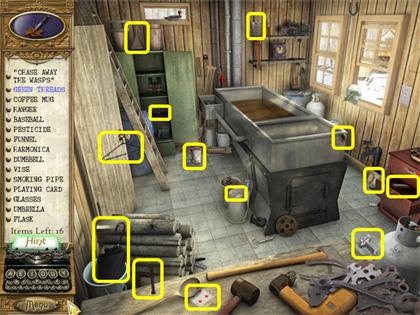
- The letters A, E, I, O, U, and Y are all highlighted in the screenshot.
- The Typewriter Ribbon is in the lower right.
Chase Wasps Away/ Green Threads
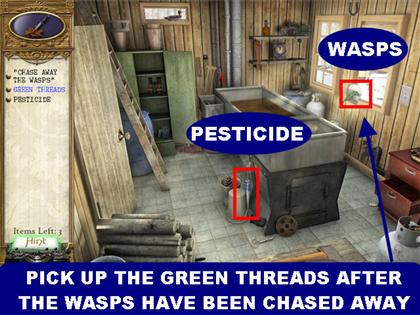
- Pick up the Pesticide on the floor.
- Place the Pesticide on the Wasps by the window.
- Pick up the Green Threads by the window.
Stratton Mountain Police Department
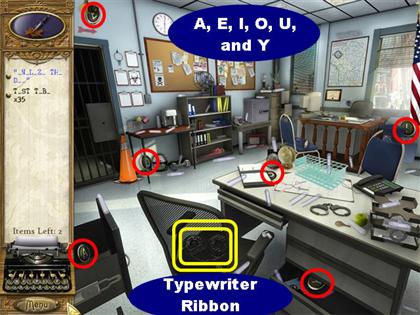
- The letters A, E, I, O, U, and Y are all highlighted in the screenshot.
- The Typewriter Ribbon is in the lower center, on the black chair.
Find 35 Test Tubes
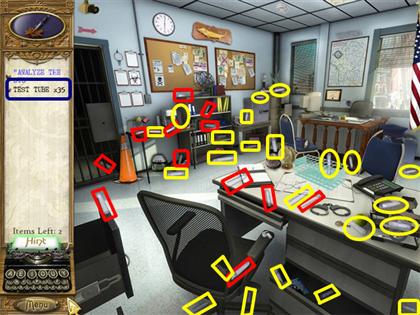
- Please look at the screenshot for the location of all the Test Tubes.
Analyze the Dye
- Click on the pile of Test Tubes on the table to trigger a mini-game.
- Your goal is to arrange the test tubes from lightest to darkest.
- Click on 2 test tubes to swap their locations.
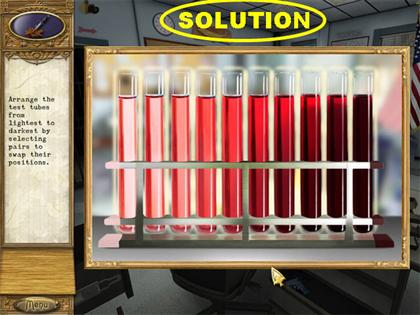
- Please look at the screenshot for the solution.
- The bottles will begin to glow after ALL of them are in the right positions.
Nature’s Gift Foods
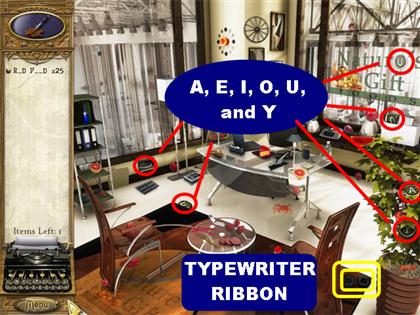
- The letters A, E, I, O, U, and Y are all highlighted in the screenshot.
- The Typewriter Ribbon is in the lower right.
Pick up 25 Red Foods
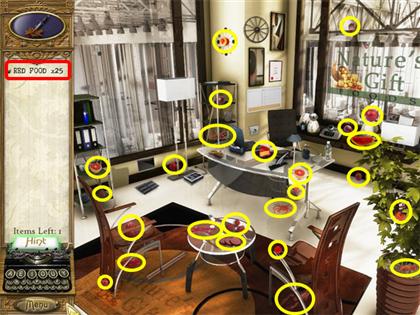
- Please look at the screenshot for the locations of all the Red Foods.
Stratton Mountain Police Department
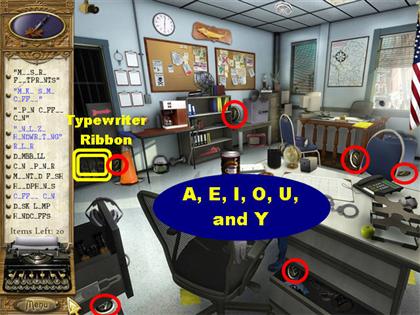
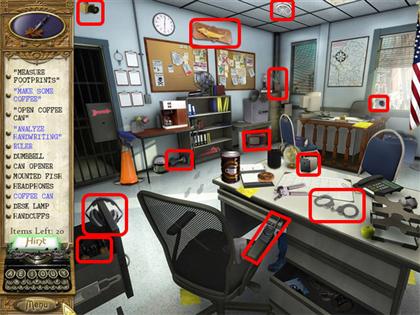
- The letters A, E, I, O, U, and Y are all highlighted in the screenshot.
- The Typewriter Ribbon is on the left.
Open Coffee Can/ Make Coffee
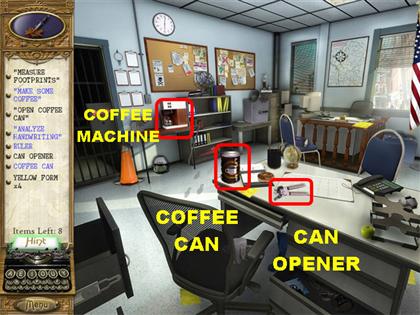
- Pick up the Can Opener on the desk.
- Place the Can Opener on the Coffee Can on the edge of the desk.
- Put the Opened Coffee Can on the Coffeemaker.
Measure Footprints/ 4 Yellow Forms
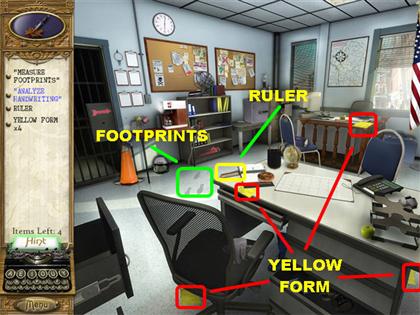
- Pick up the ruler on the edge of the desk.
- Place the Ruler on the Footprints on the left side of the floor.
- Pick up the Yellow Forms highlighted in red in the screenshot.
Analyze Handwriting
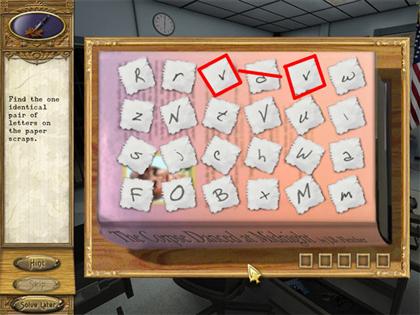
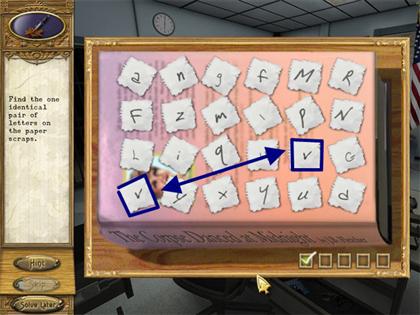
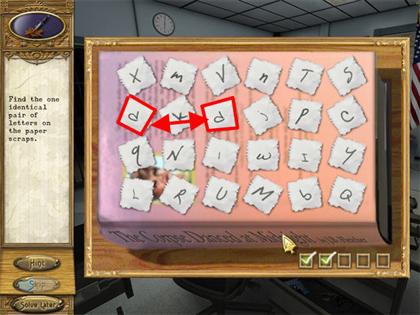
- Click on the pile of Yellow Forms on the desk to trigger a mini-game.
- Your goal in this puzzle is to find the identical pairs of letters in each set.
- You will have to identify 5 sets of letters to complete this game.
- Please look at the next set of screenshots for a random solution.
As Ewe Like It Yarn Shop
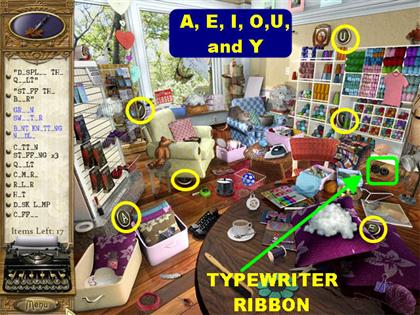
- The letters A, E, I, O, U, and Y are all highlighted in the screenshot.
- The Typewriter Ribbon is on the right.
Display Quilt/ Stuff the Bear
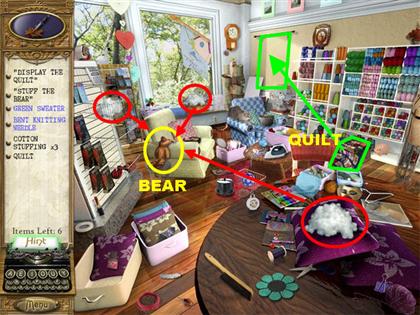
- Pick up the Quilt on the right.
- Place the Quilt on the wall close to the window.
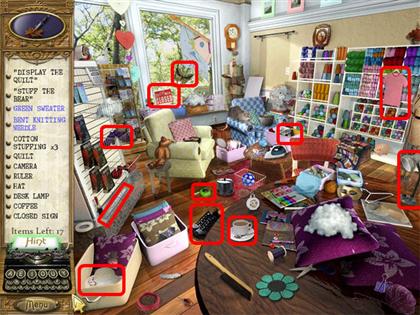
- Pick up the 3 cotton stuffing shown on the screenshot.
- Place the cotton stuffing on the Brown Bear next to the chair on the left.
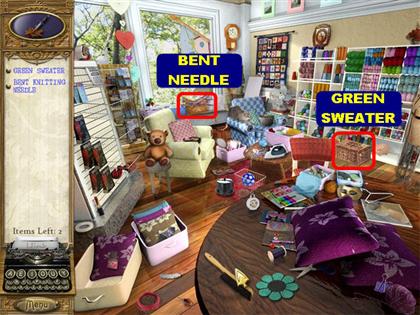
- At this point, the basket by the window is glowing and so is the one in place of the Quilt on the right.
- Click on the sparkly Basket by the window to trigger a mini-game.
Bent Knitting Needle
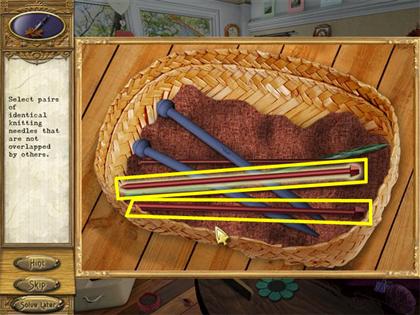
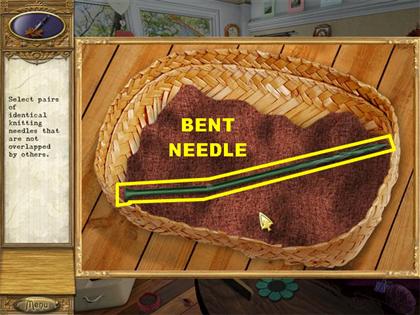
- Pick up pairs of identical needles that are not overlapping.
- The needles will light up when you click on them.
- The Bent Needle will be the last one in the basket, click on it.
Green Sweater
- Click on the sparkly Basket on the right.
- Your goal is to arrange the yarn according to the instructions on the yellow paper in the upper right.
- The yellow paper states:3 MOVES 3 SQUARES 4 COLORS EACH 0 LOOSE THREADS
- The rules tell you that you have to make 4 squares that each have 4 different colors.
- You cannot have any pieces that are not attached to something else.
- You have to accomplish this in 3 moves.
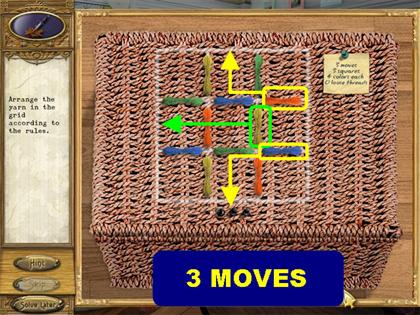
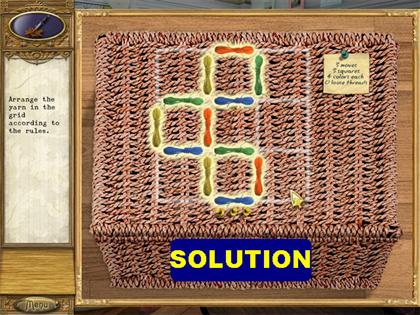
- Please look at the screenshot for a step-by-step solution to this puzzle. Drag the yarn pieces to the spots shown on the screenshot.
- Click on the green cloth in the basket at the end of the puzzle.
Case 3: A Garden to Die For
Matthew O’ Neill’s Garden
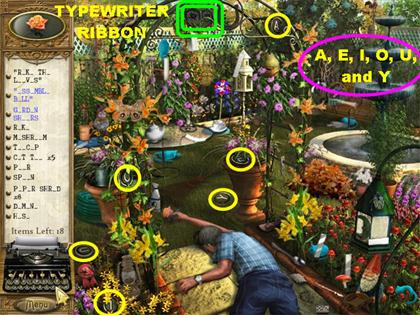
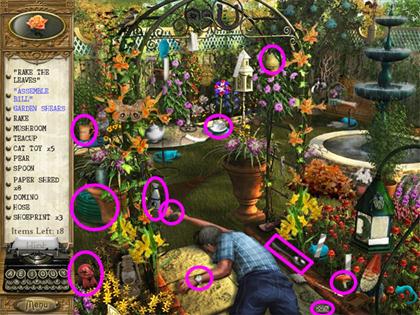
- The letters A, E, I, O, U, and Y are all highlighted in the screenshot.
- The Typewriter Ribbon is on the upper left.
5 Cat Toys/ 8 Paper Shreds
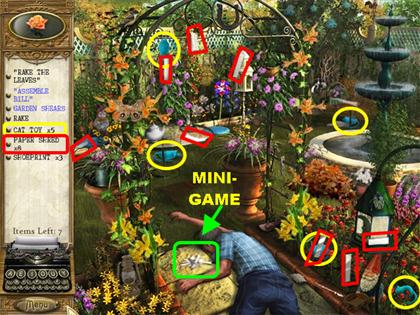
- Please look at the screenshot for the locations of the Cat Toys and the Paper Shreds.
- The Paper Shreds are in Red.
- The Cat Toys are circled in yellow.
- Click on the shredded papers that appear on the rock next to the dead man to trigger a mini-game.
Assemble Bill
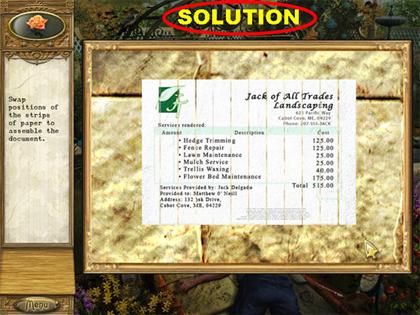
- Click on 2 strips of paper and they will swap positions.
- Please look at the screenshot for the solution.
3 Shoeprints/ Rake the Leaves (Garden Shears)
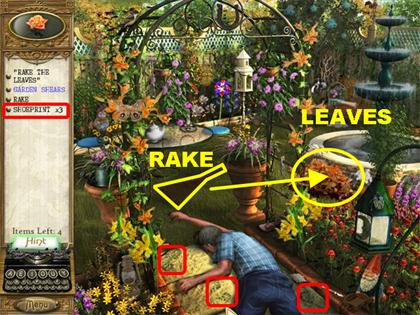
- Click on the 3 Shoeprints in the scene. They are marked in red in the screenshot.
- Pick up the Rake on the grass.
- Place the Rake on the Pile of leaves next to the fountain. Keep clicking on the rake until all the leaves disappear.
- Pick up the Garden Shears that appear below the leaves.
Emily Wiseborough’s Patio
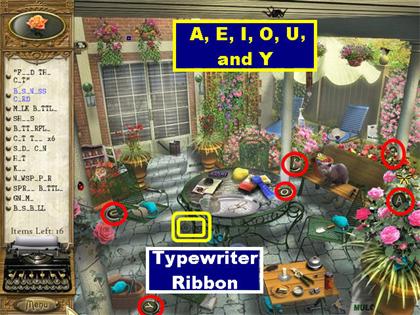
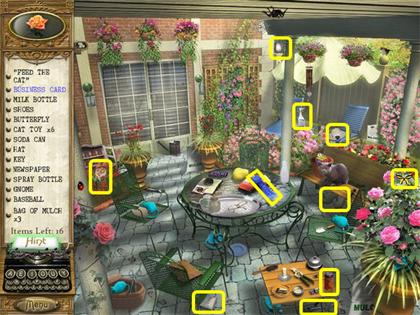
- The letters A, E, I, O, U, and Y are all highlighted in the screenshot.
- The Typewriter Ribbon is on the lower left.
6 Cat Toys/ 3 Bags of Mulch/ 3 Shoeprints
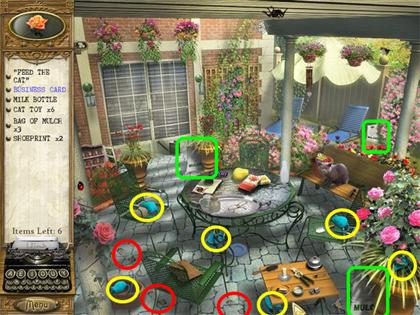
- The Cat Toys are in yellow.
- The Bags of Mulch are in green.
- The Shoeprints are in red.
Feed the Cat/ Business Card
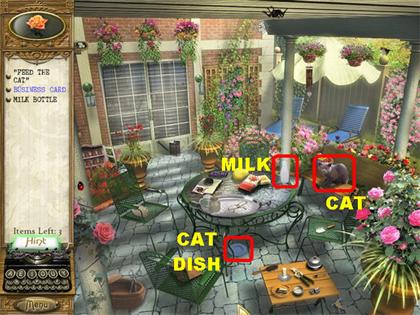
- Pick up the Milk Bottle on the table. It blends in with the white pole.
- Place the Milk Bottle in the blue dish under the table.
- The Cat will automatically go to the blue dish and start eating.
- Pick up the Business Card on the bench where the cat was sitting.
Jack Delgado’s Garage
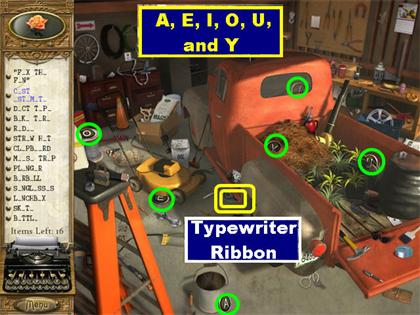
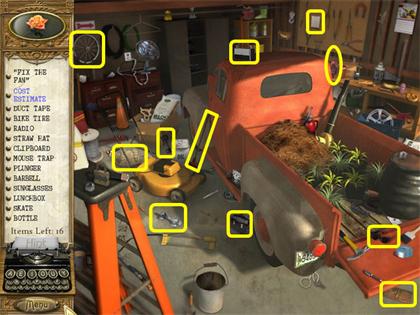
- The letters A, E, I, O, U, and Y are all highlighted in the screenshot.
- The Typewriter Ribbon is on the lower center.
3 Bags of Mulch/ 3 Shoeprints
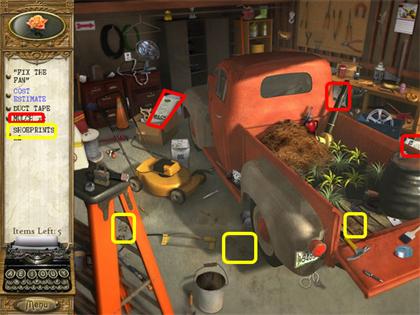
- The Mulch Bags are in red.
- Click on the 3 Shoeprints marked in yellow.
- As soon as you click on the last Shoeprint, a mini-game will begin.
Locate the Pattern Mini-Game
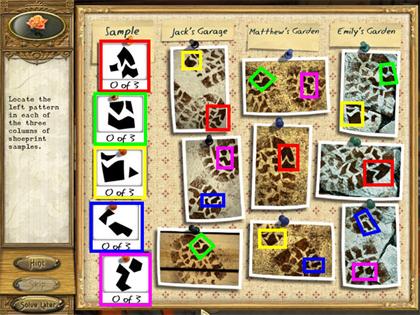
- Your goal is to find the pattern on the board that matches the pattern on the sample on the left.
- Click on the area that you think match the current sample. If you’re correct, that area will turn green and the rest of the images on that column will go dark.
- Follow the same process for the rest of the columns until you find the 1 sample in each column.
- You have to find 5 sets of patterns to win the game.
- The screenshot will show you the exact locations of the patterns you need to find for all 5 samples. Match the color of the sample with the images on the print.
Fix the fan/ Cost Estimate
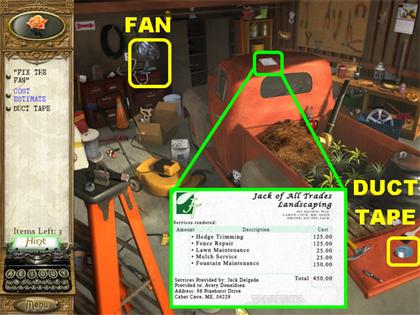
- Pick up the Duct Tape in the back of the truck.
- Place the Duct Tape on the fan in the upper left.
- As soon as the fan starts blowing a paper will float and land on top of the truck.
- Pick up the Cost Estimate above the truck.
Avery Donaldson’s Garden
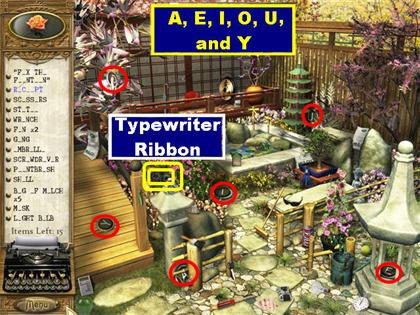
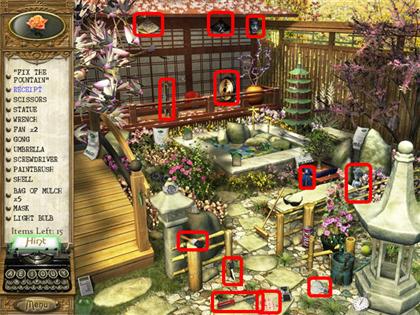
- The letters A, E, I, O, U, and Y are all highlighted in the screenshot.
- The Typewriter Ribbon is on the left.
5 Bags of Mulch/ Fix the Fountain (Receipt)
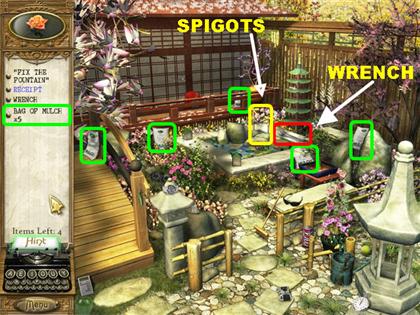
- The Mulch Bags are highlighted in green.
- The Wrench is in red.
- The Spigots are in yellow.
- Place the Wrench on the Spigots in the fountain.
- Pick up the Receipt in the fountain.
Cabot Cove Garden Club
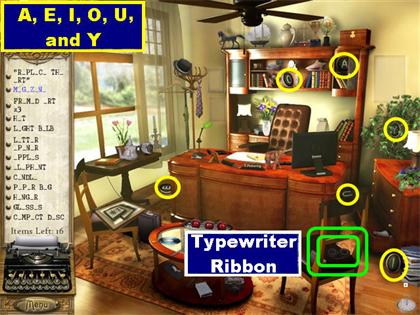
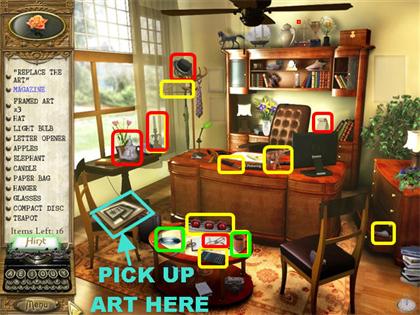
- The letters A, E, I, O, U, and Y are all highlighted in the screenshot.
- The Typewriter Ribbon is on the lower right.
Framed Art/ Replace the Art
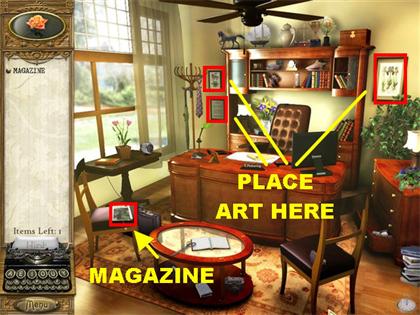
- Your goal in this section is to pick up the art on the left chair and place it on the right spots in the wall.
- Please look at the screenshot for the right places to put the art.
- Pick up the magazine that appears on the chair after all the art has been hung.
Main Coast Garden Supply
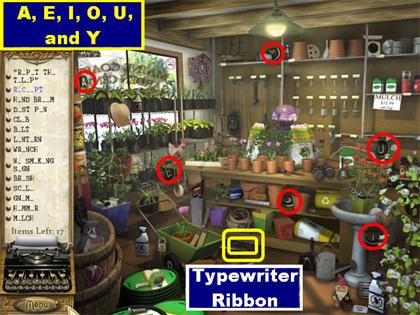
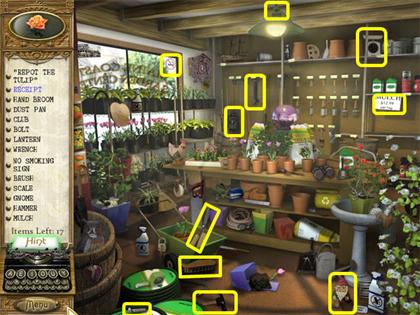
- The letters A, E, I, O, U, and Y are all highlighted in the screenshot.
- The Typewriter Ribbon is in the lower center.
4Bug Spray/ 2 Gloves
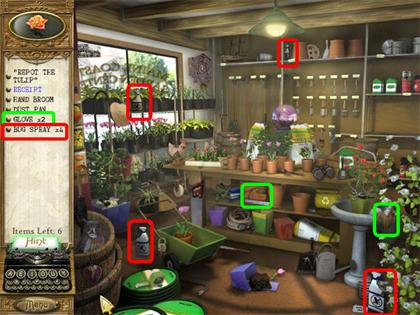
- The Gloves are in green.
- The Bug Spray Bottles are in red.
Repot the Tulip/ Receipt
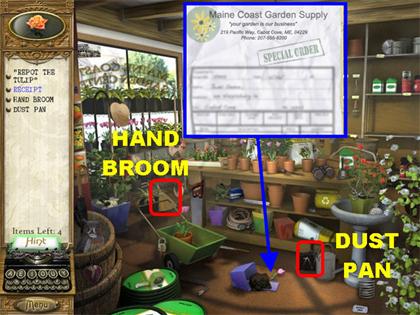
- Place the Hand Broom on the blue pot on the floor.
- Place the Dust Pan on the dirt on the floor.
- The tulip has now been repotted.
- Pick up the Receipt that appears next to the potted tulip.
Matthew O’Neill’s Garden
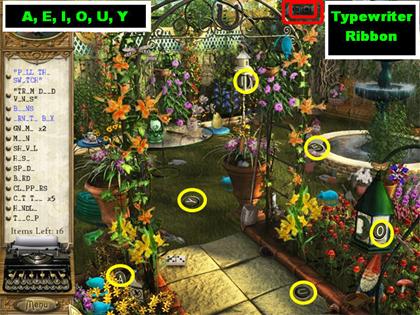
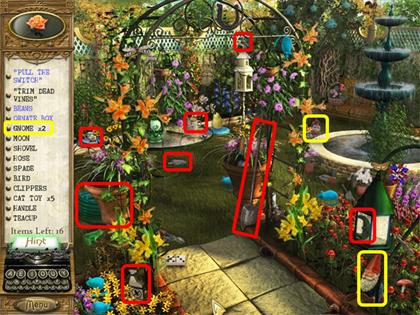
- The letters A, E, I, O, U, and Y are all highlighted in the screenshot.
- The Typewriter Ribbon is in the upper right.
Trim Dead Vines/ 5 Cat Toys
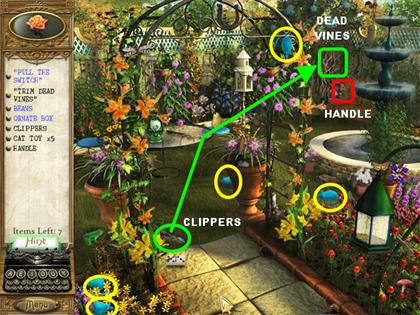
- Pick up the Clippers in the lower left.
- Place the Clippers on the dead vines in the upper right and a fuse box will appear.
- Pick up the Handle next to the vines.
- Place the Handle on the fuse box.
- The water in the fountain will become sparkly.
- Click on the ornate box in the fountain to trigger a mini-game.
Ornate Box Mini-game
- You have 2 goals in this mini-game. The first one is to arrange the letters correctly on the box.<