King’s Quest 8: Mask Of Eternity
This is the only game that you play a character that is outside the royal family, you play Connor, a local boy (he isn’t even a knight at this point). This game gets a lot of hate, mostly for being 3D, but I personally enjoy it. It is a very long game, you visit technically 11 regions (The Realm Of The Sun is 4 levels). When I play the game, I always enact god mode (each time you load from the desktop you have to use the code). To do this (you can do this from the menu screen) hold down control & shift and press the number 7, type god, then control+shift+7 again.
When you start the game, you can choose between three difficulty levels: Easy, Normal & Hard, I always use Easy.
Note: For easiness purposes, I will copy/paste the region’s map at the beginning of each region, copied right from Sierra Planet, so all map credits go to them. Now, on to the game!
Daventry
| NUMBER | DESCRIPTION | NUMBER | DESCRIPTION |
| 1 | Sarah’s House | 13 | Alchemist’s Shop |
| 2 | Connor’s House | 14 | Local Tavern |
| 3 | Pig Pen | 15 | Daventry Keep |
| 4 | Simm’s House | 16 | Unicorn Pond |
| 5 | Mausoleum | 17 | Sir James Tomb |
| 6 | Graveyard | 18 | Zombie Path |
| 7 | Church | 19 | Boulder Blockage |
| 8 | Wizard & Raven | 20 | Waterfall Tower |
| 9 | Farm Stand | 21 | Kavanagh’s House |
| 10 | Mill House | 22 | Covered Bridge |
| 11 | Wizard’s Island | 23 | Windmill House |
| 12 | Water Fountain | 24 | Stone Overlook |
Watch the opening and when you can, click on the raven. Note: I always play in first person, where you can see the scene from Connor’s eyes. To do this, press the f2 key. Enter the house, take the mushrooms and the yellow potion then leave the house. Take the mushrooms on the ground.
Note: Whenever you see a monster/zombie, kill it; likewise, if you see a barrel, smash it; and if you see coins, mushrooms crystals or potions, take them.
Walk to the next house (this is Connor’s). Take the coins from the chest on the shelf and the dagger from the table and leave. Go to the fence (as if you’re going back to Sarah’s and touch the raven. Follow him along the path to the lake and talk to the wizard.
Cross the water and fight the monster. Follow the water around the tower to reveal it on your map. Note: anytime you want to open the map you can either click it with your mouse, or press your keyboard’s tab key.
After killing the new monster, you should be in the grass by the church/graveyard.
Walk to the farm stand and take the mushrooms. Cross the path to the house and go inside. Open the chest on the shelf and take the coins, take the mushrooms from the basket and walk around the bed. Take the leather boots and leave the house.
Walk all the way left, kill the monster behind Sarah’s house and continue along the path past Connor’s house. Follow the path to the alchemist, kill the monster hanging out by the left wall of the building.
Turn left and continue on the path to the fountain. Go to the tavern and after breaking all barrels and taking what’s revealed, go inside. Behind the bar, open the chest and take the coins. Turn around and take the leather gloves. Go upstairs to the black trunk and take the crystal and leave the tavern.
Go to the fountain and continue forward on the path. Using the map as a guide, return to Connor’s then up to the alchemist. Go around the building to the backside and up the hill. Be careful near the edge, if Connor falls he will die.
Go to the brick building with a pond in front of it and turn left and follow the path. Kill the five zombies. At the street sign turn left (if you go right, it’s a dead end). Cross the bridge and come out by the waterfall. Go to the outhouse, open the door and kill the monster. Enter the main house. Take the mushrooms from the shelf just left of the door and leave the house.
Continue forward to the windmill house (the one with the wrought iron fencing). Kill the monster, enter, kill the inside monster. Then push the box to be under the axe. Hop up and take the axe. Leave the house and battle the blackguard.
Go forward and right to the house with the tree swing, turn right and go through the bridge.
Go to the mill house and chop down the tree to stop the mill. Enter the house and hop up on the mill and hop to the top level. Take the hook & rope and get down. Leave the house.
Go to the church, turn left and follow the path. Go up the grassy hill and follow the rocky path to the ledge, you’ll kinda above the graveyard. Angle to the right corner and take a running leap to leap across to the top of the mausoleum. Go to the front side and hop down. Fight the monster and take his crossbow. Leave the cemetery.
Take two rights to be at the barricaded church door.
Turn left and pass the farm stand and follow the path to the fountain. Turn right and follow the path to the alchemist shop.
Use the axe to break down the door and go inside.
Go to the right side of the room and take the yellow potion. Pan right and take the tan potion. Leave the shop.
Turn left and follow the dirt path. At the for, go left and follow the grassy path. You’ll see a beast at a pond of green water. Do not walk in the water, it’s poisoned. Talk to the beast. Continue forward. With the crossbow, kill the monster guarding the building on the right. A ghost of a knight appears. Talk to him. Click on the gate to the tomb to find out it’s barred, use the axe on it to unbar it (we will go inside later).
Cross the bridge to the old castle keep. Kill both of the first floor monsters (there’s two down here, two on the second level and one on the third). Follow the tunnel that goes around the outside edge of the wall (be cautious of any shooters that look kinda like cannon holes, these shoot arrows that can harm Connor). Along this path there is a single chain and a double chain, find both sets and pull them, this disarms those cannon shooters.
From the double chain turn around and follow the corridor. You’ll pass a wooden door (it’s locked, but we’ll get it’s key soon). Go back to the main room and up the ramp across from the main doorway to go to the second level. Kill the two monsters here, then follow the path to another ramp and go up to the third level. Here is one monster, with a leather breastplate. After killing him, take the breastplate and return to the main floor and leave the castle keep.
Follow the zombie path to the main road (you’ll see a street sign on the right). You can’t go right. there’s a boulder in the way, so go left. Go to the waterfall. Walk around to the left side and use your rope & hook and climb up. Shove the bricks into the water then climb back down. Go through the hole in the waterfall that the bricks made. This is Castle Daventry.
Follow the corridor forward, left and right to a brick wall. Touch the unlit candle on the right to open the door. Enter the dining room and walk around the table to the big portraits of King Graham and Queen Valanice. If you click on them, Connor will make a notice of them, and comment that Graham’s is off center. Push on it and soon a key is revealed, take the key (this is the key to that locked wooden door in Castle Keep. Turn left and go forward to the arch. Take the torch ash below the unlit torch and continue forward to the throne room. Go forward and left and pass two statues (one is King Graham!) and click on the magic mirror. You can interact with the game’s villain, and after the scene is through, the mirror will go back to black. Leave the castle the way you came.
Go to the covered bride and cross. Follow the path to the zombie path and go to Castle Keep. Return to that locked wooden door and unlock it. You don’t need to enter yet, but you can. This is a portal room (when you reach a portal in one of the other lands, you can come back to Daventry this way, and travel back too).
Go to the church’s blocked door and stand on the left side of the cross. Use the hook and rope to climb up. Being careful on this ledge, follow it around until you can climb down. Take the candle just right of where Connor lands. Go into the main room and all the way to the window and push the vase all the way forward. Leave the way you can and enter the cemetery. Go to the back and into the big mausoleum and through the portal. When Connor sees he can’t fight the shadow, he escapes. Return to the wizard and talk to him.
Go to the knight’s tomb and go inside. Push the lid of the sarcophagus and take the ring. Using your map as a guide, follow the lake to the wizard’s island (tower at the bottom left). Walk around the edge of the wall to be at the left of the bell stand and climb up. Enter the house and turn right. Take the green potion from under the bench. Click on the magic book and the quill will write on the blank page. Take this page and go to the celestial globe next to the door. Use the page on it and take the red potion and drink it. Turn around and walk back to the left side of the room. Click on the hidden (cloaked in magic) trunk (it’s half-way between the spellbook and the foot of the wizard’s bed. Open it and take the bell. Leave the house and climb down. Place the bell on the bell stand and use your axe to ring it three times. The lady of the lake will appear and give you excalibur. Leave and return to the wizard.
Give him the ring from the knight’s tomb, the torch ash from Castle Daventry and the candle from the church. After the wizard’s spell, return to the graveyard and the mausoleum and through the portal. The spell will dispell the shadow bane (Connor defeats it).
Dimension Of Death
| NUMBER | DESCRIPTION | NUMBER | DESCRIPTION |
| 1 | DOD Entrance | 15 | Commander Skeleton |
| 2 | Lever of Life Pillars | 16 | Bridge of Life |
| 3 | Lord Azriel | 17 | Swamp Portal |
| 4 | Dead Soldier | 18 | Central Tower |
| 5 | Tower Skeleton | 19 | Skeleton Arena |
| 6 | Teleporter | 20 | Hall of Respite |
| 7 | Moldy Corridors | 21 | Hall of Immortality |
| 8 | Cell Blocks | 22 | Hall of War |
| 9 | Switch Room | 23 | Hall of Justice |
| 10 | Hammer Room | 24 | 4 Hall Gates |
| 11 | 2-Story Tower | 25 | Sylph |
| 12 | Boatman | 26 | Healing Fountain |
| 13 | Completeness Pillar | 27 | Crying Girl |
| 14 | Black River | 28 | Dying Man |
Dimension Of Death
Note: In this land whenever you come across skeletons/mummies/specters, kill them and whenever you come across crates or vases, break them; Always take all potions/coins/crystals/mushrooms left behind — I won’t list this in all of the areas.
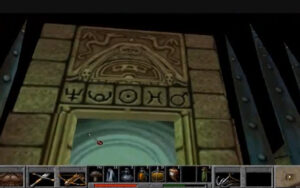
Step forward and turn around. Pan up and make a note of the symbols above the doorway (usually I take a picture of my screen with my phone, but in the past, I wrote the symbols on a dry erase board).
Now, turn back around and have your crossbow ready. Walk forward and kill the skeletons and take any coins left behind. You do need to enter Lord Azriel’s sanctuary, but first you need to unlock it. Walk around this area, battling any skeleton you come across until you find the large ankh shaped golden key sticking out of a pillar. Take it, when you see the dead warrior, click his shield to get a fragment. Now return to the four lighted tiki-style torches near the front gate of the sanctuary and in turn place the key in the torches and push to turn the torch. When all four are done and extinguished, a light ball forms and blasts the door and it’ll unlock the door. Enter and see steps with symbols. Grab you noted symbols and go one at a time. You will need to turn to find the right one to jump you and pan down. The step highlighted is the one Connor will jump to when you press your up arrow.
When you’ve successfully done all of the symbols you will be at the front with a seated figure that looks like he’s out of Egyptian mythology — this is Lord Azriel: King of the Dead (he’s the ruler of this land). Talk to him fully and he’ll give you a key. Now to the eventful part of this region. Remember to keep your bow & arrow handy. Save often
Walk all the way to the right wall and turn left. Go up to the bloody pool but do not go in! Turn left again and go to the grey path. Turn right and go up to the gate. You can kill a couple of the skeletons through the bars if you want. Unlock the gate and kill all skeletons, break crates and take all that’s left behind.
Note: This land has a lot of walking back and forth, killing mummies/specters/skeletons and collecting mushrooms/crystals/coins/potions. When you have to kill a specter, do it from a distance with the bow.
Go to the very far north wall to the box in the right corner, open it and take the square key.
Turn left and go forward. Pass the first left and take the second (with the crates). Bust all of the crates and take what’s left behind. Return to that hall you passed and follow it to the scalable tower. SAVE HERE! Using the hook and rope, climb the tower. The armored skeleton up here is the second toughest to defeat here. If you need to, use mushrooms/crystals/potions to replenish your health (the number keys on your keyboard is easiest) This is why I recommend using God Mode (you can still die in god mode with him, but fighting him is a bit easier). The object is to back him up to the edge (any edge) and to knock him off. When he falls to his death, his chainmail breastplate will be left in the hall. After defeating him, climb down and go collect that breastplate.
From where you got the chainmail breastplate, follow the corridor back to the crates you busted. Go forward and take the right path (where the flames are shooting from). Turn right and left following the S-curve of this hall. Continue on (at this turn you should cross paths with a zombie, you don’t have to kill him, but you can the zombies don’t inflict much damage to Connor even not in god mode).
The end of the moldy corridor is a dead end for now, it’s a bloody pool. Turn around and go back, turn left at the vertical column. Pass the flamed pillar to the black river. DO NOT go into or touch the water, this is the fabled River Stix. Walk close to it and use the shield fragment on it to get rust.
Turn left and go all the way forward to the corridor wall. Turn left then pass the first left corridor (that is just the other end of the moldy corridor). Go all the way to the end and go right (this takes you across the top of the map). At the corner turn left (you will pass a locked door on the left, ignore it for now). At the corner is a specter, these specters are tough (easier in God Mode), always kill them from a distance and with your bow. Round the corner and continue forward. Keep going forward (following the map, it’s down the left side).
Take the rock from behind the metal crate. There are four metal crates in this area that you need to move off of their pressure plates. When that is done, the sylph will appear at the pool. Also in this area there’s a climbable tower. Climb it to go to the other side. Break all crates and talk to the girl. Go to the tower and move the metal crate a bit so she can escape.
Return to the pool and talk to the sylph.
Go to the other locked door (southeast of the Hall portals) and past it breaking all of the vases & crates, taking the left overs (don’t forget the monsters!). Note: in this land, there is a room that is just vases that you can break and take the crystals/mushrooms/potions. You don’t have to, but it gives you those heath items and one of the vases in that room does have a specter in it. This room is the square-shaped blank one on the above map to the left of #7
Take the path that runs along the right side of that locked room, (if you’re playing in regular mode be careful of the fire on the ground — in God mode you can walk across the fire, Connor will grunt, but no damage will be had). In the corner of this corridor is another vase platform. Behind it is a lever that disables the flame shooters. After disabling them, climb down and go to the crates on the right.
Turn right, go up and turn right again. At the corner, turn left then turn right.
Skip the flaming left path for now by continuing forward.
At the stone walkway, turn right. This will take you back to Daventry through the portal in the graveyard mausoleum.
We’re back in Daventry to check up on Gwennie, so leave the graveyard and go to her house (It’s #21 on the Daventry map, if you follow your in-game map, it’s left of the covered bridge on the upper left, it’s the house with the tree swing.)
After talking to Gwennie fully, she will offer you her daddy’s gold coins, take them. Go to the Castle Keep and to the locked room. Unlock it and go inside to the portal, we can’t use it yet because we haven’t seem the portal in the Dimension of Death yet, so leave and and return to the Dimension of Death by way of the graveyard mausoleum.
Follow the stone path to the gate you unlocked earlier. Turn left and on the left wall (near a corner) is another flamethrower switch. If it’s down leave it, if it’s up flip it (Down = Disabled — Up = Enabled). Then at the corner, go left.
Turn right, left, go straight then right to go through the hall with the fire on the ground. At the corner, you see a dying man. This is the older brother Gwennie mentioned. Talk to him fully. After he dies, turn left. Pick up the stray rock as you’re going right around the second corner.
The next corner has a specter so ready your crossbow!
After killing the three skeletons and collecting their coins, mushrooms and potions, continue forward and turn left. Follow this path in a spiral to a climbable tower. This one had a bridge with a rock you need. Climb the tower and take the bridge at the right. After stepping off of the bridge, go around the left side and take the rock.
Go back the way you came and climb back down to the ground level. That was rock #3, we have one more to find!
Follow this path in a spiral then right and up in an S curve, going towards the top of the map. After weaving around the corridors go left and you’ll be at the top of the sylph area.
Go around the spiral path to the two-story tower and climb up. Walk carefully along the edge and when you can, climb up. Carefully go around this ledge too until you can climb one more time and take the potions. Climb back down to the ground level. Go right and pass by the gated area at the tip-top of the map.
Keep going forward then down and right to kill the specter! Turn right and take that final rock!
Go to the area just below the right side of the gated cells, this is the portal you can use to travel between the lands. (It’s called the teleporter room.
Go to the bottom left of the screen and then to the locked door right of the sylph area. This uses the square key you got from that box earlier. After the scene with the skeletons, kill them all. Take the round key and all coins/potions/mushrooms then leave the room.
Go to the other locked room (top left of the map). Use the round key. Ready your crossbow and enter the room. Break all crates and kill all skeletons and go to the door at the right. Get your sword ready and walk through the door. Kill this skeleton and SAVE HERE!!! These spirits can kill you (even in God mode!) Use the strength and shield potion and take a flying leap to the hammer and take it. This replaces your crossbow.
Use the map as a guide and go to the central tower in the middle (below all of the gated cell blocks). Place a rock on each of the four pressure plates, then go back to the sylph area.
There isn’t a specific order you have to do the portals in, but you must do War before Justice, this is the order I do them:
Hall of Immortality: Take the potion and look at the heart then leave.
Hall of Respite: Ready your hammer and kill all skeletons. Using the boxes cross the river (if you’re in god mode, you can take flying leaps across the river – Connor will grunt, but no damage will happen). If the pillar doesn’t fall over, shove it. Take the yellow potion and go to the bookcases and look at the skulls. On the left side case, take the skull on the bottom shelf (third) seventh from the left. Go back across the river and leave.
Hall of War: Kill all skeletons. Cross the bridge and take the strength potion. Place the skull on the warrior statue and take the feather. Cross back to the other side and leave.
Hall of Justice: Take the potion and put the feather on the right side of the scale and go forward to jump onto the left side. After the scene with Azriel, leave.
Note: You can return to the Hall Of Immortality to see the heart beating, but you don’t have to.
Go to the moldy corridor and follow it to where the bloody pool was before. Take all mushrooms and the piece of mold. Return to the sylph and give her the rusty shield fragment and the mold. Leave her area and go back to Central Tower and collect all four rocks.
Go to the room you unlocked with the round key. Play with the switches, going back and forth, killing all skeletons and Specters, taking all crystals/coins/potions/mushrooms. In one of the final left side ones there’s a bone-shaped lever. Pull it to open the top-most gate.
Go to that gate and SAVE GAME HERE!!!!!!!!!!!!! Ready your sword. The commander skeleton is a toughie (he’s another reason I play in god mode). Kill him and all other skeletons. Take all coins, mushrooms, potions and crystals.
Go to the left side of the bridge and look across. Use the hammer on the lever. Cross the bridge and enter the portal.
The Swamp
| NUMBER | DESCRIPTION | NUMBER | DESCRIPTION |
| 1 | DOD Skull Portal | 8 | Teleporter |
| 2 | Whispering Weeds | 9 | Carnivorous Plants |
| 3 | Witch’s Castle | 10 | Swamp Wisps |
| 4 | Whirlpool Portal | 11 | Healing Faucet |
| 5 | Swamp Huts | 12 | Mandragor Trees |
| 6 | Oracle Tree | 13 | Dead Skeleton |
| 7 | 2-Story Scaffold | 14 | Mushroom Forest |
Note: There is an oracle tree (#6 on the map) that you can talk to, but I don’t — I find it a waste of the gold
Go around the c0rner to the right. This is Mushroom Forest. Take all of the scattered mushrooms and navigate to the back to the golden mushroom. Use your sword to chop off a bit and take it.
Using the above map as your guide, head to the healing faucet. If you’re not playing in God Mode, this is how you can heal yourself without using potions in this land. Keeping to the border, go to the back of the Mandragor Trees. There is a dead skeleton hanging from one. Take his crossbow (this will replace the Hammer of Azriel).
Navigate to the bottom left of the map to the swamp huts. Enter the left one, open the big black trunk on the left and take the gold, then turn around and take the chainmail gloves from the bookcase. Leave the hut and go to the right one. Using the sword, break down the door. Open the big black trunk in the corner to take the gold. Turn around and break the door to the other door down and enter the room. Open the big black trunk in the left corner and take the coins. Take the hearing horn from the table and leave the huts.
Head to the bottom right corner of the map to the Whispering Weeds. Be careful not to step too close, or they’ll hide under the swampfloor. Using the hearing horn on the weeds, listen to them. After Connor drops the horn, leave this area.
Being cautious of the poisonous water, head to the top left corner to the Swamp Wisps. Talk to them and tell them the secret you learned from the Whispering Weeds. Eat the flowerblossom. Now the poisonous water won’t effect you!
Now let’s deal with that nasty witch! Head south to her castle (be careful of the mandragor tree on the right. If you aren’t playing in god mode, go around the left side and use an invisibility potion and shoot her with the crossbow; however, if you are in God Mode, you don’t necessarily need to use a potion, just kill her (in God Mode you can easily charge her and use the sword if you choose). Approach the gated castle door and use the crossbow on the hanging bag to unlatch it. Turn right and take the unicorn’s horn from the dead monster on the table. Look at the cauldron (it’s the source of the poisonous water).
Go back to the door and to the other side by the hanging skeletons. Take the rock from the left corner and return to the ramp. Use the rock on the ramp and climb up, Bust all of the barrels and take what’s left over and go up the second ramp to the balcony. Turn left then right and take the chainmail suit. Turn around and go all the way to the end and open the trunk. Take the mask piece and turn around. Fight the black guard and take his severed hand. Leave the castle.
Now on to the portal! (You can take the long way by going through the Dimension of Death, but this is the way to use the 0- portal room at Castle Keep).
The Portal Tower is near the upper left corner of the map (#8). Go there and climb up, stand on the portal and use the map to travel back to Daventry. Leave Castle Keep and go to the Unicorn (#16 on the Daventry Map above). Give her the horn, which will transform her back into her natural state and she’ll give you a pyramid. Go back to the Swamp.
Using the map as a guide go to Two Story Scaffold (#7). Climb Up, go to the part that looks like a fence and climb up again. Go to the door with a handprint. Connor’s hand is too small, so use the Black Guard’s severed hand.
SAVE HERE!!! Using Connor’s starting point as being behind you, hop in this order: NE – NE – N – W – NW – SW – W – NW – NE – NE
use this as a guide:
FINISH
O O X O O O O
O X O O O O O
X O O X O O O
O X X O X X O
O O O O O X O
O O O O X O O
START
After entering, kill both monsters. Open the trunk and take the ladle. Pull the chains, and press the button. Leave and cross back to the other side and return to the swamp floor.
Navigate back to the witch’s castle and use the ladle on the cauldron. This will cure the poisonous water! Go outside and talk to King Mudge. Enter the whirlpool portal he creates.
The Underground Realm Of The Gnomes
| NUMBER | DESCRIPTION | NUMBER | DESCRIPTION |
| 1 | Entry Hall | 10 | Boulder Room |
| 2 | Armor Shop | 11 | “Different” Wall |
| 3 | Weapons Shop | 12 | Teleporter Room |
| 4 | Rotating Bridge | 13 | Amber Glow Room |
| 5 | Apothecary | 14 | Dark Room |
| 6 | Machine Room | 15 | Tree Root Room |
| 7 | Rolling Boulders | 16 | Dragon Wyrm Lair |
| 8 | Iron Lock Door | 17 | Pedestal Room |
| 9 | Circular Corridor |
Go around the entrance room and collect the mushrooms, pick up the rock, break barrels (take the mushrooms & crystals).
Face the whirlpool, turn right around and go forward. Use the rock on the pressure plate and continue forward (use the crossbow on the mantabats).
Go left then right then immediate left.
Note: This land has a lot of walking back and forth. When you approach a rock giant or mantabats, kill them and take what’s left behind, see a barrel, smash it and take what’s left. I normally follow the above map, so I will reference it directly from here on out
Go to the weapons shop (#3), talk to the merchant then trade your crossbow for the compound crossbow and your sword for the war hammer. (When buying or trading in this and the next land, you click your coins then use the coins on the merchant). Leave the shop.
Go to the armor shop (#2), talk to the merchant and trade your breastplate for the bronze breastplate (on the left) and leave the shop.
Go up the right side of the map, there’s an alcove with barrels to smash and get crystals/mushrooms/potions. Go left and kill the spriggon.
On the right edge of the map is a dark room (#14). Take the potion on the floor. Talk to the old man. Look at the crystals in the corner and use the war hammer on them. Take the crystal and leave. Go to the teleportal room (#12).
Head up to the Amber Glow room (#13). At the pit, SAVE then backup and take a flying leap over it. Use the war hammer on the amber glow to chop a chunk out, pick it up and leave.
Go left across the bottom of the map to the rotating bridge (#4). Put a rock on each pressure plate (I think the order matters — left, middle then right) then cross the bridge.
Go to the Iron Lock door (#8) and use the hammer to break the lock & take it.
Follow the path up to the brick wall. Turn right around and take the path directly across from the brick wall to the Circular Corridor (#9). Follow it.
Facing the brick wall again, turn right and follow it to a climbable wall and climb up. Go to the boulder in the round channel and push it inside the hole (it’ll be in the circular corridor).
Go to the apothecary (#5) and talk to her. Pan right and click on the Essence Of Sun Tze (horse & warrior figurine) and ask about it. Leave the shop and go to the Tree Root Room (#15). There’s a tree root sticking out of the left side. Use the war hammer to chop it off. Pick it up and leave, going back to the apothecary. Buy Essence of Sun Tzu and leave the shop.
Go to the Rolling Boulders (#7) SAVE. To cross, be at the edge of the path and quickly go through when the boulder is at an end (you have to do each of the three one at a time). Follow the path to the Machine Room (#6) and talk to the old man, leave the room.
Return to the Circular Corridor, follow the corridor to the boulder. Now push it along the corridor to the brick wall and use it to break the brick wall.
Enter this tunnel and place your crystal on the holder on the left wall and follow this path to the Dragon Wyrm’s Lair (#16). The crossbow is no match for this beast, so (if you’re not in God Mode, potion up with shield & strength) charge at him and use the war hammer to defeat him. Take the black diamond that’s left behind (it’s his heart). Continue forward, after the man talks to Connor then disappears, go forward to the Pedestal Room (#17). Click the purplish diamond on the right side of the contraption for a message from the prophet (the man you just met). Then take the lode stone (the black horizontal line at the top of the contraption).
Return to the Machine Room at the very left edge of the map and give the lode stone to the old man. Leave and go to the teleportal room (#12) and while standing on the teleportal pad, use the map to go to the new reigion (Barren Region).
Barren Region
| NUMBER | DESCRIPTION | NUMBER | DESCRIPTION |
| 1 | Sarcophagus Temple | 8 | Shaman Lady Hut |
| 2 | Fire Dwarves Cave | 9 | Weapons Hut |
| 3 | Lava Blocks | 10 | Broken Block Bridge |
| 4 | Basilisk | 11 | Lava Geysers |
| 5 | Teleporter | 12 | Fire Gem Pyramid |
| 6 | 2-Cave Tower | 13 | Gong Temple |
| 7 | Fortress |
This region has three nasty creatures: fire ants (easy kill) and fire demons (still an easy kill, but they take more shots to kill), and fire dwarves (those are only at the end of this land). When you kill the fire ants, they leave behind a crystal. If you’re not playing in God mode, the lava pits will kill you, so be careful. You start this land at the Teleporter (#5).
No northwest to the bridge, cross it and to the weapons hut (#9). Talk to the blacksmith about the land and everything. He will tell you about the basilisk. You can’t do anything about that yet so leave his hut. Head north to the Broken Block Bridge (#10) SAVE HERE! The below chart is the order you have to hop into the blocks, the Xs are blocks you pass, the numbers are the ones that will turn silver with symbols on them. When the seven numbered ones chime and turn silver, you’ll automatically be back at START, just hop them in their numbers.
X 2 FINISH 6 X
X X X X X X 3
5 X X X 7 X X
X X 1 X X X X
X X X X X 4 X
START
Go through the lava geysers (#11) and up to the fire gem pyramid (12). Talk to the spirit. Leave and head to the gong temple (#13). SAVE HERE! If you’re not in god mode, save often with successful jumps. You have to jump from brick walkway to brick walkway (and in the lava there are some fire demons). At the VERY right there’s a lonely walkway that’s only purpose is there are potions — only attempt this is God mode as the easiest way to get there and back is through the lava. At the vertical wall, the rope icon appears, climb up. Now there are seven gongs, but the walkway looks so short! It extends with the right gong combination, this combination is in the order of the rainbow (ROYGBIV: Red, Orange, Yellow, Green, Blue, Indigo and Violet. Number the gongs 1-7 starting just to the left of Connor and going clockwise. Use your crossbow on them 4 2 7 5 1 3 6
Note: Each time you hit a correct gong, your platform extends.
After taking the stone tablet, return the way you came and go to the Fortress (#7) and place the stone of order on it’s pedistal. Go to the Fortress Blacksmith and ask him to forge you a metal shaft. Leave the fortress and return to the weapons hut (#9). Give him both the black diamond and the metal shaft so he’ll make you a pike (trade your sword).
You can see the shaman lady (#8) but it’s entirely optional.
Now, let’s go kill a basilisk! Go to Basilisk (#4). If you’re not in god mod, again save after each successful brick jump. At the vertical wall climb and hop down, stabbing the basilisk with your pike (you lose it).
Cross the little bridge to the sarcophagus temple (#1) and climb the wall and hop down. Search the fallen warrior and take the brown key by his feet. At the sarcophagus in the center of the room, take the sword (from the warrior laid out on top). Look at the wall and note the symbols (you need these here AND in a little later). At the sarcophagus, walk into the blocks to press them in this order: square – circle – triangle – moon. This will unlock the door by the fallen warrior. Enter and open the potion panel and take the potion. Pan left and take the suit of armor. Return to the mainroom and check the walls for potion panels and leave the way you came.
Back at the basilisk, use the sword to chop off his tongue and take it.
Go to the bottom left part of the map to the Fire Dwarves Cave (#2). After killing the guard dwarves, take one of the crossbows and their potions. Use the key from the sarcophagus temple on the keyhole right of the door. In the cave kill all fire dwarves you come across and take the potions left behind.
Follow the path and after turning right around the corner, use the crossbow on the three pressure plate buttons on the right wall.
Go to the first one and talk to the woman in the middle cell, this is Queen Freesa from the next land. Turn around and pull the lever on the wall. There’s nothing of interest in Queen Freesa’s cell or the cell to the right. Go to the cell to the left of hers and take the pipecap. Go to the room just left of that cell, kill the dwarf. On the wall is a panel with the symbols from the sarcophagus temple, press them but in reverse. The correct order this time: moon – triangle – circle – square. Take the second pipecap and leave to the main hall.
Go to the middle walkway and look, a chest! Can you guess what’s hidden in there? After opening it, take the mask piece and battle the black guard. Leave and go to the last walkway. Kill the dwarf and continue forward into the room to kill another dwarf. Place one pipecap on the pipe and use your crossbow on the button on the wall. This will take you just up to the second level. On the left, take the red reveal potion and on the right take Queen Freesa’s crystal septer. Return to the main floor and place both pipecaps on the pipes and use the crossbow on the button. This will shoot you all the way up to the next land, Frozen Reaches (where Queen Freesa reigns).
Frozen Reaches
| MAP LEGEND | |||
| NUMBER | DESCRIPTION | NUMBER | DESCRIPTION |
| 1 | Queen Freesa’s Palace | 8 | Frozen Pond |
| 2 | Crystal Dragon Cave | 9 | Guard Fortress |
| 3 | Barren Region Elevator | 10 | Grand Citadel |
| 4 | Teleporter | 11 | West Tower |
| 5 | King Gryph’s Castle | 12 | Path Decipher Pillar |
| 6 | Great Lake | 13 | 2-Headed Drake |
| 7 | East Tower | 14 | Pond Decipher Pillar |
This land is made up of three sections: South (where Queen Freesa and the Gryph King reside), The great Lake (you need Queen Freesa’s dragon to cross) and North (the mountains. In the north there’s a smaller lake that in god mode you can walk through, though in classic mode because of it’s coldness it will kill you.
You begin at the Barren Region Elevator (#4). Go to Queen Freesa’s Palace (#1) and talk to her. Try to give her the scepter and she will let you keep it (you need it for her dragon).
After leaving Queen Freesa’s, go to the Crystal Dragon’s cave (#2). Push the block until it’s under the broken chain, hop up and pull the broken chain. Go to the dragon and use the scepter on her and talk to her.
On the north part first go to the west and east tower (they are on the left and right sides of your map) west is #11 and east is #7. Kill the guards and take all crystals/potions. At some point take a dead guards icy crossbow (it’ll replace your current one).
If you don’t have a rock in your inventory, return to the south side of the land and go to the teleporter (#4) and go to a previous land and collect a rock you left behind then return to the north side of the land. Go up to the top right corner to the Frozen Pond (#8). Here there’s an invisible dragon guarding the pond. If you’re in god mode, grab your sword and charge on up to him and kill him, however in classic mode he’s a bit tougher so use a reveal potion, and also a shield/strength one before charging at him with your sword. With him dead, continue to the pond. Use the rock on it twice then use the fire gem on the water to get the flaming sword (again, it’ll place your current one).
Leave the area and head to the Grand Citiadel (#10). Kill the guards and go around the side until you can climb up. Navigate to the jail and talk to the Gryph King in the cell. While facing him, pan right and go out the open walkway and hop down to the guard. Once he’s dead, take all the potions and close to the building’s brick is the cell key, take it and return to the Gryph King and free him.
After the Gryph King flies away, leave out the big open door and battle a guard and fall down the grate. Battle Thork and after he’s dead, pan to the brown chest (it looks like an end table) in the corner. Open it and take the gem. Note: this gem is only used for deciphering the two pillars at #12 and #14). There is a rock in this room, but if you collected one before and already have the flaming sword, you don’t need it. Notice the cell with the chest in it is locked. Pick up the blade of ice and go out the main door (you have to remove the bar from the door first). Place the ice blade in the gap, use the sword to melt it then use the crossbow to refreeze it. This will make an ice pole. Take your icepole and go back inside and use the pole in the slot next to the cell. Open the chest and take the mask piece. Battle the blackguard and take the potions. Leave the citadel and go across the small lake to the guardhouse. Break all barrels and take all leftover potions/crystals.
Return to the dragon to go back to the south side. Go to the Gryph King’s castle (#6) and talk to him. In thanks for you rescuing him, he gives you a blue adament.
Return to the Grand Citadel and up to the jail and in the electric chair place the blue adament, golden mushroom and the basilisk’s tongue. Pan left and pull the lever.
Leave and head to the top left corner of your map to the cave of the two-headed drake! This is the MAIN reason you needed that flaming sword (this sword is the only weapon that can kill it because the flame cauterizes the wounds). Climb up and kill the drake. Walk past him and follow the path and drop down into the hole.
Paradise Lost
Follow the path to the alter in the stonehenge structure. Click on the top and notice a depression. Place the bright pyramid (the white one) Talk to the acheron spirit and since you have four of the mask pieces, you will be transported to the Realm Of The Sun.
Realm Of The Sun
Note: This region is technically four levels. Levels 1-3 has gameplay (the fifth mask piece is in one of them) and level four is where you have your showdown with Lucreto.
Level 1: Truth
| MAP LEGEND | |||
| NUMBER | DESCRIPTION | NUMBER | DESCRIPTION |
| 1 | ROS 1 Entrance | 7 | Floating Sword Room |
| 2 | Water Room | 8 | Sword Path Room |
| 3 | Locked Precept Room | 9 | Floating Beast Room |
| 4 | Potion Panels | 10 | ROS 2 Truth Door |
| 5 | Talking Archon | 11 | Archons & Tablet |
| 6 | Hall of Truth | 12 | Potion Panels |
In all three levels, the fourth is the end-game sequence with Lucreto and the game classifies it as the Mask’s Inner Sanctum (sanctuary), not a regular level); break all vases, kill all monsters/blackguards, and take all crystals/potions.
From the game entrance, go left to the water room (#2). When you can climb. Break this vase too and take the mask necklace (you will need this in another level). Climb back down and return to the hall.
Head north and bypass the locked precept room (#3) for now and go to the potions panel (#4) and open all potion cubbies and take the potions. Standing in the corner is an Archon Spirit, talk to him.
Go to the bottom left of the map to the Archons & Tablet (#11). Take the tablet and leave.
Head north and east to the Hall Of Truth (#6). Go down the left path (#9) and walk right up to the beast and he will become a key. Take the key. Now return to that Locked Precept Room (#3) and use the key on the door and enter. Take the shield and sword and leave.
Go to the top left of your map to the Hall of Truth (#10) and after the door speaks, use the tablet on it. Enter and go through to level 2.
Level 2: Light
| MAP LEGEND | |||
| NUMBER | DESCRIPTION | NUMBER | DESCRIPTION |
| 1 | ROS 2 Entrance | 6 | Locked Precept Room |
| 2 | Locked Room (No Key) | 7 | Henchmen Cauldron |
| 3 | Vase Room | 8 | Talking Archon |
| 4 | ROS 3 Light Door | 9 | Hall of Light |
| 5 | Unlit Candle | ||
Note: This level has several henchmen. Go north along the left side of the map to the vase alcove. Break all vases and collect the potions and crystals.
On the way to the alcove there was a locked door that there’s no key to, but there’s a trick to opening it. Go to the unlit candle (#5) and flip it. Now return to that locked room (#2). This is where the final mask piece is! When you can, open the chest and take it.
Go to the top right corner of the map to the Henchmen Cauldron (#7). When you can use the necklace from Level 1 in the cauldron.
Walk down along the right side of the map to the Talking Archon (#8). Talk to him and enter the Hall of Light.
Walk to the podium and push it until it’s in the light. The page will turn into magic and into a key. Take the key.
With the key, go to the locked Precept room (#6). Use the key on the door. Take the suit of armor.
Go to the Light Door (#4). After the door speaks, use the table on it and walk through to level 3.
Level 3: Order
| MAP LEGEND | |||
| NUMBER | DESCRIPTION | NUMBER | DESCRIPTION |
| 1 | ROS 3 Entrance | 4 | Skeleton & Zombie Room |
| 2 | Talking Archon | 5 | Precept Room |
| 3 | Hall of Order | 6 | Altar Room Order Door |
This is the calmest level. There aren’t any monsters in the hallways, but there is a room with zombies and skeletons that you have to get through.
Go north and east and push-click the golden vase. Take the potions from all of the now open panels.
Go to the talking Archon (#2) and talk to him. Enter the Hall of Order.
SAVE GAME, This puzzle can be mind-wrenching. It is a slider puzzle to recreate the mask symbol within the 3×3 blocks, and they will have to be centered in the black lines. When it’s correct the door at the top will open. Go inside and take the key from the alter.
Go to the Skeleton & Zombie room and kill them all. Go through to the locked Precept Room and use the key. Take the golden chalice from the alter and go to the Alter Room Order Door (#6). After the door speaks, use the tablet on it. Walk through to the alter room. (Where you have the final battle with Lucreto.)
Alter Room
Even in god-mode Lucreto will damage (and can kill) you, so heal with mushrooms/crystals/potions often.
You have to place the five mask pieces on the alter (any order) one at a time (reheal after Lucreto attacks). After the fifth piece, a vortex opens. With your sword, fight him until he backs up and is carried away in the vortex (for this part, I use the strength/shield potions for a bit of help).
Congratulations! With the restoration of the Mask of Eternity, you have put everything back where it should be, thus saving the world!