King’s Quest 7: The Princeless Bride
This is one of the more unique King’s Quest games/ It was the first to be split in chapters, the only one to have cartoon-like graphics, and it’s the only one where you play two different characters: Princess Rosella and her mother, Queen Valanice. Also, aside from The Odd Gentleman’s King’s Quest 2015 retelling, it’s the only game in the franchise that you play Valanice. Every other chapter switches between the chapters: the even chapters you are Rosella, and the odd ones you are Valanice. You don’t need to do anything in the settings for this game (yay!) You can watch the intro, it lays out the premise of the game (takes about four minutes), then click new game, type/click your name and choose Chapter 1 (you can start with any chapter, but if you’re playing the full game, you must start at the beginning)
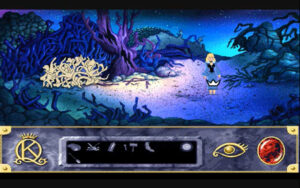
The controls: you have your inventory bar, and eye icon and a big red orb. The inventory bar is self-explanitory. The eye icon is how you look at items in your inventory (click the item and click it on the eye, for the duration of the game, for looking at inventory items, I will list it as clicking it on the eye). The big red orb is how you access the settings if you want to.
Chapter One: Where In The Blazes Am I?
We start off with Valanice tornadoing into a desert. Part of her dress gets snagged on a cactus, take it.
Note: during the cutscenes, you can skip past them by clicking the button labeled >> that’s above the inventory bar.
Walk left to the small pool and take the salt crystals (the shining bits on the south side) and take the stick. Combine the dress fragment and the stick.
Walk right two screens to the temple and go inside. When the scorpion appears, use the flag on it.
Go to the tiki table to the right. Click the big teardrop tile to turn it over. Three orbs will appear (pink on the left, blue on the front and yellow on the right). Move the yellow orb to the tiki’s top hand, the blue orb to it’s lower hand and the pink orb to the platform that rises on the right of the tiki. Take the blue arrow that pops up on the left. Click exit and leave the temple
Walk up and left. Look t the symbols on the rockface and enter the cave. Take the basket. Open it and rotate it until you can take the seed from inside it (it looks like a kernel of corn). Click on the vases (you can only take one, and it doesn’t matter which, the first three you click on always shatters and Valanice will finally take the fourth). Leave the cave.
Use the seed on the dark spot of ground (where the water is dripping) to the right of the purple plant. Take an ear of corn and walk left. Use the stick to whack the pink fruit out of the thorns and take the fruit. Walk down.
Use the comb on Valanice and use the empty vase on the pool of saltwater. Click the symbols at the base of the statue. Pour the vase of saltwater into the bowl the statue is holding then use the comb on the bowl. Use the corn on the bowl then use the empty vase on the bowl to get fresh water.
Click the statue’s head then the neck. Move the orbs in her necklace so they form a straight vertical line down the middle. Click the wrist of the hand holding the bowl and the statue will turn it over. The pool drains and you see stairs. Go down and look at the offering plate, then go back up.
Walk left and see a ghastly man. Call out to him, follow him and call out to him again. Talk to him, you have to do this twice. Give him the fresh water. When the scene ends, open the pouch and take the bottle. After he leaves, take the hunting horn and blow the dust out of it. Walk up two screens to the cactus, then up two more screens to where you got the corn. Take the yellow seed from the plant and walk right to the little house (just past the two rabbit holes). Knock and the mouse will send you away (he can’t see without his glasses).
After the jackalope scene, use the horn on the right hole twice. Take the jackalope fur and the small glasses. Knock on the mouse’s door again and give him the glasses. Now trade the seed and he will give you a blue bead. Now return to the saltwater pool and go down inside to the offering plate. Offer the bead and take the arrow piece that’s shaped like a V. Combine the two arrow pieces. Leave the pool and go up.
Look at the footprints and click the arrow-shaped keyhole above the closed cave/tunnel. Use the arrow on it and it’ll open. Walk inside.
Chapter Two: A Troll Is As A Troll Does
Rosella is sucked into a new land by way of a mirror — and furthermore, turned into a troll!
Leave the room and talk to the troll sitting knitting in the center of the screen. This is Mathilde.
Take the toy rat and walk left to the bottom (not red) path. Talk to the jeweler. Go forward and take the lantern from the wall. Go to the edge of the chasm and hop over and take some sulfur from the wall and return to the screen with the forging troll and the jeweler troll. Leave and Rosella will automatically follow the tall woman (Malicia). Talk to the two trolls in the mudbath, leave and take the shield. Separate the spike from the shield.
Take the bottom right path and try to go right (you’ll be stopped. Go to the cart and place the shield where the missing wheel goes, and add the spike to hold it in, click ride. After crashing, go back left (that big troll will no longer be a problem).
Take the top right path, this leads to the kitchen. Use the toy rat to get rid of the chef and pick the toy rat back up. The green shelf has two bowls that look gold. The bottom of the bowls are labeled (brass or 10k Gold). You have to choose one, and look at it in your inventory to be sure you have the 10k Gold one. I’m not sure if their placements are the same each gameload, or if it’s random, so I just check each time, just in case. Click the wooden machine next to the green shelf to get the bakes beetles.
Go back to the red path (the mudbath) and two different trolls are there. Talk to them fullu.
Leave and go back to the jeweler & blacksmith trolls. Go to the room you got the lantern & sulfur and use the bowl on the green water closest to Rosella and leave the room.
Use the sulfur in the hearth (fire). Grab the tongs hanging up and use them on the box. Use the box & tongs on the bucket of water to get the silver spoon. Return the tongs to their hook. Use the billows on the hearth and use the lantern in the fire then leave the room.
Take the bottom right path and go all the way right to a crystal dragon. Talk to the dragon and use the lantern on the dragon. You will get a red gem.
Return to the jeweler troll and trade him the red gem for his hammer and chisel. Return to the dragon and use the hammer and chisel to get a dragon scale. Note: you must stand in level with the mid-way point of the dragon’s tail or else when the dragon flips it’s tail, it’ll crush you.
Return to Mathilde and give her all of the spell ingredients (you have to start with the bowl of green water, the rest can be in any order).
Malicia will magic you back to the bedroom. Place the brown footstool under the portrait of King Otar, then add the vanity chair and the blue throw pillow. Click the portrait and climb up into the ventshaft. When Rosella falls out, a green creature does too. Click the bedroom path (top-most left) to hear the Mathilde & Malicia argument and after the scene, talk to Mathilde. Use the green creature on Mathilde. Use the toy rat on Malicia.
Walk right and use the magic rope Mathilde gave you on the elevator bucket and click it again to climb up.
Chapter Three: The Sky Is Falling
Quickly use the prickly pear on the beast and walk forward.
Walk left to the stag by the big tree and talk to him. Try (and fail) to take the stake out of the tree. Walk left and up. Cross the muddy riverbed by hopping across the big white stones. Walk up to the spiderweb and use the basket on the spider and talk to the bird.
Walk up and go through the small door on the right to enter Falderal. Use the comb on the archduke.
Enter the china shop and click on the mask then talk to the bull.
Look at the paper on the door to Town Hall. Walk right. Talk to the merchant in the cart at the right. Remove the cloth from the birdcage and talk to the bird, then take her. Return to the china shop and give her to Fernando and he’ll give Valanicdowne the pink mask. Leave the shop and put on the mask, enter town hall.
Walk through the room to the tapestry and walk through. The maze of staircases can be confusing (I usually just choose one and see where it leads). Go right – down – down to be at the rightside-up door. Click the door twice (the first time puts a pink smoke in Valanice’s face, the second lets her enter the room).
This is a hall of mirrors with a cherubic fountain. Click the third mirror from Valanice (the one just left of the column, it leads to the upside-down room). Valanice’s upside-down reflection will drag her through the mirror (portal) to the upside-down room.
Open the desk drawer and take the magic statuette. You can use the comb on the statuette, but you don’t have to.
Leave the room and go left – right – down – down and leave town hall.
Walk right two screens and see the moon fall into the pool and the bird (mockingbird) will fly away. Take the coin (wooden nickel) from his nest. Use the salt crystals on Valanice and enter Faux Shop. Ask the shop owner about the books on the counter. Trade him the wooden nickel for one, then trade him the mask and get a rubber chicken. Separate the chicken from the feather. Leave Falderal and return to the desert. Go to the mouse and trade him the book for a shepherd’s crook.
Return to Falderal (be sure to talk to Attis fully on the way past if you haven’t yet, he needs to tell you about Rock Spirit) and go right to the pool and try to take the moon but Valanice can’t reach. Try again, but this time, use the shepherd’s crook.
Chapter Four: Will The Real Troll King Please Stand Up
When you can, click the shovel. Talk to the grave digger fully
Go top-right then left. Knock on the door ad talk to the man. Leave the house and go right and return to Dr. Cadaver fully and leave again.
Go right, up and top-right and the rope ladder should be here, if it’s not, just leave the screen and return until it is. Click on the rope to go up into the pumpkin house. Take the foot-in-a-bag from the small coffin, then the pile of bones (Rosella will only keep the spine). Leave and return to Dr. Cadaver. Give him the new backbone. Leave and return to the pumpkin house. Use the box from Dr. Cadaver on the ghoul boys then place the box in the elevator bucket. Take the rat (Iggy!)
Go up and give Iggy to Gravedigger.
Go top-right to the pumpkin house. Use the hammer & chisel on the box to free the cat, she’ll give her one of her nine lives (in the inventory, it looks like a glowing orb).
Go left and take the shovel. Go left again and two screens down to the home of the Boogeyman. Here you must click the gravediggers horn on Rosella right where she stops (do not walk to the bones).
Go down into the hole. On the big padlock click the symbols from Gravedigger’s shed. Skull – Bat – Spider. Talk to the real King Otar. Use the dragontoad on him then use the hammer & chisel on his wrist. Climb down and when it appears, take the black cloak. Go to Dr. Cadaver’s and talk to him fully.
Go right and down and use the spray bottle on the green monster. Talk to the three-headed carnivorous plant. Use the foot-in-a-bag on them and take the flower. Continue right and go around the side of the house to the back. Use the shovel to deepen the hole and ho down. Quickly grab the spray bottle. When you can back up, then when you see Cuddles (Malicia’s dog)’s face in the floorboard’s hole, spray.
When the coast is clear, enter the house and search the dresser. Take the brown device and Rosella will also take Malicia’s icky stocking. Add the melted silver spoon to the stocking and quickly leave the house the way you came and take the cloak.
Walk up and left to the forest. Step forward and when the werewolf lurches, use the stocking of silver on him and continue forward.
Go up and cross the rocks, enter Falderal and go into town hall. Go through the tapestry. Navigate the stairs as before: right – down – down then click the door twice.
Use the left over stocking in the base of the cherub statue on the left and read the engraving. Go to the column at the top-right corner and use the hammer & chisel on a cluster of grapes to get a grape. Use it in the statue and the gateway will open but not all the way! Use the wand on Otar then go down the opening and follow Otar.
Chapter Five: Nightmare In Etheria
After the trial in town hall, leave and go right. Give the statuette to the cart merchant. Add the jackalope fur to the salve. Use the rubber chicken on the tree left of the pool and the moon on the rubber chicken. Now Valanice can leave!!!
Go right three screens to a big moss-covered (sleeping) rock. Use the feather on him until he wakes and talks to you.
Go left two screens, down one screen and right two screens. to the dry river with two stone statues. Click the flowers in the top left corner and the bird should appear and offer to spill the nectar. Use the vase on the flower. Now use the vase of nectar on the statue with a pitcher.
Go left and watch the scene. Go left again and use the salve on Valanice. Continue left and go past the three-headed carnivorous plant, up and left to Dr. Cadaver’s house. Knock on the door and talk to him.
Leave and go right to the pumpkin house. Once inside, take the bone sticking out of the mummy and leave.
Go left two screens and down to the boogeyman’s grave and talk to the black cat. Return to the Pumpkin house, go left two screens and up one to the burned out mansion. When the dog appears, toss the bone to him, you’ll make a friend and get his medal. Walk down twice to the crypt and give the medal to the crying woman.
Now the next puzzle is tricky and Valanice will die a lot, just keep at it (the restore puts you right where you were before the death).
Return to the pumpkin house and take the dynamite. Go left all the way to the tomb and use the dynamite in the keyhole. Push the coffin open and take skull.
Leave and when the headless horseman flies, click the skull on him. Note: This part can be tricky too, if you don’t catch him, leave the screen and return until you catch him.
This beginning screen of Etheria has a four-way crossroad of slide/portals to different regions. From here on, I’ll just list them by their number (1 & 2 being the top and 3 & 4 being the bottom)
- top-left = 1 (Desert)
- top-right = 2 (Falderal)
- bottom-left = 3 (Swamp, between Malicia’s house and the three-headed carnivorous plant)
- bottom-right = 4 (River of life, the bridges with the statues)
Go right two screens and up. Take ambrosia (the purple plant hang(ing in the tree). Go down and left and up and see a harp. (If you number the bars left to right) play these bars: 1 – 5 – 6 – 4 then click the orb, talk to the three women.
Walk down and left to the four-way crossroads. Go to 4 and cross the bridge. Go to the statue and look at her cornucopia. Use the ambrosia on it and take the pomegranate. Go left to the screen with Attis and Ceres and use the pomegranate on Ceres to heal her.
Use the fife and go to 3. Go through the gate into Ooga Booga and to Dr. Cadaver’s. Click the box labeled Spare Parts. Talk to Dr. Cadaver. Use his coffin to take a nap. Leave and use the fife, go to 4 and left to Ceres. Talk to her.
Use the fife and go to 3 again. Walk right to Malicia’s and around the back. Click the hole Rosella made and when you can click down. Use the ambriosia on Cuddles and when the coast is clear enter. Take a crystal from the lamp and leave. Walk up to the main path and use the fife. Go to 1. Go to the temple and use the crystal on the beam of light at the right. Leave and use the fife.
Go right and up and play the notes. Talk to the fates again and they’ll give you a dreamcatcher. Go to the screen you got the ambrosia from, and use the dreamcatcher on the cave. When it’s safe, enter the cave and try to talk to the man. Show him the dream catcher and he’ll pay attention now, and he gives you a magic tapestry. Leave and use the tapestry on Valanice.
The dreamworld, use the dreamcatcher on the new nightmare. Walk down and enter the building. Use the crystal on the frozen woman. She’ll return you to Etheria with a bridle.
Go up the path. To harness the wind, you have to stand just so.

(Note: When standing there, grab the bridle so that when you see the horse wind you can use the harness on him)
Talk to Levander (king of the winds).
Chapter Six: Ready, Set…Boom!
Click the wand on the eye and rotate it to see the bulb. If it says T you need to rotate it so you can click on the end, you need F to show on the bulb (to uncloak the fake/imposter Otar. When the bulb reads F, use it on the Otar closest to Rosella to reveal he’s really Edgar (from King’s Quest 4: The Perils Of Rosella).
Malicia sends you into the volcano! When you can, use the shovel on the wall behind Rosella. This takes you to the tunnel under the town hall of Falderal (above you is the hole you and Otar came through earlier).
Go left to the machine door. Click the left eye – right eye – nose and the door will open.
Use the device stolen from Malice’s on the plug and the flower on Otar to wake him. Take the device. After Malicia kills Edgar (she aims at Rosella but brave Edgar saved her by sacrificing himself). Now use the life from the Ooga Booga cat (glowing orb) on Edgar. Watch the remaining scenes!