King’s Quest 4 – The Perils Of Rosella
This game is the original The Perils Of Rosella (not a remake like the other King’s Quest walkthroughs I’ve written so far. This one isn’t point-and-click, that interface didn’t exist yet (the game came out in 1988), so with this came you can move by their the arrow keys on your keyboard or the mouse, but for actions, you have to type them. The typed actions will be bold, italic and underlined (to stand out). The version I have is from GOG, so it doesn’t have vocal sound but you cane hear the ambiance music. This is the first of two games where you play King Graham’s daughter, Princess Rosella (the other is King’s Quest 7 – The Princeless Bride, which that game you split the gameplay between Rosella & Valanice, but that will be explain in that walkthrough).
This game takes place during a 24 hour period, and picks up soon after the completion of King’s Quest 3: To Heir Is Human left off (as Graham’s adventuring hate is still on the floor). Now, on to the walkthrough!
When the gameplay begins, (Note: the opening cutscenes take roughly nine minutes, that you can’t skip past, so go get a snack; also, you can speed up the game if it seams slow.
Walk right down and right to a pool (it has roman columns on the sides). See cupid flying around. Approach him and he will flee. Get out of the pool and take bow.
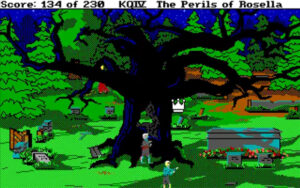
Walk up and right and see a door built into a hill. Go up and see a little house built into the base of a tree. Walk to the door and open door. After entering the house, clean house. After Rosella sits, talk (do this until Rosella doesn’t talk to the dwarves anymore). After the dwarves leave and Rosella stands, take pouch, then open pouch. Leave the house and walk left to the bridge and look under bridge. Rosella should automatically take the gold ball, if that doesn’t happen, you might have to move closer to get the game to mention the ball and if need be, type take ball. From here walk up one screen to the small pond and walk to the edge CAREFULLY (don’t go into the water, or you’ll scare the frog; if this does happen though, just leave the screen and return until he’s there and try again). Look at frog, and when the game mentions his crown, throw ball, he’ll hop to the edge of the water. Go to him and get frog and when Rosella picks him up, kiss frog. He’ll give you his crown and walk away.
Walk down two screens and right one screen to the door build into the hill, this is the diamond mine the dwarves work in. Enter and go to the bottom level and all the way right. Talk, try to return the pouch of diamonds by typing give pouch. The dwarf will not take the diamond pouch, but gives you a lantern too.
Leave the mine and walk right two screens to the spooky house (Manor) Enter the manor and go through the doorway on the left. Go to the bookcase to the right of the painting and look at bookcase then get book. Leave the manor, walk left one screen (this is West Cemetery), walk down two screens to the diamond mine, and right two screens to the base of the rocky mountain. Go left one screen and you should see a bird digging a worm out of the ground (if this doesn’t happen, leave the screen and return until it does). Walk close to the bird and he’ll fly away, leaving the worm. Take worm.
Go left three screens to the ocean (where you began your quest) and up two screens where you see a man ( Minstrel) sitting on a tree stump playing a lute. Talk then give book to Minstrel (He will give Rosella the lute in exchange for this Shakespeare book).
Walk up to the sea-side (Fisherman’s) house and go left down the dock to the Fisherman. Talk. Follow him t the house. Open door. Go to the woman by the stove, talk. Walk to Fisherman and talk. When he speaks of financial woes, give pouch to Fisherman. The wife will give you his fishing pole. Leave the house.
Go back to the dock (click on the second from last plank to not go over the edge) and bait pole. Now you need to catch a fish. Fish (you may only have to do this once, or multiple times, if you have to do it multiple times, press your keyboard’s F3 key to use the last typed action (this trick can be used later when you go get the fruit you need to save King Graham).
Walk right two screens (to be at the back of the Fisherman’s house) and up one screen to see a little strange creature that resembles a goat boy dancing around playing a flute. This is Pan. Talk to Pan, then play lute, you’ll notice talking doesn’t get his attention but playing the lute sure does. Try to talk to him again and walk to Pan and give lute to Pan.
Walk to West Cemetery, and walk right two screens to East Cemetery. There is really only one cemetery with Manor in the center, but I call the left one west and and right one east to keep them straight. Go down one screen to the waterfall and go to the edge of the dirt path. Wear Crown.
At the entrance to the cave is a board, take board. (Note: SAVE HERE! Be careful inside this cave — you never know when the beast will strike, if he’s charging at you, leave the screen quickly). Step inside and look. Get bone. Ho left two screens and down one screen to be at the base of the rocky mountain.
Carefully go up the rocky path and about half-way up, two winged goons will appear and take you the rest of the way up to the evil fairy Lolotte’s castle. After the cutscenes, the goons fly you down to the base of the rocky mountain.
Go to the fisherman’s house and down the dock and jump off into the ocean. SAVE HERE! Swim left two screens to a small island. Walk left and see a peacock feather. Walk close to the feather and take feather. Walk right two screens to the ocean. Here on the horizon you should see a whale (if not, go back left and right until you do). Swim up and he’ll swallow you. this next part can be tricky so SAVE HERE!!! and save often.
(Note: this part is optional, and only for an easter egg tied to another Sierra game.) Go right ti the bottle, take bottle, open bottle, and read note.
(This part you can do either on the right or left, but I tend to usually do the right side, but both work equally well. Walk right to the edge of the tongue. The point of this puzzle is to climb the tongue (to be under the uvula) to the center so you can make the whale sneeze you out. To do this, climb the tongue in a upward-diagonal motion, saving after successful moves so you don’t have to reclimb (this is helpful if you get very far and make a misstep and have to reclimb the tongue). When you’re near the center and Rosella stands up straight, tickle uvula with feather.
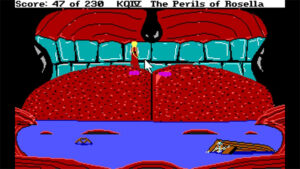
The whale sneezes you out into the ocean. SAVE GAME HERE!!! Be careful of the shark! Swim up to the small island.
Go to the shipwrecked boat look at ground. Here you get the unicorn’s bridle! Walk close to the pelican and throw fish. After the pelican flies away, get whistle. Walk to the edge of the island and blow whistle. You will be greeted by a dolphin. Walk to him and ride dolphin. He will carry you back to the main island of Tamir.
Walk up one screen and right until you see the unicorn (it can vary which screen he’s on, but it’s usually the screen with the stream or the next right one with the small pale tree. Before he flees, shoot unicorn. Walk close to him (stand by his face) and put bridle on unicorn, move to stand next to his belly and ride unicorn. You will automatically ride him to Lolotte’s castle. After the scene with Lolotte, her goons will take you to the base of the mountain.
Go left two screens (to the mine) and down one screen and see a yellow-roofed house. SAVE HERE!!!!!!! This is where the ogre and ogress live, if they catch you, they’ll capture and kill you, so if they appear, leave the screen quickly. When the coast is clear go to the door and open door. They have a bulldog that will attack so instantly throw bone.
With the dog occupied, go upstairs and to the right wall. Take axe. Return downstairs and walk past the dog to the closet (closed door) open door. Soon you will hear the ogre enter, look keyhole. After the ogre falls asleep, (SAVE) open door, walk to the table and take hen. Quickly leave the house and walk down. SAVE!
Walk right and see a bunch of spooky trees. Use axe. Go up and right and see a skull-shaped cave.
Go left, up and right to the base of the rocky mountain and go up to Lolotte’s.
Go left, down and right to the skull cave and enter. Chase the witch around the cauldron to the other two and QUICKLY get eye. Leave the cave and return. Take scarab. Give eye. Leave the cave and walk down to screens to East Cemetery, then down one more screen to the waterfall. SAVE HERE!!! Wear crown (Note: this is where you’ll have to be very careful of the cave’s beast). Light lantern. (Note: Save here OFTEN).
Go to the bottom center of the screen and down one more screen. Go right two screens and off to the side of the center of the screen you see a blue blob (this is the rear exit of the cave). Following the bottom edge, go to the middle and put board over chasm.
Walk up to that opening. After leaving the hole, go to the edge jump (you have to do the jump action 15 times to the end of the swamp, this is where that F3 trick I mentioned earlier comes in handy). Put down board, play flute. With the snake mesmerized, cross the board and take fruit and return past the board. Pick up board. Return to the cave opening and save.
Inside, walk down and to the bottom of this screen. Put board over chasm.

Return to the other cave opening. After exiting the cave, save.
Go to the manor and open door. Go through the left doorway and to the painting, look at painting. Walk to the left wall, look at wall, flip latch. Go through the secret door and take shovel.
Leave the manor and go left and up, dig.
Go back inside the manor, upstairs and to the left doorway. Continue left and walk to the cradle and give rattle.
Go downstairs and leave the manor. Go to the West Cemetery and to the grave left of the tree (by the bottom left corner of the screen). Dig and return to the manor and to the library. If you don’t see an old man dragging chains, leave the room and return. Walk to him and give coins.
Go to East Cemetery, to the first grave to the left of the blue cross and dig. Return to the manor, go upstairs and go to the right doorway and walk close to the bed. An old woman in a rocking chair will appear. Walk to her and give locket.
Go to West Cemetery and to the first headstone to the right of the big tree and dig.
Return to the manor and go to the doorway on the right (the kitchen) walk up and back down and go to the table and a man will appear. Give medal.
Leave the manor and go to East Cemetery. Go to the cracked stone in the back and dig. Return to the manor and go upstairs to the right room. Go up he ladder that’s now there and climb up. Approach the boy and give toy horse. When he disappears, open chest and look in chest. Go to trap door and climb down ladder.
Go to where you got the shovel and carefully go up the spiral staircase.
Walk close to the organ to be between the organ and it’s bench and sit and play sheet music. When Rosella finishes play the sheet music, a small drawer will pop open. Take key then stand up and leave he room and the manor, go to East Cemetery. Walk to the big mausoleum on the right, unlock door and open door.
You’ll be on a small platform and at the end is a rope ladder in a heap. Walk to the rope latter and get ladder, climb. Walk to the small black box, this is the infamous Pandora’s Box. Take box, then leave the mausoleum and return to Lolotte’s Castle.
After the cutscene, you’ll be escorted to Edgar’s room. After about a minute, Edgar will climb the stairs and slip a red rose under the door, with a key tied to it. Go to the door, look at rose, get key, unlock door and open door.
Carefully go down the spiral staircase. At this last section of stairs, be careful not to wake the goon. Go along the bottom edge of the screen to the open doorway. In this small dining room is another sleeping goon, don’t wake him. Go through the doorway closest to him and to the cabinet on the right of the fireplace stove. Open door — this is all of your possessions!!! Get Inventory.
Return to the doorway and SAVE!!!!
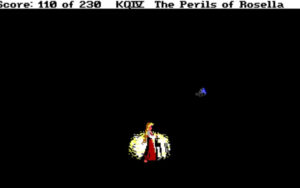
Carefully walk to the bottom right doorway and go out and around this goon too and through the right doorway. Here is another spiral staircase. Go around the bottom and all the way up to Lolotte’s door. SAVE! Use gold key to unlock door After entering Lolotte’s room, Shoot Lolotte. (Cupid’s arrow will kill her). Go to the bed and take talisman.
Go down to the landing that’s half-way down this staircase and enter the door on the left. Go to the closed door and open door. Walk to the black box near the top right and take box then go to the left and take hen.
Leave the storage room and go right. Go down to the main floor and out the front door. Go to the left to the stable. Go to the vertical bar in the center of the pen and open gate. Leave and carefully go down the mountain path.
Go to East Cemetery and to the mausoleum and walk inside. Climb Down and go to the center and drop box. Go back to the ladder and climb. Leave the mausoleum, close door and lock door.
Go to the Fisherman’s house and to the end of the dock. Save! Jump into the ocean and swim left to Genesta’s little private island.
Go left two screens and down one screen. Cross the swan bridge and go right to the pink double doors. Open door. Go up the stairs on the left and follow the stairs all the way up. Go to Genesta’s bedsize and give talisman. Watch the ending!!!