King’s Quest 2: Romancing The Stones
This game continues the story that began in the last game, though Graham is now king (and has been for a few years).
The gist of the story is, Graham sees a damsel in distress in the magic mirror and is led to the distant land of Kolyma to rescue her. Upon the game opening, again increase all settings to the max.
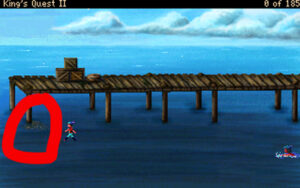
The game begins with Graham on the dock of Kolyma. Walk right to the end of the dock and walk down the stairs and swim left to be right below where you had just been standing. Against the dockleg is a fishing net, take it and go to the shore.
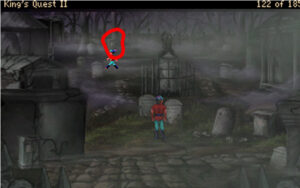
Walk right three screens and up one to the log. Peek inside. See a tree (caution: it’s boobie-trapped). Use the sword on the coins, then take them. Walk up two screens and left three screens. Here you should see a little girl in a red cloak (her location is sometimes random, but this is where I usually find her). Talk to her (we will later learn her true name) and she will ask you to help her find her lost basket. It’s location too is random, so just walk around until you find it (sometimes it’s sitting on the ground or on rocks, but it’s always outside of town proper). When you find it, return to her and give it to her and she’ll give you a yellow flower in thanks.
From here, walk down two screens and take a picket off of the sand. Walk right and check the mailbox of the little cottage. Walk right and up and pick a lemon off of the tree and walk up one more screen. Walk right two screens to the town sign. Walk down two screens and right to the bridge. Save here. Carefully cross the bridge and walk right to the mountain. Walk to it to see a face and talk to it. Return to the other side of the bridge and take the paper off of the ground. Walk left and up two screens to the town sign and continue along the dirt path.
At the tree, touch the hole and take a hammer. Continue up and look at the haystack. Touch the haystack and continue into the town. After the man leaves the fountain, use the coins on the fountain and talk to him. Take the little pumpkin and leave the town. Follow the path back to the lemon tree. Walk left, up two screens and right to see a pumpkin patch. Try to take the big one, then place the baby pumpkin (Baby) in the patch and talk to the big one (Mama).
Walk down, right, then down three screens to a small natural brook. Use the bowl from Baby pumpkin on the brook. In the inventory, cut the lemon with the sword, then use the lemon on the bowl of water. Return to the pumpkin patch and pour the sour water on Baby and talk to Mama fully.
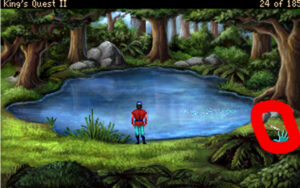
Walk left then down two screens to a pond with a small yellow duckling. Use the fishing net to catch the duckling. Walk up two screens to a pond with swans. Release the ducking into the pond and watch the scene. When they leave, take the stray swan feather.
Return to down, go to the door to the right of the library. Look at the note and try to take it. Use the sword to get it. Use the envelope on Graham and enter the library and walk up to the desk. Wait until the librarian looks away and use the quill to sign the card. Talk to her, then use the library card on her and talk to her again. Touch the book to read it and leave the library.
Return to Duck Pond, walk up one screen and then left two screens to be on the shore by a log. Search it and take a clam. Open the clam to get a pearl. Return to town and talk to the man. Trade the pearl for the shell comb.
Walk down three screens. left three screens and down two screens (where you got the picket earlier) and see a mermaid on a rock. Offer the shell comb to her.
The Quest For The Birth Gem (And King Neptune’s Trident)
After the cutscene, ride the seahorse. Talk to King Neptune.
You are led to the Sharkee Realm. In this realm, regular sharks are harmless, but the Sharkees (they look like a cross between mermaid and sharks) will kill you.
Go up and left to the shipwreck. Search the boat and get a bottle. In the inventory, open the bottle.
Go down, left two screens and up to see a glowing hole. Look at the fish flittering around. Take the plant and use it on the bottle and use the bottle on the fish.
Go down three screens, left, down, then left two more screens and see what appears to be a dead end. Go left into the wall and you will pass right through. Follow this tunnel until you find a big clamshell door on the top wall (you will go left two screens, and right two screens and the door will be in the top right corner, but you have to go close to see it).
Use the sword to open the clamshell door and swim inside. Watch the scene and touch the seahorse to get him to cause a distraction. Swim up to the vault and press the same buttons that the Sharkee King did (truthfully, I never have luck here, so I always click the SKIP button).
Take the trident and quickly leave. Remount the seahorse and you will be given a choice to play through the arcade game of navigating the tunnel (but the Sharkees usually catch and kill me, so I always choose no).
When the voice speaks, use the trident on the left wall.
Go right two screens, up four screens and right one more screen (to the glowing fish), down and then right three screens to King Neptune’s realm and Graham automatically gives him the trident. Talk to him fully to get the birth gem.
After the scene you’ll be back at the beach on the shore.
From here go to the haystack outside of town and use the cloth (it looks like a tissue) on the haystack. Take the needle and enter town.
Go to the library and talk to the librarian. Read the book she offers you (do this twice). Leave the library and go next door to Angelina’s shop (it has a big A on the sign). Talk to her.
Leave Angelina’s shop and town and go down two screens, left, up and left three more screens to a cave. Use the blue birth gem on the left skull then use the hammer on that skull. Turn both skulls to get the bat symbol above to disappear. Carefully enter the cave and keep along the left wall. Search the black cloak. Use the cloth on the birdcage, then use the key on the birdcage. Take the birdcage and leave the way you came. Smash the left skull with the hammer and take the blue birth gem off of the ground. Walk down one screen and remove cloth from birdcage, touch the birdcage to get a note and read it. Return to Angelina’s and give her the birdcage.
After Angelina leaves, take the lamp off of her desk and use it on Graham. Touch the arm of the suit of armor to open the trap floor. Go down into the basement and read the note on the desk. Take the rolled magic carpet.
Watch the scene and after it’s over take the potion from the area lighted by the light shining down the hole and go back up into the shop’s main room, close the trap door and quickly leave.
Go down one screen to the haystack and use the magic carpet.
Go right and use the mermaid’s necklace on the snake.
Walk right and enter the cave. Read the right wall and touch the table along the back wall.
In the inventory, use the picket on the sword to remove the crystal. Put the yellow flower and brooch in the flask. Use the sword to light it. Put the swan’s flower and the crystal into the flask. Click the talk icon on the flask to recite the spell. Go to the snake and use the crystal on him.
Go left and use the magic carpet. Walk left three screens and on the right side of the screen see a big boulder with six smaller stones infront of it’s base. Use the crystal on the fifth one from the left and take the bridle. Walk right and use the carpet.
Return to the cave entrance. Touch the hole in the rock for a fun easter egg then enter the cave. Wait for the Enchanter to appear and watch the scene. Return to the winged horse and walk around to be in front of him. Talk to him and use the bridle on him. Climb onto his back.
The Quest For The Air/Growth Gem
In the clouds, talk to the horse again and then talk to Cloud Spirit.
The First Challenge: You are in Daventry in your youth. When you are questioned, click the talk icon on King Edward and select The Sacrificial Lamb.
The Second Challenge: You are now older (about seventeen years past present time). When you can, use the talk icon on the cloaked man and elect Serving The Lifeline.
The Third Challenge: You are now even older, speaking to a young knight (Connor from King’s Quest 8: Mask Of Eternity). Talk to Connor and select Knight Time.
When the cloud spirit offers it take the green gem and mount the horse.
You land on the path with the town sign. Eat the sugar cube the horse gives you.
Go right to the church, which is now unlocked.
Take the red bible. Pick up the dropped paper (this is important later). Touch the later to pray. Talk to the monk and he gives you a cross. Wear the cross and leave the church, walk left one screen.
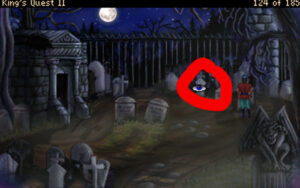
After the cutscene, go left two screens, down three screens and hear a sobbing child. Walk right and talk to Possum.
After she leaves go up two screens to a tree with a door built into it. Hide along the side and when the coast is clear, enter it. Go downstairs and right. Take the soup and search the trunk. Leave and go left, down two screens, left and up to the cottage.
Enter the cottage and warm up the soup in the fireplace, then give the hot soup to Possum’s Grandma. When she tells you to, search the bottom of the bed (the bedskirt) to get a ruby ring and a black cloak. Look at the portrait of a man on the wall and talk to Grandma until she’s asleep.
Leave and wear the cloak.
The Quest For The Death Gem
Walk left, up two screens, left and up two more screens. Walk right to the entrance to the forest. Read the paper from the bible and make a note of the directions on it (the first letter of each word Up (N), Right (E), Down (S) and Left (W) — these directions and the words on the paper vary everytime the game is loaded. Walk right one screen SAVE HERE. Now start with your directions. At the end, you’ll see a castle in the far distance at the top of your screen.
Go forward to the boat, and take a reed from the water. In the inventory, click on the arrow icon then the needle to get the needle to be your cursor. Now click on the reed and click the reeded needle on the poisonous water.
Give the coins you stole from the tree-house trunk to the boatman.
Walk to the castle. Use the cross necklace on the door (use it on the cross-shaped keyhole twice — the first time gets the ghosts to leave, the second time unlocks the doors. Push the doors open.
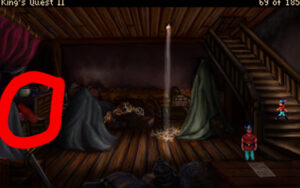
Go up the left staircase. Take the shovel and light your candle on the torch. Return to the main hall and up the right staircase. Go through the room and through the doorway on the other side of the room (ignore the doorway with the curtains). Go down this staircase and through the door by the base of the stairs.
Remove the cloak and open the coffin and peer inside. When you can, use the ruby ring on the count and talk to him.
After he leaves, peer inside the coffin again and touch the pillow to take the red death gem. Return to where you got the shovel and go up those stairs and out the window. Try to climb down the wall and three bats will fly at you. Watch the scene and awaken back in the castle’s dining room with the Count and Countess (the old lady from the cottage by the sea). Talk to them both.
Leave then take the doorway in the main hall (under the left chandelier — this is the library. You see a young slightly familiar woman. Talk to her and learn this is little Possum (aged and vamired, and her true name is Anastasia. Look at the book Anastasia gave you, read it in the inventory and show the key from it to Anastasia. The book gives you a hint to the books you need to click on (you can use the eye icon to find the right ones and click the touch to select them). The books you need are
- Cinderella
- The Three Little Pigs
- Little Bo Peep
- Rumplestiltskin
- Romeo & Juliet
- Treasure Isle (note: this one is hidden and doesn’t appear until Romeo & Juliet is clicked)
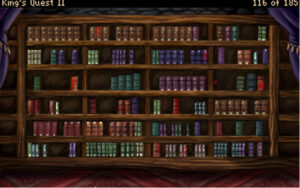
(Note: the * is where Treasure Isle appears)
In the inventory, use the key on Treasure Isle and read it. Show the key to Anastasia. Leave the library and she’ll give you her bracelet. Leave the castle and walk left of the door to the little cemetery.
Use Anastasia’s bracelet on the ghosts (her parents) and place it on the grave beneath them. Take the gold wedding band.
Read the tombstones until you find one with a deathdate of 1200.
Use the shovel then look in the grave and open the chest.
Return to the boatman and go to the cottage. SAVE HERE. Open the door, if there’s a wolf in the bed, quickly leave (this is another thing that can be random), but if the coast is clear, go to the bed and touch the pillow. Use the ointment on Graham and go to the church.
Read the purple book on the alter and go through the room (bottom edge of the screen) to the cemetery behind the church.
Read the headstones until you find Larmon Obnarb (he’s at the back).
Dig by clicking the shovel on the headstone (Graham may have to move slightly) then search the grave and open the chest to take the tiara and return to the forest.
Return to the boatman just like before….but he’s not there!!!! And to make matters worse, you are cornered by two wolves and a werewolf. When you can, use the poisoned needle on the big one in the middle (the werewolf, he’s the monk from earlier).
When the boatman arrives, go to the castle and give the tiara to Count for the red death gem. Now you have all three gems!!!
Quest For Valanice
Leave and go to the bridge. Try to carefully cross, but it breaks. In the inventory, use the cloth on the gems (you only have to click one) and toss them to the right side (farthest from the dwarf). When you can, talk to him and use his dagger on the rope closet to Graham’s leg. Climb the bridge to the other side and Graham will throw the dagger into the ravine.
Go to the mountain, and in the inventory, unbundle the gems. Place them in the holes in the mountain wall. Watch the scene and at the question select Tower Realm.
Use the net on the lake of purple water until you catch a giant gold fish. Release him and he’ll return and offer to carry you across the lake. Touch him to climb onto his back.
Walk right two screens and stand on the darkened sand. Look at it and touch it to be transported to a smaller island.
Take the quartz gem and climb the tall palm tree, take a coconut and climb back down.
Go to the darkened sand on the left, stand on it and read it. In the inventory, cut the coconut with the sword and fill the coconut half with lake water. Pour this purple water onto the left darkened sand, and return to the blue portal.
Walk left and up to the tower. Look at the door and place the disc from Hagatha’s cloak and the quartz. Talk to the right lion and look at the door. Select Cloud – Sun – Water – Earth. Enter the tower and climb the stairs to see a live lion guarding the door. Use the green crystal on him and after the man leaves, take the lion fur. In the inventory, add the fur to the youth potion from Angelina’s basement. Open the door and walk inside.
Move the dresser closer to the girl and tilt the mirror. Use the green crystal on her and after she awakens, talk to her. Touch her to kiss her.
Give the potion to Hagatha and tilt the mirror. Talk to Valanice.
In Hagatha’s cave, take the item at the bottom right corner of the screen (it looks like a snowglobe) – this is the portal Hagatha used for the tower realm. Leave the castle and talk to the count.
You are transported to the Count’s castle and to the wedding of Graham and Valanice. Watch the scene and the ending.