Nancy Drew – Midnight In Salem
The game starts out with Nancy in Austria, on a mission for her father. A colleague and mentor, Judge Danforth, needs a book, The Book Of Apologies to prove ownership of the most famous house in Salem, Massachusetts, Hathorne House. Which has been recently involved in an arson case.
Nancy is led through the Moonsham Castle to the archive room of Judge Samuel Sewall. After the cutscene, move to the window and open the shutters. At anytime you can talk to Elisabeth through the door (she will not enter the archive room).
After looking at everything on the shelf below the window, tutn around to see a sheet-covered desk. Remove the sheet. Read the note on the writing top, then click the lantern in the carving. Along the righthand side of the desk is a square golden button with a circle in the center, click on it.
A key will enter Nancy’s inventory. Inspect the the key and click on it’s prongs to turn it into the shape needed for the desk. Close the close-up of the key and click on the keyhole of the desk with the key.
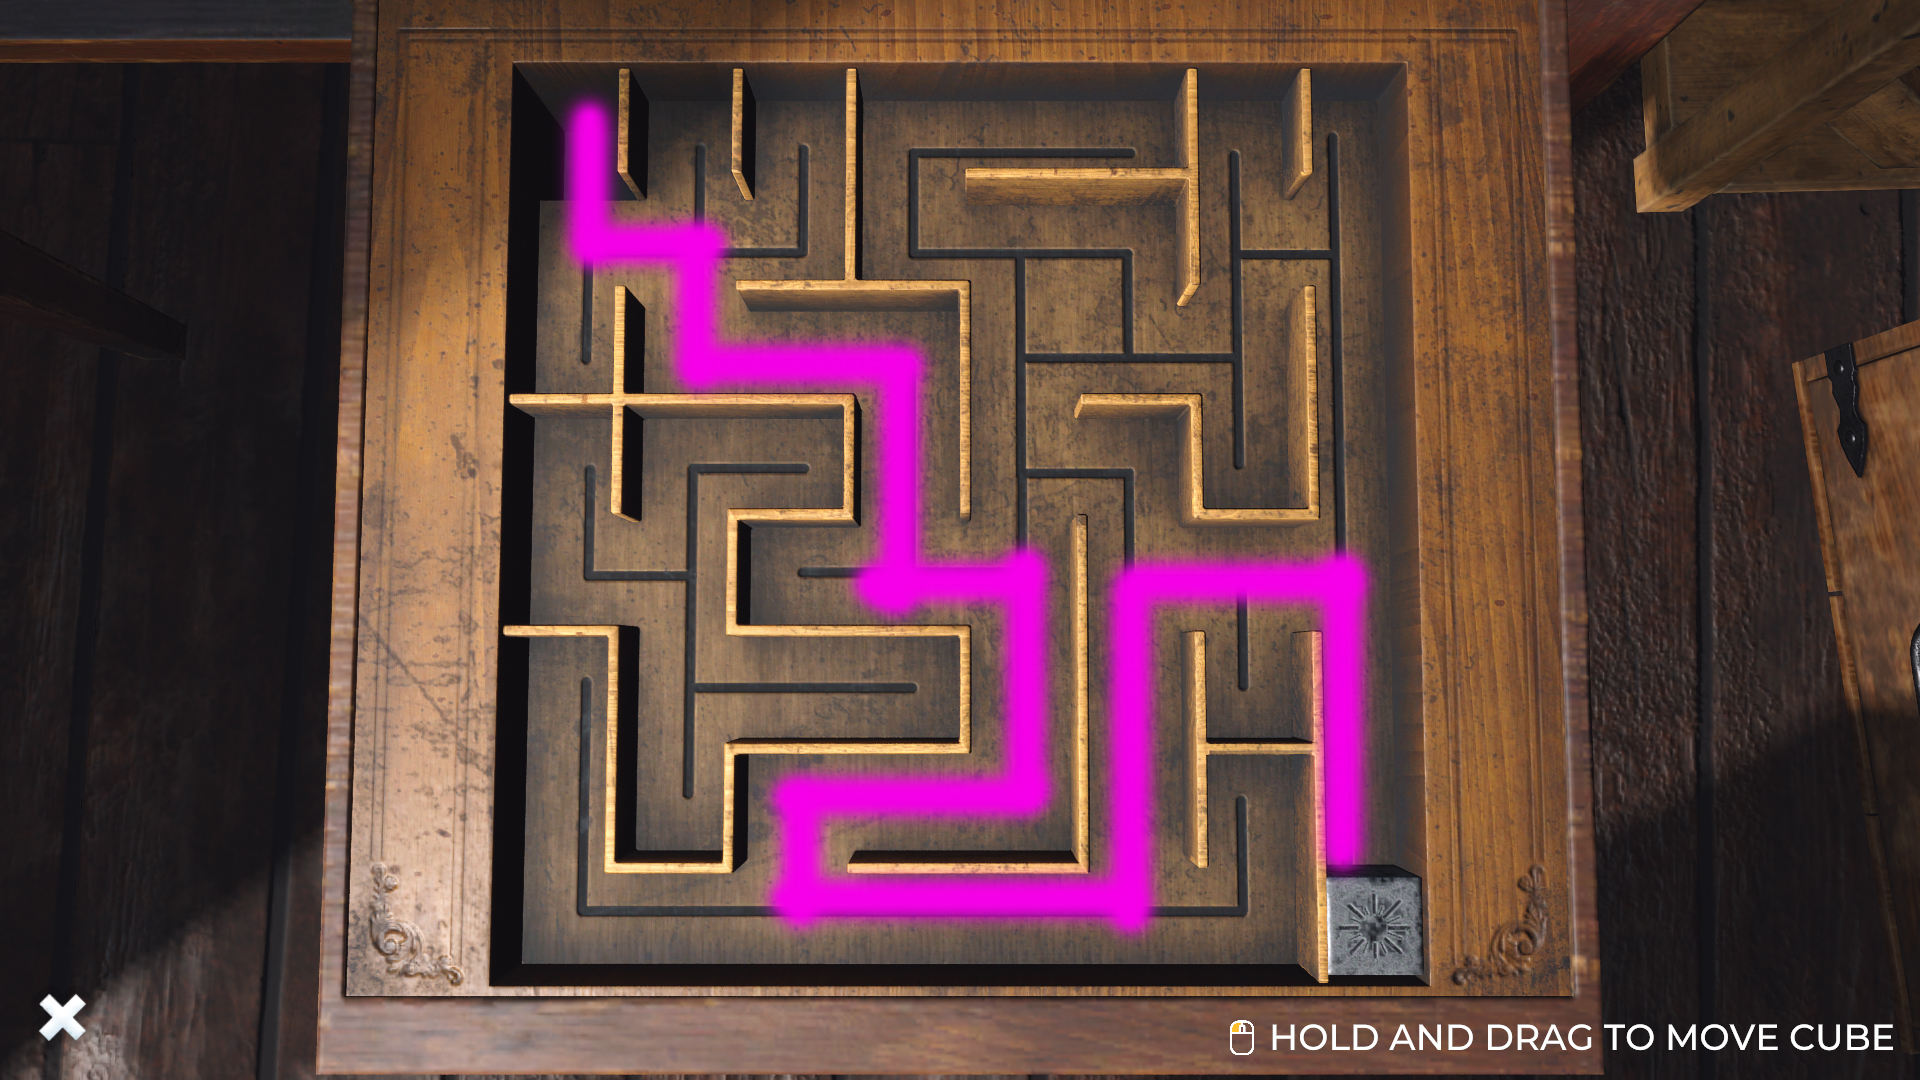
The labyrinth is a very simple maze, you just drag the grey box from the bottom right corner to the top left. This is the way I did it:
Directions
Up to the first junction – left – all the way down – left to the first junction – up – right – up to the first junction – up once – left – and finally up
The completion of this puzzle opens the left side of the desk where the Book of Apologies is…under an elusive AW lock.
Leave the room and double back for a cutscene with the book being stolen. Leave again and chase the thief.
In the woods, after the thief escapes, check the ground thoroughly, take plane ticket stub and AW key.
Next Nancy gets a call from Deirdre Shannon, needing help in Salem (HINT: the two cases are connected!)
After the cutscene, get out of the car and enter the house with Deirdre, meet both Teegan and Mei Parry. Talk all convos with all characters.
Leave the house with Deirdre and head into town. Watch the magic show in the square, then talk to Olivia.
After meeting Olivia, go to the area behind the stage to find the museum and talk to Teegan completely. She will give you a ticket for Olivia’s self-guided witch tour. The locations of the witchtour has a symbol of a raven sitting on a branch, wrapped in a circle. Two of the locations are in the museum (The Executed Souls Of The Salem Witch Trials plaque on the wall and the female puritan statue in the middle of the room); one is in the street in the square, and the rest are all in the cemetery.
If you want to complete the game’s optional jack-o-lantern puzzle, you make them here at Teegan’s desk. There are twelve candles scattered throughout the town.
Jack-O-Lantern Locations
1.) Museum – Left side of Teegan’s desk, next to the flyer stand
2.) Town Square – Roger Conant Statue
3.) Town Square – Olivia’s Stage
4.) Town Square – Haystack across from the courthouse
5.) Town Square – Courthouse Stairs
6.) Cemetery – Big tree in the center
7.) Cemetery – Praying statue at the Unknown Graves
8.) Parry House – Window in Nancy’s room
9.) Parry House – Kitchen Counter
10.) Parry House – Front Steps
11.) Luminous Infusions – Counter (Note: this one cannot be done until after Nancy meets Lauren)
12.) Hathorne House – To the left of the carriage House stairs (building to the left of Hathorne House)
Go back to the town square, and give the ticket Teegan gave you to Olivia. A tablet will be added to Nancy’s inventory. To look at the tablet, right click
it; to use it on a hotspot in the tour, click on it in the inventory to get it to be the mouse cursor and click on the raven symbol.
Salem Sinkholes – The police cordoned area before Olivia’s stage (road closed signs). To get to the raven symbol, go around like you’re going to the museum, turn around,
Accused Witched Memorial – This one is in the museum: As soon as you enter it’s the plaque on the right wall labeled as The Executed Souls Of The Salem Witch Trials
Puritan Statue – Also in the museum, it’s the big puritan statue in the middle of the room
the last four are in the cemetery
Little Liberty Statue – A few paces into the cemetery, there’s a statue of a woman with children (on the right-hand side is engraved AW)
Hathorne House – Near the forest is an information plaque for the Hathorne House
Judge Hathorne’s Grave – Follow the circular path to the bench.
Unmarked Graves – Across from the Hathorne House plaque is Unmarked Graves (near the praying angel statue)
After finishing Olivia’s witch tour, go to the courthouse to meet Judge Danforth. Upon entering, turn right and go ti the closed brown door. Click on the door to talk to the judge (through the door) fully.
Turn around and go to the door opposite (you can see the blue wall from the Judge’s door). This is the lawyer, Alicia Cole’s office. She will give Nancy a paperclip, return to the Judge and ask for permission to pick his lock, Talk to him fully.
At some point while outside of the Parry’s house, look down and pick up the leopard print light to the left of the door. Walk inside and turn right and offer the lighter to Mei.
Easter Egg – In Mei’s area, look close at the potted plant (it’s to the right of the wicker basket trashcan) Note: Nancy will just comment (unlike in previous games, the egg won’t be in the inventory afterwards.
Look into the trashcan, and puzzle together the ripped note. Take the spray can on the shelf above and go to the kitchen and talk to Deirdre.
Leave the house and head to the cemetery. Go into the woods, stopping at the “ghost” and inspect it’s right (left side of the screen) arm and take the paper scrap. Continue to Hathorne House. When Lauren approaches you, select “I’m looking for Lauren Holt”, then “No but I want to.”. Then talk to her fully.
The Next Morning
Take over breakfast.
Johnny Cakes
1 Cup Flour
1 Cup Cornmeal
2 TBSP Sugar
1 tsp Salt
1 TBSP Baking Powder
1 Milk
2 Eggs
1 Butter
2 Vanilla
1 Nutmeg
Then click on the whisk.
For an achievement, you can make special Johnny Cakes for each character.
Mei = Pirate
Deirdre = Cat
Lauren = Werewolf
Olivia = Witch
Teegan = Pumpkin
Joe = Ghost
Frank = Frankenstein
When flipping, flip when the steam first starts.
After all talking, leave the house.
Go to the Judge’s office and meet his son, Jason. Talk to the Judge fully. Leave his office and go to Alicia’s and talk to her fully. She will give you the key for Hathorne House.
Go outside and talk to Jason.
Go to Hathorne House, take the red crowbar in the shrubbery to the right of the door. (Note: You may need to try the key in the door a few times to trigger it. Once you have the crowbar, use it on the door and try the key again)
Inside, take the blue coat and inspect it. Skip the bedroom, nothing to see here. Instead, turn to the kitchen and inspect the full-length mirror (click on the painted laurels). Turn right around and click on the dark spot on the desk.

For the herb puzzle at Lauren’s shop: slight = 1, moderate = 2 & unbearable = 3.
Chamomile – Anxiety
Cinnamon – Indigestion
Feverfew – Migranes
Garlic – Blood Pressure
Ginger – Nausea
Our Lady’s Thistle – Liver
Rosemary – Allergies
Sage – Memory
After leaving Hathorne House, walk around town and talk to everyone. This also includes a phone contact Damian (Teegan’s boyfriend, who works for Alicia). To trigger getting permission to examine the evidence room at the courthouse, go to the courthouse and walk to Alicia’s office, but instead of entering, turn right and look at the keypad. Then call Carson. After talking to him, head to the Judge.
For the door combination (after the judge mentions he misplaced it), turn around and search the left side (by the lamp) of the table by the opposite wall. It’s on a yellow sticky note. The combination is 0815
With the combination, go to the evidence room. Key in the code on the keypad. Inside the evidence room, inspect the broken window. Turn left and take the white papers on the desk and turn around. You only need to check drawers #6, #11 & #18, but I do all 20 (pan down to do the bottom row) – this gives you an achievement at the end. To check against the evidence list, use the list on the inside of the drawer.
Look at the security camera in the doorway of the evidence room doorway, then talk to both Alicia and Judge Danforth about CCTV footage.
When Teegan calls, Nancy rushes back to the Parry House. Talk to her, leave the room and Frank calls. (Note: here the gameplay switches to you playing as Frank.
In the cemetery, Frank has to find the 3 cold spots. When the spectral scanner pops up, you have to match up the two lines. (Amateur mode is easier than master. With amateur you only need to use the two round knobs, with master you also have to move the toggle switch in the middle). The right knob controls the height of the spikes and the left one controls the frequency. I have found it’s easiest to start with the height then the frequency. This puzzle can take a bit of time, but just keep at it (and if need be, back out and find a new spot). The final spot is always by the big tree in the center of the cemetery. When the last one is done, Frank notices a motion detector mounted to the tree.
Go to the forest. There are four items of ghost fakery to find: a bowl of ash (burned herbs), fog machine, jack-o-lantern & ropes with pulleys.
Go to Olivia’s shop and take the paper off of the desk and inspect both sides of it. Be sure to click on the backside for Joe to comment. Then head to the cemetery and go to Judge Samuel Sewall’s grave. Pan down and search the bushes to find a decrypter. Using the decrypter, decipher the paper taken from Olivia’s.
Inside Wheel = Letter Wheel ; Middle Wheel = Greek Wheel You never have to do anything with the outside wheel
Turn the letter wheel clockwise seven times and the greek wheel clockwise six times. SELECT LET RESTOCK WANDS
Turn greek wheel counter clockwise six times. SELECT LETTERS == GROCERY SHOPPING
Turn greek wheel counter clockwise six times. SELECT LETTERS == INVENTORY JUST DO IT
Turn greek wheel counter clockwise four times. SELECT LETTERS == CAT MAINTENANCE
Turn greek wheel counter clockwise one time. SELECT LETTERS == GET STOCK FROM L
After all cutscenes, Nancy and Deirdre will leave and head back to the courthouse to talk to Judge Danforth and Alicia. (For the remainder of the game, Alicia will stay in the Judge’s office with him).
With the CCTV footage, go to Alicia’s offuce and search her desktop. Take all contents of the black box and go to the evidence room.
Place the waterworks map on the town map and align it with Hathorne House.

Use the CCTV Footage (USB stick) on the computer. Nancy has to setup the timeline.
0:00 – Cam Outside
0:01 – Cam Entrance
0:02 – Cam Hallway
0:03 – Cam Men’s Room
0:04 – Cam Men’s Room
0:05 – Cam Men’s Room
0:06 – Cam Men’s Room
0:07 – Cam Hallway
0:08 – Cam Evidence Room
0:09 – Cam Evidence Room
0:10 – Cam Hallway
0:11 – Cam Entrance
0:12 – Cam Outside
0:13 – Cam Outside
0:14 – Cam Outside
0:15 – Cam Outside
Go outside and talk to Jason, turn around and look at the red car parked infront of him (click on the license plate), then turn around and talk to Jason again.
From here go to Hathorne House. Pan left from the carriage house (Lauren’s home) and look at the strange patch of grass.
Click on it until the hatch opens, use the rust-be-gone can on the wheel and take the ergot fungus.
Return to town and question everyone. Go to the cemetery and talk to Frank and Joe competely.
At the Parry House, talk to Teegan completely.
After Deirdre leaves, check the chair Mei is usually in, to take her phone. Go outside and talk to Jason. After the cutscene, search his car (click on the glovebox to get the airline ticket) Then talk to him.
Go to the cemetery to the Little Liberty statue (where Frank and Joe are) and search the statue. Head to Olivia’s office and click the lantern on her desk and return to the statue. Use the lantern on the woman’s hand to unlock the tunnels (a pit on the ground will open up on the side with the AW engraving). Enter the tunnels.
Tunnel Navigation
Forward – Left – Left – Right – Right – Forward – Left – Right – Forward – Right – Left – Right – Forward
Frank & Joe
Left – Right – Left – Forward – Forward – Right – Forward – Forward – Left – Right – Forward – Forward
The door key needs to be puzzled together by swapping pieces. This is cropped from the official strategy guide for numbering purposes.
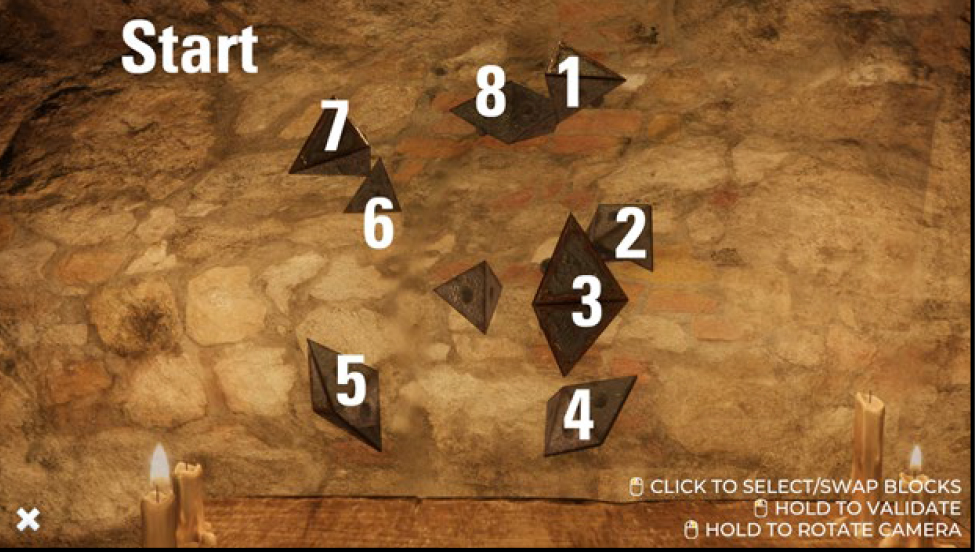
Swap 4 & 5
Swap 6 & 4
Swap 8 & 4
Swap 4 & 1
Swap 2 & 3
Swap 2 & 7
Swap 2 & 1
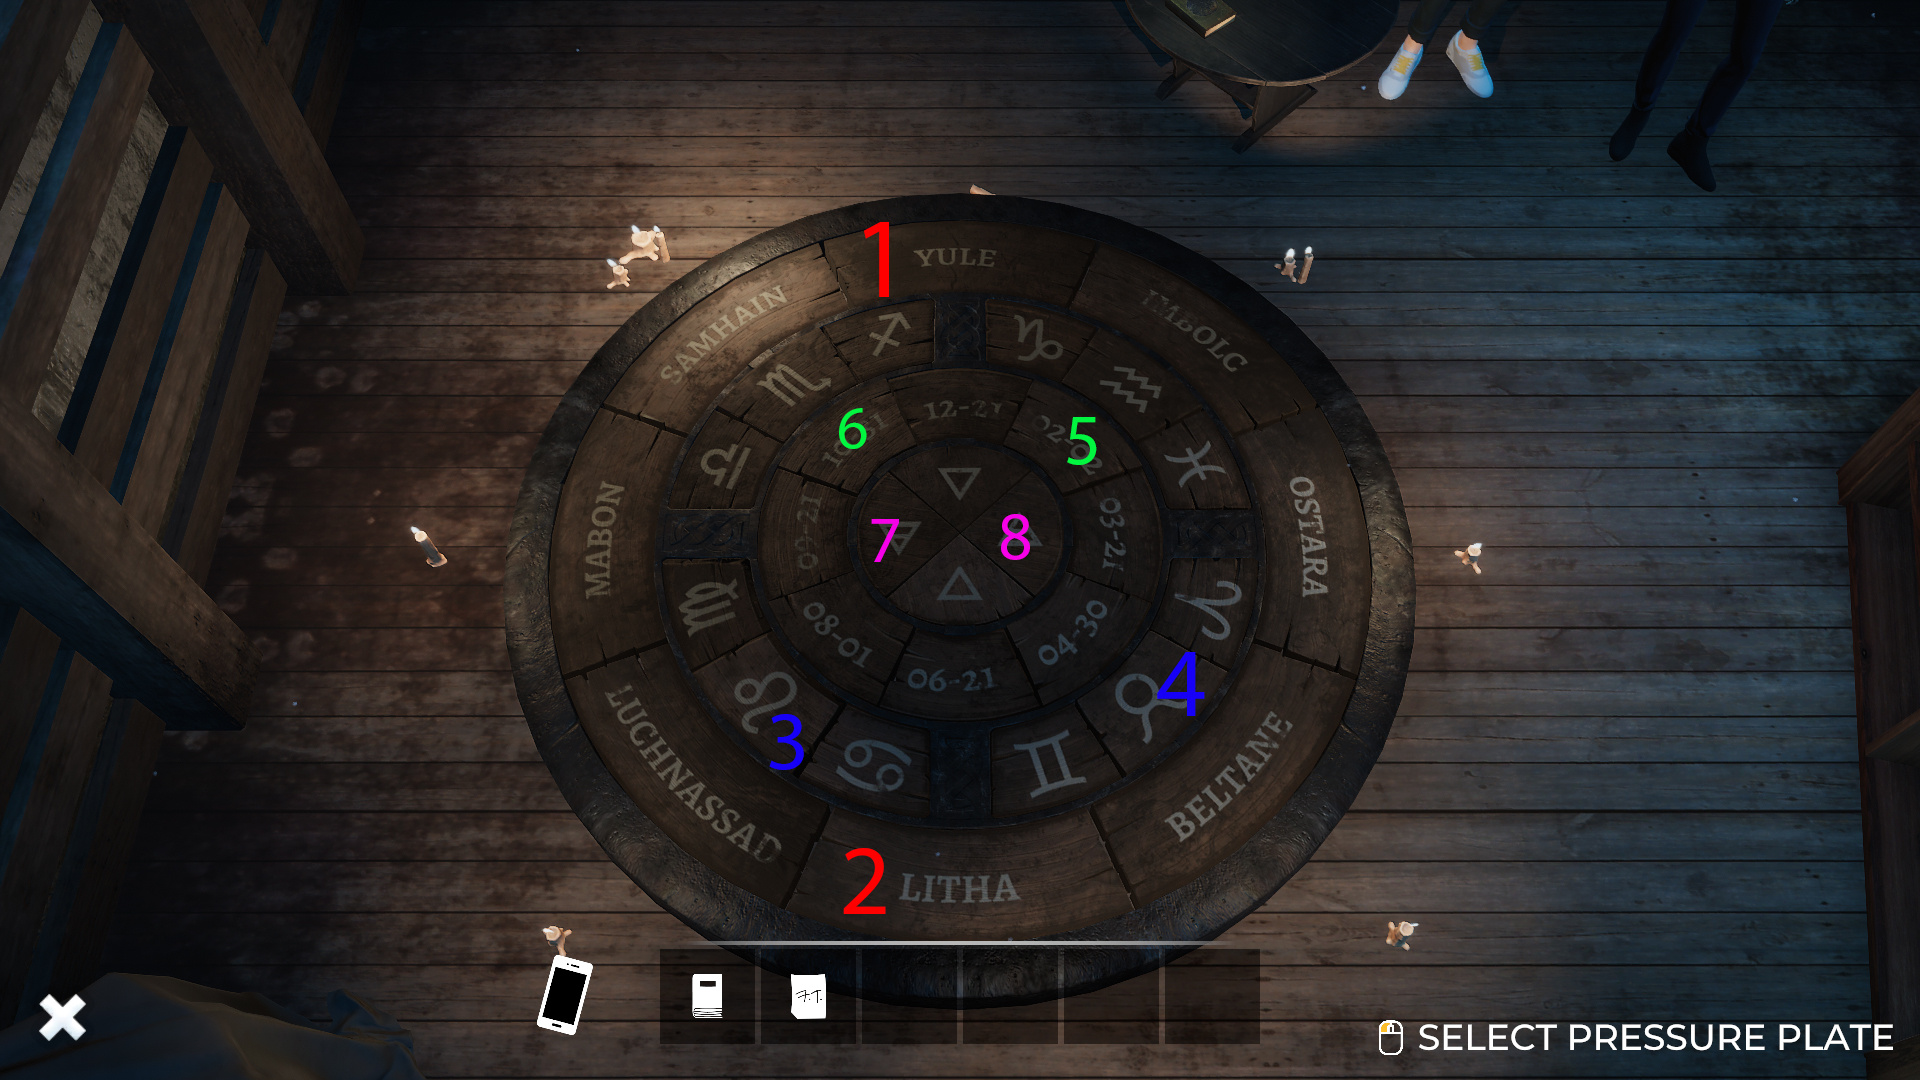
Circular Floor Puzzle
Rings go outter to inner
On the house model, click on the porch, the chimney, rotate (right-click and drag) the house clockwise and click on the hole in the roof. Tip the table and press the button. Turn the house around and click on the roof. This reveals Francis Tuttle’s will.
As Nancy, click on the paper next to Mei.
Turn right twice and click on rhe Premonitions poster. All drawers will fit in the chest, it just takes some arranging. What I do, is I start with the ones with the triangle sides, then the rounded (since there’s only a few of each) then work on the squared ones.
Escape The Tunnels
Forward – Forward – Right – Forward – Right – Left – Right – Left – Right – Right – Left – Left – Forward
In the secret room, talk to Mei fully. Ask for her lighter. Light the lantern and all candles. Take the paper to the left of the lantern and the sliver to the right of the lantern (it’s a woodwn feather). On the AW barrel, look at the symbol, loosen the fourth board from the top and take it’s contents.
Return to the candles and use the note on any of them and inspect the note.
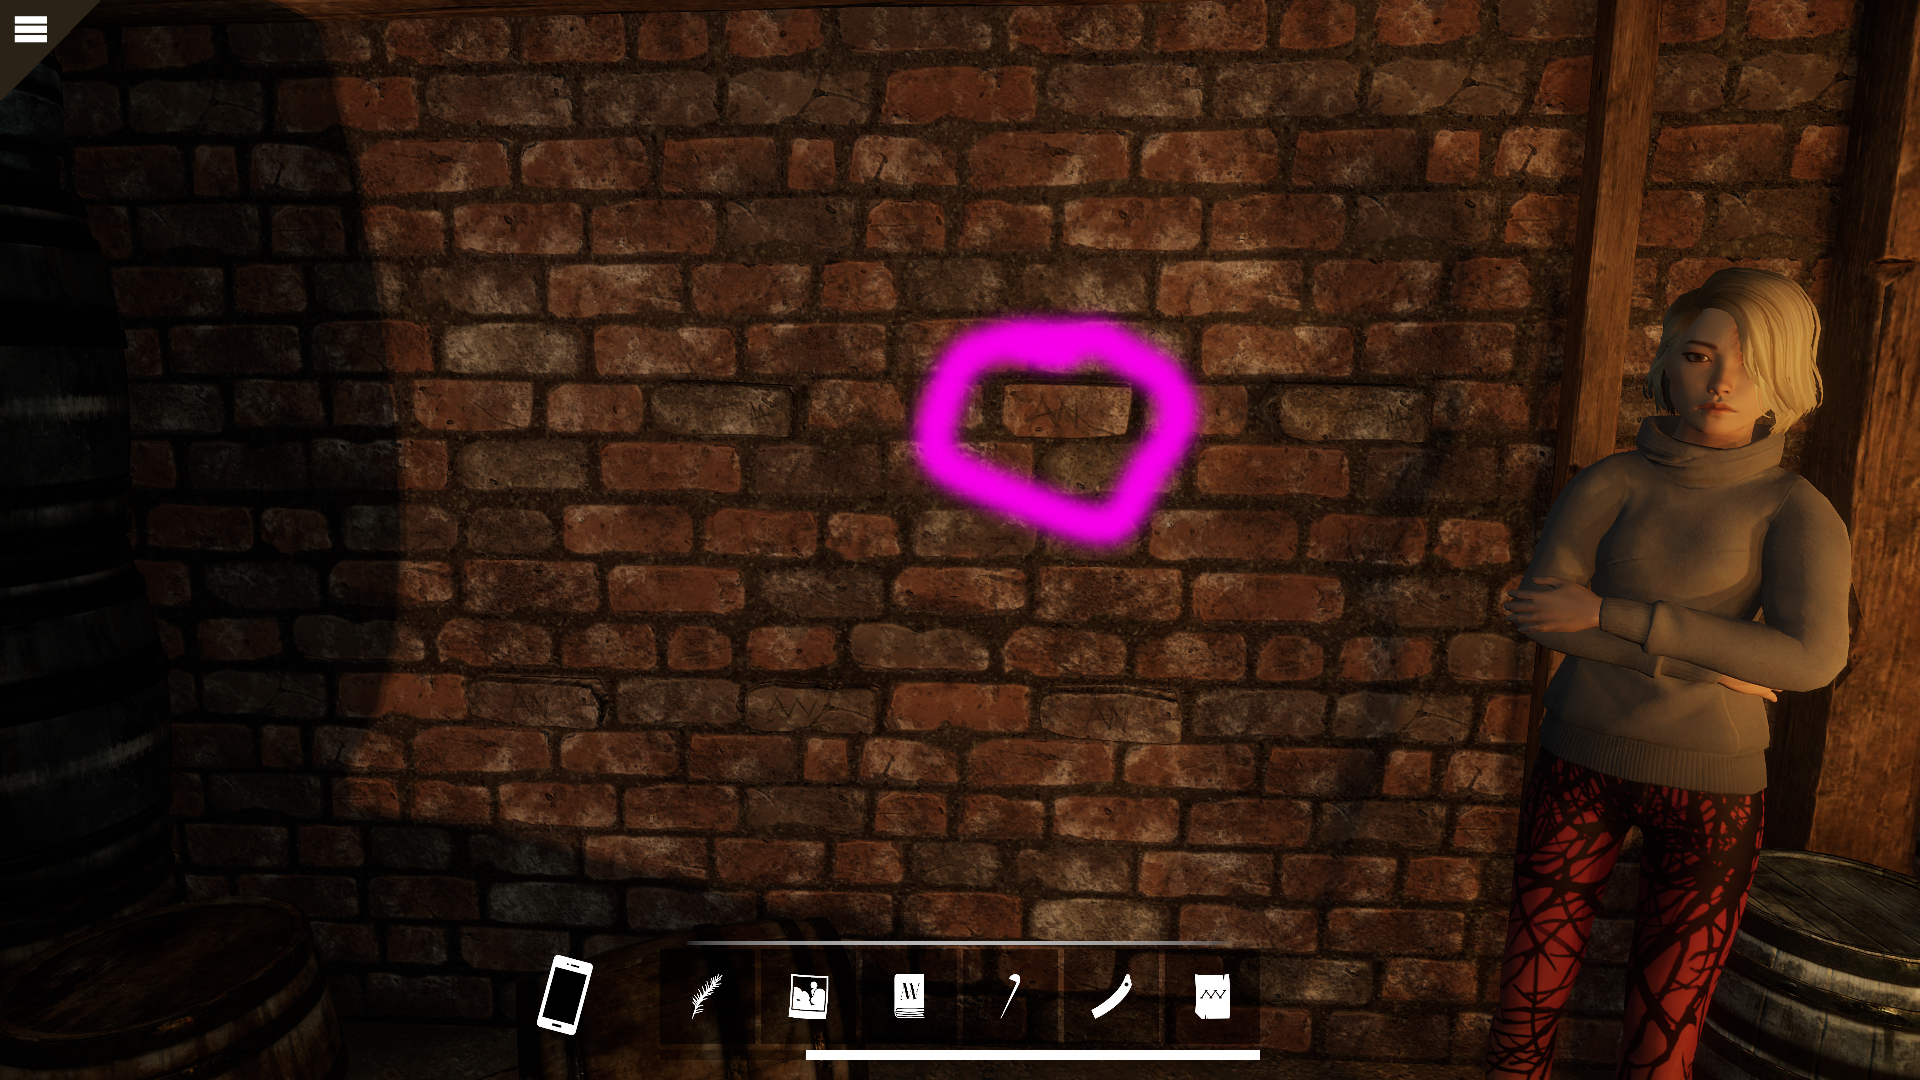
Pan to Mei, and using the note as a guide, loosen the AW brick.
Pan to the angel carving and place the two wooden feathers and dust off the angel.
Numbering the feathers closest to the angel’s head going outward (you only have to do anything with the right side), click and drag them 4 – 3 – 1
Use the AW key on the box in the angel’s hands
Watch the ending. To trigger the completion of the game, talk to everyone at the Parry house and then leave.
Note: there are two possible endings, one where Teegan set the fire on purpose and one where she did it by accident. If you choose accident, at the end she’s at the house and she was given a light sentence; however, if you chose purpose, she won’t be at the house because she was arrested.