Nancy Drew – Mystery Of The Seven Keys
Welcome to Mystery Of The Seven Keys!
Case File
note: taken directly from the Strategy Guide
Get ready for a thrilling blend of adventure, mystery, and history in the latest installment of the award-winning Nancy Drew game series – Nancy Drew®: Mystery of the Seven Keys.
This all-new 3D game experience transports players to the heart of the historic city of Prague as they assume the role of famous detective Nancy Drew. Tasked with uncovering the truth behind the theft of a clientʼs heirloom necklace, players will navigate and sleuth through the beautiful city’s mysterious oldworld environments. Encounter challenging puzzles, decode riddles, and discover clues entwined with medieval legends, alchemy, and lore.
As the investigation deepens, Nancy uncovers a sinister web of cybercrime. Players must outwit devious suspects and use their detective skills to unravel a mystery threatening the city’s Bohemian heritage. Danger and intrigue at every turn add to the suspense as the criminals stop at nothing to prevent you from bringing the truth to light. Your investigative and critical thinking skills are crucial to solving the case and discovering the real mystery behind the legend of the seven keys!
note: in this game you have a choice of 2 navigation modes; Classic (point-and-click) or Modern (moving around with either your keyboard’s arrow keys or wasd keys). The classic is rather buggy, can be staggery in my opinion. One thing to note, you can change between the two during gameplay.
The game does have some keyboard shortcuts to make some things easier.
In Classic mode:
- TAB opens the phone
- C Opens the camera
- Scroll with your mouse to zoom
- G opens the gallery
- J opens the Journal
- Click & hold the mouse’s left button and move the mouse to rotate/inspect an item
- ESC to close whatever (camera/gallery/journal/phone) is opened up
Modern mode:
- WASD and arrows move forward/right/back/left
- Hold down SHIFT while moving will make Nancy run
- Left-click mouse will pickup/inspect items and initiate conversations
- Right-click mouse will lock/unlock mouse cursor (to access inventory)
- Q or E will cycle through inventory
- TAB opens phone
- C opens camera
- Scroll with your mouse to zoom
- G opens the gallery
- J opens the Journal
- Click & hold the mouse’s left button and move the mouse to rotate/inspect an item
- ESC to close whatever (camera/gallery/journal/phone) is opened up
When the game opens, watch the cutscene. You will be led into the town square, enter the cafe and Nancy will approach a woman sitting at one of the tables. Talk to her fully, then another woman will join into the conversation. Nancy will talk to both women. Nancy can choose how to tell who the real Adela is. I didn’t choose the coffee answer, so I don’t know if there’s a RIGHT or WRONG choice, but choose “In Your Letter….” Both women will respond, then as Nancy you choose who Adela really is (the woman standing). This leads to another cutscene. When the game resumes, it’s the next day (Nancy needed to rest from her flight).
Go to the counter and talk to Patricie completely. Walk to the right-hand corner of the cafe, to the table closest to the windows and click on the chair closest to the window to sit down.
Adela will join you. Talk to her fully. After the conversation, walk to the end of the counter that is closest to the door and on the rack of pamphlets pick up and look at the one that looks like a coffee menu. Pay attention to the review on the top right (by Sonny Joon). This is a hint for an upcoming Easter Egg. On the counter is a pile of 3 postcards. Take all three. Go to the opposite end of the counter and take the pen. In the inventory, select a postcard (you can choose any of the three, each will have a little bit of a different message). Use the pen on the postcard to write to Ned.
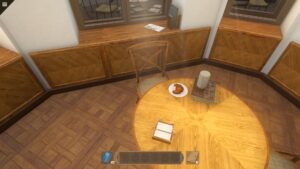
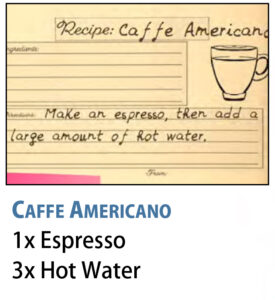
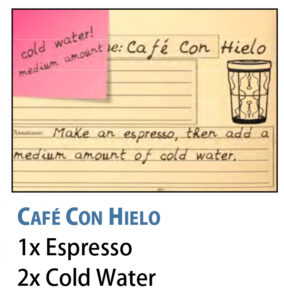
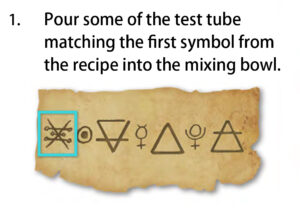
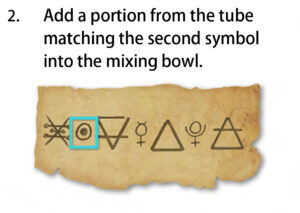
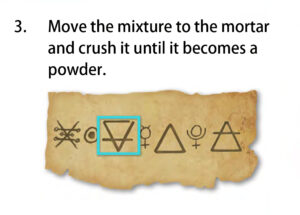
Talk to Patricie again and she will ask for Nancy’s help with coffee. (I found the coffee puzzle absolutely FUN!) But first, Nancy needs to find 3 things in the cafe. The Coffee Handle (on the counter where you got the postcards – looks kinda like a ladle), the coffee bin (on the floor by the plant near Adela’s table, and finally Patricie’s recipe book (this is on a divider between tables close to where Adela sits.
Go back to Patricie and this triggers the puzzle. She explains how to make the coffee.

The recipe book does help, but I found how the guide had it a little more easier (mostly because of HOW it as listed out)

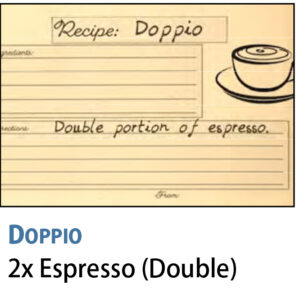
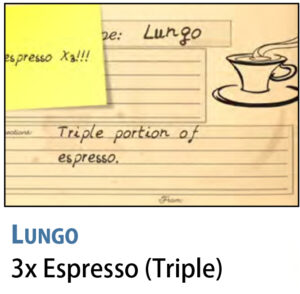
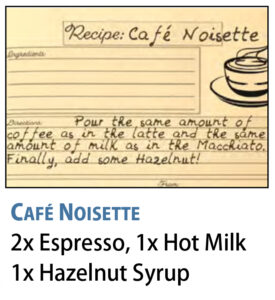

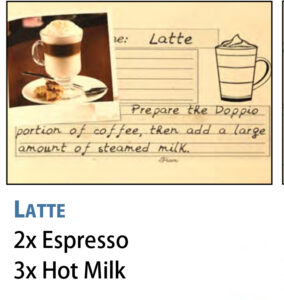


Please note, for all coffee orders with steamed milk, you’ll have to do latte art. Initially, I had trouble (as many reviews I’ve seen), but I do have some advice.
Take your time. This doesn’t need to be done in a rush, nor in a single connected line. The picture you get is random (plus there’s instances of a free-form). What I do is I look at my picture. and do the harder parts first. Hold the mouse down until your milk line is thick enough (instead of using a thin line and going over it multiple times). Keep in mind, sometimes your art could LOOK done, but if the SERVE button isn’t at the bottom of the screen, take a breather and look at the picture to see what could be missing.
Some people compare this puzzle to the name writing in Shadow At The Water’s Edge, and I do agree. (I found this puzzle easier than sewing Mrs. Archer’s dress in Secret of the Old Clock though). After this puzzle is completed, Patricie will give you a mysterious snowglobe. After this point, you can make coffees whenever you want by clicking the coffee machine (from the customer side of the counter).
Some coffee orders can be kind of vague, so you may have to play a bit. Also, some of the orders in Master mode can be a little more complicated.
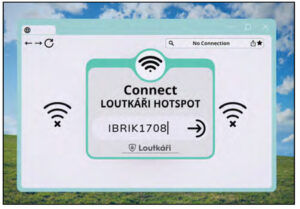
Explore the cafe. There is a item of importance on the wall to the left of the door. (It looks like a QR code, this has the cafe’s wifi password — you’ll need this later on in the game.
Let’s do some exploring! In the inventory, open the list that Adela gave Nancy. Click on Oskar’s name (this will add him into Nancy’s phone contacts) and SecondShine.de (this will open the Second Shine website on Nancy’s phone. Scroll to the bottom of the page and click on the Second Shine phone number to add it into Nancy’s phone contacts as well.
If it isn’t still open, open up Nancy’s phone, and click on Messenger. Please note: Although they’re phone contacts, Carson and Frank & Joe Hardy are unavailable for 90% of the game.
With the phone pulled up, call Hans Feiersinger (head of Second Shine) and talk to him completely. Call Oskar Devorak and talk to him completely as well. While Nancy’s phone is pulled up, click on the Unknown Caller and try to open the attachment (this is something we’ll solve soon). After that rather harsh interaction with Hans, try to call home to Dad (Carson). Nancy will leave him a voicemail. Since Carson wasn’t fully reachable, try calling Ned, but as you click on Ned, you see Nancy has started a text. Simply click the arrow to send.
Explore the cafe’s many books. Look for section 15. Alchemy. Hint: If you face the door, it’s in the left corner. Touch the rightmost book (it has a greyish cover) then take it.
Next, let’s work on decoding that coded text Nancy got from that Unknown. Look through all of the bookshelf sections and notice all sectiones aren’t just named (i.e. Romance, Mystery, Travel), but also numbered too (such as Alchemy was 15). Let’s look at that Unknown message again and see if we can break the code! The exact wording: Fall in love…with our past. Find your own way. Now let’s break that down.
Fall in love = Romance
With Our Past = History
Find Your Own Way = Travel
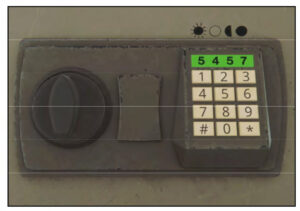
Now, browse the bookshelves until you find those 3 sections and make note of their numbers. Now open that Unknown text in Nancy’s phone. Click the attachment to get the combination lock. We need four digits, and those 3 clues will equal your code. In the combination, enter 1169 and click APPLY.
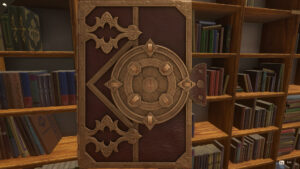
Nancy now has a map to a mysterious treasure! Now we have to figure out what this means. The map is of the cafe. Go to 10. Kafka and find a book that is also sealed with a combination lock.
This is a rather complicated puzzle. The gist is you have to input the numbers from that map into the lock. It’s also kinda a math puzzle.
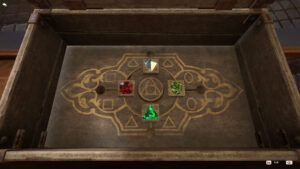
Look at the map again. The 1 and 4 are where West and East should be and the 3 and 6 are Southwest and Northeast. Notice those two circles on the bottom left corner of the map? This is the hint you need in order to solve for the rest of the numbers. Any two numbers in the outer ring added together will equal the one number in between them on the inner ring.
I know that sounds quite confusing, I learned that from the strategy guide. Below is the completed puzzle. When it’s complete, click the N in the very center with the arrow pointing up (North compass). Take the key inside the book.
Now it’s time to venture outside of the cafe. Leave through the door and keep going forward and right ahead until you reach the Exhibition Hall.
Enter the glass door on the right and meet Vladena. Talk to her fully.
Leave Vladena’s shop through the open arched door and walk straight across the hall to meet Oskar. Talk to him completely. Nancy will get a text from Ned. Open Nancy’s phone and in MESSENGER navigate to Ned. Press the send arrow to send the text Nancy has typed. Repeat this until Ned and Nancy’s text conversation is complete. Leave the Exhibition Hall, return to the cafe and call Ned. Talk to him completely. After Nancy hangs up, call Frank & Joe Hardy and talk to them completely.
After Nancy’s conversation with the Hardys, night falls. Enter the cafe and talk to Patricie completely. After Patricie asks, take the coffee she hands you over yo the man sitting across from the door (Leo) and talk to him completely.
Before leaving, check out the 2 pamplets left on the counter then leave the cafe.
Walk right, like you’re going back to the Exhibition Hall, but instead of going to the Exhibition Hall, take an immediate left to the alley.
This is Old Town. Go forward a few feet and turn left. Enter the shop Aparat. This is where Patricie sent you. Talk to Elka completely. Turn left and enter the Collectables side of Aparat. Talk to Elka’s grandfather Malek completely. Leave Aparat the same way you came, returning to the Castle Square.
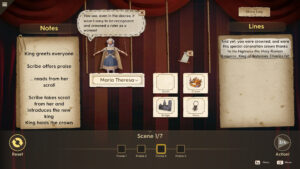
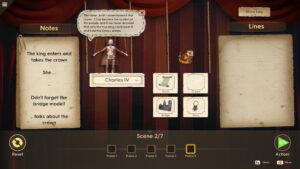
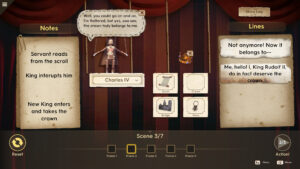
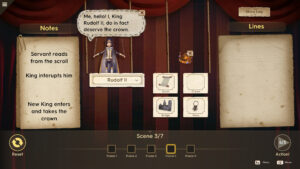
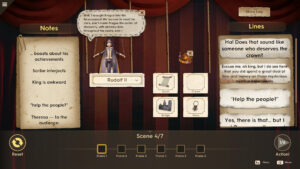
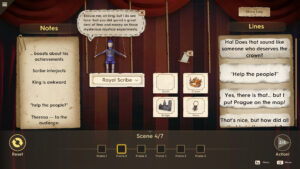
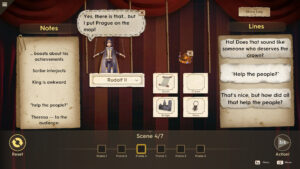
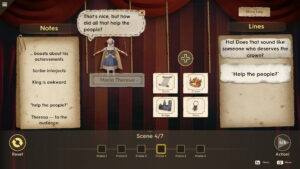
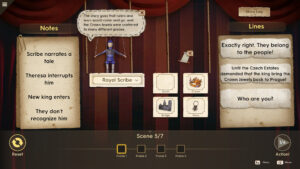
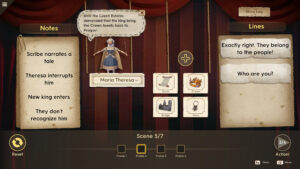
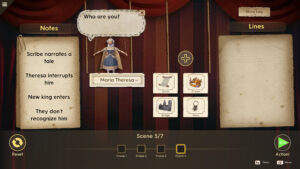
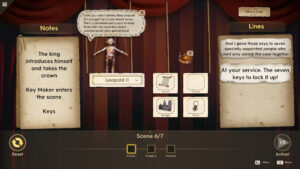
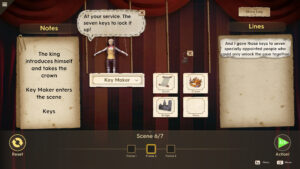
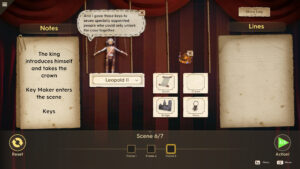
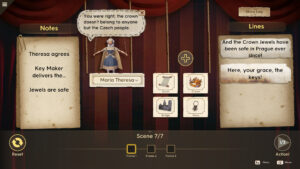
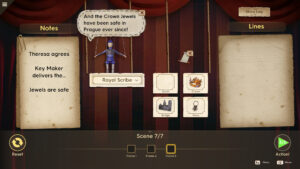
Go to the Marionette Theatre (green cart-type building) and talk to Radek. He will enlist Nancy’s help with his Marionette show. (insert groan on this, I didn’t care for this puzzle…and it’s SEVEN [four-six frames each] scenes!) The trick is to make the storyboard show the scene. Note: to switch between frames, click the frame you want to do at the bottom
Then click the green 4/4 arrow in the bottom right corner and if it’s right, Nancy will continue to scene 2. Do the exact same for scenes 2-7.
Scene 1:
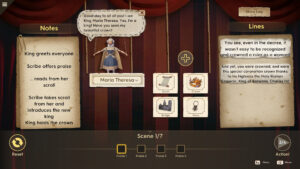
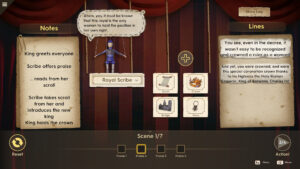
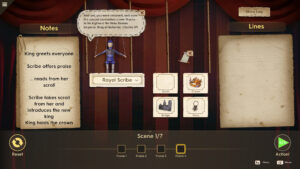
Scene 2:
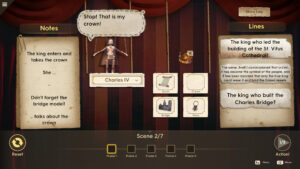


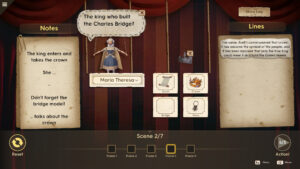

Scene 3:


Scene 4:

Scene 5:
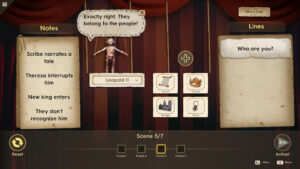
Scene 6:
Scene 7:

Go to the Exhibition Hall, to where you spoke to Oskar, but go to the back of the room and up the stairs. Follow the corridor and listen at the closed double door. After eavesdropping on Oskar and the Dean’s assistant, Nancy gets a text from the Hardys. Open her phone, click MESSENGER and read the text. Go to the cafe. Go to the table on the right side of the cafe (close to where you gave Leo his coffee) and pick up the lone computer charger (and click the take button). In the inventory, double-click the laptop from Elka, then click the charger on it. With the laptop on, click the email (envelope at the bottom). Now this is where Nancy has to connect to the cafe’s wifi. Click the white password field and type the wifi password from that sign on the wall (with the QR code). Note: Just like in real-world, it is case sensitive….the letters have to be uppercase.
Click the red attachment button to download the attachment. Click the X to close the email, the attachment downloads to the desktop. Note: everytime you have to access this file, you have to download it. Everytime you access it, you must do the CAPTCHA to prove Nancy’s human and not a robot (UGH! looks like a slider, but no, you swap neighboring pieces to make the photo.
Note: don’t fret if Nancy gets an error while doing the captcha — this is supposed to happen!
Nancy will cry out, so Patricie will come over and talk to Nancy. After talking to Patricie, go to Aparat. Nancy will see it’s closed, but Elka lets Nancy in. Talk to her completely.
While Elka’s gone, snoop in her stuff. Pick up the photo of her and her mom, turn it over and open it by clicking the four clips. Don’t forget to click her computer to look at it. Leave her area and snoop Marek’s desk since he’s not here. Open the drawer and click the set of keys and use them on the box to open it. Pick og the stamp and eggs to look at them. Be sure to look at his Will hanging up by the keys. Go back to Elka’s desk and she has just come back.
Talk to her full and at the end, Nancy will say she has to go. Before Nancy leaves, Elka shows her the Cyber Block program (I found this fun). This is the first puzzle with a big difference between Amateur and Master. This puzzle, no matter if you’re Amateur or Master, has 2 levels. You can make the moves either with the mouse or arrow keys, I found the arrows easier. In Amateur mode, both levels has 29 moves, In Master level 1 has 30 and level 2 has 31.
Amateur Mode:
Level 1
1. UP
2. LEFT
3. UP
4. RIGHT
5. UP
6. UP
7. UP
8. LEFT
9. UP
10. DOWN
11. RIGHT
12. RIGHT
13. RIGHT
14. UP
15. RIGHT
16. RIGHT
17. DOWN
18. RIGHT
19. DOWN
20. DOWN
21. LEFT
22. DOWN
23. DOWN
24. RIGHT
25. DOWN
26. UP
27. LEFT
28. LEFT
29. DOWN
Level 2
1. RIGHT
2. DOWN
3. LEFT
4. DOWN
5. DOWN
6. LEFT
7. DOWN
8. DOWN
9. DOWN
10. UP
11. UP
12. RIGHT
13. DOWN
14. RIGHT
15. RIGHT
16. RIGHT
17. DOWN
18. UP
19. RIGHT
20. UP
21. RIGHT
22. LEFT
23. UP
24. LEFT
25. UP
26. UP
27. RIGHT
28. UP
29. RIGHT
Master Mode:
Level 1
1. UP
2. UP
3. LEFT
4. UP
5. UP
6. RIGHT
7. DOWN
8. RIGHT
9. LEFT
10. UP
11. UP
12. RIGHT
13. UP
14. RIGHT
15. RIGHT
16. DOWN
17. RIGHT
18. RIGHT
19. DOWN
20. DOWN
21. LEFT
22. DOWN
23. LEFT
24. DOWN
25. RIGHT
26. DOWN
27. UP
28. LEFT
29. LEFT
30. DOWN
Level 2
1. RIGHT
2. DOWN
3. LEFT
4. DOWN
5. DOWN
6. RIGHT
7. DOWN
8. UP
9. LEFT
10. LEFT
11. DOWN
12. RIGHT
13. DOWN
14. RIGHT
15. DOWN
16. UP
17. RIGHT
18. RIGHT
19. RIGHT
20. DOWN
21. UP
22. UP
23. UP
24. RIGHT
25. LEFT
26. LEFT
27. UP
28. UP
29. RIGHT
30. UP
31. RIGHT
After the Cyber Security puzzle is done, Zane Garrett (the contact The Hardys connected Nancy to) will call Nancy and she puts him on speaker phone. Talk to him fully, and after the cutscene, Ned calls. Talk to him completely. After Ned hangs up, Adela calls. Talk to her completely, too.
Turn left and go to the Marionette Theatre and talk to Radek completely. Walk around the green marionette building to it’s east side and enter. Use the chisel on the toolbox to open it, and look at the papers inside (Radek’s new story). Be sure to look at all papers in the building. Leave and talk to Radek on more time.
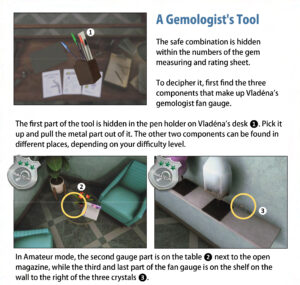
After leaving Radek, go talk to Vladena. After she leaves to talk to Oskar, break into her safe. The safe combination is a four digit code, each number is rather hidden in the office, and their locations differ depending on if you’re Amatuer or Master. I want to mention the code components aren’t just hidden, but it’s also a math puzzle! And also, the combination is the same numbers for Amatuer and Master. While looking around her office, don’t forget to make a note of the poem on a glass plaque hanging on the wall (we’ll need this later).
Amatuer:
Master:
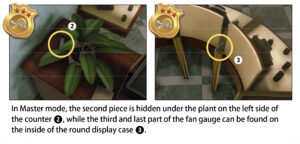
In Master, step one is the same locale, here’s 2 & 3:
After all three components are collected, merge them together in your inventory by combining the 3 pieces in inspection mode. Then, rotate the pieces of the fan gauge to bring them into the position
that matches Vladena’s sketches on the desk.
Move the elements as shown in thepicture so that a straight continuous line is formed. When the parts snap together, the tool is aligned correctly. Now you’re ready to check out the gem poster! Go over to the sheet and use the fan gauge on it. On Master Sleuth, you must first rotate it (see picture). Then, you can move the device freely over the table. On two of the three ruler parts there are mathematical equation.
You have to find the values on the sheet that make the equations true. Use the colors on the tool as placement hints.
The correct solution to this is: (4.5 x 3) x 4 ‒ 9 = (7.5 x 6) (7 x 5) x 2 = 10 x (7) 46
To extract the final numbers from the equations, first check out the middle sketch on Vladéna’s desk. It will give you some crucial hints about the marks on the fan gauge.
Next to each colored cutout on the gauge, there are up to three tickmarks. Solve the equations in each cutout and use the tickmarks to discern which digits of the solution to take for the safe code.
Awesome, you now have 4 numbers! They need to be put in the correct order to open the safe. Go inspect the safe and notice the symbols above the keypad.
Head back to the countertop with the sketches on the desk. One of them shows the same symbols as on the safe ̶ the sun and moon in different phases, pointing to specific fields on the fan gauge.
Order the numbers you found in the last step as shown above the keypad to get the correct safe combination (turn the round kn=nob to open safe door):
Click the papers on the middle shelf and take the DEGAS file. Back away and go back to the middle of the room and Vladena will come back. Talk to her. Go back to the cafe and load up Nancy’s computer. Another Captcha puzzle to get in (and prove Nancy isn’t a robot)! This one you will complete.
The purose of this puzzle is to compare the written file and the DEGAS file. click the right arrow twice to go to page 3, then drag a line to the similaries.
After Nancy comments that the date is different, return to Vladena in the Exhibition Hall, and talk to her completely. After the conversation, Nancy gets a text from the Hardys, open her messenger and read the text and click the send arrow to reply. Then call Zane. Talk to him completely.
Go to Oskar’s area and updstairs to that door you heard Oskar’s arguement with the Dean’s assistant earlier. Now Nancy can go inside. Search the assistant’s desk fully, using the knife on the envelope (take and read the letter inside. Leo is the Dean!!!!). Then move onto the Dean’s inner office.
Go to Leo’s desk and move the potted plan to reveal a paper (Faith Weekly). Look at it, then back away. Open the folder to the right and click the pen. Then click the pen holder just to the right to put it away. This will open the drawer. Click the magazine in the drawer. This is actually Leo’s calendar. Now let’s work on freeing the cat that’s meowing!
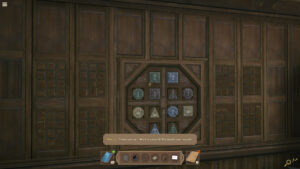
Turn around and look at the ornate design in the wall. This puzzle, in a way makes me think of the Bento boxes in Shadow of the Water’s Edge (the clues are on the side, just not in an order that’s spelled out).
This is the best screencap I could get in-game (first picture). The second is a little clearer, so I added it too (it’s cropped from the strategy guide)

Turn to the left and see Leo’s cat! She’s not caught behind the bookcase anymore. Walk over and pet her, then enter the bookcase tunnel.
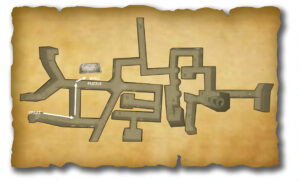
The tunnels are being patroled by a dark and deadly figure, so try not to get lost. Here’s a map to help you escape!
After Nancy escapes, she will immediately call the Police. After the call with the police, Adela messages Nancy. Read her message then go meet her at the cafe.
After go at Cyber Block! (this time level 1 in Amatuer is 26 moves, level 2 is 30 moves and level 3 is 37 moves. In Master mode, level 1 is 31 moves, level 2 is 29 moves and level 3 is 38 moves.
Amatuer:
Level 1
1. LEFT
2. DOWN
3. LEFT
4. LEFT
5. RIGHT
6. RIGHT
7. DOWN
8. RIGHT
9. UP
10. RIGHT
11. LEFT
12. DOWN
13. DOWN
14. DOWN
15. LEFT
16. DOWN
17. UP
18. UP
19. LEFT
20. LEFT
21. UP
22. LEFT
23. RIGHT
24. DOWN
25. DOWN
26. LEFT
Level 2
1. UP
2. RIGHT
3. UP
4. RIGHT
5. UP
6. RIGHT
7. UP
8. LEFT
9. UP
10. DOWN
11. RIGHT
12. RIGHT
13. UP
14. RIGHT
15. UP
16. DOWN
17. LEFT
18. DOWN
19. RIGHT
20. DOWN
21. RIGHT
22. LEFT
23. LEFT
24. DOWN
25. LEFT
26. DOWN
27. DOWN
28. RIGHT
29. RIGHT
30. RIGHT
Level 3
1. RIGHT
2. UP
3. UP
4. LEFT
5. UP
6. LEFT
7. RIGHT
8. DOWN
9. RIGHT
10. RIGHT
11. RIGHT
12. UP
13. UP
14. LEFT
15. UP
16. LEFT
17. LEFT
18. UP
19. LEFT
20. RIGHT
21. DOWN
22. RIGHT
23. RIGHT
24. DOWN
25. RIGHT
26. RIGHT
27. UP
28. RIGHT
29. LEFT
30. DOWN
31. LEFT
32. DOWN
33. DOWN
34. DOWN
35. DOWN
36. RIGHT
37. RIGHT
Master
Level 1
1. LEFT
2. DOWN
3. DOWN
4. RIGHT
5. UP
6. RIGHT
7. LEFT
8. LEFT
9. LEFT
10. LEFT
11. DOWN
12. LEFT
13. RIGHT
14. UP
15. RIGHT
16. RIGHT
17. DOWN
18. LEFT
19. DOWN
20. DOWN
21. RIGHT
22. RIGHT
23. UP
24. RIGHT
25. LEFT
26. DOWN
27. LEFT
28. LEFT
29. LEFT
30. LEFT
31. LEFT
Level 2
1. UP
2. RIGHT
3. UP
4. RIGHT
5. UP
6. RIGHT
7. UP
8. LEFT
9. UP
10. DOWN
11. RIGHT
12. RIGHT
13. UP
14. RIGHT
15. UP
16. DOWN
17. LEFT
18. DOWN
19. RIGHT
20. DOWN
21. RIGHT
22. LEFT
23. LEFT
24. DOWN
25. DOWN
26. DOWN
27. LEFT
28. RIGHT
29. RIGHT
Level 3
1. RIGHT
2. UP
3. LEFT
4. UP
5. UP
6. LEFT
7. UP
8. UP
9. UP
10. RIGHT
11. RIGHT
12. UP
13. DOWN
14. DOWN
15. DOWN
16. RIGHT
17. DOWN
18. RIGHT
19. DOWN
20. RIGHT
21. LEFT
22. UP
23. UP
24. RIGHT
25. UP
26. RIGHT
27. UP
28. RIGHT
29. UP
30. DOWN
31. LEFT
32. DOWN
33. DOWN
34. RIGHT
35. DOWN
36. DOWN
37. DOWN
38. DOWN
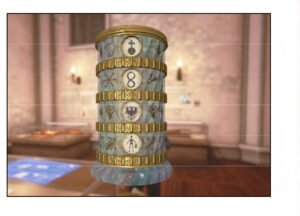
After helping Adela with Cyber Block, talk to her completely. After leaving Adela, go talk to Patricie completely, then leave the cafe. Go visit Oskar in the Exhibition Hall. Talk to him fully. When there’s nothing else to talk about, turn left and look at the cylindrical artifact.
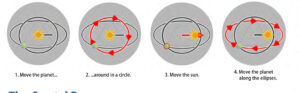
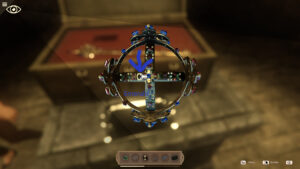
Looking at the top, move the round marble in a circle, flip the sun ensconed mable to the side, then rotate the other marble around the oval. When you’ve done this right, Nancy will make a comment about Keplar’s Law in action. (I know I didn’t explain it well….here’s the diagram from the guide):
Now we need to solve the other half of this puzzle, the four rotating discs!
There is a clue to this here in the Exhibition Hall, but not in Oskar’s area. When you were in Vladena’s office looking around, did you look at the glass plaque hanging on her wall? If not, no worries. You can just leave Oskar’s area and run across the hall to Vladena’s office and look for that plaque. Once you know you have seen the plaque, return to Oskar and look at that artifact again.
When you have all of the symbols right, click the gold symbol with a crown at the bottom to open the artifact.
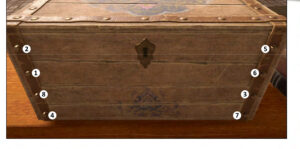
Leave and go to Aparat and talk to Marek completely. He gives you permission to open the old wooden trunk in the window. Pan left and go look at the trunk. This is essentially an old puzzle box! The right and left side each have a darker circle that look like tree knots. Click on each of those (one per side). This will pop out the bolts in the metal banding on the front. You have to click these in a specific order.
Nancy will make a mention of the symbol carved inside the trunk. Now let’s move on! Did you notice the haunted tour poster outside Oskar’s? Return to the Exhibition Hall, but instead of just going inside Oskar’s area, click the poster.
Note: to start the tour, the poster needs clicked twice total, once for Nancy to read it, and once to start the tour. Take notice of the numbered paintings with the speaker icons. You must visit these in a particular order and click the speaker to hear them.
- Charles Bridge
- Mad Barber
- The House Of Rosenberg
- Dalibor Of Kozojedy
- Daliborka Tower
Before finishing the tour, however, go to that cylindrical artifact we opened a little while ago. Now that Oskar’s not here, borrow the gems.
Go back to that poster and click it again to exit the tour. Go back to Aparat and enter Marek’s workshop, and over to his trunk.
Place the blue diamond (or is it a sapphire?) in the hole on the right side.
Then place the red square gem in the square hole at the top and the green triagular gem in the triangle hole at the bottom.
The trick to this last level, is to get the gems in the right place (by the shape carvings). When they are in the right order, bring the sapphire forward and the middle circle will pop up. Click on it.
This is how they should look:
The front drawer of the trunk pops open, take the key.
Now it’s time to go back into the tunnels, but first thing’s first! That key from Marek’s trunk, it fits the snowglobe Patricie gave you. So in inventory, double click the snowglobe and turn it over. Use the key on it.
Open Nancy’s Phone and click on Ned. See that Nancy has typed a text. Click send. Again, do this until Ned and Nancy’s texts are done.
Go back to the castle courtyard, just outside of the Exhibition Hall.
Now we’re going back into the tunnels, but this time NOT via the dean’s office. This time we’re going in by the way of the ramp we came out of last time.
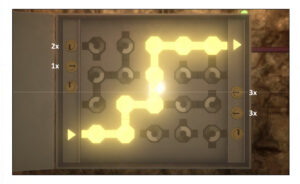
Look at the tapestries on the walls until you find the one that looks like the image on the snowglobe. This one will have an indentation in the framing on the bottom right corner.
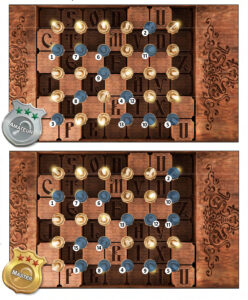
Use the snowglobe on the indentation. Nancy will immediately turn it (like a key!) This will unlock a light puzzle. This light puzzle is trickier than any of the lightbeam ones from previous games. Some of the light anchor’s are two-sided, some are three-sided and one is even four sided! (also, some may need rotated too!) Below is the completed puzzle.

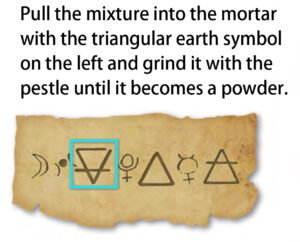
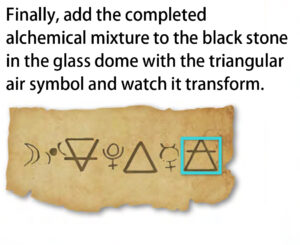
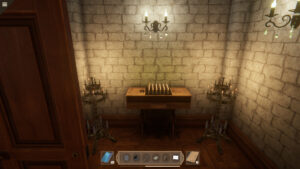
This is the old Alchemy lab! Walk around to the table (desk) and pick up the black stone in the center and take it. Click the book on the left side of the desk. Move the transparent page to the right and rotate it (right-click) five times.
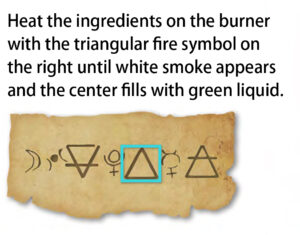
Go to the other side of the room to the worktable. Nancy will automatically place the black stone inside the dome. Now we need to find a way to open it.

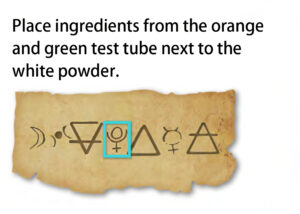
Move the white powder back into the black dish in the middle to continue.
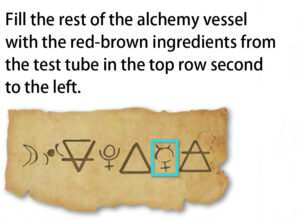
Back away so Nancy can open the dome and take the stone. Go around the table to the cabnet. Click the inner-most wheel to the right twice, the middle wheel to the left once and the outside wheel to the right 4 times.
In the bottom left, move the gems to look at the parchment they’re sitting on. Take the coin.
Open the top center drawer. Take the book. At the bottom right, look at the looking contraption
Now it’s time to leave the lab, but you can’t leave the way you came.
Note: the exit ladder is HARD to see. Look along the right wall.
After Nancy’s escape, Adela calls. Talk to her completely and she’ll send Nancy a text, so open Nancy’s phone and go the messenger and hit send to reply. Take the time to check the messages from Patricie (she has nothing) and Ned (hit send until there’s nothing else to say).
Go to the cafe and leave the journal behind the counter by the register.
Message Patricie and let her know about the journal, then call the police and check back about Leo.
Go outside and talk to Radek at his Marionette Theatre.
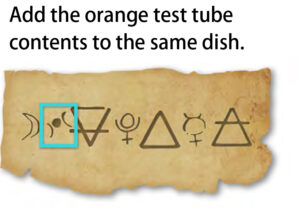
Go inside the cafe, and stop off and talk to Patricie first, then go wait for Adela at her table. While Patricie has Adela busy, snoop in Adela’s bag. Move the newspaper and scarf and look at her scrabblebox. The trick is to spell out the words: JEWEL SPIRE CLOCK
After talking to Adela fully, call Zane. After the call, go talk to Patricie fully. Open messenger, and text Ned until there is nothing else to say.
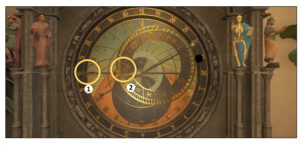
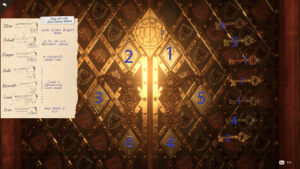
Go to the clock across the room and to the left of the counter. Look at the wheel with the four figures and what looks like a tuning fork. The wheel should match November (match the picture here) and the strip of numbers in the fork should have the arrow pointing to the 1.
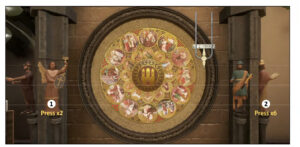
Next opens a role with a line. This puzzle is different from Amatuer and Master….and the line isn’t connect so I don’t understand it’s mechanics.
Now back up and look up at the top wheel of the clock. For this one, you have to set the date for Rudolf IIʼs coronation.
Take the key and look up to the very top of the clock and use that key on both keyholes.
Leave the cafe and go to the Exhibition Hall. Click the Haunted tour poster again and enter.
This time, ignore the tour voiceover and go directly to the knite in shining armor by the stairs. Click on him to activate the turning points. Now rearrange him (in the end he’ll look like he’s playing the violin).
Then click his helmet to open it. Take the paper inside.
Now, exit the tour, but stay inside the building. Go upstairs like you’re going to the dean’s office, but instead of going to his office, look at the small table of candles to the right of his assistant’s outer office.
Use the coin on the symble on the left. The symbol on the coin means copper, and in the magazine in Leo’s office, Faith Weekly, we saw the latin spelling of it is CUPRUM. So the object here is to have ONLY those symbols lit up (all else dark). Note: the darker round spot on the right is a reset button
This opens a drawer with the last missing page! So take it.
Leave the building and find yourself in a darkened, spooky courtyard. Nancy’s Messenger chimes. Open the message from Ned and reply until there’s nothing left to say.
Go towards the cafe, but stop at the outdoor seating. Turn around and go towards the other white umbrella seeting, then turn right towards the alley.
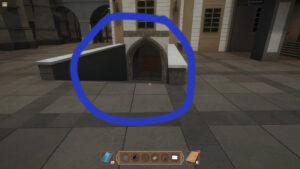
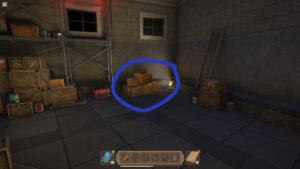
Look left at the boxes and take the green screwdriver. Now go to that gate that the above photo points to and use the screwdriver to pick the lock. (I like the method of lockpicking in this game better than in the previous game, personally). The trick here is to click when the white disk is in the green area (for all pins)
Go forward and turn left. Go to the table and take the hammer. Return right and go over to the pile of boxes and take them.
Turn left to the scaffolding (stairs) and go all the way up. See the white outlined boxes up here? Place your inventory boxes here (4 times). Go the side you did not come up on. Look down at the latches. Use the hammer on them. (There’s a total of 3 latches.
Turn left and see the white square on one of the boxes? Walk to it and touch it. Nancy will put her phone there.
After he unmasks himself, talk to Radek completely. Marek will join into the conversation. After the conversation, Nancy, Marek and Radek will be in Marek’s workshop.
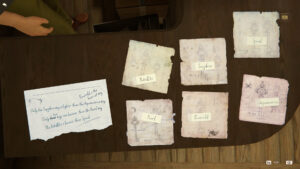
Match the six lables to the six key schematics.
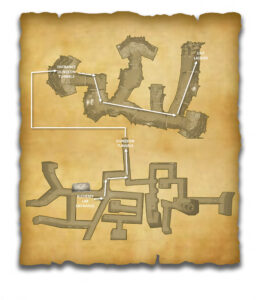
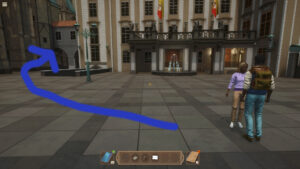
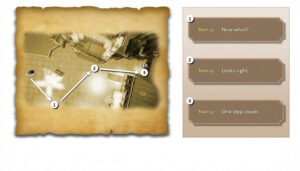
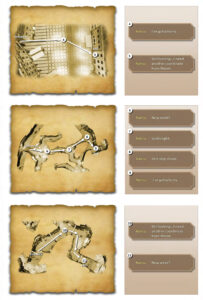
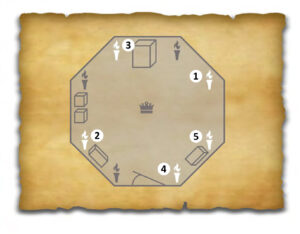
Watch the cutscene. Nancy will have to deliver the bag to the dead-drop location (the base of the Statue in the Castle Square, then track it. This is one puzzle that gave me fits. Below are images with the 14 locations Nancy must go to (I cropped them from the guide to include what Nancy says, so you know if you’re right on spot….some can be a little finnicky. Note: At spot #5, click on the door!!! I want to emphasise that because in my second play through I kept forgetting that and got stuf for an hour before I remembered it
Eventually this takes you back to the tunnels under the Exhibit Hall. Navigate to the Lab Entrance and re-open the door with the snowglobe (this time you do not need to do the light puzzle again).
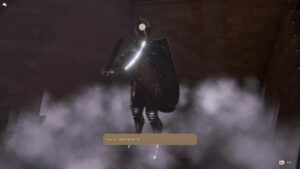
Inside, you will confront the villain, who throws a smoke bomb at Nancy.
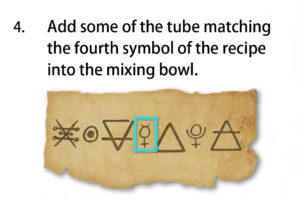
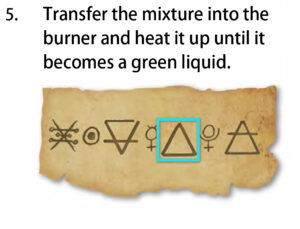
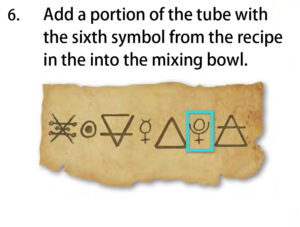
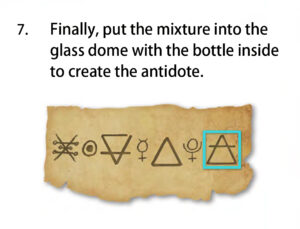
Turn around and grab the bottle and go to the alchemist work table. Place the bottle inside the dome and look up at the papers hanging with ther herbs.
Follow the recipe to make the antidote (it will be RED. Make sure to click the antidote so Nancy will drink it.
Go around the workbench to the door Vladena left open and go through. Follow the passage, but before going to the wooden door, turn left to the alcove, and then another immediate left to the desk. Click on the computer to video call Elka & Marek.
Take the gems, then go to the wooden door and go through.
Look at the golden door and take the bag at the bottom left then click on the golden door.
First we keed to get the keys all in the correct keyholes.
To begin, click the key labeled 7 in it’s stop on the top and turn, now place 1-6 in their correct spots. When done, turn the top key again. If they’re right, Nancy will make a comment about turning them in order, so turn them 1-6.
Walk forward to the locked door, but first we have to restore power to the panel. Look at the grey power box at the bottom left. Watch the cutscene and talk to Elka completely. When gameplay resumed, click on the grey power box. This is the powergrid for the door. You need to create a continuous circuit from the bottom left to the top right.
Now go right, to the door. This is the final round of Cyber Block.
Amateur
Level 1
1. UP
2. RIGHT
3. UP
4. UP
5. LEFT
6. UP
7. UP
8. RIGHT
9. DOWN
10. RIGHT
11. RIGHT
12. LEFT
13. LEFT
14. UP
15. UP
16. RIGHT
17. RIGHT
18. RIGHT
19. DOWN
20. RIGHT
21. RIGHT
22. UP
23. DOWN
24. LEFT
25. LEFT
26. DOWN
Level 2
1. UP
2. RIGHT
3. UP
4. UP
5. LEFT
6. UP
7. DOWN
8. DOWN
9. LEFT
10. LEFT
11. DOWN
12. DOWN
13. LEFT
14. RIGHT
15. UP
16. UP
17. UP
18. UP
19. LEFT
20. RIGHT
21. DOWN
22. RIGHT
23. LEFT
24. UP
25. UP
26. RIGHT
27. DOWN
28. RIGHT
29. RIGHT
30. RIGHT
31. RIGHT
32. LEFT
33. LEFT
34. LEFT
35. LEFT
36. LEFT
37. LEFT
38. RIGHT
39. DOWN
40. DOWN
41. LEFT
42. LEFT
Level 3
1. UP
2. LEFT
3. UP
4. RIGHT
5. UP
6. LEFT
7. UP
8. RIGHT
9. UP
10. LEFT
11. UP
12. UP
13. RIGHT
14. UP
15. RIGHT
16. DOWN
17. RIGHT
18. RIGHT
19. RIGHT
20. UP
21. UP
22. RIGHT
23. LEFT
24. LEFT
25. LEFT
26. UP
27. UP
28. RIGHT
29. UP
30. DOWN
31. RIGHT
32. RIGHT
33. UP
34. LEFT
35. UP
36. UP
37. UP
Master
Level 1
1. LEFT
2. UP
3. RIGHT
4. UP
5. RIGHT
6. LEFT
7. UP
8. LEFT
9. UP
10. RIGHT
11. UP
12. RIGHT
13. RIGHT
14. DOWN
15. DOWN
16. UP
17. UP
18. LEFT
19. UP
20. RIGHT
21. RIGHT
22. DOWN
23. DOWN
Level 2
1. UP
2. UP
3. UP
4. RIGHT
5. UP
6. DOWN
7. LEFT
8. LEFT
9. DOWN
10. LEFT
11. UP
12. LEFT
13. UP
14. LEFT
15. RIGHT
16. DOWN
17. RIGHT
18. LEFT
19. UP
20. UP
21. RIGHT
22. DOWN
23. RIGHT
24. RIGHT
25. RIGHT
26. RIGHT
27. LEFT
28. LEFT
29. LEFT
30. LEFT
31. UP
32. UP
33. UP
34. LEFT
35. RIGHT
36. UP
37. UP
38. LEFT
39. LEFT
40. LEFT
Level 3
1. RIGHT
2. UP
3. LEFT
4. UP
5. RIGHT
6. UP
7. LEFT
8. UP
9. RIGHT
10. UP
11. LEFT
12. UP
13. UP
14. RIGHT
15. UP
16. RIGHT
17. DOWN
18. RIGHT
19. RIGHT
20. UP
21. DOWN
22. RIGHT
23. RIGHT
24. UP
25. LEFT
26. UP
27. UP
28. RIGHT
29. UP
30. UP
31. DOWN
32. LEFT
33. LEFT
34. UP
35. RIGHT
36. UP
37. UP
38. UP
Listen to Elka’s villainous monologue, and talk to her fully. Nancy automatically takes Elka’s taser ring. Enter the room with Vladena and finally find Leo.
After the conversation, notice the gems, crown and the scepter in the padded box and the pouch. Pick up the crown. You need to put the gems on the crown, Nancy will comment if a gem is in the right place. Note: only red and blue gems are on the outside, the one emerald goes near the top. Be sure to rotate all gems that you add three times.
The eyeball in the top left is Vladena watching Nancy, when it isn’t on the crown (the spotlight not shining on the crown), add the taser ring.
Now let’s escape! To open the secret exit, we have to touch specific candles.
Go through the secret exit. Have a brief conversation with Leo, leaving him with his cat at the foot of the spiral stairs. Take the hallway to the right of the stairs. Follow it to the locked door, and now Nancy can pick this lock with her green screwdriver, then exit through this door.
Watch the cutscene and Nancy will eventually return to the cafe and Zane meets with her and Adela.
After all of the ending scenes, check Nancy’s messages. I usually save here, because you have a choice for the ending. Nancy has to call and check in with either her dad (Carson) or Ned, so I save here so I can see both endings.