Nancy Drew – Secrets Can Kill: Remastered
While on vacation in Florida, a student named Jake Rogers was killed at Paseo del Mar High School. Beech, an undercover detective asked Aunt Eloise if Nancy can go undercover and investigate the murder.
Aunt Eloise’s home:
Foyer: Look close at the note on the table under the mirror.
Read Aunt Eloise’s note: the key to the library is in the safe. There’s an underlined warning – Remember not to enter in a wrong combination.
Open the right drawer. Read the Sigma Phi Kappa Delta Sorority invitation.
Take the coin left of the calculator. A flashing light shows-denotes the coin. It is seen at top left of the screen. If you get all the coins, you might get an award.
Hallway: Look close at the tapestry at end of the hallway left of the table.
Safe: Move the tapestry and see a safe. The lock pad has Greek letters buttons.
Enter the name of the sorority by pressing Sigma Phi Kappa Delta.
Take the library key on the safe door.
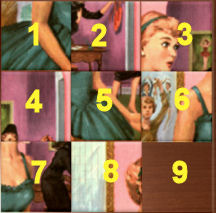
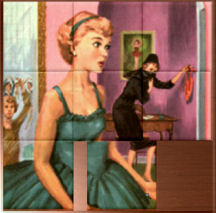
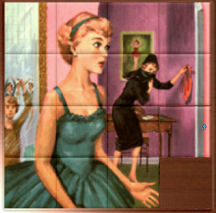
Wooden box: Look close at the wooden box.
Click to open the box and see a slider. Arrange the tiles to form the picture on the cover.
Junior:
Click on the numbered positions of the tiles. One possible solution:
6 5 8 7 4 1 2 5 8 7 4 1 2 3
6 5 8 7 4 1 2 5 8 9 6 3 2 1 4
5 8 7 4 5 8 9 6 5 8 9
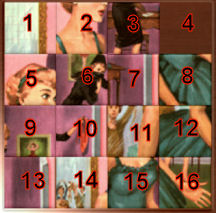
Senior:
Click on the numbered positions of the tiles. One possible solution:
3 2 6 5 9 13 14 15 16 12 8 4 3 2 6 5 1 2 6 10 9 13 14 15 16 12 8 7 6 10 11 12 8 7 6 10 11 12 8 4 3 7 8 4 3 2 1 5 9
10 6 7 8 12
16 15 14 10 11 15 16 12 11 10 9 13 14 15 16 12 11 10 9 13 14 15 16
Read the note and learn the school computer’s info:
Login name: Eloise Drew
Password: O Wise Elder
Living room: Enter the room right of the main door.
Side table: Look close at the end table right of the sofa. Open the drawer.
Take the coin at the very back behind the envelope.
Read the note pad and learn about Jake and library books out of order. So Jake worked at the library.
Books: Pan left and look close at books on table under the window.
Read the Hidden Clues are Everywhere book. Learn about The Haunted Ghost Bridge.
In close up of the table, pick up the coin behind the sofa at right.
Chest: Open the chest left of the entryway.
Take coins from the rolled white blanket sat right side.
Book case:
Look close at right side of the book case.
Take one of the red books at right side of the book case. See a secret compartment inside. Take the Teacher’s lounge key.
Open the middle cabinet and see a TV and video recorder-player.
Look close at left side of bookcase. Take coin from the World Almanac space at right side.
Exit the living room.
Take coin from the lamp on the wall left of the main door.
Detective Beech: Click the main door to exit the house and get a call from Detective Beech.
His cover is Uncle Steve. He is at Maxine’s Diner wearing glasses and striped shirt. Exit through main door.

Maxine’s Diner:
Select Maxine’s Diner on the map. Enter the diner.
Detective Beech: Turn left and forward to the man sitting in a booth.
Before reaching the booth, take the coin on top of the mustard jar on the table at right.
Talk to Detective Beech and learn about the murder of Jake Rogers. Jake was pushed down the stairs and had lots of money in his bank account.
Menu: Go forward to the other end of the diner by the door.
Check the menu on the table at left (or by the door). See that certain letters are in different colors.
Red: His
Green: Journal
Blue: is my
Pink: Cash Cow
Xe: R3 is written by the dessert menu.
Jukebox: Check the jukebox. See NANCYDREW written in reverse as the label of the jukebox. You can use a coin if you want listen to some records. Click on the coin slot and the automatically the coin is inserted. If you play all the songs, you might win an award.
Barnacle Blast: You can play Barnacle Blast on the left if you want. If you reach the last level, you might win an award.
Daryl Gray: Talk to the young man behind the counter. Daryl is the student council president at the high school. He mentions the death of Jake.
Behind him is the menu board. Some letters on the right side of the board under the main headings are in red: b o l t c u t t e r. Later in the game when Daryl leaves, the left side shows red letters that form: s o u p l a d l e.
Daryl flirts with Nancy. If you select enough dialogues that rebuff Daryl’s flirting, you might get an award.
Kitchen: Enter the kitchen through the double doors on the left.
Pan left and check the black tub under the spill sign. Take the soup ladle.
Pick up and read the crumpled note on the left of the tub. Connie breaks a dance date with Daryl.
Pan right and look close at the tomatoes on the cutting board. Watch out is etched on the cutting board.
Bolt cutter: Look under the table with the tomatoes. See a bolt cutter propping a pipe.
Take the bolt cutter and see the pipe leak. Use the soup ladle as replacement pipe prop for the bolt cutter.
Work schedule: Pan right and look close at the work schedule on the center wall shelf.
The last entry is Te: L3
Click on the torn part at bottom right and Nancy comments on it.
There is a set of letters at the bottom.
Rearrange them by reading the letters one from top line and one from bottom line and then top, bottom…
Check yer eyesight in gym.
Closing procedure: Look close at the paper tacked on the fridge at right.
See Jake’s note. There is a line of numbers at the bottom and Hg: L3.
The first number is the line on the note and the second number after the period is the position of the word on that line.
1.3 (Daryl), 8.9 (brings), 6.7 (secrets), 4.4 (to), 5.4 (diner.),
4.4 (to), 12.5 (get), 4.9 (the), 8.5 (cash), 13.6 (for), 4.6 (a), 10.8 (life), 14.5 (so), 4.10 (finer).
Daryl brings secrets to diner. To get the cash for a life so finer.
Exit the diner.
Paseo del Mar High School:
Enter the high school and look around.
Jake Rogers’ locker:
Turn left from the main display and forward to front left hallway.
Look close at the locker with the torn police tape at left.
Pick up the coin on top of the padlock of the locker left of Jake’s.
Combination lock: See a padlock that needs 4 numbers.
Open the cell phone; click and select phone. Check the numbers that form the name JAKE.
Enter 5253 on the padlock.
See an empty video case.
Pull out and read the English Essay book. A Treatise on Etiquette by Prudence Rutherford is marked with a piece of paper.
Read the Judo Today magazine. Read about the unknown last minute entry that won the 5th annual men’s judo tournament.
Move the cursor to bottom of screen and look down. Pick up the coin on the hinge of the locker door and the newspaper. Read about a break in at the Drug Station Pharmacy. Several vials of Hectinol were taken.
Bulletin boards:
Left locker-front hallway: Turn left and look close at the bulletin board.
See a white note. The letters-words are read right to left.
Up, down, left, right
The first letters will help my plight.
He: u2
Front left side hallway: Turn to the left and turn the corner. Look close at the bulletin board.
See that Hal Tanaka is the honor student of the month.
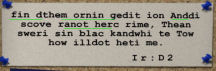
See another note above Hal’s picture.
Form the words by using the next set of letters with previous words.
find the morning edition And discover another crime, The answer is in black and white to who will do the time. Ir: D2
Go forward and take the coin on top of the trash bin on the right.
Back left side hallway: Look close at the bulletin board.
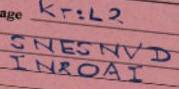
Read the pink call note at right side of the board.
Kr: L2
The letters are scrambled to form a cryptogram.
Sinners on a vid.
Right of Gaiser Gym: Go forward to end of hallway and turn right. Look close at the bulletin board at left.
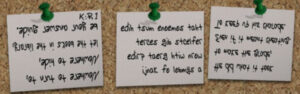
See 3 white notes.
K: R1
The left note is upside down.
Nowhere to turn to,
Nowhere to hide,
let the books in the library,
be your guide.
The middle note has words written from right to left and bottom to top.
a symbol of kanji
worn with great pride
reflects big secrets
that someone must hide
The right note is upside down and written from right to left.
He did what it took
to make the grade,
Even if it meant cheating.
To keep up his charade.
Left of the women’s rest room:
Take a coin from the racket in front of the closed sports equipment window.
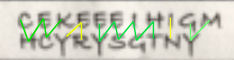
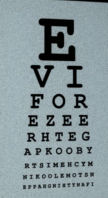
Eye chart: Remember the clue seen at the diner’s work schedule.
Look close at the eye chart left of the big bin.
Read the eye chart from bottom up and right to left.
If anything happens to me look in my chemistry book page three zero five.
Hector Hulk Sanchez:
Turn around from the eye chart and talk to the young man wearing a jersey with the number 80.
Judo poster: Turn to the right and look close at the Self Defense poster.
The Crane School of Self-Defense has judo classes for men and women of all ages.
Soda machine: See soda machines on the right. If you drink a lot of soda, you might win an award.
Bulletin boards continued:
Outside the library: Turn back to hallway and go left at the back hallway.
Go forward to the display outside the Memorial Library.
Check the student art exhibit boards. Take a coin from the woman in silhouette’s magnifying lens.
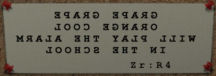
Left library board: Look close at the bulletin board left of the library door.
The note at left side of the board is written from right to left in reverse.
Grape grape
orange cool
will play the alarm
in the school
Zr: R4
Right library board: Look close at the bulletin board right of the library door.
The note at right side of the board is written in numbers.
Count off the letters in the alphabet to decipher this note.
cool, cool
pop, spot
grape Y: D3

Hal Tanaka:
Go forward to the Study Dome at end of right hallway. Talk to Hal. He wants to be a doctor.
Bulletin boards continued:
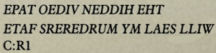
Study Dome board: Look close at the bulletin board at left end of the windows.
Check the Paseo HS news left of the Earth Day poster.
The note is written in reverse and right to left.
The hidden video tape will seal my murderers fate.
C: R1
Pick up the coin on the floor left of the trash bin.
Turn around from the board. Take a coin 2 tables right of Hal.
Take coin from top of the recyclable cans bin.
Pan right and take the coin top of the fire extinguisher at right.
Back right hallway: Enter the hallway right of the recyclable cans bin.
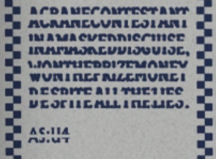
Check the bulletin board at left. Look close at the blue and white note under the Get Involved sign at right side.
The words are separated at the center by clear line.
A crane contestant in a masked disguise, won the prize money despite the lies. AS: U4
Front right hallway: Go forward and take coin from the left drinking water fountain.
Look close at the board right of the entrance of the student’s lounge.
Look close at the Senior Essay Contest note.
Certain letters are underlined. Combine them to form words and then sentences.
put elements in order to open puzzle Zn: D1
Student’s Union board: Turn around. Enter the lounge between the 2 bulletin boards here at the right hallway.
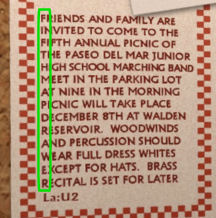
Look close at the bulletin board at right. Look close at the pink note partly covered by the Victory sign at bottom left.
Read the words formed by the first letters of each line.
Fifth map drawer La: U2
Take a coin left of the potted plant by the Student of the Month picture board.
Magazines: Turn around and see the magazine rack.
Take coins from 3 magazines at bottom rack.
Soda machine: Look close at the soda machine.
Remember the clue noted on the right bulletin board outside the library.
Do not add any coins or click on the coin slot of the machine.
Press cool, cool, pop, spot, grape.
Take a confidential Easter egg. Also get 80 coins added to your stash.
It is best not to try the clue noted on the left bulletin board outside the library. That one states the alarm will set off. The school monitor is here.
If you find a combination of buttons that works other than the above code, you might win an award.
Take the coin beside the phone book below the Tony’s pizza sign.
Take the coin on the floor at the corner left of the entryway.

Connie Watson:
Talk to Connie, the school monitor. Talk to her several times until Nancy stops the conversation.
Learn about Daryl, Hal and Hulk.
Teacher’s lounge:
Try to enter the Teacher’s lounge door left of the bulletin board and Connie stops you.
Maintenance room:
Go to hallway and turn left. Go forward until the end.
See a door on the left with a Braille keypad.
Take the coin on the floor right of the double doors.
Bulletin boards continued:
Right front hallway: Turn around and go left.
Take the coin on the white tile on the floor under the fire extinguisher on the left wall.
Look close at bulletin board. Check the note left of the Drama poster.
Student files under lock and key will show the lies of the doctor to be Hf: L1
Hal Tanaka:
Go back to Hal at the student’s dome. Talk to him again about everyone.
Learn about Hulk’s injury and the bankruptcy of Daryl’s father.
Hulk Sanchez:
Go back to Gaiser Gym at other side of the building. Talk to Hulk about the other students.
Get Connie the monitor out of the student’s union:
There’s a soda machine here. It is time to distract Connie away from the lounge.
Remember the clue on the left board outside the library.
Do not add any coins or click on the coin slot of the machine.
Press: Grape grape orange cool
Hear the alarm go off. Hulk says to call Connie.
Go to the student union: go to hallway, left at next hallway, right and enter the student union.
Talk to Connie about other things and the alarm.
Connie Watson:
Connie leaves to fix the alarm.
Read her notebook. Learn about her feelings for someone.
Teacher’s Lounge:
Use the teacher’s lounge key taken from Aunt Eloise’s secret book on the locked door.
Enter and look around.
Bookcase: Look close at bookcase right of the door.
Read about Gray Enterprises’ second quarter’s loss and possible leak of classified military hardware information.
Take the coin right of the apple, one coin at top of the Physics Level 2 book and another coin from the green bowl on the shelf above.
Take coin from the cakes on the dining table.
Map: Check the map on the wall.
See words on the frame of the map.
A Trophy Was Not The Only Prize But Also Money of A Greater Size. Ag D1
File cabinets: Look close at file cabinets. Open the Senior Final Papers drawer.
Pull out Tanaka, Hal’s folder. Nancy comments that it is exactly like the one in Jake’s locker.
This must be the one referred to by the note at right front hallway board and the right note on the board by Gaiser Gym.
Computer: Turn right and click on the computer monitor or keyboard or mouse.
Using your keyboard enter user name: Eloise Drew and password: O Wise Elder.
Press Ok.
Check the printer. Click Ok to print the security report.
Check mail and learn that Jake has bulletin board duty.
Check password and learn that maintenance room’s password is NOTE.
Check the To Do list and learn that Dillon HVAC is needed for boiler service.
Take the coin on top of the pencil holder and another coin from lower blue in/out tray.
Security report: Go to the printer at left and take the security report on top.
Learn that: Connie lost her backpack. Dillon HVAC Service left a toolbox at the boiler room. Hal retrieved his homework that night. Hulk and possibly Jake were arguing by the gym. Daryl Gray and other kids were caught soaping the teacher’s lounge windows. At midnight, Jake was found by east stairwell.
Bulletin board: See that the bulletin board left of the door has CL D2 on it.
Exit the teacher’s lounge.
Mitch Dillon:
Get a threatening phone call from Mitch Dillon.
Use the cell phone. Click menu and select phone. Press call button under Mitch Dillon’s name.
Talk to Mitch Dillon. He denies threatening Nancy.
Library:
Let’s finally go to the library. Turn right from the lounge and enter the study dome. Turn left to the back hallway.
Use Aunt Eloise’s key taken from the safe door on the library lock.
If you read every available active book in the library, you might get an award.
Magazines: Go right pass the Information Desk. Turn right behind the Information Desk and check the magazines.
Read the Sports Today magazine. Learn about Hectinol, a human growth hormone. Nancy comments about it being stolen from the Drug Station.
This must be what is referred by the clue on the front left side hallway board.
Reference books: Turn around from the magazines and check the reference books on the nearest bookcase.
Kanji: Pull out the K red-white Encyclopedia Americana from top left shelf.
Learn that the medallion Connie is wearing is Kanji for crane. Remember the Judo poster by the soda machine and the middle clue on the board outside the gym.
Take the coin above the R Encyclopedia Americana.
Braille: Pull out the B of the Global Book at top right shelf.
Remember that the maintenance door has a Braille keypad and that the password learned from Aunt Eloise’s computer is NOTE. Note down the Braille letters for NOTE. ☺
Take coin from top of the H Global Book.
Maps: Turn right from the reference bookcase. Look close at the cabinet at the corner.
Remember the clue on the student union’s board.
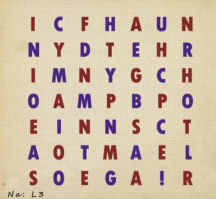
Open the fifth drawer from top. Pull out the paper behind the map.
Red letters: If anything happens to me sear
Blue letters: ch under my combo in catalog
Na: L3
Computers: Go to the computers at back side of the room and right of stairs.
Catalog search: Let’s follow Jake’s map clue. Click on a monitor.
Enter the combination to his locker on the catalog search line: 5253. Click on Go.
See Evidence by J. Rogers – Under My Seat – Reference.
Let’s look for Jake’s seat.
Shelves of books on lower level: Go to front part of the library. Go to left side of the room and take coin from under the book cart with books at second aisle,
Enter the aisle between the shelves. Click on any active books. See that the books are all related to other Nancy Drew games.
Get coin on left empty shelf space of the first aisle that can be entered.
Pick up coin from under the book cart at back end of the bookcases.
Walk the center aisle between the tables and then face the stairs. Take the coin under the blue book on the table at left.
Climb the stairs go left to the book cases.
Shelves of books on upper level:
Take the coin from under the book cart. and the coin from under the chair at right.
Go forward and enter the aisle between the shelves. Click on any active books. See that the books are all related to other Nancy Drew games.
Take coin from top of the Saboteur book at first aisle at right shelf.
Get coin on the back right corner on the floor at last aisle that can be entered.
Turn to the left and take coin from the nameplate of the second portrait.
Turn around and take the coin under the book cart by the book shelves.
Turn around again and go forward.
Jake’s chair: Go forward and see a table with a yellow pad with “Jake was here”.
Chemistry book: Remember the eye chart clue. It states page 305 of the chemistry book.
Open the book and read Jake’s Things to Remember:
* The answer to my fate lies in the box.
* A matchbook behind Maxine’s schedule holds the first step.
* My messages hold the remaining 18 steps.
* The Elements tell the order.
* The letter and digit tell the direction.
I:U2
Jake’s Things to Remember:
Box: Check “under my seat” clue by looking under the chair at right.
See a box with symbols. We can come back to this later.
Easter Egg: Thanks Sandra!
If you enter the code for the box under Jake’s seat earlier than you’re supposed to, Nancy says something funny to the effect of “This puzzle is unavailable at this time, please come back later after you’ve escaped the boiler room trap. Love, Nancy”
The egg is yellow and has a blue outline of Nancy on it.Matchbook: The diner’s work schedule paper was torn; there’s no matchbook there. We still have to find it. It has the first step.
Go down the steps and take coin from the R of the Library sign on the wall by the stairs.
Go down from the other stairs and take the coin top of the M of Memorial sign.
Look for coin on top corner handrail after getting coins from sign and another coin on the other handrail. Thanks, Robin!
Exit the library.
Hulk Sanchez:
Go outside the gym and talk to Hulk (if you haven’t yet) about his injury.
Hal Tanaka:
Talk to Hal at the study dome about his essay.
Connie Watson:
Turn around from Hal and go to the student union down the hallway. Talk to Connie about her medallion and money.
Daryl Gray:
Exit the school and go to the diner. Talk to Daryl.
Learn that the detective lost something at the diner and accused them of stealing it.
He has an internship at his father’s company’s computer department.
Daryl hands a note from Dillon HVAC. The note states that he has the solution to the mystery and wants a meet at the HS basement of the maintenance room.
Exit the diner and go back to the school.
Boiler room:
Enter the school and go right. Turn right at side hallway and look close at the maintenance room door with a Braille lock.
The lock’s keypad is in Braille. Aunt Eloise’s computer states that the password is NOTE.
The library’s reference area has a Braille book. Enter NOTE in Braille.
The light turns green. Enter through door.
Take the coin from the top of the flammable barrel left of the elevator door.
Press the service elevator button. Go down to the boiler room.
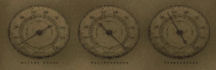
See that the boiler is in full blast and the gauges are on maximum.
The levers are padlocked.
This is a timed puzzle but you get a second chance if you run out of time.
Padlock:
If you have the bolt cutter, use it on the chain-padlock.
If you do not have the bolt cutter, look at the plaque bottom of right wall and see that the school was built in 1967. Enter 1967 on the padlock.
Boiler gauges:
Check the chart on the left wall and see where the gauges should be set.
Look down and open the toolbox left by the Dillon HVAC (as noted in the security report). Take the gloves.
Use the gloves on the 3 levers above the gauges. Adjust the gauges to the correct settings.
The middle gauge is at the correct setting already. The left and the right gauge need to be adjusted.
Use the gloves on the left lever 2 times.
Use the gloves on the right lever 2 times.
Use the gloves on the left lever 1 time. <whew>
Look around. See that the panel for the elevator is ripped off. The elevator cannot be opened.
Take a coin on top of the right warning cone. (Total of 128 coins).
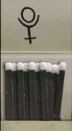
Matches: Look left and see a Maxine Diner cup and a book of Maxine’s matches. Check the matches. See a Mercury symbol on the cover. This must be the match and the “the first step” that Jake referred to on his “Things to Remember” list.
Turn around from the matches and see a grate right of the boiler. Pick up the video cassette in front of the grate.
Exit through the grate.

Aunt Eloise’s home:
Go home and enter the living room.
Open the TV cabinet. Turn the TV on and use the video cassette on the video recorder.
Watch Hunk with the Hectinol box in his locker and the masked judo winner place the trophy in the locker. See Hal copying the essay. This is what Jake used to blackmail the other students.
Take the video cassette out of the machine.
Confront the students:
Go back to the school. Hal already admitted his cheating.
Talk to Connie at the student union about the judo win.
Talk to Hulk by the gym about the drug station robbery. He saw Daryl Gray delivered a note to Jake.
Go to diner and talk to Daryl. Daryl leaves in a huff.
Detective Beech: Go to the booth and talk to Detective Beech about Dillon and something lost. He says it is his wallet. He really wants Jake’s journal.
Jake’s Things to Remember continued:
Go back to the school and finish Jake’s list. Go to the library and Jake’s chair.
18 steps: There are 18 letters and numbers on the 18 clues left on notes all over the place. All those notes have been collected.
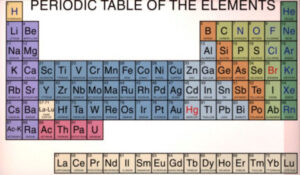
Elements: Look at the Periodic Table of the Elements on the wall above Jake’s chair.
Arrange the 18 clues:
Based on the letters and digits seen in the notes, the letters on the left side of the note clues are elements. Find those letters on the periodic table.
The right sets of letters with digits are the directions.
Arrange them by the atomic numbers shown at top left of each square.
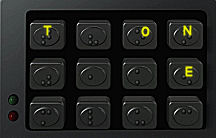
Elements Directions Elements Directions Elements Directions Start at the mercury symbol shown on the match. He U2 As U4 I U2 C R1 Kr L2 Xe R3 Na L3 Y D3 La U2 Cl D2 Zr R4 Hf L1 K R1 Ag D1 Ir D2 Zn D1 Te L3 Hg L3
Open the box:
Look under the chair and take out Jake’s box.
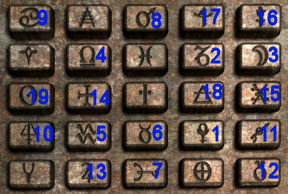
See the cover of the box has buttons with symbols on them.
The match clue states that mercury symbol is the “first step”.
Starting from mercury, follow the directions seen on the 18 steps.
U means up; R is go right, L is go left and D is go down.
The digits are the number of the buttons to move down to.
Take the video cassette with red line.
Aunt Eloise’s home:
Go home and enter the living room.
Open the TV cabinet. Turn the TV on and use the video cassette with red line on the video recorder.
Watch and see another evidence for blackmailing someone else. Jake also has plans for another source of money.
After viewing the tape, hear someone come in. Take the video cassette from recorder. Turn off TV.
Enter the foyer.
See and talk to the baddie. The baddie wants the tape. Reply with the wrong answer twice only to get more info. The third wrong answer gets you hit and a second chance.
Then respond that the tape is behind the tapestry. Remember Aunt Eloise’s note about the combination.
When asked for the combination, select incorrect codes. If the correct answer is given, game ends with second chance.
Aunt Eloise’s security system caught the baddie.