Follow Me!
Redemption Cemetery – Salvation Of The Lost
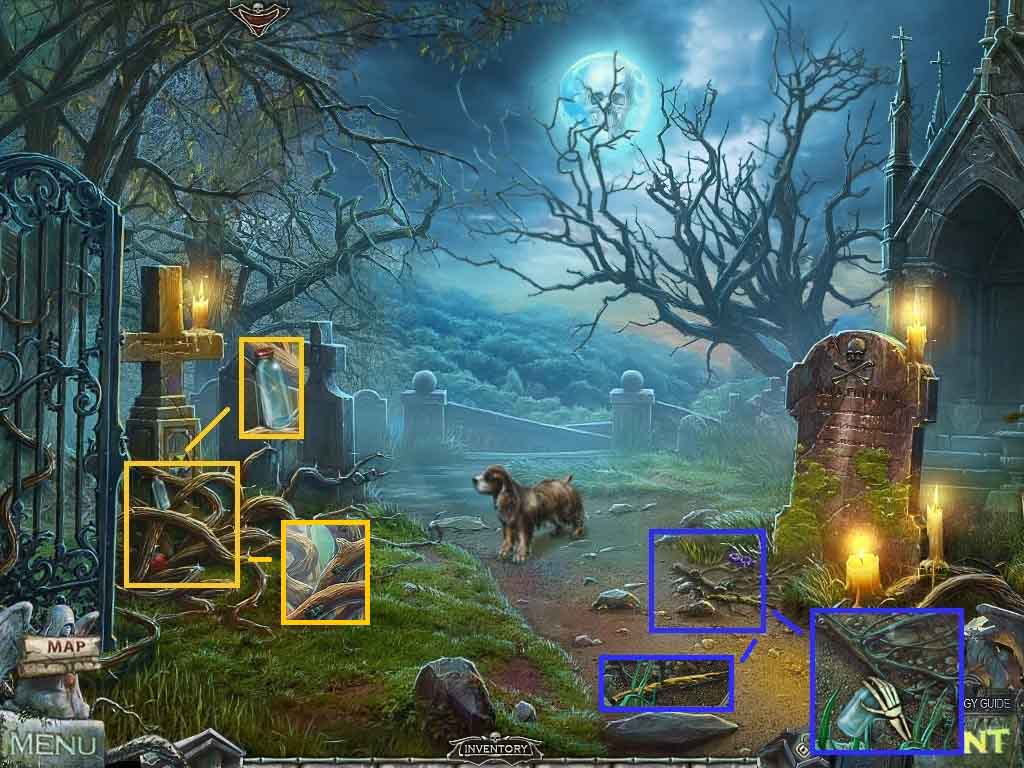
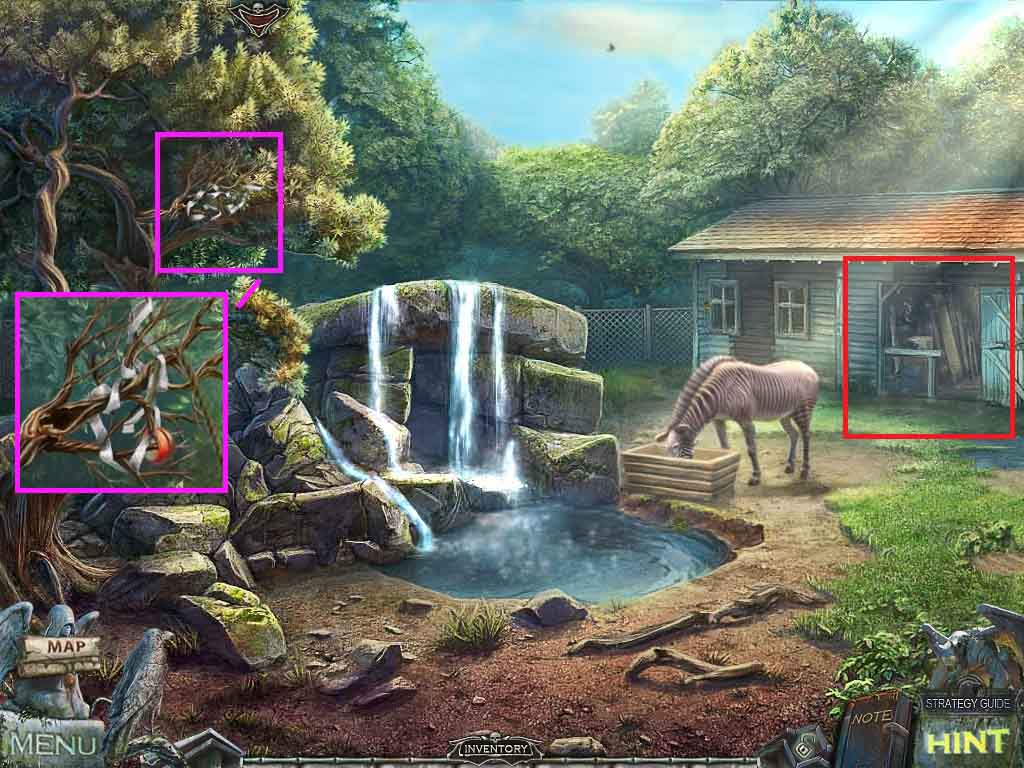
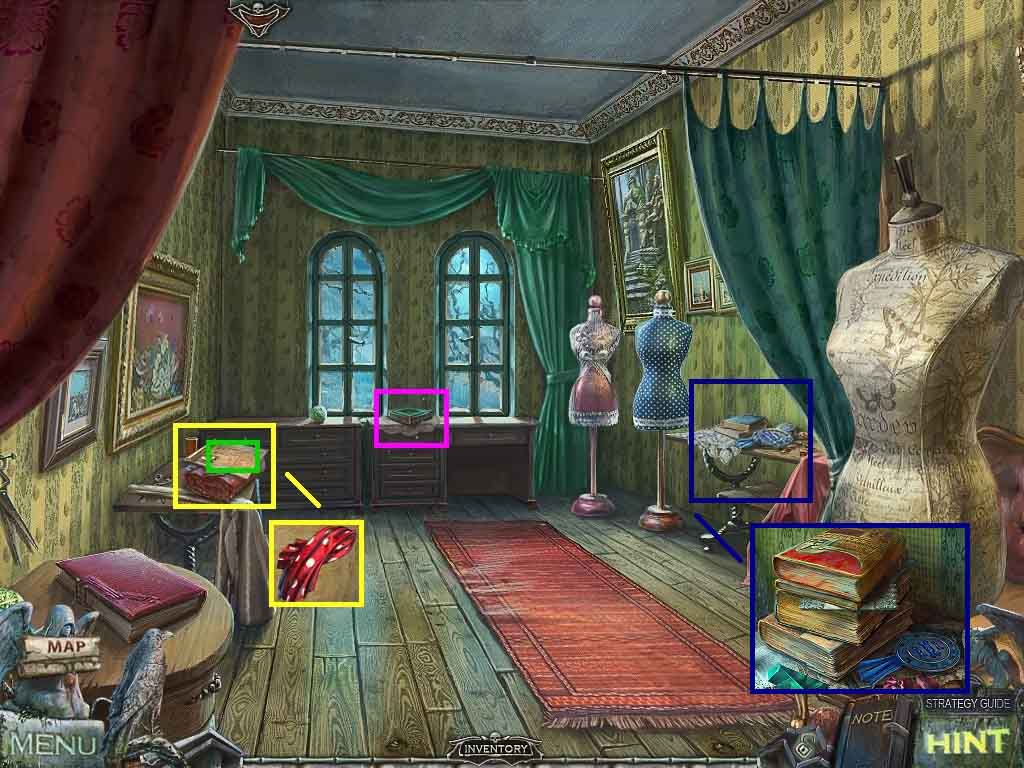
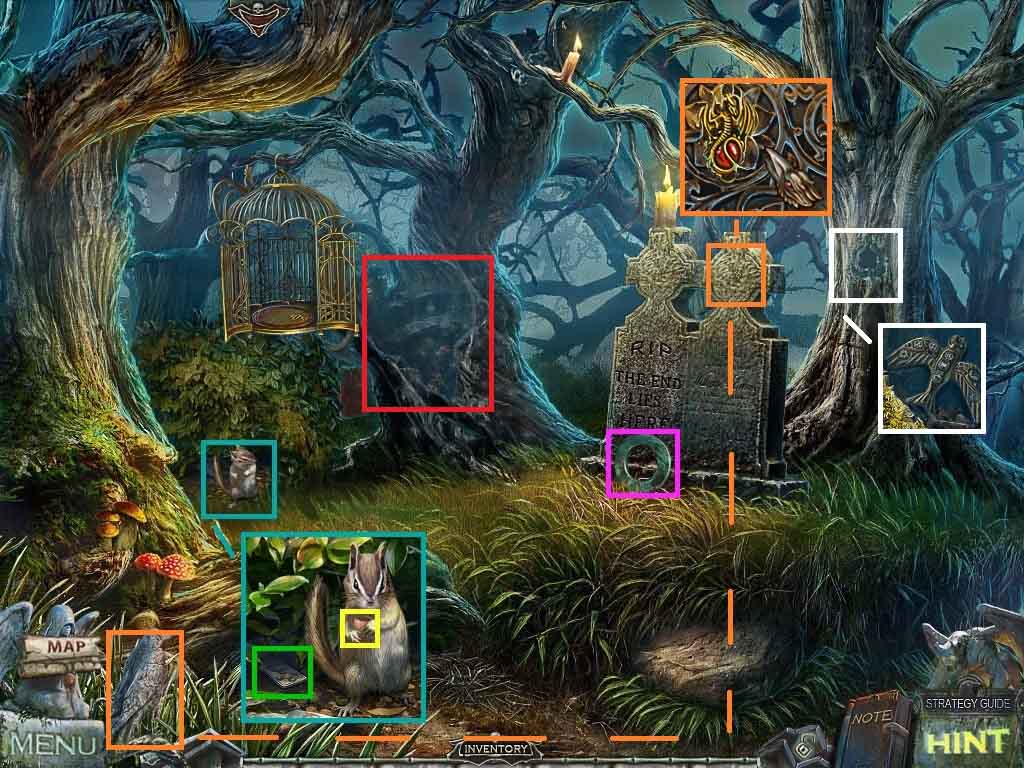
- Click the branches; collect the bottle.
- Click the ground; collect the branch with wax.
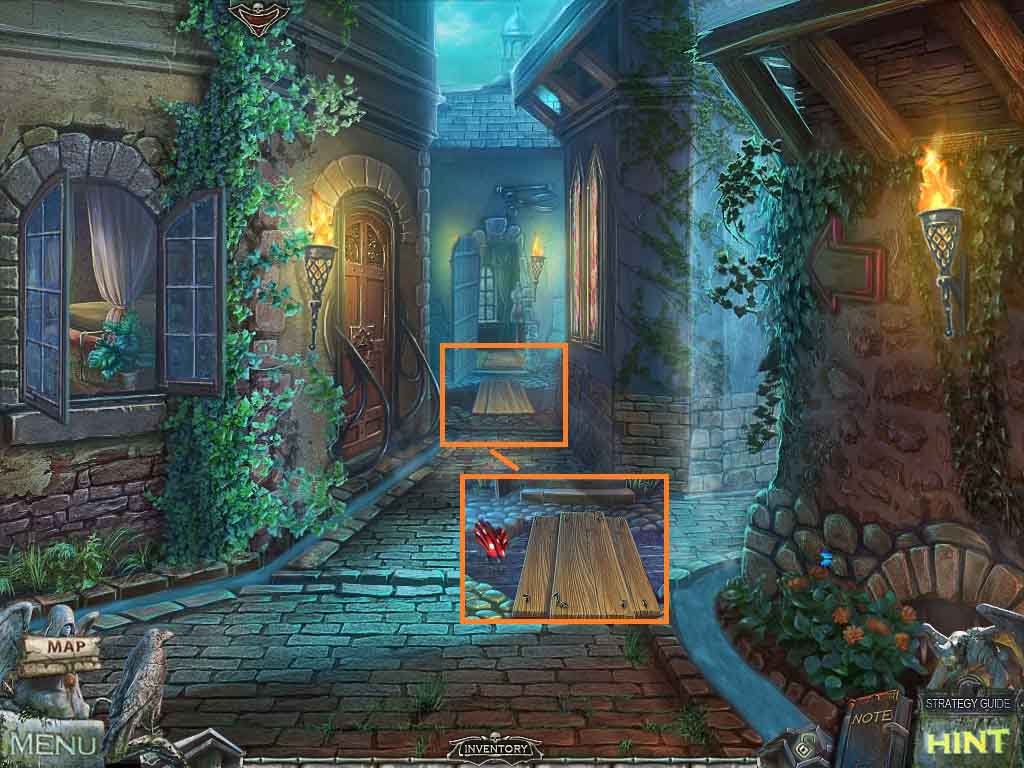
- Place the bottles near the bugs; collect the wood borers.
- Click the branches once more and place the wood borers onto the branches.
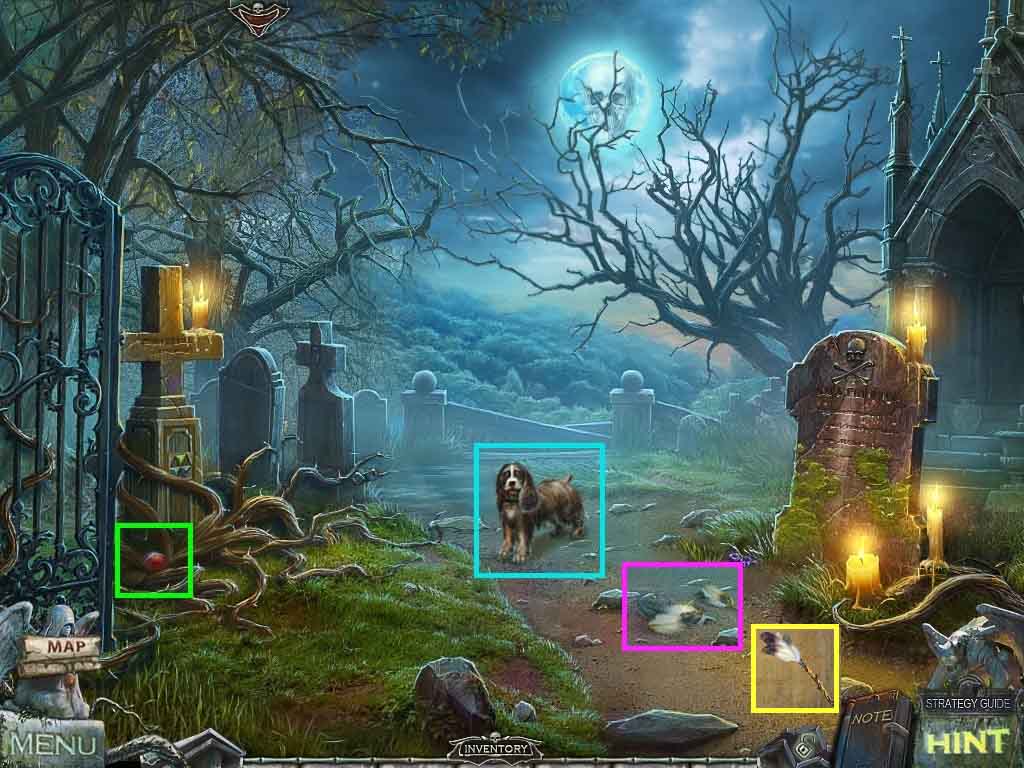
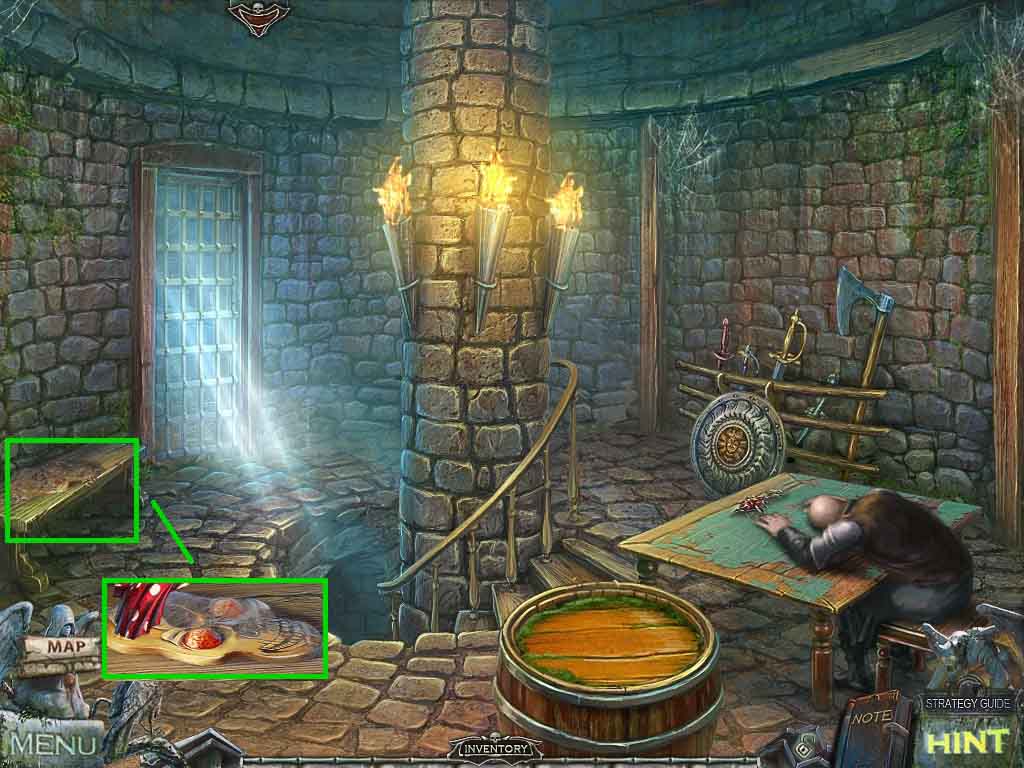
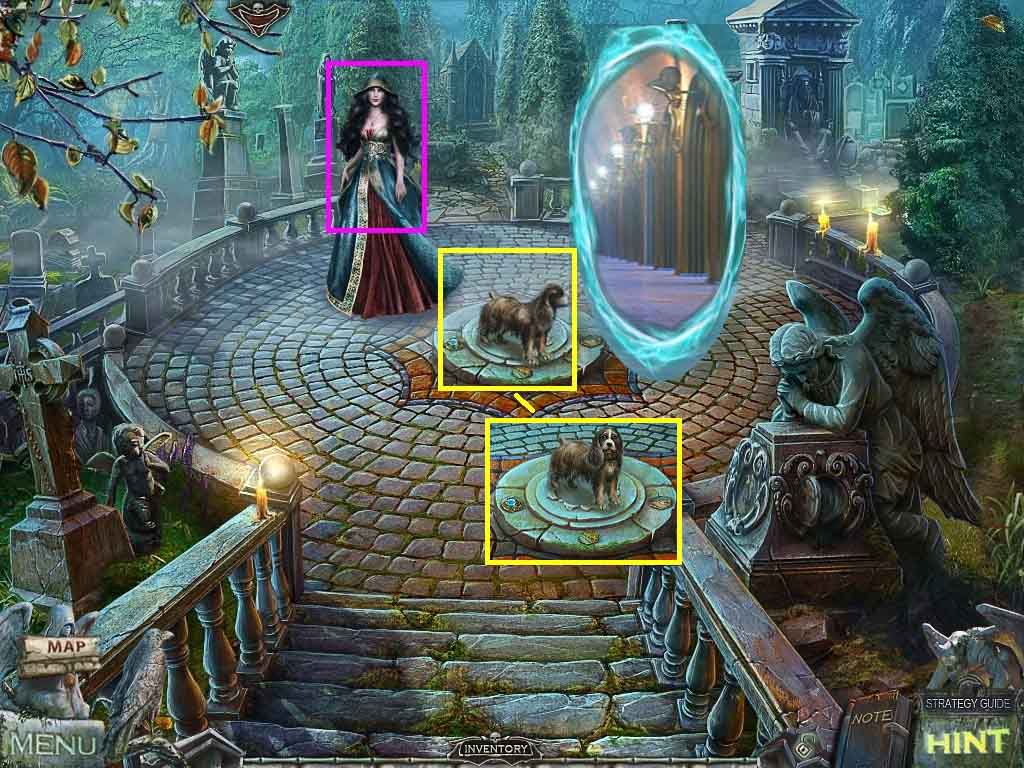
- Collect the ball; toss it to the dog.
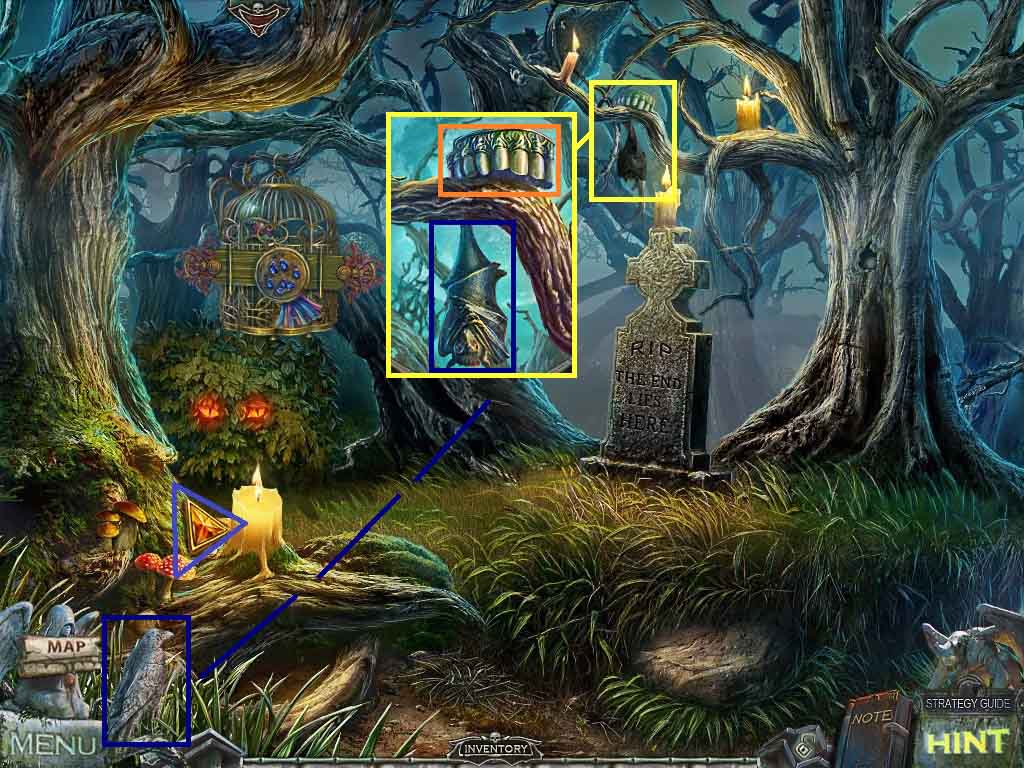
- Collect the feathers.
- Combine the branch with wax and the feathers to create the duster.
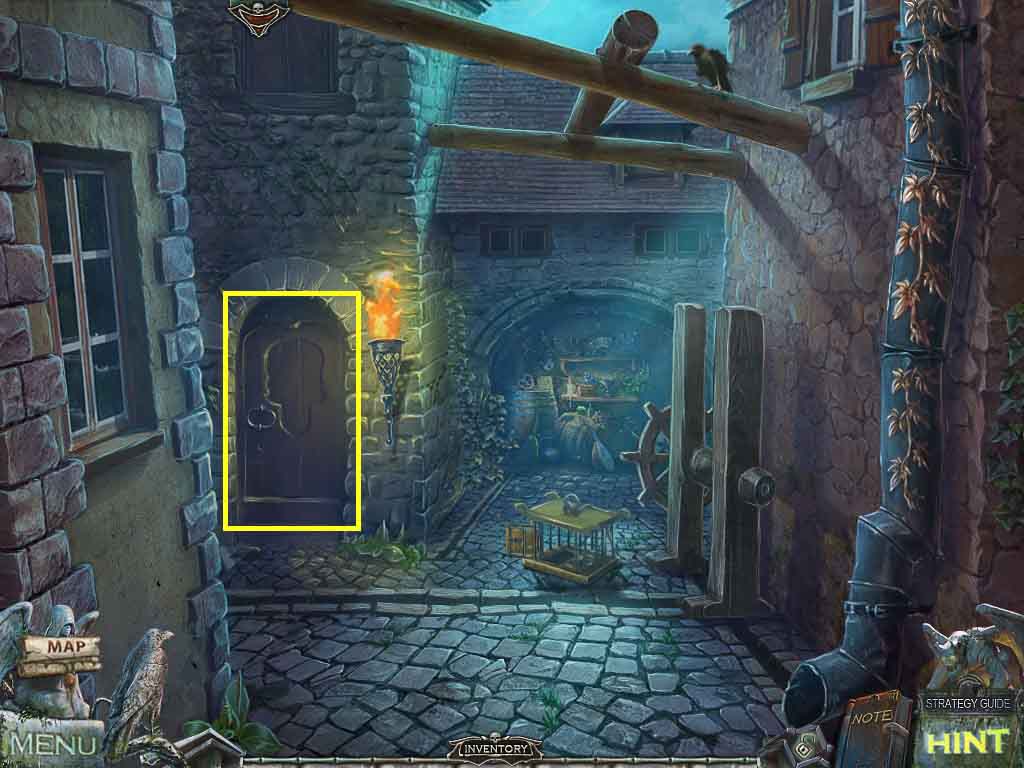
- Move ahead.
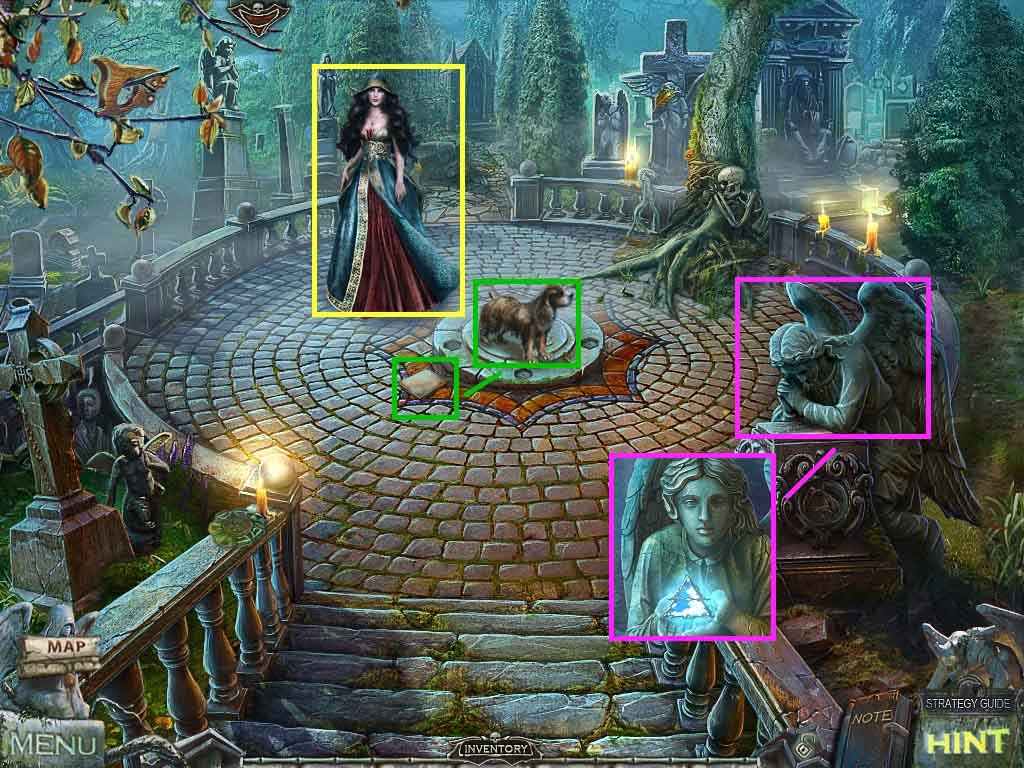
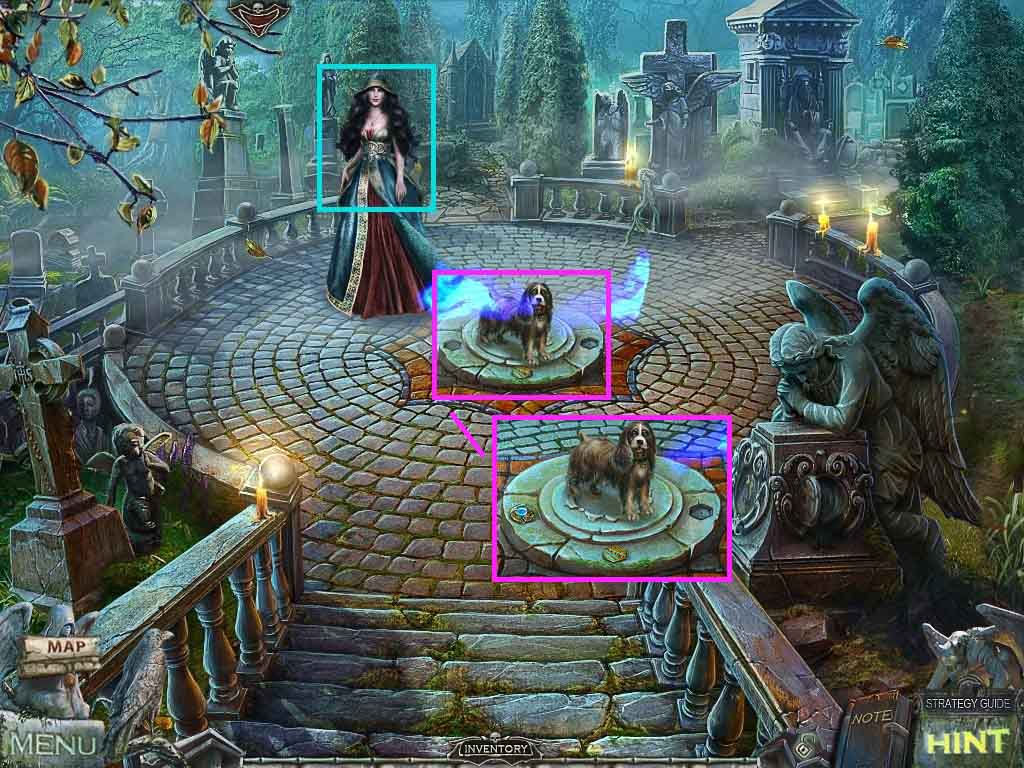
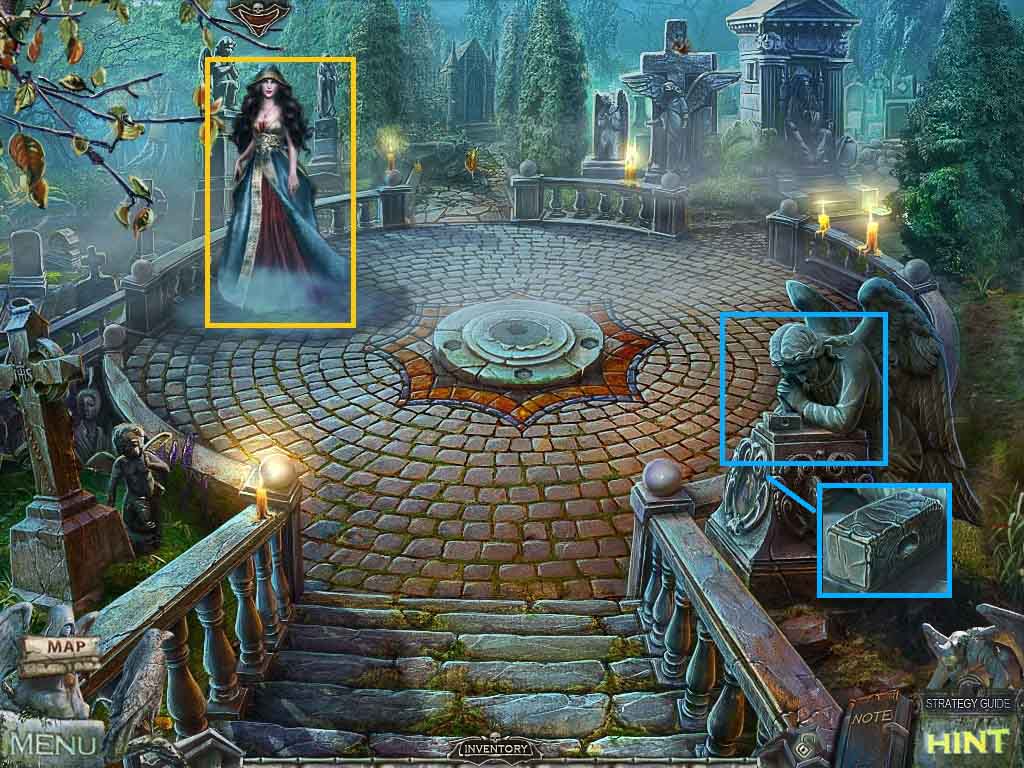
- Speak to Hina.
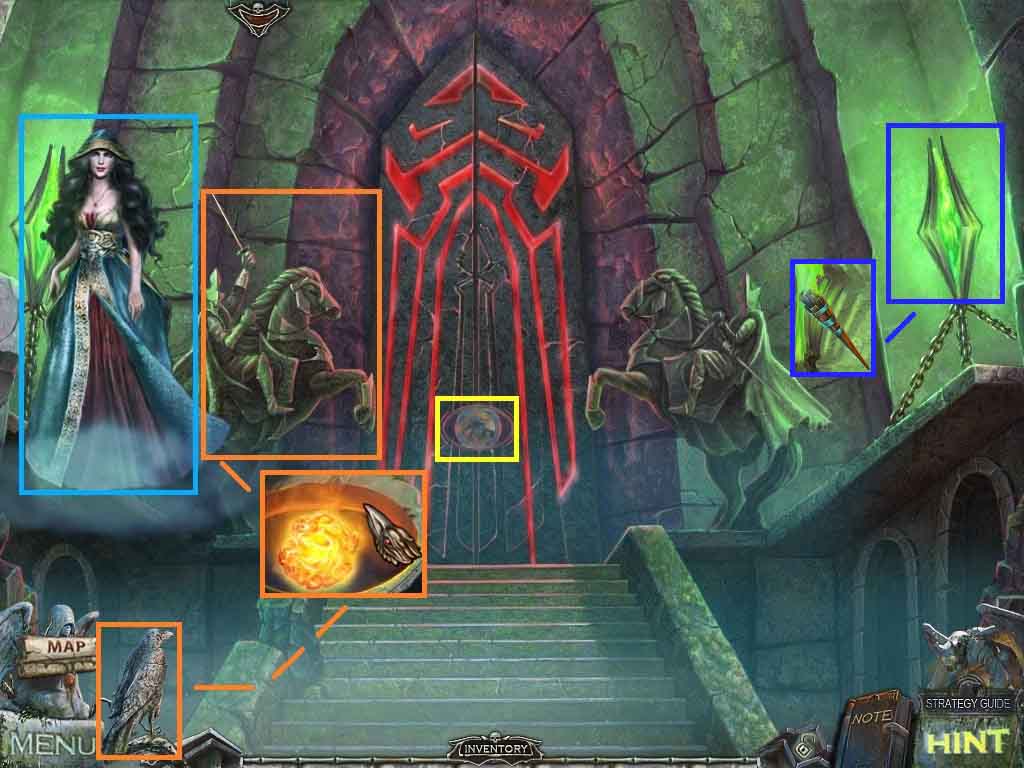
- Click the dog; collect the note.
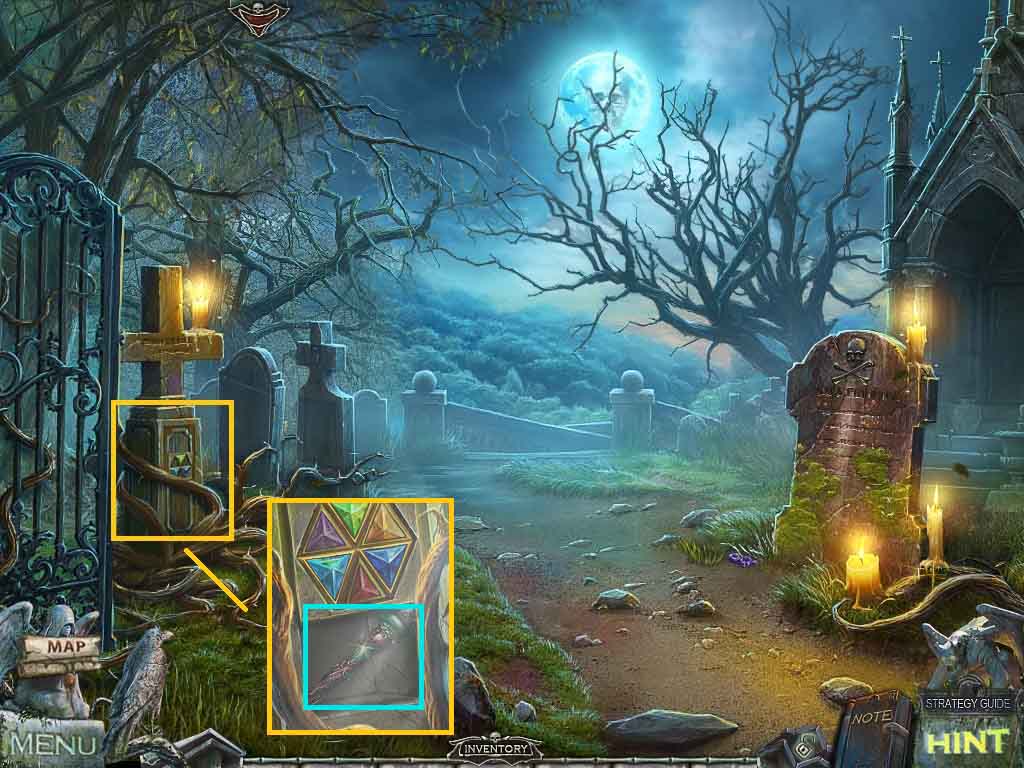
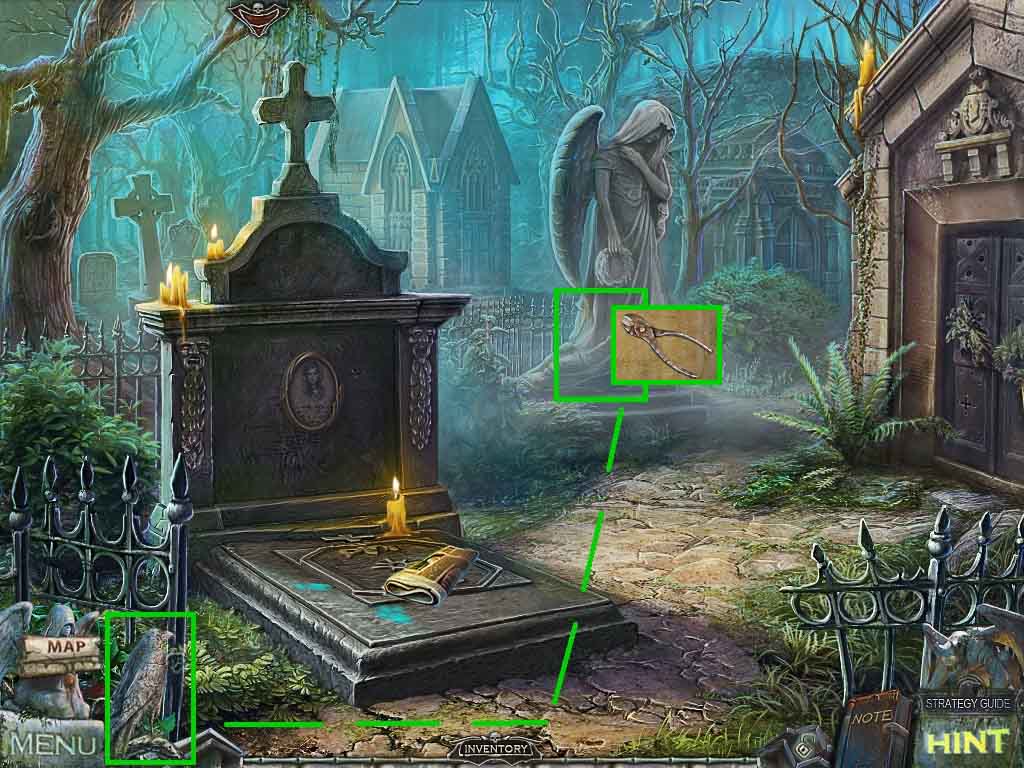
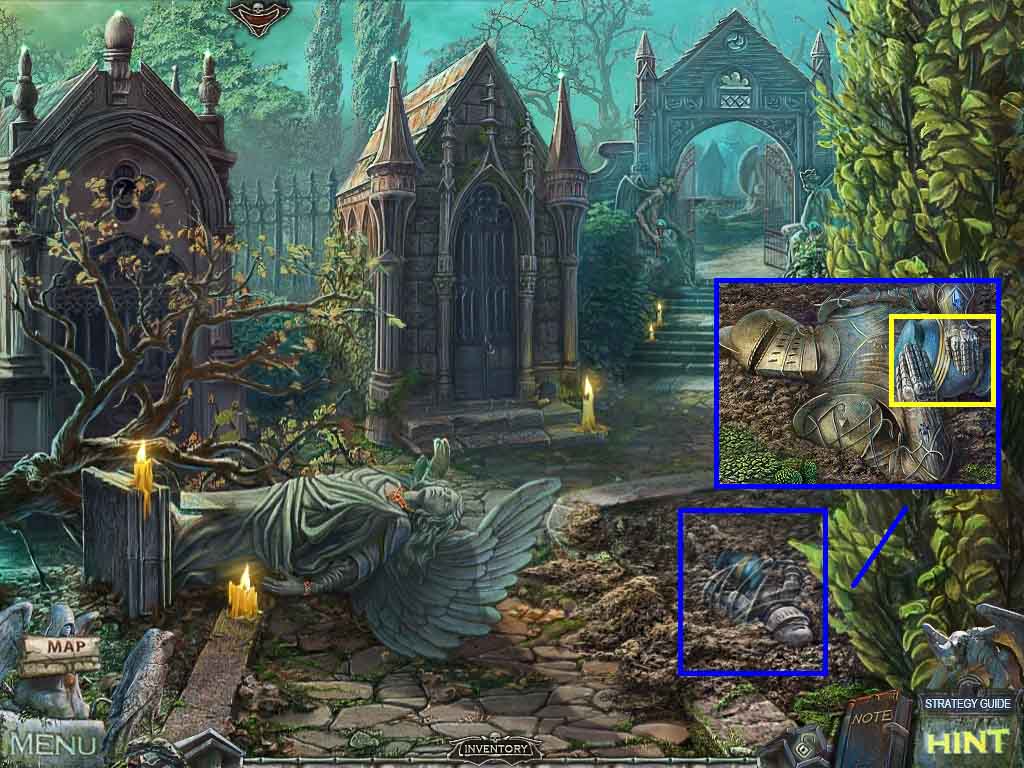
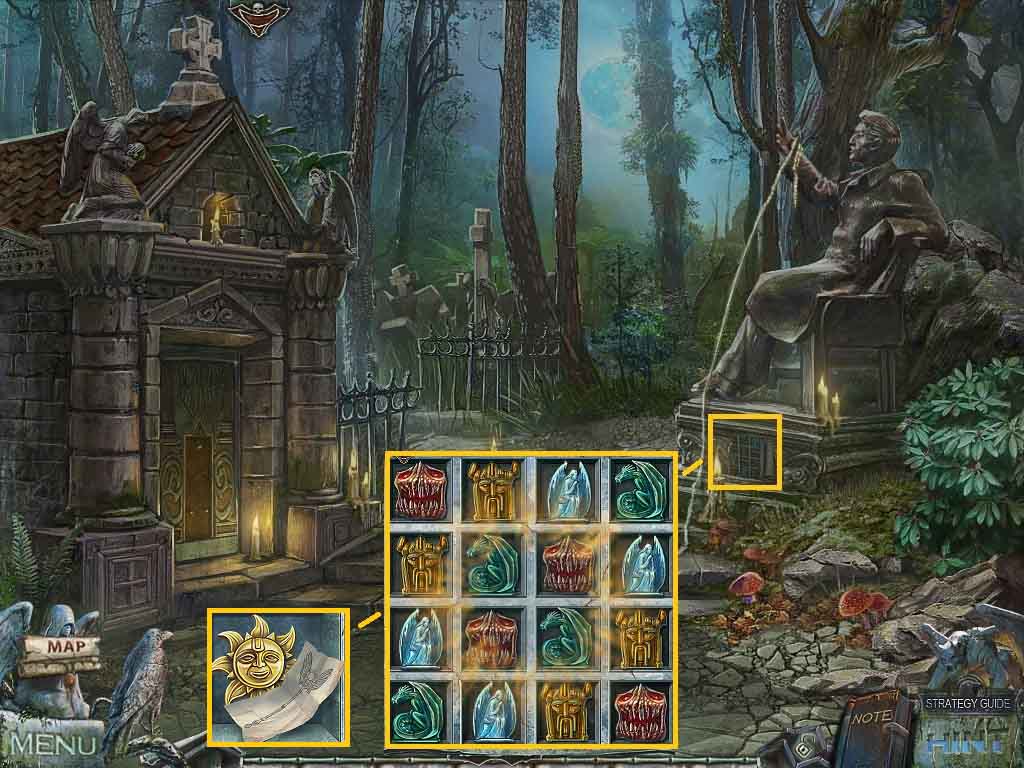
- Click the angel statue; collect the power of air for the raven.
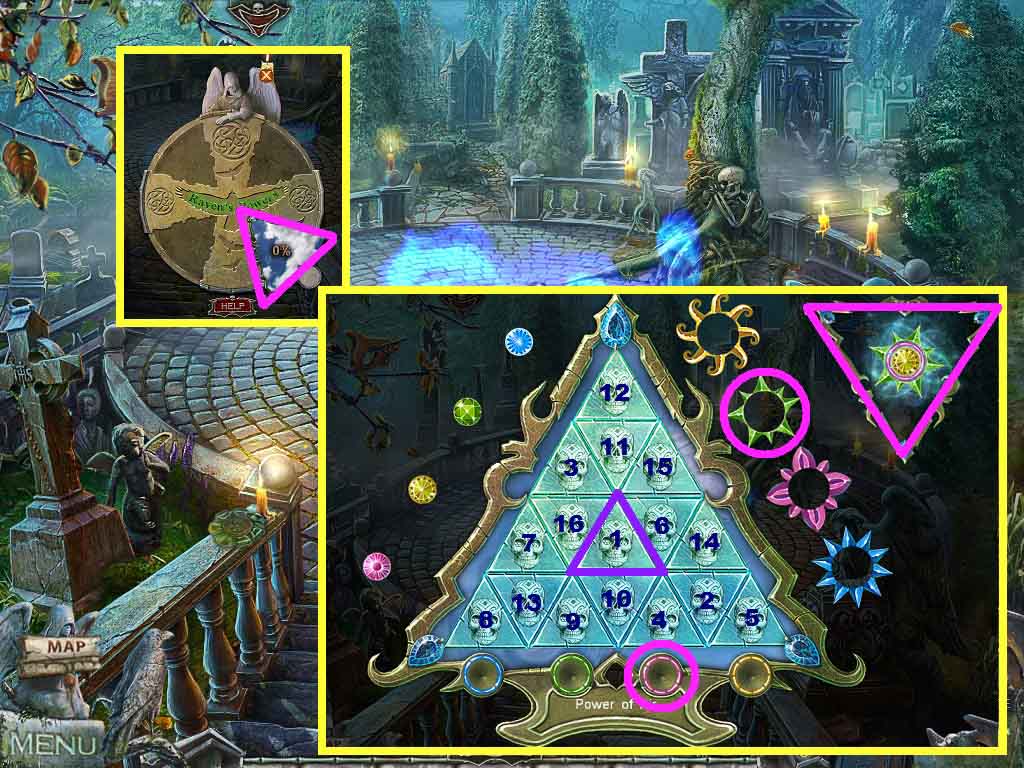
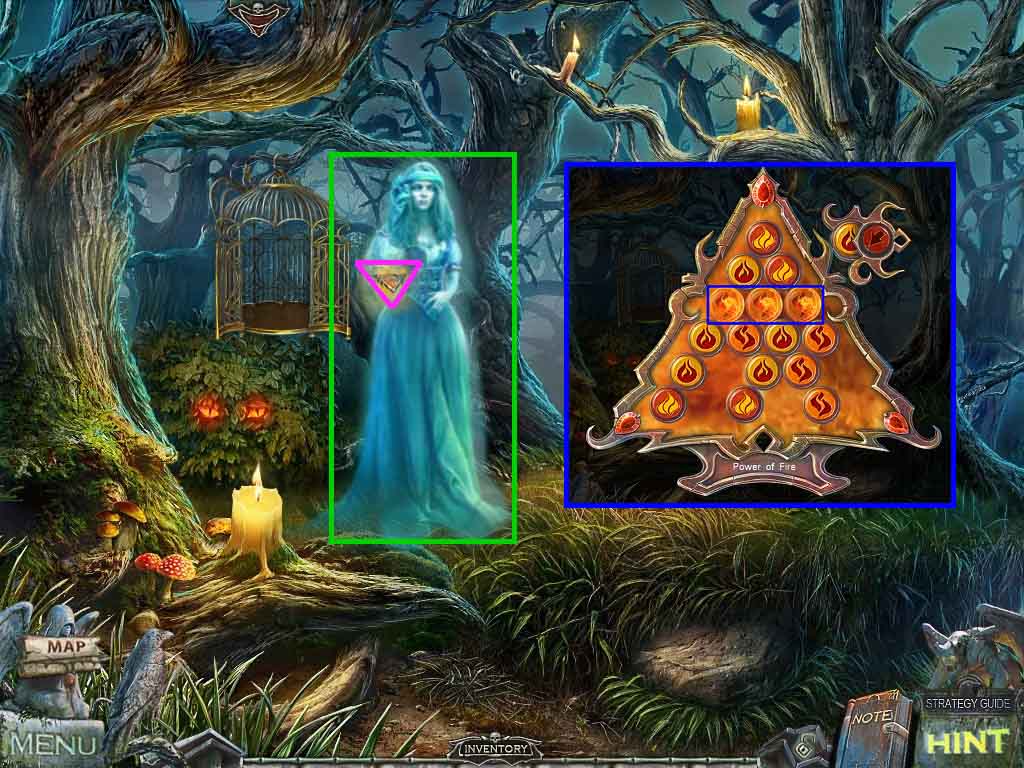
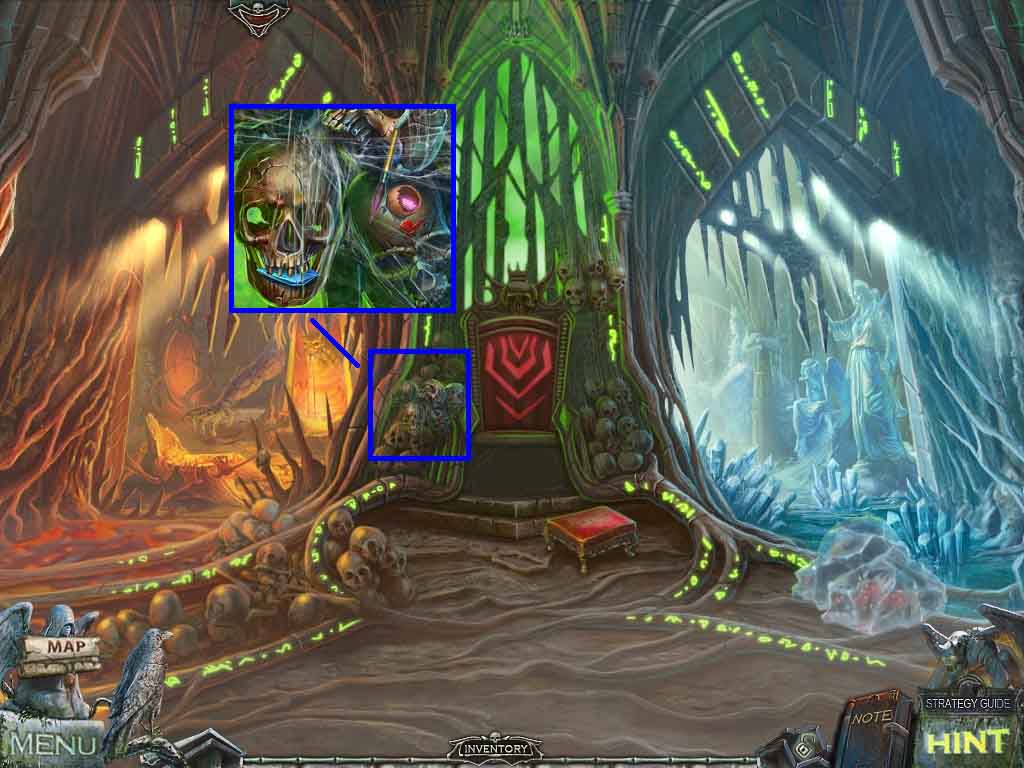
- Click the power of air triangle; a mini-game will trigger.
- Find the skull that illuminates the 3 pieces.
- Find the matches; click the triangles as shown.
- The power of air will be charged.

- Click the branch; collect the saw handle.
- Click the charged triangle and use it on the raven.
- Move to the left.
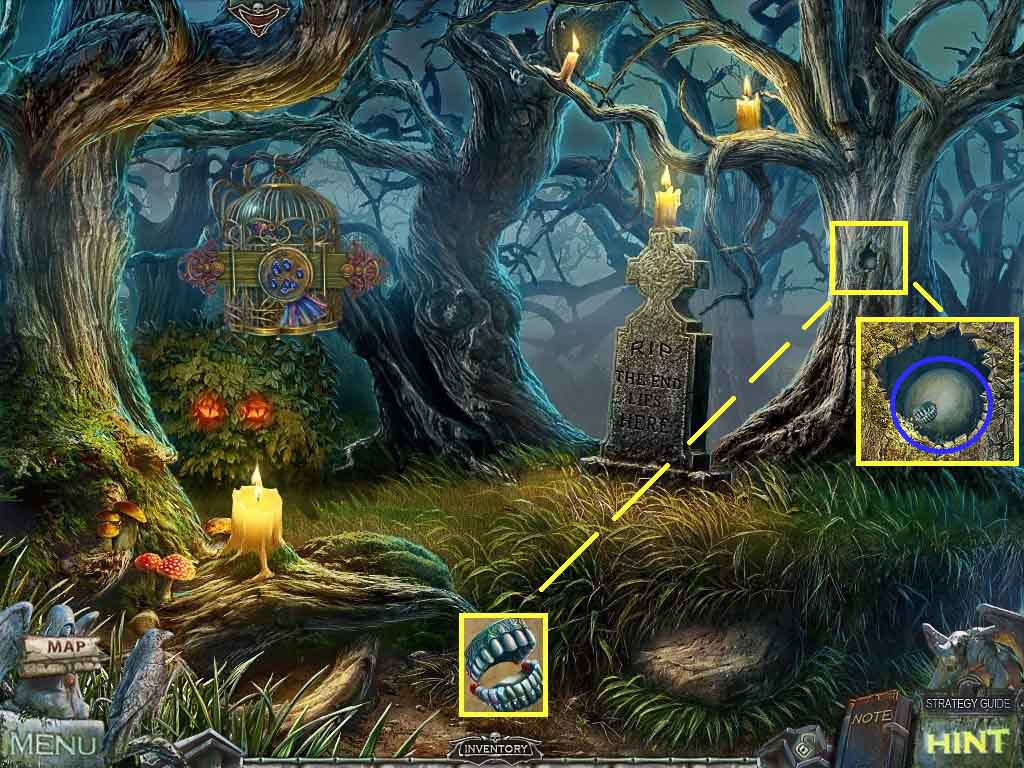
- Collect the 1st crystal.
- Click the bat; use the power of air on the hanging bat.
- Collect the upper jaw.
- Move down once and go forward.
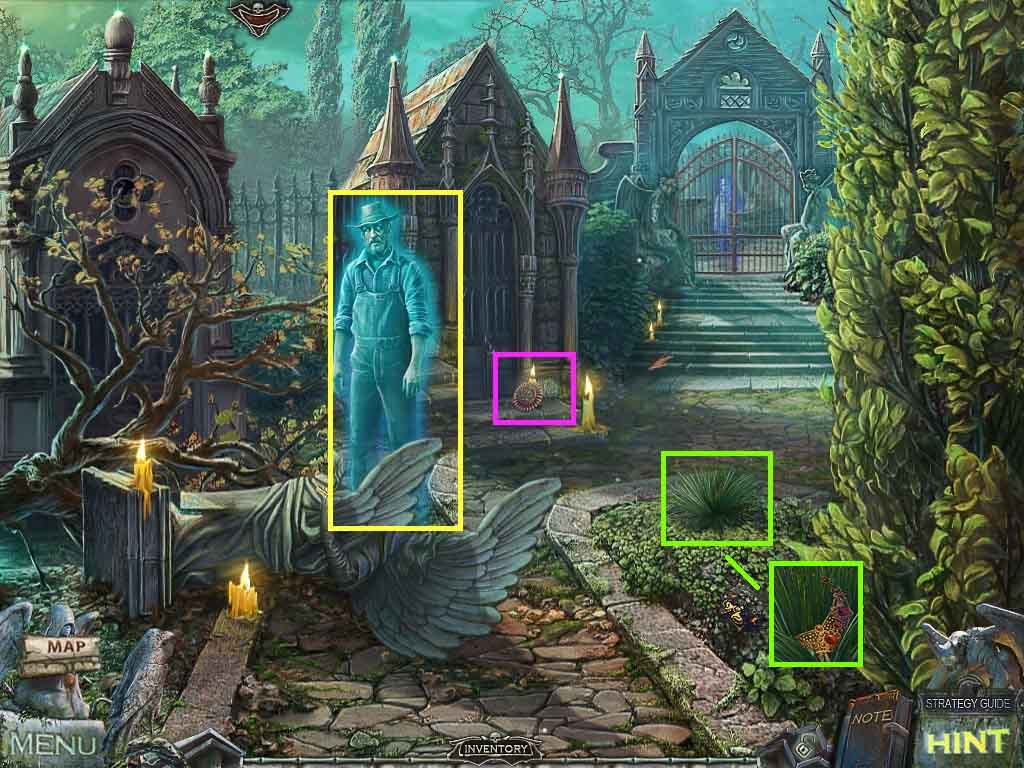
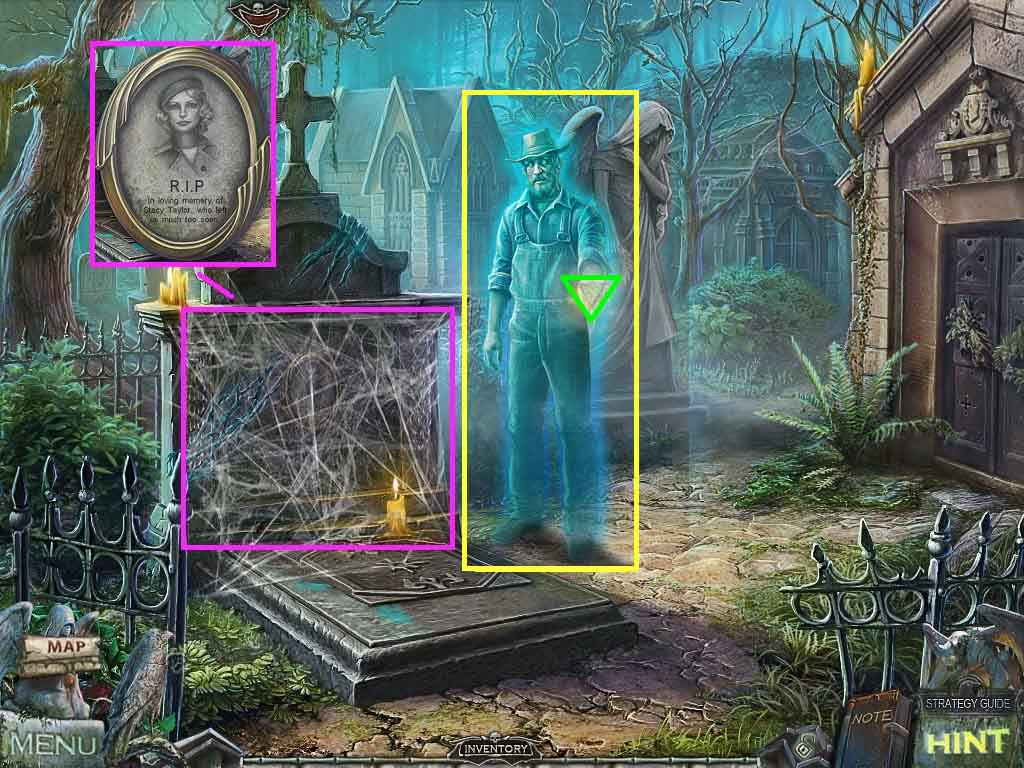
- Speak to the ghost.
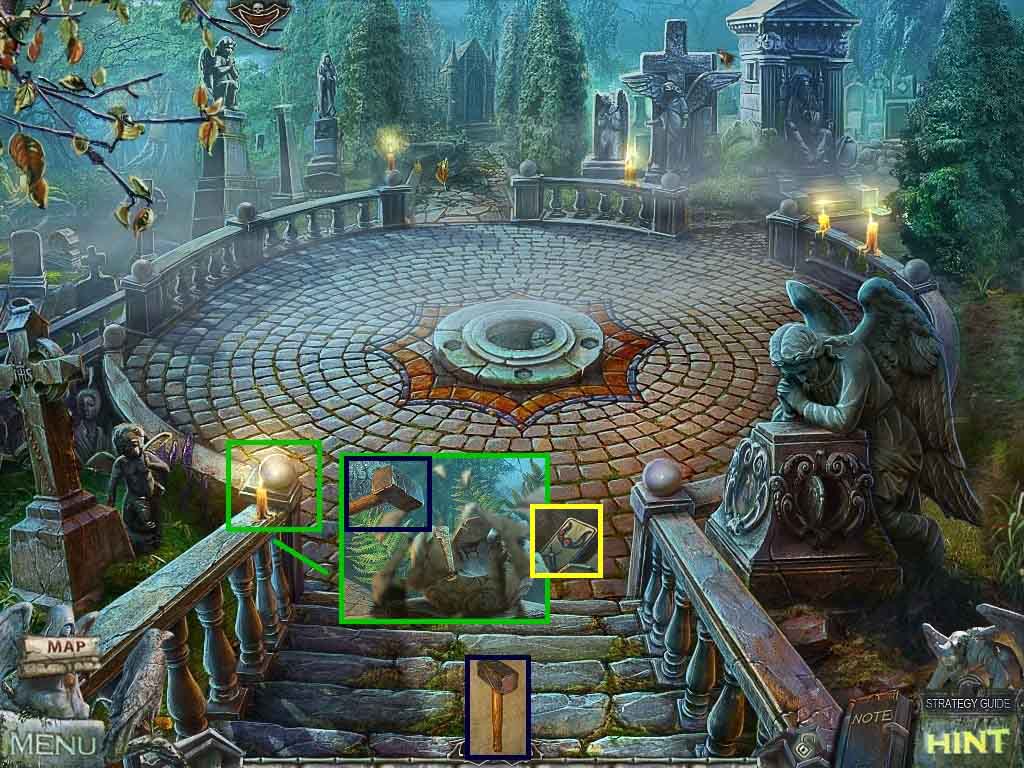
- Click the crypt.
- Collect the medal and click the candle to collect the crow’s wing.
- Click the ground, click the grass and collect the necklace.
- Move ahead.
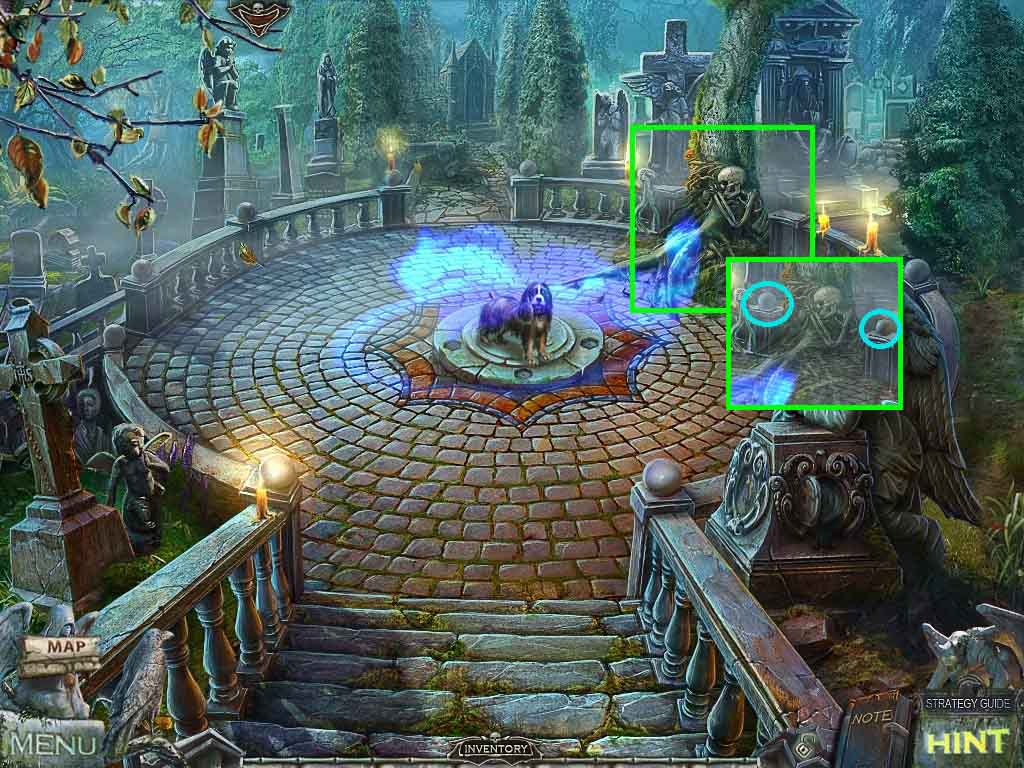
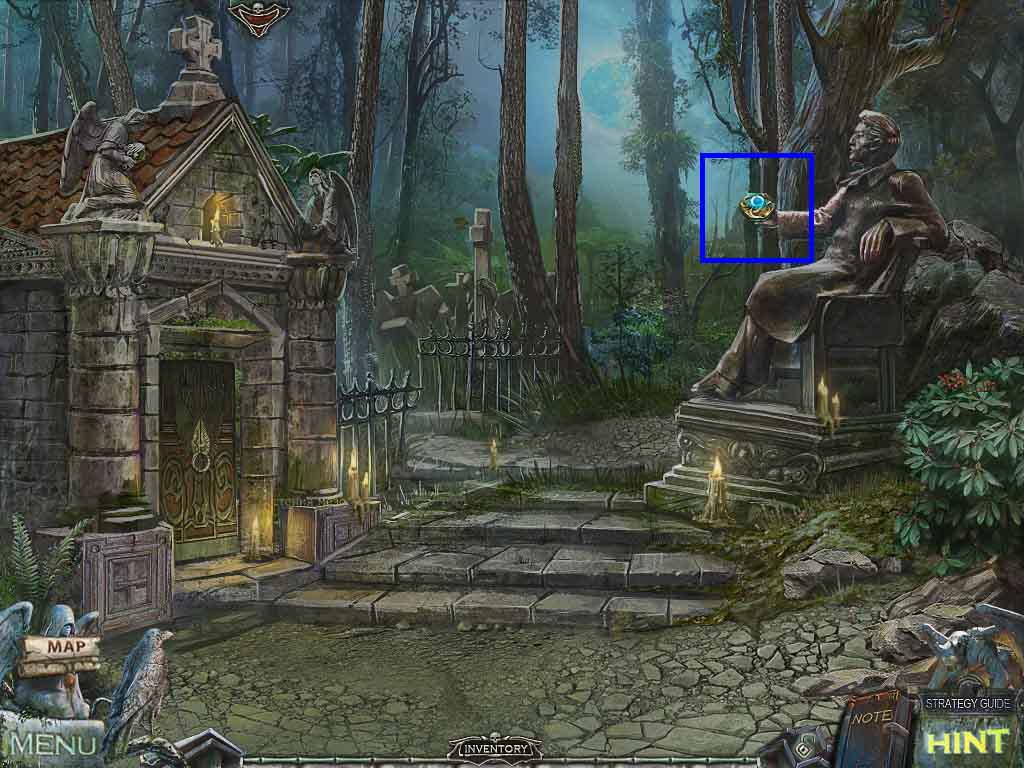
- Speak to the ghost.
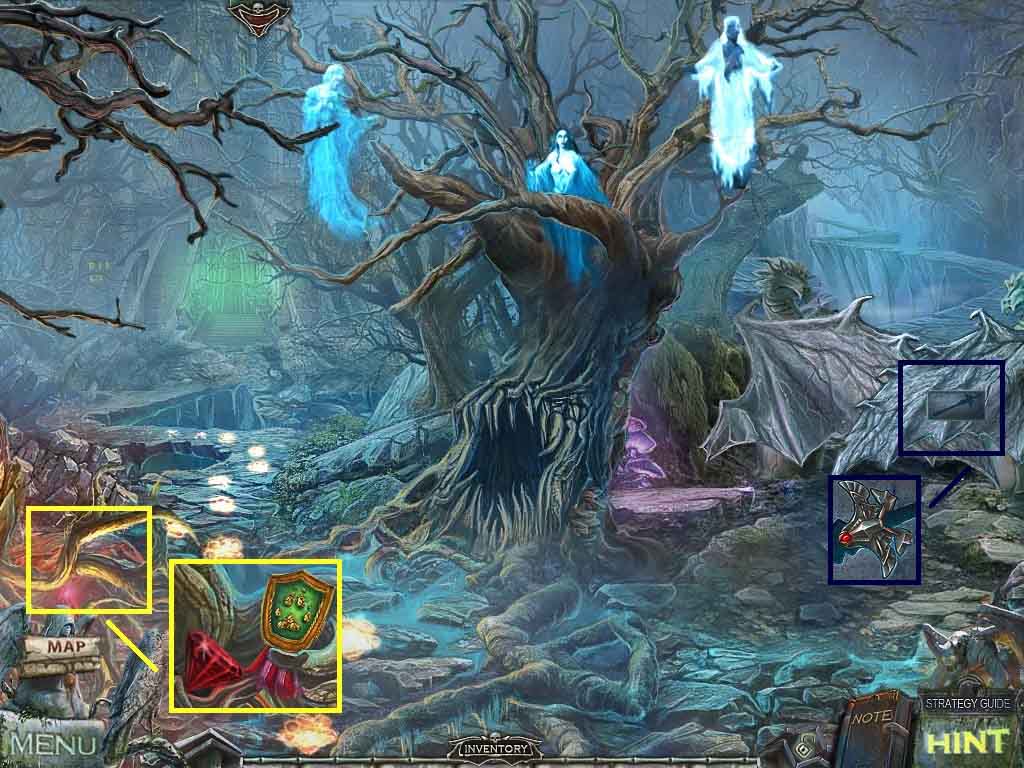
- Collect the 1st orb.
- Move back 2 times.
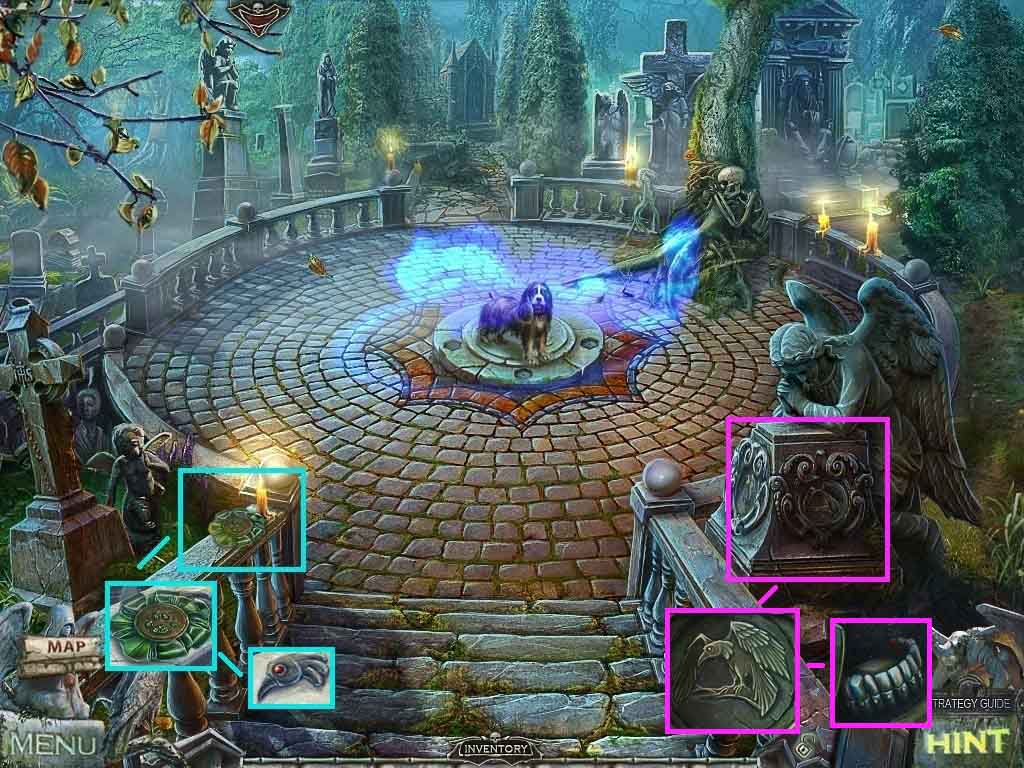
- Click the rail; collect the medal and the crow’s head.
- Click the pedestal and attach the crow’s head and the wing.
- Collect the lower jaw.
- Move to the left.
- Combine the upper and lower jaw to create the complete jaw.
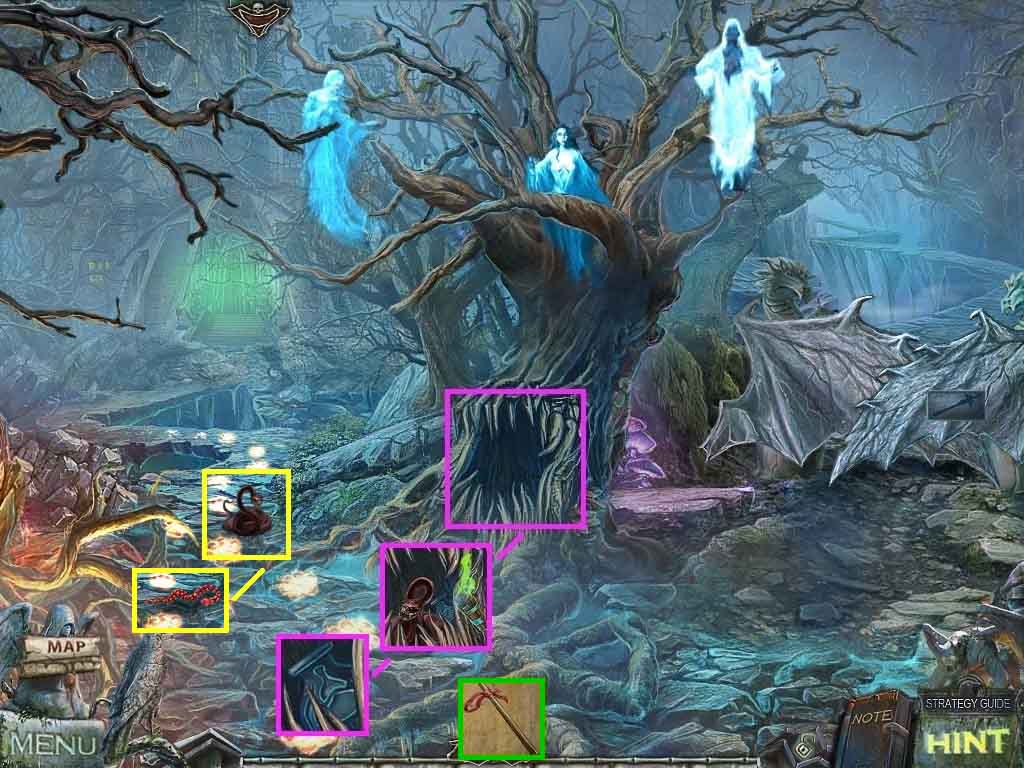
- Click the tree hollow and scare away the snake.
- Select the jaw and use it on the tree.
- Collect the 2nd orb.
- Move down once.
- Click the skeleton.
- Insert the 2 orbs onto the posts.
- Move to the right.
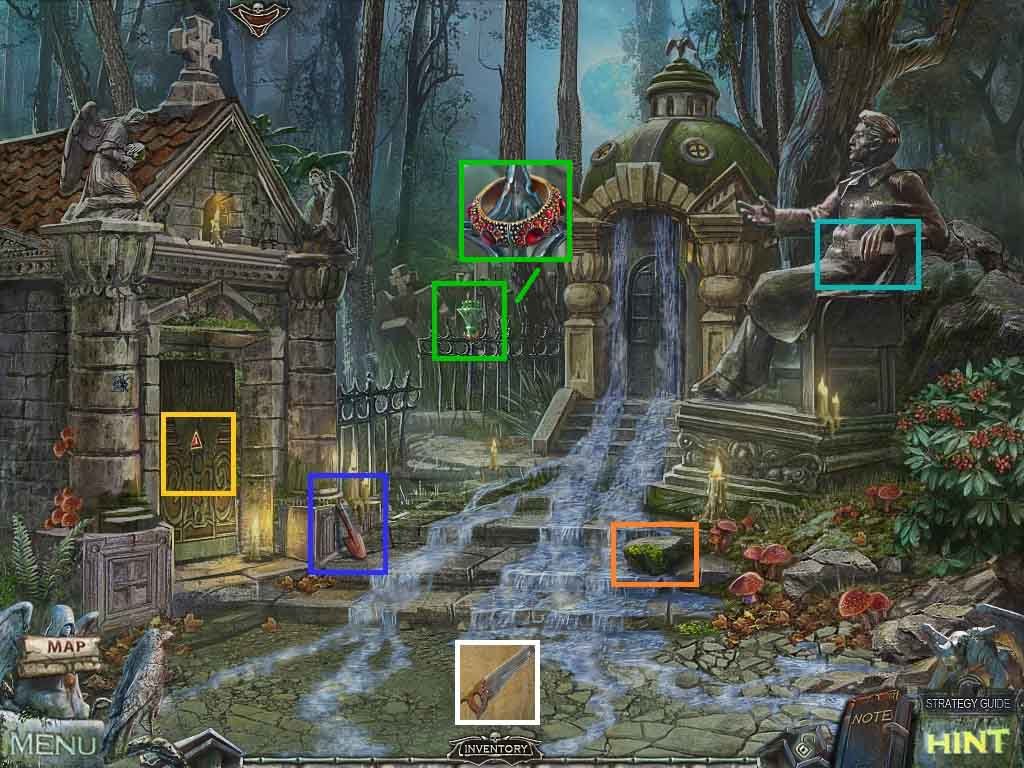
- Collect the shovel.
- Click the door and collect the 2nd crystal.
- Click the statue’s hand and collect the saw blade.
- Combine the saw blade and handle to create the saw.
- Collect the stone.
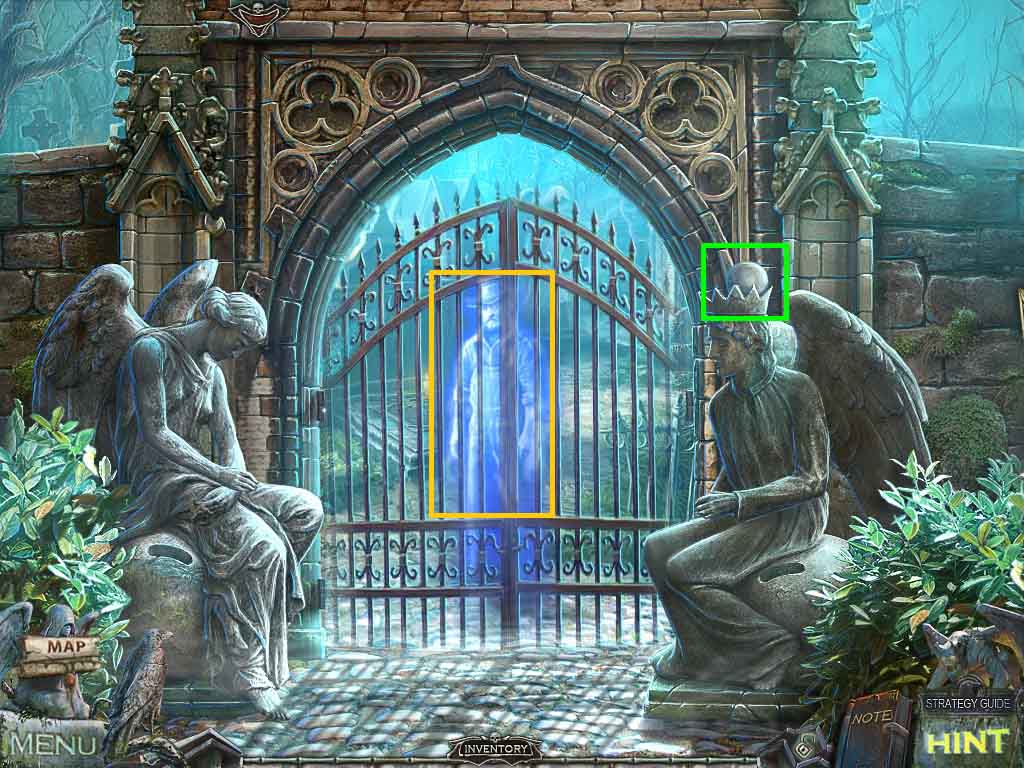
- Click the fence and use the stone to smash the green glass; collect the bracelet.
- Move down once and walk forward.
- Click the statue.
- Lay the necklace and bracelet onto her neck and wrist.
- Collect the crypt key.
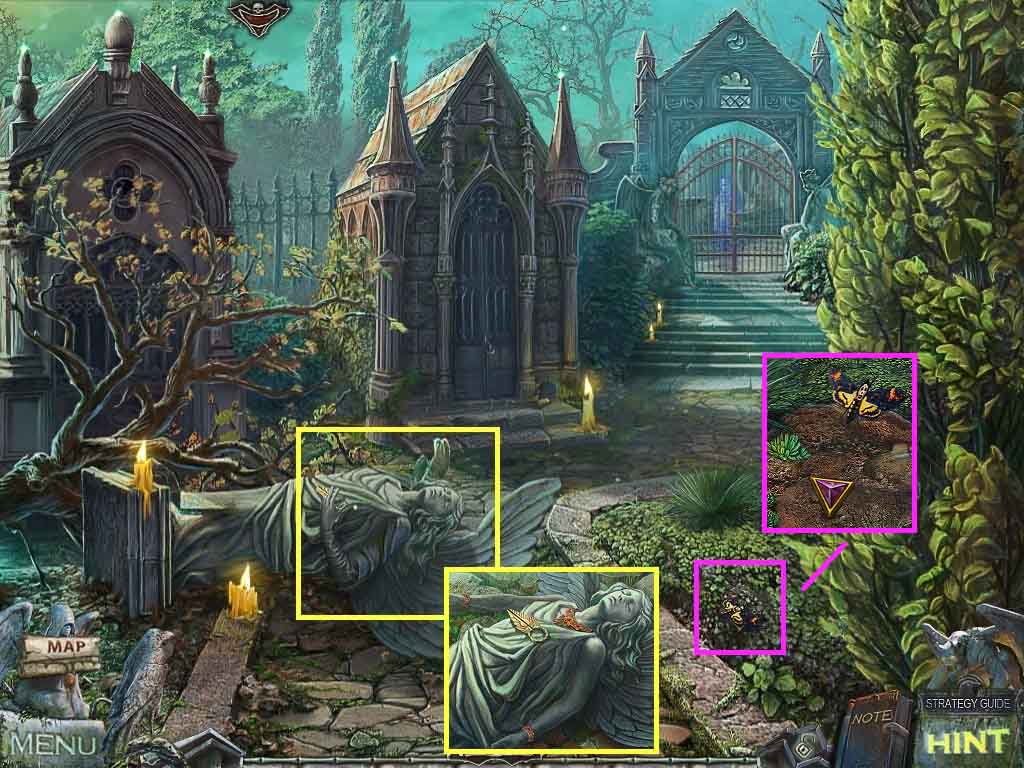
- Click the dirt; click the moth away.
- Dig up the 3rd crystal using the shovel.
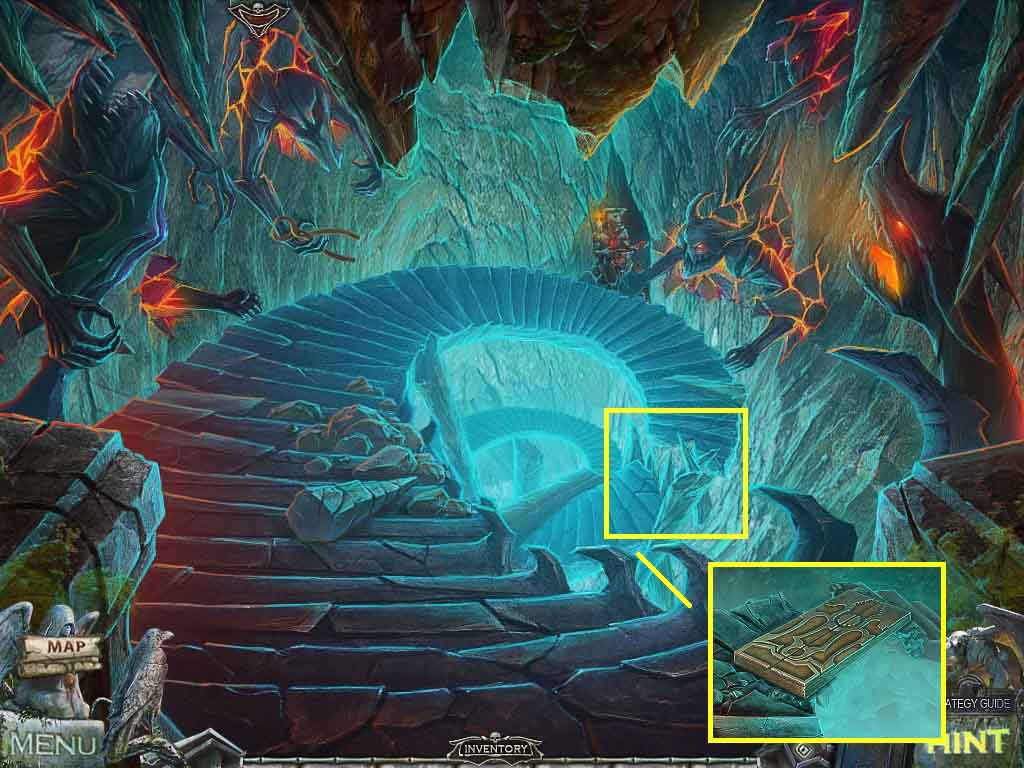
- Move down 2 times.
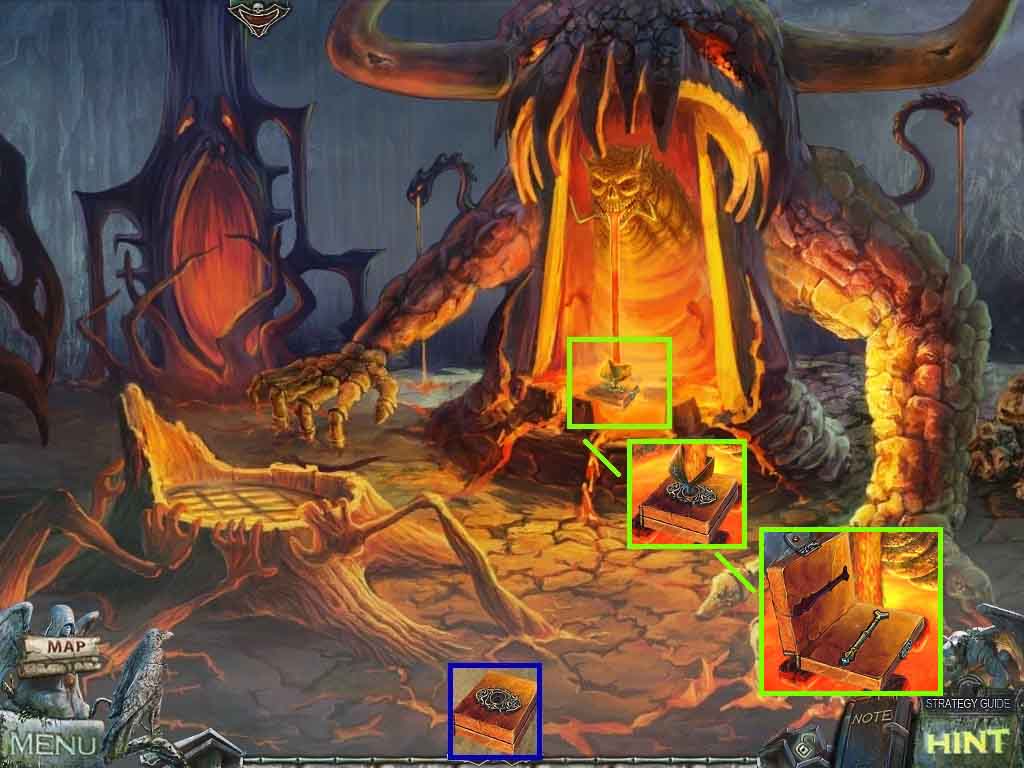
- Click the tombstone; insert the 3 crystals.
- Collect the 1st scepter.
- Move ahead and go to the right.

- Click the crypt door.
- Insert the crypt key to access a hidden objects area.
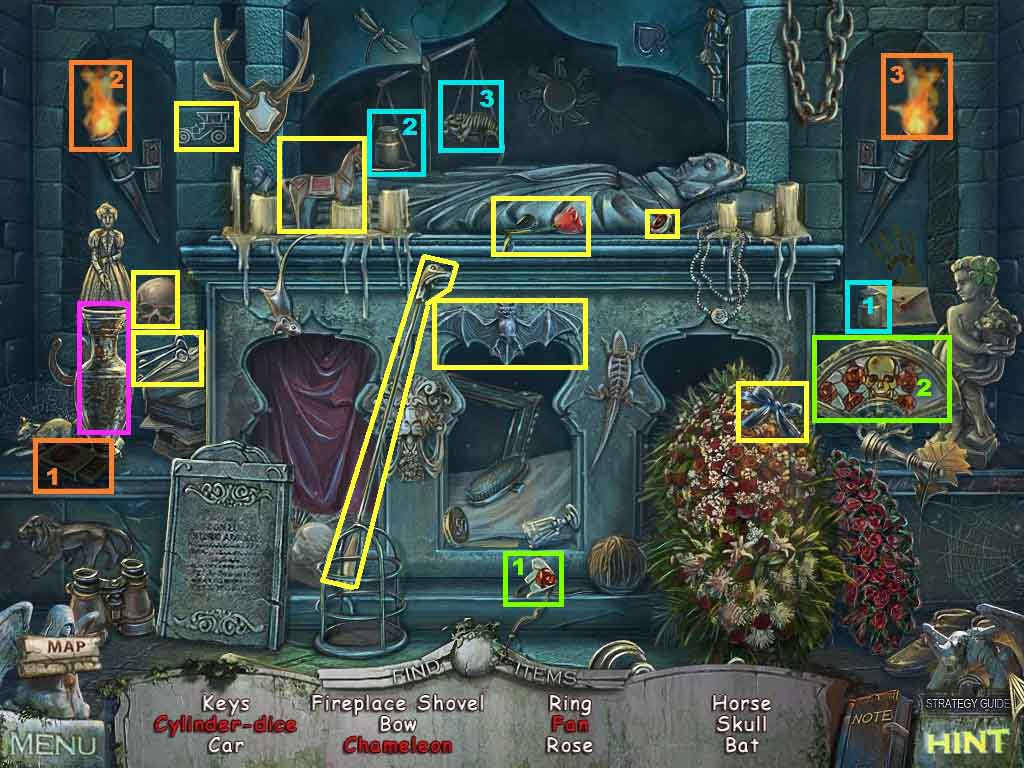
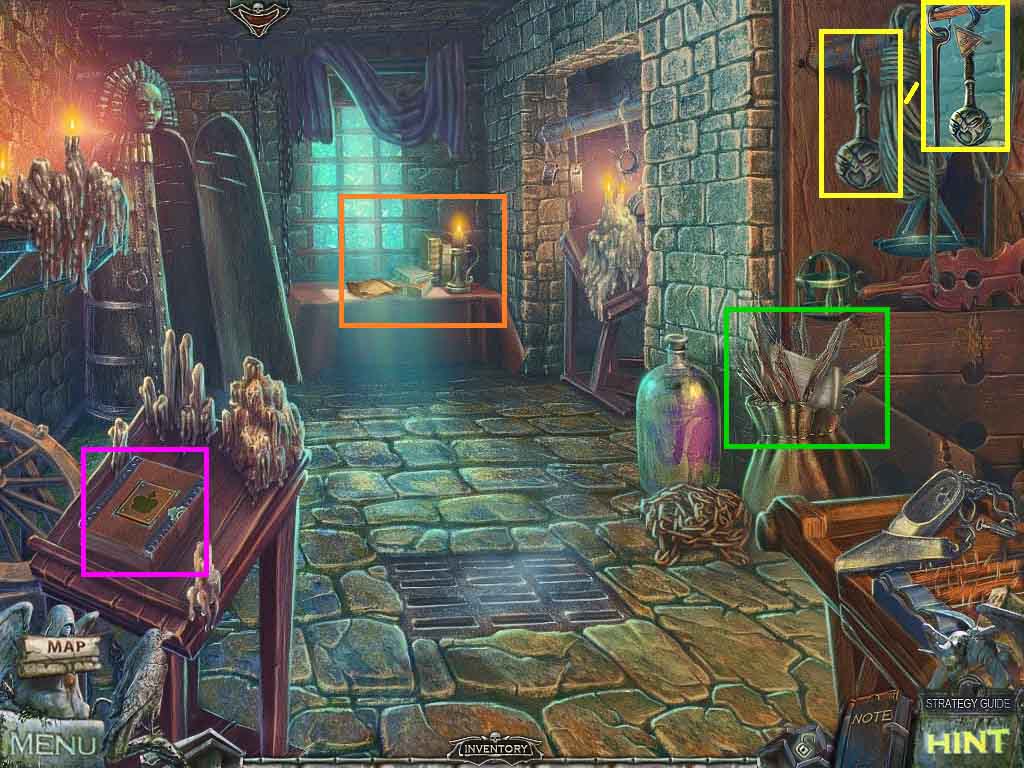
- Click the matches and use them to light the torches.
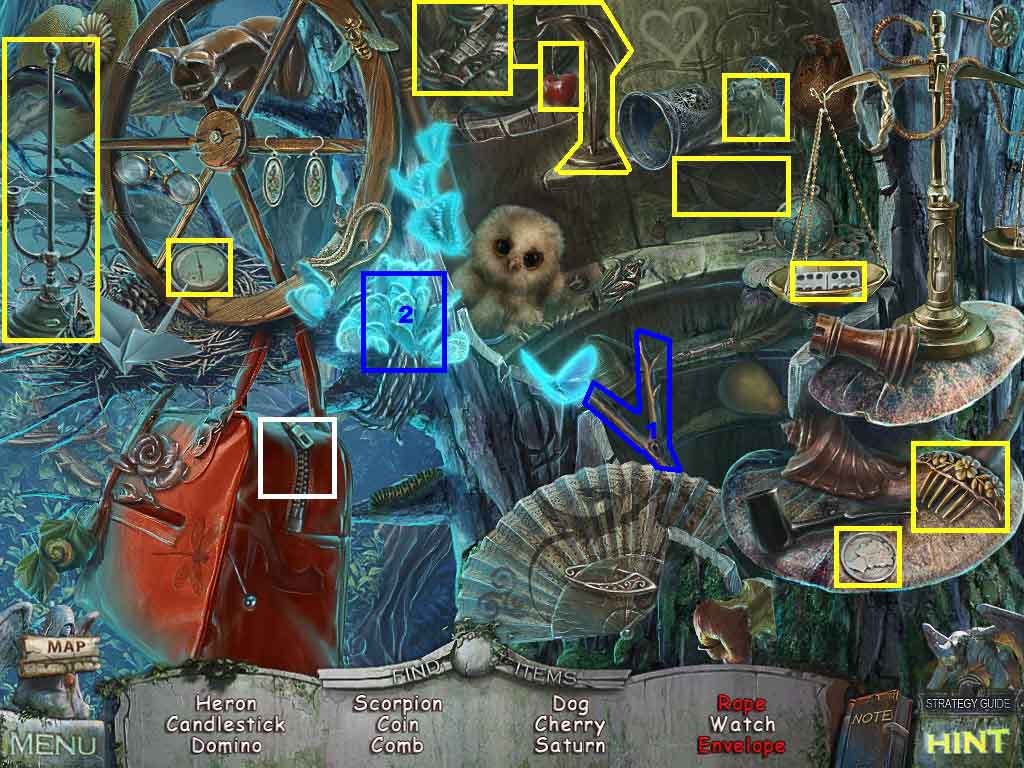
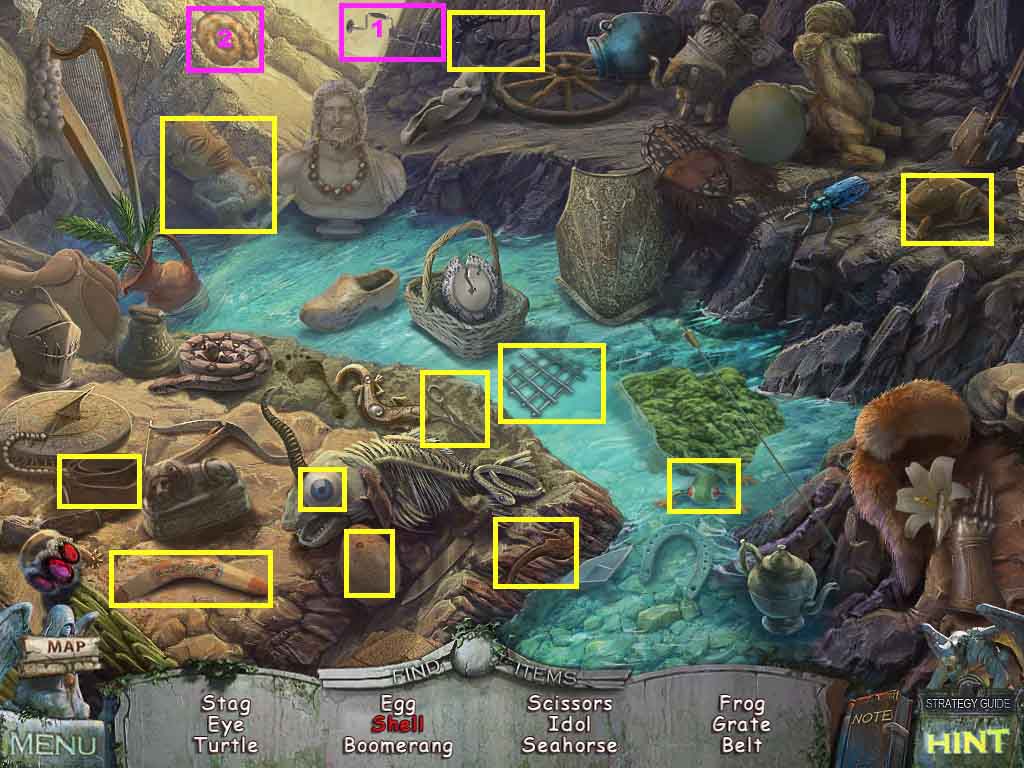
- Find the listed items.
- Click the vase; collect the cylinder dice.
- Put the weight onto the scale; collect the chameleon.
- Insert the piece into the frame; collect the fan.
- Collect the cylinder dice.
- Move down one time and go left.
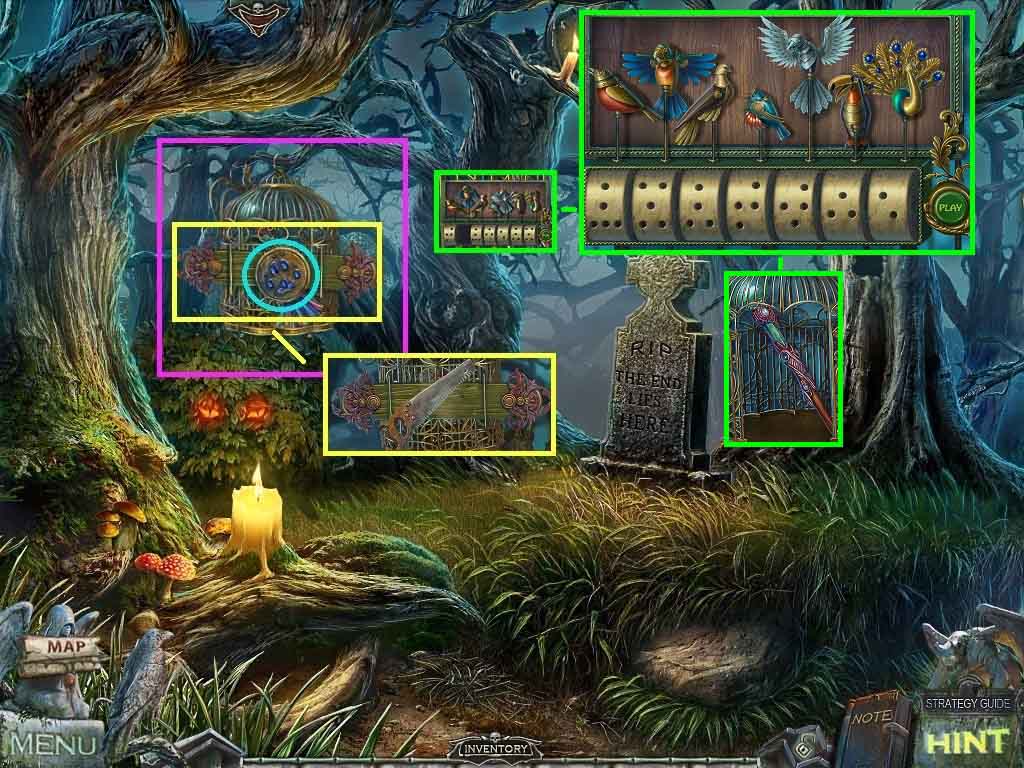
- Click the cage; collect the medal.
- Select the saw and use it to cut the board.
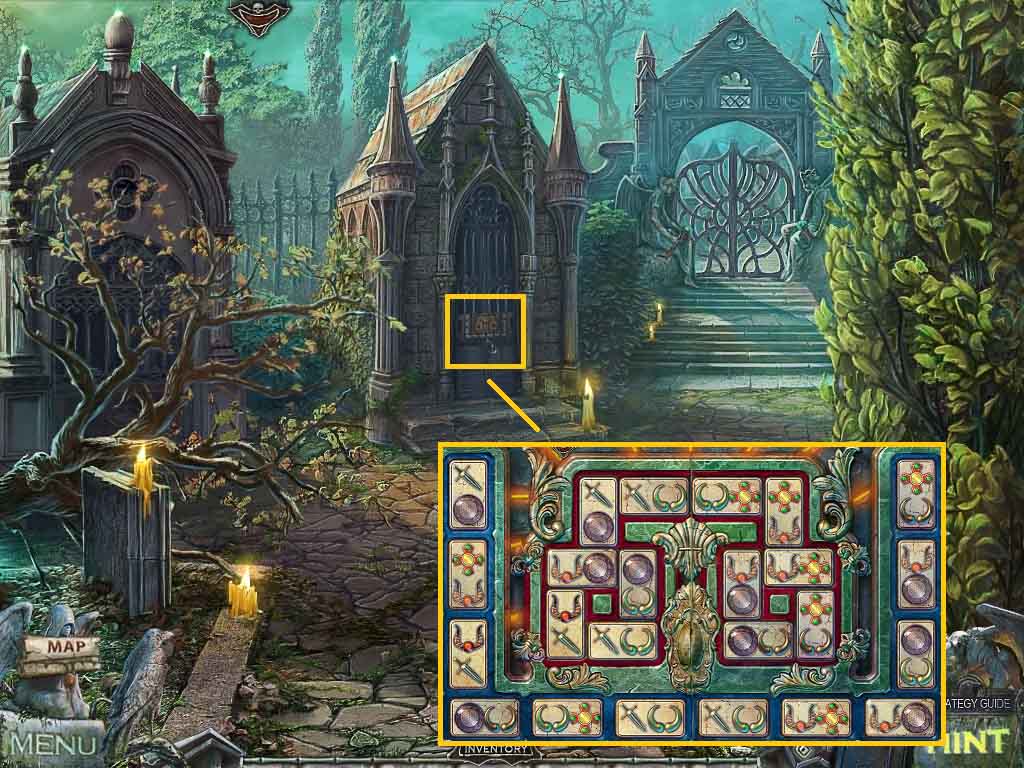
- Click the lock to trigger a mini-game.
- Insert the cylinder dice to start the game.
- Click the cylinders as shown to change the position of the birds and click play.
- Collect the 2nd scepter.
- Move down once and go forward 2 times.
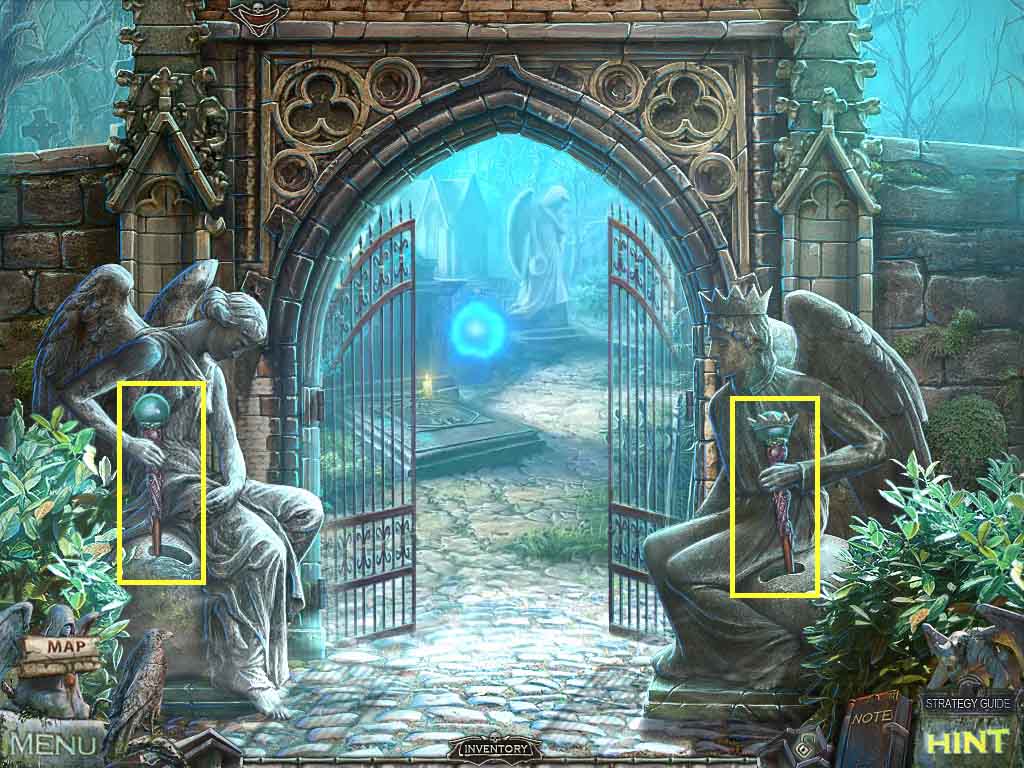
- Insert the 2nd scepter onto the hand of the left statue.
- Insert the 1st scepter into the hand of the right statue.
- Move ahead.
- Clear the spider webs using the duster.
- Read the plaque.
- Speak to the ghost.
- Collect the power of earth from the ghost.
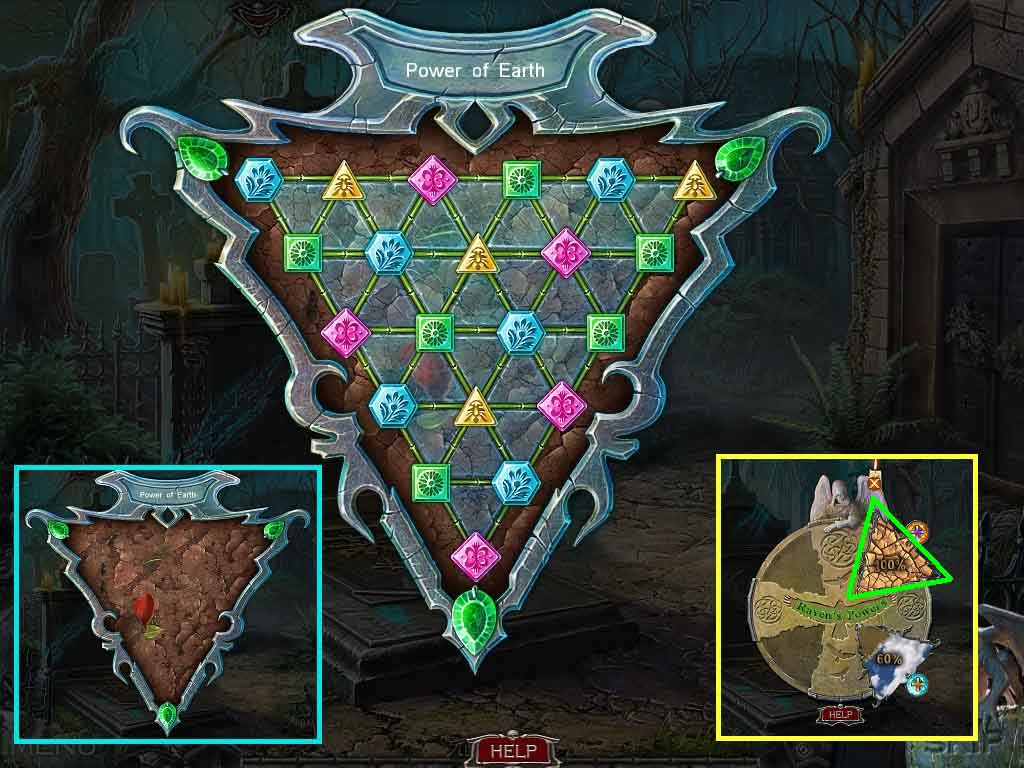
- Click the center of the triangles to move the outer gems to get 3 matching gems at the 3 points of a triangle.
- Clear all the glass and collect the Power of earth for the raven.
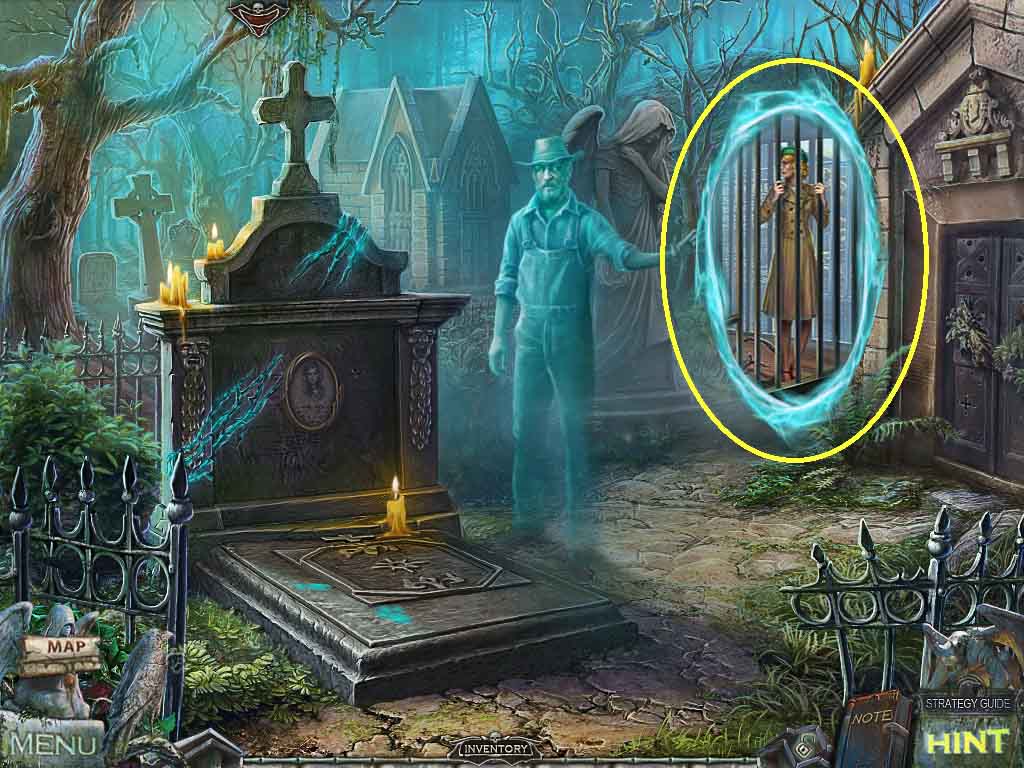
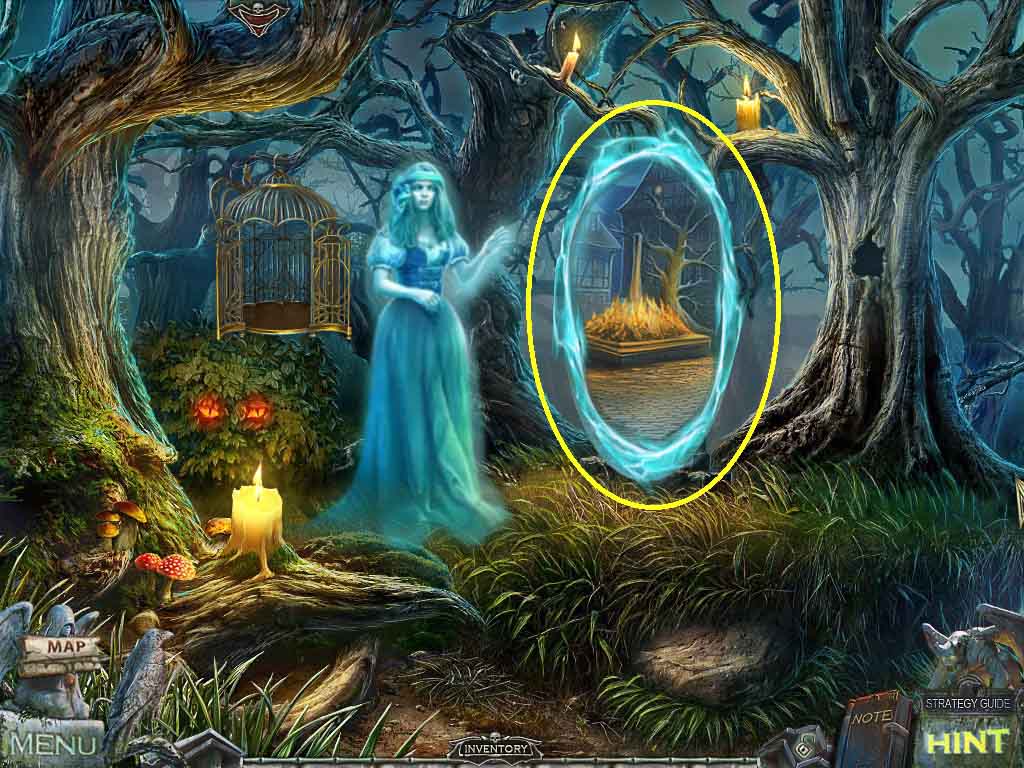
- Move into the portal.
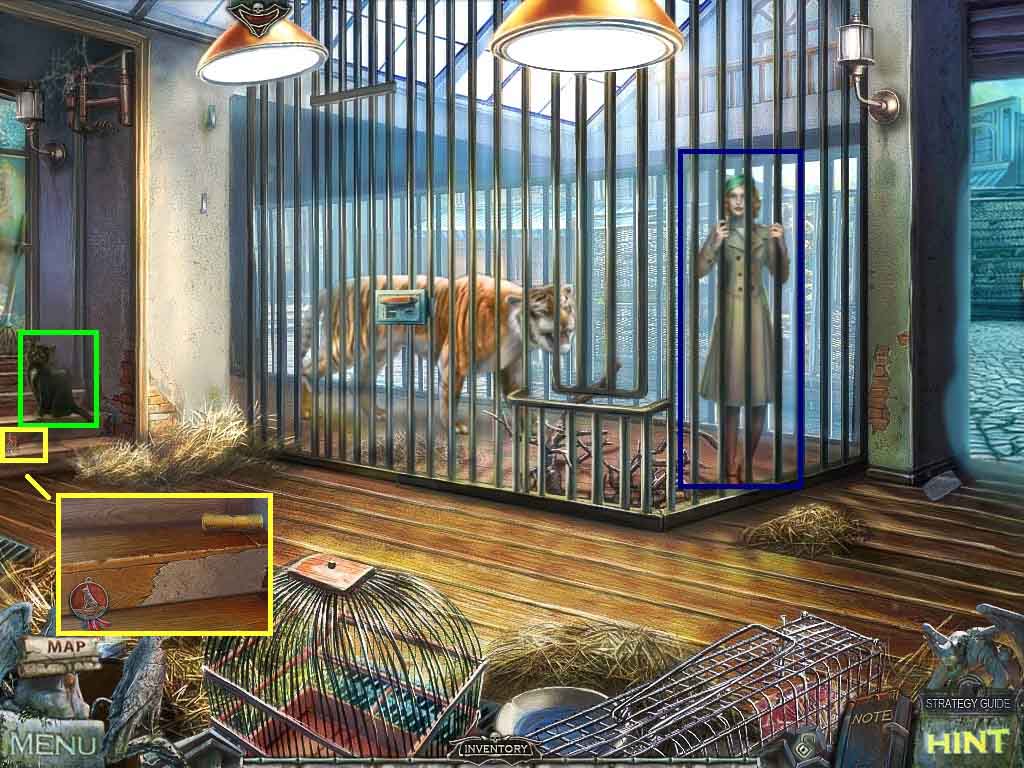
- Speak to the girl.
- Click the cat away.
- Click the stairs; collect the medal and the drill handle.
- Click the door.
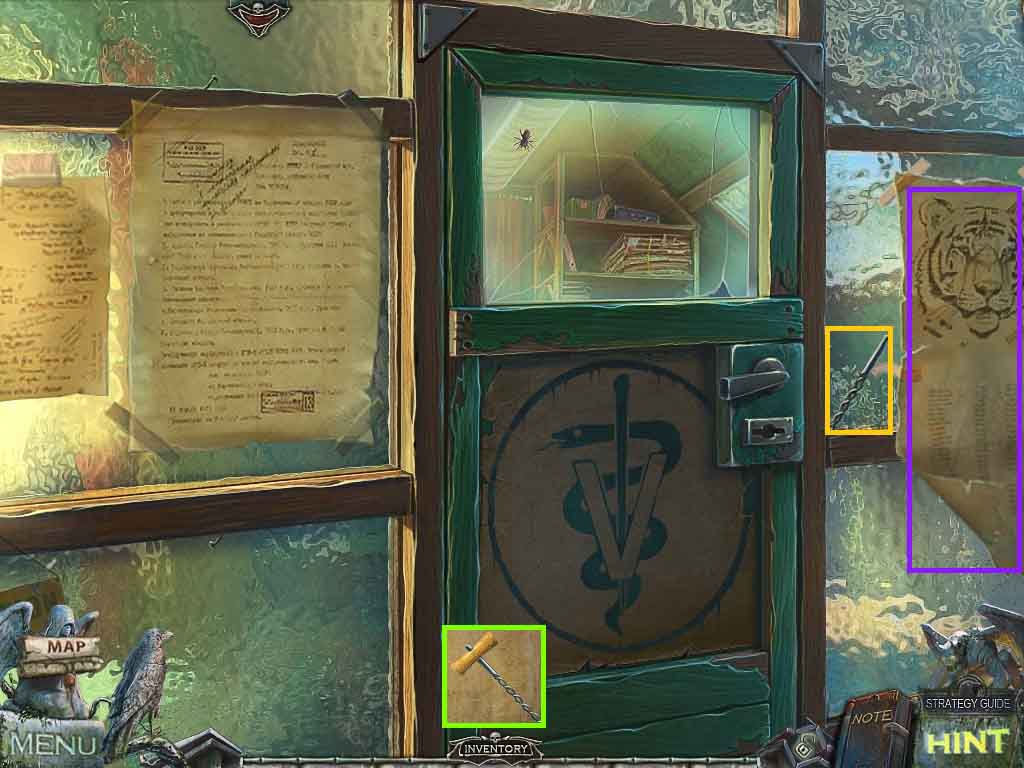
- Collect the drill bit.
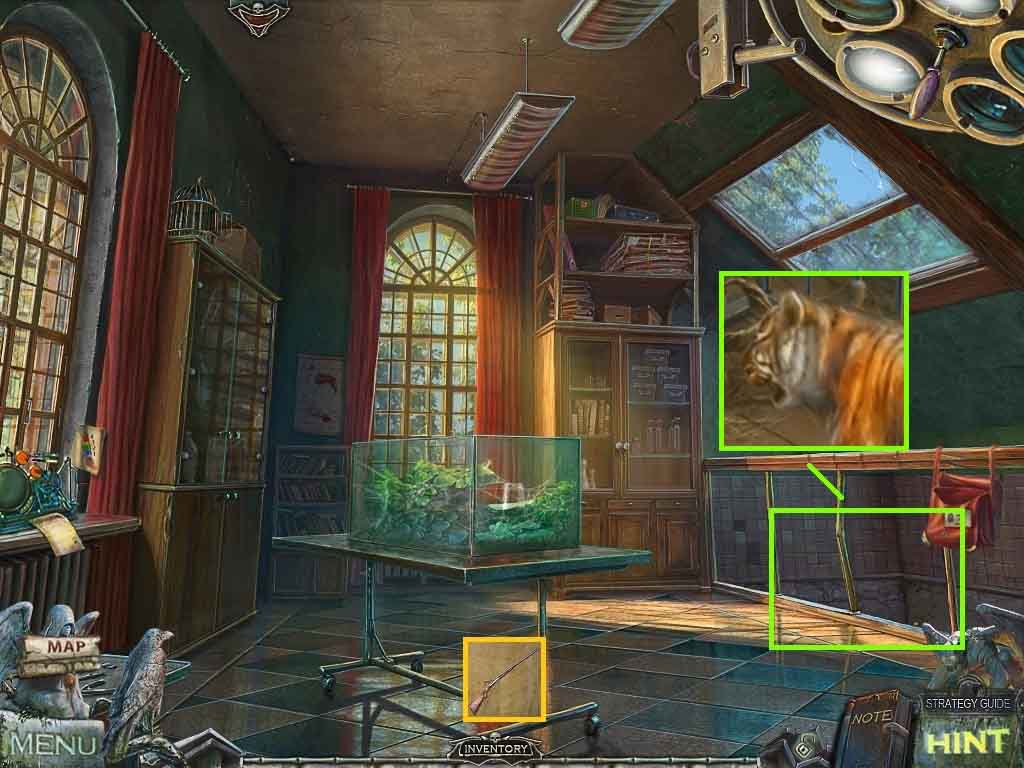
- Read the notes about tigers.
- Combine the drill bit and the drill handle to create the corkscrew.
- Move down one time and go right.
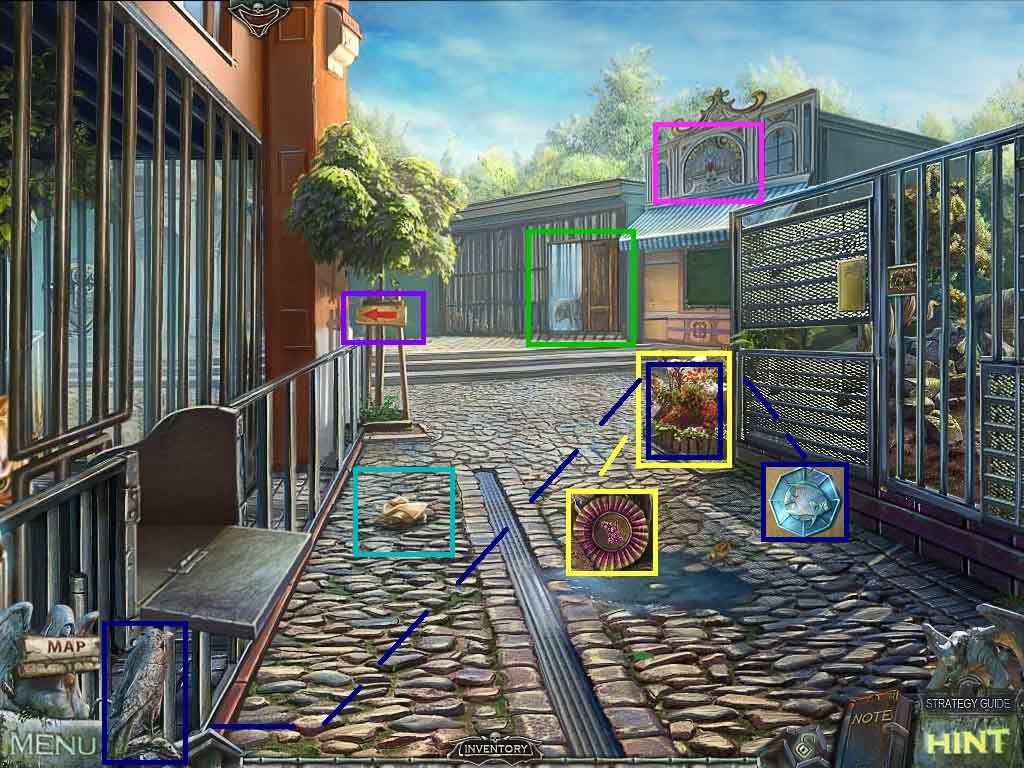
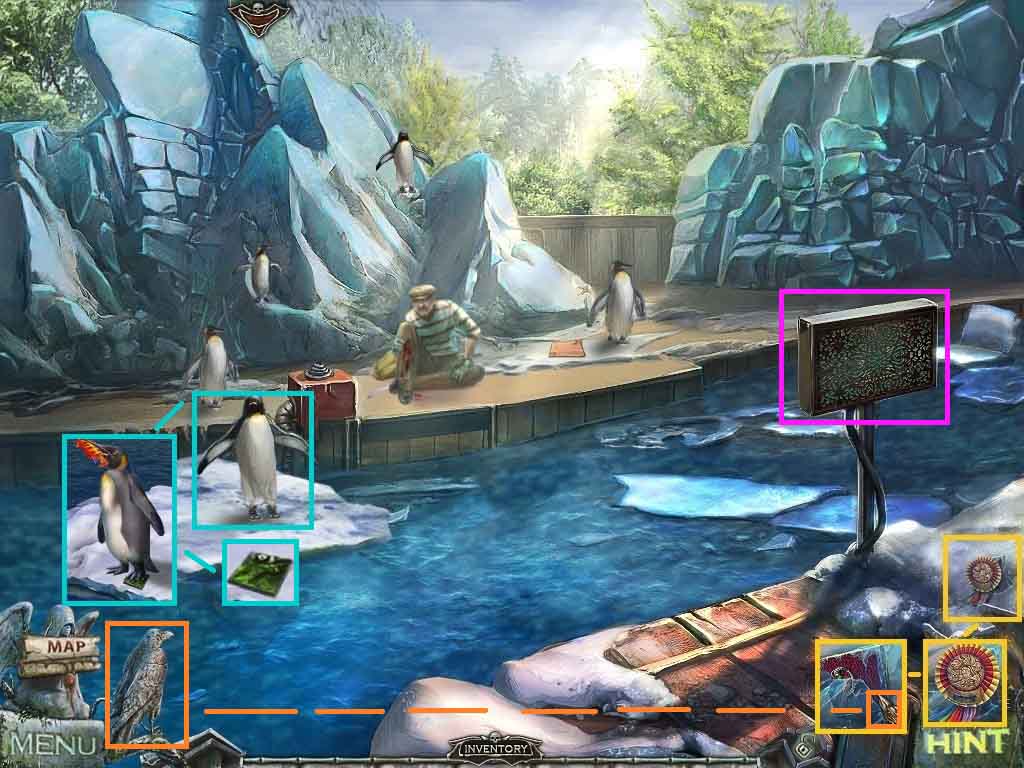
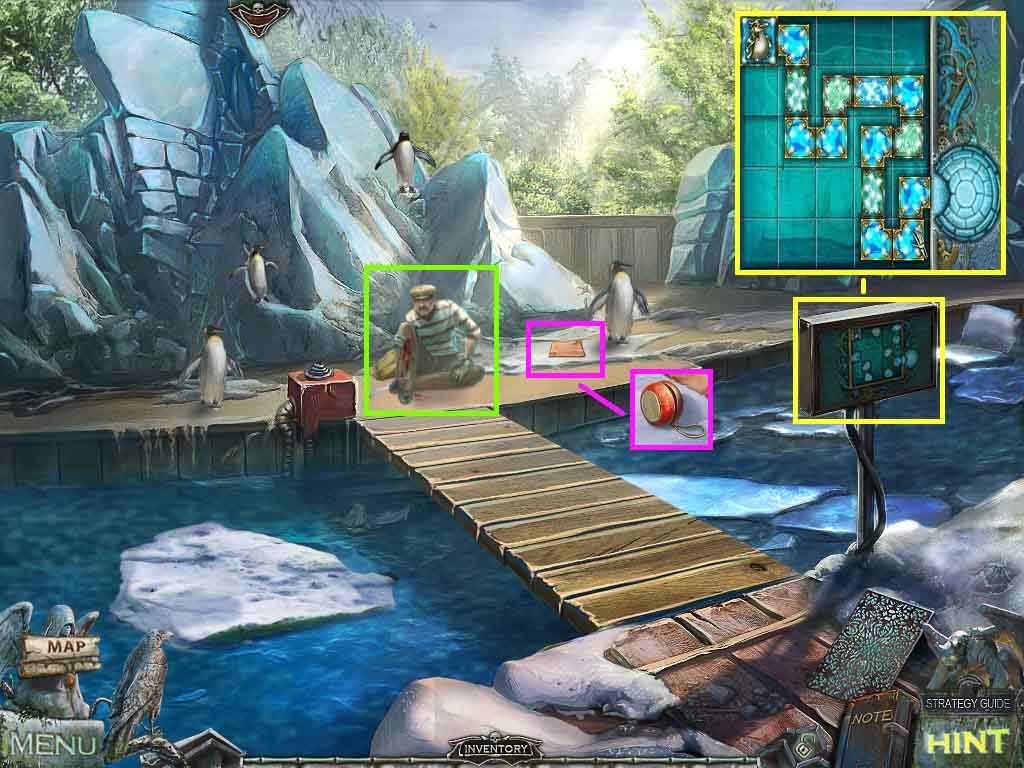
- Read the note about penguins.
- Click the flowers; collect the medal.
- Select the raven’s power of earth on the hole; collect the aquarium token.
- Notice the path on the left.
- Notice the arcade.
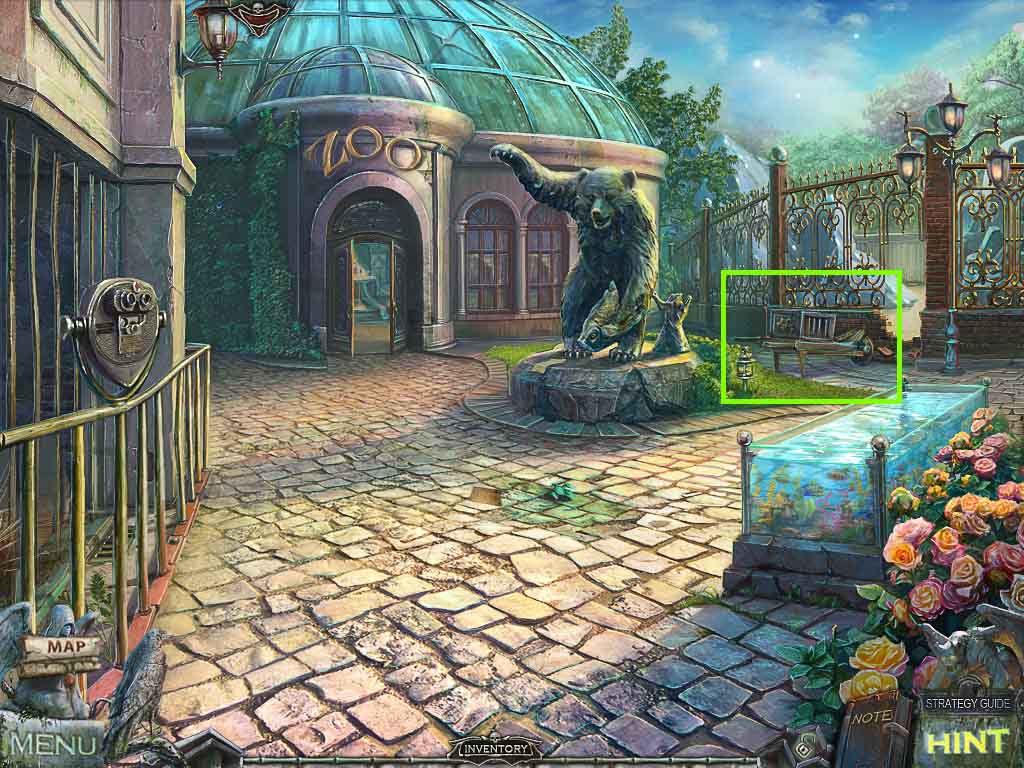
- Click the wolf cage.
- Move down one time and move to the left.
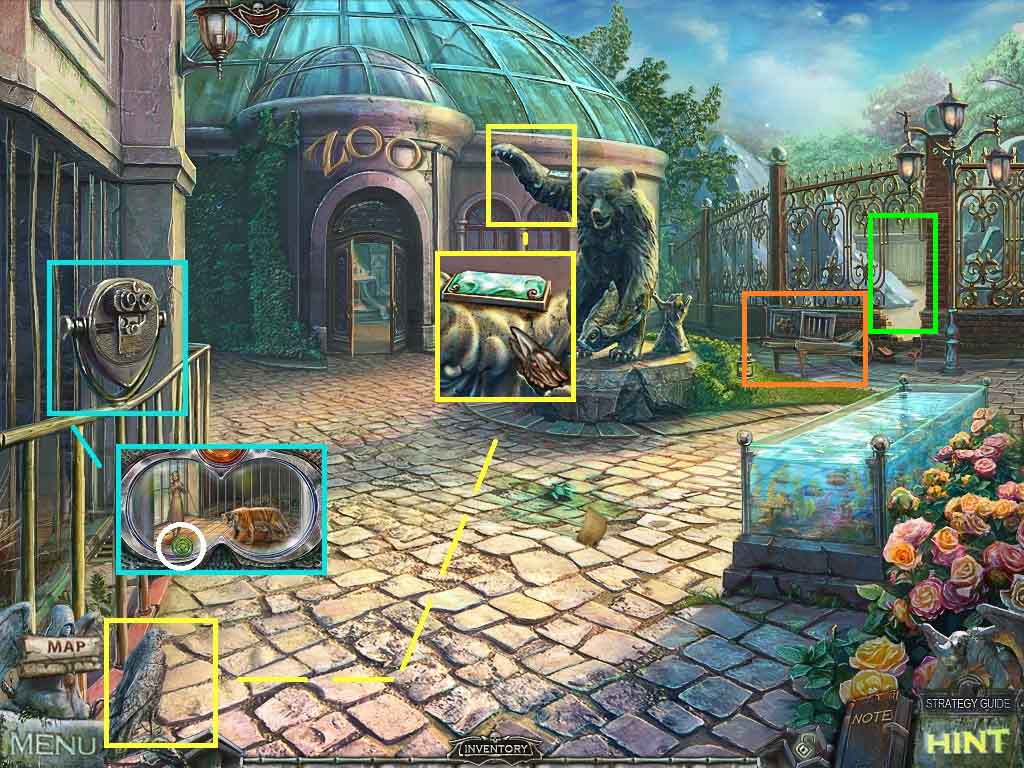
- Click the telescope; collect the game token.
- Click the bear statue’s paw; select the raven to collect the 1 / 4 piece of ice.
- Notice the hole in the fence.
- Click the wheelbarrow.
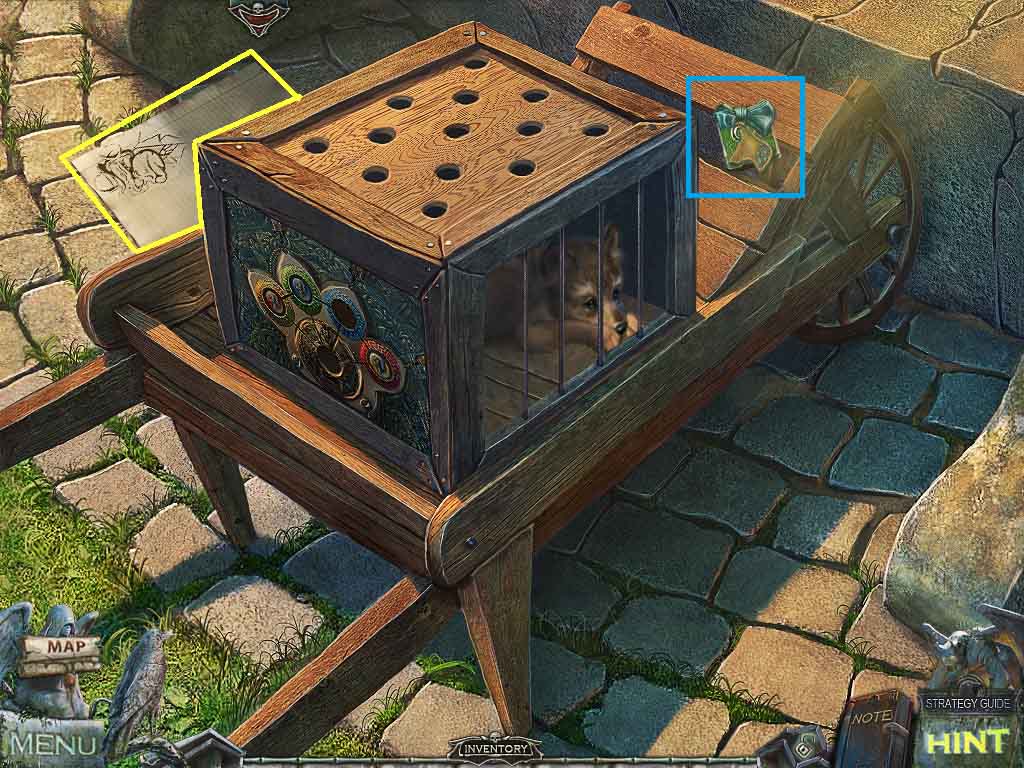
- Read the gorilla notes.
- Collect the medal and the 1st zebra mosaic piece.
- Move down 2 times.
- Click the arcade; insert the token into the slot.
- Click the token with the matching face.
- The solution is randomized.
- Complete all 3 levels and collect the toy fishing rod.
- Move to the left.

- Click the aquarium; insert the aquarium token.
- Dangle the toy fishing rod into the aquarium; collect all the fish.
- Move into the zoo building.
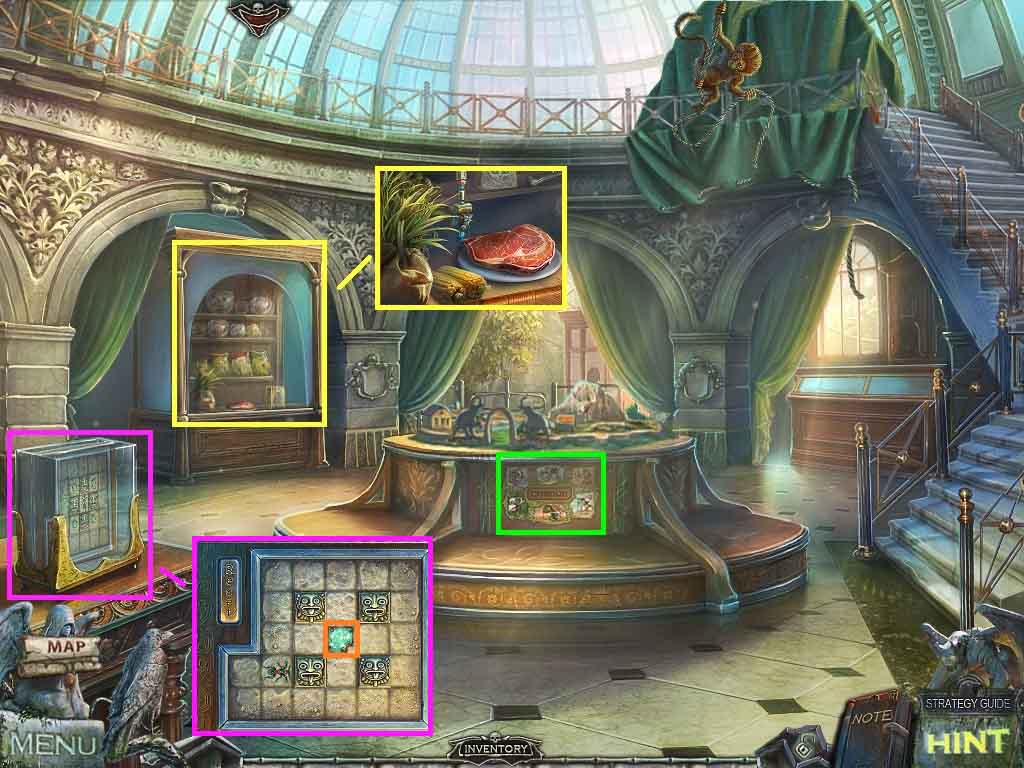
- Click the cabinet; collect the grass and meat.
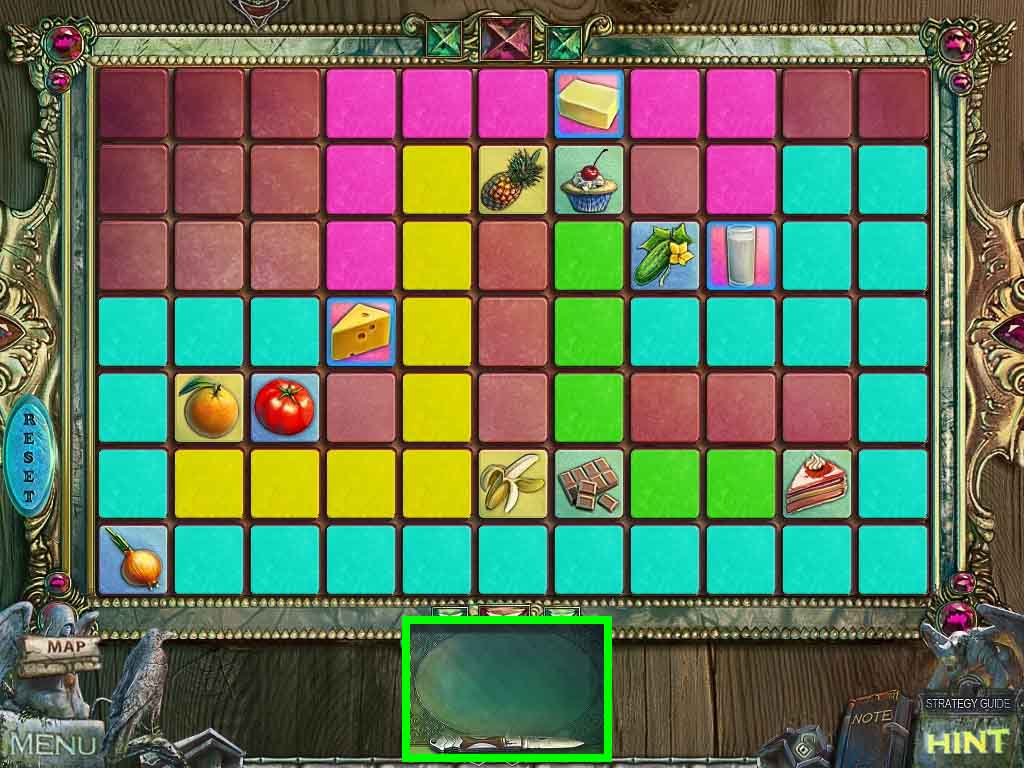
- Notice the mini-game on the display.
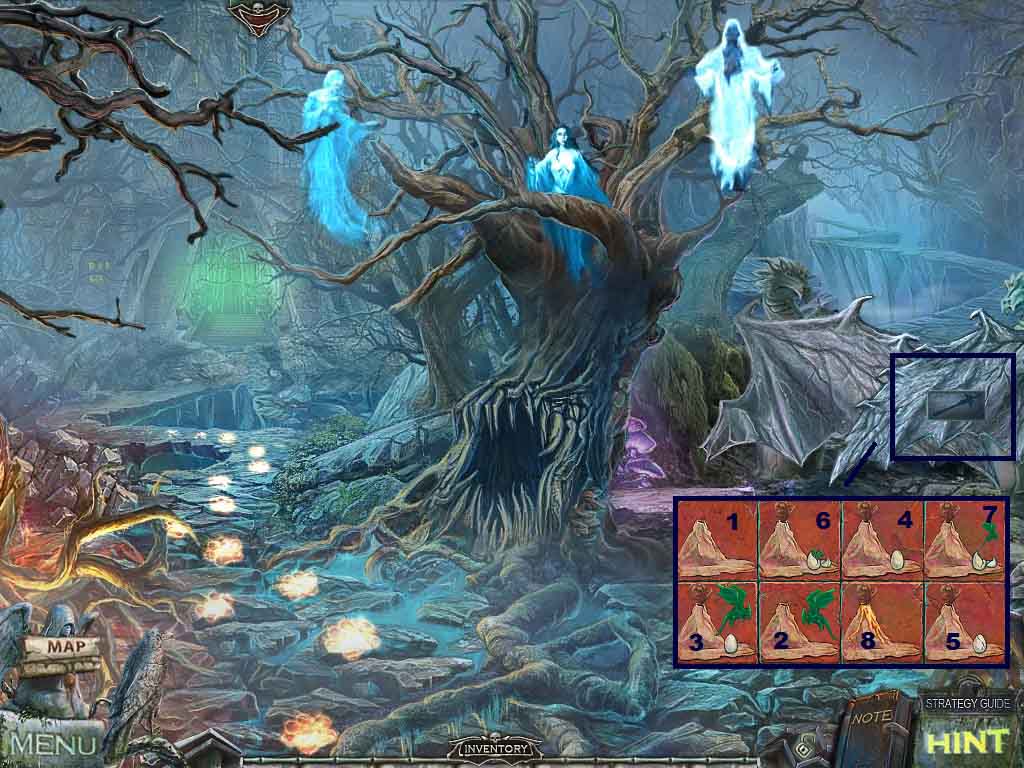
- Click the glass cube to access a mini-game.
- Move the ant as follows to solve the puzzle.
- Left – up – left – down
- Up – up – right – right – right – down –left
- Right – right – down – down – left – up
- Left – left – down – right
- Down – left – left – left – up – left
- Collect the 2 / 4 piece of ice.
- Move down two times.
- Click the gate.
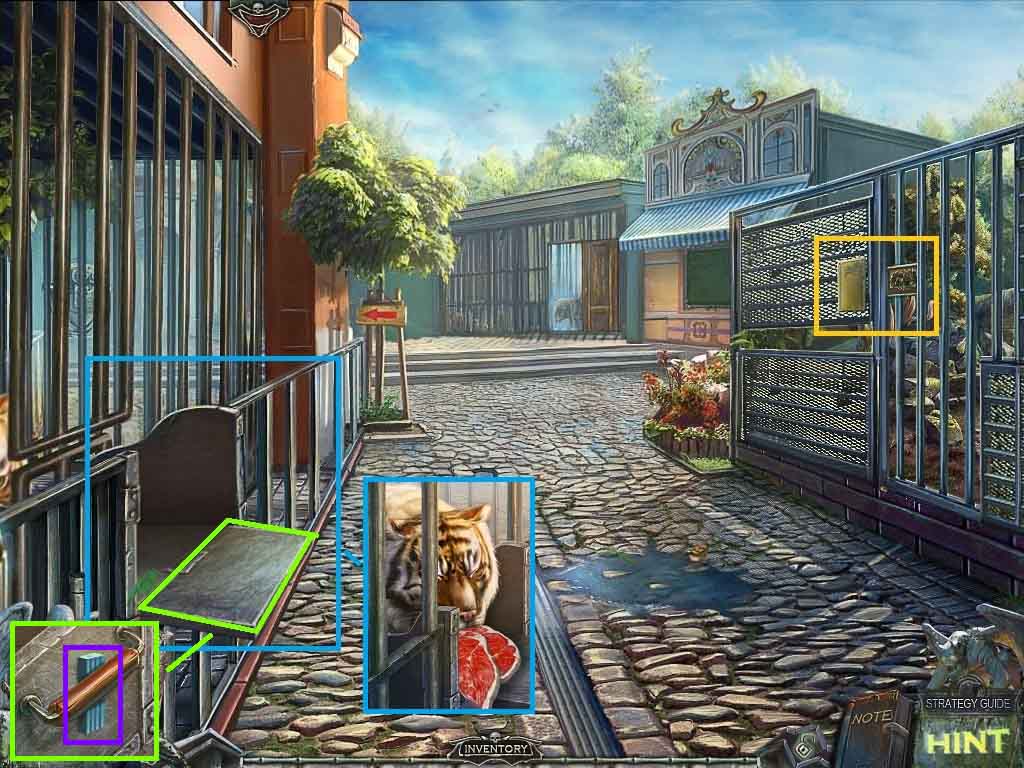
- Read the zebra info.
- Notice the mini-game.
- Click the opening and give the tiger the meat.
- Click the panel and collect the soft plastic.
- Move down one time.
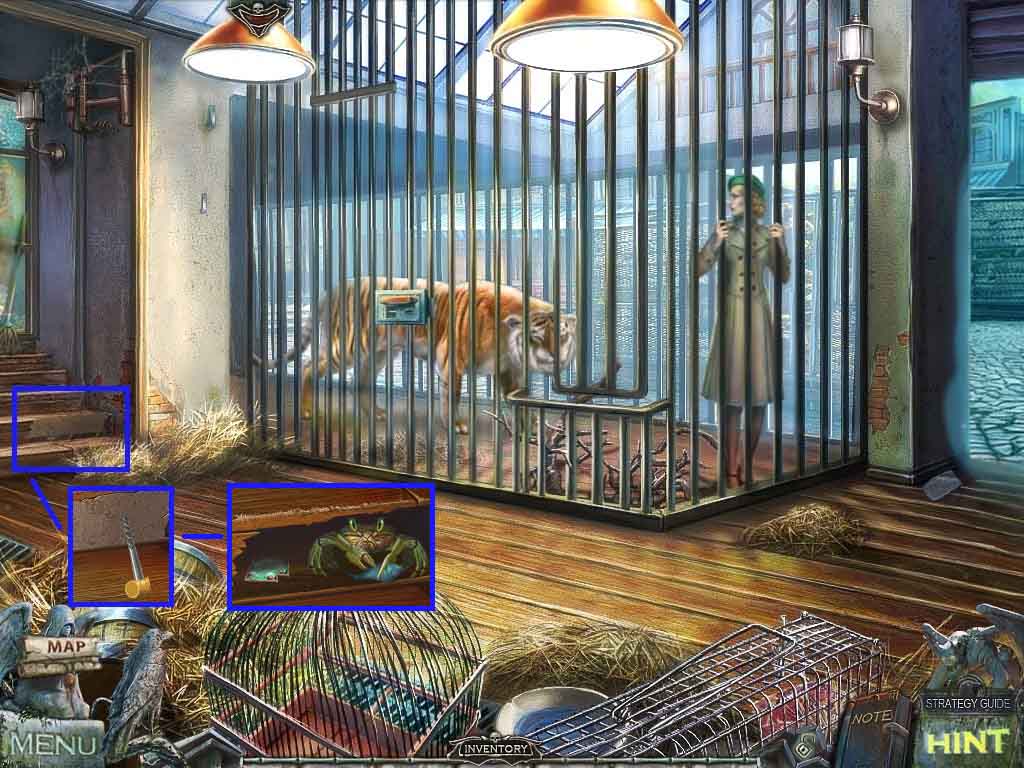
- Click the stairs; use the corkscrew on the panel.
- Give the crab the soft plastic and collect the 3 / 4 pieces of ice.
- Move to the right, then go left and go through the hole in the fence.
- Click the snow.
- Collect the medal and use the raven’s power of earth to collect the 2nd zebra mosaic piece.
- Click the penguin and hand him the fish.
- Click the ice and collect the 1st animal tile.
- Click the control panel cover and notice the mini-game in the panel.
- Move down two times.
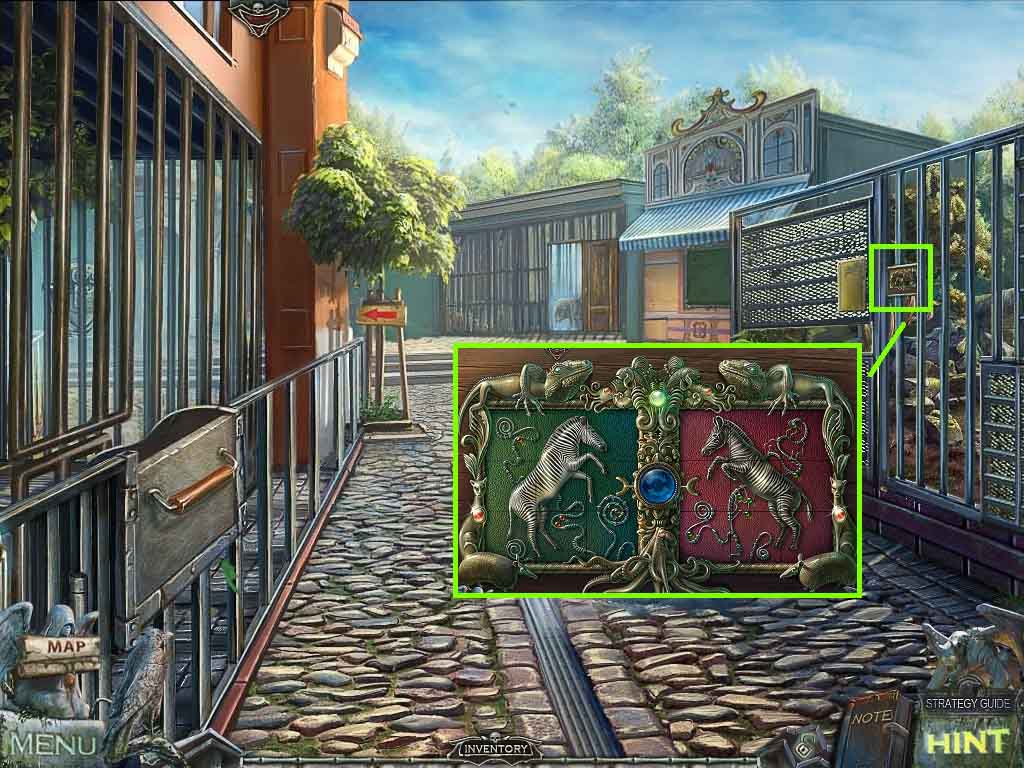
- Click the gate on the right.
- Click the mosaic to access a mini-game.
- Insert the 2 zebra mosaic pieces to trigger the mini-game.
- Click the tiles into the correct positions.
- Once the picture is restored move through the gate.
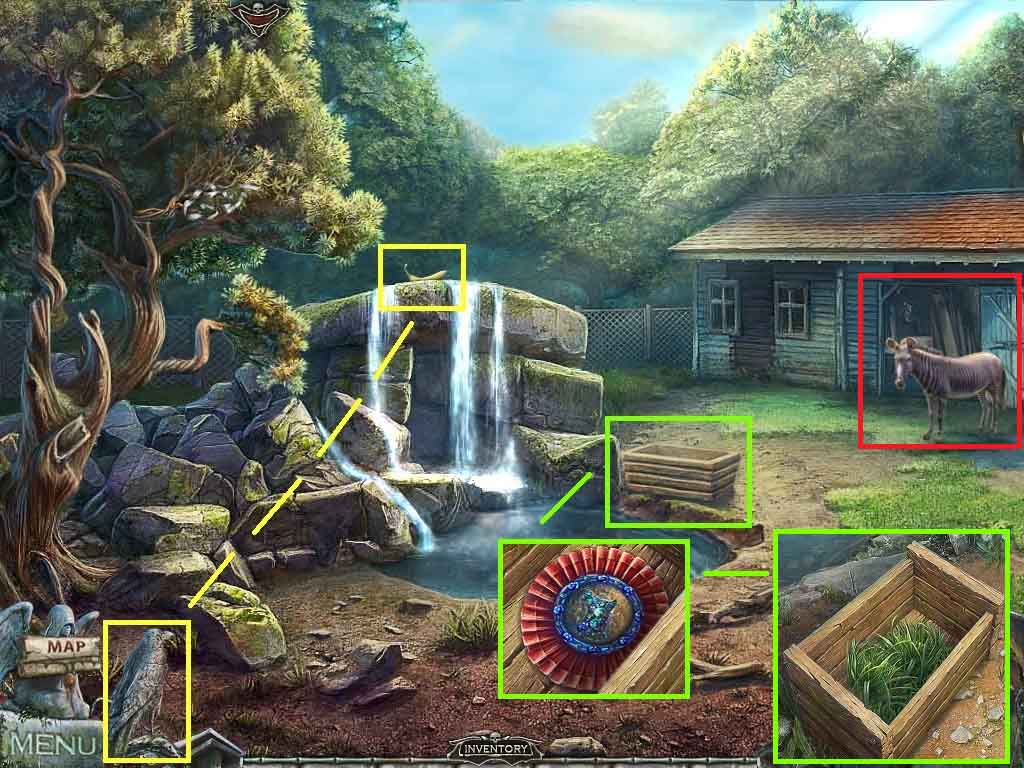
- Click the waterfall.
- Select the raven’s power of air to collect the banana.
- Click the trough.
- Collect the medal and insert the grass.
- Click the barn to access a hidden objects area.
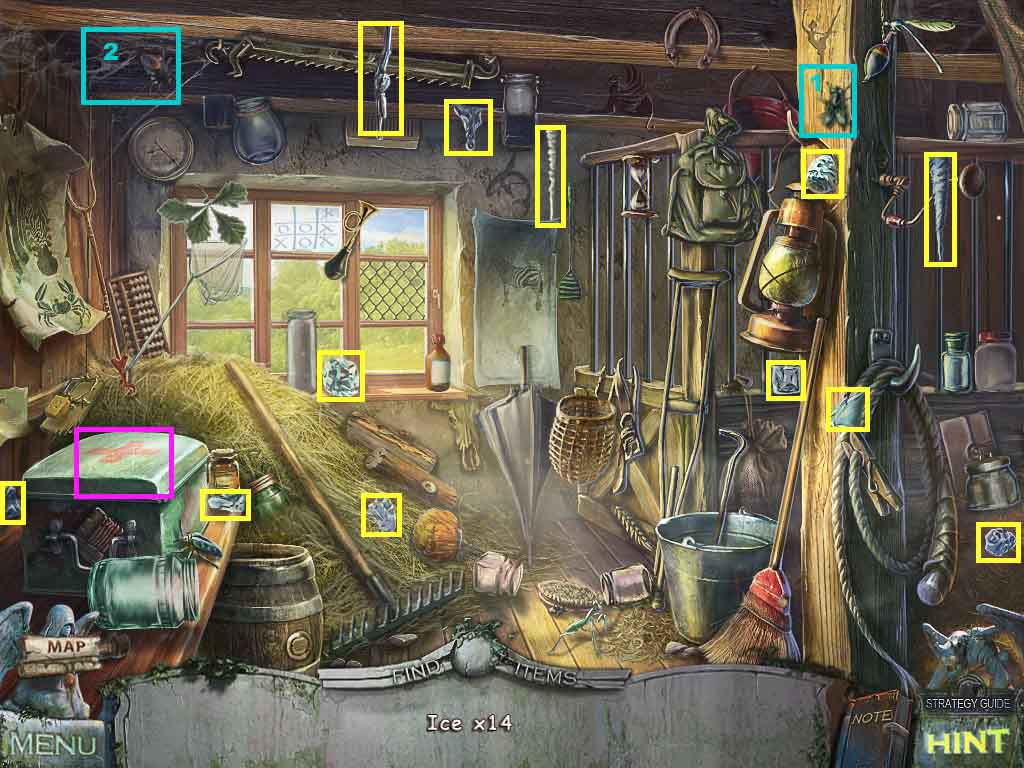
- Find all the ice.
- Click the crate.
- Place the fly in the web.
- Collect the 4 / 4 pieces of ice.
- Move down once, go left and move forward.
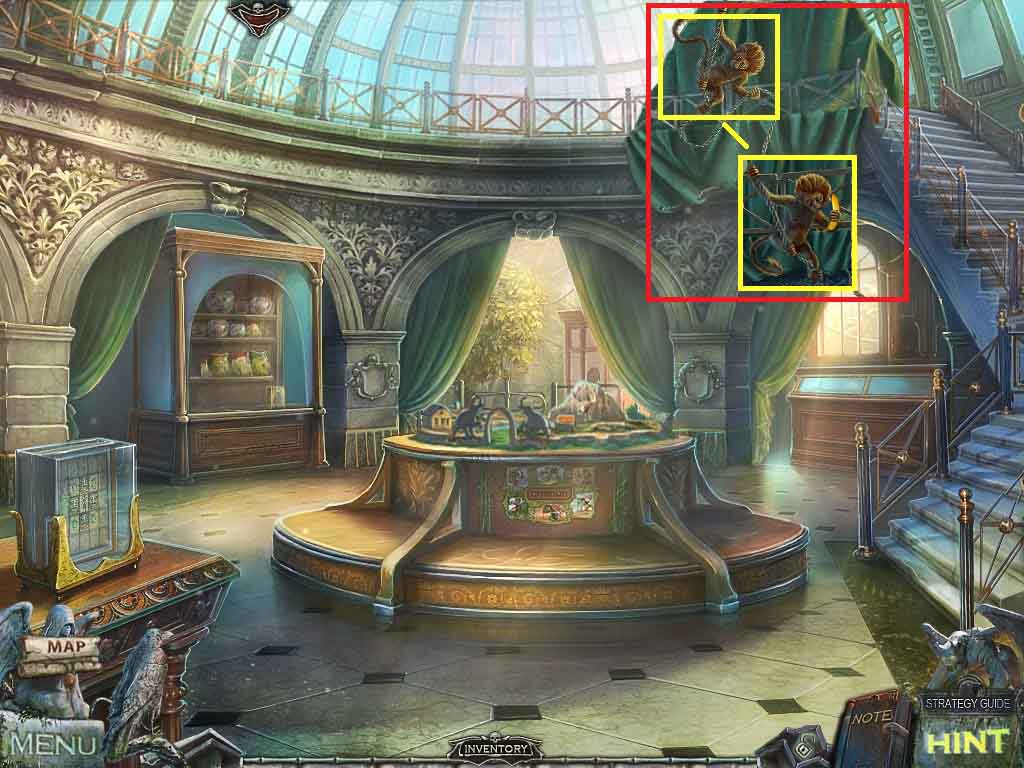
- Click the monkey and hand him the banana.
- Click the area at the top of the stairs to access a hidden objects area.
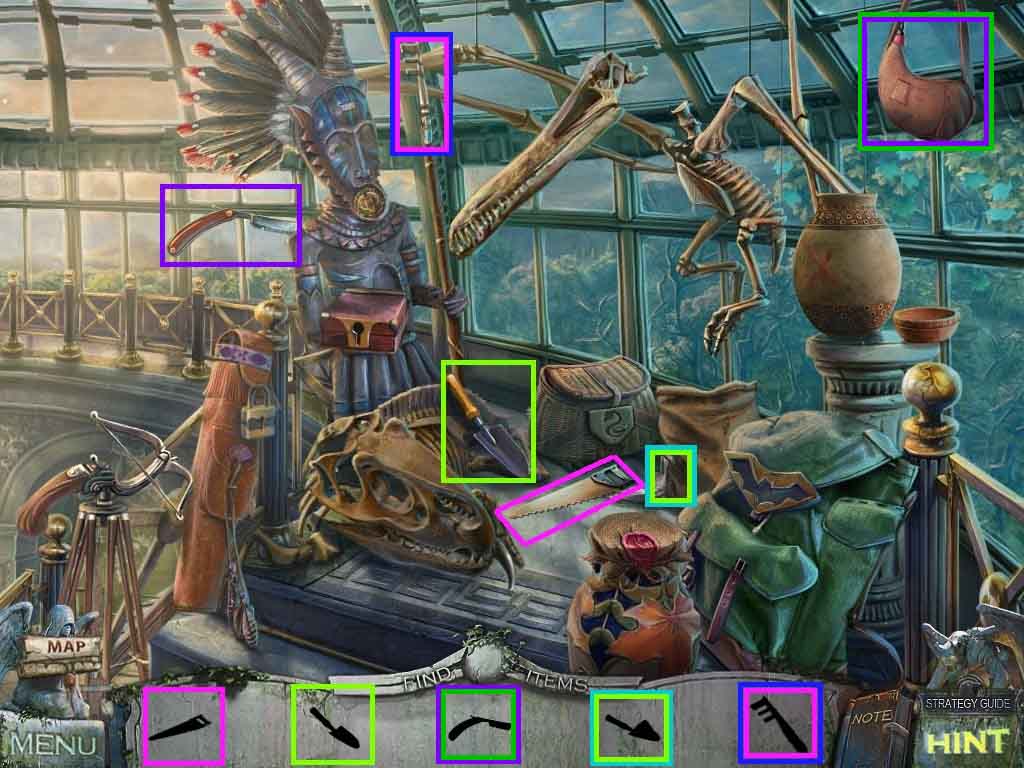
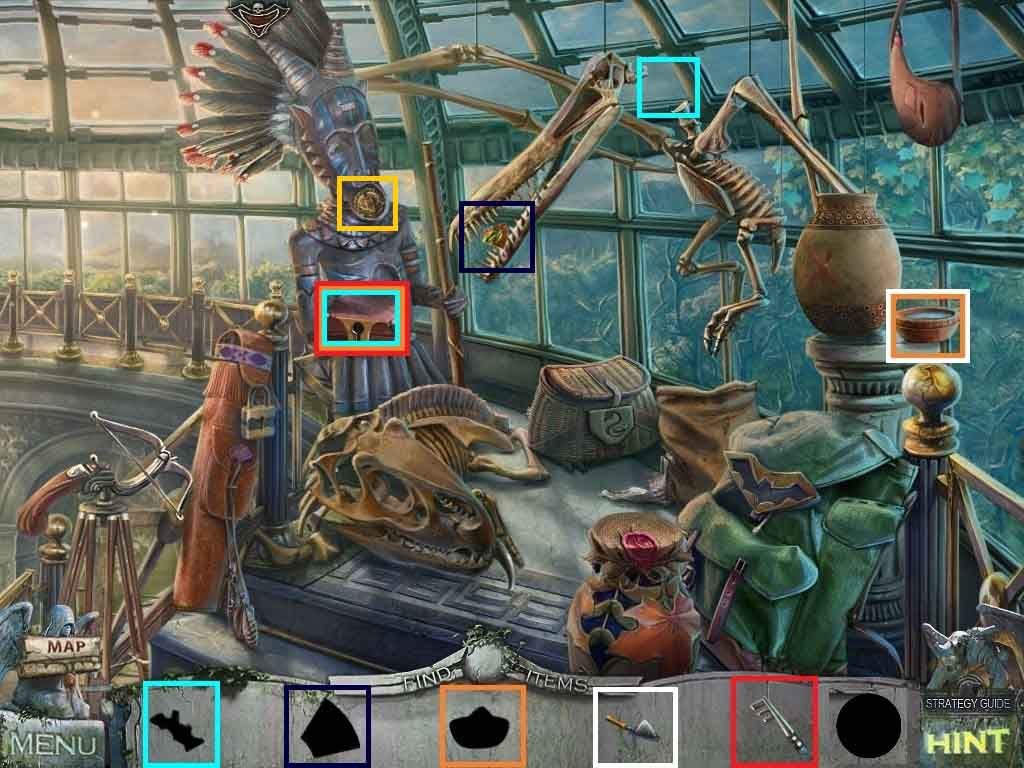
- Find all the items shown in the silhouettes.
- Select the shovel and use it on the bag; collect the shovel with gypsum.
- Select the saw and use it on the spear; collect the spearhead.
- Select the razor and use it to slice the water bag.
- Pour the shovel with the gypsum into the bowl; collect the bowl with gypsum.
- Select the spearhead and use it to open the case then pour the bowl of gypsum into the case.
- Collect the bone and place it onto the skeleton.
- Collect the game part.
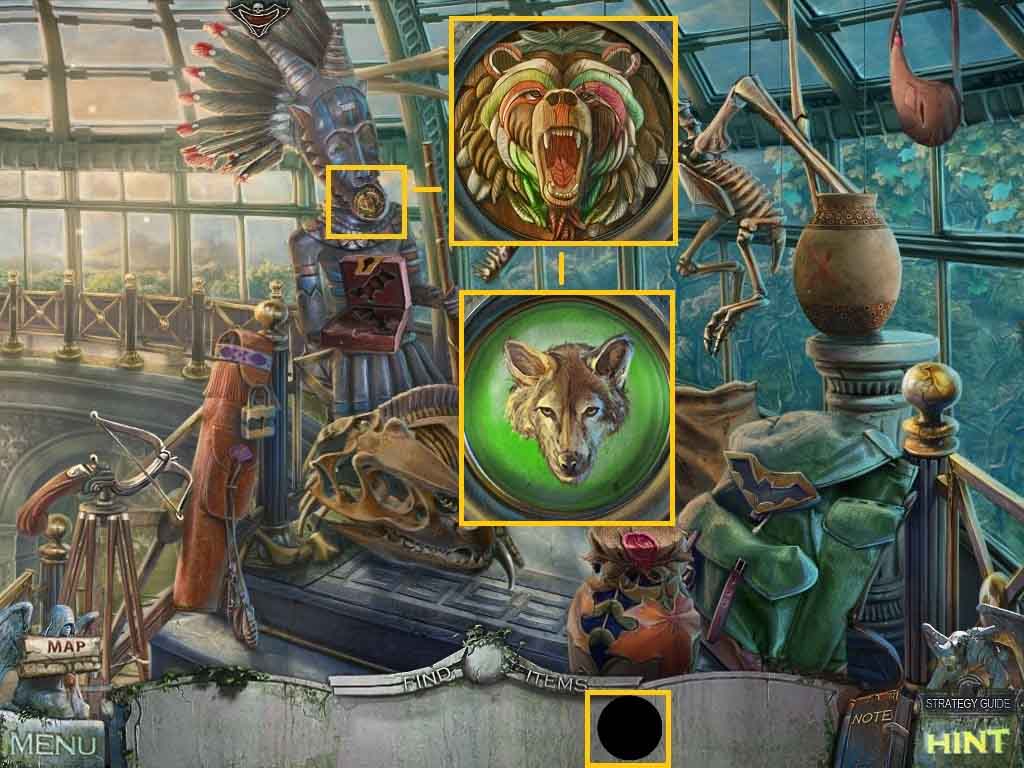
- Click the idol’s mouth to access a mini-game.
- Insert the game part to trigger the mini-game.
- Click the outer pieces to re-create the picture.
- Collect the wolf medallion.
- Move down once and go to the right.
- Click the control panel to access a mini-game.
- Insert the 4 pieces of ice to trigger the mini-game.
- Make a walkway for the penguins from beginning to end.
- The blue pieces can be adjusted and the green pieces rotate in place.
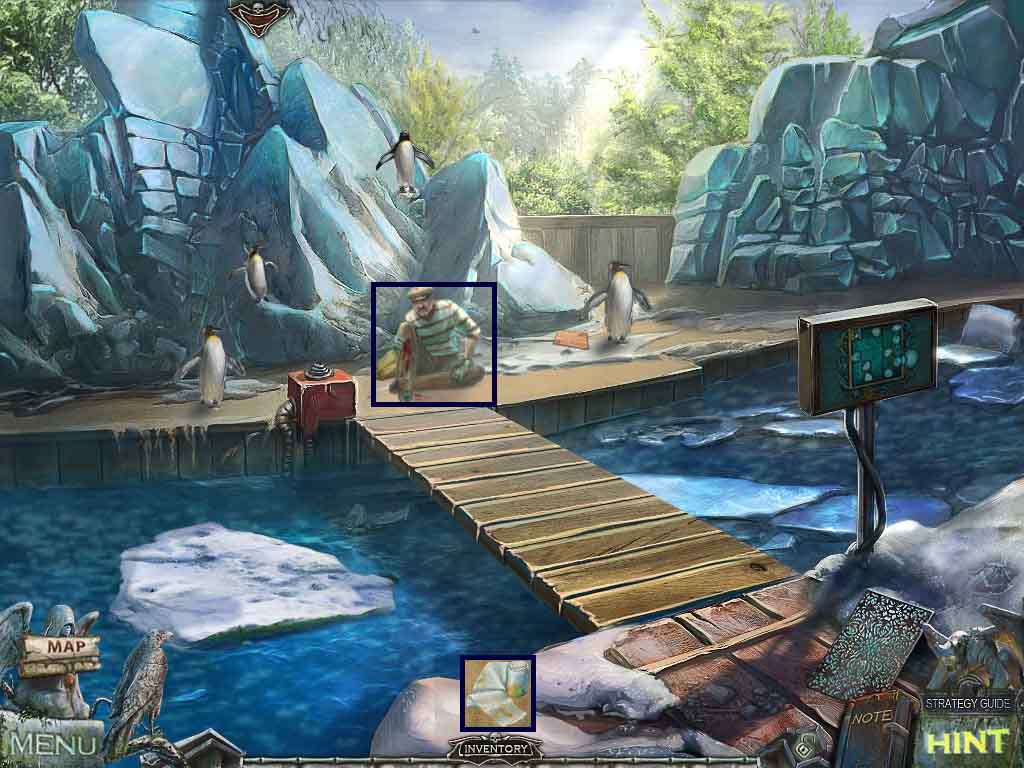
- Speak to the thief.
- Read the warning and collect the yo-yo.
- Move down one time.
- Click the wheelbarrow.
- Click the end of the cage to access a mini-game.
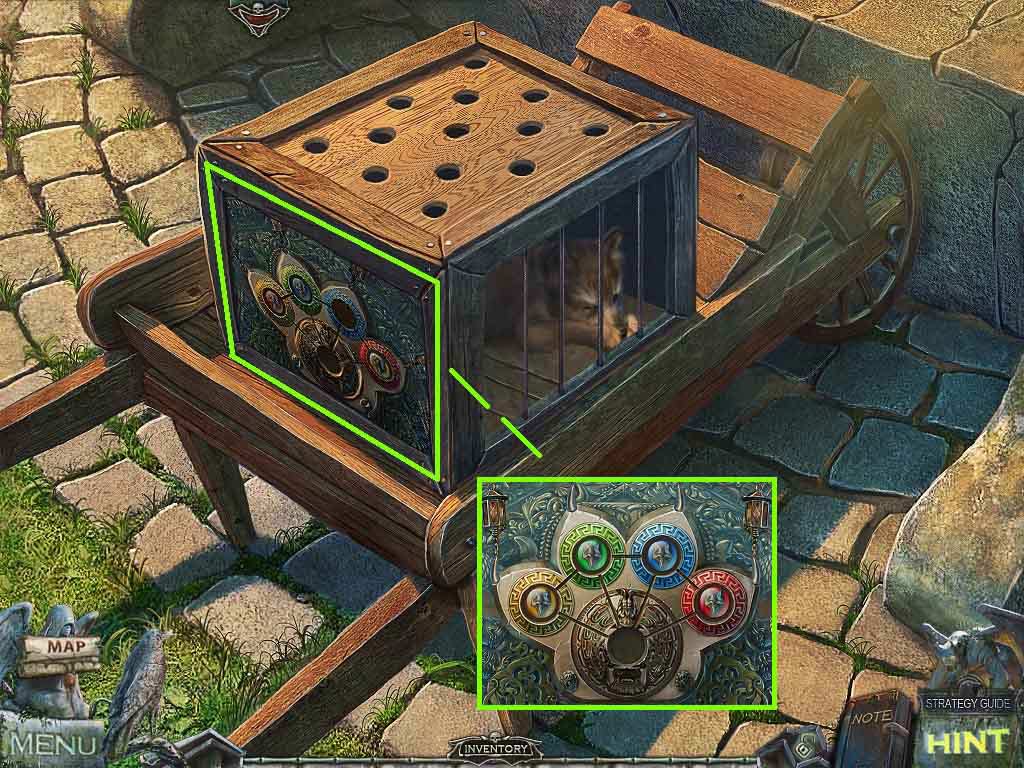
- Insert the wolf medallion to trigger the mini-game.
- Arrange the medallions to the circles of the same color.
- Click the medallions in the following order:
- Blue – red – blue – green – red – blue – green – yellow –red – blue – green –yellow
- Collect the wolf cub.
- Move down and go into the wolf cage.
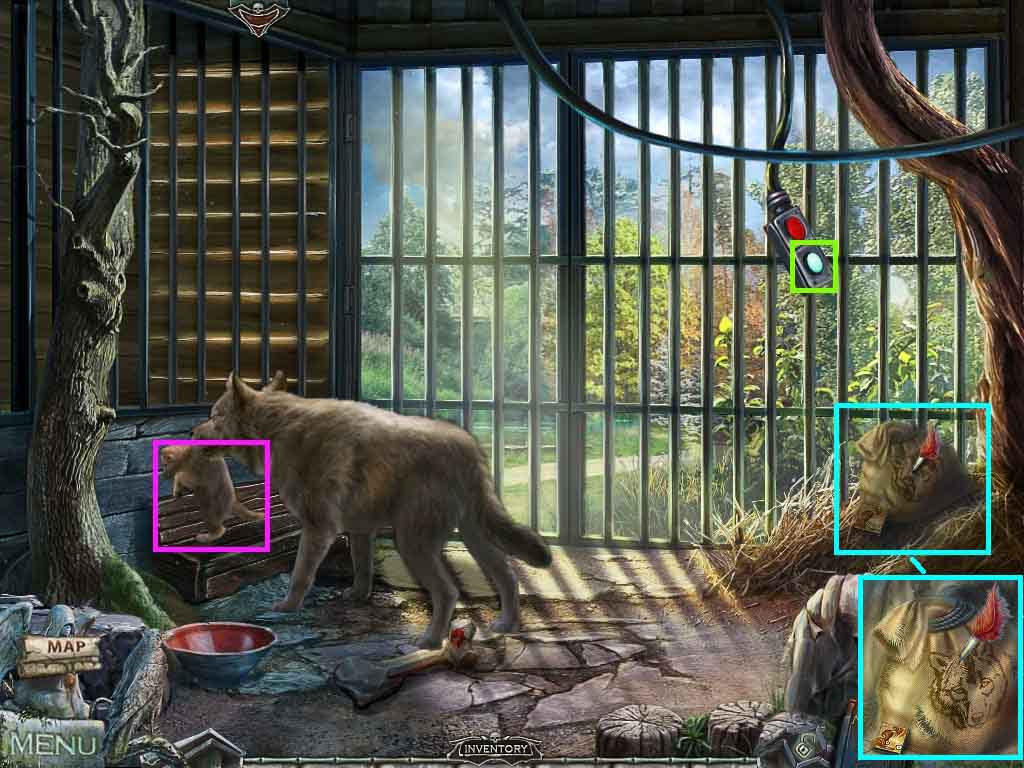
- Give the wolf cub to the wolf.
- Click the control and click the green button.
- Click the corner; collect the 2nd animal tile and the dart.
- Move down once and to the right.
- Click the tree and toss the yo-yo onto the branch.
- Collect the bandage.
- Click the barn to access a hidden objects area.
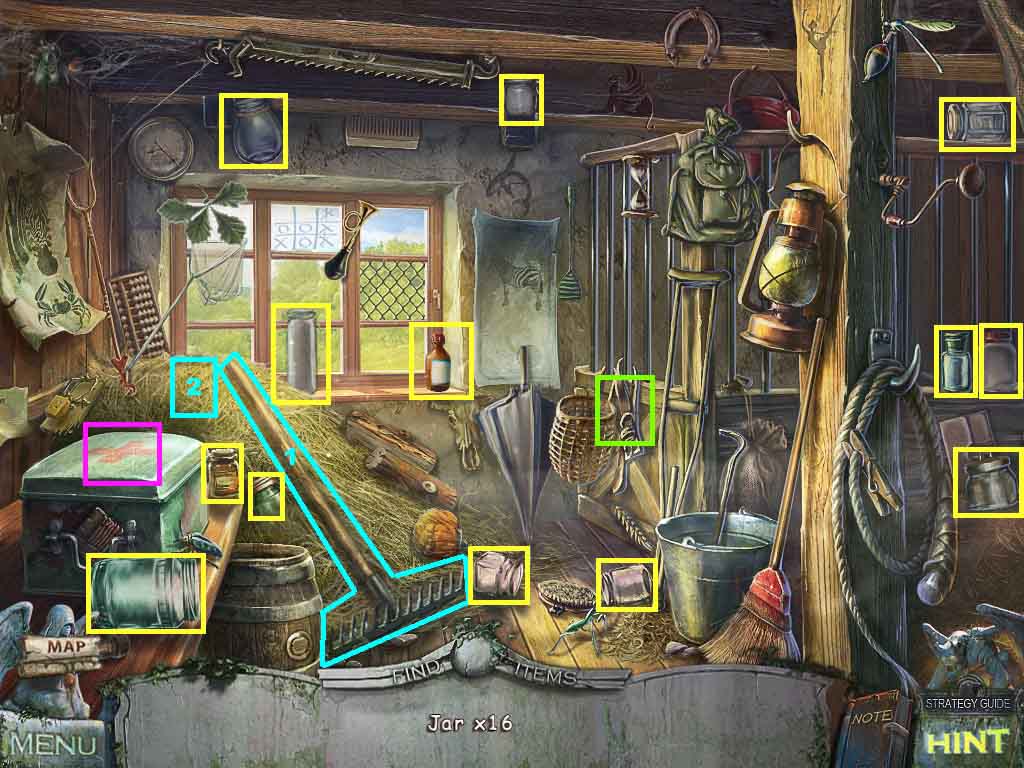
- Find the 16 jars.
- Click the chest open; collect the jar.
- Click the stall door; collect the jar.
- Rake the floor; collect the jar.
- Collect the hydrogen peroxide.
- Move down once, turn left and move to the right.
- Combine the bandage and the hydrogen peroxide to create the antibacterial bandage.
- Place the antibacterial bandage onto the thief.
- Speak to the thief; collect the keys.
- Move down and go forward.
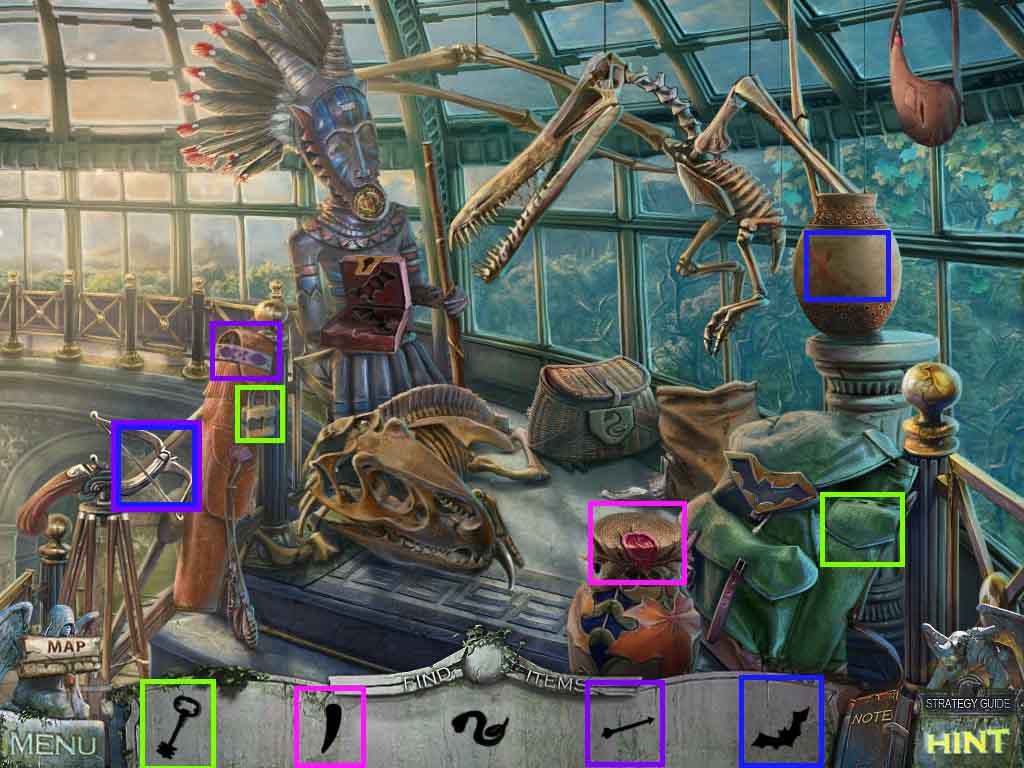

- Click the area at the top of the stairs to access a hidden objects area.
- Find the items using their silhouettes.
- Click the lid on the vase; collect the fang.
- Click the pocket; collect the key.
- Insert the key into the lock.
- Collect the arrow and place it onto the crossbow.
- Fire the crossbow and collect the bat from the broken vase.
- Select the bat to use on the backpack lock; collect the flute.
- Place the fang into the skeleton head; collect the gold snake.
- Use the gold snake on the basket; use the flute on the snake.
- Collect the 3rd animal tile.
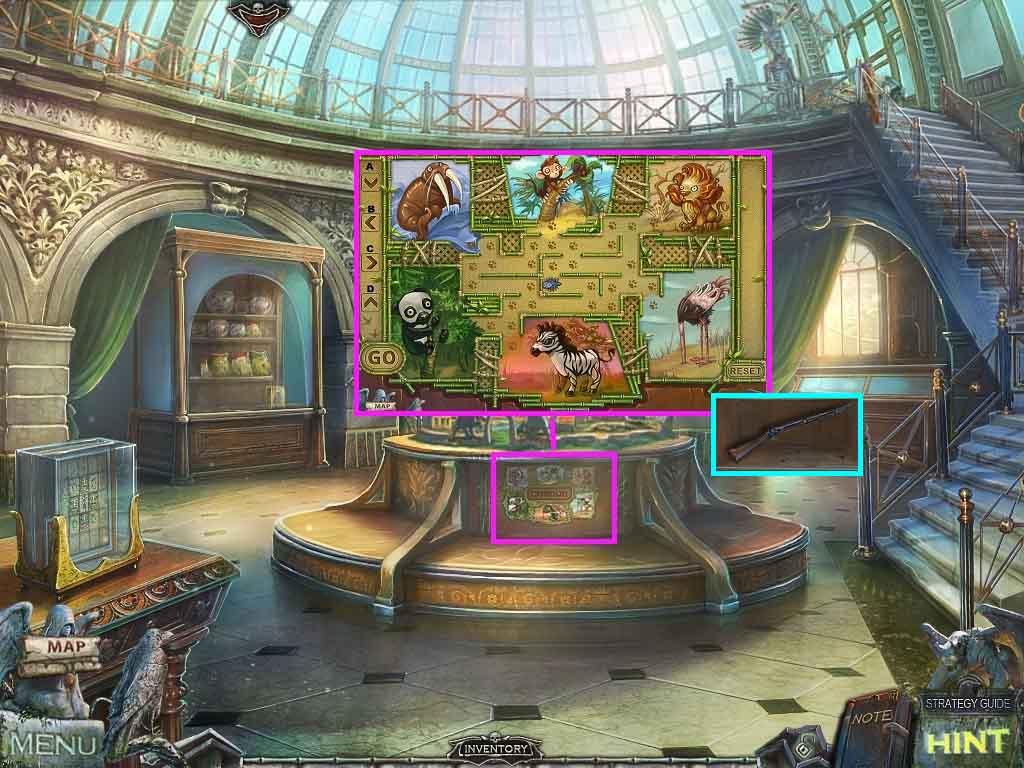
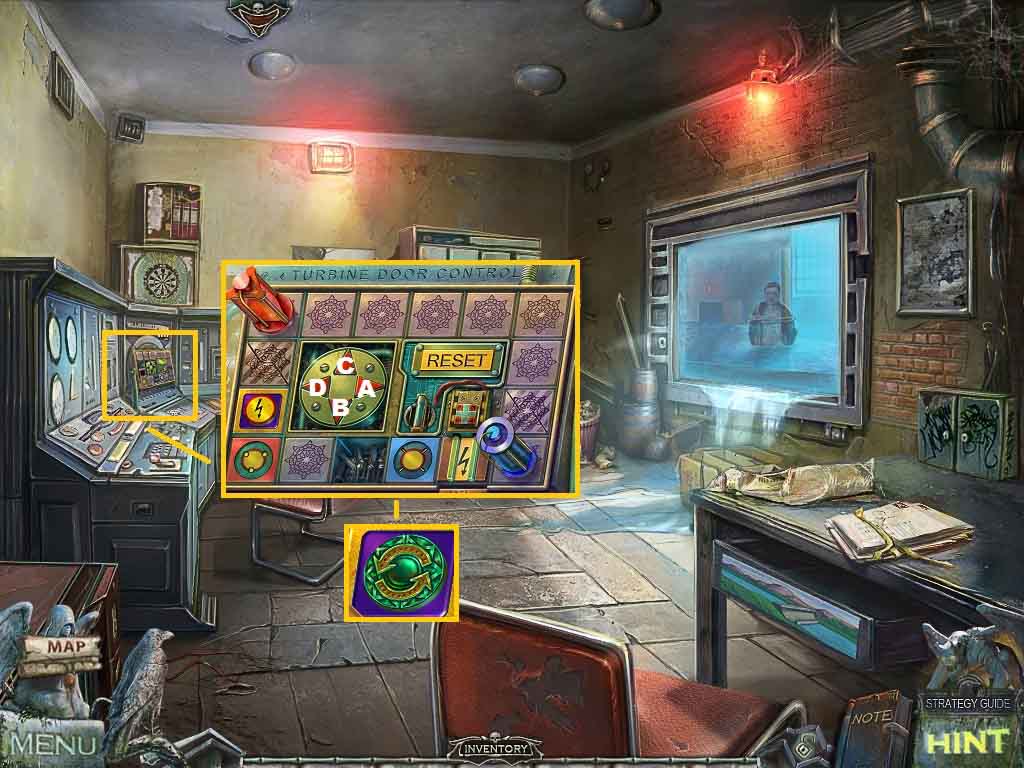
- Click the mini-game on the center console.
- Insert the 3 animal tiles to trigger the puzzle.
- Click the tiles to re-create the picture.
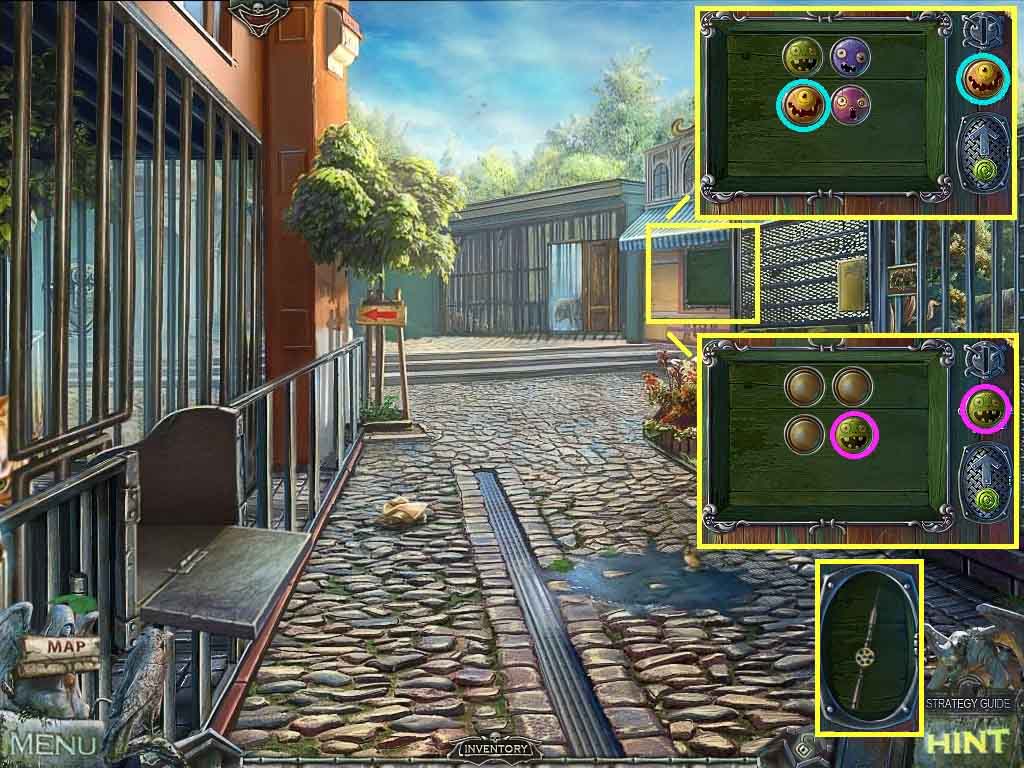
- Click the arrows as shown to solve the mini-game.
- To feed the fish to the walrus click the arrows as follows:
- D – C – D – B – B –A – B –D –B – GO
- To feed the banana to the monkey, click the arrows as follows:
- D – C – D – B – D – GO
- To feed the steak to the lion, click the arrows as follows:
- D – C – C – D – C – GO
- To feed the bamboo to the panda, click the arrows as follows:
- C – A –B – B- A –B – GO
- To feed the hay to the donkey, click the arrows as follows:
- C – A –B – B – A – A –A –GO
- To feed the worm to the ostrich, click the arrows as follows:
- D – C – C – A – C – A – GO
- Collect the gun and move down 3 times.
- Click the door.
- Insert the key into the lock.
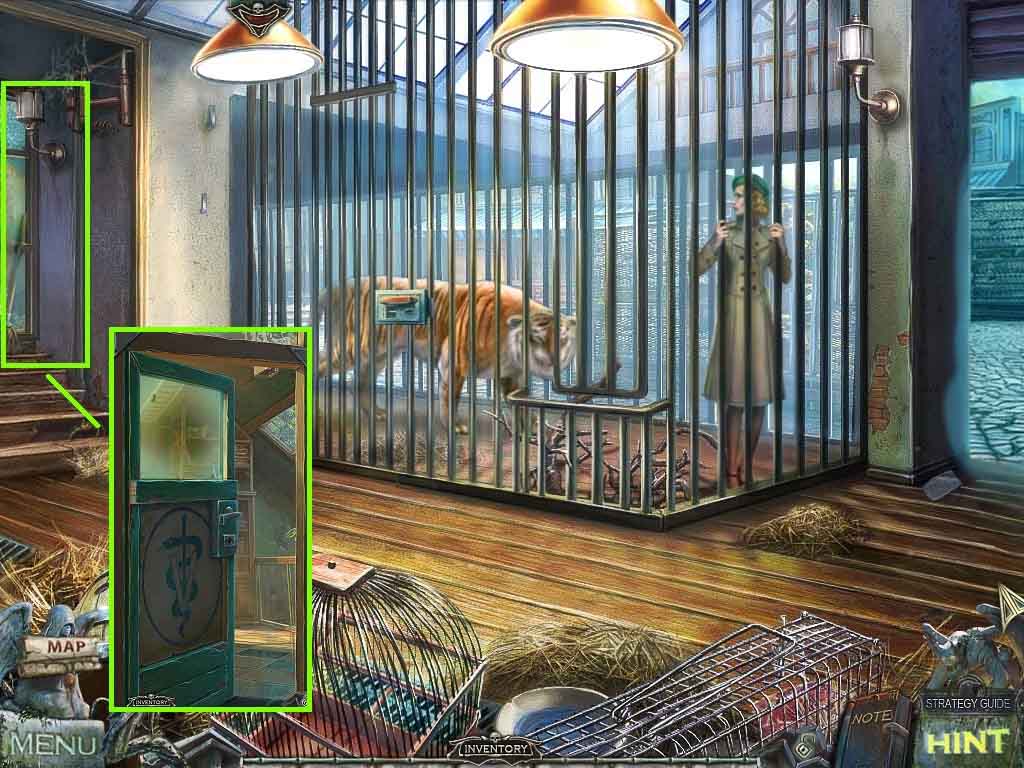
- Move ahead.
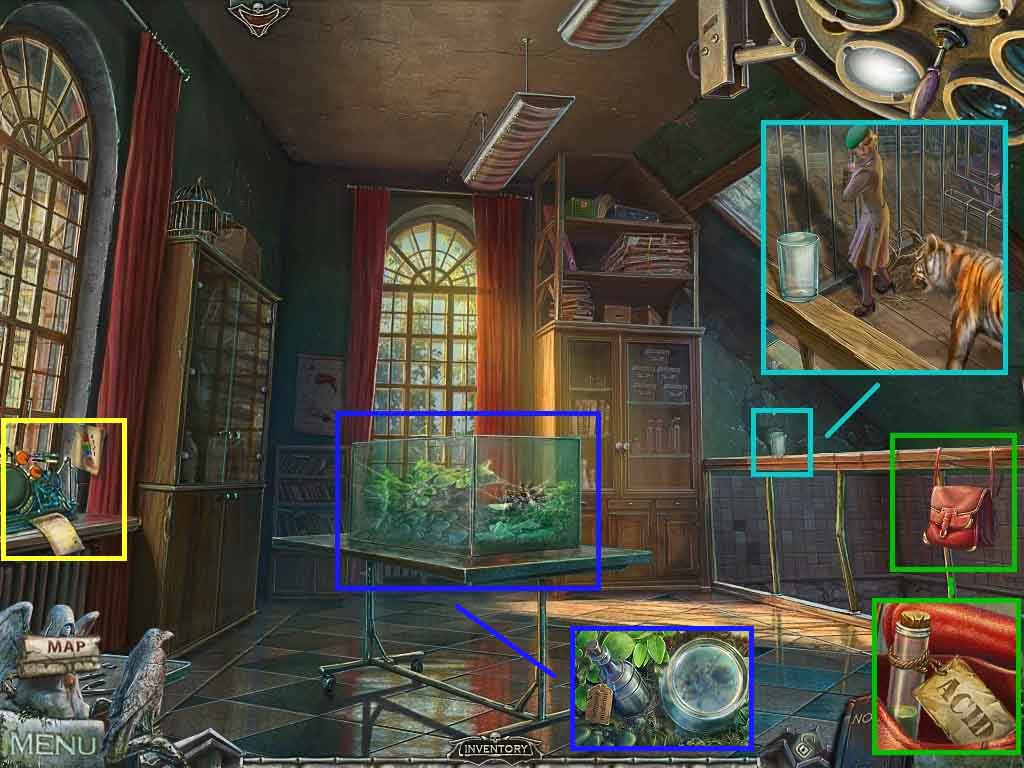
- Click the cage; collect the glass.
- Click the purse and click it once more; collect the acid.
- Click the terrarium and lay the glass over the spider.
- Collect the sleeping medicine.
- Click the machine on the windowsill.
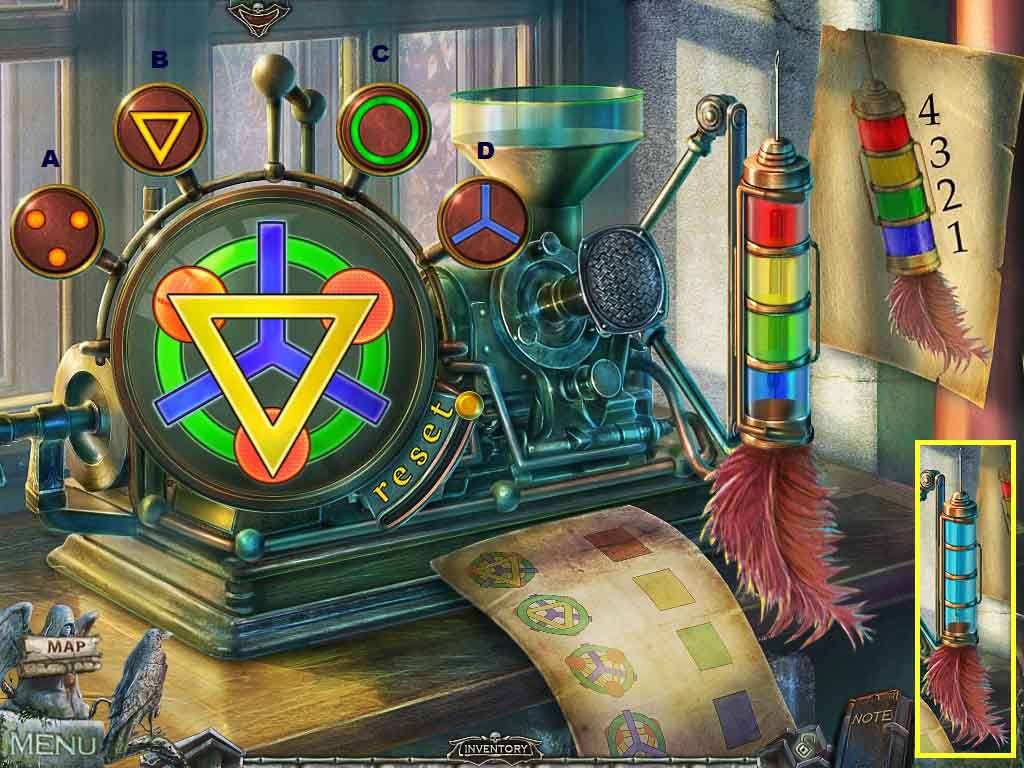
- Pour the sleeping medicine into the reservoir.
- Insert the dart into the holder.
- Notice the color order of the dart.
- Use the formula key as a color guide.
- To create the blue layer, click the icons as follows:
- D – C – A – B
- To create the green layer, click the icons as follows:
- A – C – D – B
- To create the yellow layer, click the icons as follows:
- C – B –A – D
- To create the red layer, click the icons as follows:
- B – D – A – C
- Collect the tranquilizer dart.
- Combine the gun and the tranquilizer dart to create the tranquilizer gun.
- Click the tiger’s cage; use the tranquilizer gun on the tiger.
- Move down one time.
- Click the cage door; pour the acid onto the lock.
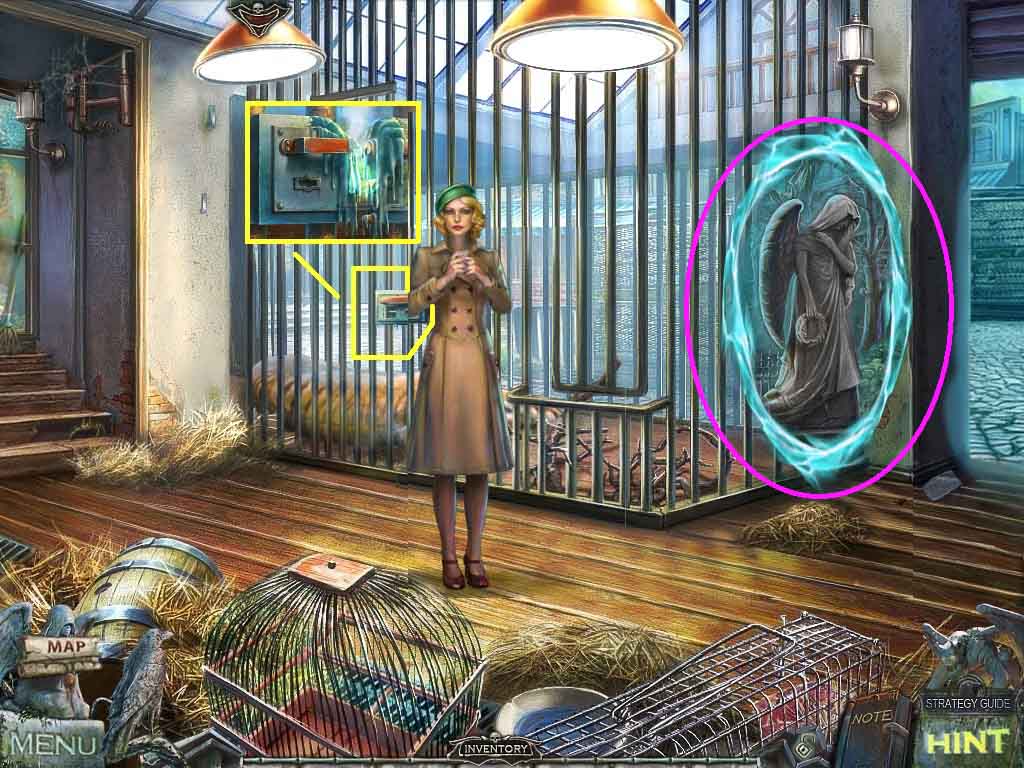
- Move into the portal.
- Collect the dog crystal and read the newspaper.
- Move down 2 times.

- Speak to Hina.
- Click the dog; insert the dog crystal.
- Move to the right.
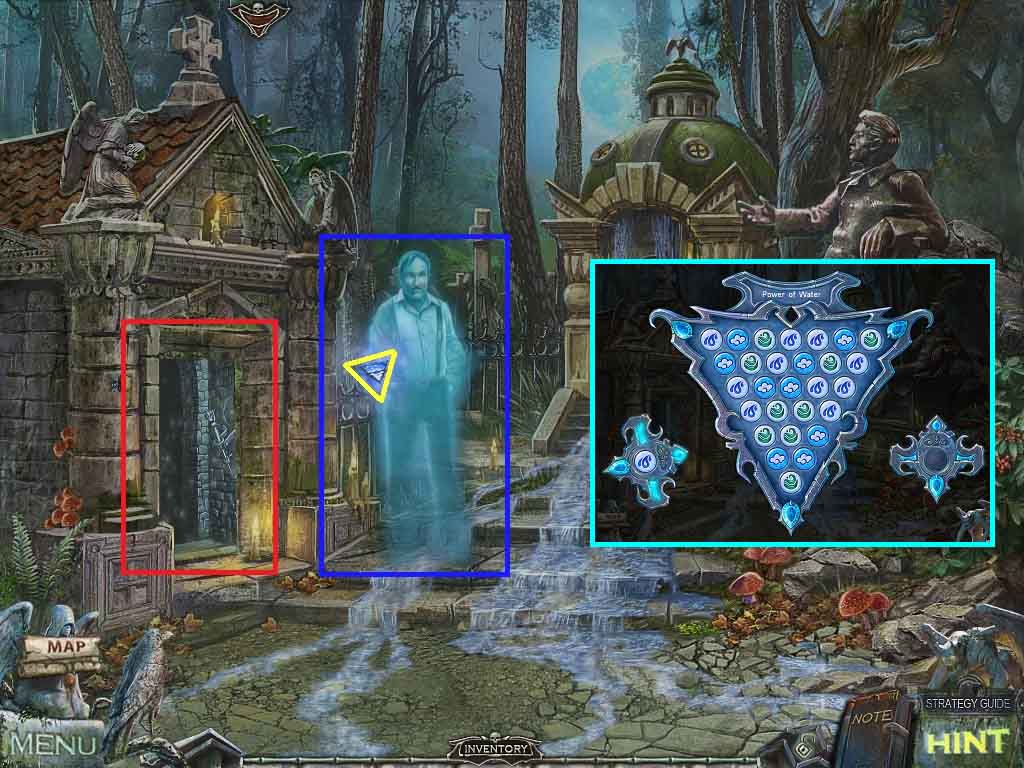
- Speak to the ghost.
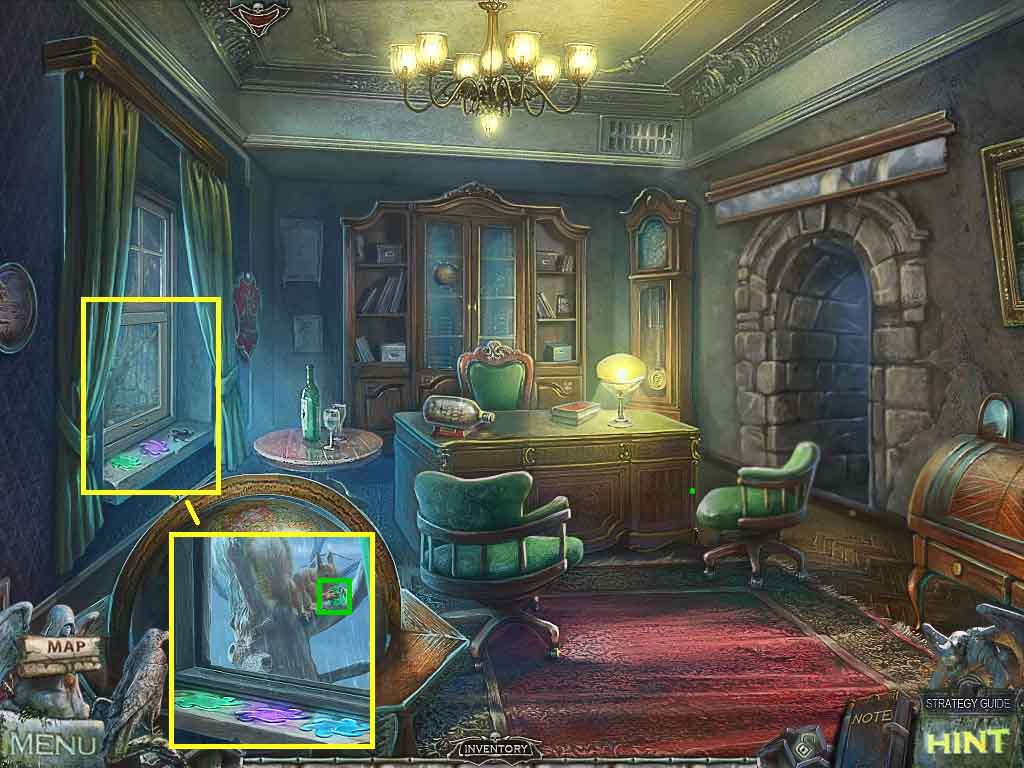
- Collect the power of water symbol to access a mini-game.
- Click and aim at a ball with the same symbol.
- Shoot all the balls to charge the raven.
- Click the crypt to access a hidden objects area.
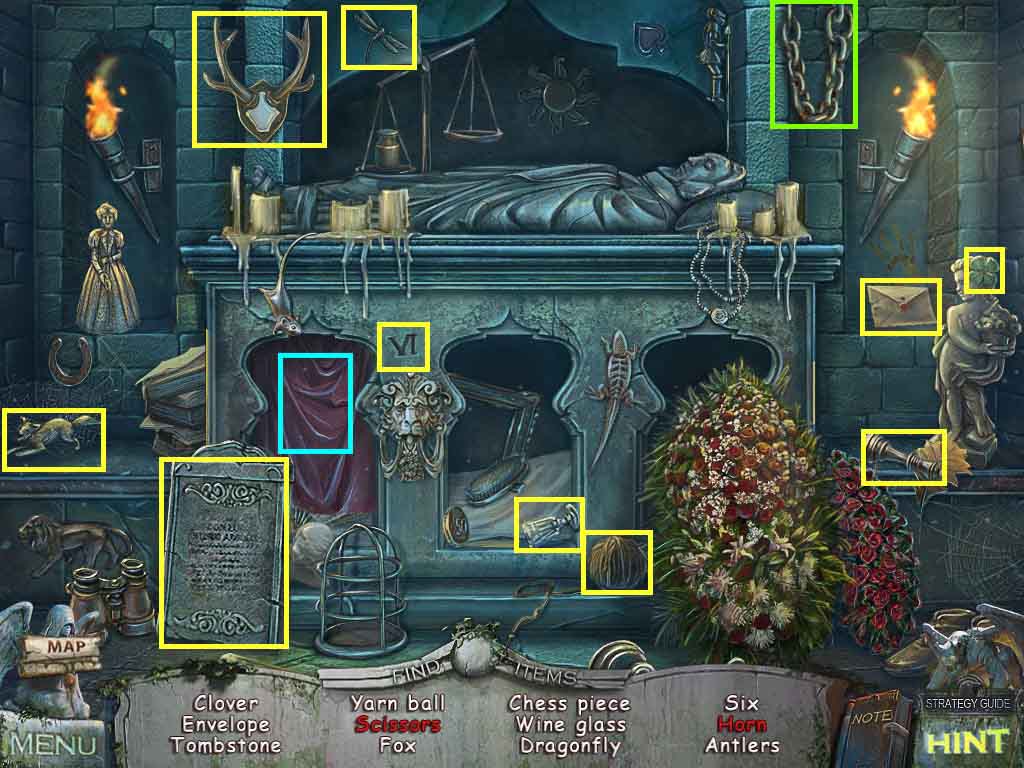
- Find the listed items.
- Click the curtains; collect the scissors.
- Click the chain; collect the horn.
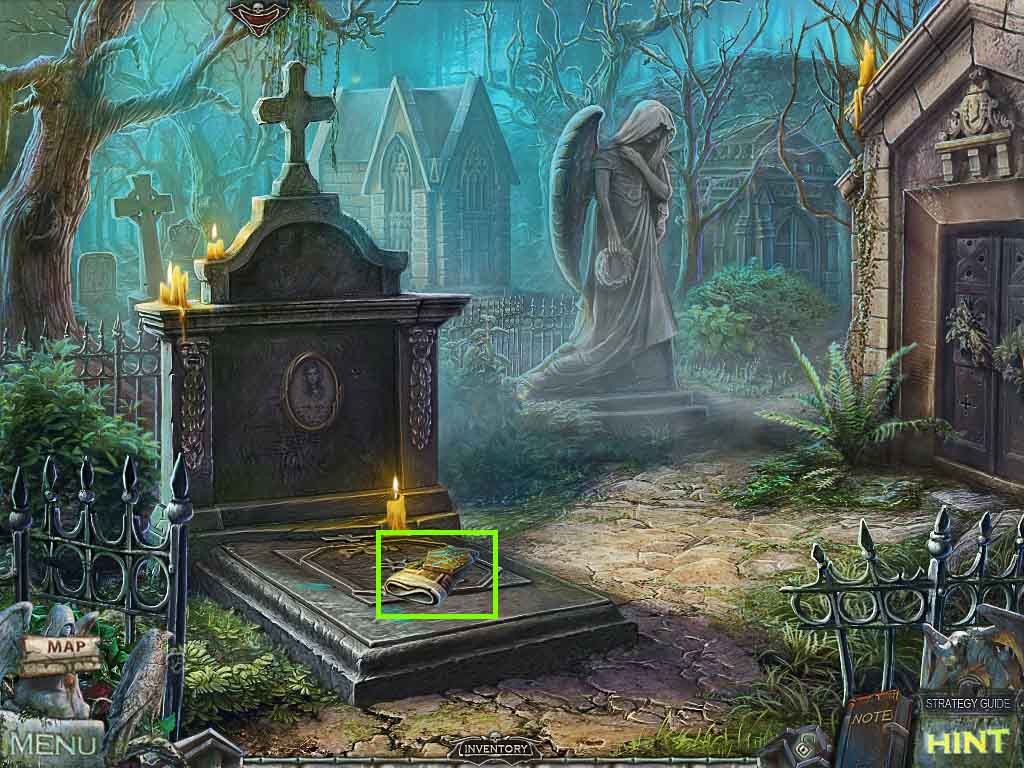
- Earn the tombstone.
- Hand the spirit the tombstone.
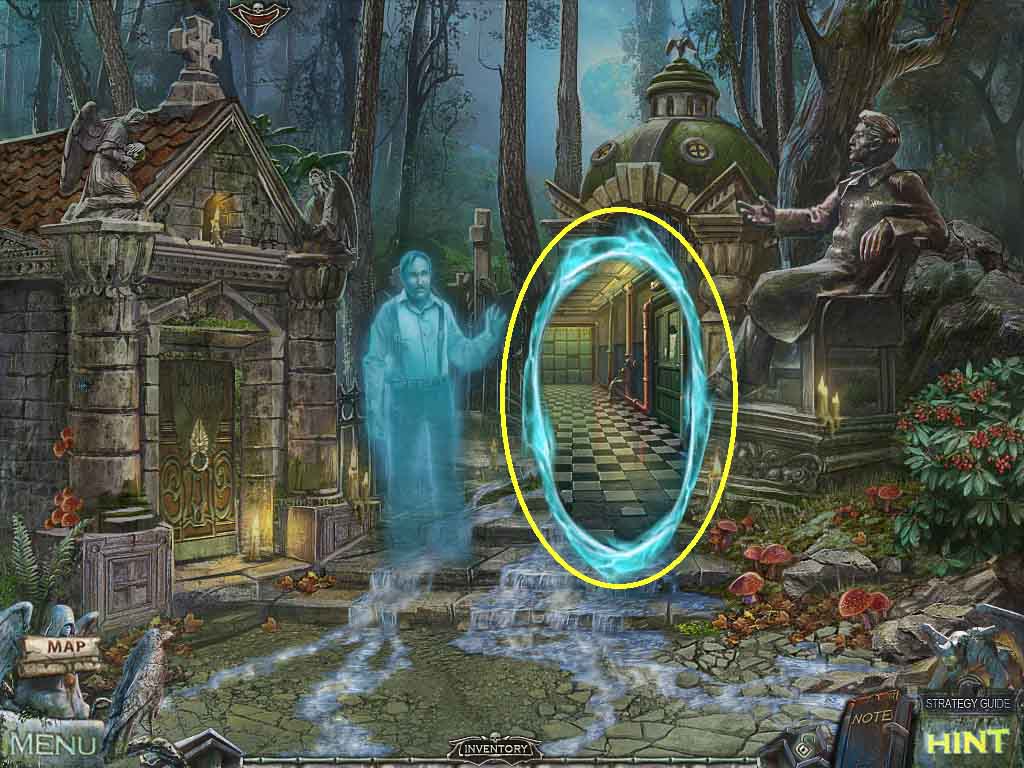
- Move into the portal.
- Collect the 1st part of the dam.
- Notice the mini-game on the back wall.
- Notice the door on the right.
- Look over the rail.
- Speak to the worker.
- Select the raven’s power of water to collect the nutcracker.
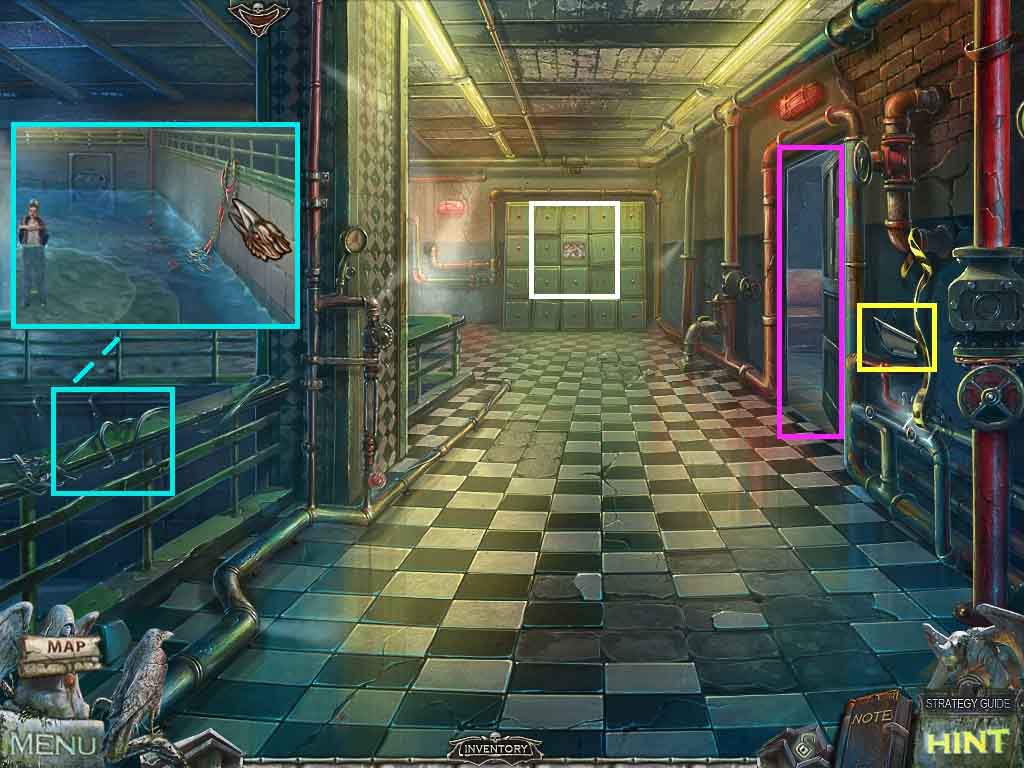
- Move into the doorway on the right.
- Click the table.
- Click the envelope; collect the sheet of paper and the 1st chip with the image of a car.
- Read the note about hydroelectric power.
- Click the window and select the raven’s power of air to collect the tweezers.
- Notice the mini-game next to the elevator.
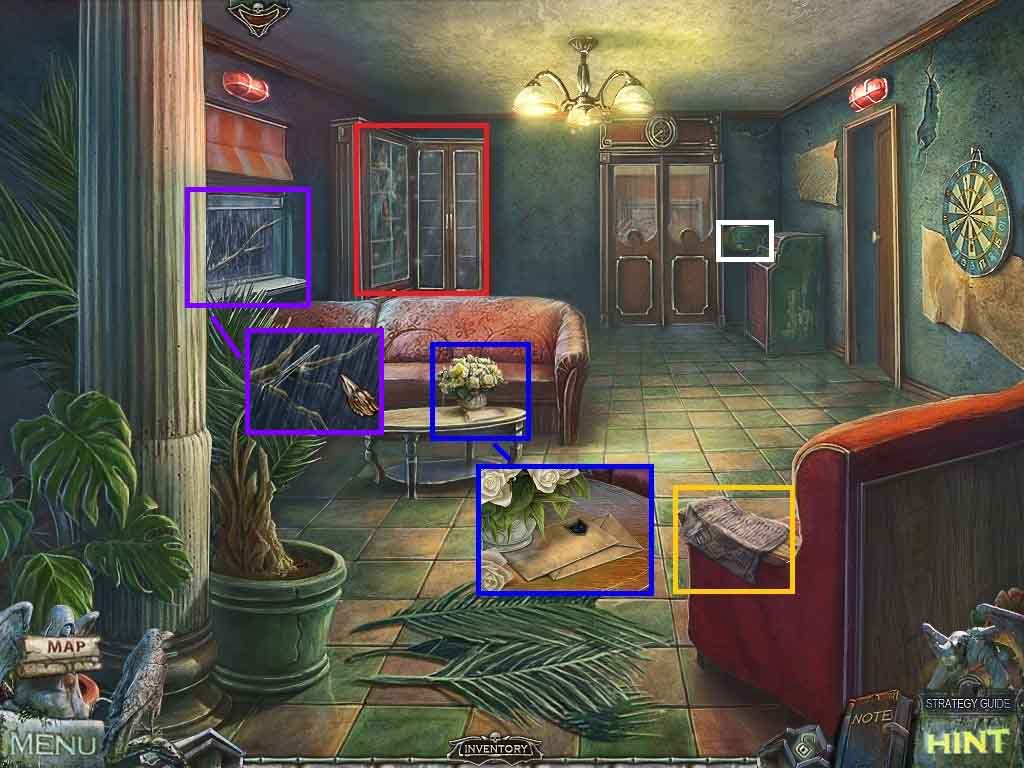
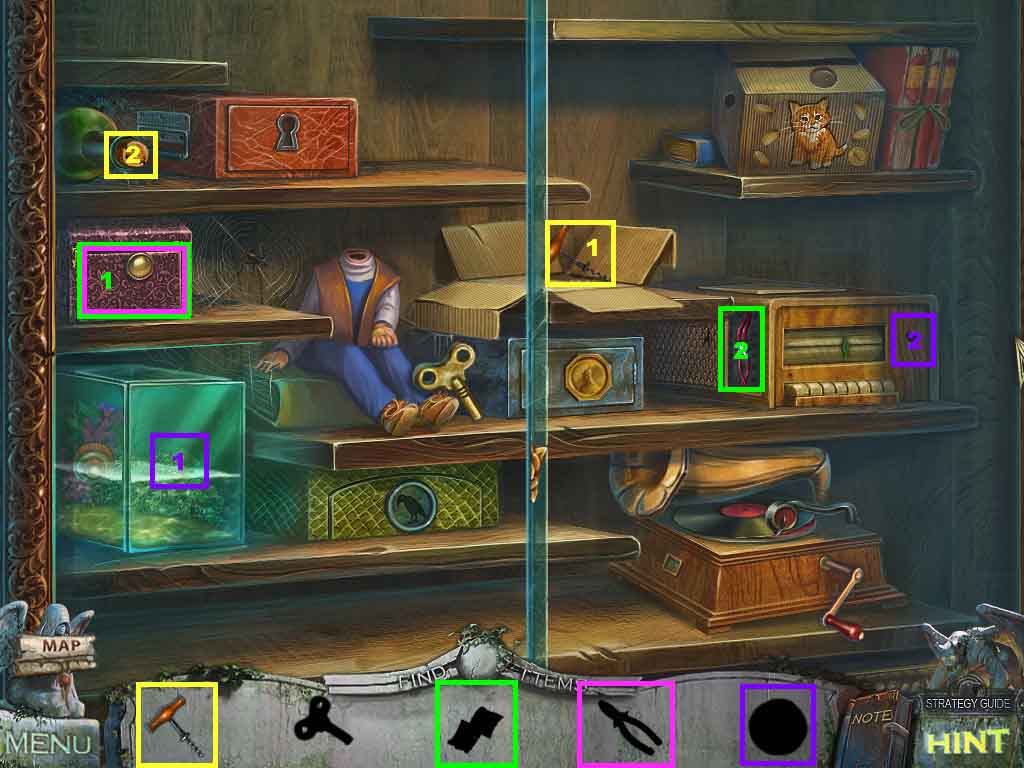
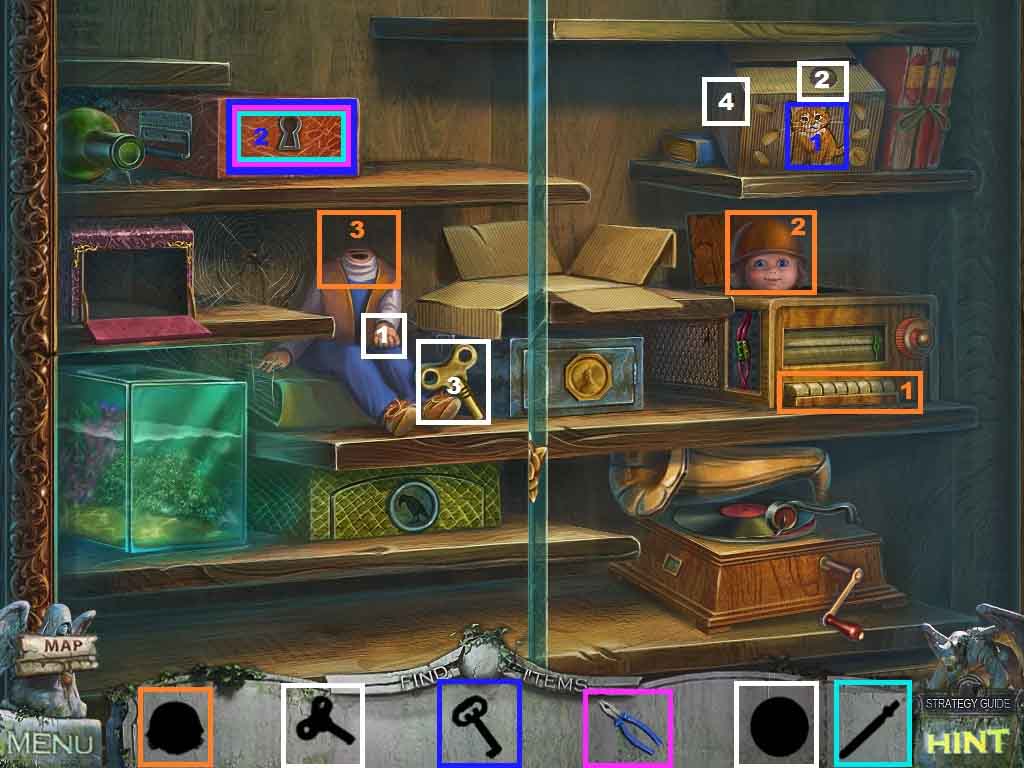
- Click the cabinet to access the hidden objects area.
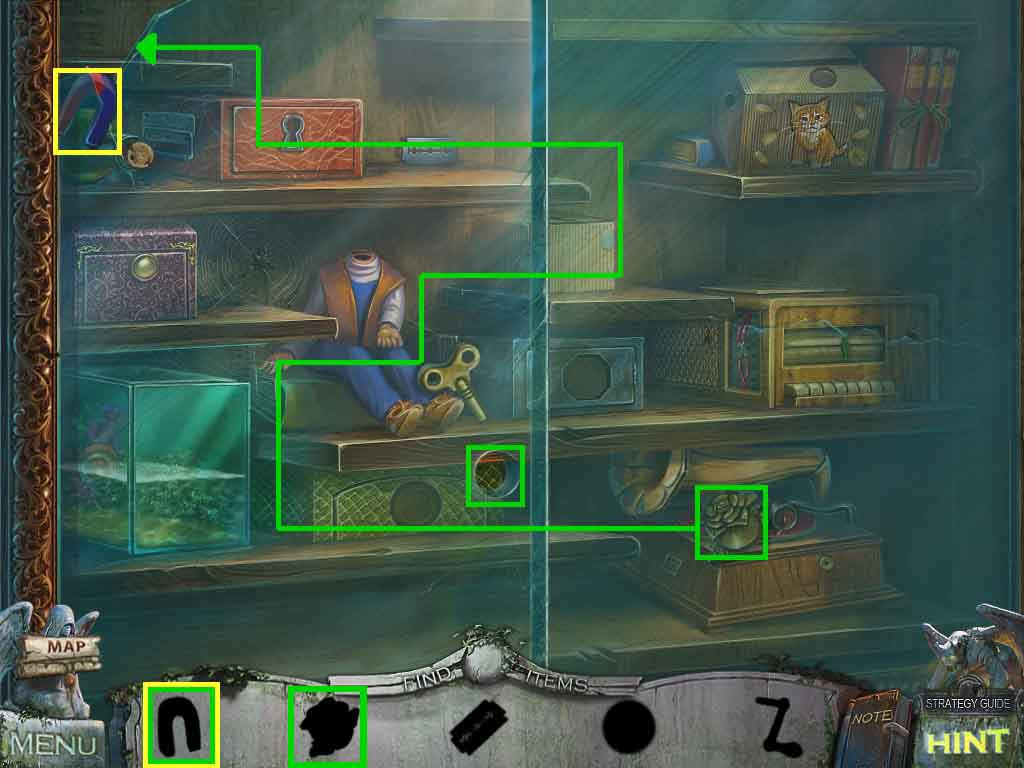
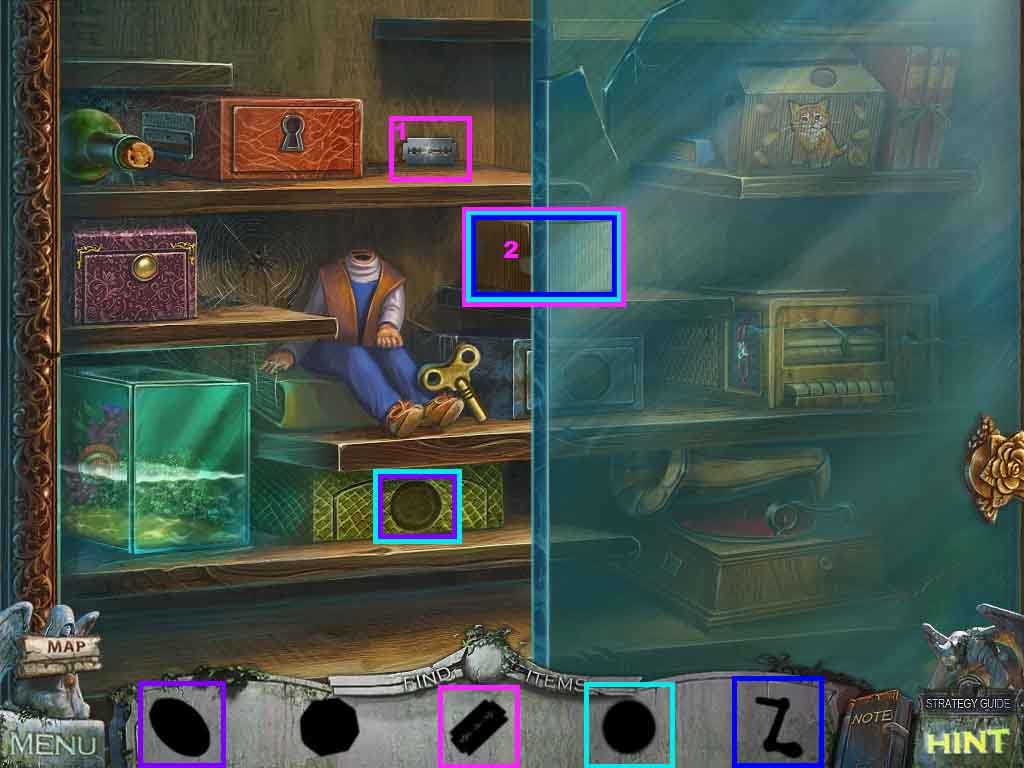
- Find all the items using their silhouettes.
- Select the magnet to move the handle through the shelves and out through the hole in the glass.
- Place the handle onto the circle in the glass; slide the door open.
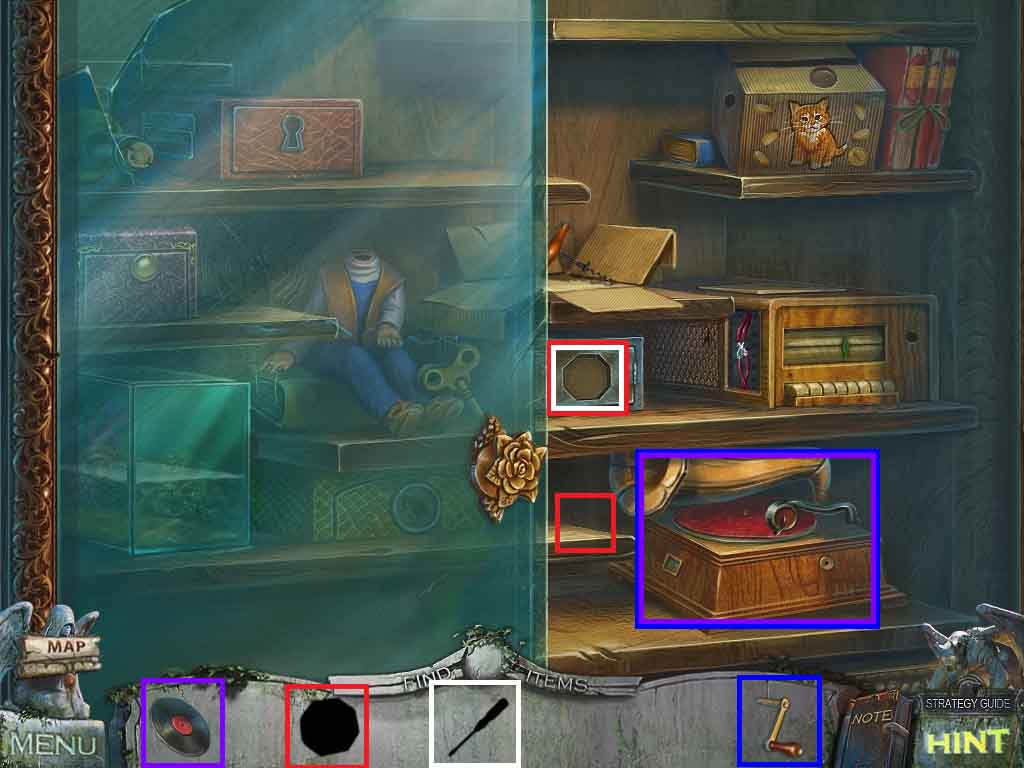
- Select the blade; use it to cut the cardboard box and collect the handle and the raven.
- Insert the raven onto the green box; collect the record.
- Attach the handle and the record onto the phonograph; click the handle.
- Collect the medallion and insert it onto the gray box.
- Collect the screwdriver.
- Move to the right.
- Collect the 2nd chip with the image of a car.
- Click the cabinet and use the screwdriver to remove the 6 screws.
- Notice the mistreated cat in the cabinet.
- Click the upper cabinet to access a mini-game.
- Link 3 like items without crossing paths.
- Once completed; collect the penknife.
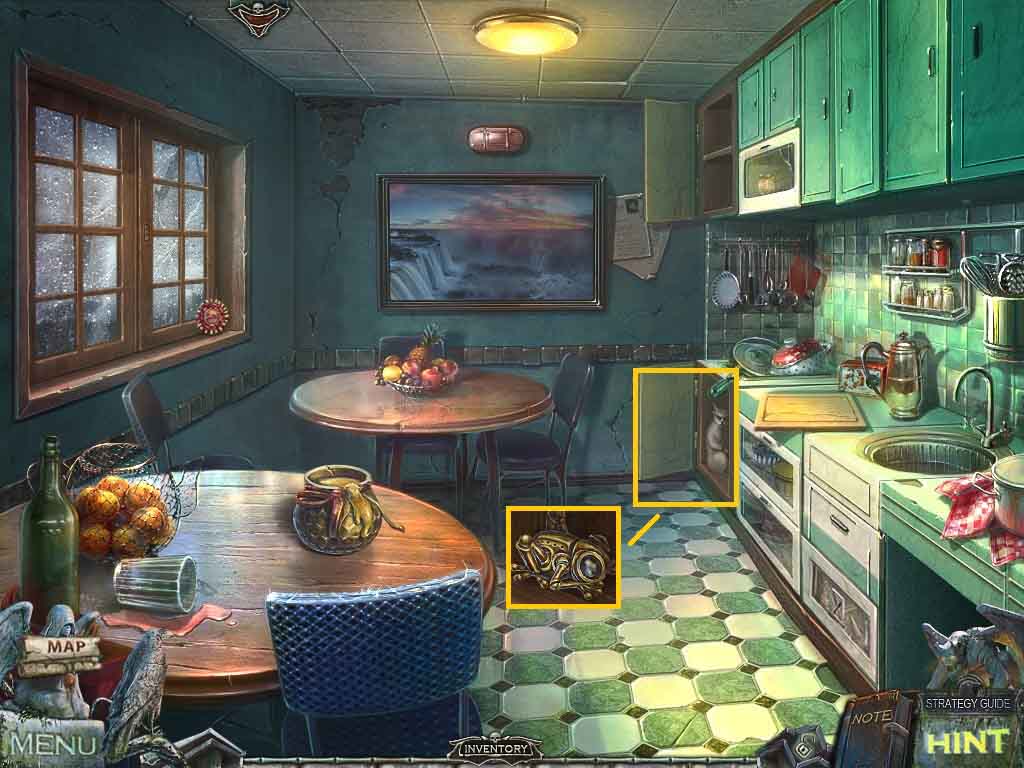
- Click the cabinet and free the cat using the penknife.
- Click the cabinet once more and collect the toad.
- Move down once.
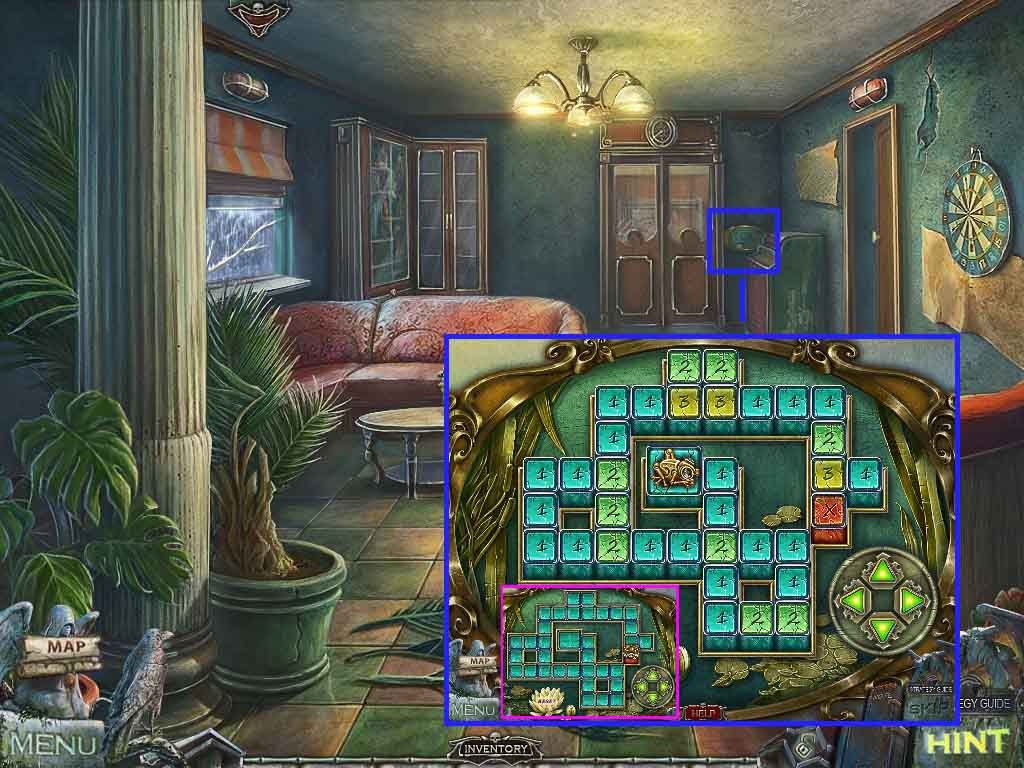
- Click the mini-game next to the elevator; insert the toad to trigger the mini-game.
- Click the arrows to move the toad toward the red square.
- Move ahead and go into the elevator.
- Notice the trap door mini-game.
- Click the control panel and collect the medal; click the bottom button.
- Move ahead.
- Click the water.
- Use the raven’s power of water to collect the bunny.
- Collect the symbol of a knife.
- Read the note.
- Read the prohibition note.
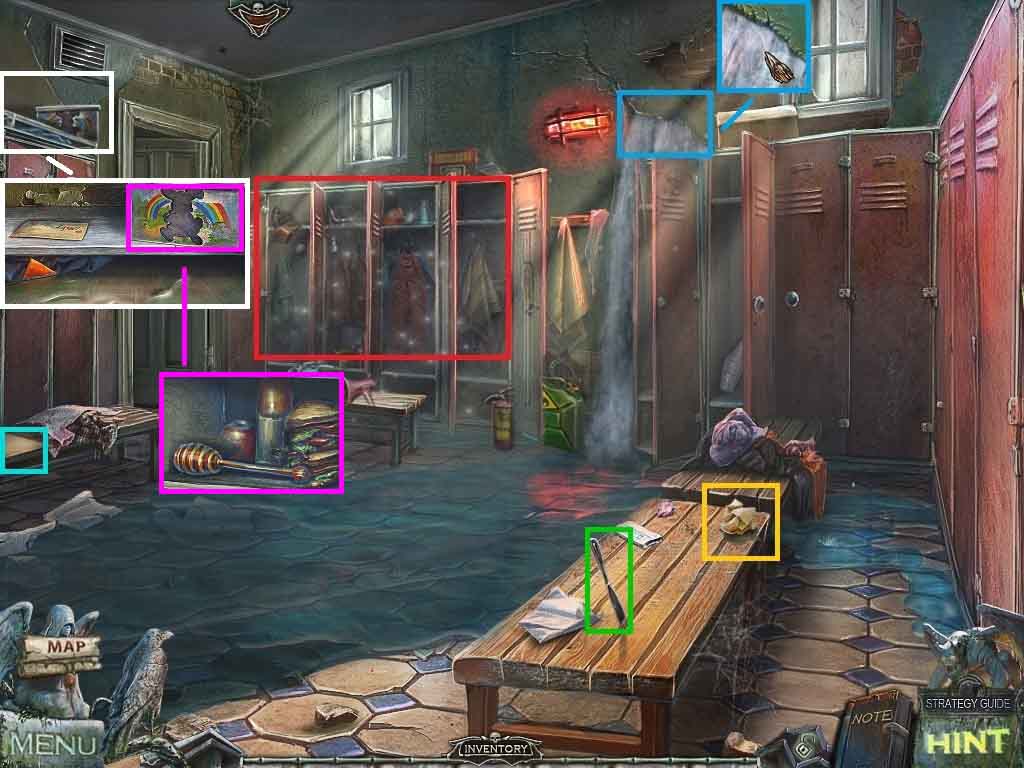
- Click the top of the lockers; collect the 1 / 4 control panel elements and read the note.
- Insert the bunny into the lunchbox; collect the honey dipper.
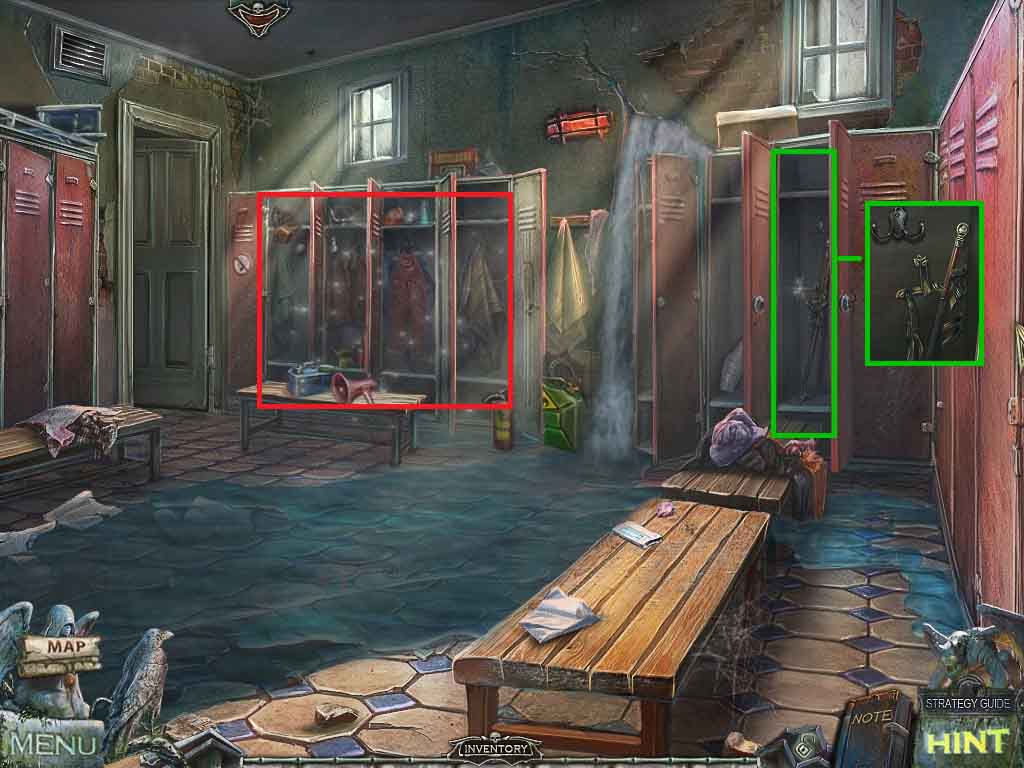
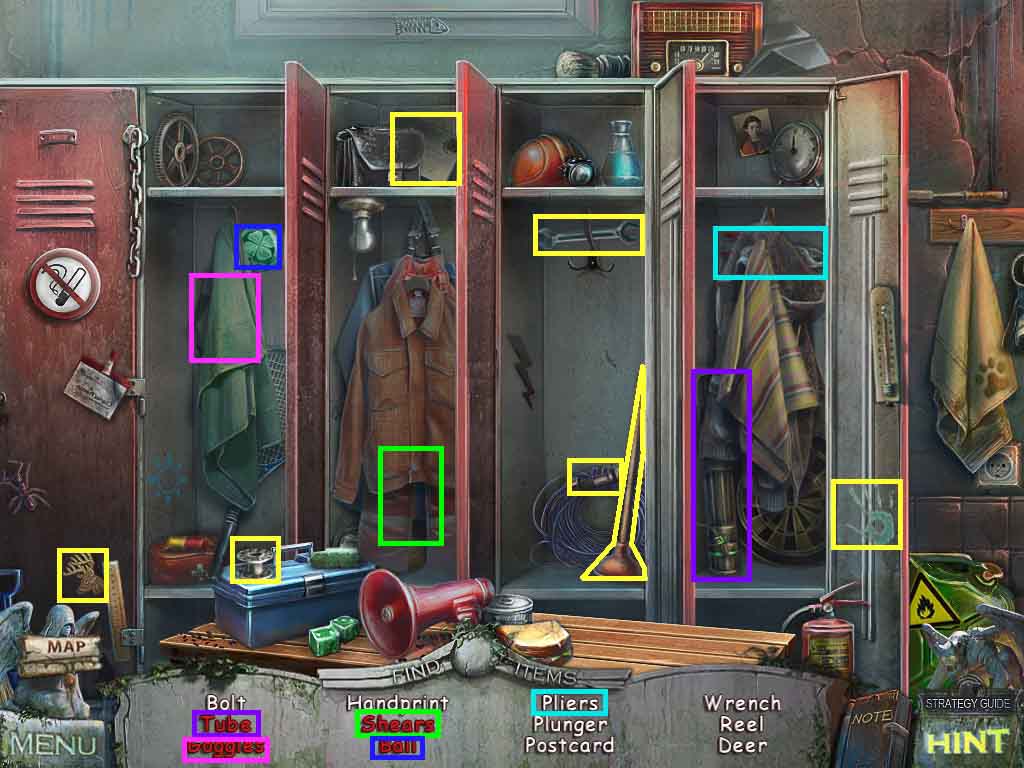
- Click the locker to access the hidden objects area.

- Find the listed items.
- Click the clothes in the 2nd locker; collect the shears.
- Click the clothes in the 3rd locker; collect the canteen.
- Collect the rope with a hook.
- Go through the doorway on the left.
- Click the window; collect the symbol of a fork.
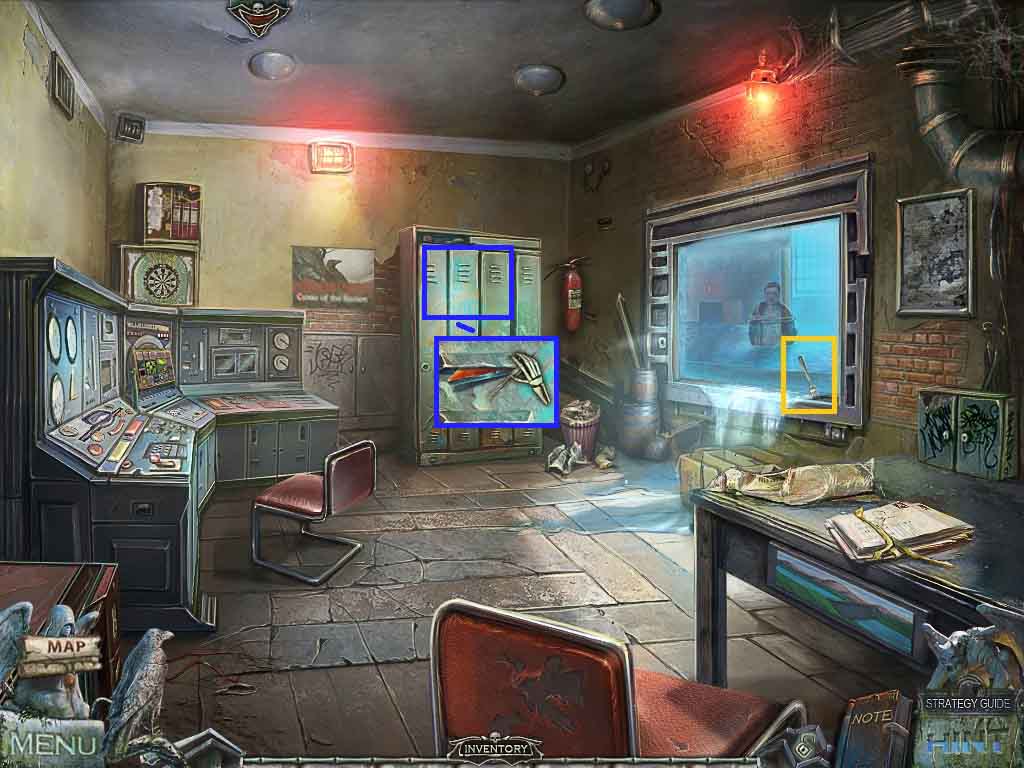
- Click the locker.
- Select the tweezers to collect the 2 / 4 control panel elements.
- Move down 2 times, click the elevator control panel and click the 2nd button from the bottom.
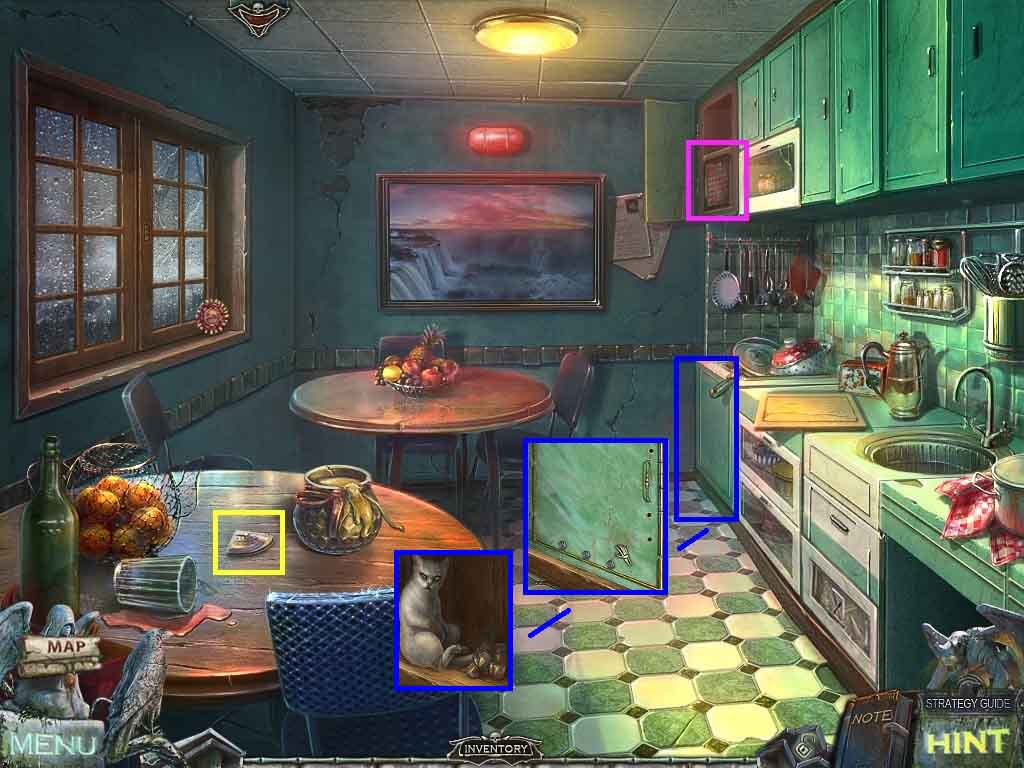
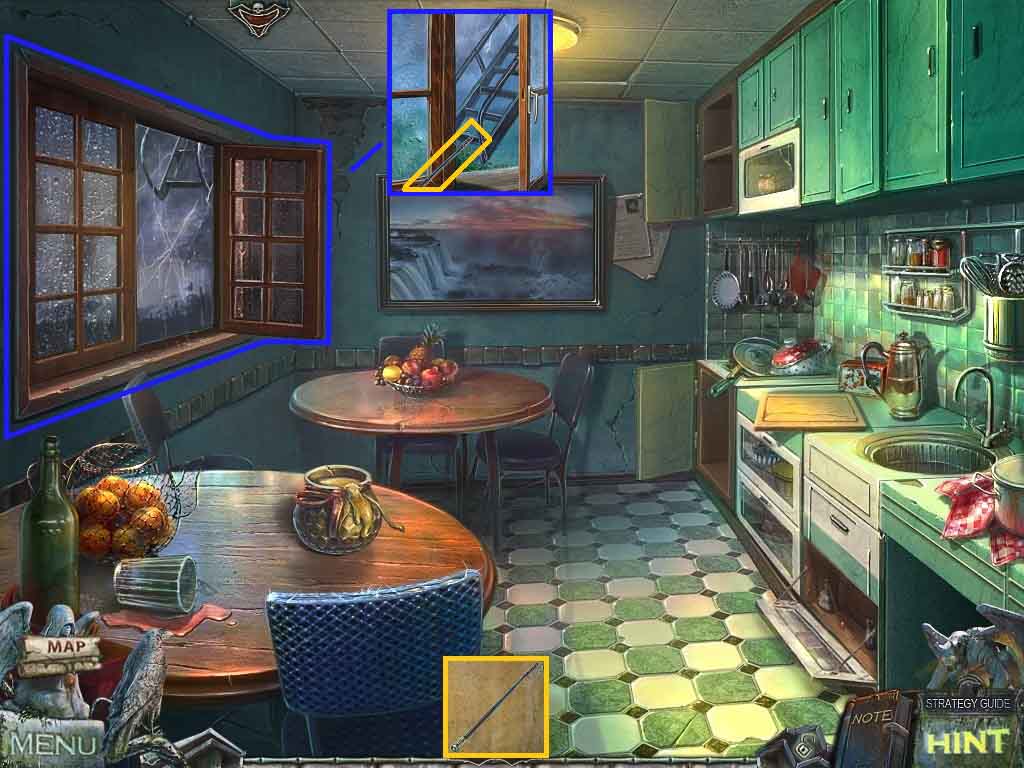
- Move forward and turn right into the kitchen.
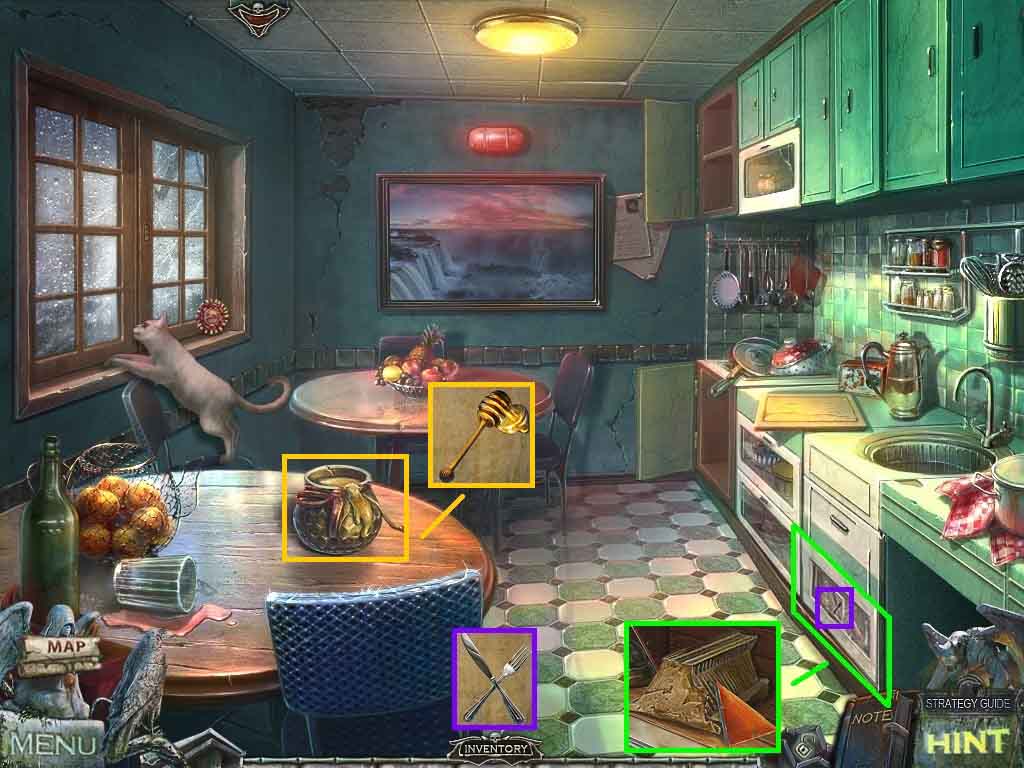
- Combine the symbol of fork and the symbol of knife to create the fork and knife.
- Click the drawer and insert the fork and knife; collect the 3 / 4 control panel elements and the 2nd part of the dam.
- Place the honey dipper into the jar; collect the honey dipper with honey.
- Move down once, go into the elevator and click the control panel then click the bottom button.
- Move forward and go into the doorway on the left.
- Combine the 1st and 2nd dam parts to create the dam.
- Click the drawer; insert the dam.
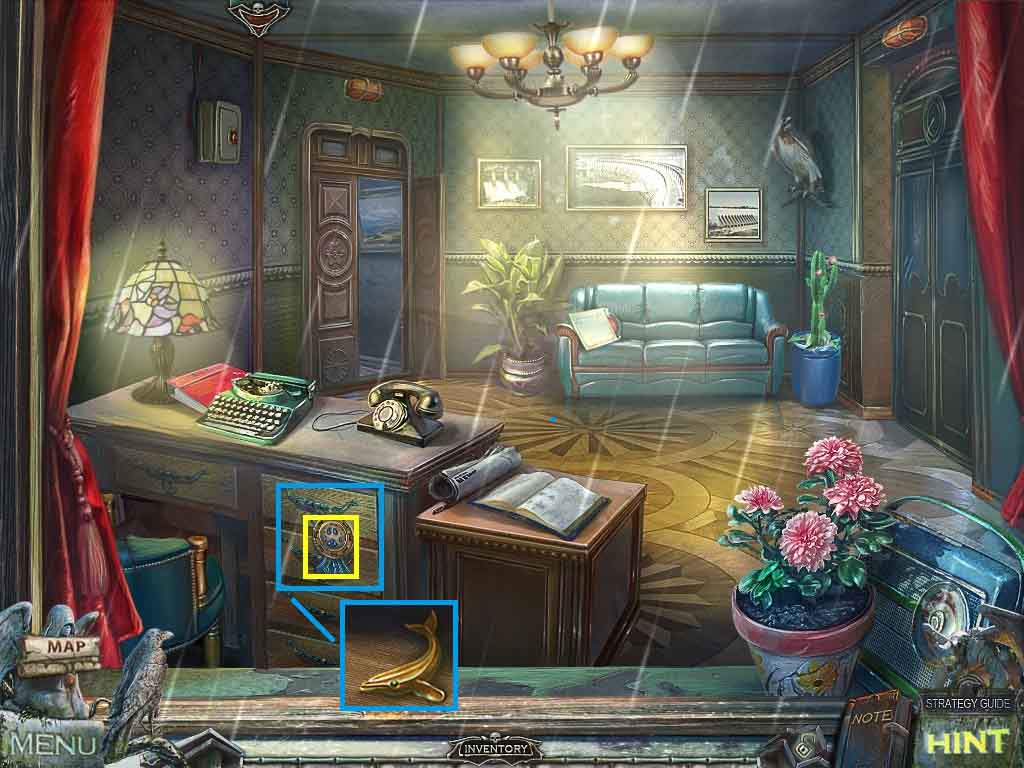
- Collect the window handle, 1st whale and the 3rd chip with the image of a car.
- Move down 2 times, click the control panel and click the 2nd button from the bottom then move forward and down.
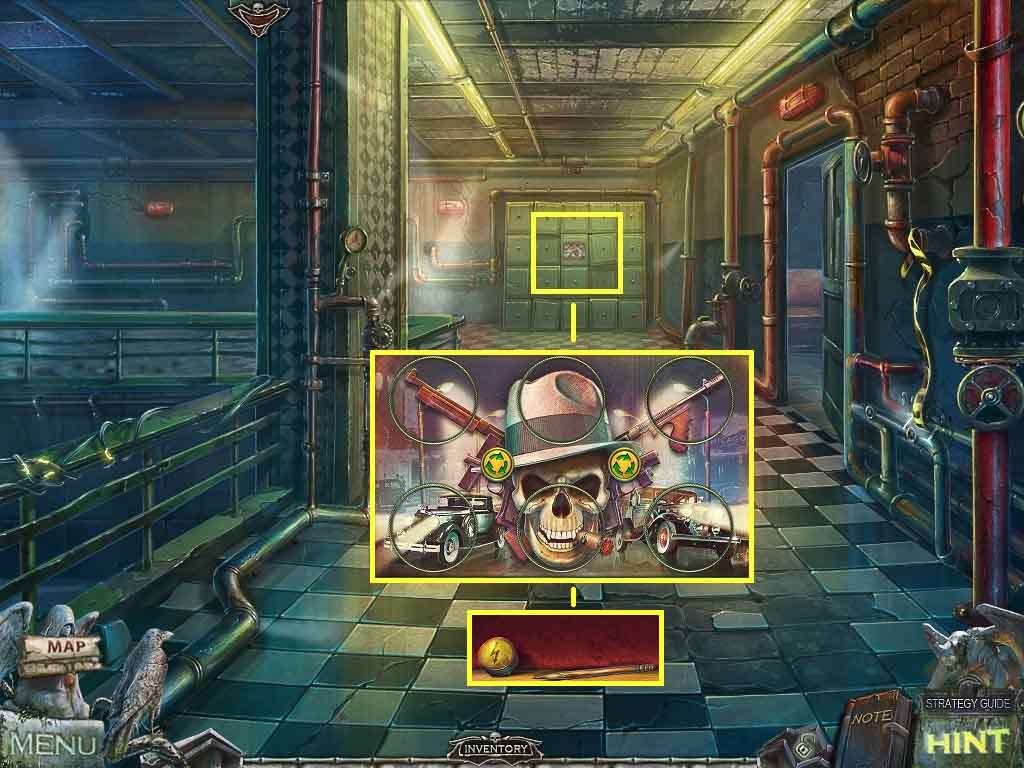
- Click the back wall to access a mini-game.
- Insert the 3 chips with the image of a car to trigger the mini-game.
- Rotate the circles and swap the pieces to create a clear image.
- Once solved, collect the control panel element and the pencil.
- Move to the right 2 times.
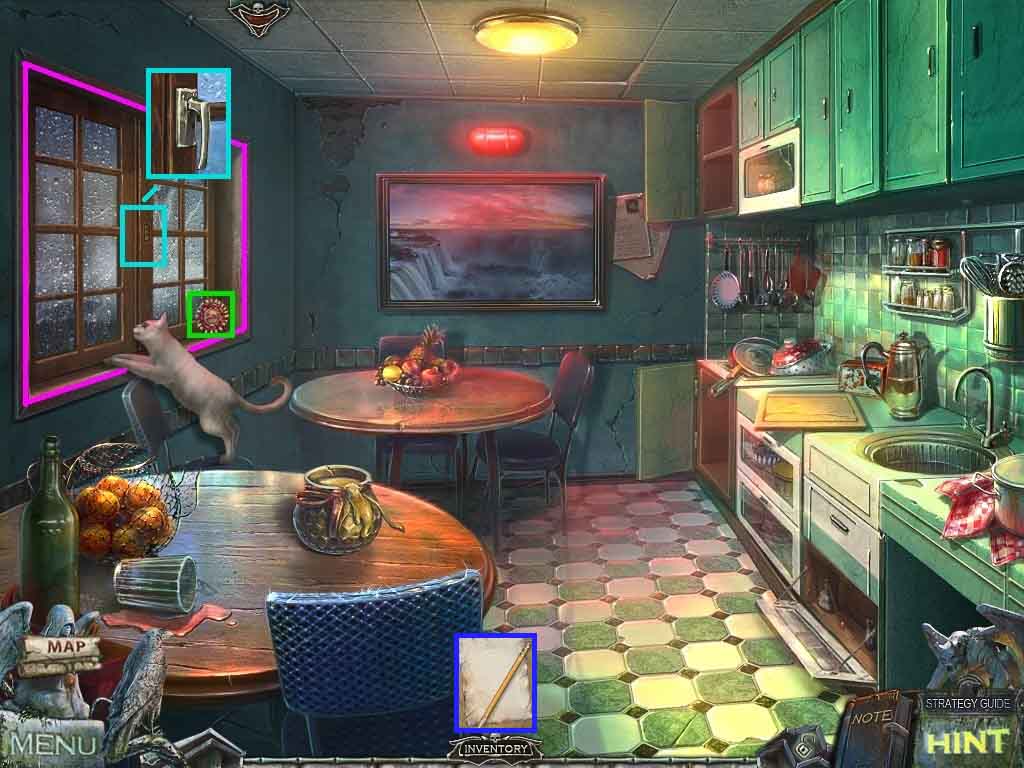
- Click the window.
- Collect the medal and attach the window handle to open the window.
- Combine the pencil and the sheet of paper to create the pencil and sheet of paper set.
- Move down once and go into the elevator, click the control panel and click the bottom button.
- Move forward.
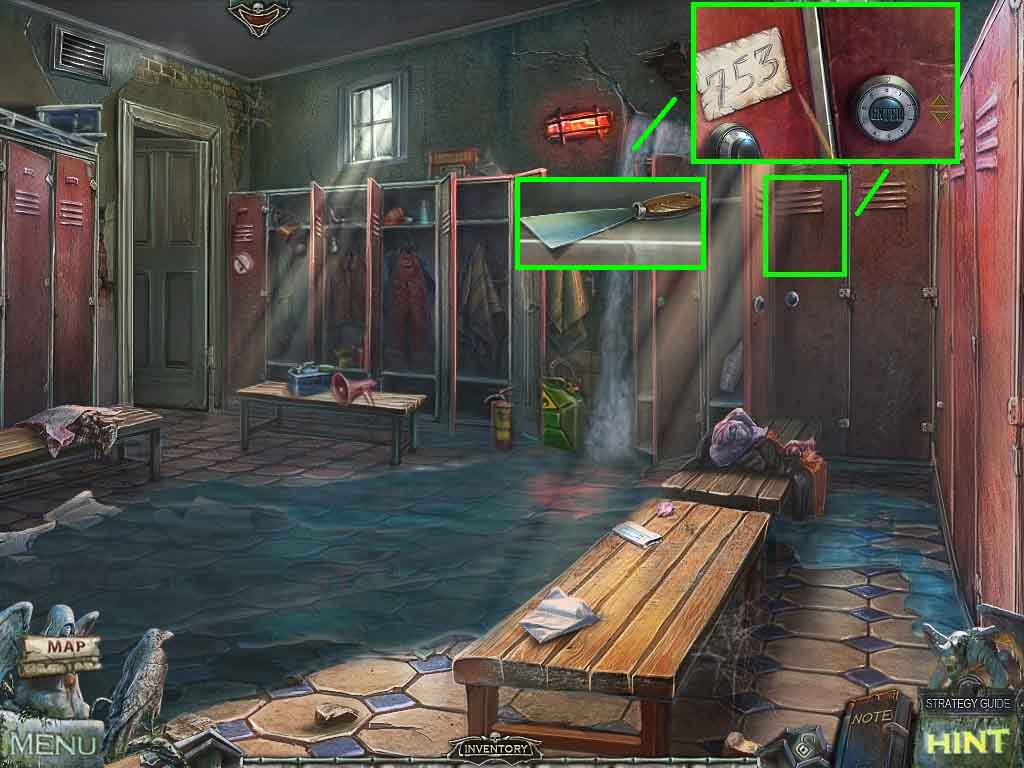
- Click the lockers; place the pencil and sheet of paper on the left side.
- Click the up arrow 3 times and click enter.
- Click the up arrow 2 times and click enter.
- Click the up arrow 2 times and click enter.
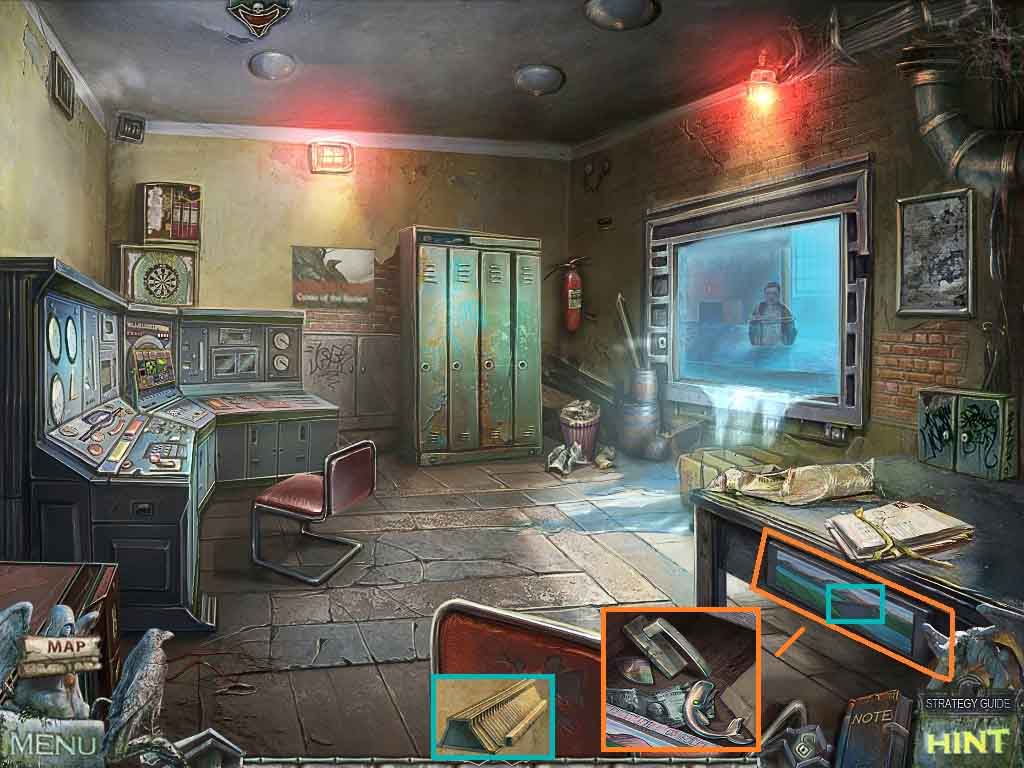
- Collect the scraper.
- Move down one time.
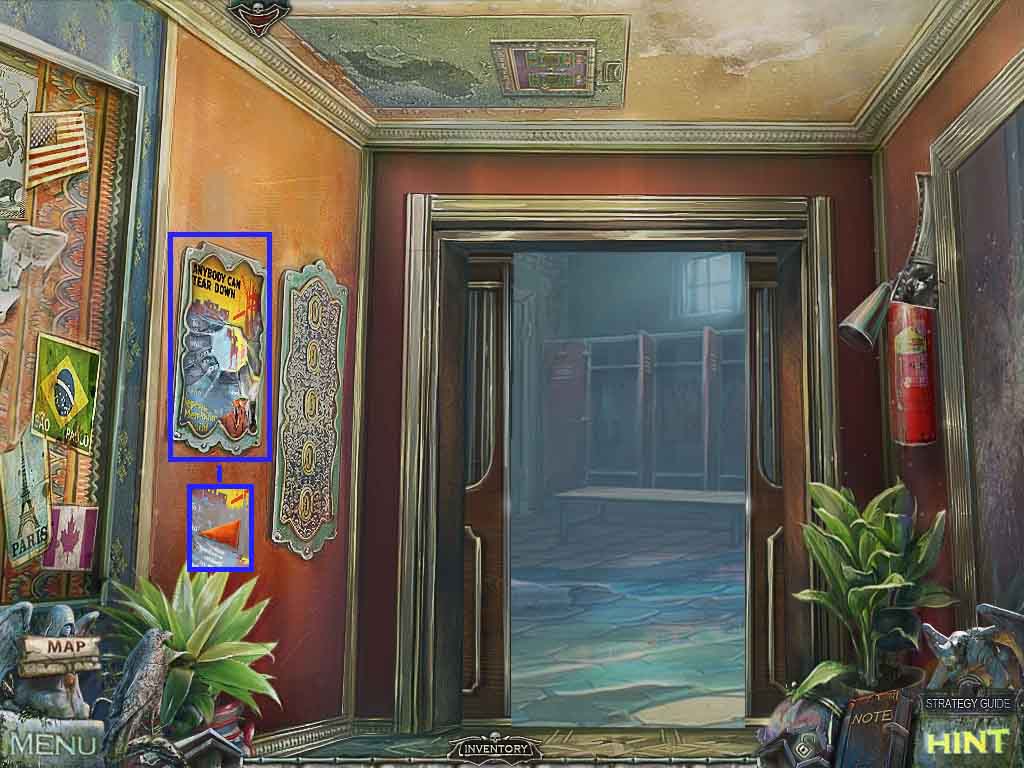
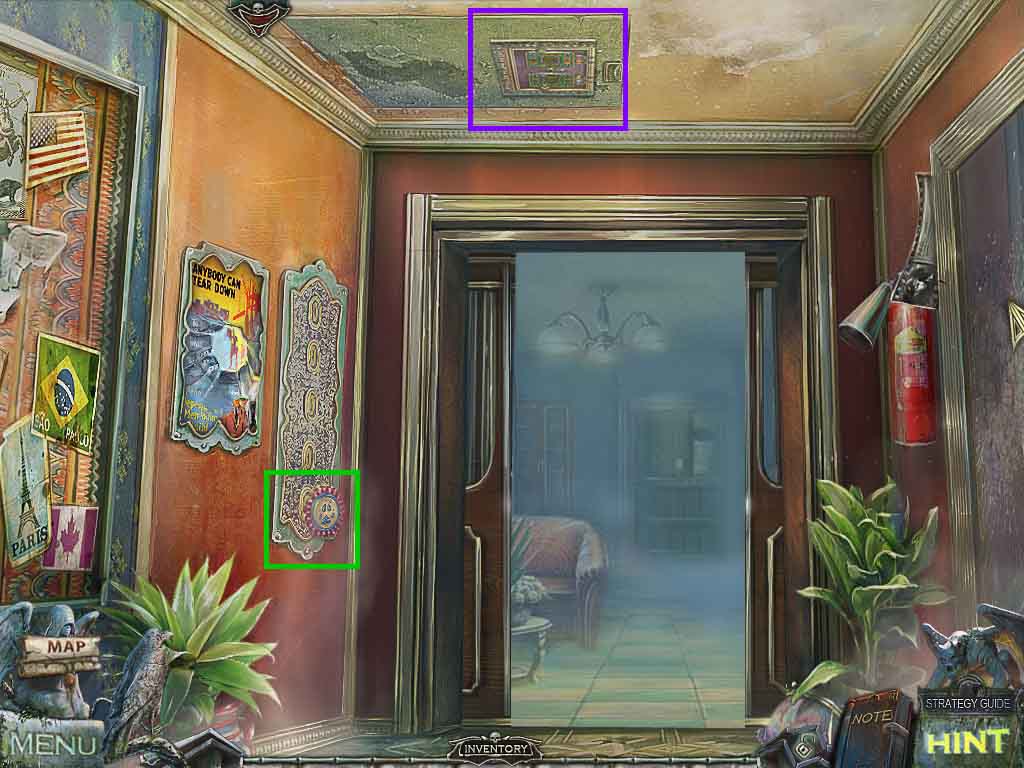
- Select the scraper to remove the poster.
- Collect the 4 / 4 control panel elements.
- Move forward and to the left.
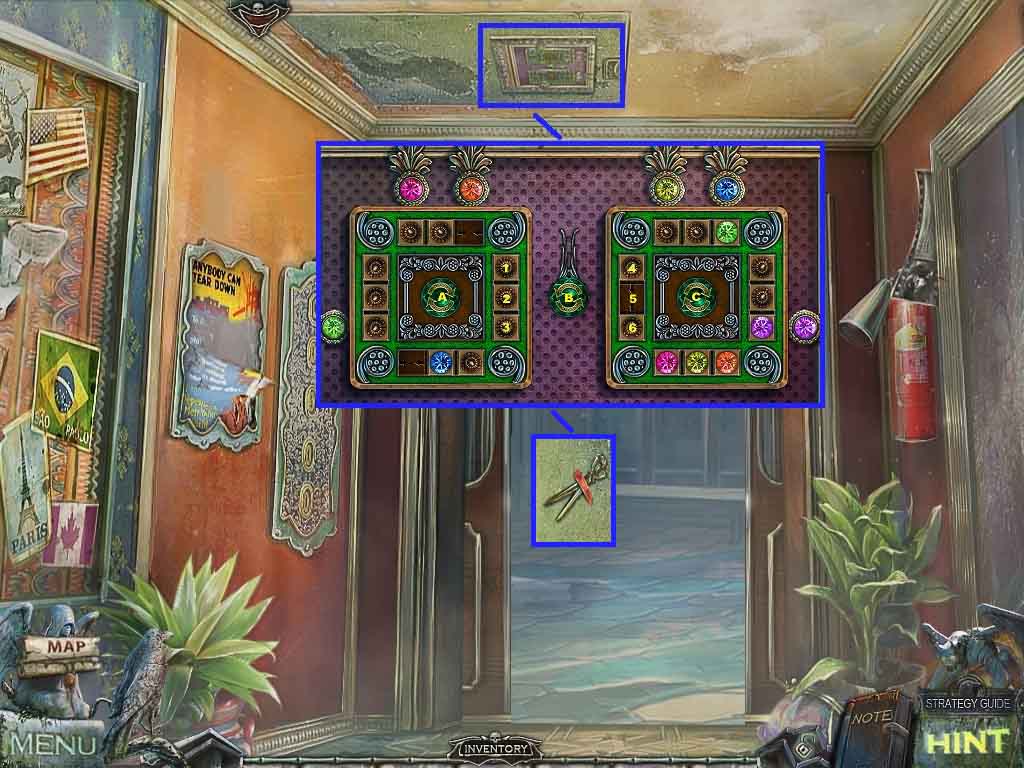
- Click the control panel to access a mini-game.
- Insert the 4 control panel elements to trigger a mini-game.
- Move the elements to the color matched space.
- Click the “A” button 5 times, the “B” button once.
- Click the “C” button once; click the “D” button 5 times.
- Click the “B” button two times and the “A” button two times and the “B” button once more.
- Collect the rotation knob.
- Move down two times.
- Click the trap door to access a mini-game.
- Insert the rotation knob to trigger the mini-game.
- Arrange the chips on the squares so that they are connected to the outer chips of the same color.
- Click the buttons as follows to solve the game.
- C: 3x’s – A – 2 – B – C – B – C: 3x’s – B – A: 2x’s – B – 5 – 6 – B – C: 2x’s – 2 – B – C:2x’s – 2 – B – C: 2x’s – B – 5 – 3 – B – C: 2x’s – 1 – 4 – B – 2 – 3 – B – 5 – 6 – B – 2 –A – B – 5 – A – B – C: 3x’s – B – A: 2x’s – 4 – B – A – 1 – B – C – B – 2 – B: 2x’s – C: 3x’s
- Once solved, collect the scissors.
- Move ahead.
- Click the locker.
- Select the scissors to cut the ribbon; collect the cane.
- Click the lockers on the left to access the hidden objects area.
- Find the listed items.
- Click the clothing to and from every locker to find the items.
- Collect the green ball.
- Move down one time, go to the elevator and move up to the trap door.
- Click the cabinet on the left of the elevator to access a hidden objects area.
- Find the items on the list by using their silhouettes.
- Click the glass door back and forth as necessary.
- Select the corkscrew and use it to uncork the cork.
- Click the drawer; collect the tape and nippers.
- Select the tape and use it on the wires.
- Collect the knob from the tank, attach it to the radio and click the knob.
- Click the down the radio buttons 3 times.
- Collect the head and attach it to the doll; collect the doll.
- Collect the coin from the doll’s hand; insert it on the cat box.
- Insert the winding key into the cat box and click it.
- Collect the key and insert it into the lock.
- Select the nippers and use it to cut the ties; collect the glass cutter.
- Move to the right.
- Combine the cane and the rope with a hook to create the long hook.
- Click the window and use the long hook on the fire escape.
- Exit through the window.
- Click the axe handle.
- Read the record case.
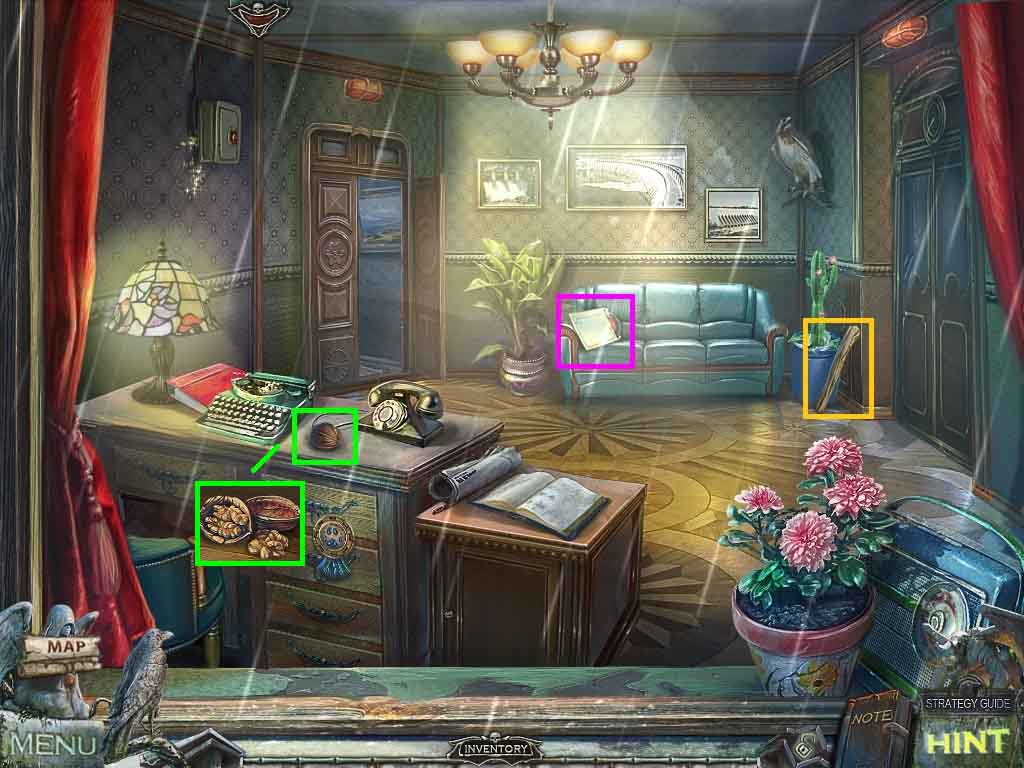
- Click the desktop.
- Select the nutcracker and use it on the walnut; collect the nut.
- Move to the left.
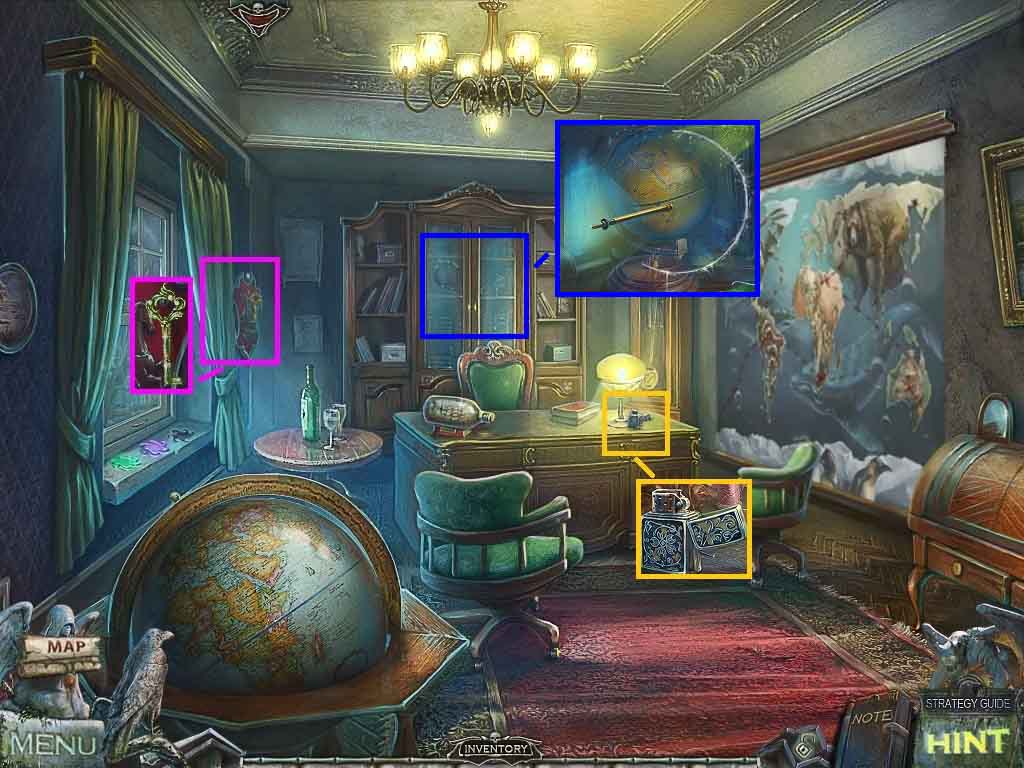
- Click the window; collect the key.
- Click the desk and collect the lighter.
- Click the cabinet.
- Select the glass cutter and use it to cut the glass.
- Notice the mini-game on the globe.
- Move down one time.
- Click the desk.
- Collect the medal and insert the key into the lock.
- Collect the 2nd whale.
- Move to the left, click the cabinet and click the globe to access the mini-game.
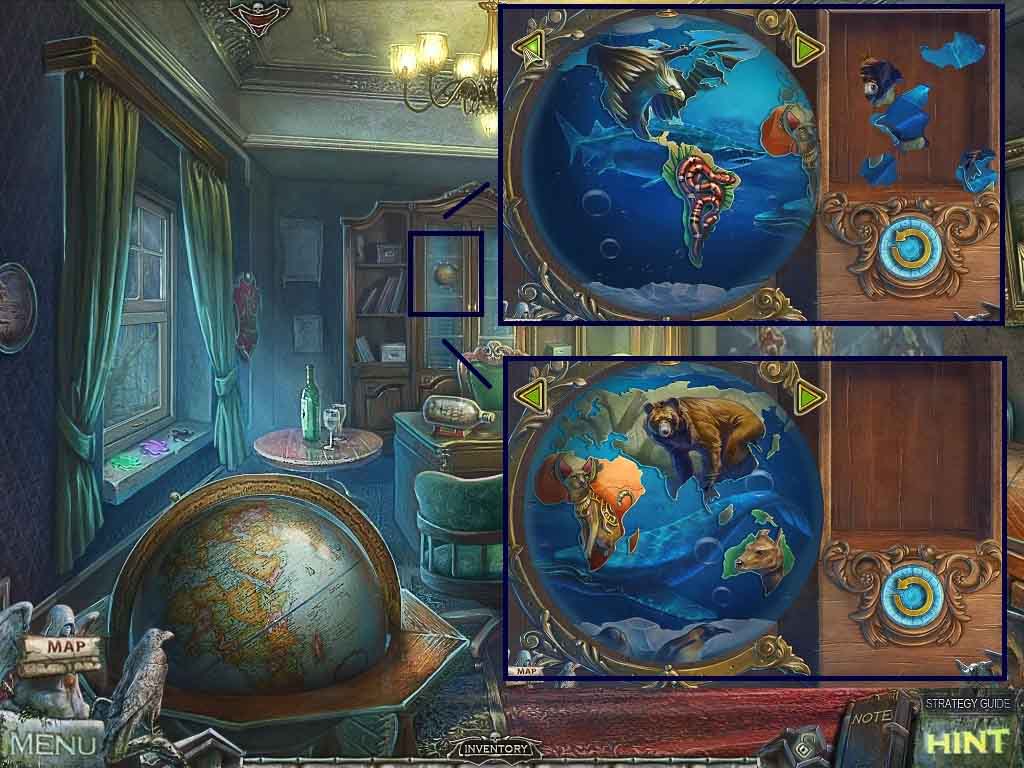
- Insert the 2 whales to trigger the mini-game.
- Insert the globe pieces to complete the globe.
- Select a piece and place it onto the button to rotate it in place.
- Click the arrows to make the globe spin.
- Move to the right and enter the secret passage.
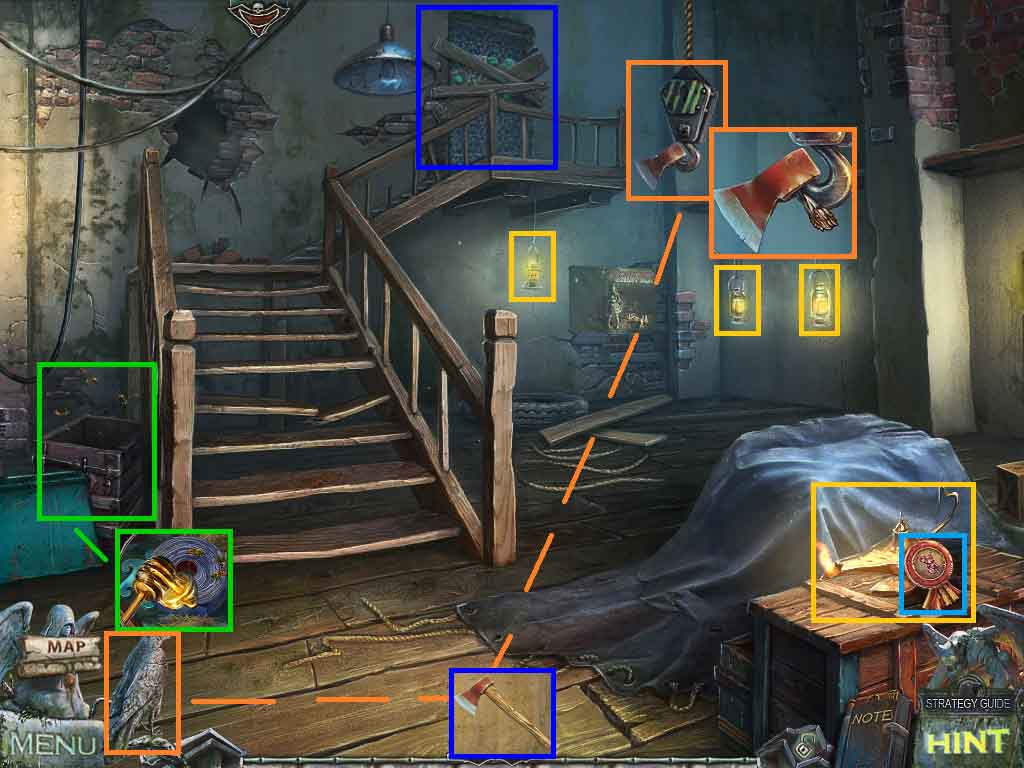
- Collect the medal.
- Select the lighter and use it to light the lamp.
- Click the crate.
- Select the honey dipper with honey and use it on the bees; collect the insulating tape and the water symbol.
- Click the winch and select the raven’s power of air to collect the axe blade.
- Combine the axe blade and axe handle to create the axe.
- Select the axe and use it to cut the boards.
- Notice the mini-game on the door.
- Move down one time.
- Click the window; insert the water symbol into the sill.
- Give the squirrel the nut.
- Collect the 2nd green ball from the squirrel.
- Move to the right and click the mini-game on the door.
- Insert the 2 green balls to trigger the mini-game.
- Find the elements that match the snakes and insert them into the snakes heads and tails.
- Once the game is solved, move into the doorway.
- Select the lighter and light the fuse.
- Click the crates and select the axe to open 3 of them.
- Collect the rope ladder and examine the photos.
- Move down 6 times.
- Click the rail.
- Place the insulating tape onto the wires.
- Hang the rope ladder.
- Move down the ladder.
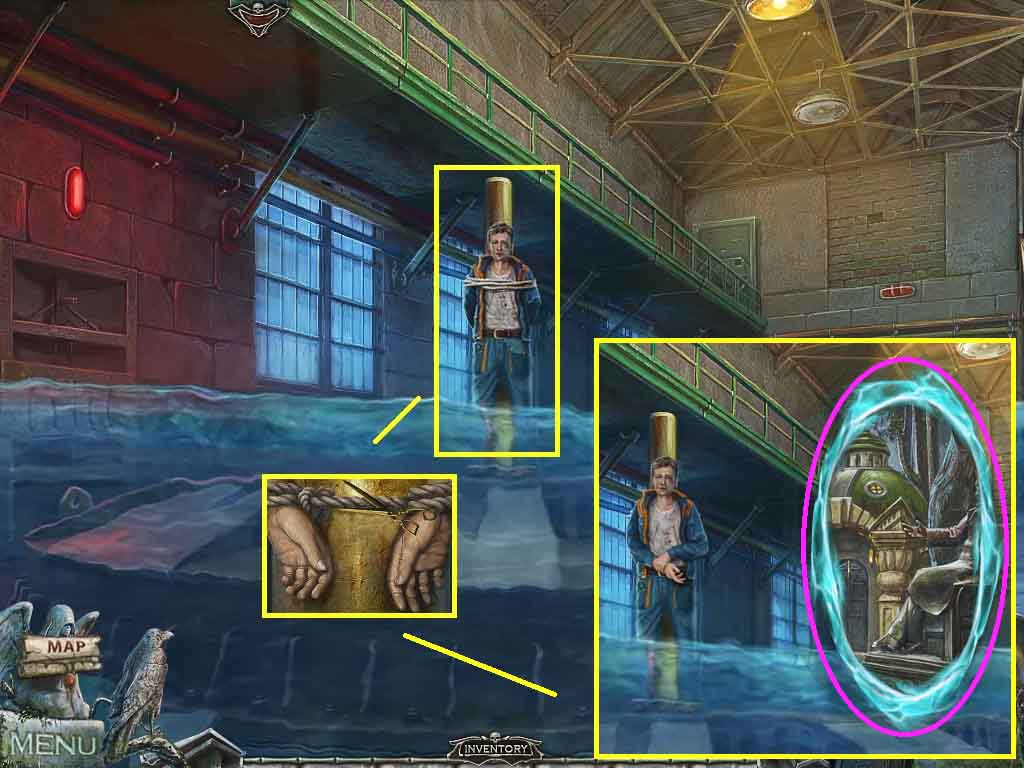
- Click the man and use the scissors to cut the ropes.
- Speak to him and go into the portal.
- Collect the dog crystal.
- Move down one time.
- Speak to Hina.
- Click the dog; insert the dog crystal into the pedestal.
- Move forward 2 times.
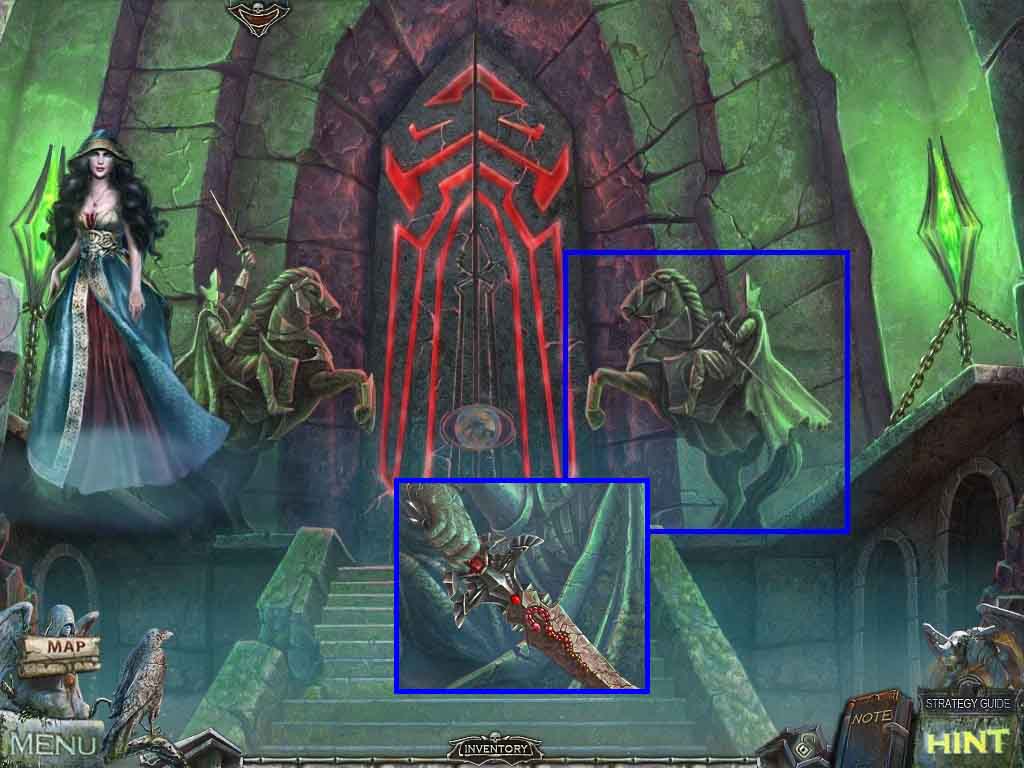
- Click the statue.
- Select the raven’s power of earth to collect the wire cutters.
- Move down once.
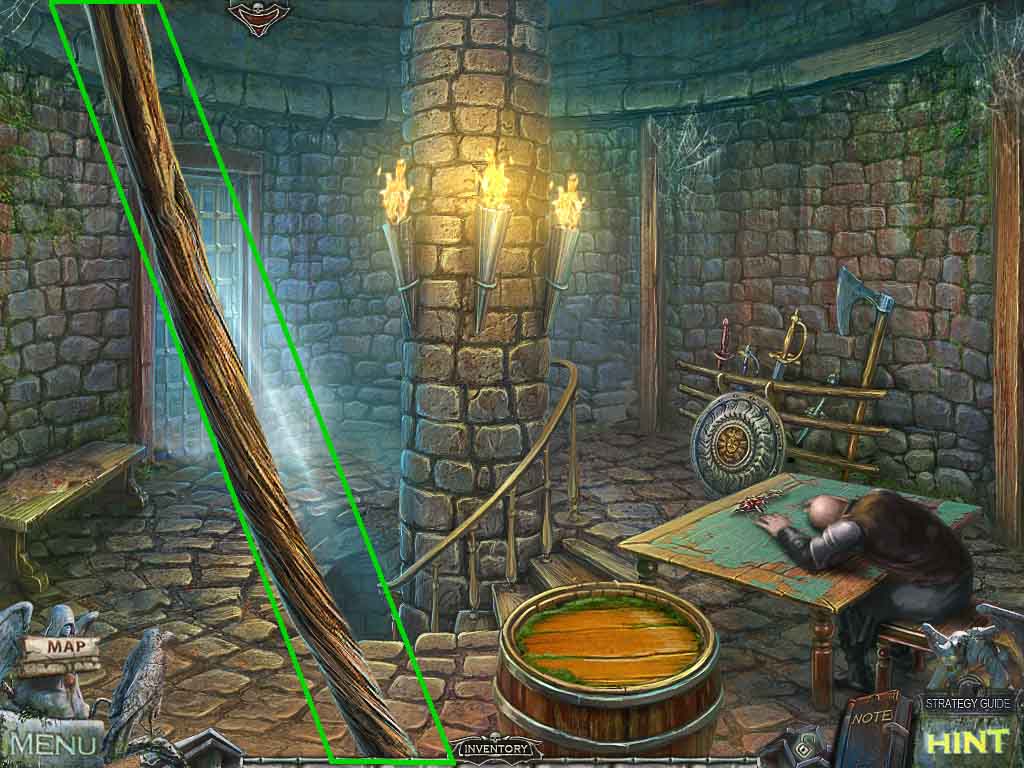
- Click the knight.
- Select the wire cutters and use them to cut the wires.
- Click the knight’s hand and collect the ashes.
- Move down once and go to the left.
- Speak to the spirit.
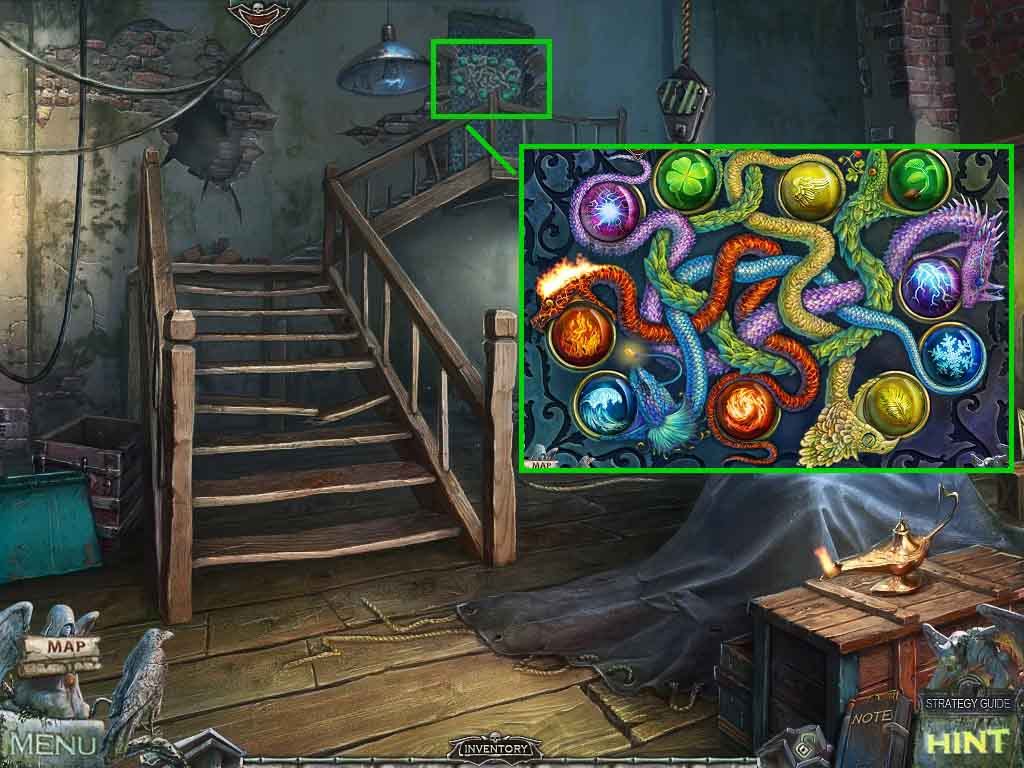
- Collect the power of fire from the spirit to access a mini-game.
- Shoot the fireballs to create 3 or more matches.
- Do this until the board is cleared.
- Give the spirit the ashes.
- Move into the portal.

- Click the mug.
- Pour the sleeping potion into the mug.
- Click the barrel and collect the bird.
- Insert the hairpin into the lock.
- Collect the stick.
- Move down once.
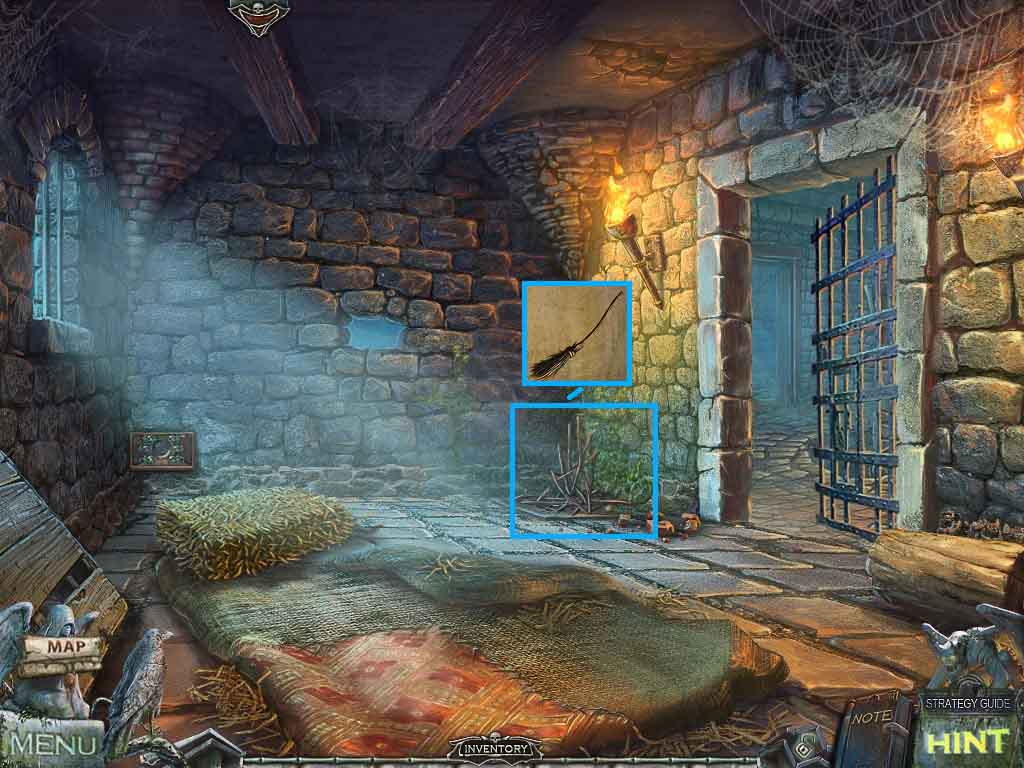
- Select the stick and add it to the pile of branches.
- Collect the broom.
- Move to the right.
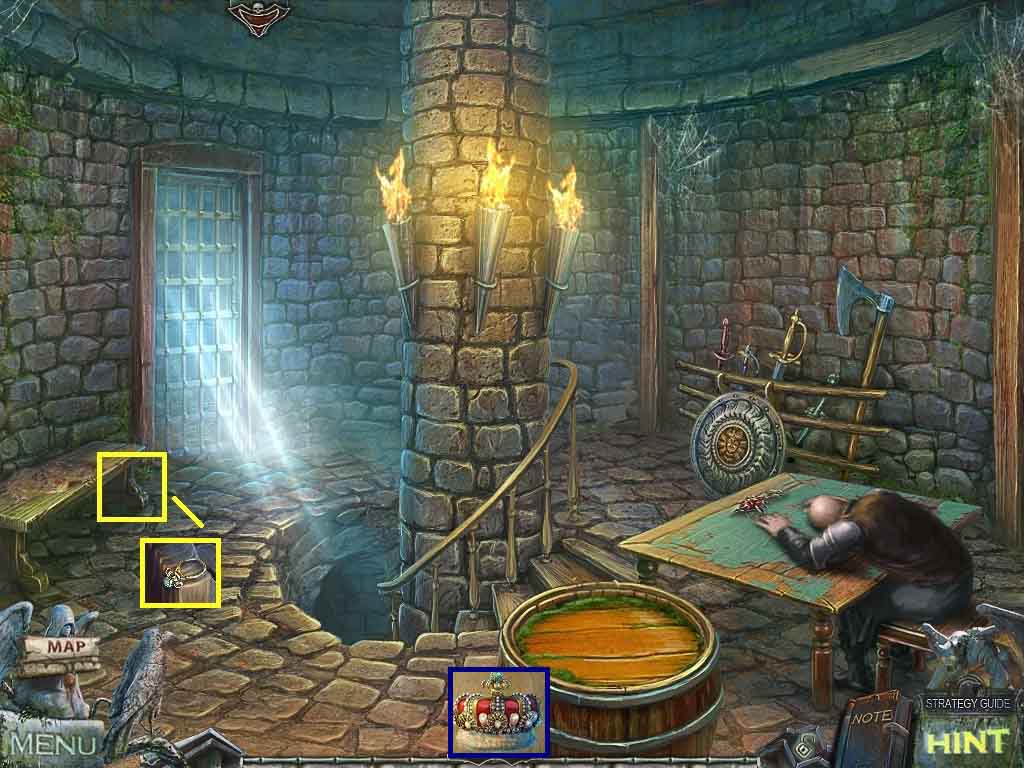
- Click the bench; collect the ring.
- Combine the medallion and the ring to create the crown.
- Move down the steps.
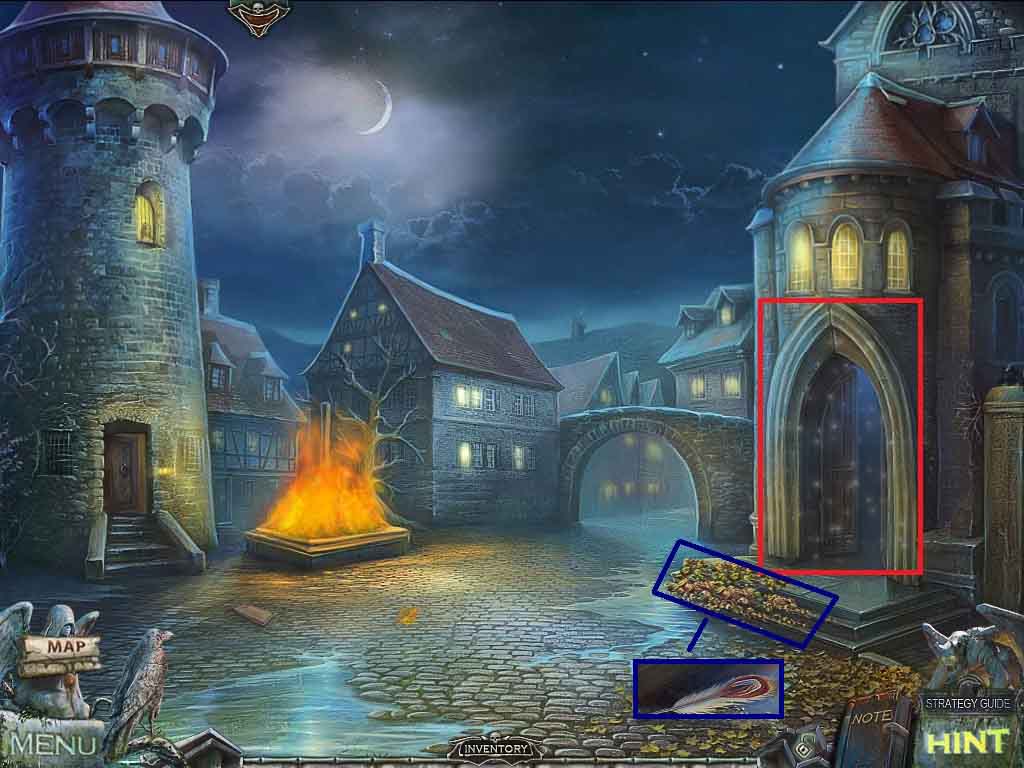
- Click the steps.
- Select the broom and use it to sweep the leaves 3 times.
- Collect the pen.
- Click the doorway to access a hidden objects area.
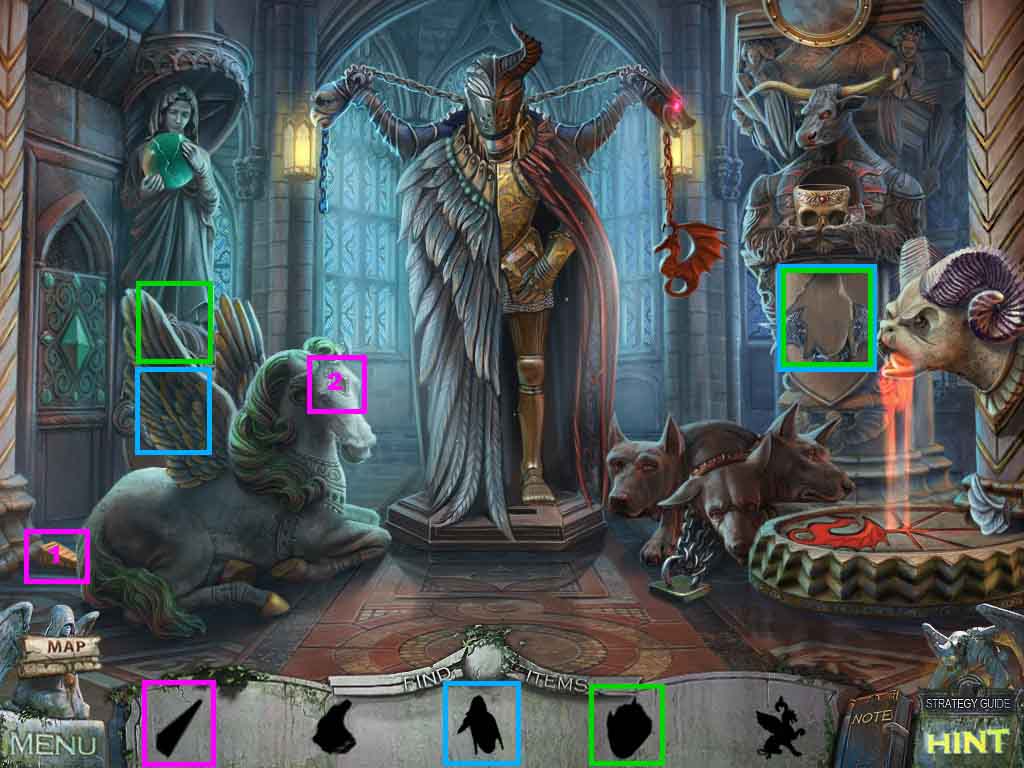
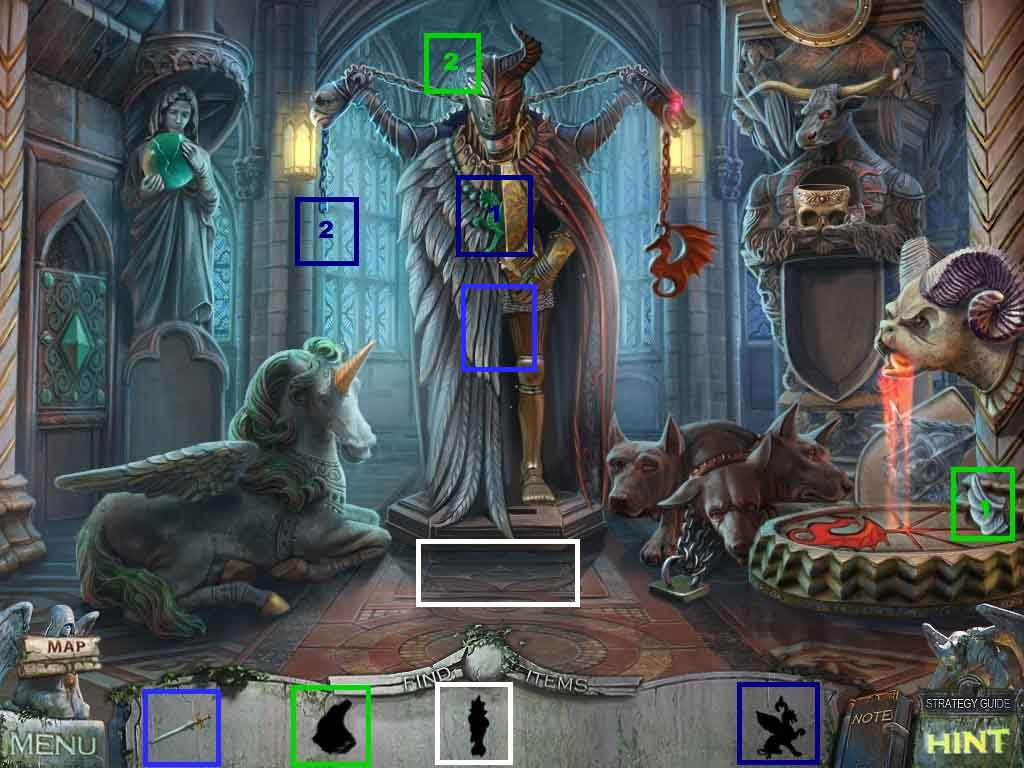
- Find all the items based on their silhouettes.
- Attach the horn onto the unicorn.
- Insert the skull onto the shield.
- Place the head onto the pedestal.
- Insert the wing onto the helmet.
- Place the griffin onto the chain.
- Give the knight the sword.
- Collect the 1st doll.
- Move ahead and to the right.
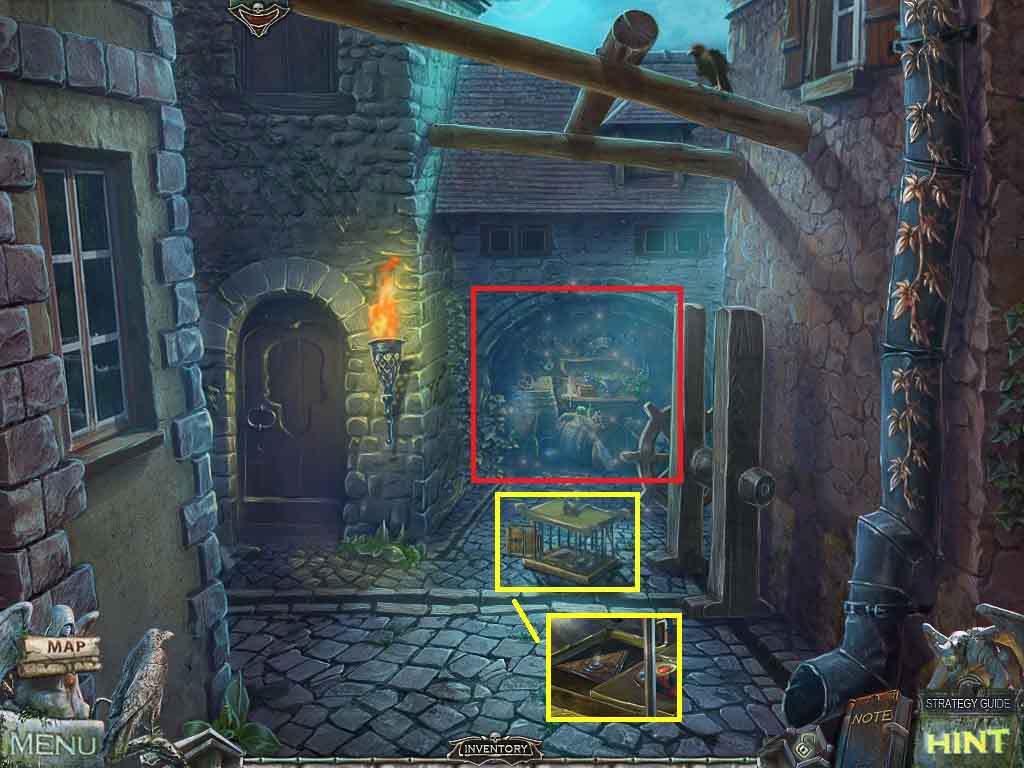
- Click the cage and insert the bird.
- Collect the all-seeing eye.
- Click the alcove to access a hidden objects area.
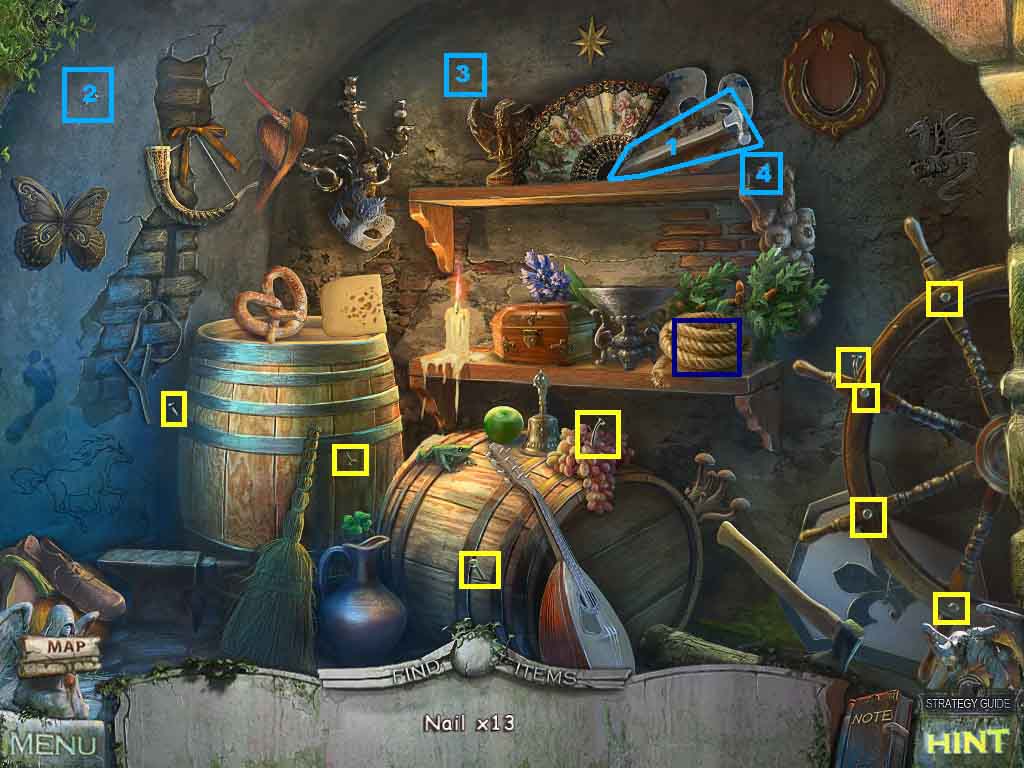
- Find the 13 nails.
- Click the rope; collect a nail.
- Select the hammer and use it to pull the 3 nails.
- Collect the nails.
- Move down once.
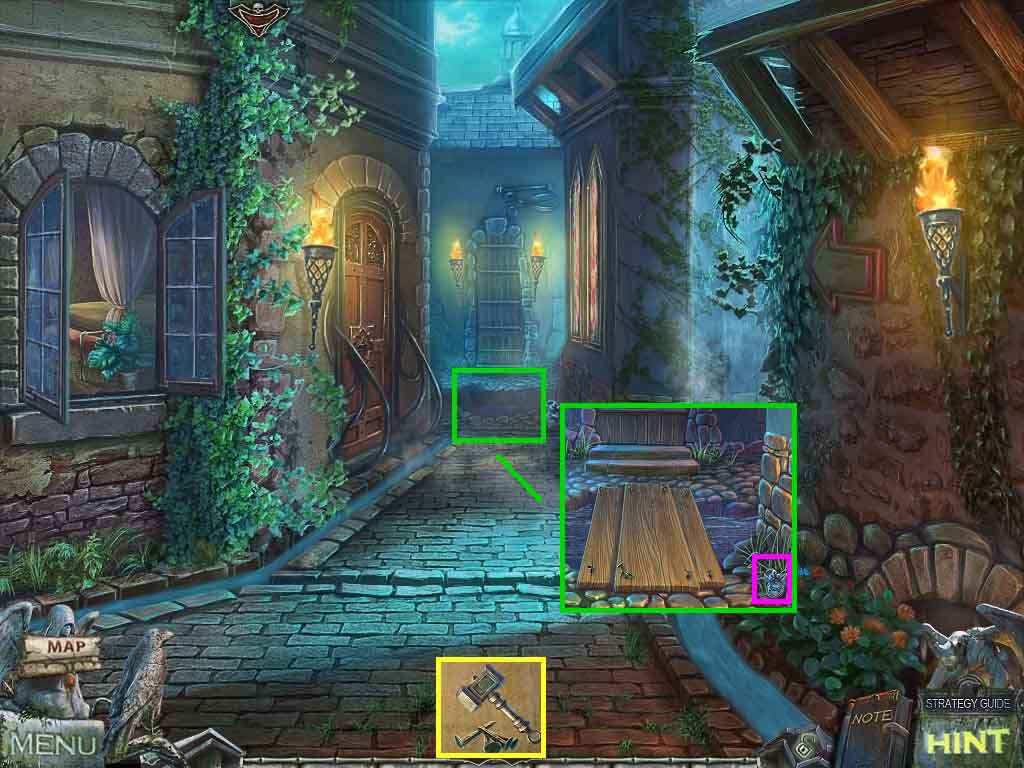
- Combine the hammer and nails to create the hammer and nails.
- Click the ground, collect the medal and lay the planks over the water.
- Use the hammer and nails on the planks.
- Click the door open and move ahead.
- Read the notes.
- Select the knife and use it to cut the cloth; collect the rag.
- Notice the mini-game near the window.
- Click the table.
- Collect the medal and read the pile until you get to the love letters.
- Move down once.
- Click the planks.
- Place the rag into the water; collect the wet rag.
- Move down and go into the tower on the left.
- Click the bench.
- Wipe the dirt using the wet rag; collect the skull.
- Move down the stairs, go forward and go to the right.
- Insert the skull into the door.
- Enter into the doorway.
- Click the rack.
- Insert the all-seeing eye into the lock; collect the mace.
- Click the bag, collect the kindling and read the notes.
- Click the table.
- Place the kindling onto the candle; collect the hot kindling.
- Click the book and insert the crown to access a mini-game.
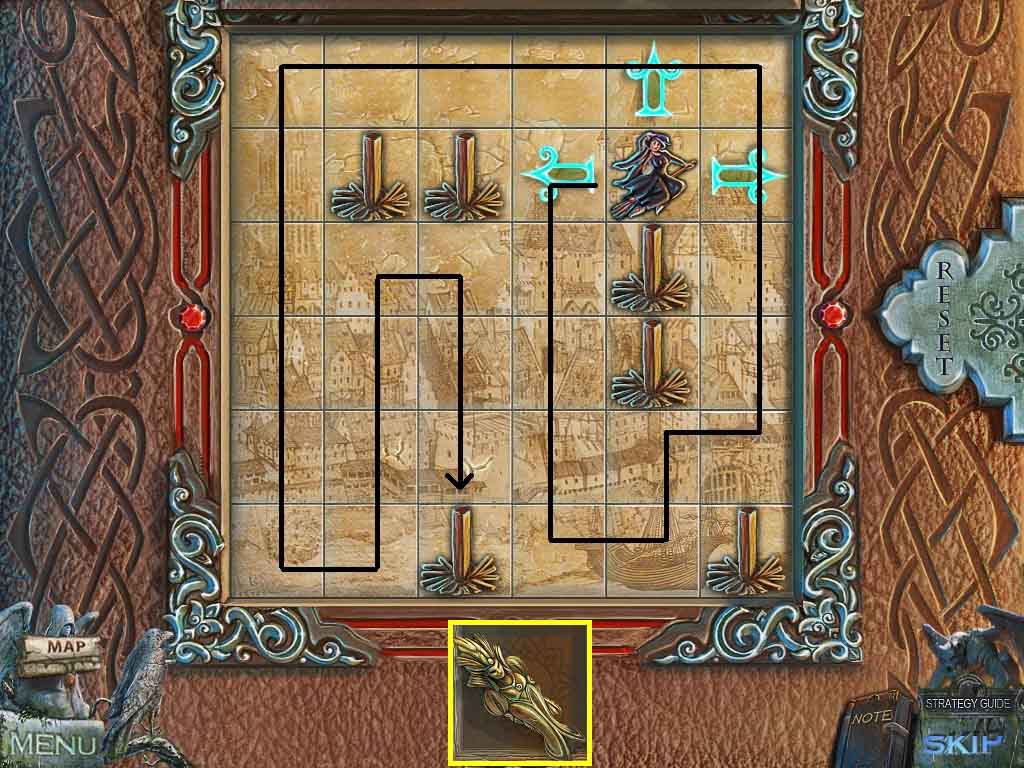
- Move the witch through all the squares.
- Click the arrows to move the witch.
- Collect the 2nd doll.
- Move down 2 times and move forward.
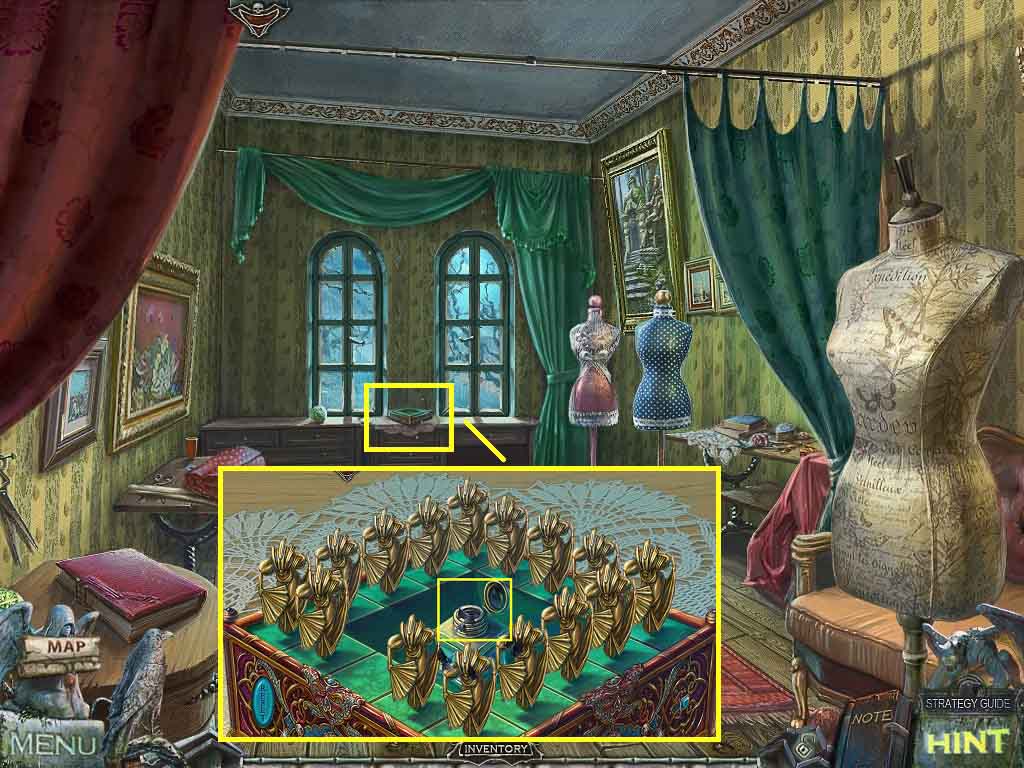
- Click the mini-game by the window.
- Insert the 2 dolls onto the board to trigger the game.
- Click the dolls to make them bow; collect the ink.
- Move down, go to the right and go into the skull door.
- Combine the ink and pen to create the pen and ink.
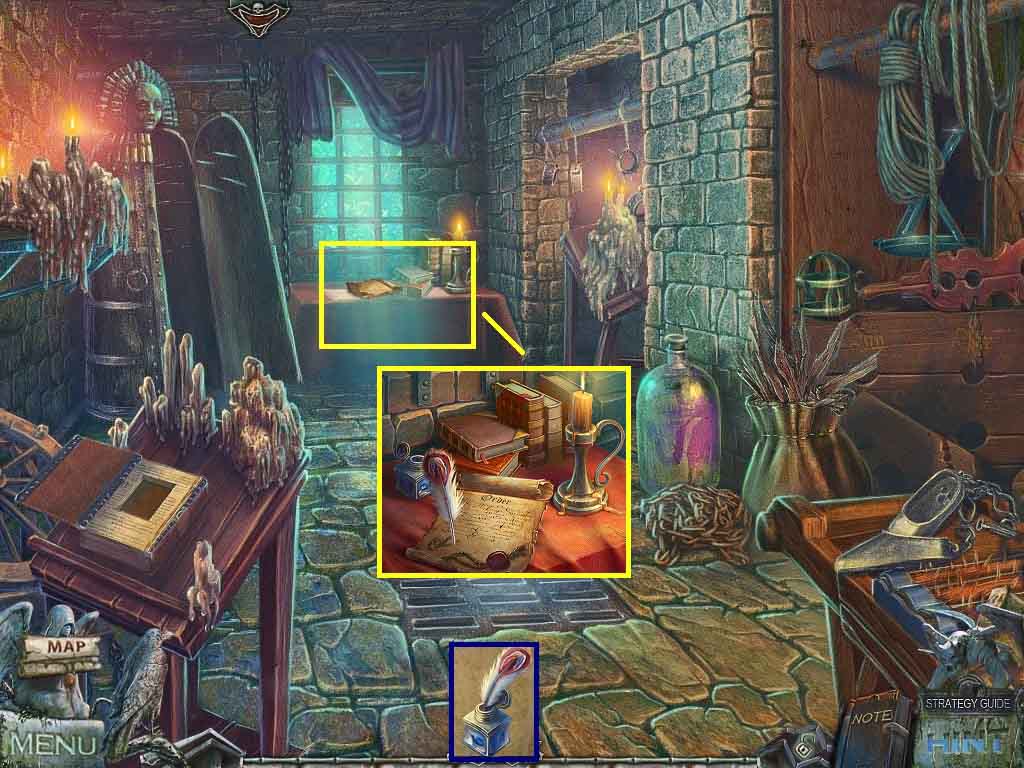
- Click the table.
- Use the pen and ink on the parchment and set it on the table.
- Click the pen to collect the release order.
- Move down 3 times and go into the tower.
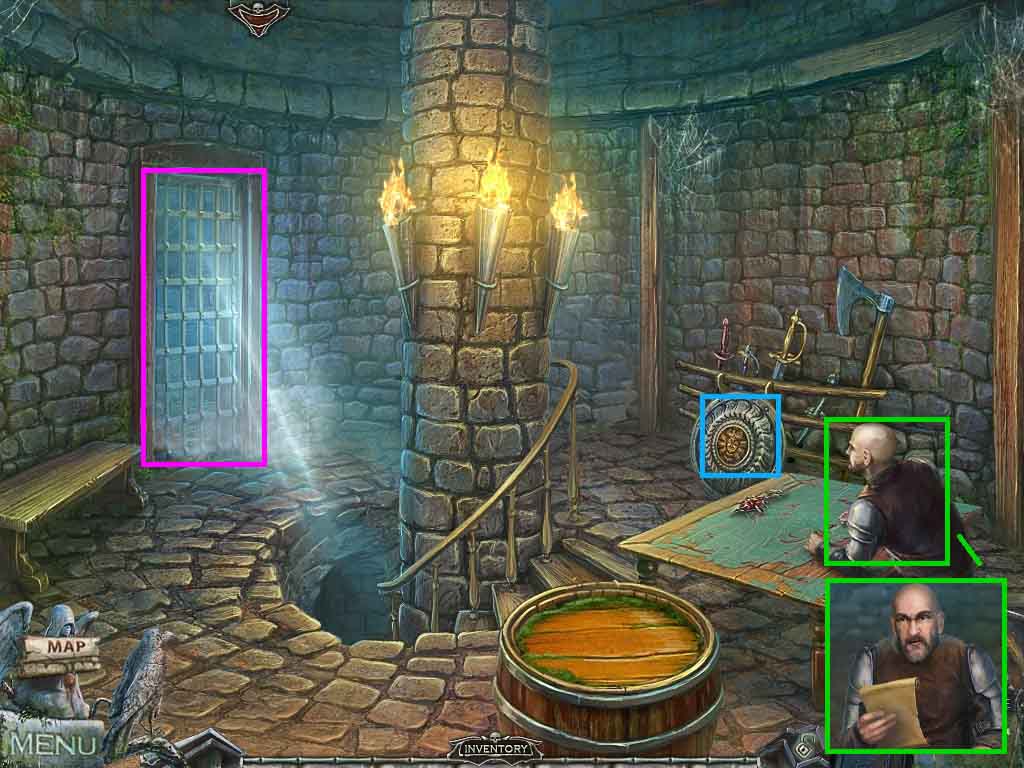
- Click the weapons; bang the mace onto the shield.
- Speak to the guard; give him the order.
- Collect the key to Fiona’s cell.
- Click the cell door.
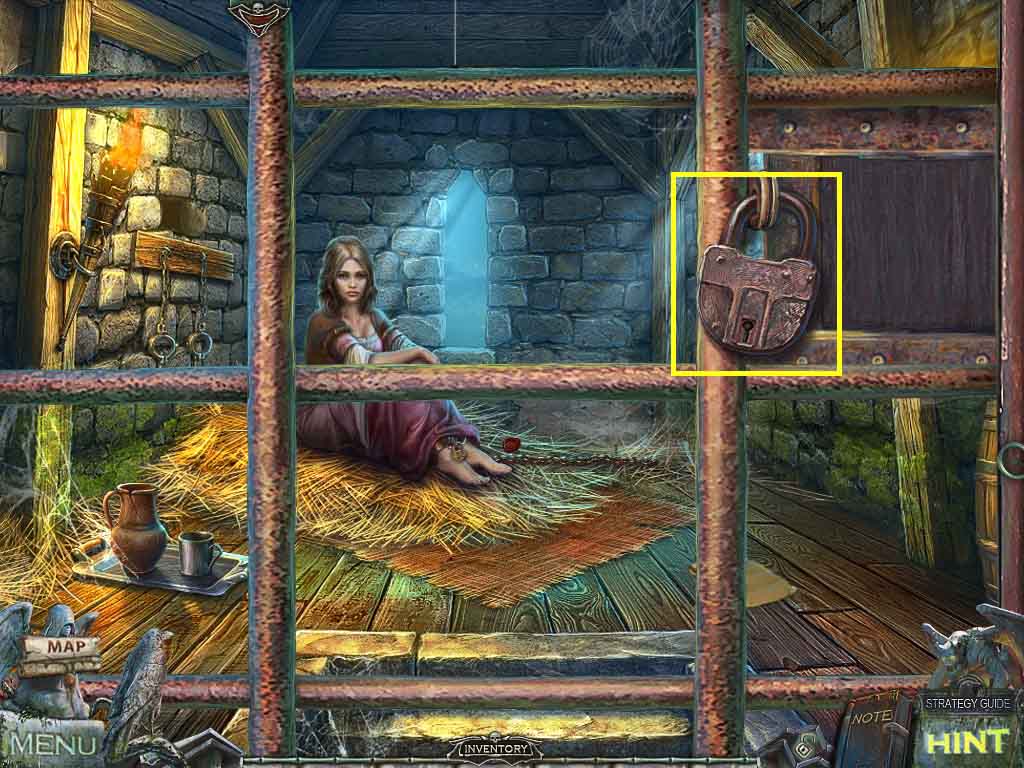
- Insert the key into the lock.
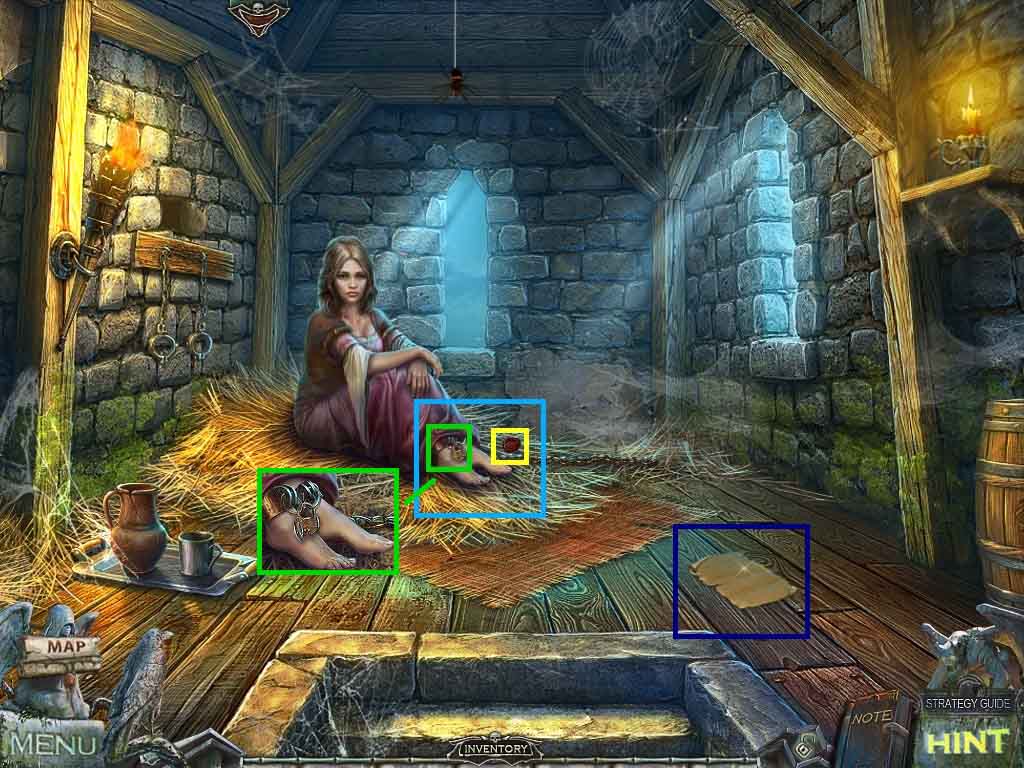
- Read the note.
- Click Fiona’s feet; collect the sealing wax and insert the key to Fiona’s cell into the shackles.
- Combine the sealing wax and the hot kindling; collect the melted wax.
- Select the melted wax to repair the key and open the shackles.
- Move down once.
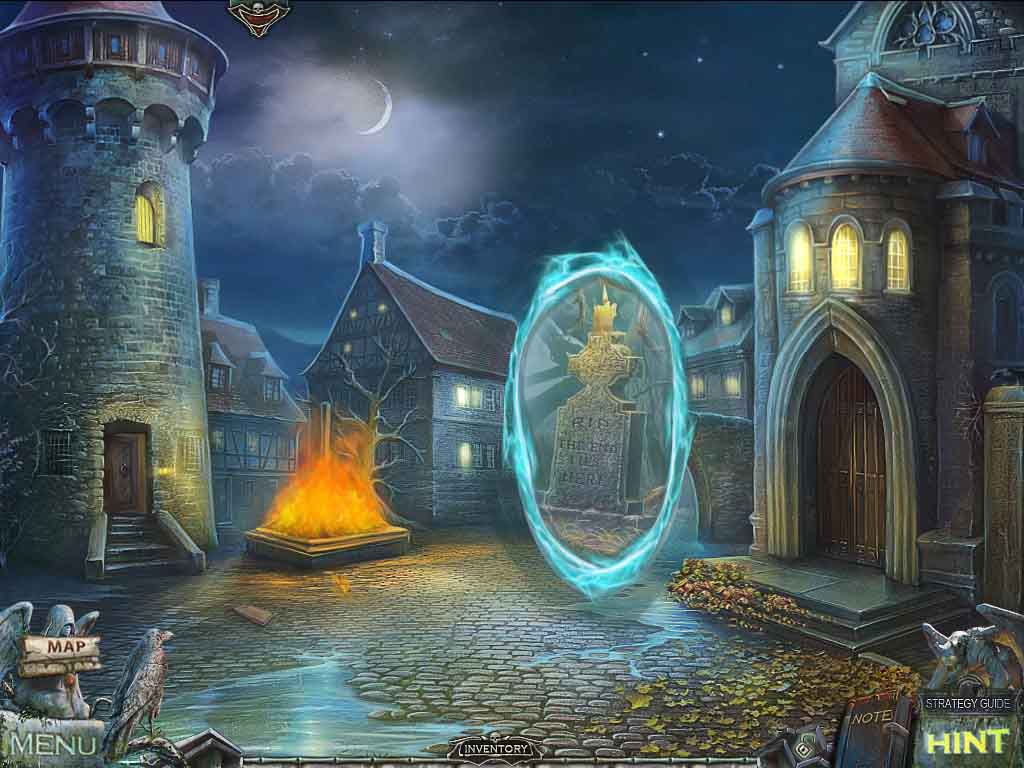
- Enter the portal.

- Collect the dog crystal.
- Move down once.
- Click the dog.
- Insert the dog crystal.
- Speak to Hina.
- Go into the portal.
- Speak to Hina.
- Click the angel; collect the hammerhead.
- Move ahead.

- Click the tree and collect the nut.
- Collect the collar.
- Notice the mini-game on the crypt door.
- Click the gate.
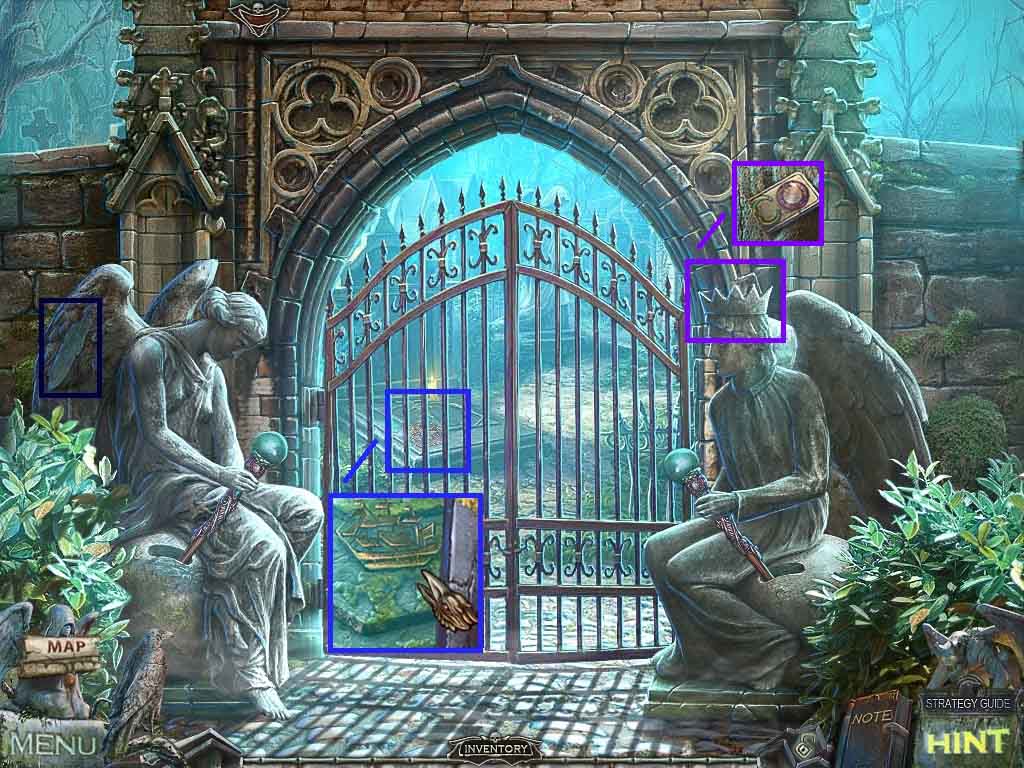
- Collect the 1 / 4 feathers.
- Look through the gate.
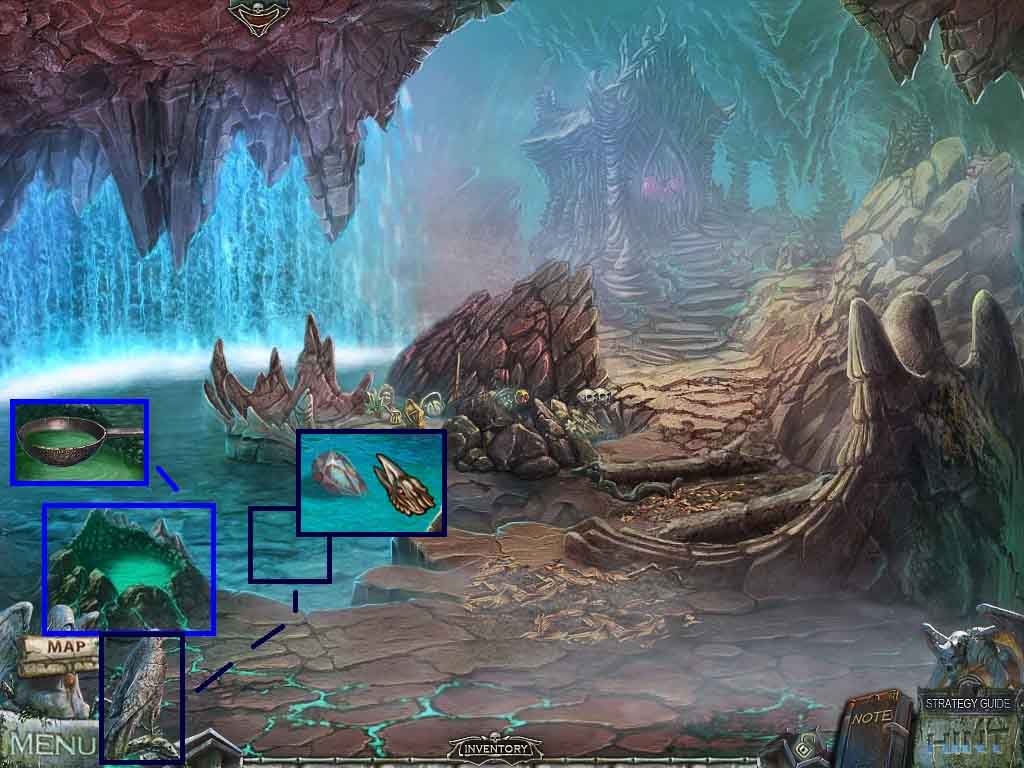
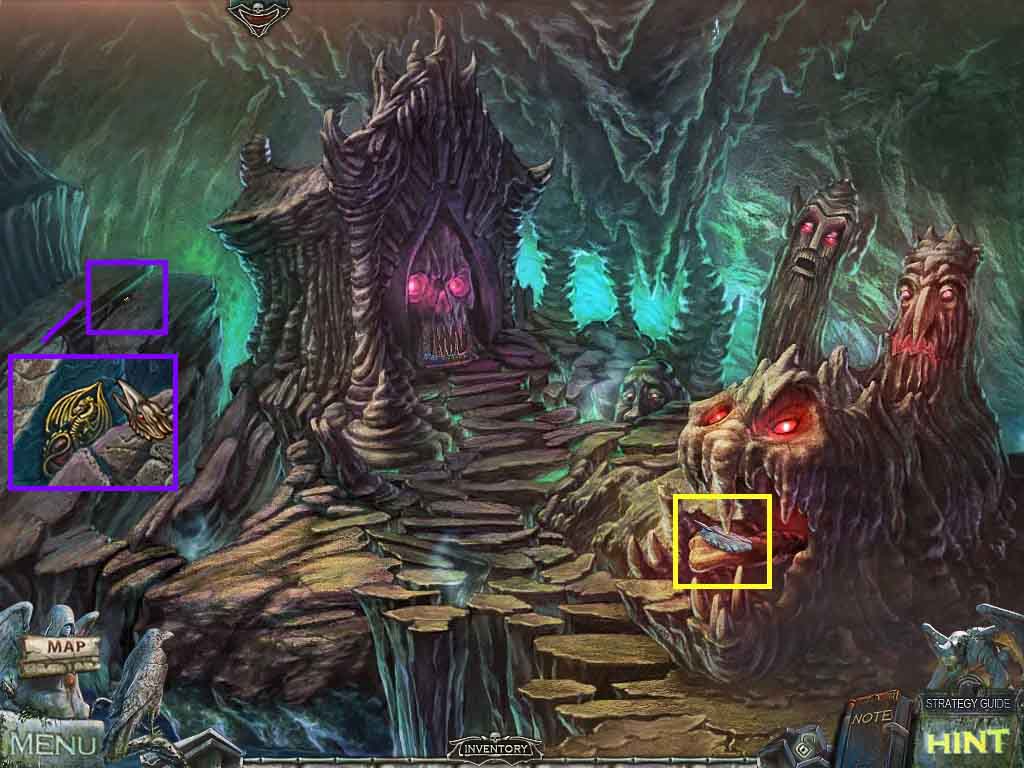
- Select the raven’s power of air to collect the ship symbol.
- Click the crown and collect the 1 / 3 chips.
- Move down 2 times.
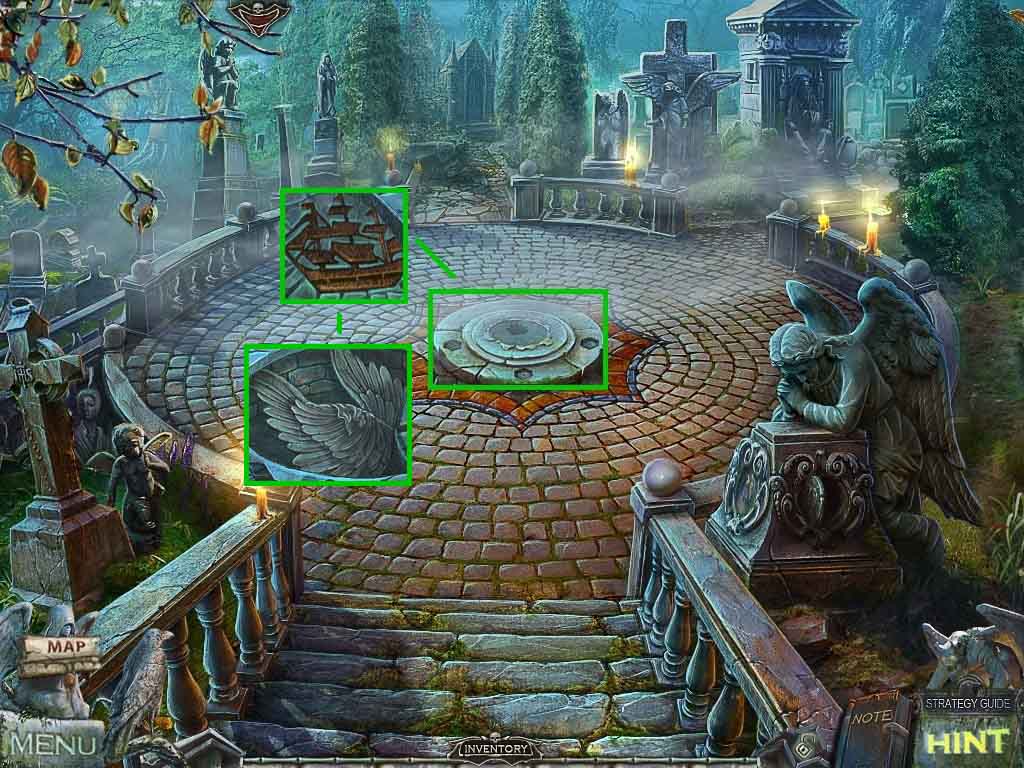
- Click the platform; insert the ship symbol.
- Collect the angel wings.
- Move ahead.

- Click the angel; hand her the angel wings.
- Click the ground; collect the chisel.
- Move down and go to the left.
- Click the chipmunk; hand him the nut.
- Collect the 2 / 3 chips and the nutshell.
- Collect the round part of the gate lock.
- Click the tombstone; select the raven’s power of earth to collect the gold 1 / 2 part of a gate lock.
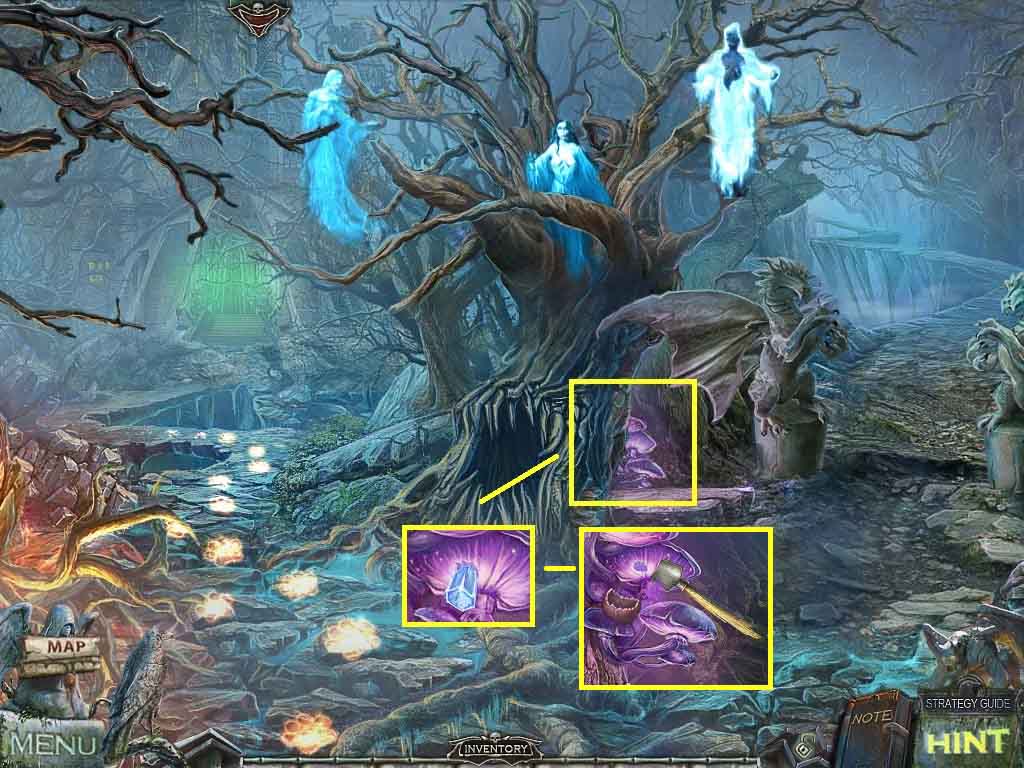
- Click the tree hollow.
- Collect the 1st part of the bird key.
- Click the center tree to access a hidden objects area.
- Find the listed items.
- Select the stick and use it on the moth to uncover the rope.
- Collect the long rope.
- Move down and go to the right.

- Click the crypt; collect the magic ribbon.
- Notice the mini-game at the statue base.
- Click the gate and collect the medal and the wooden handle.
- Move down once.
- Combine the wooden handle and the hammerhead to create the hammer.
- Click the railing.
- Place the chisel onto the stone ball and select the hammer to pound the chisel.
- Collect the 3 / 3 chips.
- Move ahead and click the crypt door to access a mini-game.
- Insert the 3 chips to trigger the game.
- Move the tile so that the adjacent tiles match.
- Go into the crypt.
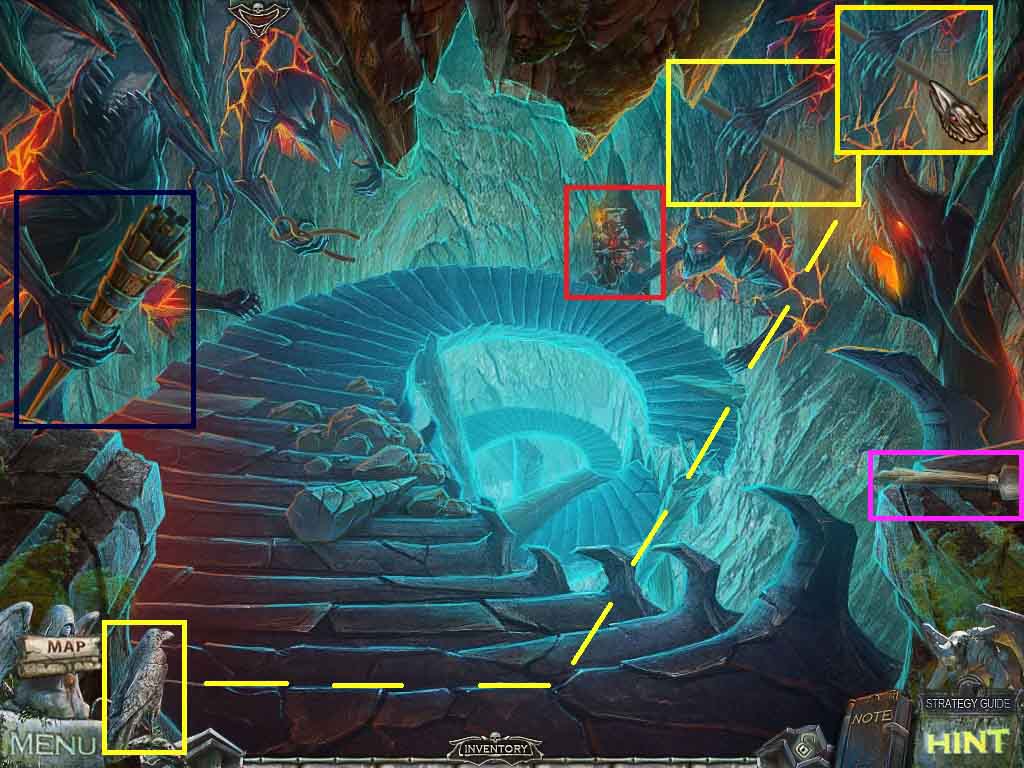
- Collect the extinguished torch.
- Collect the scraper.
- Select the raven’s power of air to collect the stick.
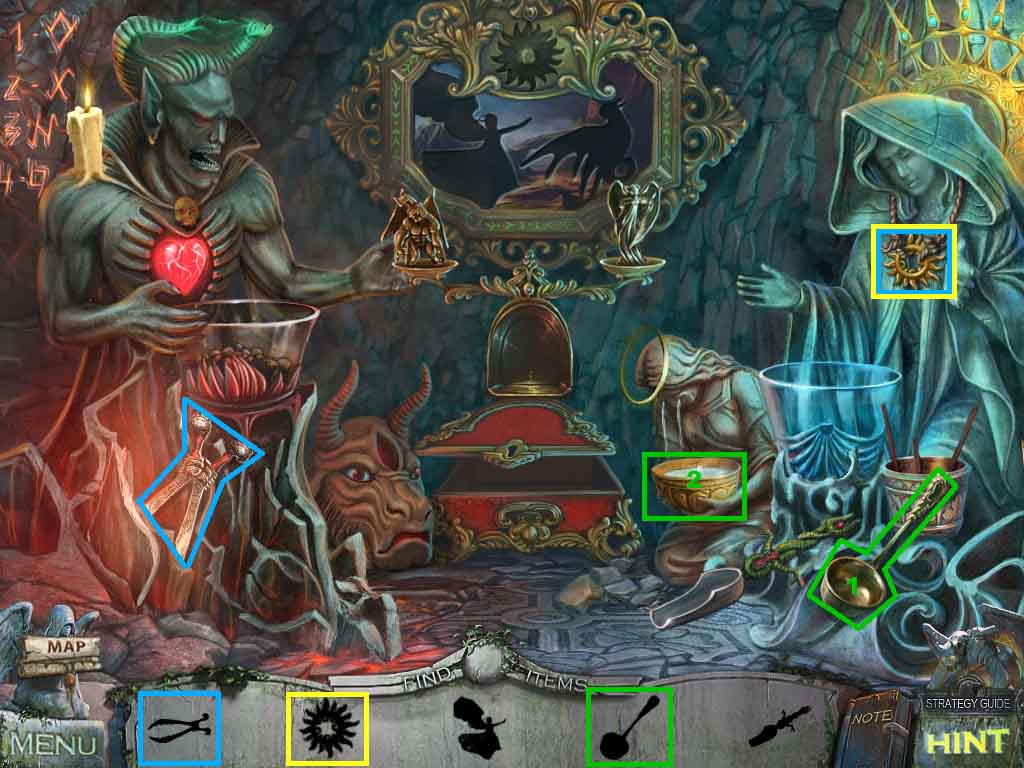
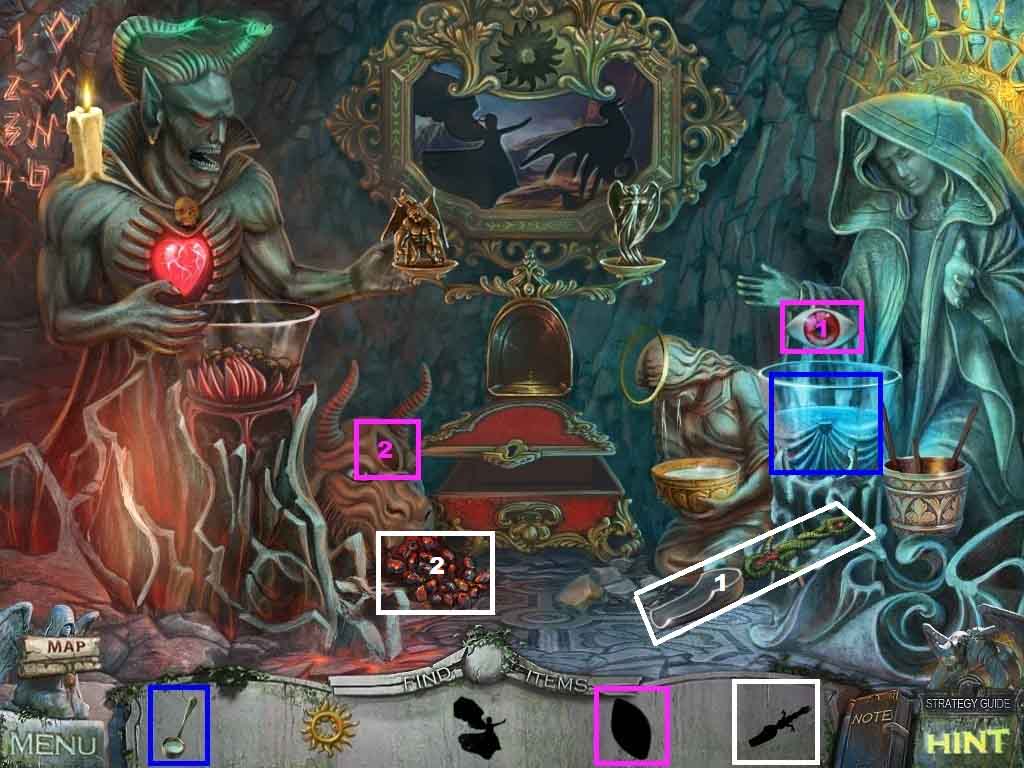
- Click the cave to access the hidden objects area.
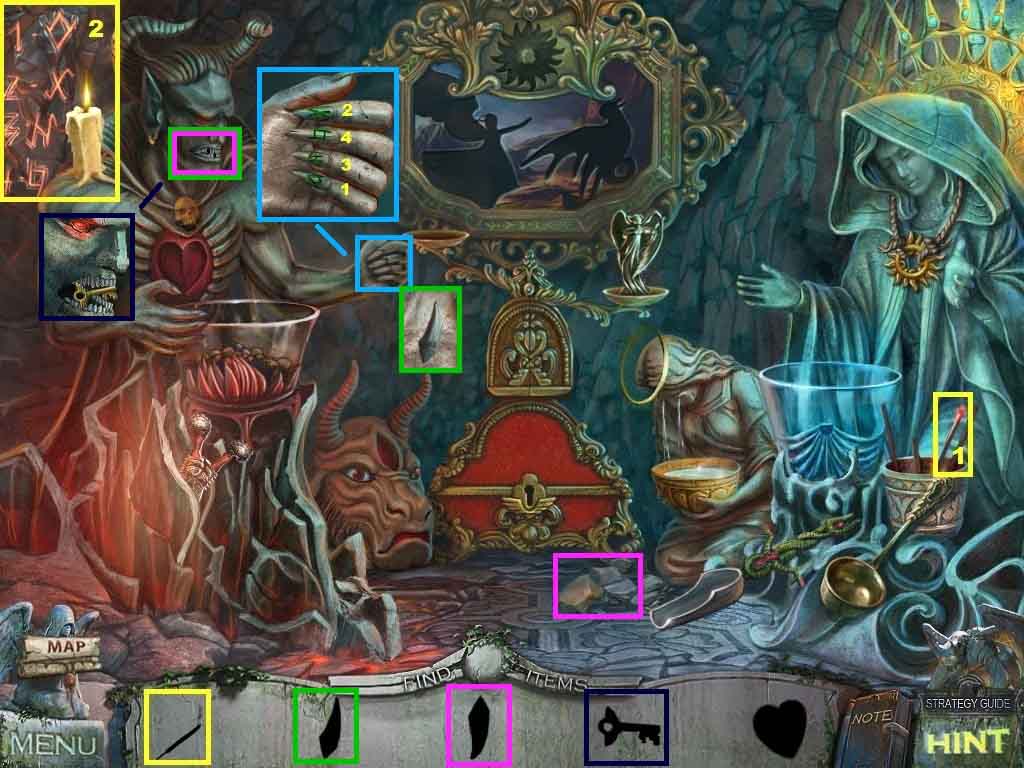
- Find all the items based on their silhouettes.
- Select the burning ember and use it on the candle to reveal the symbols.
- Click the demons hand; click the symbols in numerical order.
- Collect the 1st stone tooth from the hand.
- Click the rock to collect the 2nd stone tooth.
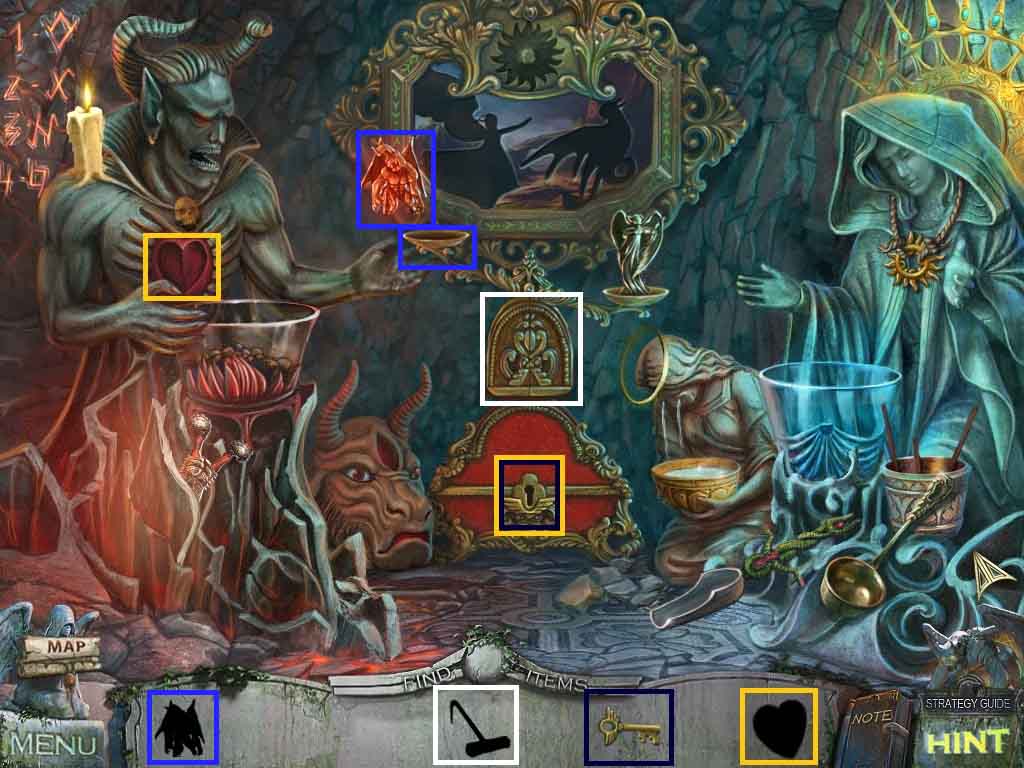
- Click the demon’s mouth and insert the 2 stone teeth.
- Collect the metal key from the demon’s mouth; insert it into the chest.
- Collect the heart from the chest and insert it into the demons heart.
- Collect the metal demon figurine and place it onto the scales.
- Collect the hook.
- Move down 2 times and move to the right.
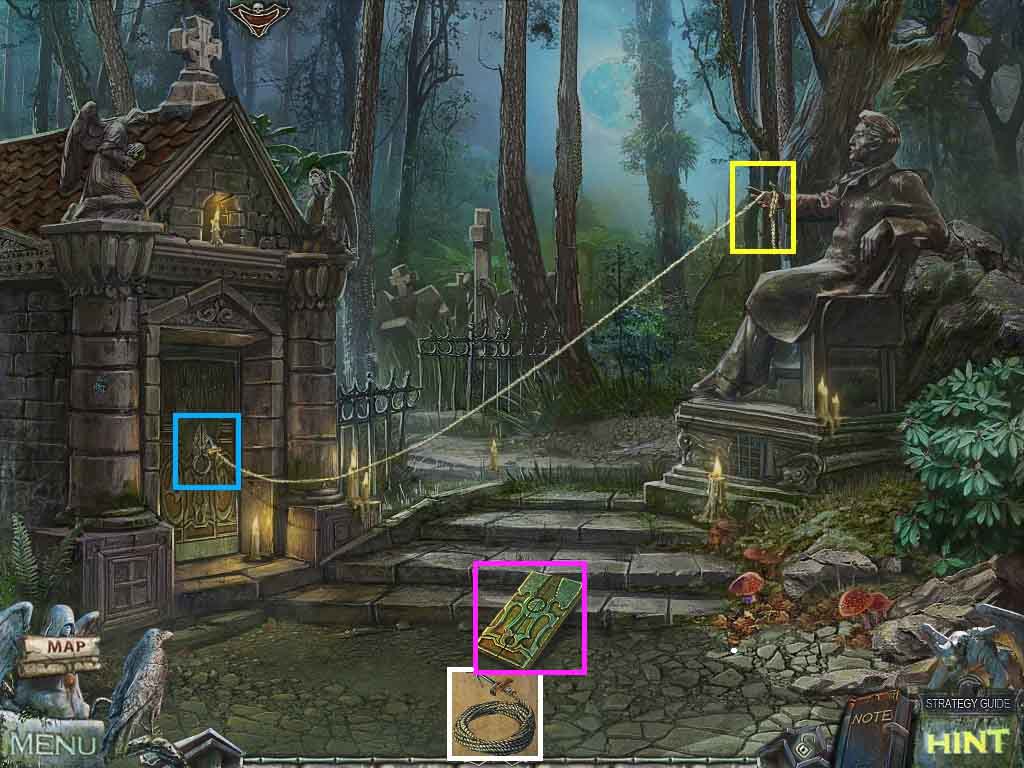
- Combine the hook with the long rope to create the hook.
- Click the door and attach the hook.
- Attach the rope end to the statue.
- Click the statues arm.
- Collect the tomb plate.
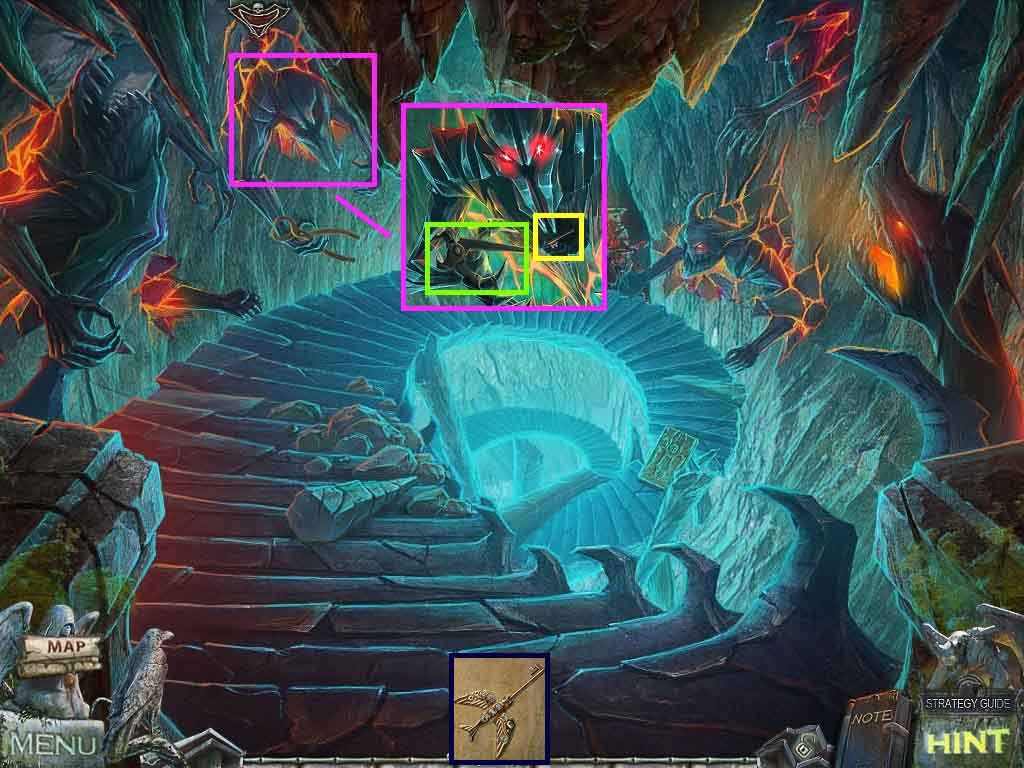
- Move down once, go forward and go into the tomb.
- Click the broken stairs and place the tomb plate down.
- Move down the stairs.
- Click the roots and branches.
- Collect the medal and the 1st ruby eye.
- Click the wings; collect the sword hilt.
- Move ahead on the left side.
- Speak to Hina.
- Click the left statue and select the raven’s power of fire to collect the fireball.
- Click the green flame; insert the extinguished torch into the flame to collect the burning torch.
- Notice the mini-game on the door.
- Move down one time.
- Click the tree hollow.
- Select the burning torch and use it on the snake.
- Collect the 1 / 2 jars.
- Combine the magic ribbon and the stick to create the magic ribbon on a stick.
- Select the magic ribbon on a stick to use on the snake; collect the snake sign.
- Move ahead on the left side.
- Click the right statue; insert the snake sign and the sword hilt.
- Collect the sword.
- Move down once.
- Click the wings and insert the sword to trigger a mini-game.
- Click the tiles in order to tell the dragon’s story.
- Move to the path on the right.
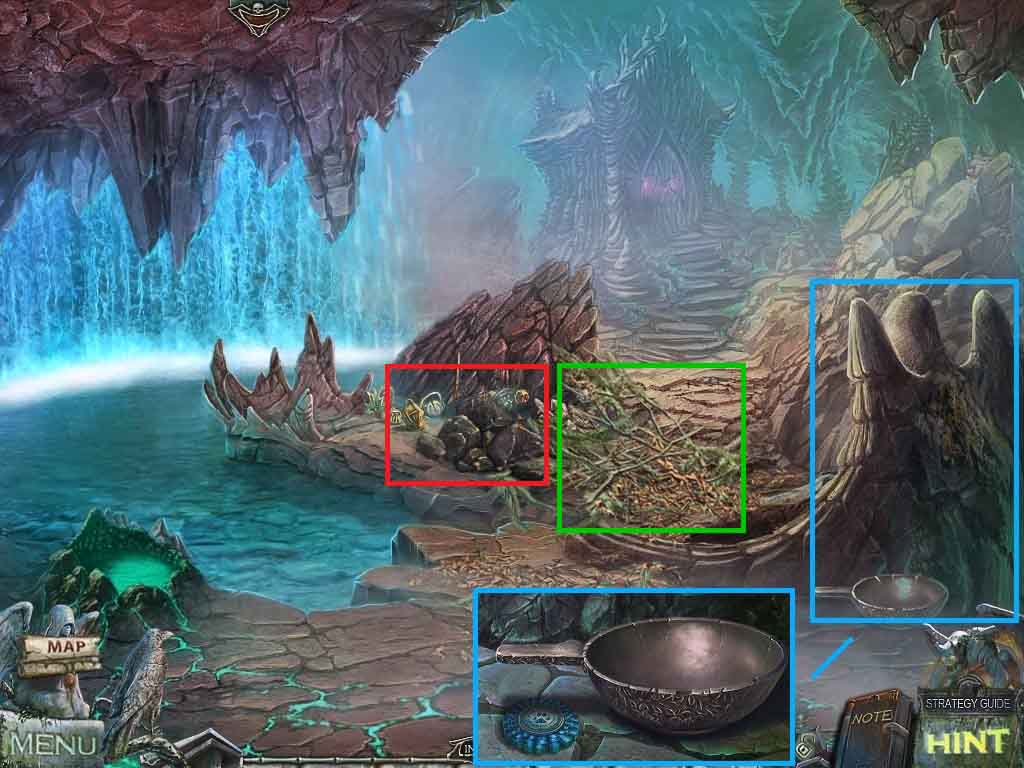
- Click the angel.
- Collect the medal and the bowl.
- Click the weeds.
- Click the rocks to access a hidden objects area.
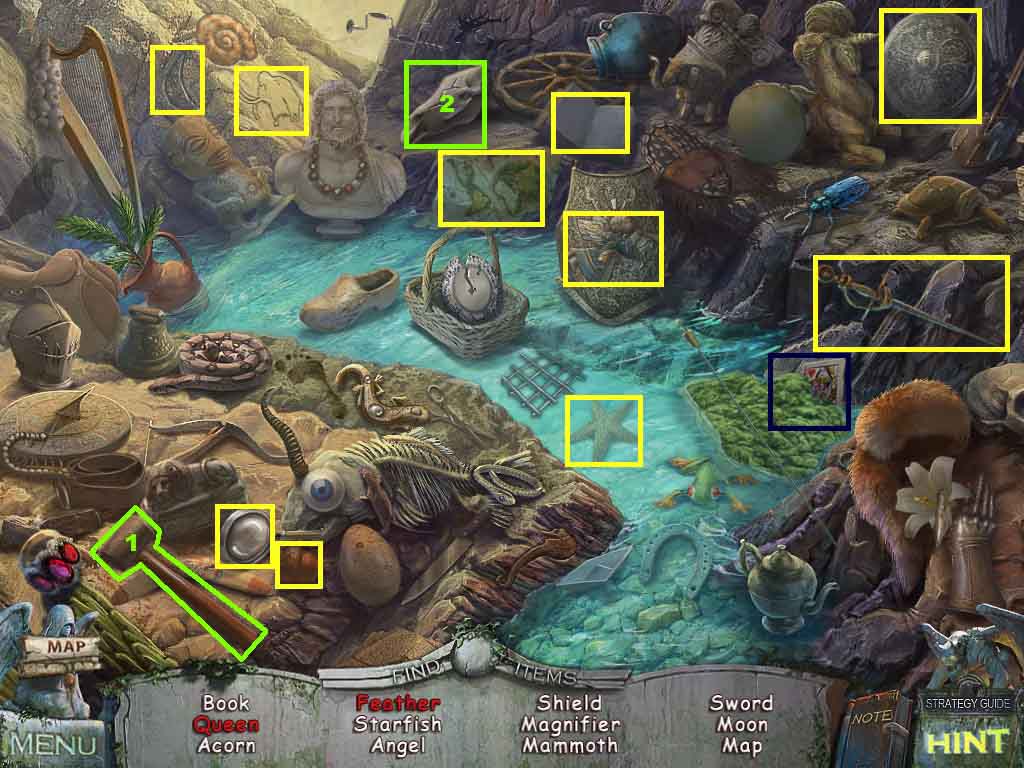
- Find the listed items.
- Click the algae to collect the queen.
- Select the hammer to smash the skull; collect the feather.
- Collect the 2 / 4 angel feathers.
- Click the basin.
- Place the bowl into the water; collect the bowl of water.
- Click the water.
- Select the raven’s power of water to collect the 2nd ruby eye.
- Move ahead.
- Collect the 3 / 4 angel feathers.
- Click the cliff.
- Select the raven’s power of earth to collect the 2 / 2 part of the gate lock.
- Move down 3 times.
- Click the cave to access the hidden objects area.
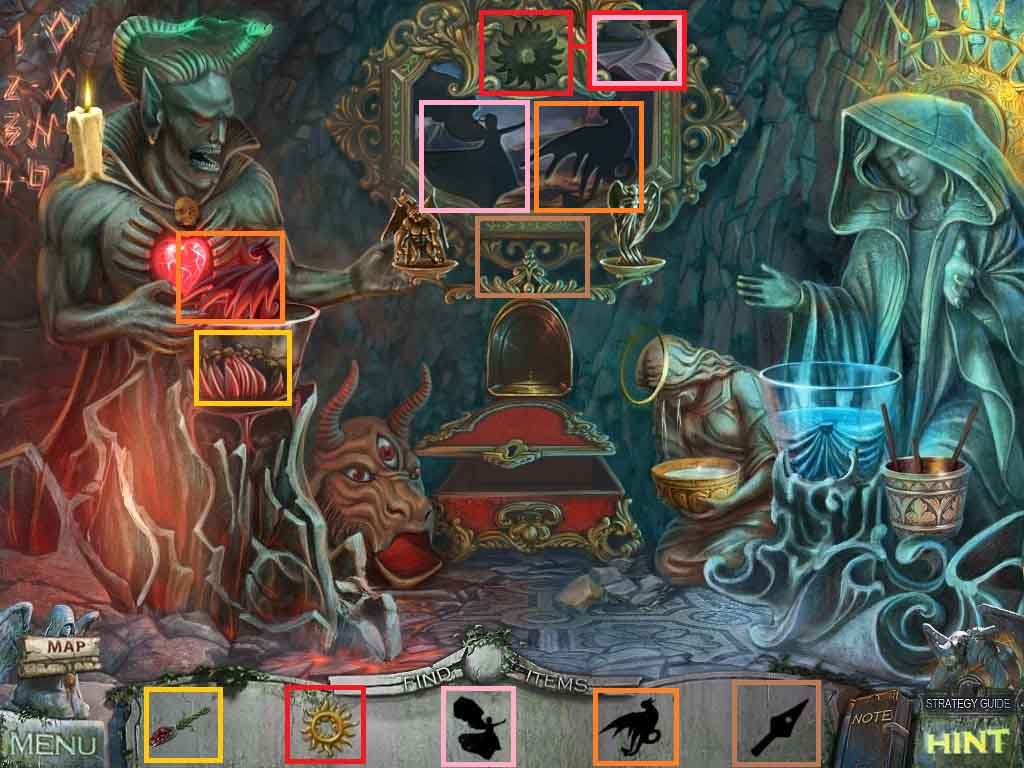
- Find the items based on their silhouettes.
- Select the scissors to collect the sun shaped amulet.
- Place the empty ladle into the bowl; collect the ladle of liquid.
- Pour the ladle of liquid into the angel’s bowl.
- Insert the stone eye into the beast’s head.
- Select the metal shovel and place it into the coals; collect the shovel with coals.
- Pour the shovel with coals into the demons bowl.
- Insert the sun shaped amulet into the top of the frame; collect the miniature angel.
- Insert the miniature angel and the miniature demon into the painting.
- Collect the blunt spearhead.
- Click the figure; insert the 2 ruby eyes.
- Collect the tongs and the 2nd part of the bird key.
- Combine the 2 parts of the bird key to create the bird key.
- Move down 2 times and move to the left.
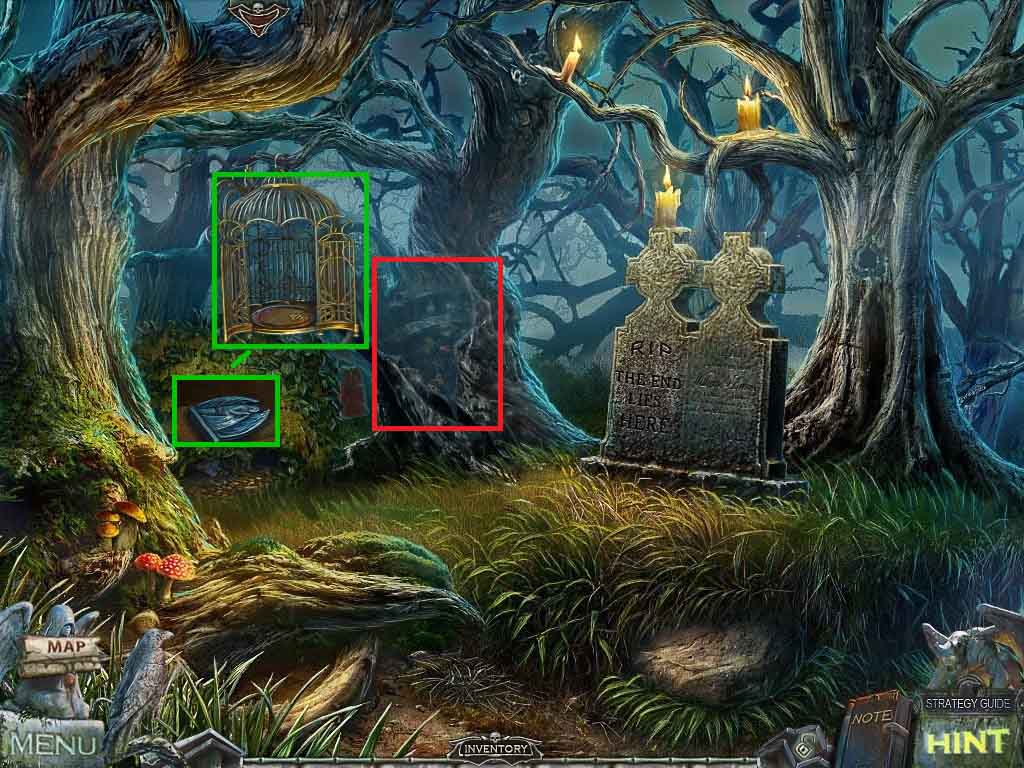
- Click the birdcage; insert the bird key into the lock.
- Collect the angel statuette.
- Click the tree to access a hidden objects area.
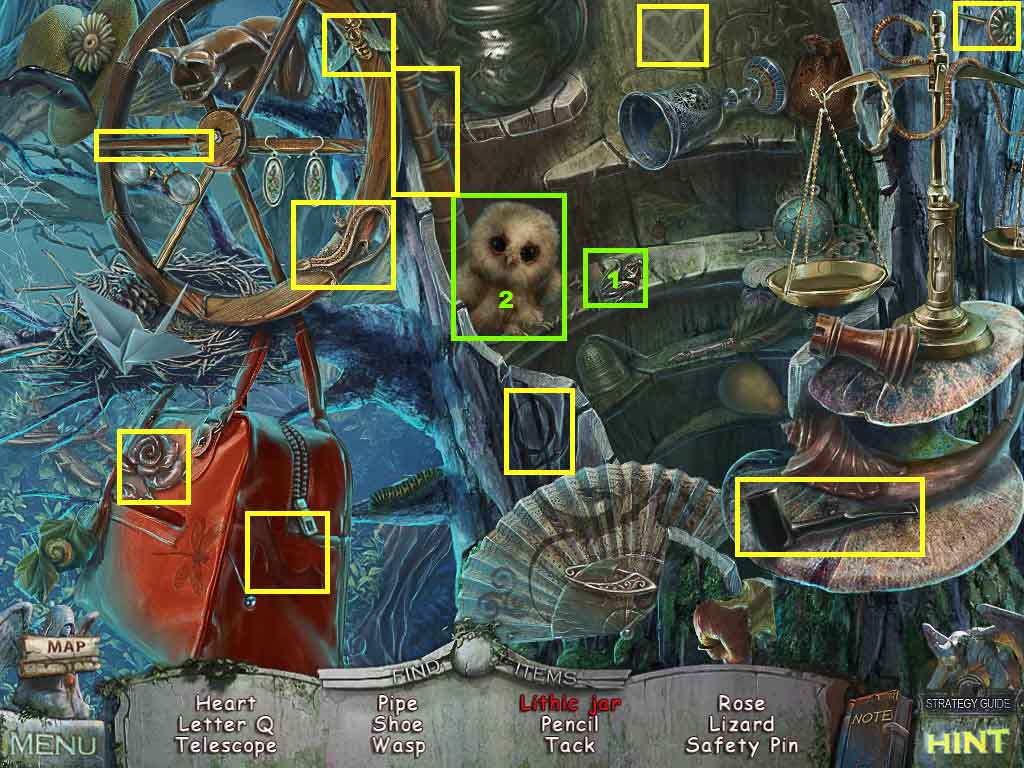
- Find the listed items.
- Give the baby owl the bug; collect the jar.
- Collect the 2 / 2 jars.
- Move down once and go to the right.
- Click the statue base to access a mini-game.
- Insert the angel statuette to trigger the game.
- Arrange the statuettes in a pattern that there are 4 different statuettes in each column and row.
- Read the note.
- Collect the staff solar disk.
- Move down once, move ahead and go into the crypt.
- Move down the stairs and go ahead on the left side.
- Click the door to access the mini-game.
- Insert the 2 parts of the gate lock and the round part of the gate lock.
- Click the ring and then click the dragon buttons to rotate the rings.
- Click the outer circle and click the right button two times.
- Click the 3rd circle and click the left button 4 times.
- Click the 2nd ring and click the right button 3 times.
- Click the 4th ring and click the right button 1 time.
- Click the 5th ring and click the right button 1 time.
- Move ahead.
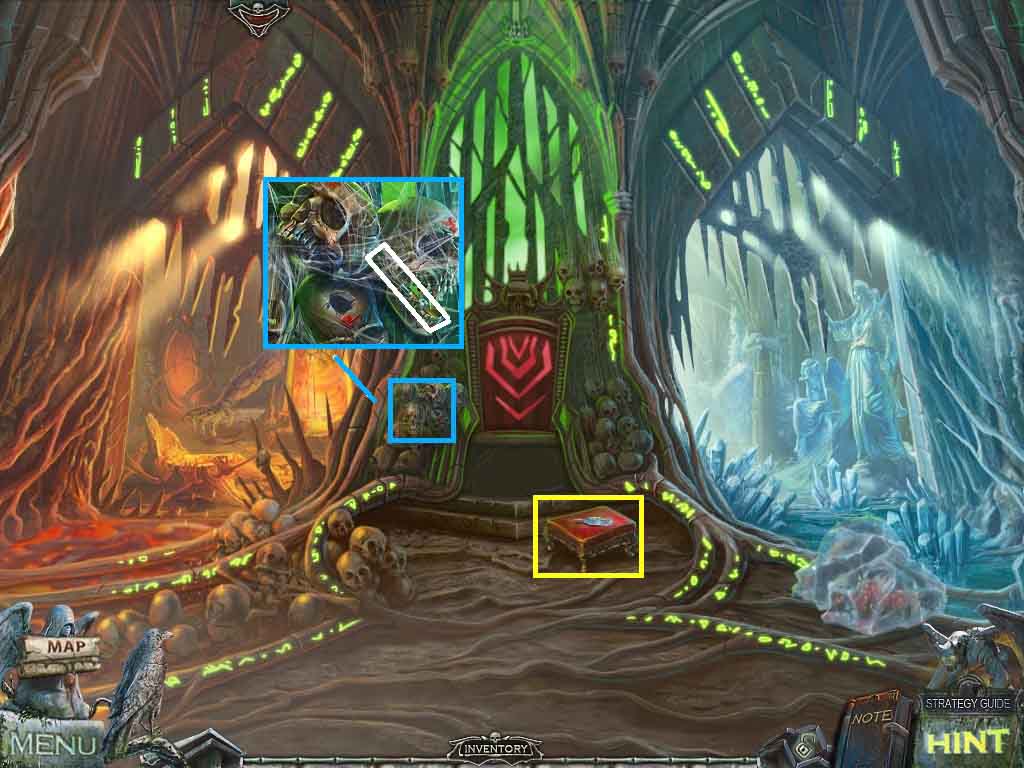
- Click the skull; collect the brush.
- Click the footstool; collect the 4 / 4 angel feather and the drawing.
- Notice the icy path.
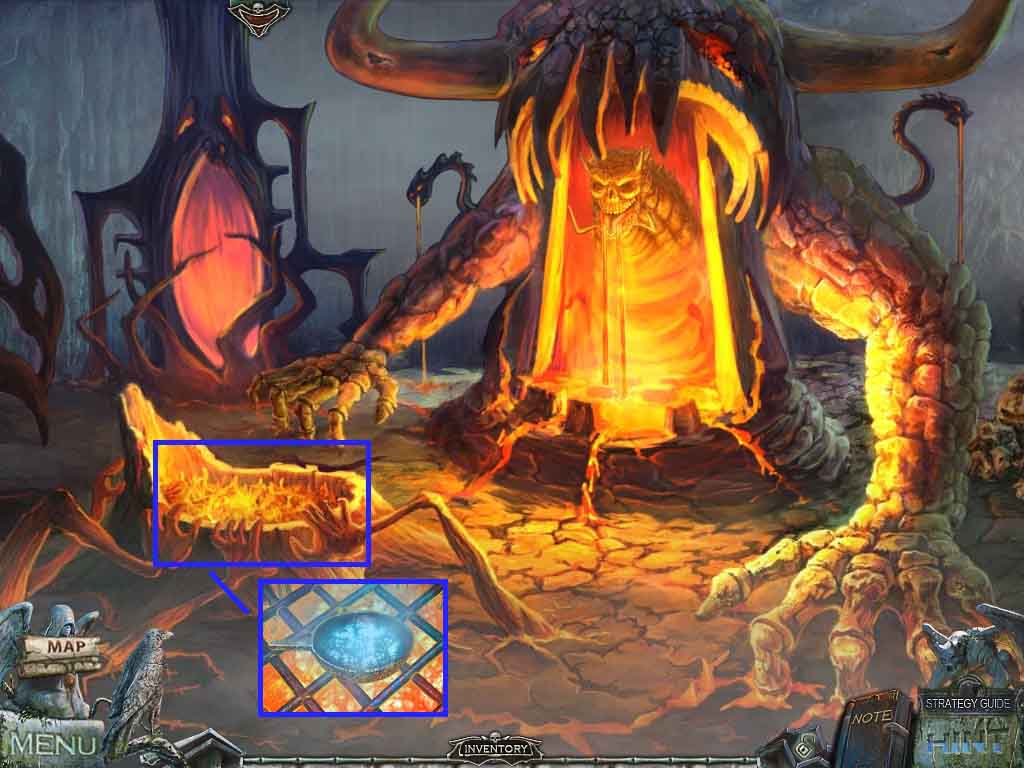
- Move ahead on the fiery path.
- Notice the crater.
- Click the demon head; open the jaw.
- Click the work area to access the hidden objects area.
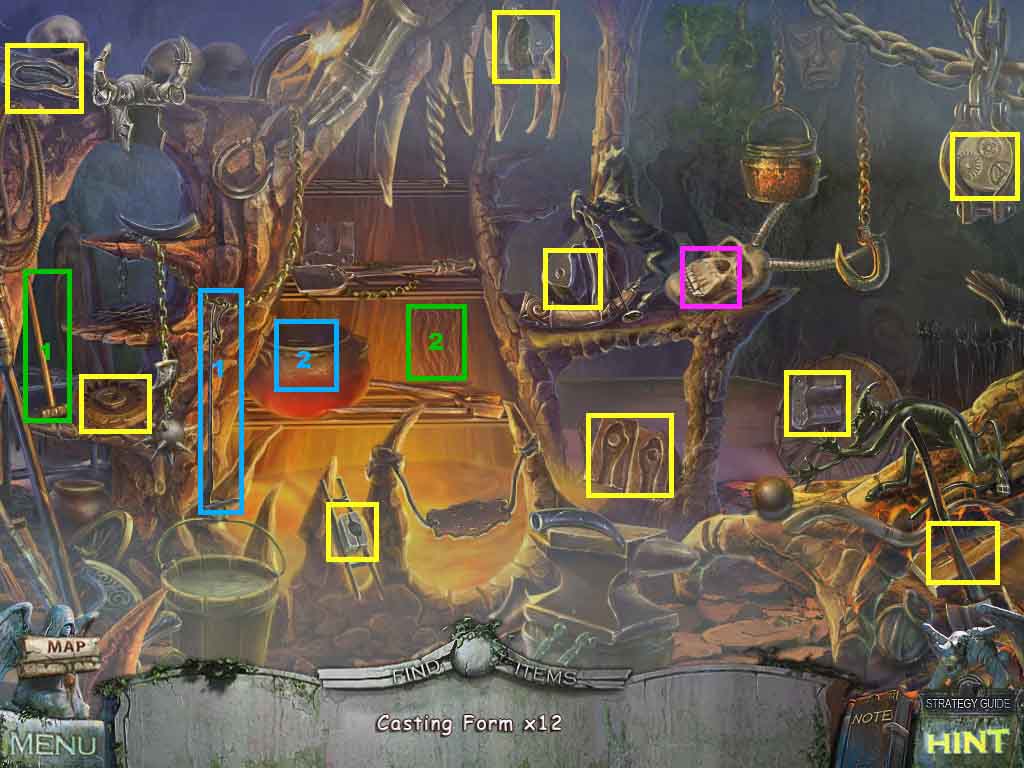
- Find all the casting forms.
- Click the jaw on the skull; collect the form.
- Place the ladle into the pot; collect the form.
- Select the hammer and use it to smash the carving; collect the form.
- Collect the 1st half of the casting form.
- Move down and then forward on the icy path on the right.
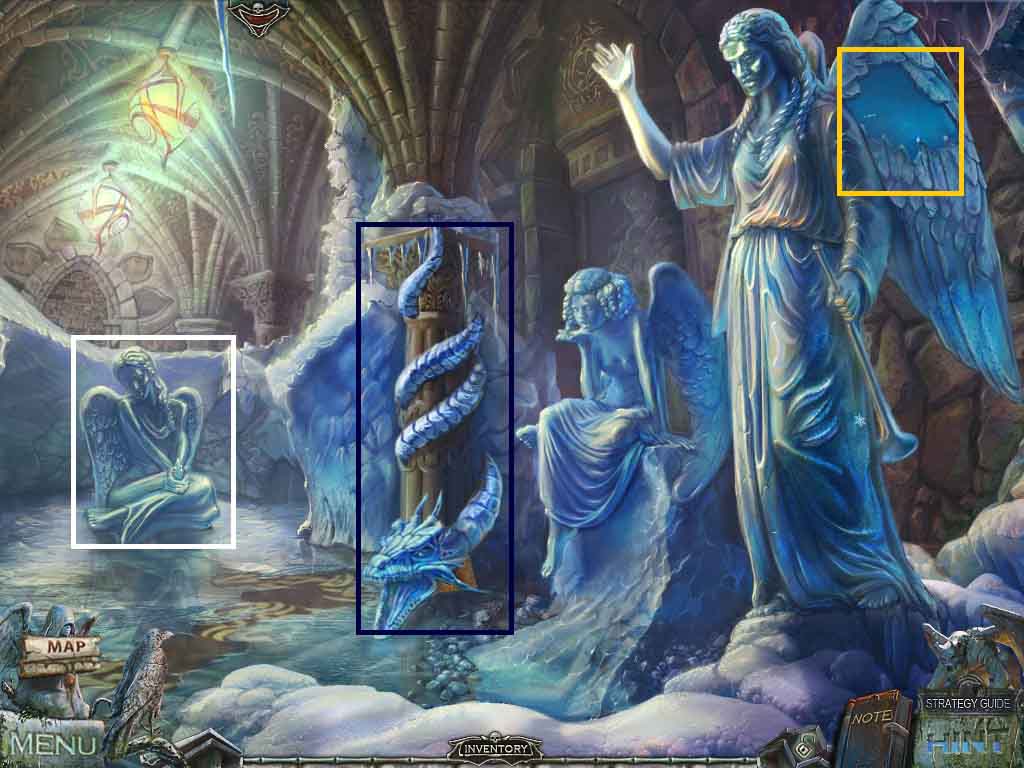
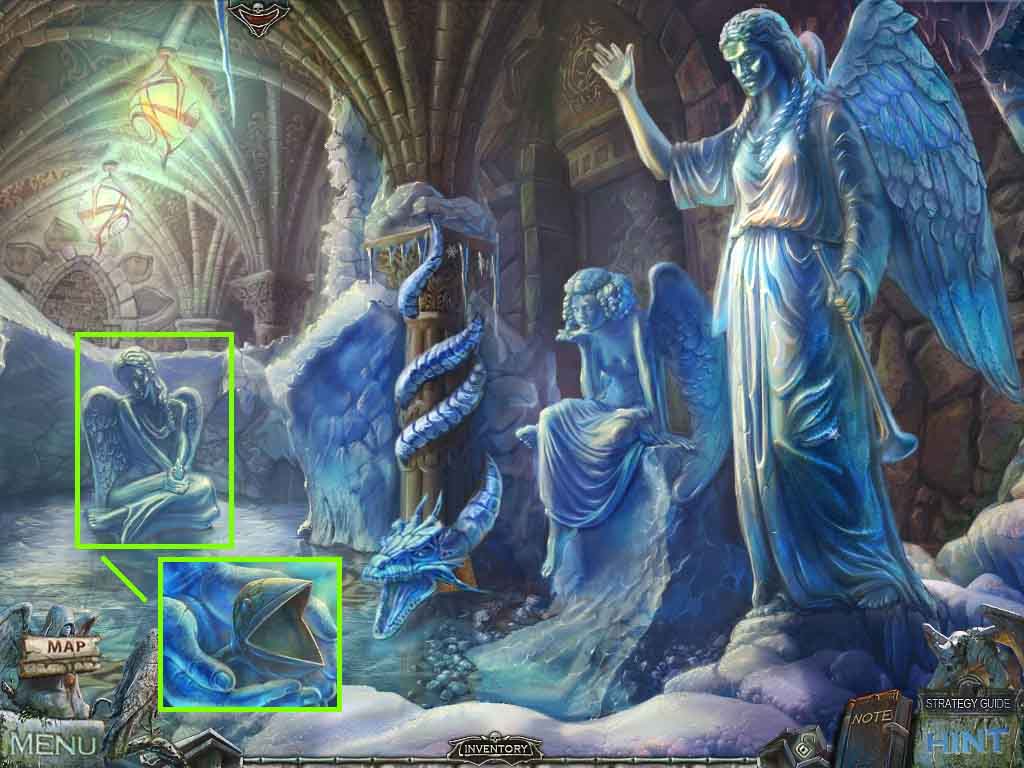
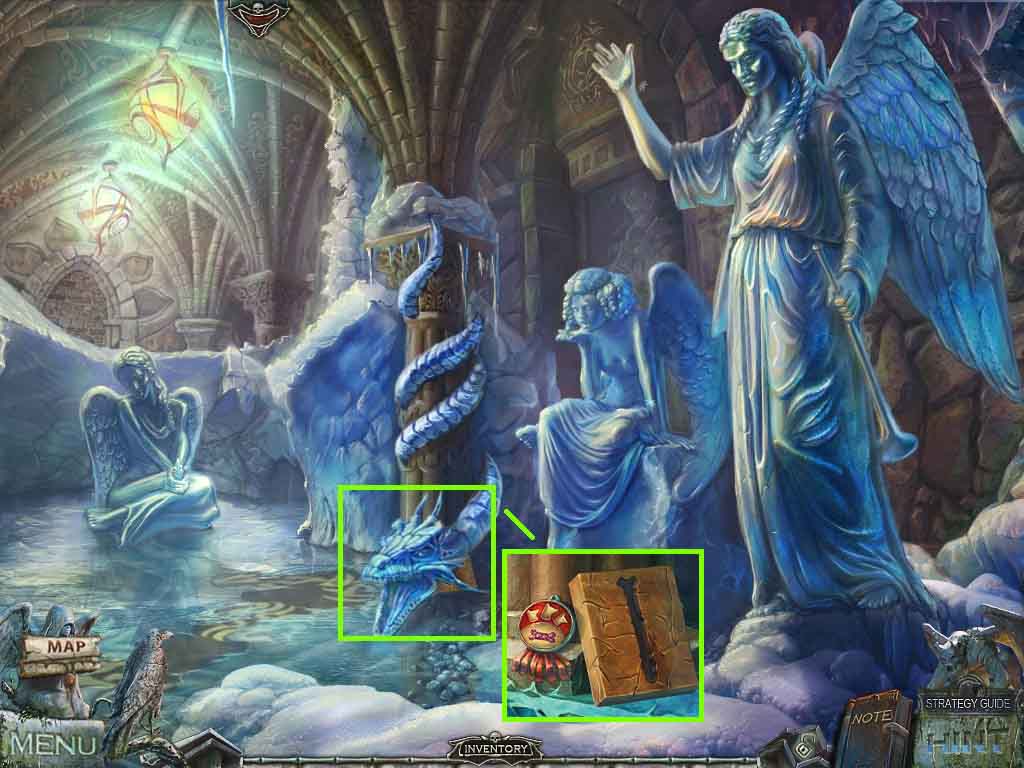
- Notice the sitting angel.
- Notice the strange snake.
- Click the angel’s wing to access a mini-game.
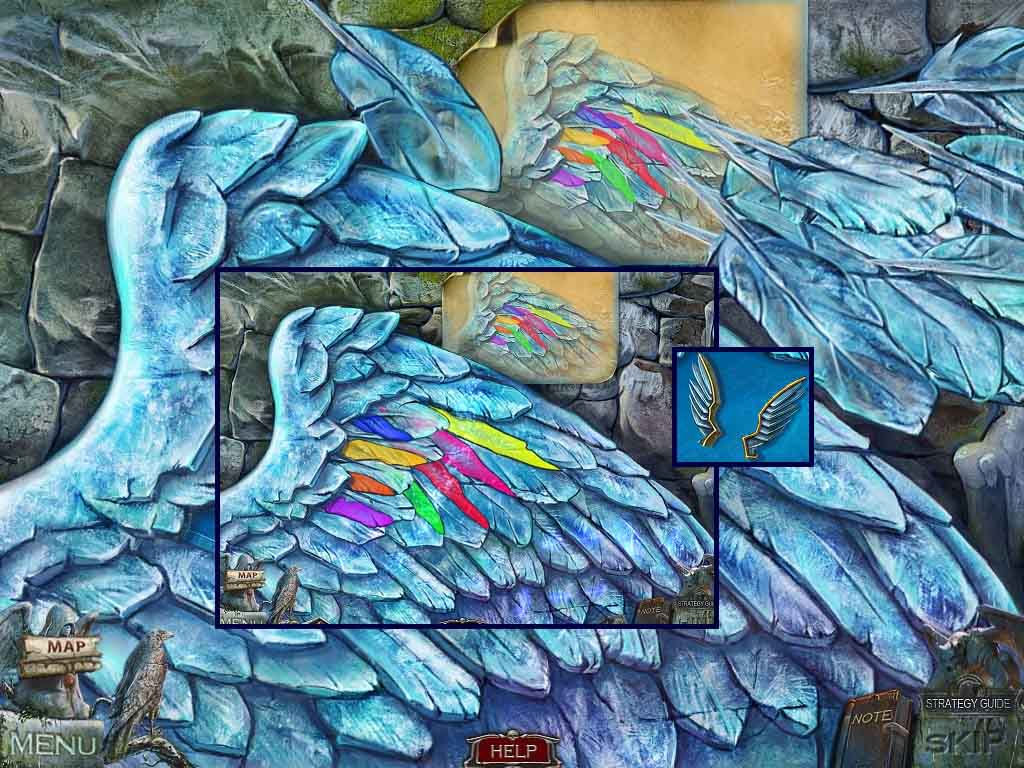
- Insert the 4 angel feathers onto the stone to trigger the game.
- Insert the longest feathers on the edges.
- Insert the color matched feathers.
- Collect the staff wings when the game is complete.
- Move down 3 times.
- Click the mushrooms; collect the 1st diamond tooth.
- Insert the nutshell onto the mushroom.
- Select the scraper and use it on the larger mushroom.
- Collect the mushroom dust.
- Move forward on the left path and move ahead.
- Pour the mushroom dust into the skull hole.
- Dip the brush into the mushroom dust; collect the 2nd diamond tooth.
- Move down 2 times, go down the right path and move ahead.
- Click the carving and insert the 2 diamond teeth.
- Select the blunt spearhead and use it on the teeth to create the sharp spearhead.
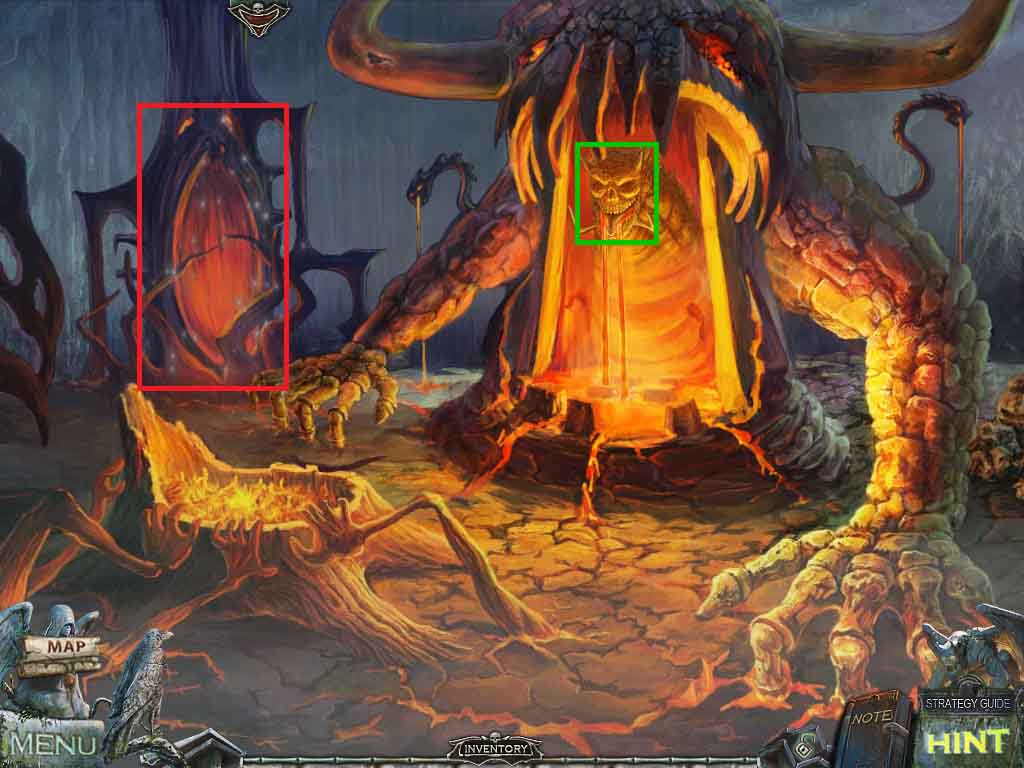
- Click the skull door to access a mini-game.
- Insert the 2 jars and the fireball to trigger the mini-game.
- Move the fireball to the skull.
- Collect the magic cage.
- Move down 2 times, go ahead on the left side and move ahead once more.

- Click the footstool.
- Select the sharp spearhead to cut the cloth; collect the token.
- Select the magic cage to use on the demon.
- Move down 2 times and move ahead on the right side.
- Click the rocks to access a hidden objects area.
- Find all the listed items.
- Select the hand drill on the shell; collect the shell.
- Collect the grate.
- Move down once, go to the left and move ahead and go to the left once again.
- Click the crater; place the grate over the lava.
- Lay the bowl of water onto the grate; collect the bowl of hot water.
- Move down once, go forward to the right.
- Click the angel.
- Pour the bowl of hot water onto the sphere.
- Collect the funnel.
- Move down and move ahead on the left.
- Click the alcove to access the hidden objects area.
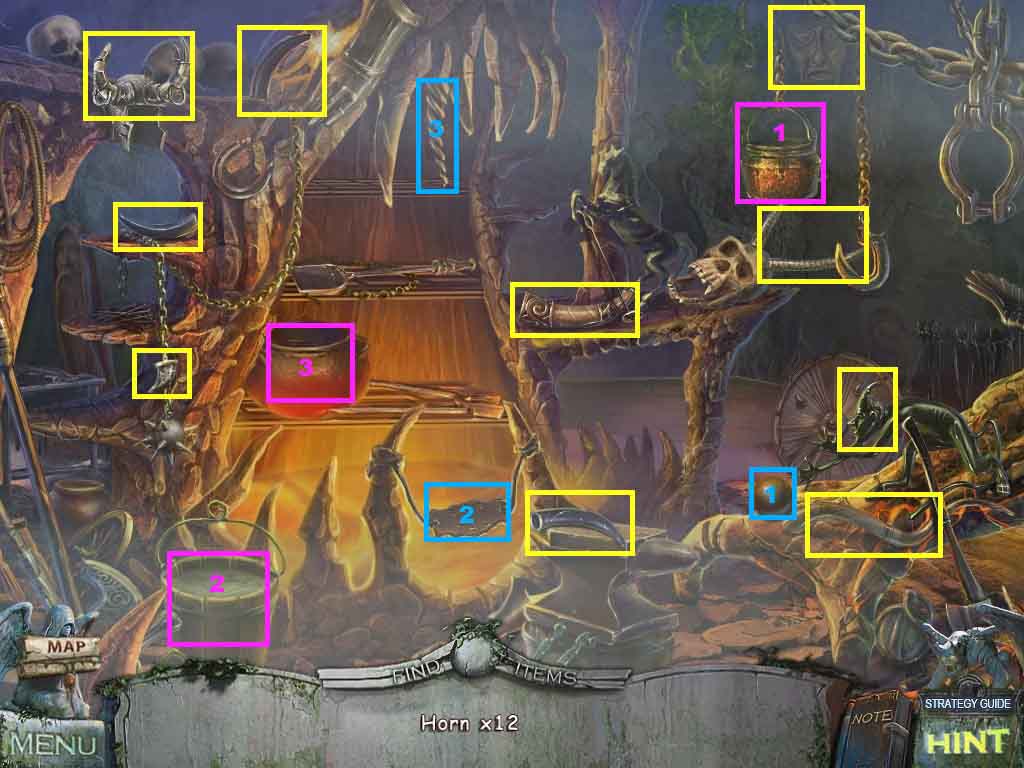
- Find the horns.
- Place the ball into the slingshot; collect the horn.
- Place the teapot onto the bucket and then on the cauldron.
- Collect the horn.
- Move down once, move forward on the right side.
- Click the strange snake and attach the horn onto the head.
- Click the base of the pedestal.
- Collect the medal and the 2nd half of the casting form.
- Move down and move ahead to the left.
- Combine the 2 halves of the casting forms to create the casting form.
- Click the pit and place the casting form onto the stones.
- Insert the funnel.
- Click the demon head and click the jaw closed.
- Click the pit and select the tongs to open the mold.
- Collect the part of the magic staff.
- Move down 2 times.
- Combine the part of the magic staff with the staff solar disk to create the magic staff.
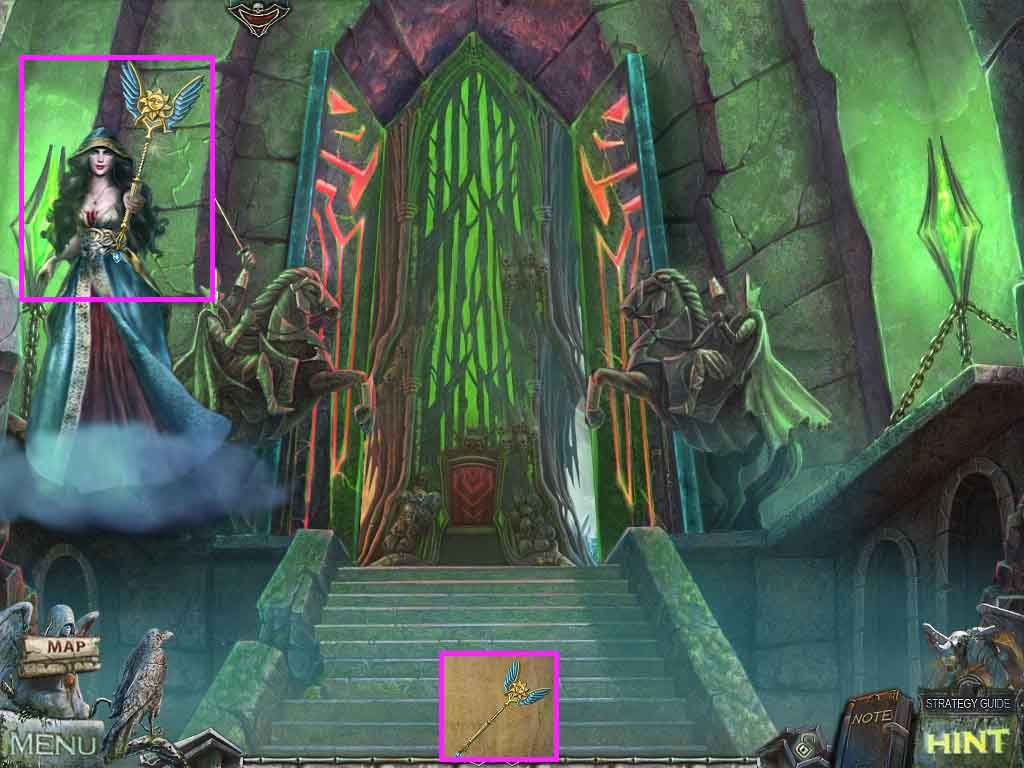
- Give Hina the magic staff; collect the magic staff once again.
- Move ahead.

- Select the magic staff to use on the cage.
- Place the collar onto the dog.
- Speak to Hina.
- Go into the portal above the throne.
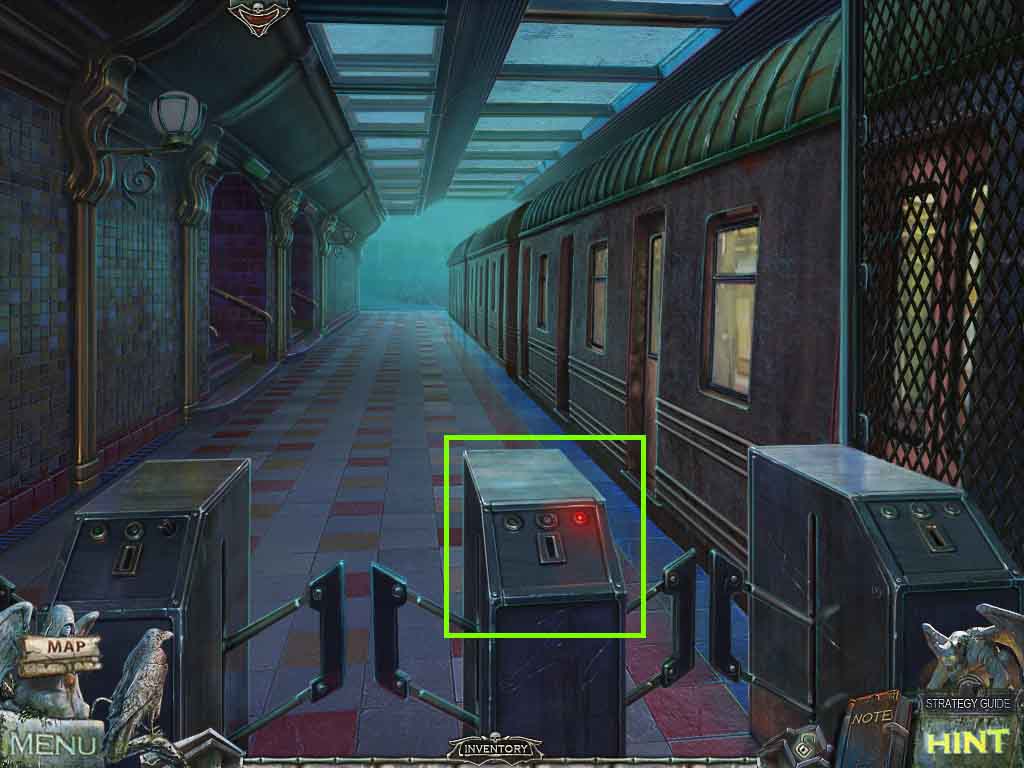
- Click the turnstile.
- Insert the token into the slot.
Congratulations! You have successfully completed Redemption Cemetery: Salvation of the Lost Collector’s Edition!