Follow Me!
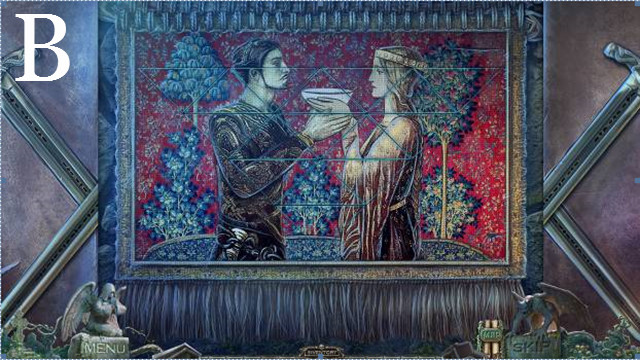
Redemption Cemetery – The Island Of The Lost
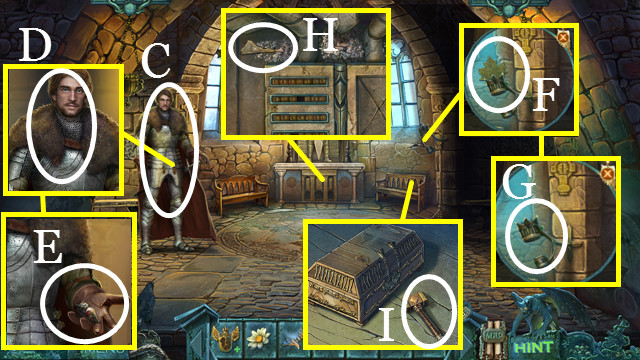
Chapter 1: Cemetery
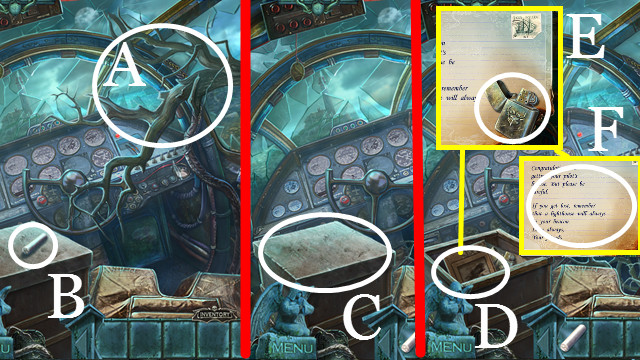
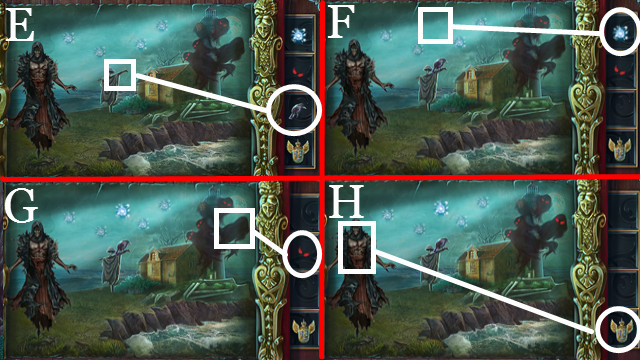
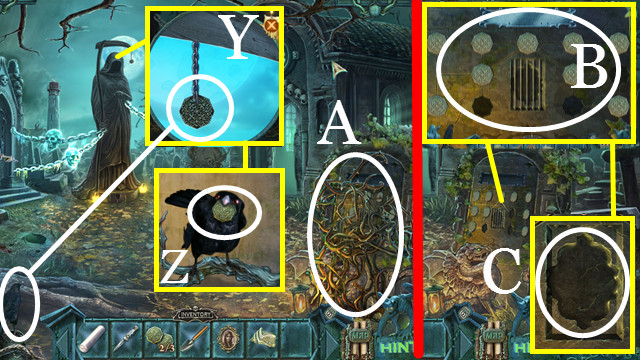
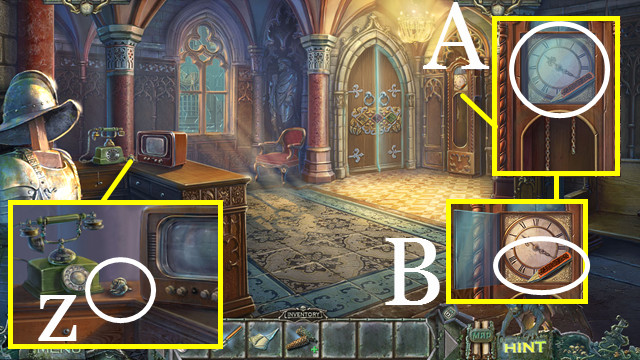
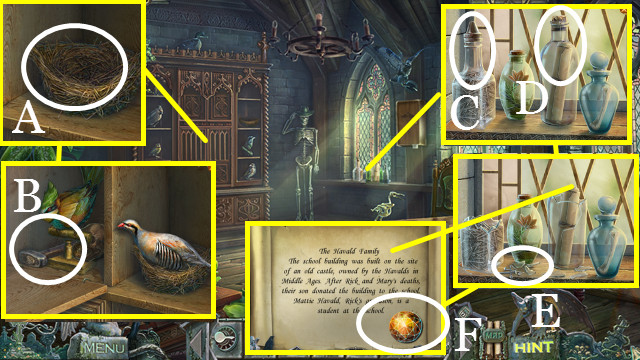
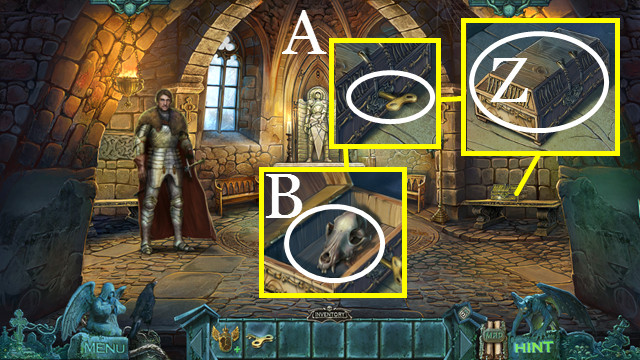
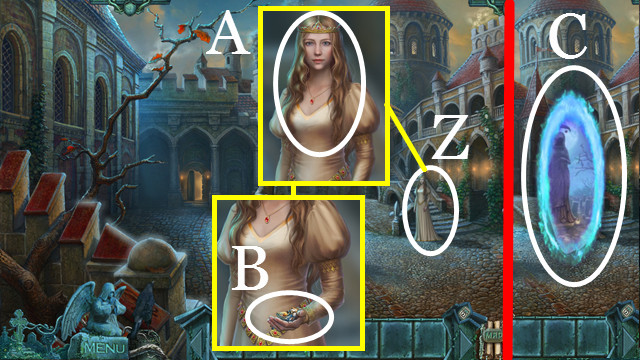
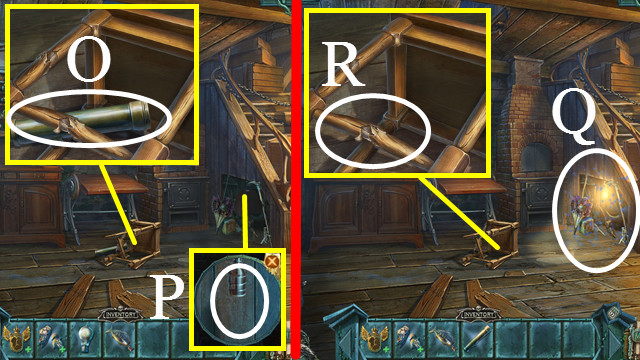
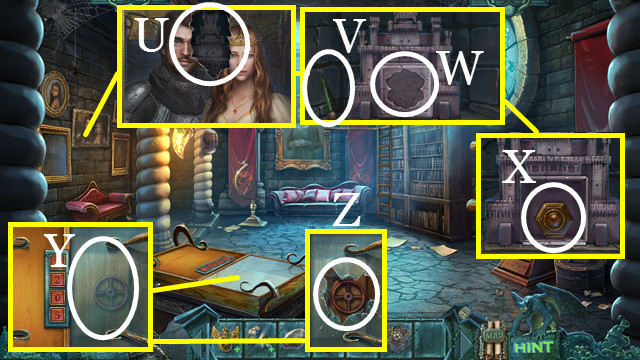
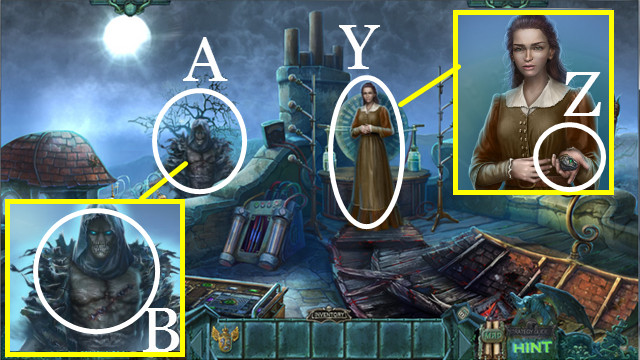
- Touch (A) twice.
- Take the CHALK (B).
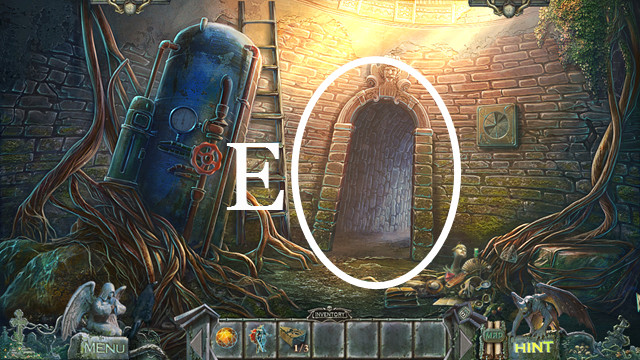
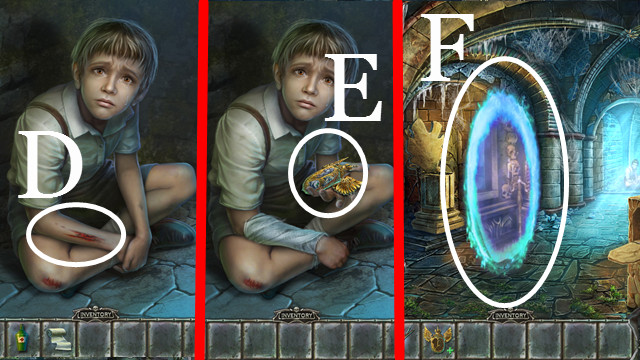
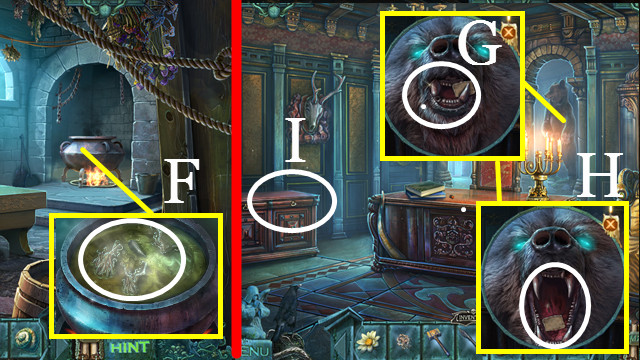
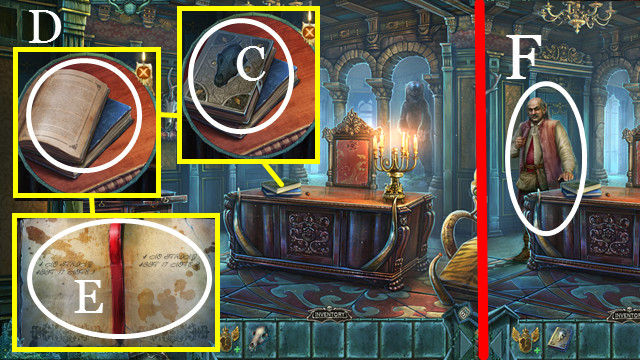
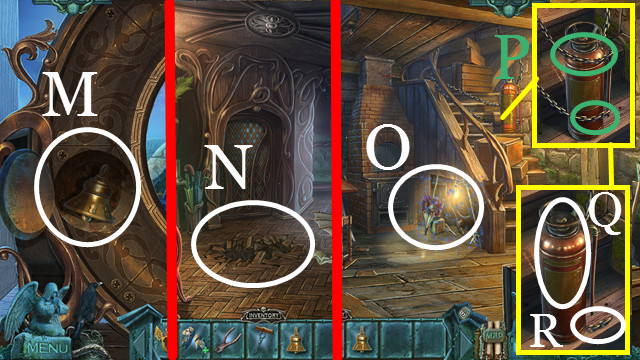
- Open (C); touch (D); take the LIGHTER (E); touch (F).
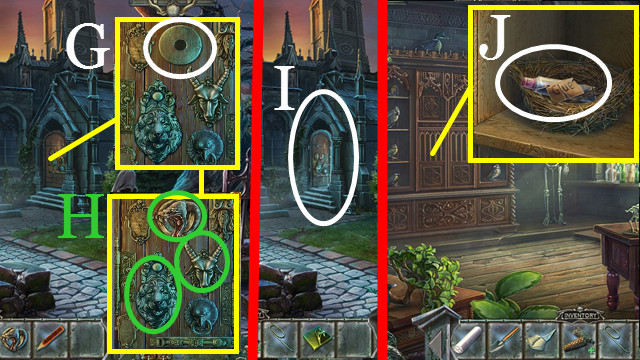
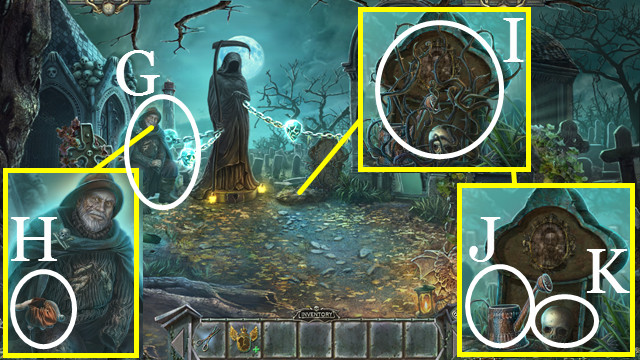
- Exit (G).
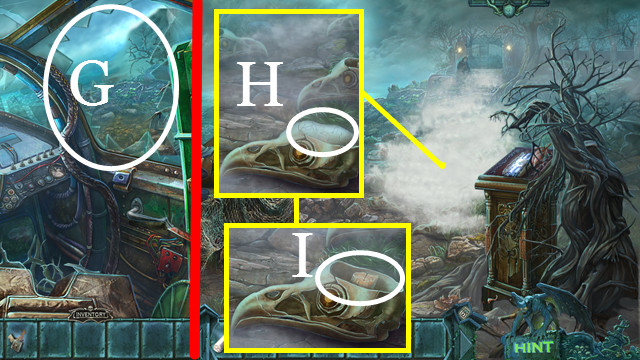
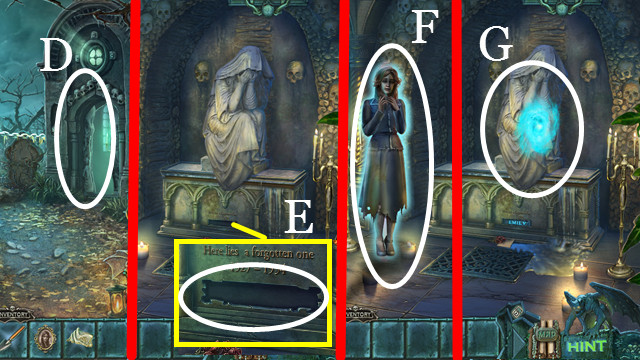
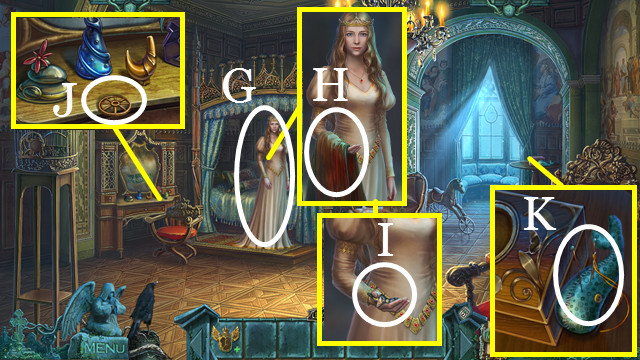
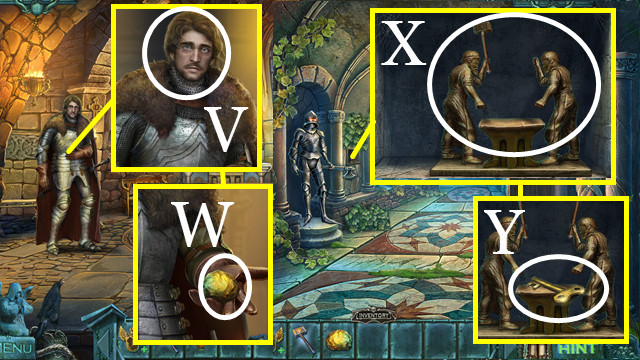
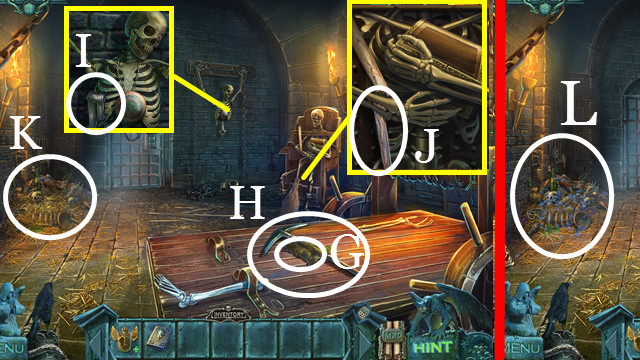
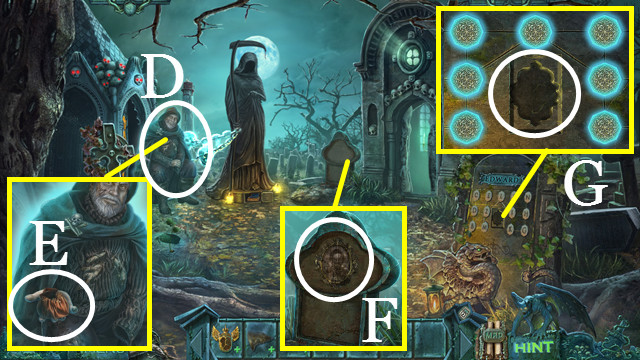
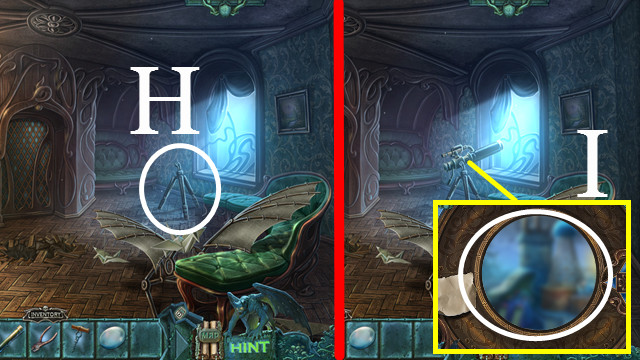
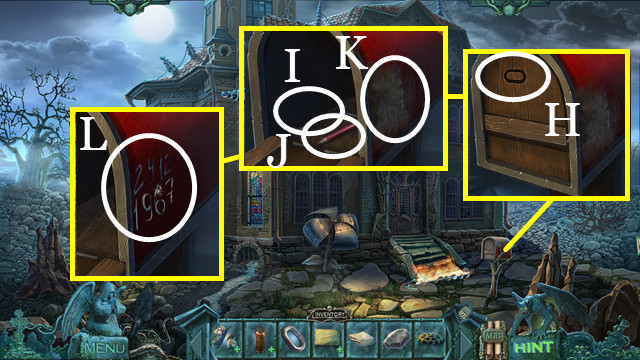
- Touch (H); use the LIGHTER (I).

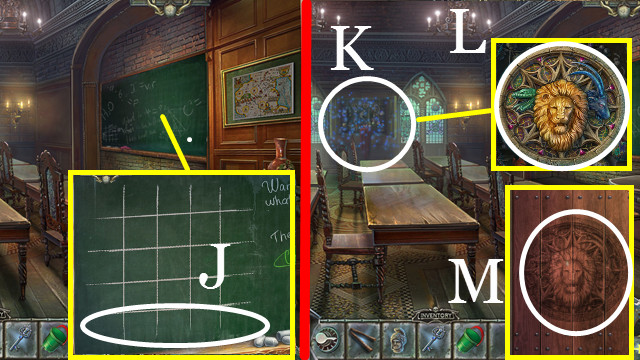
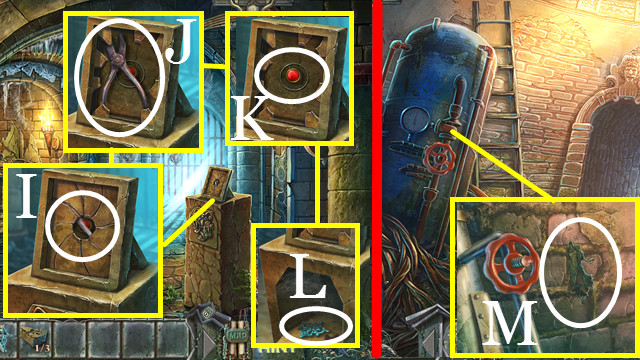
- Touch (J) three times; take the KNIFE HANDLE (K).
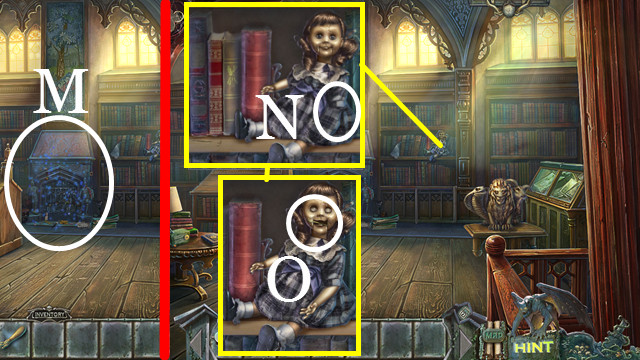
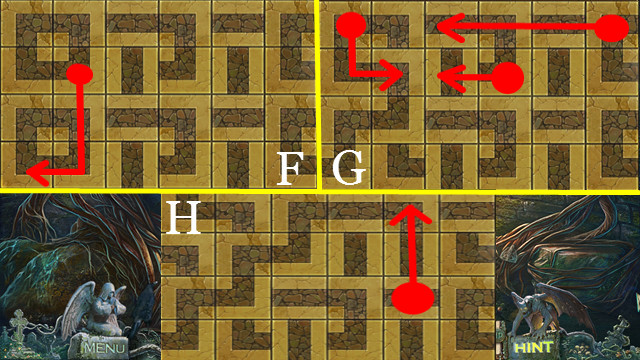
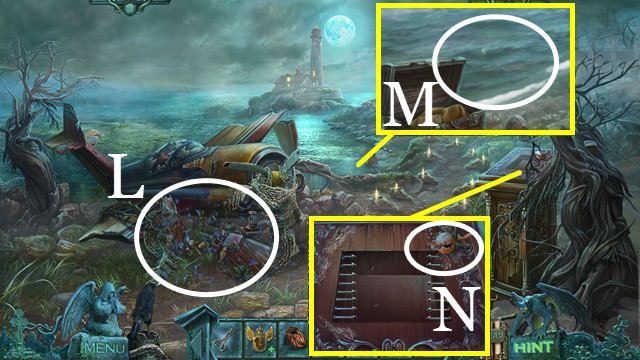
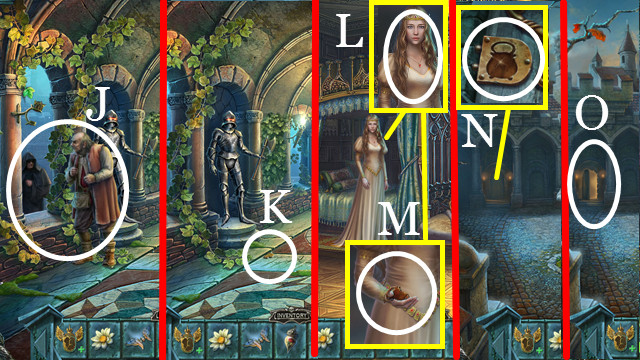
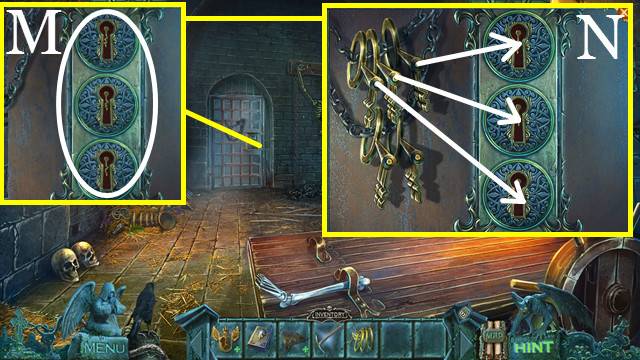
- Walk forward (L).
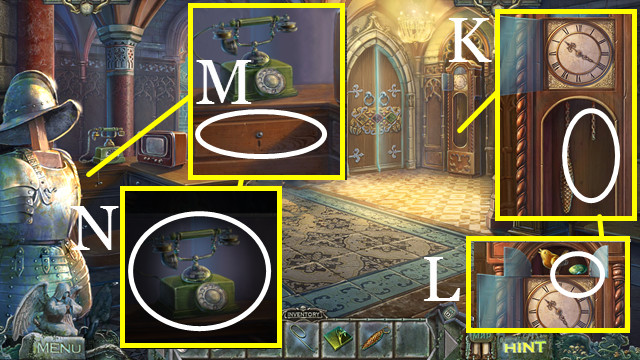
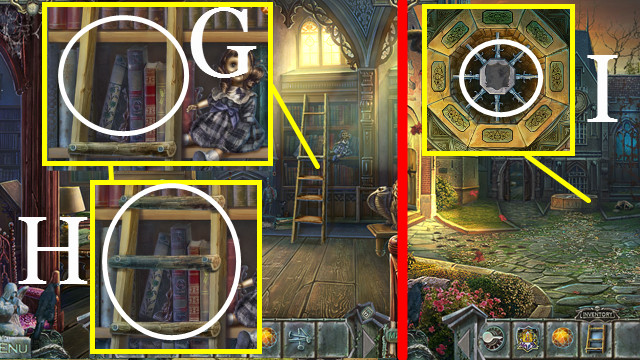
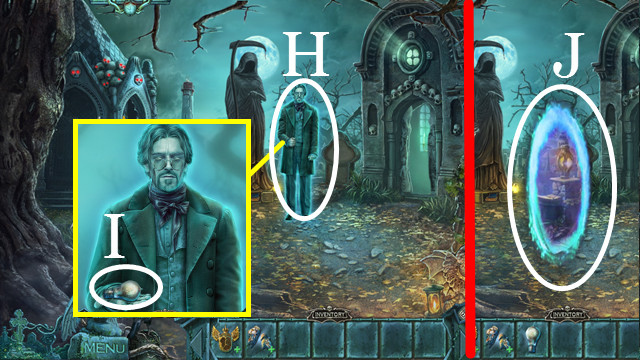
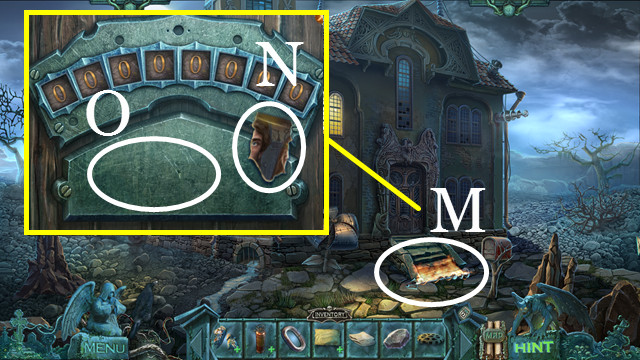
- Talk (M); take the SKULL KEY (N).
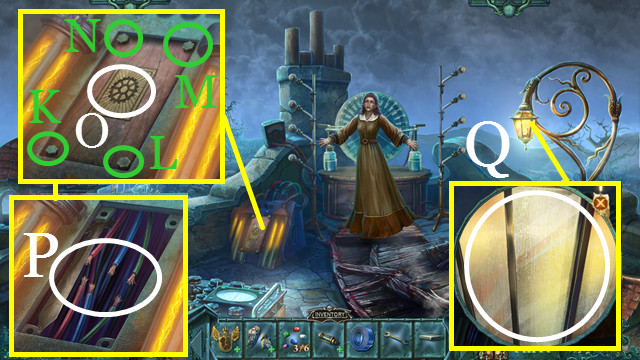
- Take the FISHING LINE (O).
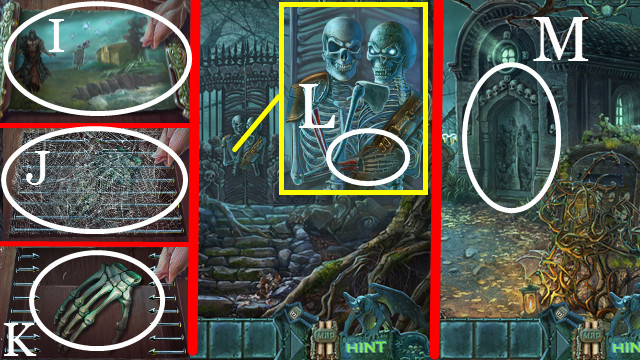
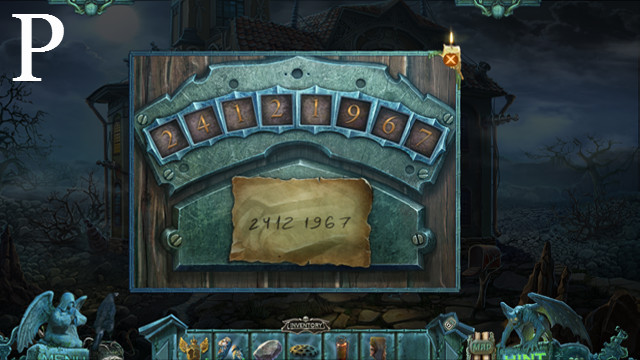
- Use the KNIFE HANDLE (P); receive the KNIFE.
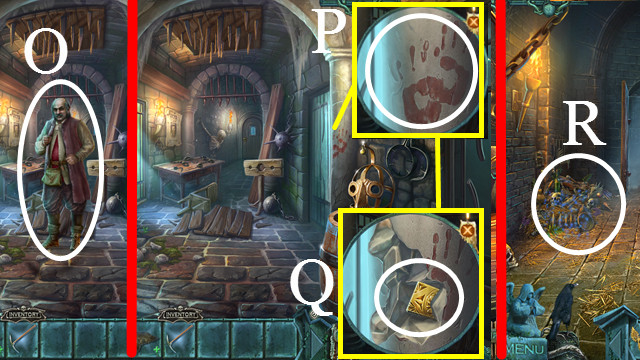
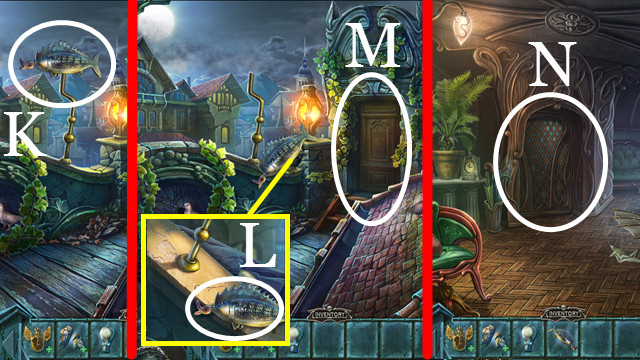
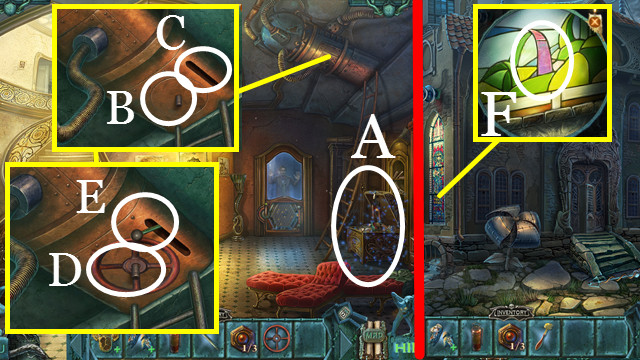
- Walk down.
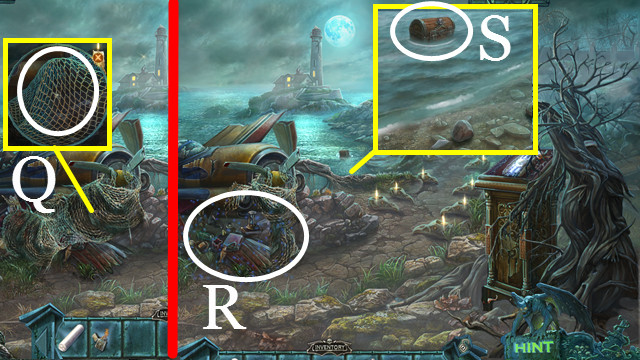
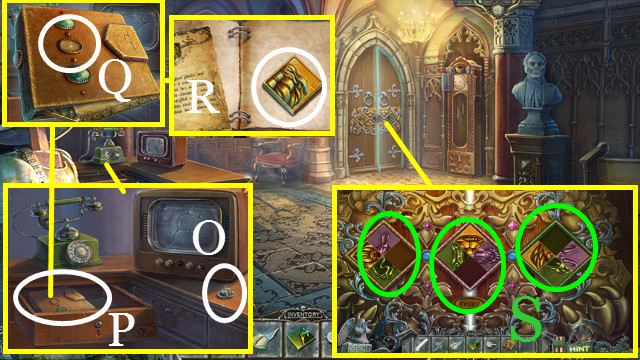
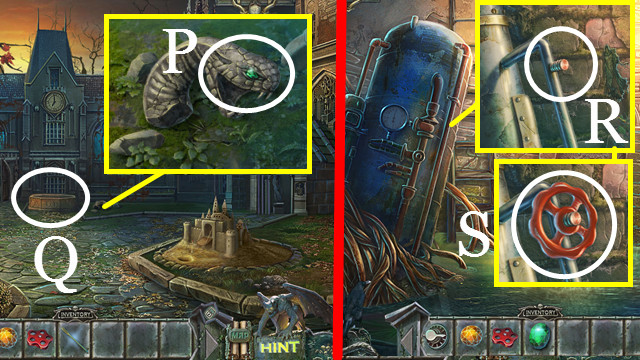
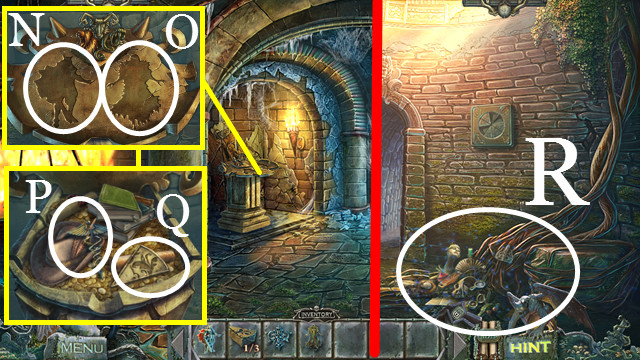
- Use the KNIFE (Q) to trigger a HOP.
- Play the HOP (R); receive the FISHING ROD.
- Combine the FISHING LINE and FISHING ROD (inventory); receive the FISHING ROD WITH HOOK.
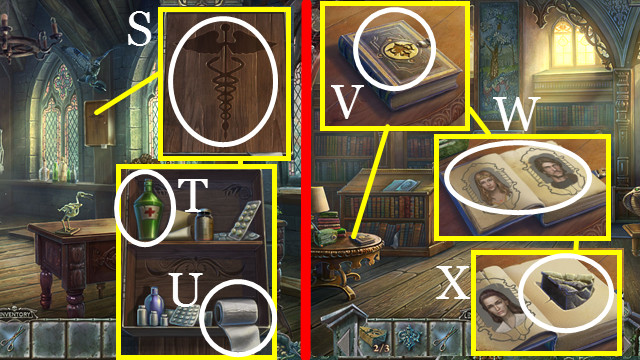
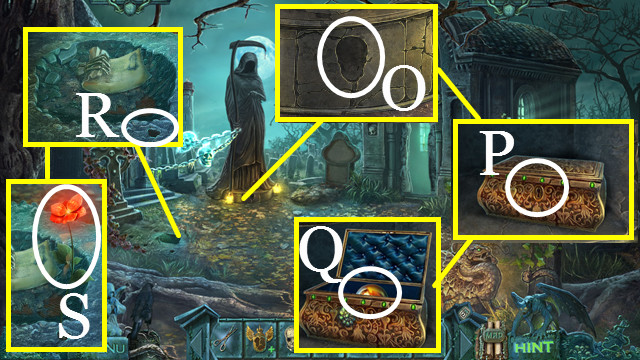
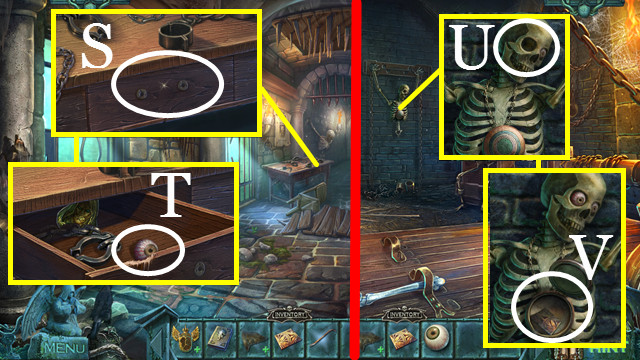
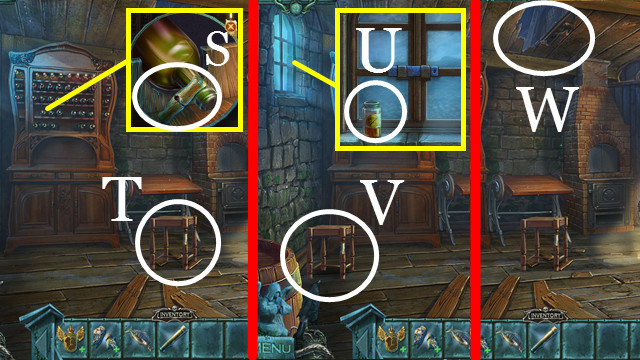
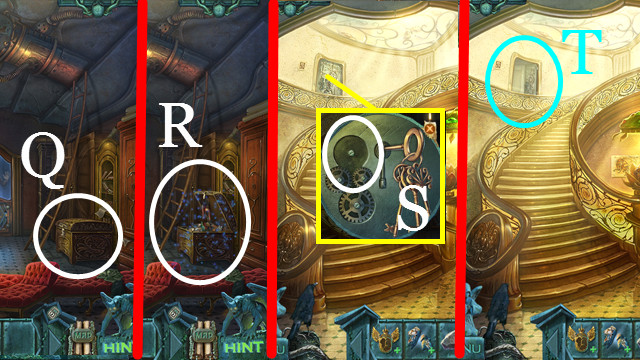
- Use the FISHING ROD WITH HOOK (S).
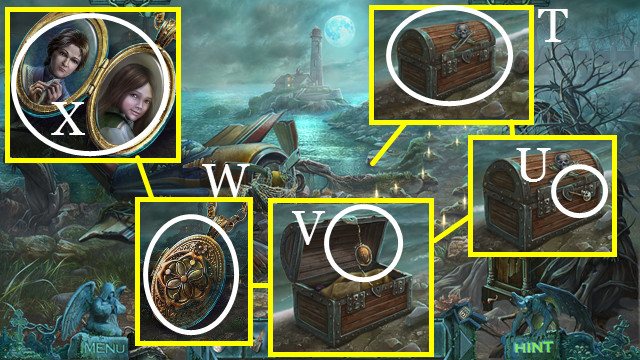
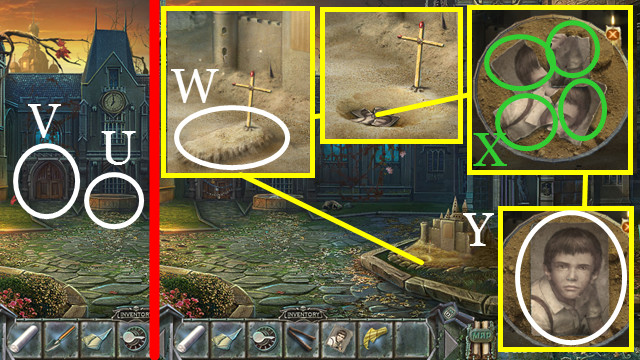
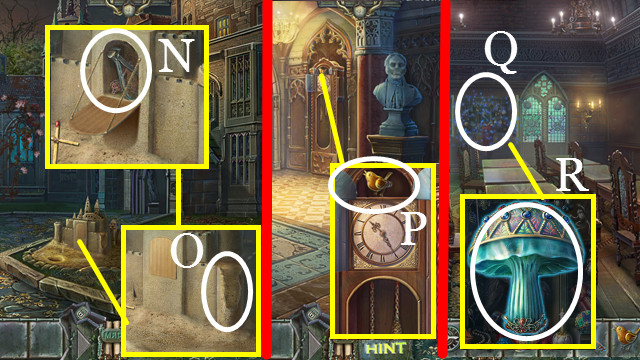
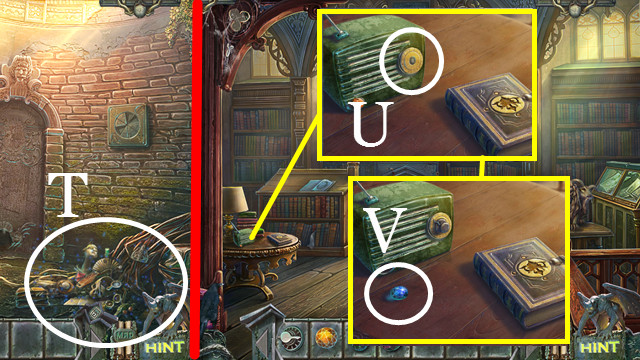
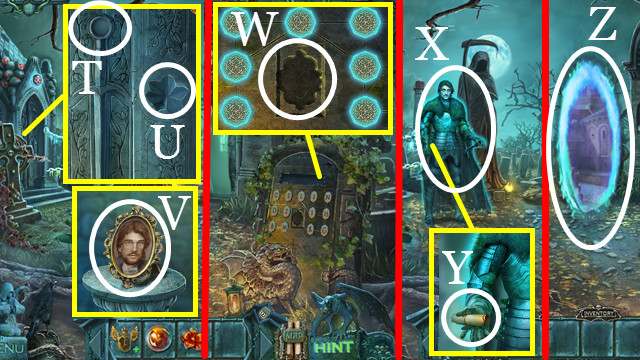
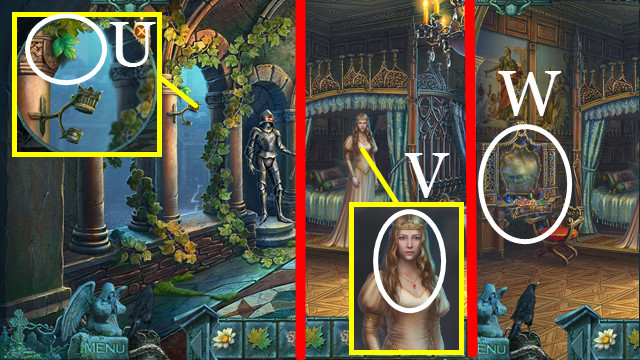
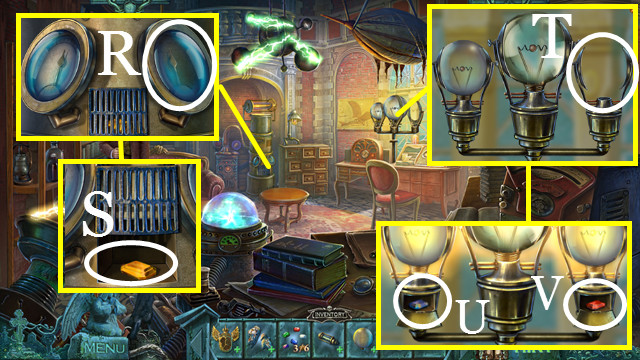
- Use the SKULL KEY (T); touch (U).
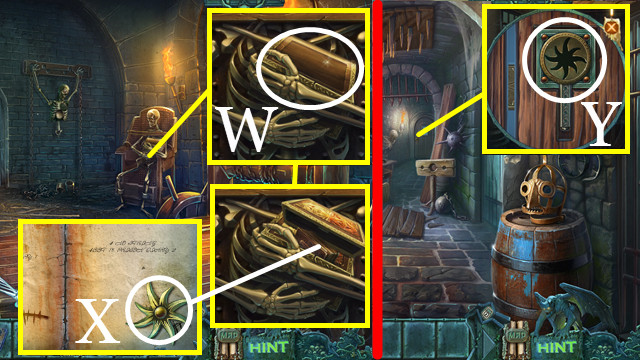
- Touch (V); open (W).
- Take the FISHERMAN’S LOCKET (X).
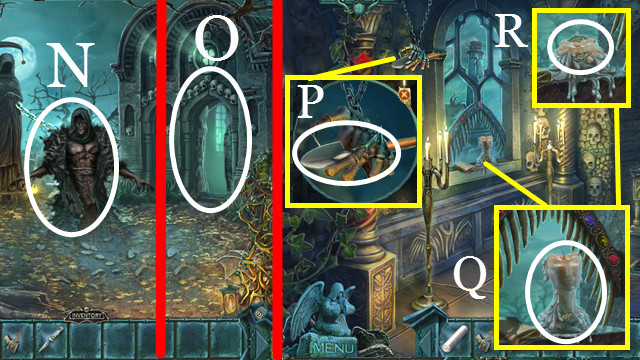
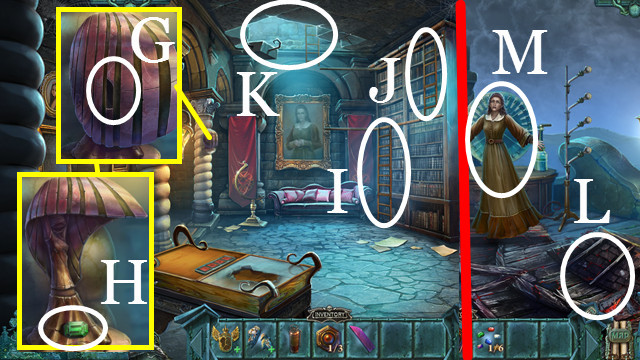
- Walk forward.

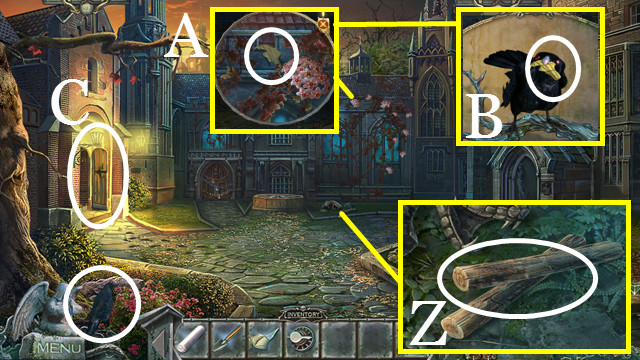
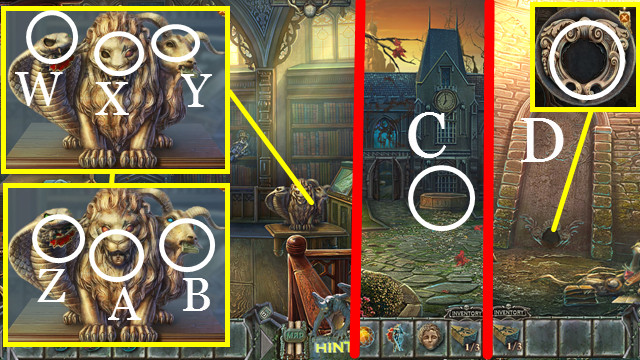
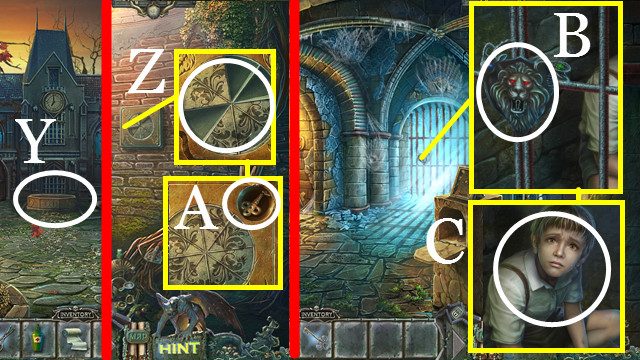
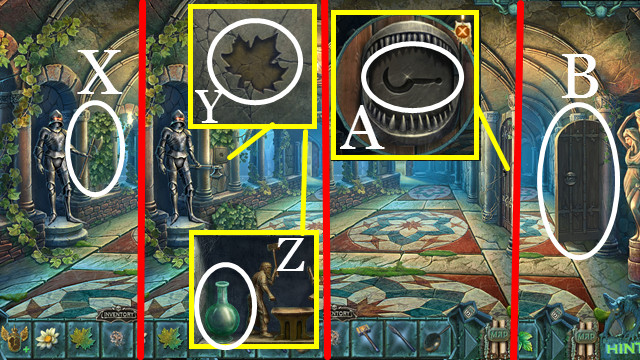
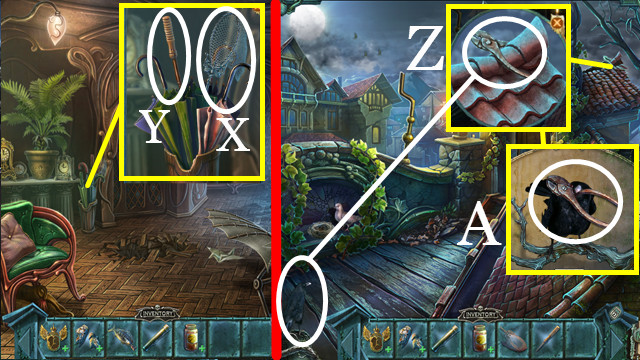
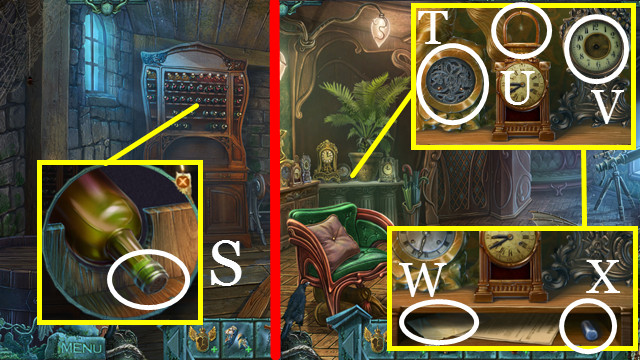
- Give the FISHERMAN’S LOCKET (Y); take the BONE (Z).
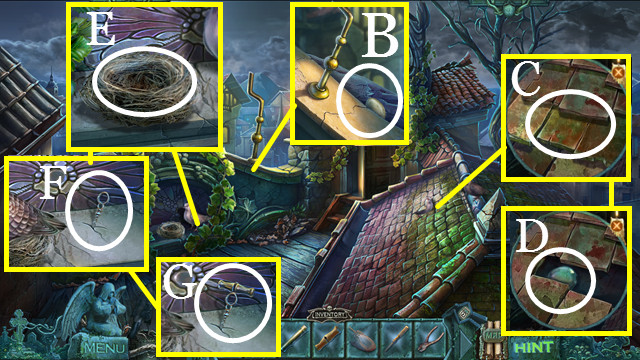
- Place the BONE (A); take the RAVEN HEAD (B).
- Walk down.
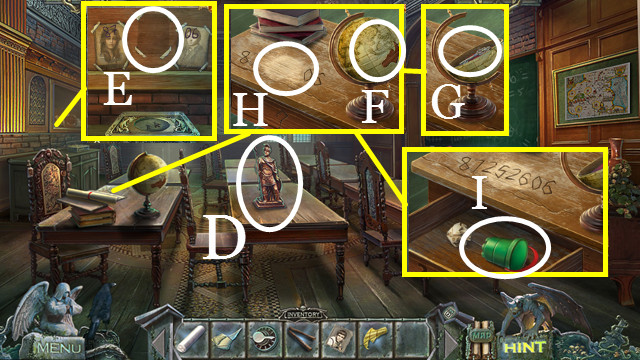
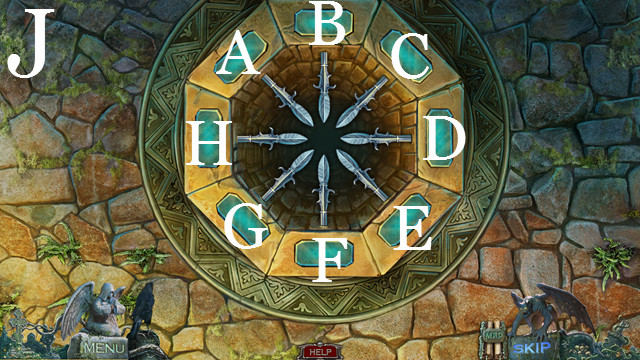
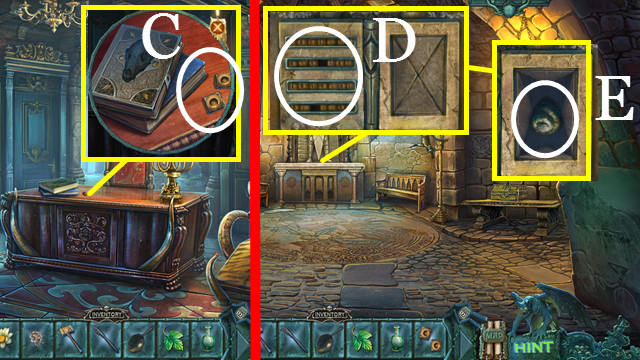
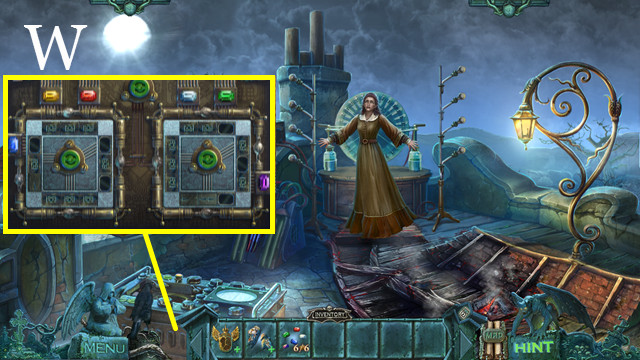
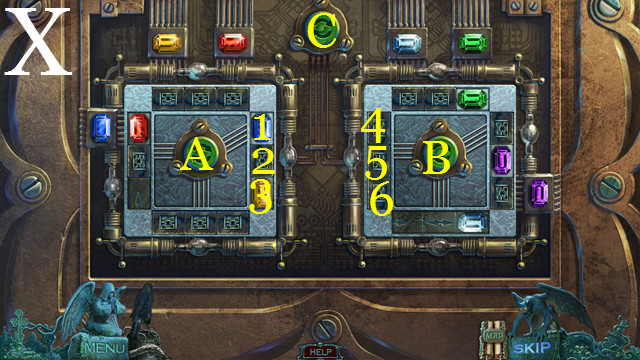
- Place the RAVEN HEAD (C) to trigger a mini-game.

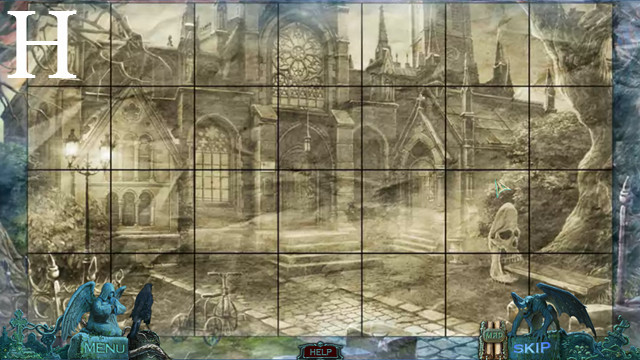
- Solution: (D-E-F-G-H).
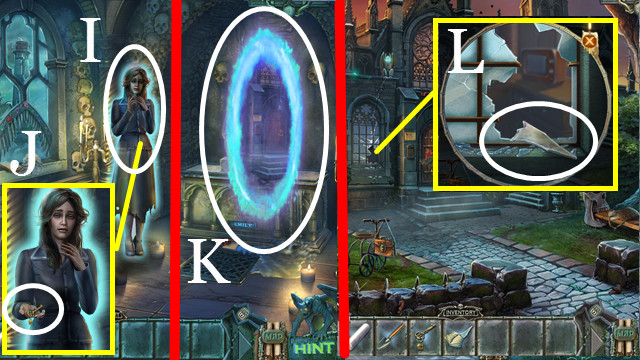
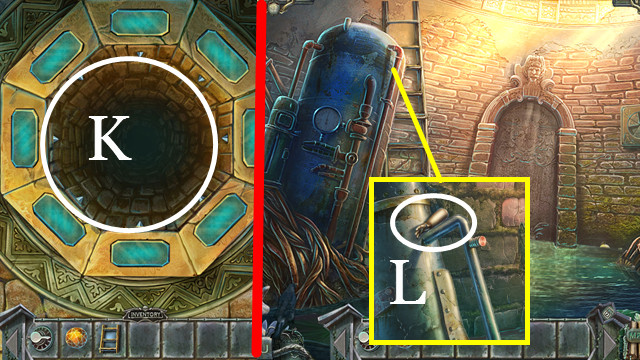
- Take (I); remove (J); take the SKELETAL HAND (K).
- Walk forward.
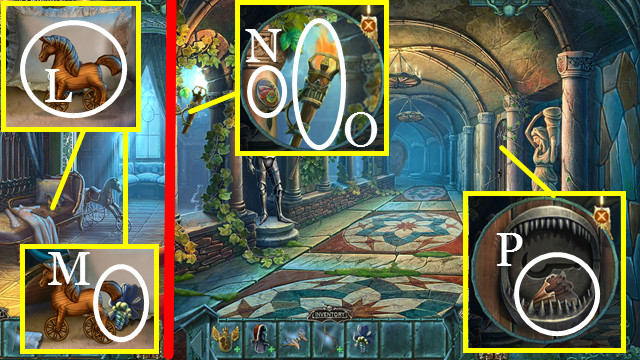
- Place the SKELETAL HAND (L).
- Walk forward.
- Touch anywhere.
- Touch (M).
- Talk (N).
- Enter (O).
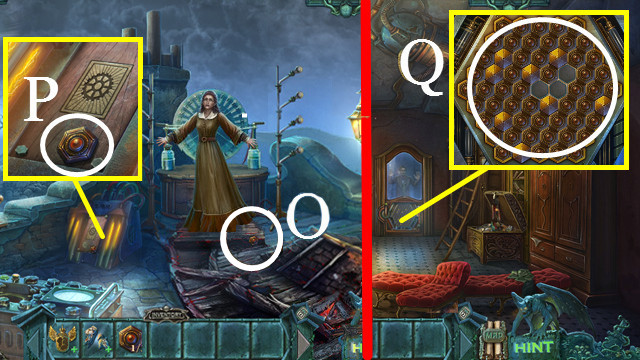
- Take the SHOVEL (P).
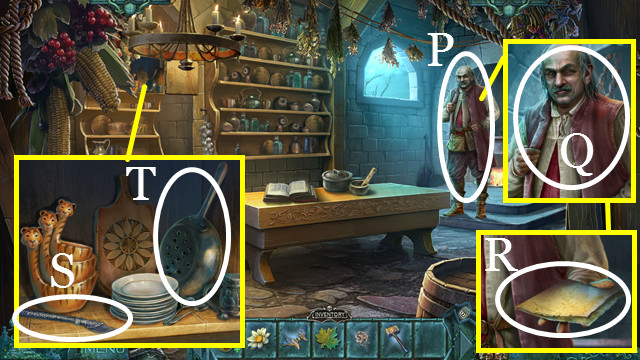
- Use the LIGHTER (Q); take the TOKEN 1/3 (R).
- Walk down.
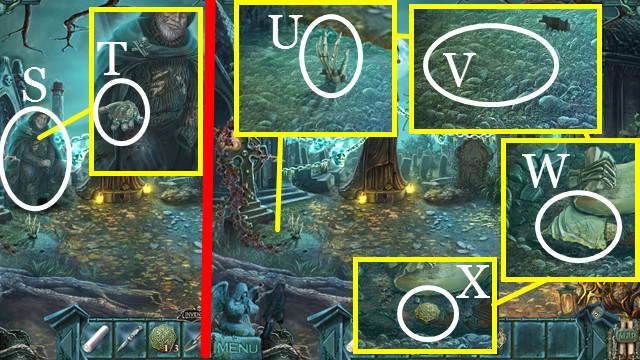
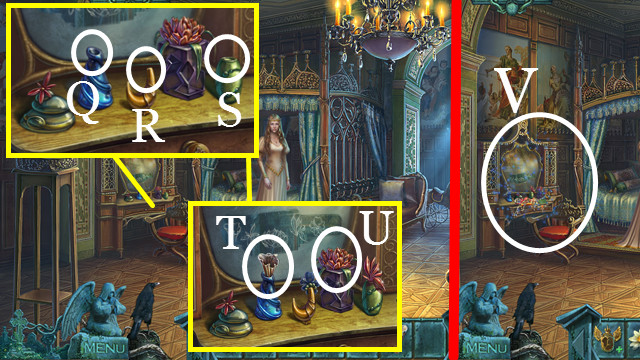
- Talk (S); take the PHOTO (T).
- Touch (U).
- Use the SHOVEL (V).
- Take the SHAWL (W) and TOKEN 2/3 (X).
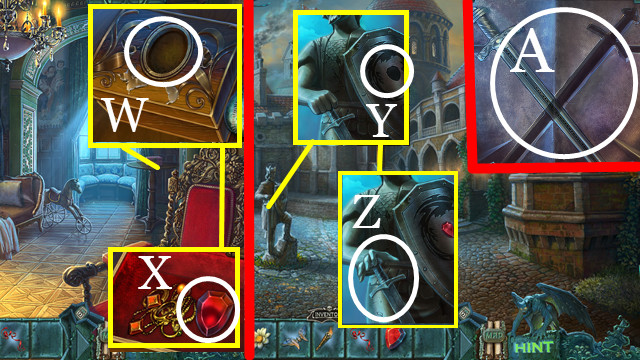
- Use the Raven (Y); take the TOKEN 3/3 (Z).
- Use the KNIFE (A) three times.
- Place the TOKENS (B) and PHOTO (C) to trigger a mini-game.
- Solution: E-M-I-L-Y. Letter placements are randomized.
- Receive EMILY’S PLATE.
- Enter (D).
- Place EMILY’S PLATE (E).
- Talk (F).
- Touch (G) to trigger a mini-game.
- Solution (H).
Chapter 2: School
- Talk (I); take the SCHOOL KEY (J).
- Enter (K).
- Touch anywhere to trigger a cutscene.
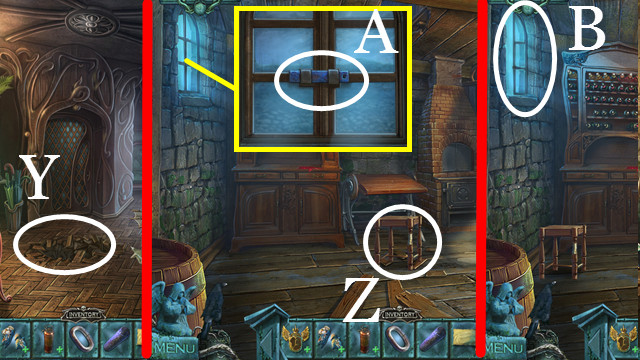
- Use the SHAWL (L); receive the GLASS SHARD.

- Take the BROKEN CLOCK WEIGHT (M).
- Open (N); take the LOCK PART (O).
- Touch (P).

- Use the Raven (Q); take the PUZZLE PIECE (R).
- Place the LOCK PART (S).
- Touch (T); take the RAVEN’S HEAD (U).

- Place the RAVEN’S HEAD (V).
- Use the SCHOOL KEY (W); touch (X).
- Enter (Y).
- Touch anywhere to trigger a cutscene.
- Take the SNAKE HANDLE (Z).
- Open (A); take the PENCIL KEY (B).
- Walk down.

- Use the PENCIL KEY (C); take the PAPER CLIP (D).
- Use the PAPER CLIP (E); take the PUZZLE PIECE (F).
- Place the SNAKE HANDLE (G).
- Touch (H).
- Enter (I).
- Take the GLUE (J).
- Combine the BROKEN CLOCK WEIGHT and GLUE (inventory); receive the CLOCK WEIGHT.
- Walk down then left.
- Use the CLOCK WEIGHT (K); take the GEM (L).
- Use the PAPERCLIP (M).
- Touch (N).
- Take the KNOB (O).
- Touch (P); place the GEM (Q); take the PUZZLE PIECE (R).
- Touch anywhere to trigger a cutscene.
- Place the PUZZLE PIECES (S) to trigger a mini-game.
- Solution (T): B-B-B-D-A-A-A-D-E-B-B-A-A-D-E-B-C-C-E.
- Walk forward.
- Touch anywhere to trigger a cutscene.
- Touch (U) then (V).
- Use the SHOVEL (W); touch (X); take the PHOTO (Y).
- Take the PLANKS (Z).
- Use the Raven (A); take the GLOBE PART (B).
- Enter (C).
- Take the STATUE (D).
- Place the PHOTO (E).
- Place the GLOBE PART (F); take the SILVER KEY (G).
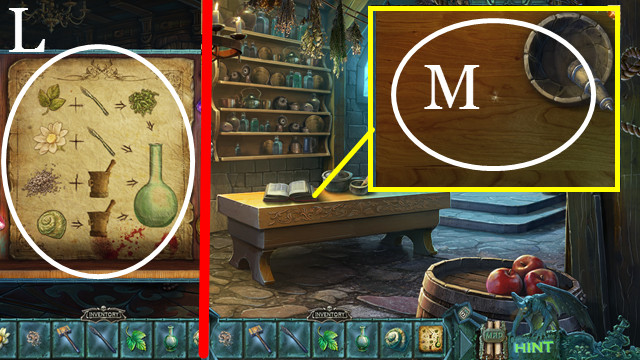
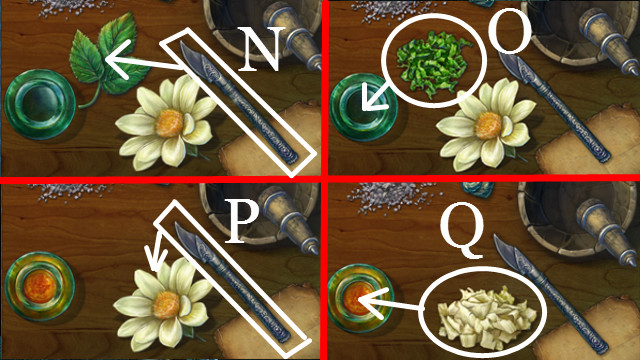
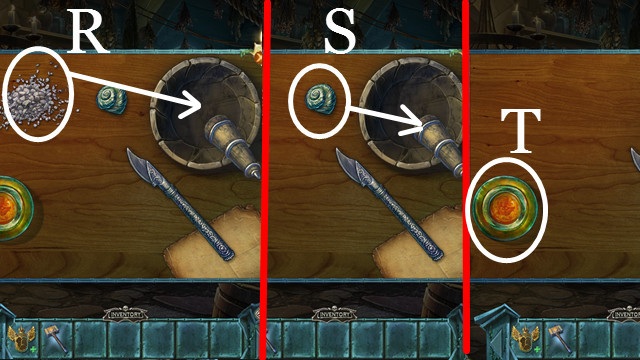
- Use the GLASS SHARD (H); take the SAND BUCKET (I).
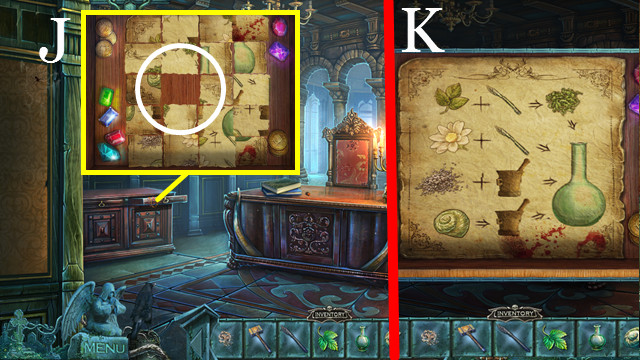
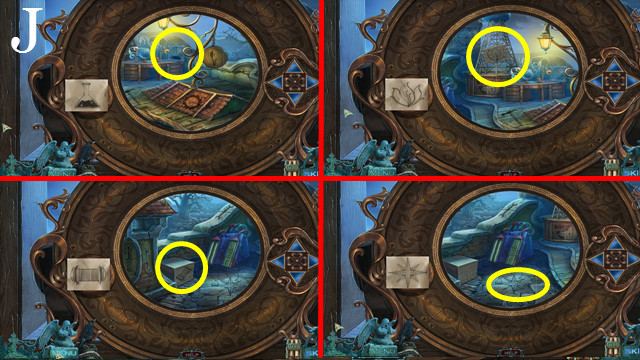
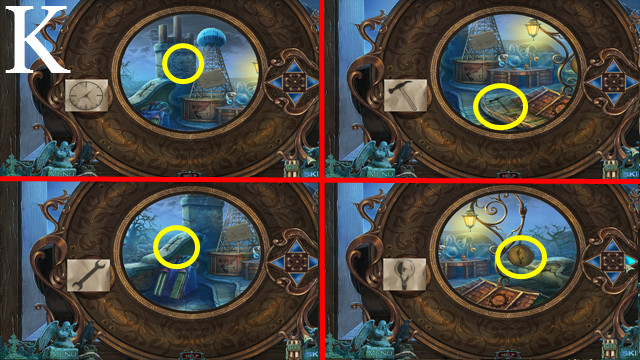
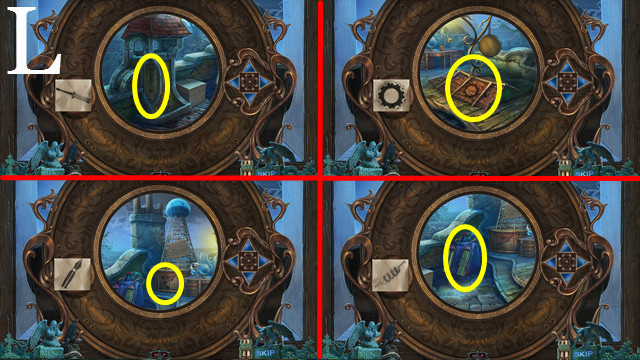
- Use the CHALK (J) to trigger a mini-game.
- Solution is random.
- Play the HOP (K); take the CHIMERA DISK (L).
- Walk down; place the CHIMERA DISK (M); walk down.
- Use the SAND BUCKET (O); take the PINCERS and GOLDEN KEY (N).
- Walk down.
- Use the PINCERS (P); receive the BIRD.
- Walk up then left.
- Play the HOP (Q); take the CRYSTAL MUSHROOM (R).
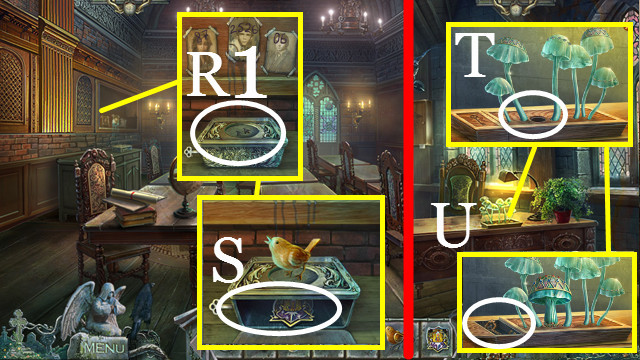
- Place the BIRD (R1); take the SCHOOL SHIELD (S).
- Walk down, down, down, right.
- Place the CRYSTAL MUSHROOM (T); take the COPPER KEY (U).
- Walk down, up, up.
- Place the GOLDEN KEY (V), SILVER KEY (W), and COPPER KEY (X).
- Enter (Y).
- Place the STATUE (Z) to trigger a HOP.
- Play the HOP; receive the STUFFED BIRD.
- Walk down three times, then right.
- Place the STUFFED BIRD (A); take the HAMMER (B).
- Use the HAMMER (C-D); take the NAILS (E) and SUN GEM (F).
- Walk down, up, up, up.
- Use the PLANKS, NAILS, and HAMMER (G); take the LADDER (H).
- Walk down.
- Place the SCHOOL SHIELD (I) to trigger a mini-game.
- Solution (J): C-D-E-F-G-H-A-B.
- Use the LADDER (K).
- Take the DOLL’S ARM (L).
- Walk up, forward.
- Play the HOP (M); receive the VALVE.
- Use the DOLL’S ARM (N); take the NEEDLE (O).
- Walk down.
- Use the NEEDLE (P); receive the EMERALD EYE.
- Climb down (Q).
- Use the VALVE (R); touch (S) to trigger a HOP.
- Play the HOP (T); receive the RUBY EYE.
- Walk up, forward.
- Use the KNOB (U); take the SAPPHIRE EYE (V).
- Place the EMERALD EYE (W), RUBY EYE (X) and SAPPHIRE EYE (Y).
- Take the KNIGHT FIGURINE (Z), ANGEL (A) and STONE WEDGE 1/3 (B).
- Walk down; climb down (C).
- Use the ANGEL (D).
- Touch (E) to trigger a mini-game.
- Solution (F-G-H).
- Walk forward.
- Place the SUN GEM (I); take the TONGS (J).
- Press (K); take the INSIGNIA (L).
- Walk down.
- Use the TONGS (M); receive the GHOST FIGURINE.
- Walk forward.
- Place the KNIGHT FIGURINE (N) and GHOST FIGURINE (O).
- Take the CADUCEUS (P) and STONE WEDGE 2/3 (Q).
- Walk down.
- Play the HOP (R); receive the SCISSORS.
- Climb up; walk down, down, right.
- Use the CADUCEUS (S).
- Take the MEDICINE (T).
- Use the SCISSORS (U); receive the BANDAGE.
- Walk down, up, up, up.
- Place the INSIGNIA (V); touch (W); take the STONE WEDGE 3/3 (X).
- Walk down.
- Climb down (Y).
- Place the STONE WEDGE (Z); take the CHIMERA KEY (A).
- Walk forward.
- Use the CHIMERA KEY (B).
- Talk (C).
- Use the MEDICINE and BANDAGE (D).
- Take the ANCIENT AMULET (E).
- Enter (F).
Chapter 3: Cemetery-Part 2
- Walk down.
- Talk (G).
- Take the BAG (H).
- Use the SCISSORS (I).
- Take the EMPTY CANISTER (J) and STONE SKULL (K).
- Walk down twice.
- Play the HOP (L); receive the ENCRUSTED KEY.
- Use the BAG (N); receive the BAG WITH SEEDS.
- Use the EMPTY CANISTER (M); receive the CANISTER WITH WATER.
- Walk up twice.
- Use the STONE SKULL (O).
- Use the ENCRUSTED KEY (P); take the AMBER (Q).
- Use the BAG WITH SEEDS and CANISTER WITH WATER (R).
- Use the SCISSORS (S); receive the FLOWER.
- Place the AMBER (T) and FLOWER (U).
- Take the PORTRAIT (V).
- Place the PORTRAIT (W) to trigger a mini-game.
- Solution: E-D-W-A-R-D. Letter placements are randomized.
- Talk (X); take the LETTER FOR LIANNAH (Y).
- Enter (Z).
Chapter 4: Castle
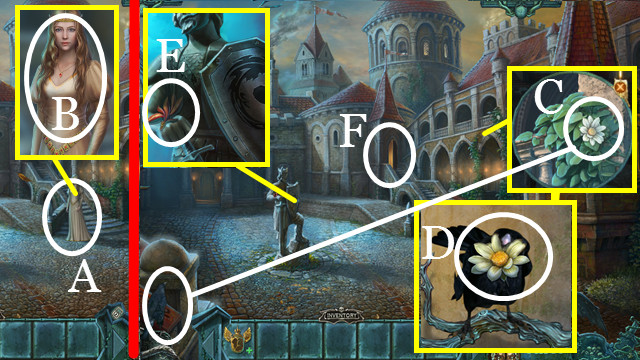
- Talk (A).
- Give the LETTER FOR LIANNAH (B).
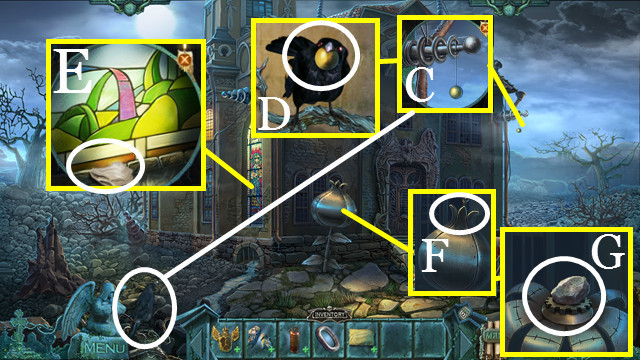
- Use the Raven (C); take the WHITE FLOWER (D).
- Take the PERFUME BOTTLE CAP (E).
- Walk up (F).
- Talk (G); take the TORN CLOAK (H) and GUARD INSIGNIA (I).
- Take the TOY WHEEL (J) and NEEDLE (K).
- Combine the TORN CLOAK and NEEDLE (inventory); receive the CLOAK.
- Use the TOY WHEEL (L); take the PERFUME BOTTLE CAP (M).
- Walk down then right.
- Use the CLOAK anywhere.
- Take the BUTTERFLY TOKEN (N), TORCH (O) and PERFUME BOTTLE CAP (P).
- Walk down, up.
- Place the PERFUME BOTTLE CAPS (Q-R-S).
- Touch (T-U).
- Play the HOP (V); receive the RIBBON.
- Use the BUTTERFLY TOKEN (W); take the SHIELD GEM (X).
- Walk down.
- Use the SHIELD GEM (Y); take the SWORD (Z).
- Walk right, forward.
- Place the SWORD (A) to trigger a mini-game.
- Solution (B).
- Walk forward.
- Talk (C).
- Give the RIBBON (D); take the PENDANT (E).
- Take the STONE LEAF (F); place the TORCH (G).
- Take the FRAGMENT (H) and TOY HAMMER (I).
- Walk down.
- Observe (J).
- Walk up; talk to Edward.
- Walk down; take the CAULDRON EMBLEM HALF (K).
- Return to Liannah’s chambers.
- Give the PENDANT (L); take the CAULDRON EMBLEM HALF (M).
- Combine the CAULDRON EMBLEM HALF and CAULDRON EMBLEM HALF (inventory); receive CAULDRON EMBLEM.
- Walk down.
- Use the CAULDRON EMBLEM (N); Enter (O).
- Talk (P).
- Use the GUARD INSIGNIA (Q); take the ORDER (R).
- Take the KNIFE (S) and COLANDER (T).
- Walk down then right.
- Use the KNIFE (U); receive the LEAF.
- Walk down then up the stairs.
- Give the ORDER (V).
- Play the HOP (W); receive the SICKLE.
- Walk down then right.
- Touch (X).
- Use the STONE LEAF (Y); take the BOTTLE (Z).
- Use the SICKLE (A).
- Walk right (B).
- Take the BUTTONS (C).
- Walk down, up.
- Use the BUTTONS (D); take the SHELL (E).
- Walk down, down, forward.
- Use the COLANDER (F); receive the BEAR TOOTH.
- Walk down, right, right.
- Use the BEAR TOOTH (G); take the RECIPE PART (H).
- Open (I).
- Place the RECIPE PART (J) to trigger a mini-game.
- Solution (K).
- Take the ANTIDOTE RECIPE (L).
- Walk down, down, up.
- Place the ANTIDOTE RECIPE, LEAF, WHITE FLOWER, FRAGMENT, SHELL, BOTTLE, and KNIFE (M).
- Use (N-O-P-Q).
- Use (R-S).
- Take the ANTIDOTE (T).
- Walk down, right, up.
- Give the ANTIDOTE (V); take the GOLD (W).
- Walk down.
- Place the TOY HAMMER and the GOLD (X).
- Take the KEY (Y).
- Walk up.
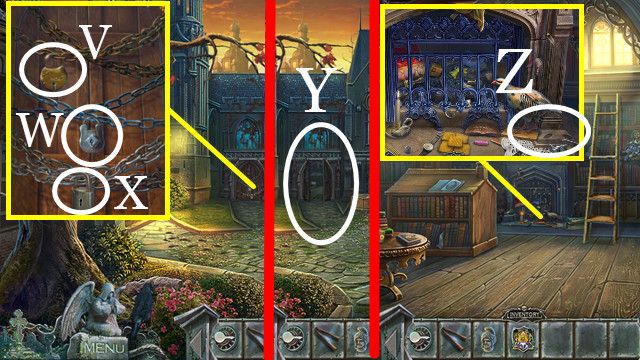
- Use the KEY (Z); touch (A); take the RAT SKULL (B).
- Walk down, right.
- Use the RAT SKULL (C); touch (D); take the PRISONERS DIARY (E).
- Talk (F).
- Take the RAG (G), MATTOCK (H), BAND (I) and BROKEN BROOM (J).
- Combine the BAND and BROKEN BROOM (inventory); receive the BROOM.
- Use the BROOM (K) to trigger a HOP.
- Play the HOP (L); receive the KEYS.
- Place the KEYS (M) to trigger a mini-game.
- Solution (N).
- Walk forward.
- Talk (O).
- Use the MATTOCK (P); take the PATTERN PLATE (Q).
- Walk down.
- Play the HOP (R); receive the CROWBAR.
- Walk up.
- Use the CROWBAR (S).
- Take the EYE (T).
- Walk down.
- Place the EYE (U); take the PATTERN PLATE (V).
- Place the PATTERN PLATE and PATTERN PLATE (W).
- Take the STAR CREST (X).
- Walk forward.
- Place the STAR CREST (Y).
- Walk forward.
- Talk (Z); give the PRISONER’S DIARY (A).
- Take the AMULET GEMS (B).
- Enter (C).
Chapter 5: Cemetery-Part 3
- Talk (D). Take the AWL (E).
- Use the AWL (F); receive the DIRTY PHOTO.
- Combine the RAG and DIRTY PHOTO (inventory); receive the OLD PHOTO.
- Place the OLD PHOTO (G) to trigger a mini-game.
- Solution: R-I-C-K. Letter placements are randomized.
- Talk (H). Take the BULB (I).
- Enter (J).
Chapter 6: Tower
- Touch anywhere to trigger a cutscene.
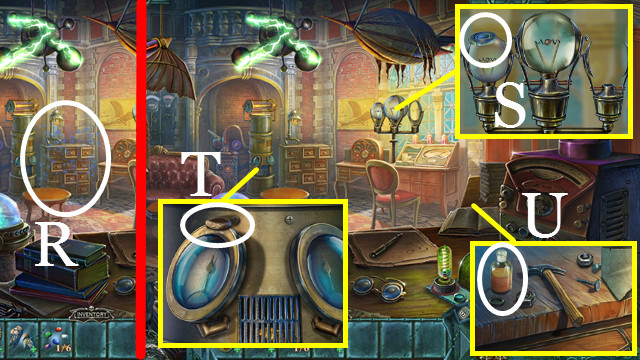
- Touch (K); take the SHARP METAL FISH (L).
- Open (M).
- Walk forward.
- Touch (N).
- Take the TELESCOPE TUBE (O).
- Use the BULB (P) to trigger a HOP.
- Play the HOP (Q); receive the BANDAGE.
- Use the BANDAGE (R).
- Take the CORKSCREW HANDLE (S).
- Move (T).
- Take the SOLVENT (U).
- Move (V).
- Climb up (W).
- Take the NET (X).
- Use the SHARP METAL FISH (Y); receive the STICK.
- Walk down.
- Use the Raven (Z); take the METAL SNIPS (A).
- Use the NET (B); receive the EGG.
- Use the STICK (C); take the DIRTY LENS (D).
- Combine the SOLVENT and DIRTY LENS (inventory); receive the LENS.
- Place the EGG (E).
- Use the CORKSCREW HANDLE (F); take the CORKSCREW (G).
- Walk forward.
- Place the TELESCOPE TUBE (H) and LENS (I) to trigger a mini-game.
- Solution (J-K-L).
- Take the CLOCK BELL (M).
- Climb down (N).
- Play the HOP (O); receive the CLOCK FACE.
- Use the METAL SNIPS (P).
- Take the INCOMPLETE FIRE EXTINGUISHER (Q) and CHAIN LINK (R).
- Use the CORKSCREW (S); receive the CLOCK HANDS.
- Walk up.
- Place the CLOCK FACE (T), CLOCK BELL (U), and CLOCK HANDS (V).
- Take the PAPER (W) and LATCH (X).
- Climb down (Y).
- Move (Z).
- Use the LATCH (A).
- Walk left (B).
- Use the Raven (C); take the PISTIL (D).
- Take the RAG (E).
- Place the PISTIL (F); take the STONE and GEAR (G).
- Place the CHAIN LINK (H); take the TUBE (I) and PENCIL (J).
- Combine the PAPER and PENCIL (inventory); receive the WRITING TOOLS.
- Use the RAG (K).
- Use the WRITING TOOLS (L); receive the CODE.
- Combine the INCOMPLETE FIRE EXTINGUISHER and TUBE (inventory); receive the FIRE EXTINGUISHER.
- Use the FIRE EXTINGUISHER (M).
- Take the PICTURE FRAGMENT (N).
- Place the CODE (O).
- Solution (P).
- Walk forward.
- Touch (Q) to trigger a HOP.
- Play the HOP (R); receive the METAL FLOWER.
- Place the GEAR (S); touch the key.
- Enter (T).
- Place the PICTURE FRAGMENT (U); take the LEVER (V).
- Place the METAL FLOWER (W); take the LIGHTBULB 1/3 (X).
- Use the STONE (Y); take the VALVE (Z).
- Walk down.
- Play the HOP (A); receive the GLASS CUTTER.
- Place the VALVE (B) and LEVER (C).
- Touch (D-E).
- Walk down.
- Use the GLASS CUTTER (F); receive the GLASS.
- Walk forward, up.
- Place the GLASS (G); take the GEM 1/6 (H).
- Move (I-J).
- Walk up (K).
- Use the FIRE EXTINGUISHER (L).
- Talk (M).
- Take the LIGHTBULB 2/3 (O) and LIGHTBULB 3/3 (P).
- Walk down twice.
- Place the LIGHTBULBS to trigger a mini-game (Q).
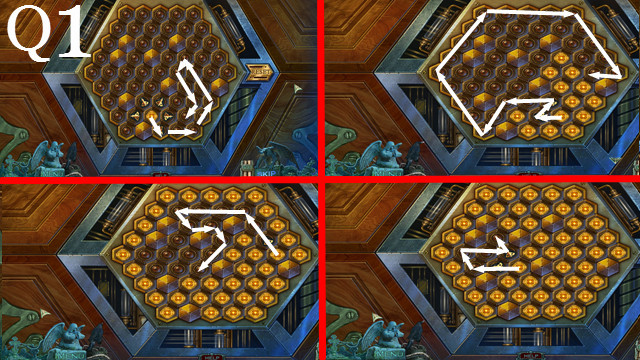
- Solution (Q1).
- Walk forward.
- Touch anywhere to trigger dialogue.
- Play the HOP (R); receive the ELECTRICAL STEM.
- Take the INSULATING TAPE (S), STATUE BELT (T) and LIQUID (U).
- Walk down, up.
- Place the STATUE BELT (V); take the CODE (W).
- Place the CODE (X).
- Press (Y) 2-5-0-7.
- Take the GEM 2/6 (Z).
- Climb up.
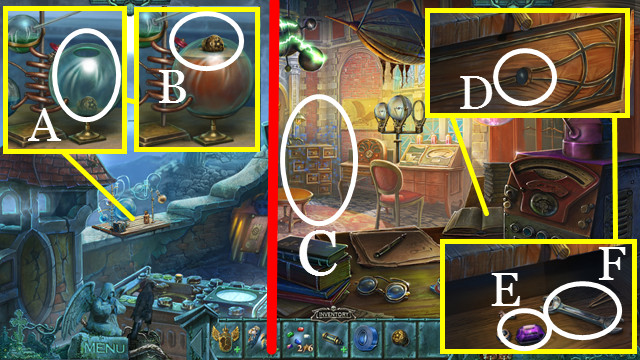
- Pour the LIQUID (A); take the KNOB (B).
- Walk down, down, forward.
- Play the HOP (C); receive the WOODEN FLOWER.
- Use the KNOB (D); take the GEM 3/6 (E) and WRENCH (F).
- Walk down.

- Place the WOODEN FLOWER (G); take the CUBE PART (H).
- Return to rooftop.
- Place the CUBE PART (I); take the GLASS BULB (J).
- Use the WRENCH (K-L-M-N); touch (O).
- Use the INSULATING TAPE (P).
- Take the GAUGE BACKGROUND (Q).
- Walk down, down, forward.
- Use the GAUGE BACKGROND (R); take the GEM 4/6 (S).
- Combine the ELECTRICAL STEM and GLASS BULB (inventory); receive the INCANDESCENT BULB.
- Place the INCANDESCENT BULB (T); take the GEM 5/6 (U) and GEM 6/6 (V).
- Return to rooftop.
- Place the GEM 6/6 (W) to trigger a mini-game.
- Solution (X): B-C-5-3-C-B-B-C-2-6-C-A-A-C-B-B-C-2.
- 4-C-A-A-C-5-1-C-B-B-B-C-2-4-C-A-A-A.
- C-5-3-C-B-C-2-6-C-A-C-5-3-C-B-B-C-A-A.
- A-C-5-A-C-B-B-B-C-A-A-A-4-C-A-C-5-B-B-A.
- Select anywhere to talk.
- Talk (Y); take the AMULET GEM (Z).
- Combine the ANCIENT AMULET and AMULET GEMS (inventory); receive the INCOMPLETE AMULET.
- Combine the INCOMPLETE AMULET and AMULET GEM (inventory); receive the COMPLETED AMULET.
- Talk (A).
- Use the COMPLETED AMULET (B).
- Talk (C).
- Enter (D).
- Talk (E).
- Congratulations! You’ve completed Redemption Cemetery: The Island of the Lost!
Bonus Chapter: