Follow Me!
Redemption Cemetery – Bitter Frost
Chapter 1: The Manor

- You have the option of a brief tutorial.
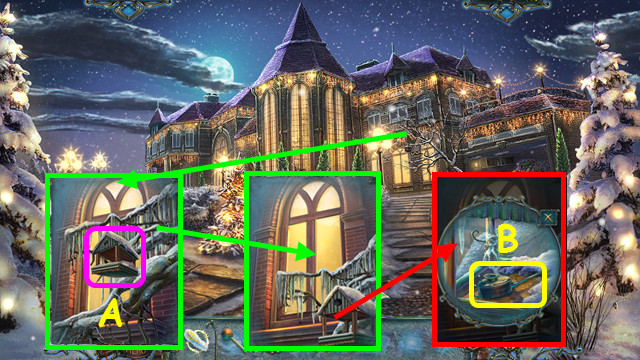
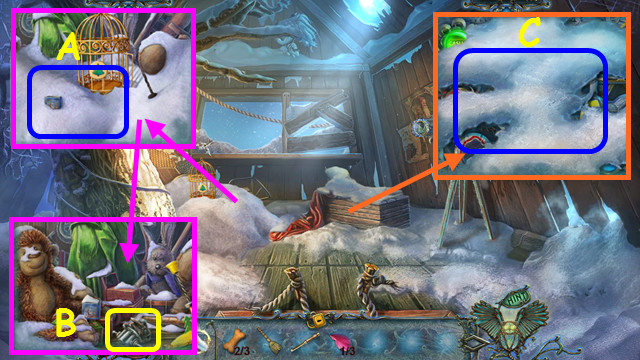
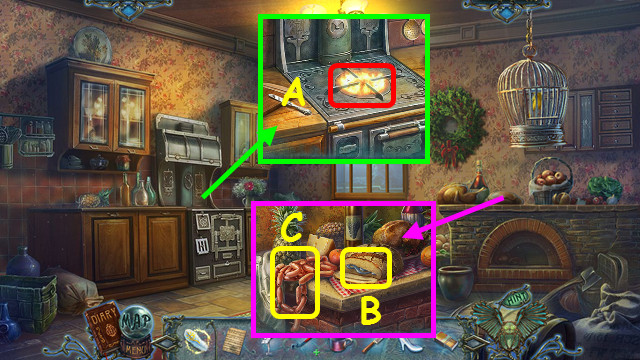
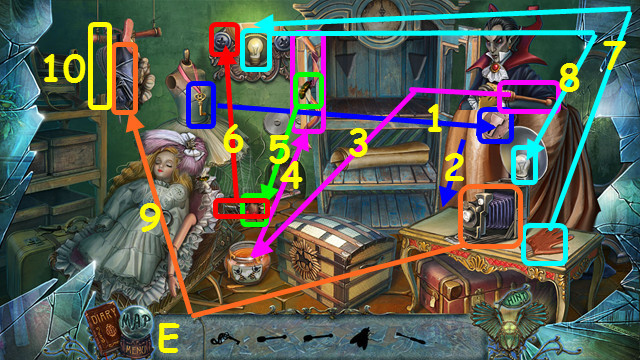
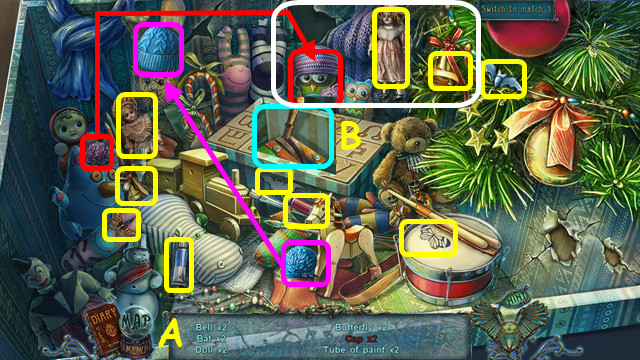
- Turn on the lamp (A).
- Read the list; take the CHRISTMAS STOCKING and MATCHES (B).
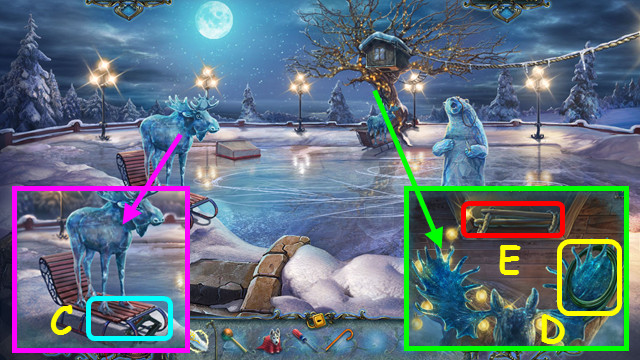
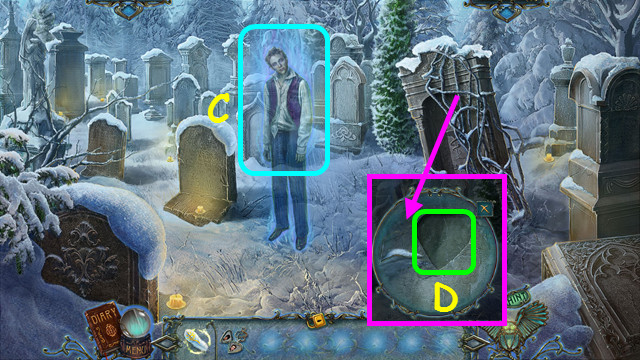
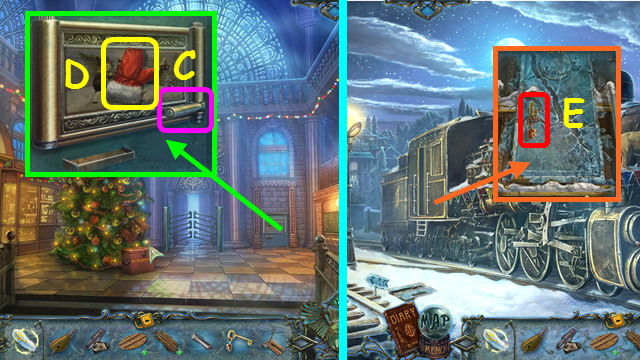
- Hang the CHRISTMAS STOCKING on the hook (C).
- Type any name on the tag and select OK (D).
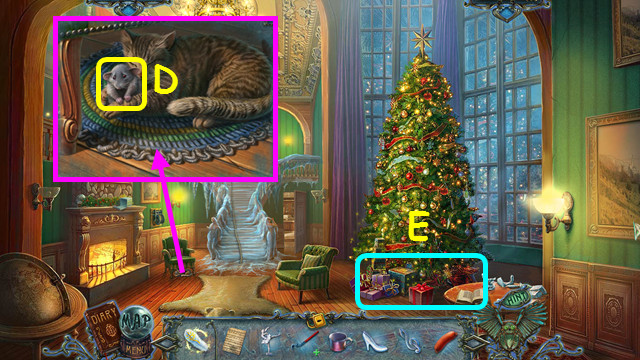
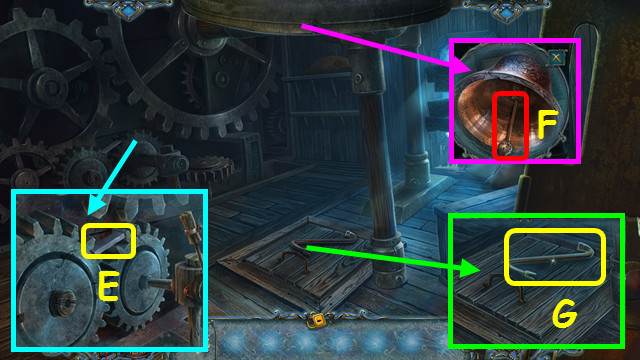
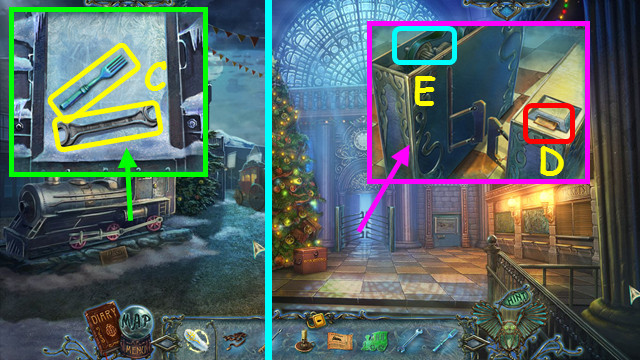
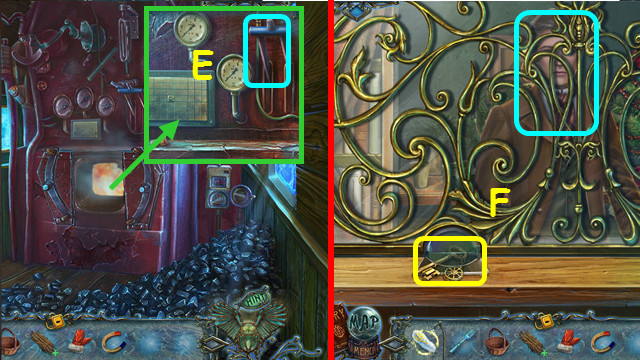
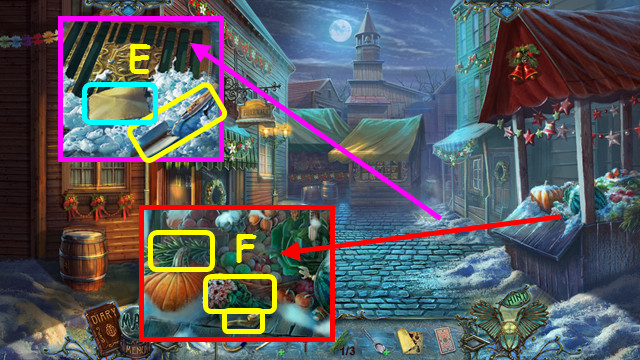
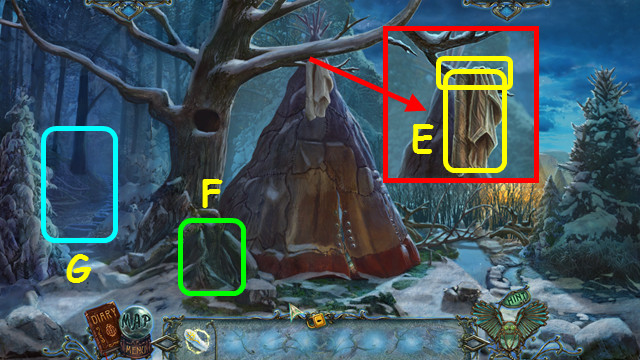
- Take the 1/3 LOCK PART (E).
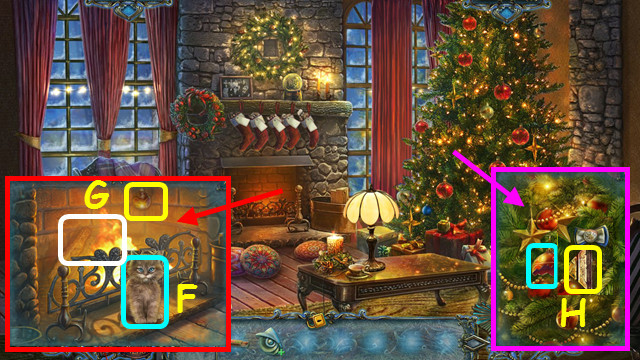
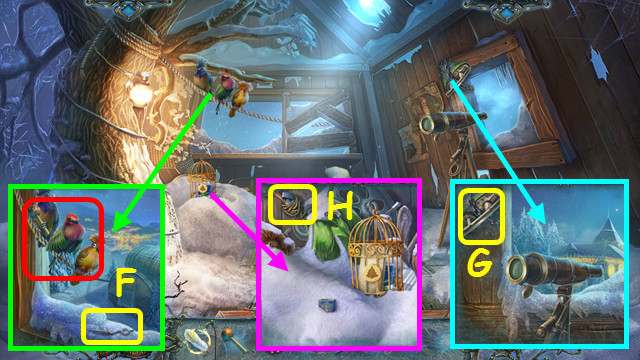
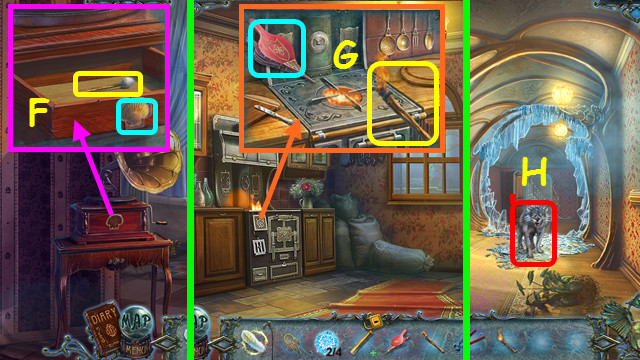
- Pet the cat (F).
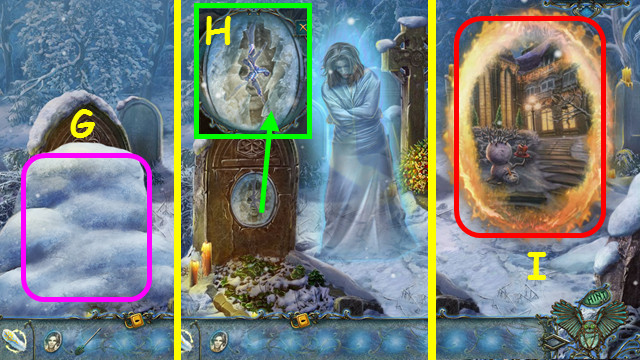
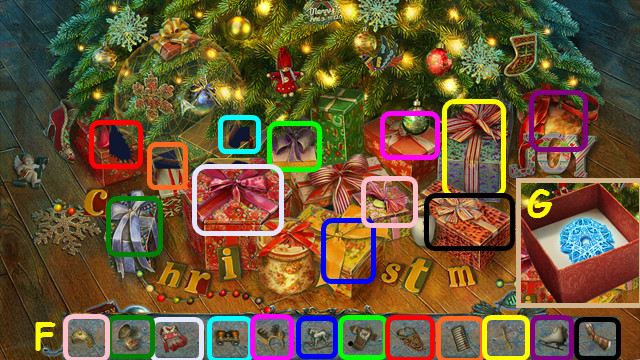
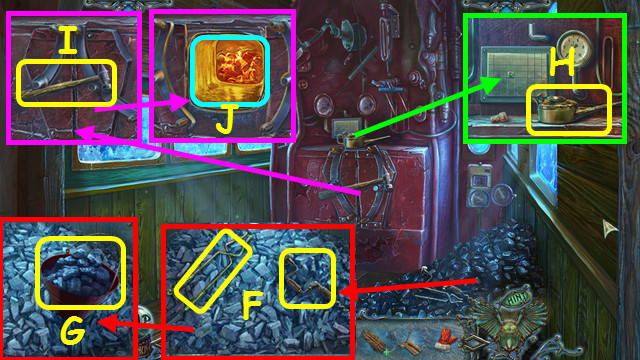
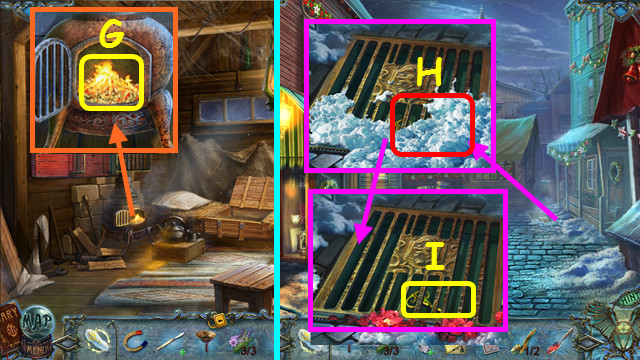
- Use the MATCHES on the logs; take the CHRISTMAS ORNAMENT (G).
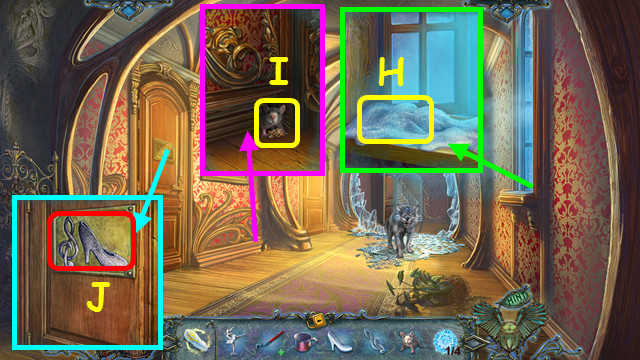
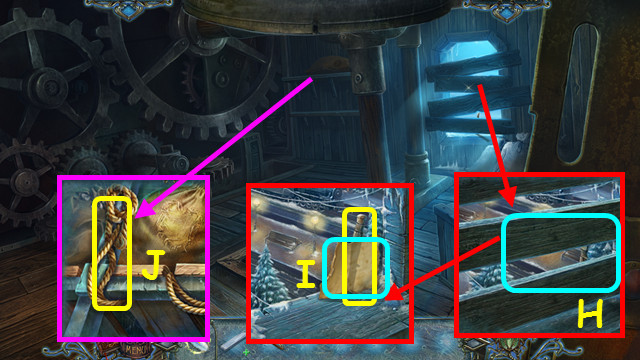
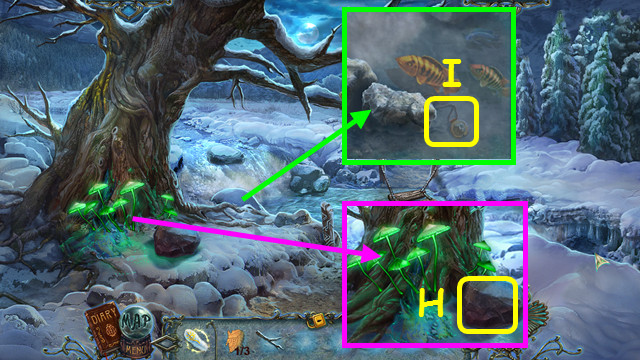
- Remove the broken ornament, hang the CHRISTMAS ORNAMENT, and take the 2/3 LOCK PART (H).
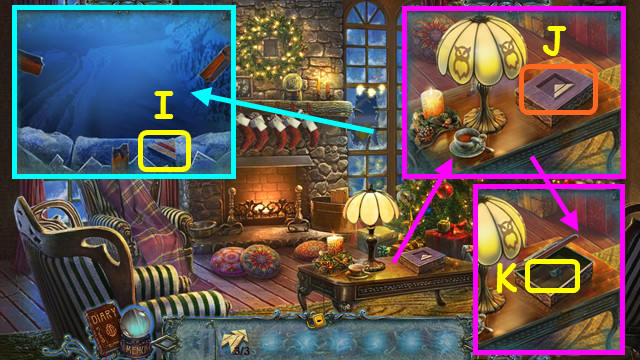
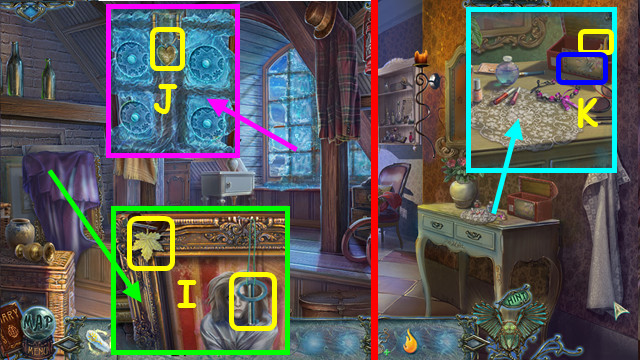
- Take the 3/3 LOCK PART (I).
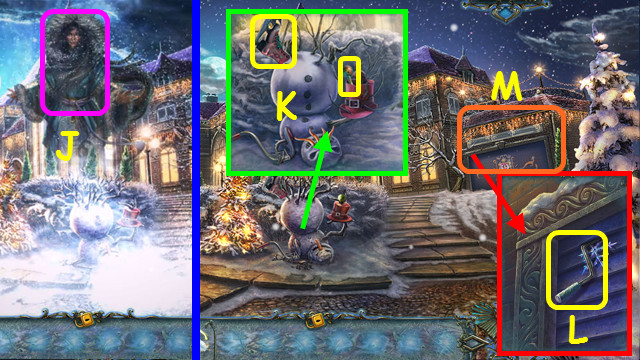
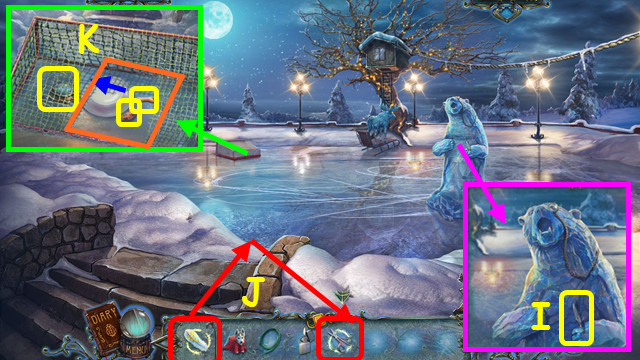
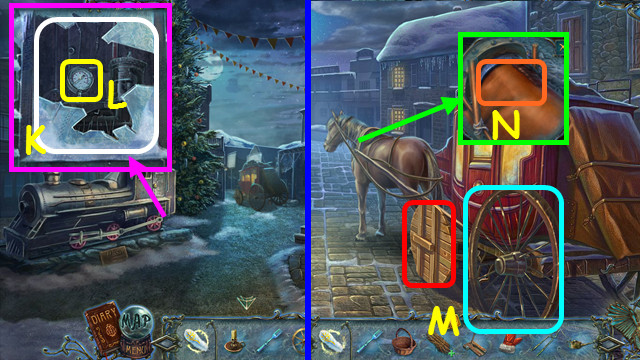
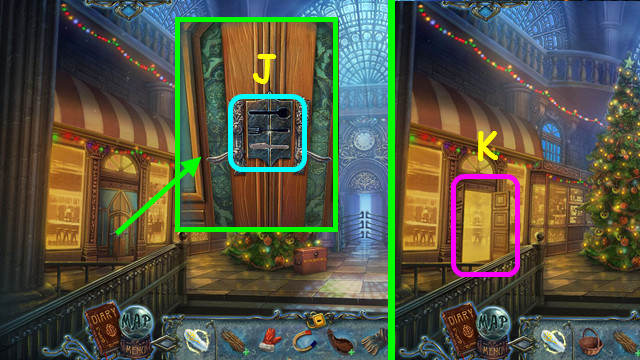
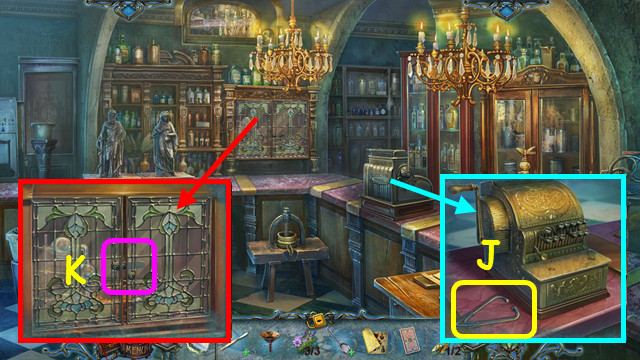
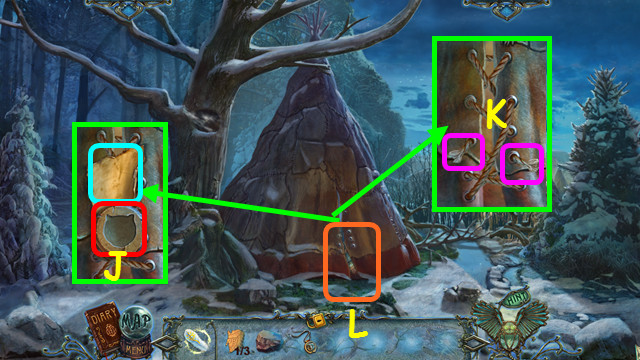
- Place the 3 LOCK PARTS on the box (J).
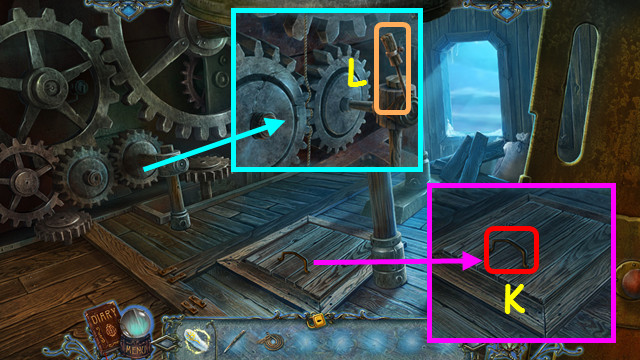
- Open the box and take the PHOTO ALBUM (K).
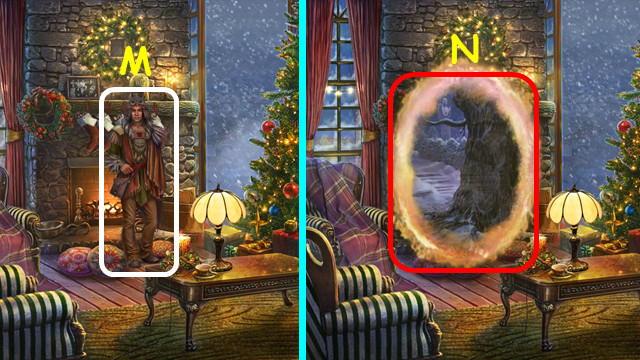
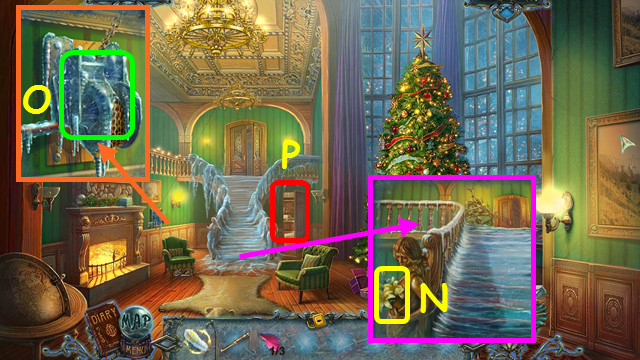
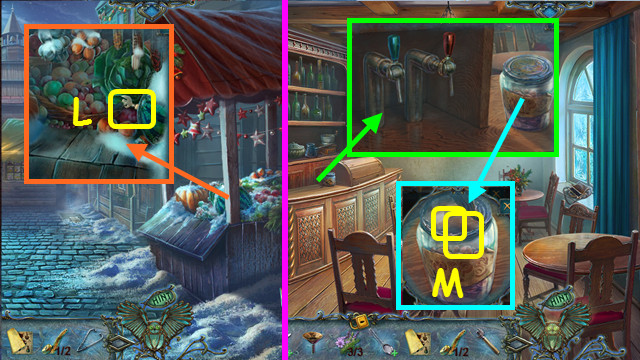
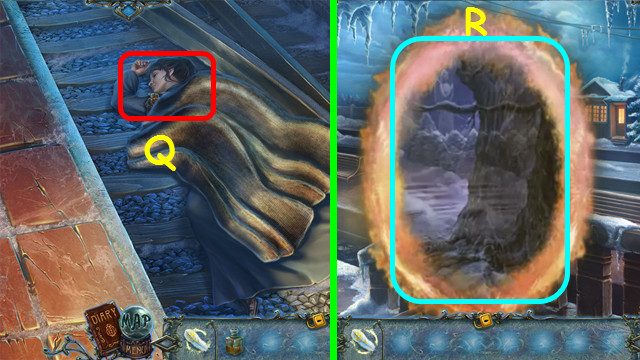
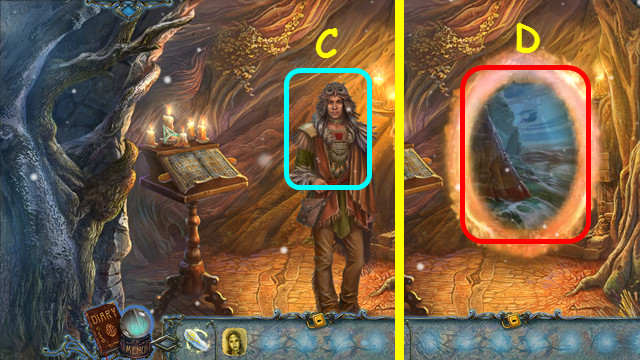
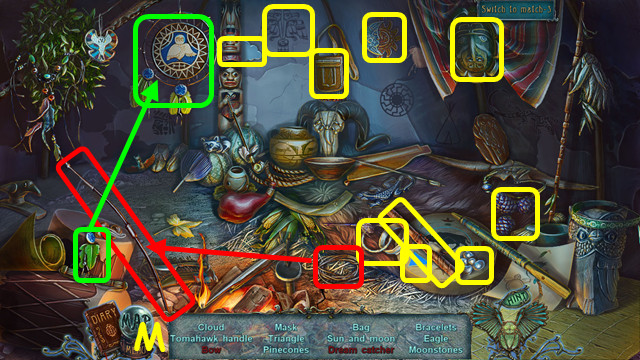
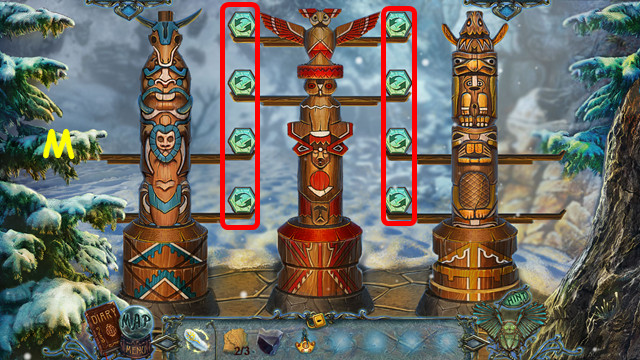
- Talk to the strange man (M).
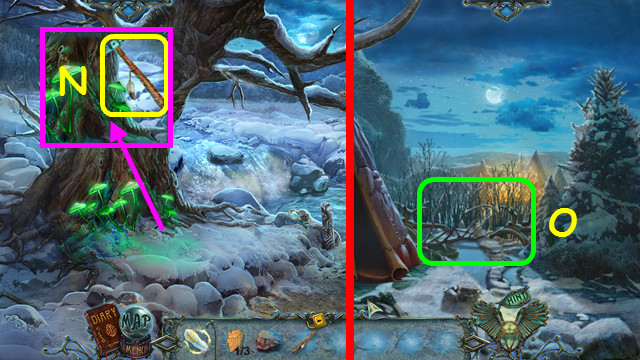
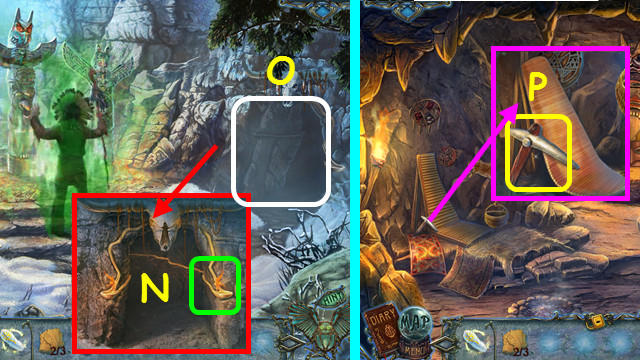
- Enter the portal (N).
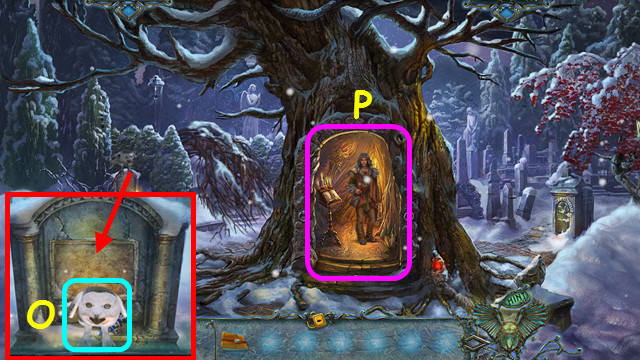
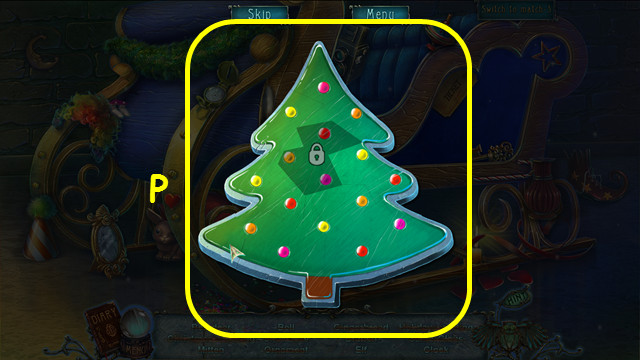
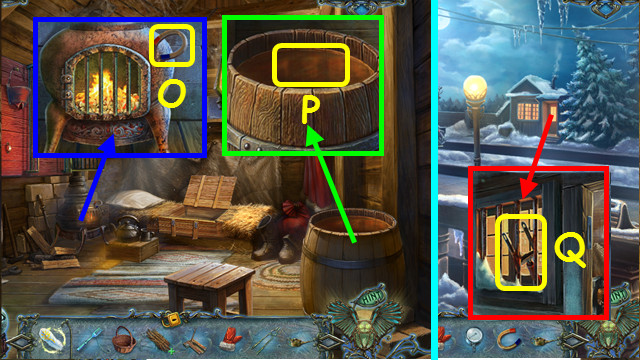
- Pet the owl (O).
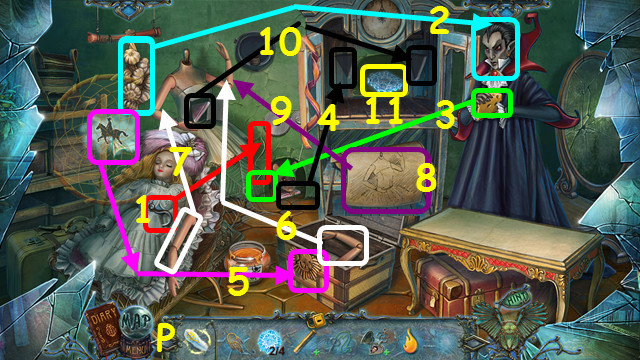
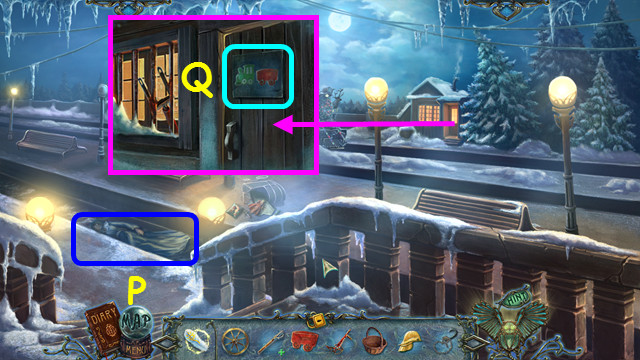
- Enter the tree (P).
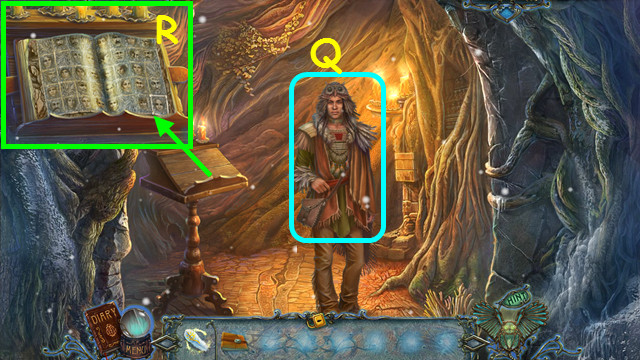
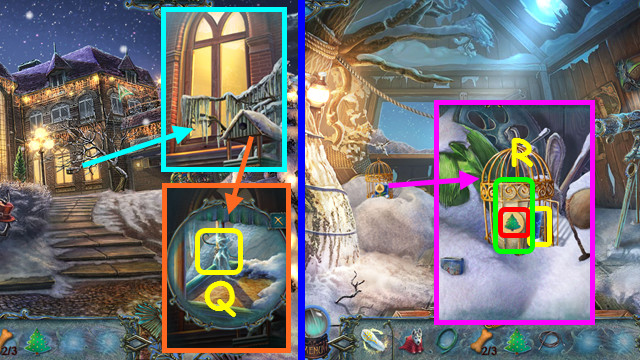
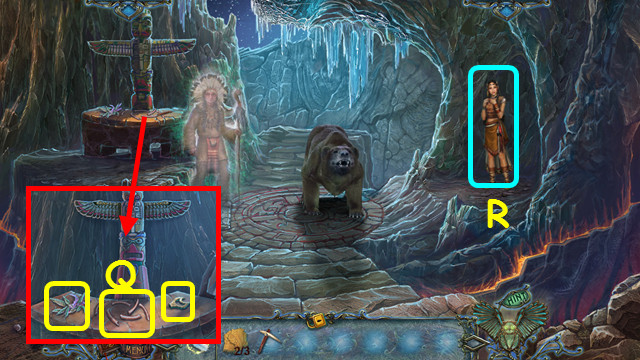
- Talk to Koturi to receive the MAGIC FEATHER (Q).
- Place the PHOTO ALBUM on the stand; open it and select the pages (R).
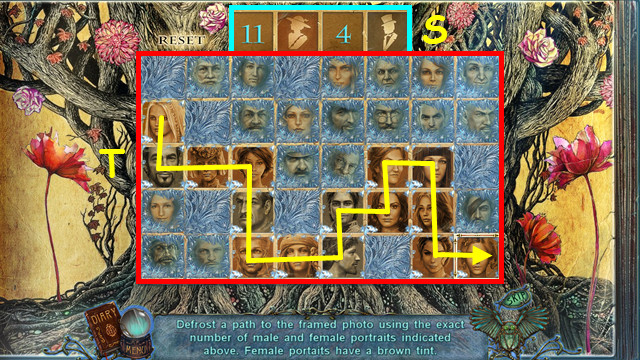
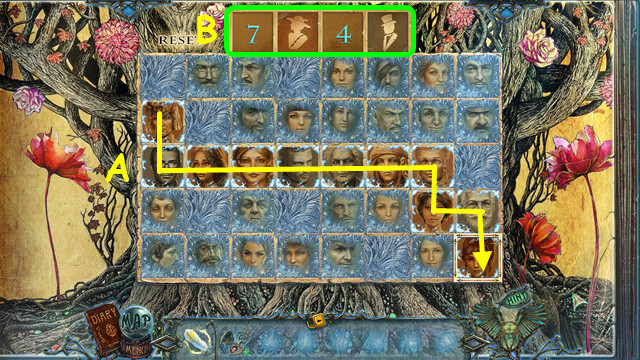
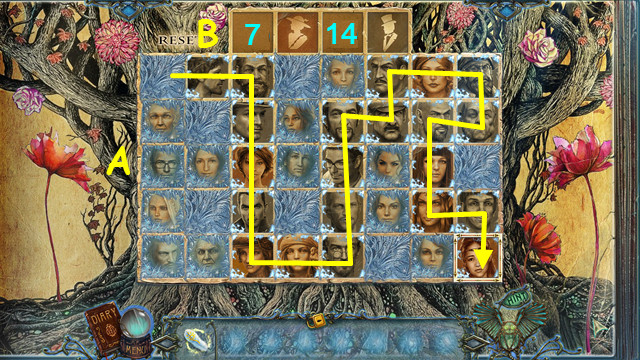
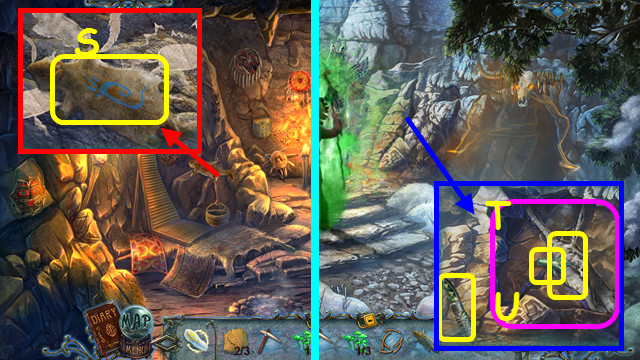
- Find a path through the photos using only the number of female and male photos shown at the top (S).
- Select the photos to form the path (T).
- You earn the GIRL’S PHOTO.
- Walk down and right.
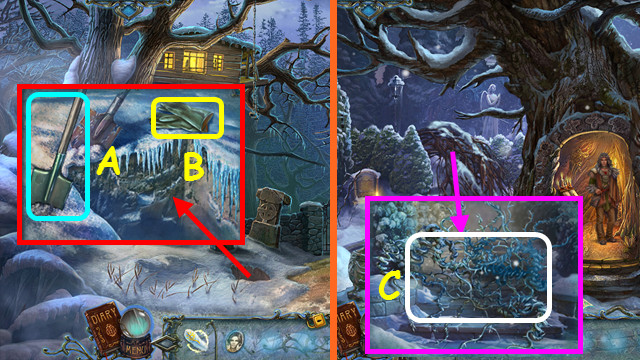
- Try to take the shovel (A).
- Take the GLOVES (B).
- Walk down.
- Use the GLOVES on the brambles (C).
- Walk left.
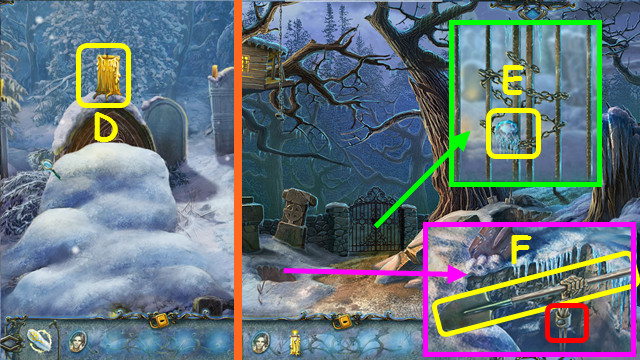
- Take the CANDLE (D).
- Walk down and right.
- Use the CANDLE to take the RUBY (E).
- Place the RUBY in the bracelet; take the SHOVEL (F).
- Walk down and left.
- Use the SHOVEL to remove the snow (G).
- Remove the broken glass and the torn photo; place the GIRL’S PHOTO in the frame (H).
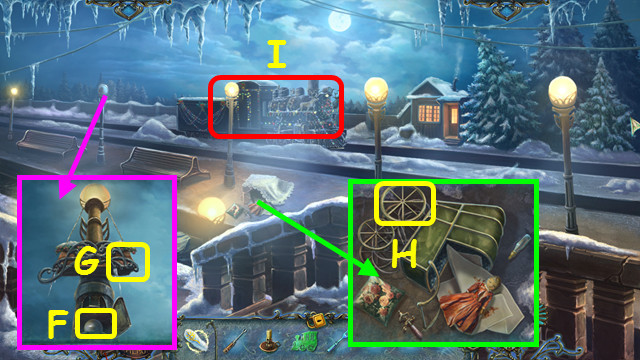
- Enter the portal (I).
- Talk to Wenonah (J).
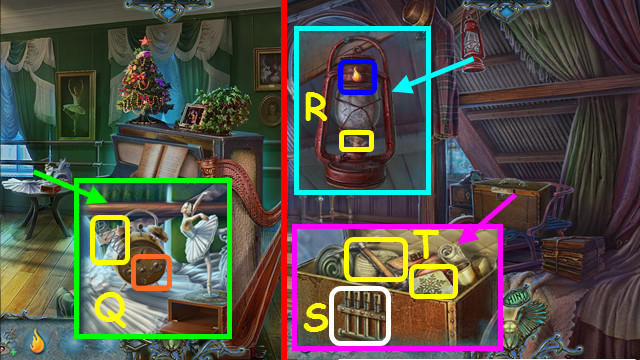
- Take the 1st SKATE and the MARACA (K).
- Take the JACK HANDLE (L).
- Select the garage (M).
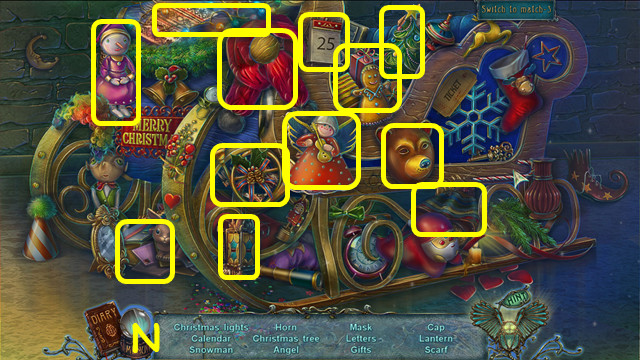
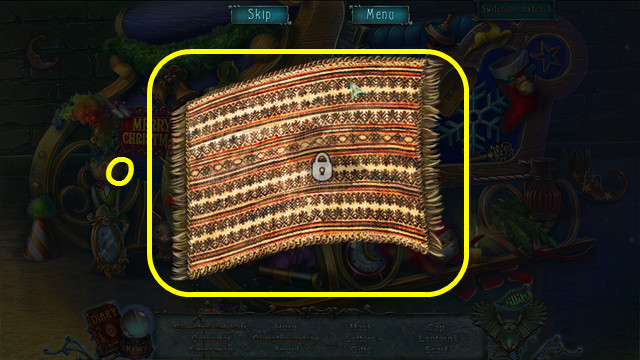
- Play the HOP (N).
- Restore the pieces to earn the BLANKET (O).
- Walk to the left.
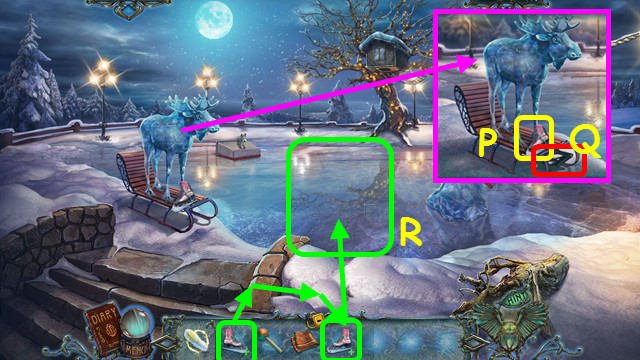
- Take the 2nd SKATE (P).
- Use the JACK HANDLE on the jack (Q).
- Combine the 2 SKATES in your inventory to make the SKATES; use the SKATES on the ice (R).
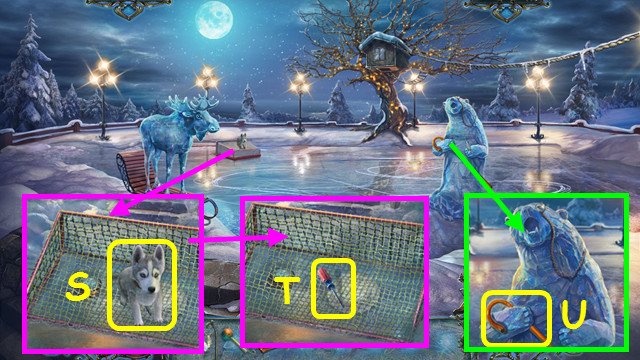
- Use the BLANKET to take the PUPPY (S).
- Take the SCREW DRIVER (T).
- Take the CANE (U).
- Walk down.
- Use the CANE on the birdhouse (A).
- Take the OILCAN (B).
- Walk left.
- Use the OILCAN on the sled; push the sled (C).
- Take the HOSE (D).
- Use the CANE on the ladder (E).
- Go up the ladder.
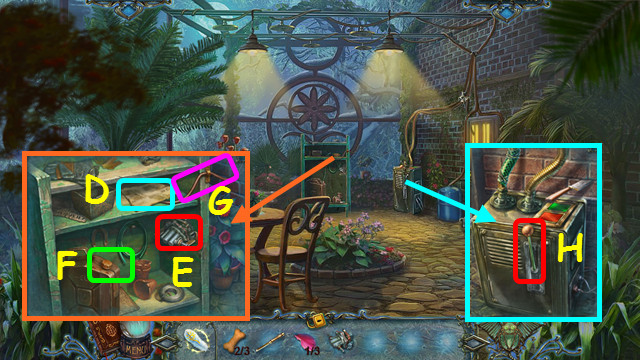
- Give the MARACA to the birds; take the 1st SCISSOR HALF (F).
- Use the SCREWDRIVER to take the SKATE BLADE (G).
- Use the SKATE BLADE to take the LIGHTER (H).
- Walk down.
- Use the LIGHTER to take the 2nd SCISSOR HALF (I).
- Combine the 2 SCISSORS HALVES in your inventory to make the SCISSORS.
- Use the MAGIC FEATHER on the SCISSORS in your inventory to make the GARDEN SCISSORS (J).
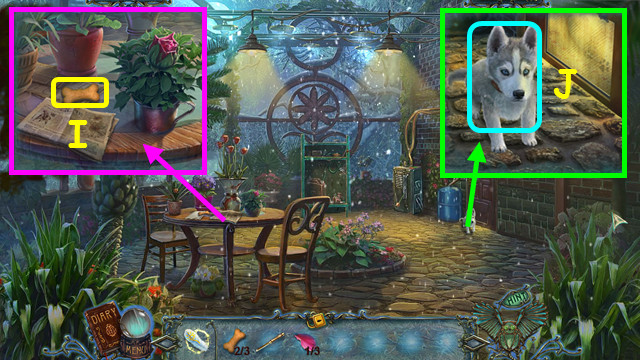
- Use the GARDEN SCISSORS on the net and move the plate; take the LENS, the COOKIE, and the 1/3 DOG TREAT (K).
- Go forward.

- Place the LENS on the telescope (L).
- Take the 2/3 DOG TREAT (M).
- Give the COOKIE to the birds (N).
- Walk down twice and select the garage.
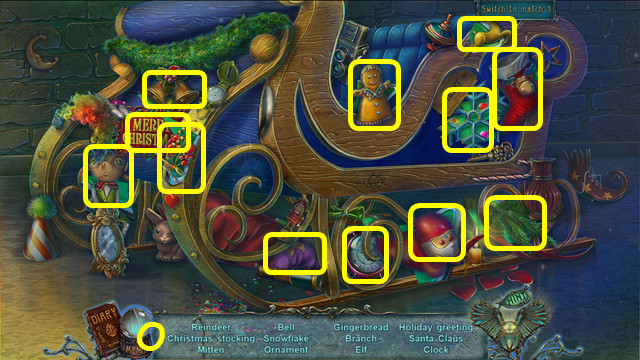
- Play the HOP (O).
- Restore the pieces to make the TREE MEDALLION (P).
- Use the LIGHTER to take WIRE (Q).
- Walk left and forward.
- Use the TREE MEDALLION on the cage; take the story piece and the HAT (R).
- Walk down twice.
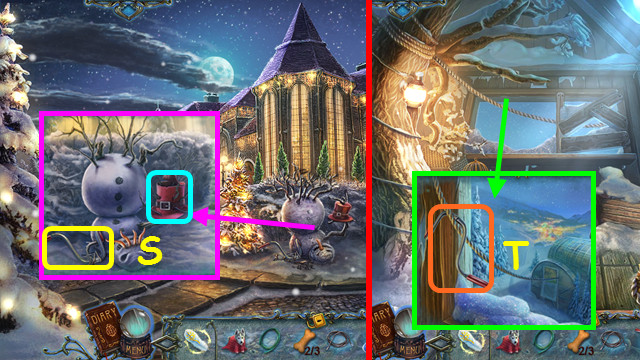
- Place the HAT on the old hat and take the BICYCLE HANDLEBAR (S).
- Walk left and forward.
- Use the BICYCLE HANDLEBAR on the rope; slide down the rope (T).
Chapter 2: Saving Mandy
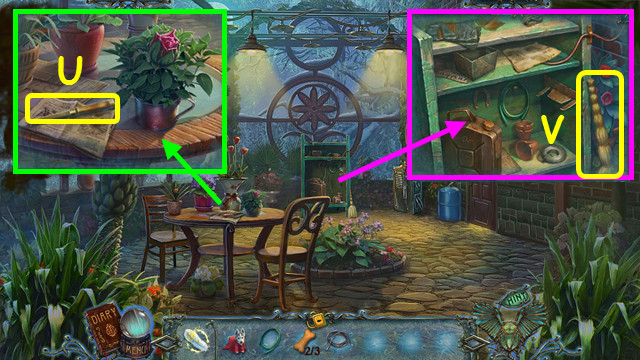
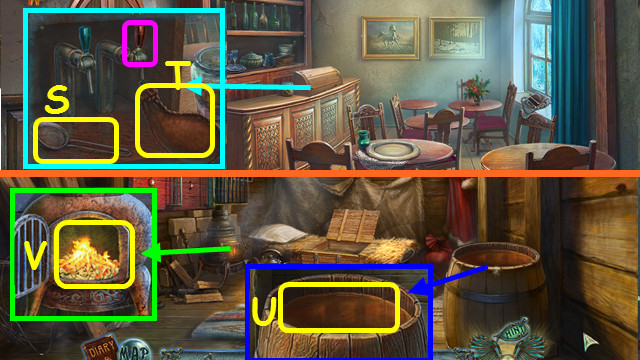
- Take the CHISEL (U).
- Take the BROOM (V).
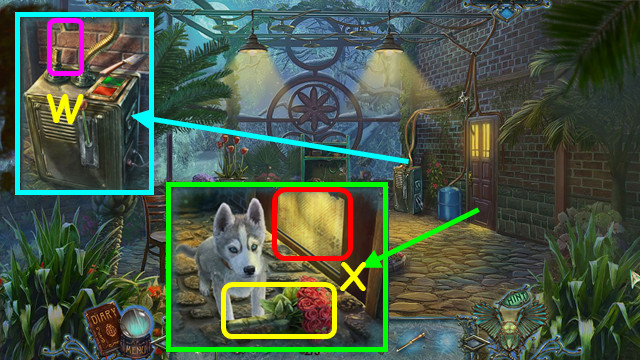
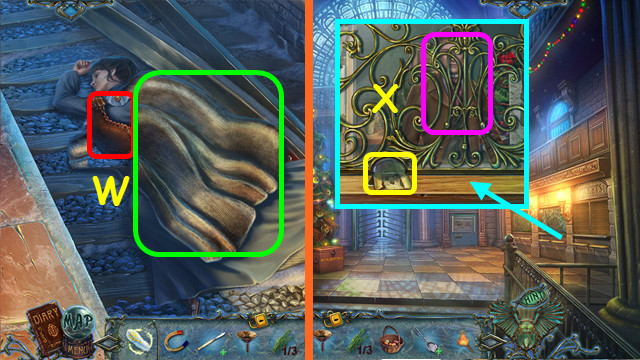
- Use the HOSE and then the WIRE on the break (W).
- Use the PUPPY on the doggy door; take the 1/3 PETAL (X).
- Walk down.
- Use the BROOM on the snow (A).
- Take the WATER PUMP (B).
- Use the BROOM on the snow; note the mini-game (C).
- Go forward.
- Read the instructions (D).
- Place the WATER PUMP on the bracket (E).
- Open the container (F).
- Attach the hose (G).
- Pull the lever (H).
- Take the 3/3 DOG TREAT (I).
- Give the 3 DOG TREATS to the puppy (J).
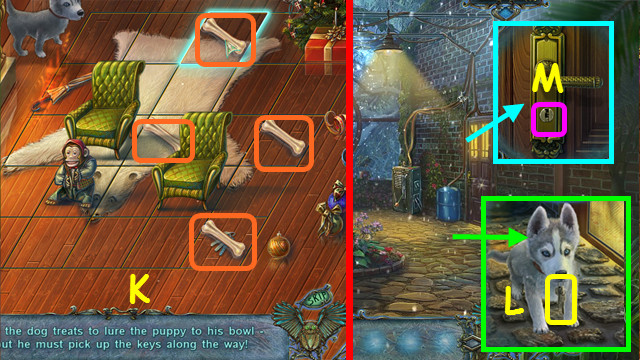
- Place 4 dog treats on the floor to lure the puppy to the keys (K).
- Take the KEYS (L); use them on the lock and walk to the right (M).
- Take the 2/3 PETALS (N).
- Use the CHISEL on the ice until it is gone; turn the crank (O).
- Enter the door under the stairs (P).
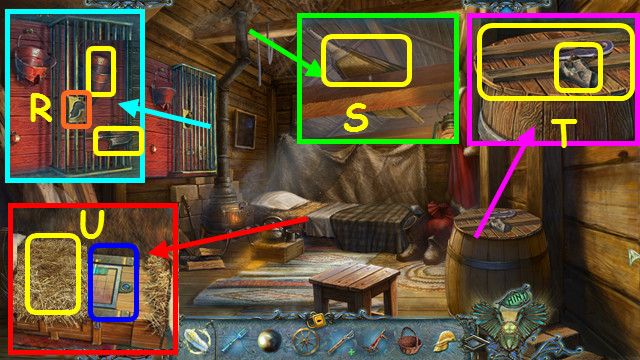
- Remove the glass and take the 1st DREAM CATCHER HALF (Q).
- Take the WEDGE (R).
- Take the RIBBON (S).
- Walk down.
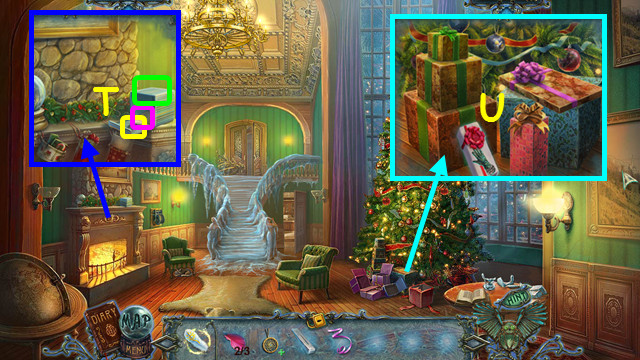
- Place the RIBBON on the box; take the story part and the 2nd DREAM CATCHER HALF (T).
- Combine the 2 DREAM CATCHER HALVES in your inventory to make the DREAM CATCHER.
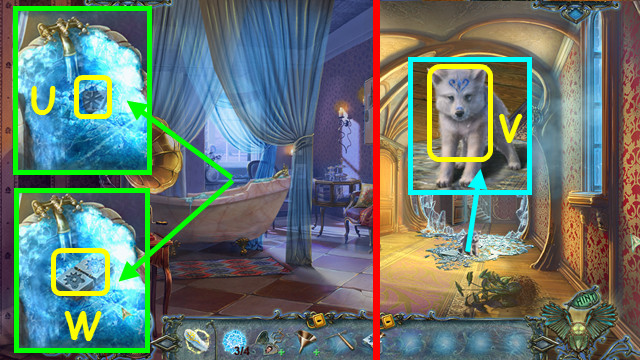
- Touch the gifts, replace them under the tree, and then select the gifts (U).
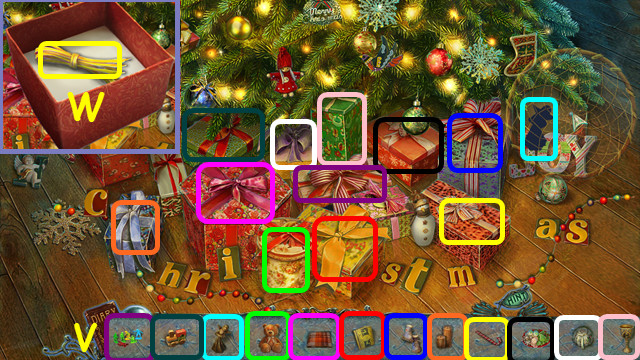
- Use the DREAM CATCHER on the gifts to play the HOP (V).
- Place the items on the matching silhouettes.
- Open the gift and take the BOOT LACES (W).
- Use the MAGIC FEATHER on the BOOT LACES in your inventory to make the ROPE.
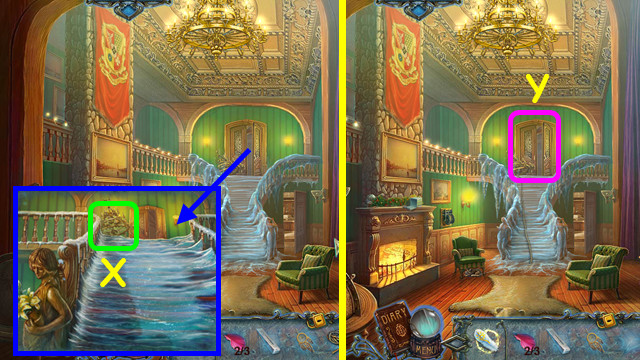
- Use the ROPE on the fallen chandelier (X).
- Go up the stairs (Y).
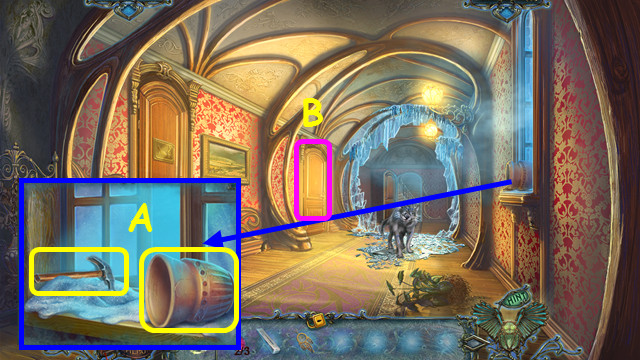
- Take the HAMMER and the POT (A).
- Enter the 2nd door on the left (B).
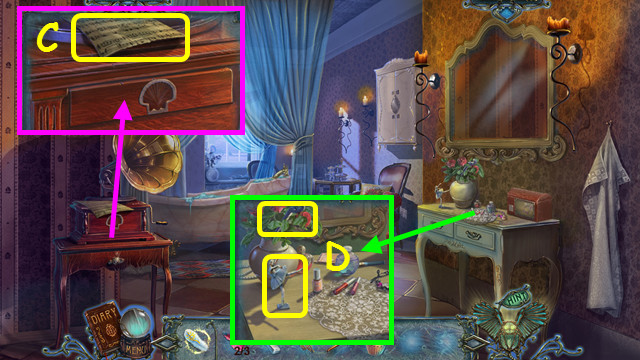
- Take the SHEET MUSIC (C).
- Take the BALLERINA and the 1st TONGS PART (D).
- Walk down 3 times.
- Swap the POT to take the CUP; take the 3/3 PETAL (E).
- Use the WEDGE and the HAMMER to take the KNIFE (F).
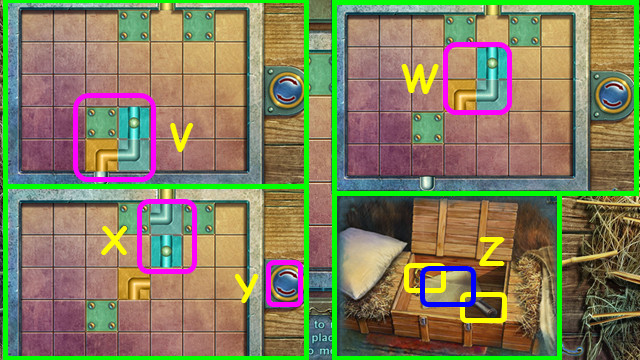
- Walk down and select the mini-game on the crate.
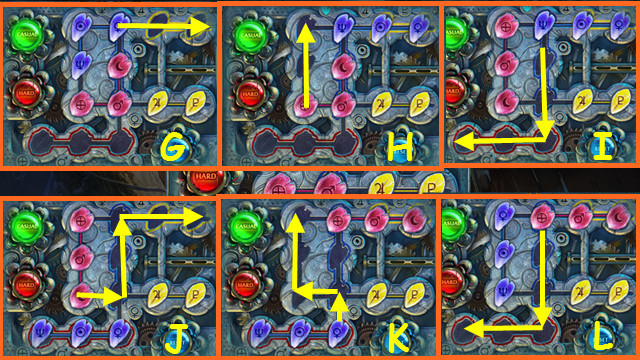
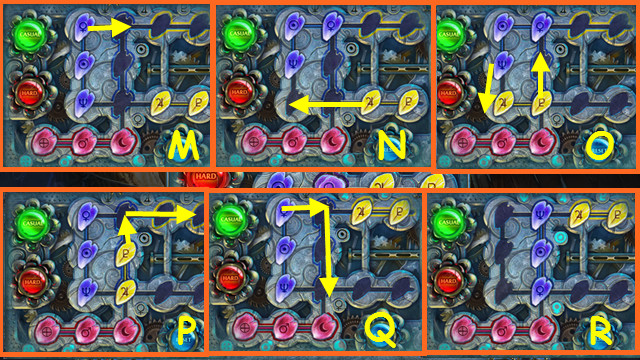
- Place the 3 PETALS into the device.
- Move the chains to petals so the symbols match.
- The casual solution is shown in steps G-R.
- Hard mode is shown in steps 1-12.
- After solving this mini-game in either mode, take the GLASS SLIPPER and the MATCHES.
- Go forward, right, and enter the door under the stairs.
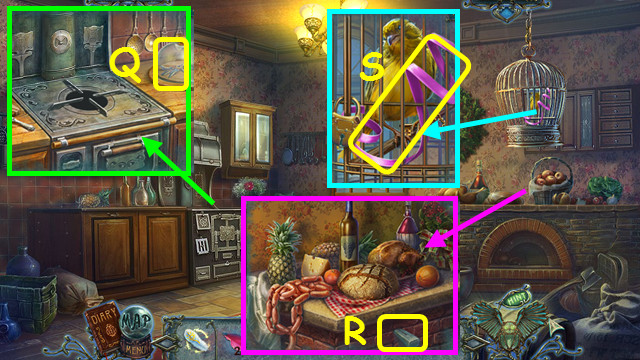
- Use the MATCHES to light the stove (A).
- Cut the bread with the KNIFE and take the TREBLE CLEF (B).
- Use the KNIFE to take a SAUSAGE (C).
- Walk down.
- Swap the SAUSAGE for the MOUSE (D).
- Select the gifts under the tree (E).
- Play the HOP (F).
- Open the gift and take the 1/4 SNOWFLAKE (G).
- Walk up the stairs.
- Use the CUP on the sill to get the CUP OF SNOW (H).
- Place the MOUSE in the hole to get the CANARY FOOD (I).
- Place the TREBLE CLEF and the GLASS SLIPPER in the door (J).
- Walk left.
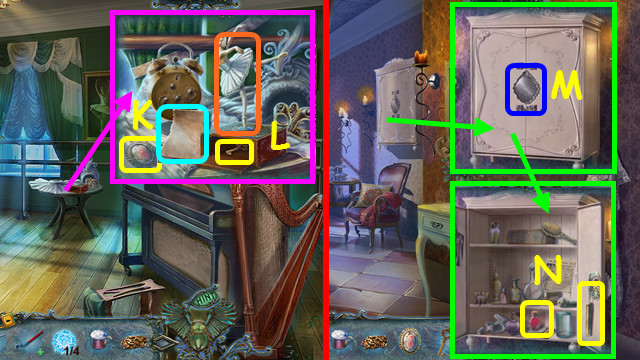
- Take the story piece and the BROOCH (K).
- Place the BALLERINA on the box; take the CAGE KEY (L).
- Walk down and enter the 2nd door on the left.
- Use the BROOCH on the cabinet doors (M).
- Take the LATCH and the ALCOHOL (N).
- Walk down twice and enter the door under the stairs.
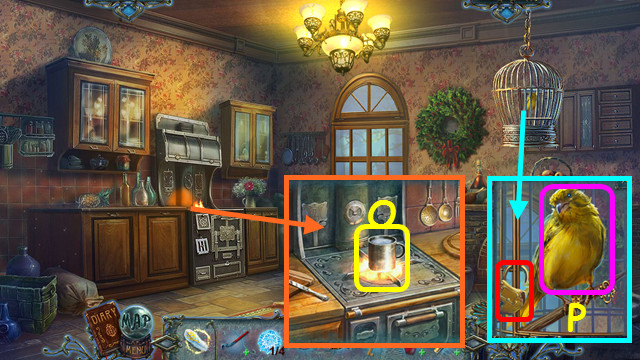
- Place the CUP OF SNOW on the burner; take the CUP OF HOT WATER (O).
- Use the CAGE KEY on the lock and select the bird (P).
- Place the CANARY FOOD in the dish (Q).
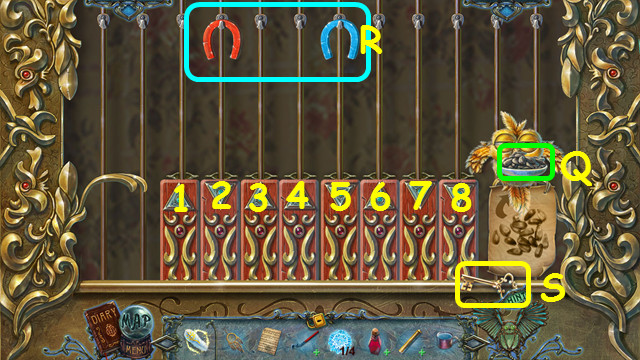
- Move all the bars to the same height.
- Press the buttons 8, 8, 8, 1, 7, 5, 6, 4, 5, 2, 1, 7, and 6; you can use this solution at any time.
- There will be two bars out of position; move the magnets to the positions shown (R) only after you have used the sequence.
- Another solution that does not use the magnets is 8, 8, 8, 2, 5, 5, 6, 1, and 7.
- Take the PIANO KEY (S).
- Walk down, go up the stairs, and enter the left door.
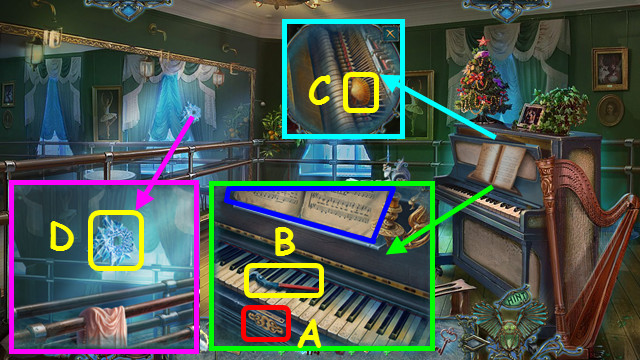
- Use the PIANO KEY on the lock (A).
- Take the 2nd TONGS PART and place the SHEET MUSIC on the stand (B).
- Combine the 2 TONGS PARTS in your inventory to make the TONGS.
- Take the SHELL (C).
- Use the CUP OF HOT WATER to take the 2/4 SNOWFLAKE (D).
- Select the hole in the mirror.
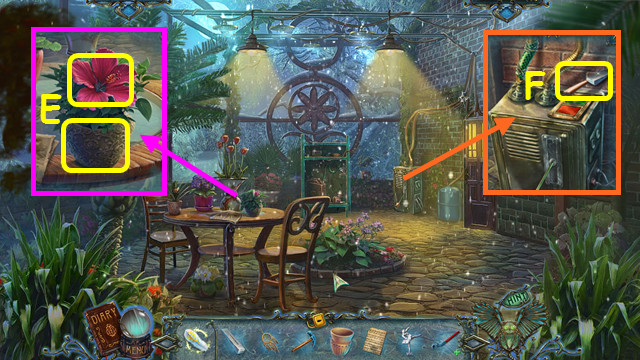
- Play the HOP to earn the BELLOWS (E).
- Locate and use the items in numerical order (1-10).
- Walk down and enter the 2nd door on the left.
- Place the SHELL on the drawer and take the COTTON SWAB (F).
- Combine the ALCOHOL and the COTTON SWAB in your inventory to make the COTTON SWAB WITH ALCOHOL.
- Use the MAGIC FEATHER on the COTTON SWAB WITH ALCOHOL to make the ALCOHOL-SOAKED TORCH.
- Walk down twice and enter the door under the stairs.
- Use the BELLOWS on the stove, and then use the ALCOHOL-SOAKED TORCH to make the BURNING TORCH (G).
- Walk down and go up the stairs.
- Use the BURNING TORCH on the beast (H).
- Walk forward.
- Remove the drape; use the TONGS to take the LEAF EMBLEM, and take the WINDING KEY (I).
- Take JOHN’S MEDALLION and note the snowflake mini-game (J).
- Walk down and enter the 2nd door on the left.
- Place the LEAF EMBLEM on the box and take the FIRE EMBLEM (K).
- Walk down, enter the left room, and select the hole in the mirror.
- Use the DREAMCATCHER on the scene.
- Play the HOP to earn the 3/4 SNOWFLAKE (P).
- Locate and use the items in numerical order (1-11).
- Use the WINDING KEY on the clock; take the SPRING (Q).
- Combine the LATCH and the SPRING to make the SPRING LATCH.
- Walk down and go forward.
- Place the FIRE EMBLEM on the lantern and take the FUNNEL (R).
- Use the SPRING LATCH on the lock (S).
- Open the chest; take the PICKAXE and the MOLD TOP (T).
- Walk down and enter the 2nd door on the left.
- Use the PICKAXE to take the MOLD BOTTOM (U).
- Combine the MOLD TOP and the MOLD BOTTOM to make the MOLD.
- Combine the FUNNEL and the MOLD to make the FUNNELED MOLD.
- Walk down.
- Use the FUNNELED MOLD on the puppy to get the MOLD WITH WATER (V).
- Enter the 2nd door on the left.
- Place the MOLD WITH WATER in the tub; open the mold and take the 4/4 SNOWFLAKE (W).
- Walk down and forward; select the snowflake mini-game.
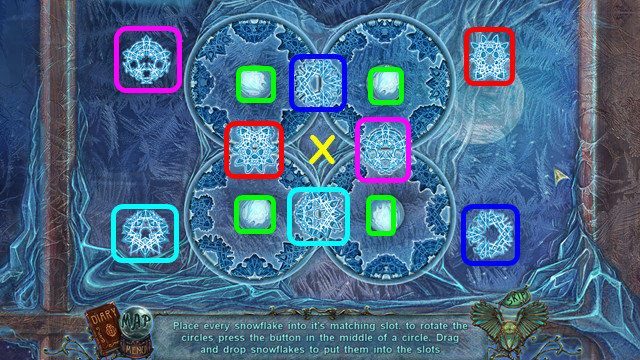
- Place the 4 SNOWFLAKES on the board (X).
- Rotate the 4 dials (green) and place the snowflakes in the 4 openings.
- The snowflakes will rotate into the spot if the 2 halves match.
- Enter the portal.
Chapter 3: The Train Station
- Enter the tree and select the photo album.
- Select a path through the photos (A) using the number of women and men noted (B).
- You earn the PHOTO.
- Combine the PHOTO and JOHN’S MEDALLION to make the MEDALLION.
- Walk down, right, and go forward.
- Talk to the ghost (C).
- Place the MEDALLION in the indentation (D).
- Enter the portal.
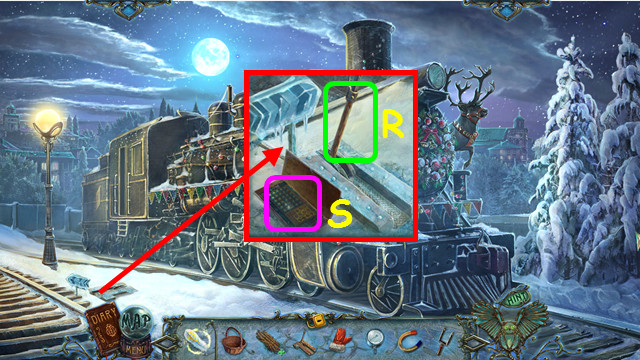
- Take the SHARPENER (E).
- Pull the clapper (F).
- Take the CROWBAR (G).
- Use the CROWBAR on the planks (H).
- Take the story piece and the BLUNT KNIFE (I).
- Combine the BLUNT KNIFE with the SHARPENER to make the SHARP KNIFE.
- Use the SHARP KNIFE to take the ROPE (J).
- Use the ROPE on the trapdoor (K).
- Pull the lever (L).
- Enter the trapdoor.
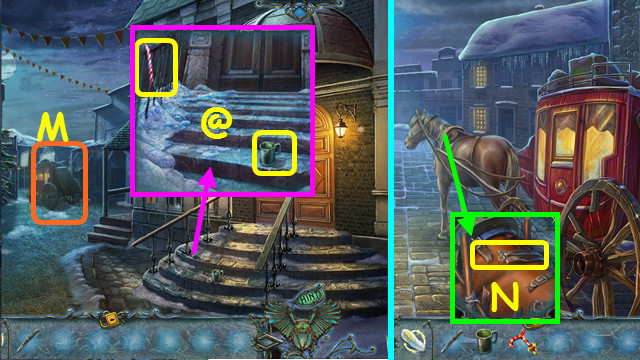
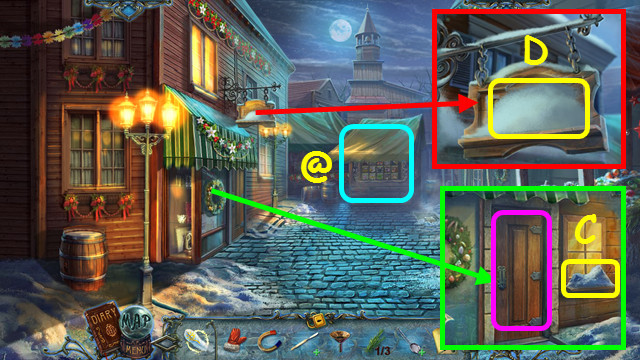
- Take the CUP and the CANDY CANE (@).
- Use the MAGIC FEATHER on the CANDY CANE to make the CANDY WALKING STICK.
- Select the carriage (M).
- Use the SHARP KNIFE to take the BELT (N).
- Walk down twice.
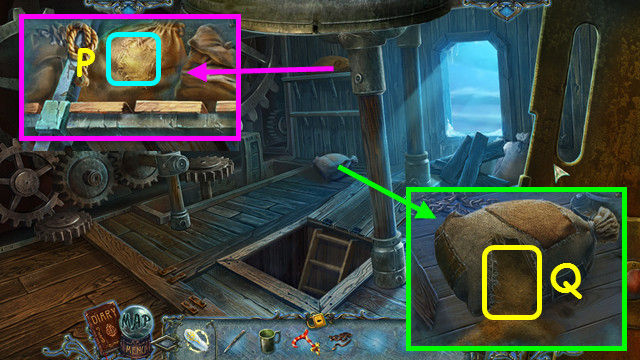
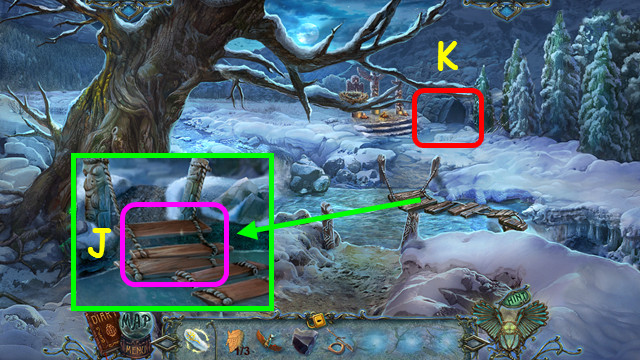
- Use the CANDY WALKING STICK to knock down the sack (P).
- Use the SHARP KNIFE to cut open the bag; use the CUP to take a CUP OF SAND (Q).
- Enter the trapdoor.

- Use the CUP OF SAND on the stairs (R).
- Enter the door (S).
- Talk to John (T).
- Take the BROOM (U).
- Take the SCREWDRIVER (W).
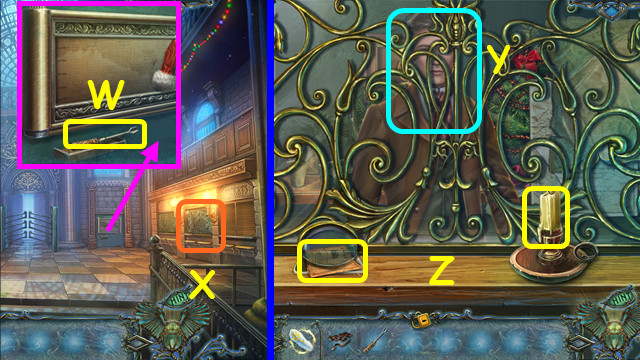
- Select the ticket window (X).
- Talk to John (Y).
- Take the TICKET and the CANDLE (Z).
- Select the Christmas tree.
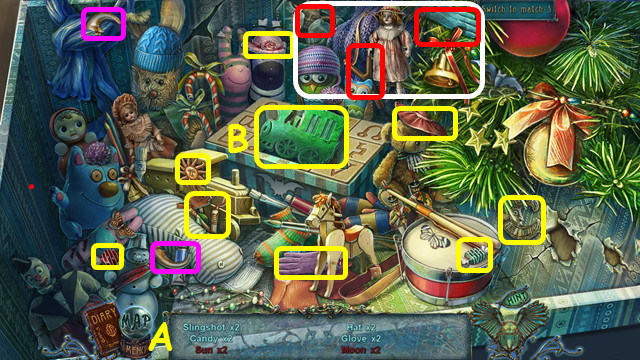
- Play the HOP (A).
- Take the TRAIN EMBLEM (B).
- Walk down.
- Use the BROOM on the snow; take the WRENCH and the FORK (C).
- Enter the station on the right.
- Place the TICKET in the slot (D).
- Use the WRENCH on the bolts, open the cover, remove the old belt, and place the BELT inside (E).
- Walk forward.
- Use the SCREWDRIVER on the panel and take the STEEL BALL (F).
- Take the METAL HOOK (G).
- Move the handkerchief and take the PRAM WHEEL (H).
- Use the MAGIC FEATHER on the PRAM WHEEL to make the 1st CARRIAGE WHEEL.
- Go forward to the train (I).

- Pull the lever twice (J); take the HANDLE and the COAL CAR EMBLEM (K).
- Take the BRIDLE (L).
- Take the BASKET (M).
- Pull the chain (N); take the FIRE SYMBOL and the CHAIN (O).
- Combine the METAL HOOK and the CHAIN to make the GRAPPLE.
- Walk down.
- Note the woman on the tracks (P).
- Place the COAL CAR SYMBOL and the TRAIN EMBLEM on the door (Q); walk forward.
- Place the FIRE SYMBOL in the lock; take the SHOVEL BLADE and the BUCKET (R).
- Combine the SHOVEL BLADE and the HANDLE to make the SHOVEL.
- Use the GRAPPLE to take the BELLOWS (S).
- Take the FIRE STRIKER and the BARREL LID (T).
- Move the blanket, take the HAY, and select the mini-game (U).
- Place the STEEL BALL on the grid.
- Move the 3 tiles and rotate gravity to move the ball to the upper tube.
- Move the tiles as shown in the steps V, W, and X.
- Press the button 4 times (Y).
- Take the story piece, the TRAIN KEY, and the POSTER HANDLE (Z).
- Walk down twice and select the Christmas tree.
- Play the HOP (A).
- Take the TOY SWITCH (B).
- Use the MAGIC FEATHER on the TOY SWITCH to make the SWITCH.
- Place the POSTER HANDLE on the device and pull the handle (C).
- Take the MITTEN (D).
- Walk forward, and go to the train.
- Place the TRAIN KEY in the lock; use the MITTEN on the key and walk forward (E).
- Take the TONGS and the DRILL (F).
- Use the DRILL on the BARREL LID to make the 2nd CARRIAGE WHEEL.
- Place the BUCKET on the coal, use the SHOVEL on the bucket, and then take the BUCKET OF COAL (G).
- Take the EMPTY OILCAN (H).
- Take the HAMMER (I).
- Open the cover and use the BUCKET OF COAL and the FIRE STRIKER, followed by the BELLOWS on the opening (J).
- Walk down 4 times.
- Use the CANDLE on the glass, followed by the HAMMER (K).
- Take the PRESSURE GAUGE (L).
- Walk forward to the carriage.
- Use the 1st CARRIAGE WHEEL on the rear broken one and the 2nd CARRIAGE WHEEL on the front broken one (M).
- Place the BRIDLE on the horse (N).
- Walk down, right, forward, and forward again to the cabin and go inside.
- Use the TONGS to take the MAGNET (O).
- Use the EMPTY OILCAN on the barrel to get the FULL OILCAN (P).
- Walk down.
- Use the FULL OILCAN to take the SWITCH (Q).
- Walk to the train.
- Replace the SWITCH (R).
- Select the mini-game (S).
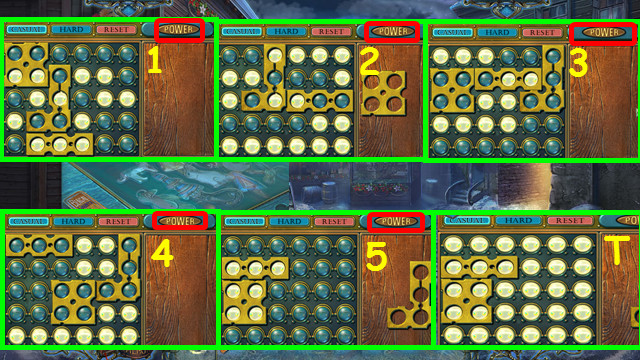
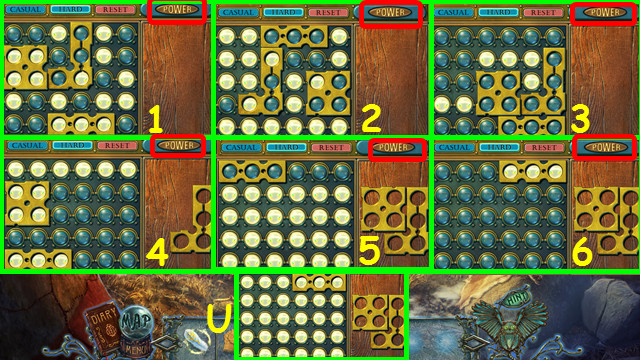
- Use the plates and the power switch (red) to turn all the lights on.
- Place the plates as shown in each step, and then push the power button.
- The casual solution (T) requires 5 steps (1-5).
- The hard solution (U) has 6 steps (1-6).
- Enter the train.
Chapter 4: Saving Margaret
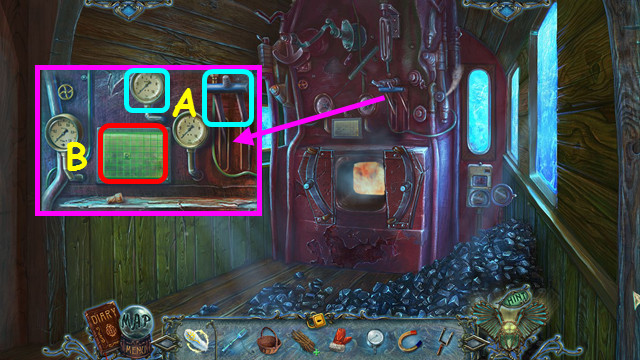
- Place the PRESSURE GAUGE on the left and the SWITCH on the right (A).
- Select the mini-game (B).
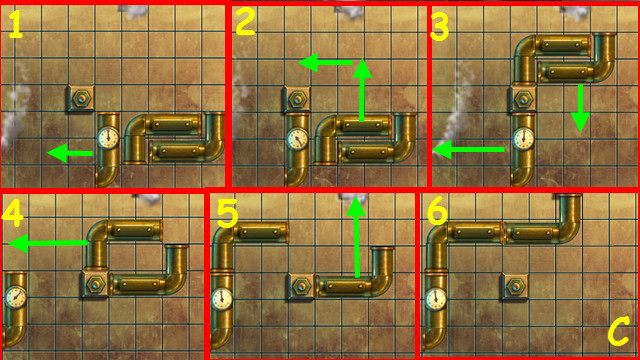
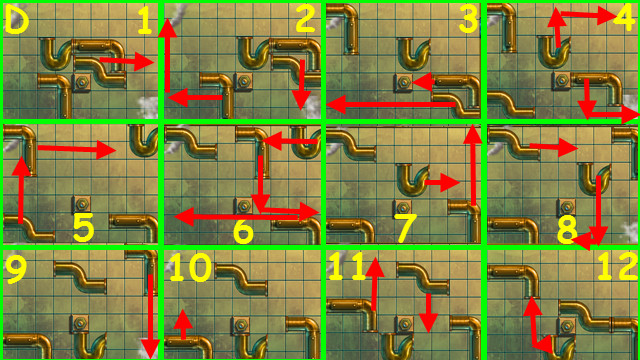
- Slide the pipes to connect the steam outlets.
- The casual level solution is (C).
- The hard level solution is (D).
- Pull the lever (E).
- Walk down. After the cut-scene, walk down twice.
- Talk to John and take the CARRIAGE KEY (F).
- Exit the close-up, walk down, and go forward to the carriage.

- Use the CARRIAGE KEY on the lock (G).
- Take the TORN WINESKIN and the BLANKET (H).
- Take the SCALPEL and the SPOON (I).
- Walk down and right.
- Place the FORK and the SPOON in the lock (J).
- Enter the dining room (K).
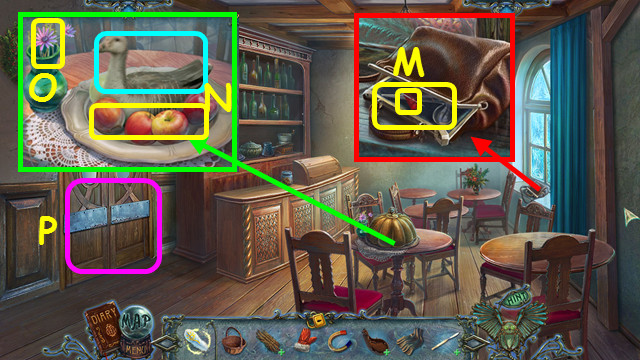
- Open the drapes and purse; take the THREAD and the FUNNEL (M).
- Use the THREAD on the TORN WINESKIN to make the WINESKIN.
- Remove the tray cover, try to take the goose, and then use the BASKET to take the APPLES (N).
- Take the 1/3 HERBS (O).
- Select the kitchen door (P).
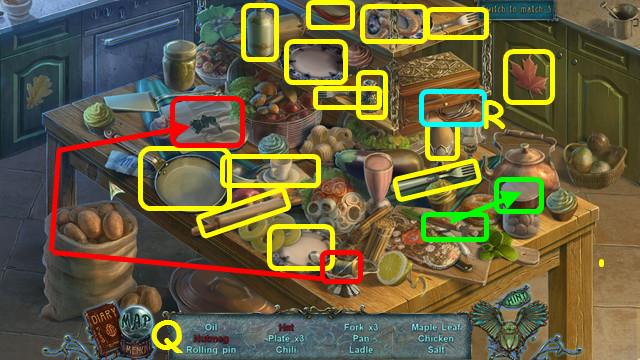
- Play the HOP (Q).
- Take the WIRE (R).
- Combine the WIRE and he HAY to make the HAY TORCH.
- Take the TEA STRAINER (S).
- Place the WINESKIN on the red tap and pull the lever; take the HOT WATER BOTTLE (T).
- Walk down, forward, and enter the cabin.
- Use the HAY TORCH on the barrel to get the OILED TORCH (U).
- Open the grate and use the OILED TORCH on the coals to get the BURNING TORCH (V).
- Walk down and select the woman on the tracks.
- Place the HOT WATER BOTTLE and the BLANKET on the Margaret (W).
- Walk down twice.
- Talk to John and take the PRESCRIPTION (X).
- Walk down and go forward to the carriage.
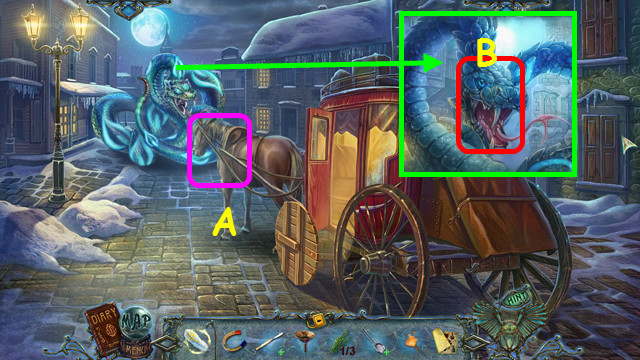
- Give the APPLES to the horse (A).
- Use the BURNING TORCH on the beast (B).
- Walk forward.
- Note the Pharmacy door and use the MITTEN on the snow to make SNOWBALLS (C).
- Use the SNOWBALLS on the sign to get the TAROT CARD (D).
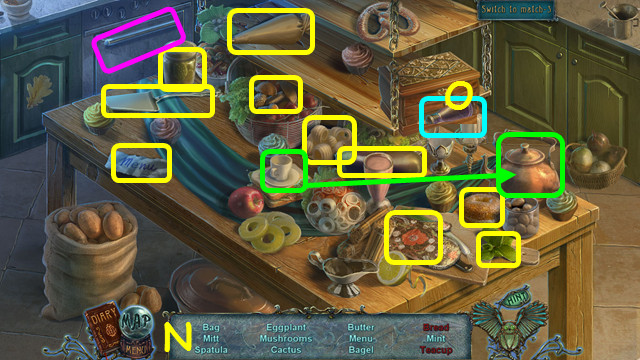
- Note the stall mini-game (@).
- Take the story part and the SPADE (E).
- Take the 2/3 HERBS, the 3/3 HERBS, and the 1/2 BUTTON (F).
- Walk down, right, forward, and forward again into the cabin.
- Use the SPADE on the coals to get the SHOVEL OF EMBERS (G).
- Walk down 3 times and go forward twice.
- Use the SHOVEL OF EMBERS on the snow (H).
- Use the MAGNET to take the PHARMACY KEY (I).
- Use the PHARMACY KEY on the Pharmacy door and go inside.
- Take the BROKEN STETHOSCOPE (J).
- Use the TAROT CARD on the cabinet doors (K).
- Note the lab inside the cabinet.
- Walk down.
- Use the BROKEN STETHOSCOPE to take the OPENER (L).
- Walk down, right, and left.
- Use the OPENER on the jar; take the 2/2 BUTTON and the 1/2 CHIP (M).
- Select the kitchen door.
- Play the HOP (N).
- Take the BEAKER (O).
- Walk down twice, go forward twice, and go left to the pharmacy.
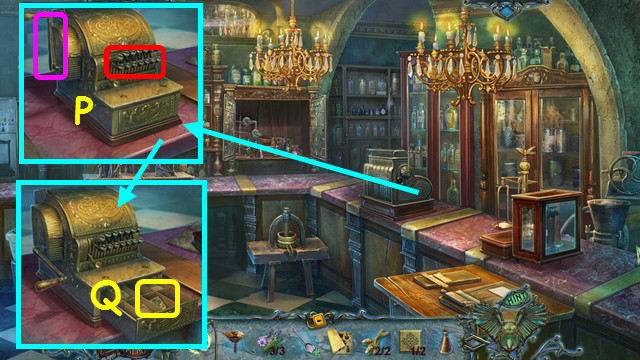
- Place the 2 BUTTONS on the register and pull the handle (P).
- Take the 2/2 CHIP (Q).
- Walk down and select the stall mini-game.
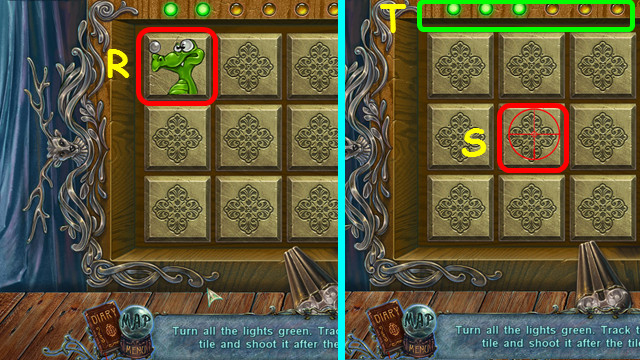
- Note the animal card when it turns over (R), track it as it shuffles, and then shoot the card once it stops (S).
- You will have 10 targets to shoot (T).
- This mini-game is randomly generated; your solution may vary.
- Take the OVERSTUFFED TEDDY BEAR.
- Combine the SCALPEL and the OVERSTUFFED TEDDY BEAR to get the COTTON.
- Combine the TEA STRAINER and the COTTON to make the FILTER.
- Walk left and select the lab in the cabinet.
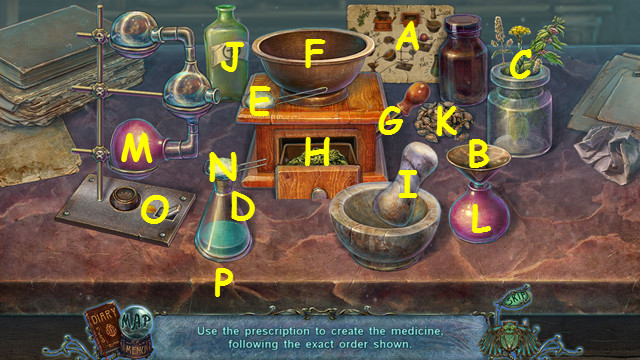
- Place the PRESCRIPTION (A), FUNNEL (B), the 3 HERBS(C), the BEAKER (D), and the FILTER (E) on the table.
- Read the recipe to learn the correct sequence.
- Place the herbs in the grinder bowl (F) and pull the lever (G).
- Take the ground herbs from the drawer (H), place them in the mortar and use the pestle (I).
- Place the liquid (J) and the seeds (K) in the mortar and use the pestle again.
- Pour the contents of the mortar into the purple bottle (L).
- Place the purple bottle on the stand (M).
- Place the filter on the clear bottle (N) and flip the switch (O).
- Take the HEART MEDICINE (P).
- Walk down twice, go right, forward, and select the woman on the tracks.
- Use the HEART MEDICINE on Margaret (Q).
- Enter the portal (R).
Chapter 5: Tribal Grounds
- Enter the tree and select the photo album.
- Select a path through the photos (A) using the number of women and men noted (B).
- You earn the PORTRAIT.
- Give the PORTRAIT to Koturi (C).
- Enter the portal (D).
- Take the 1/3 GOWN PIECE and the BRANCH (E).
- Note the gown mini-game (F).
- Walk on the left path (G).
- Take the STONE (H).
- Use the BRANCH to take SHEENAH’S MEDALLION (I).
- Walk down.
- Take the story; use SHEENAH’S MEDALLION on the lock (J).
- Pull out the laces; select the ends of the lace several times (K).
- Select the teepee opening (L).
- Play the HOP to earn the TOMAHAWK HANDLE (M).
- Walk to the left.
- Place the TOMAHAWK HANDLE in the blade and use the STONE to take the TOMAHAWK (N).
- Walk down.
- Use the TOMAHAWK to clear the path (O).
- Walk forward.
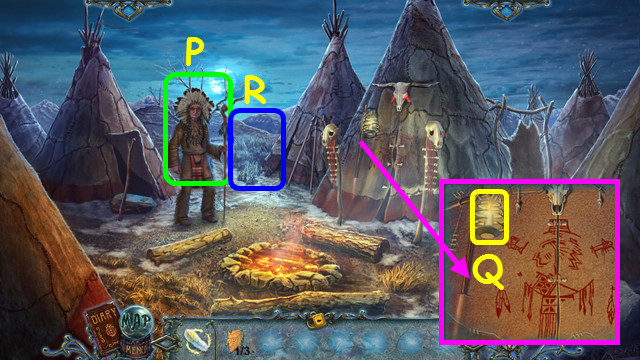
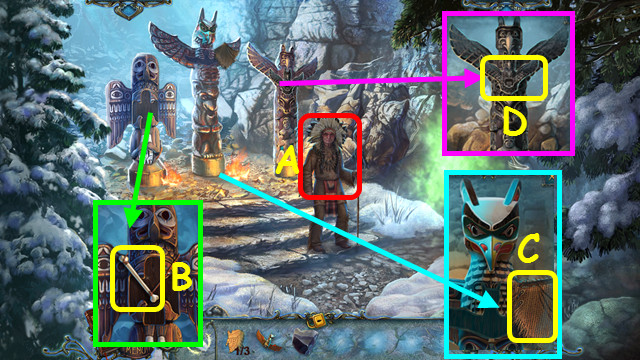
- Talk to the Shaman (P).
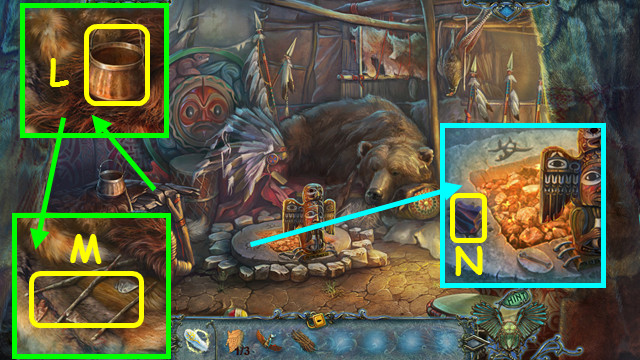
- Take the BONE LAMP (Q).
- Walk forward (R).

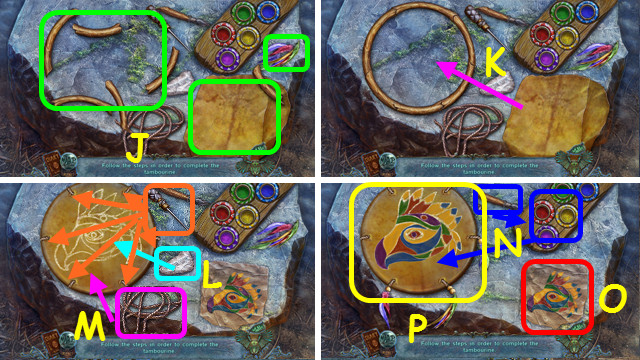
- Take the FISH BONE and the FIFE (S).
- Note the net mini-game (T).
- Select the canoe (U).
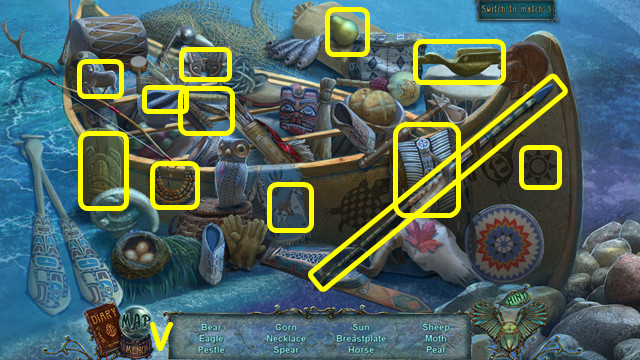
- Play the HOP to earn the MORTAR AND PESTLE (V).
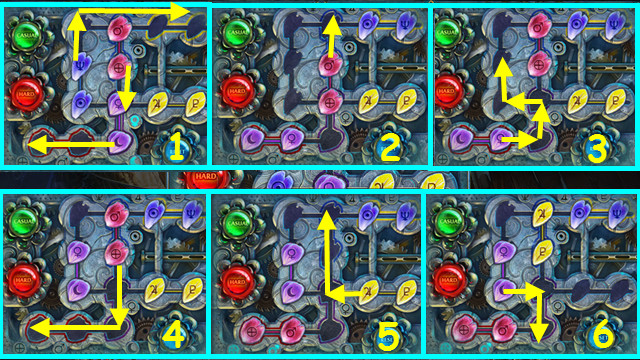
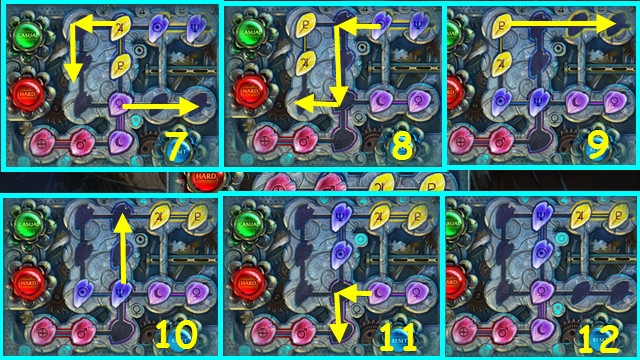
- Select the net mini-game.
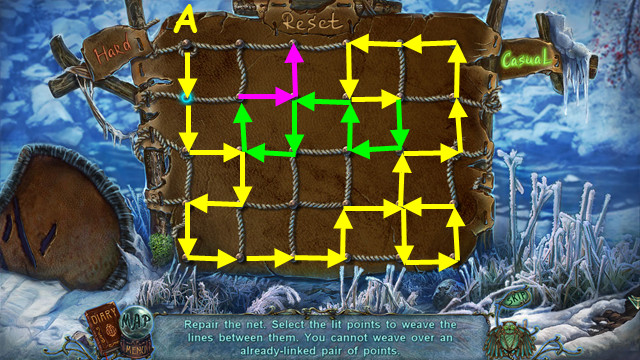
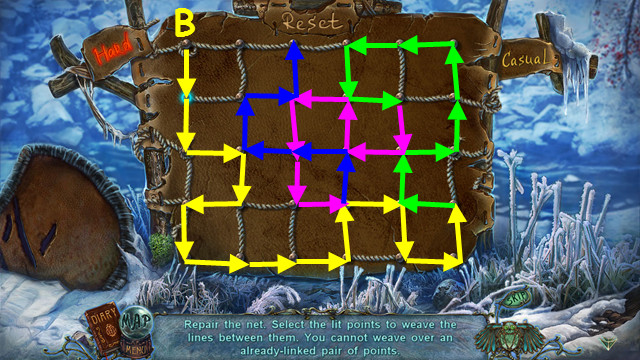
- Place the FISH BONE on the net.
- Select a lighted point to string the entire net without retracing a line.
- For the casual level (A), follow the arrows from yellow, to green, and to pink.
- For the hard level (B), follow the arrows from yellow, to green, to pink, and to blue.
- Take the NET.
- Walk down twice.
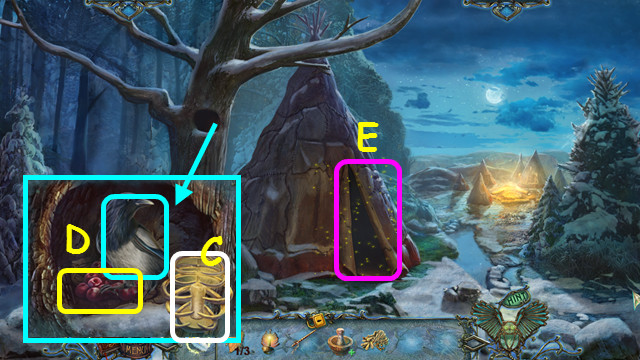
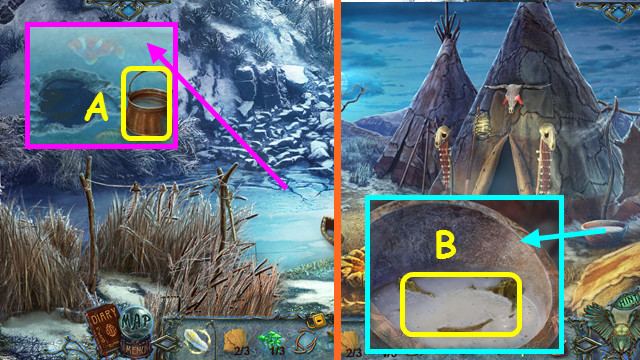
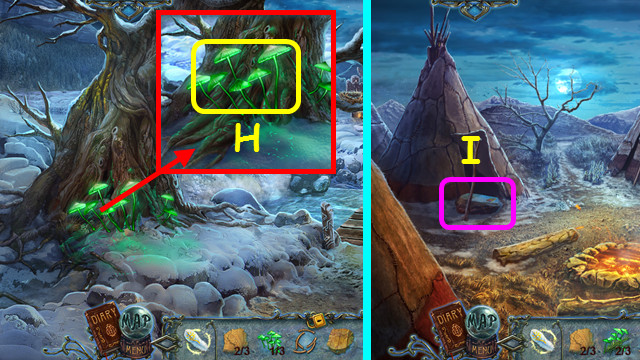
- Use the BONE LAMP on the dark hole (C).
- Use the FIFE on the magpie; take the BERRIES (D).
- Combine the BERRIES and the MORTAR AND PESTLE to make the MORTAR OF BERRIES.
- Select the teepee (E).
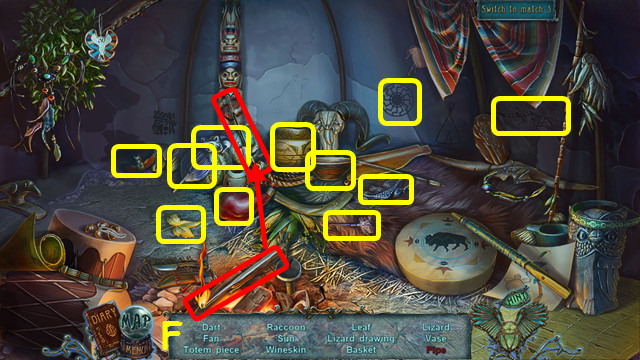
- Play the HOP to earn the TOTEM PIECE (F).
- Walk left.
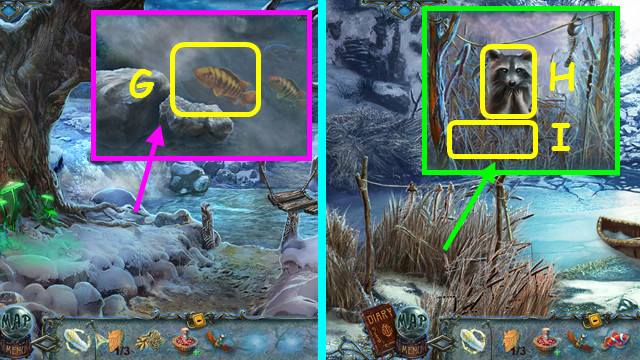
- Use the NET to catch the FISH (G).
- Walk down and go forward twice.
- Use the FISH to take the RACCOON (H).
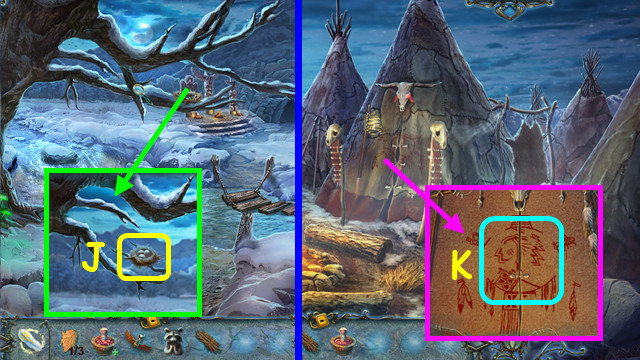
- Move the grass and take the TINDER (I).
- Walk down twice and go left.
- Use the RACCOON to take the EGGS (J).
- Combine the EGGS and the MORTAR OF BERRIES to make the RED PAINT.
- Walk down and forward.
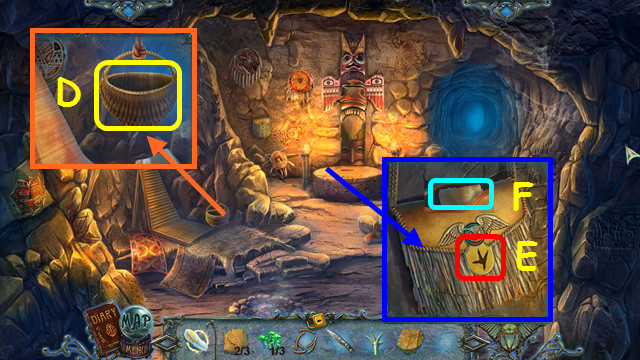
- Use the PAINT on the teepee door; go inside the teepee (K).
- Take the POT (L).
- Move the fur and take the ARROWS (M).
- Take the FLINTSTONE (N).
- Walk down twice and go left.
Chapter 6: Saving Sheenah
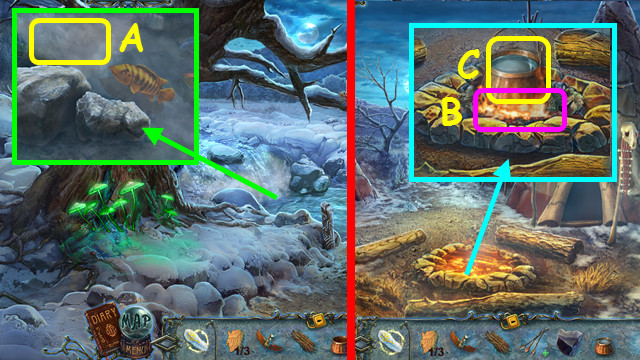
- Use the POT on the stream to get the POT OF WATER (A).
- Walk down and forward.
- Place the TINDER in the fire pit and use the FLINTSTONE on the tinder (B).
- Place the POT OF WATER on the flames; take the BOILING WATER (C).
- Walk forward.
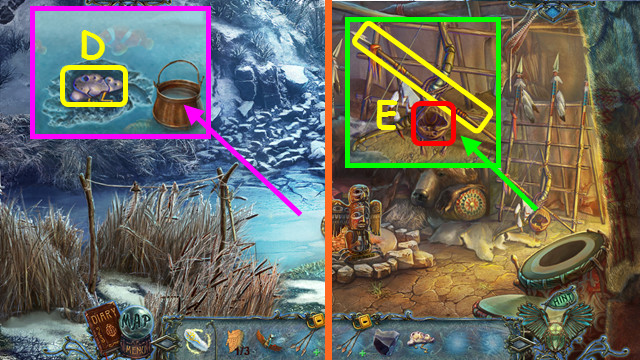
- Use the BOILING WATER on the ice and take the MEDALLION (D).
- Walk down and enter the teepee.
- Use the MEDALLION on the lock; take the SPEAR (E).
- Walk down and forward.

- Use the SPEAR on the hole to catch a FISH (F).
- Walk down twice and go left.
- Use the FISH to take the RACCOON (G).
- Walk down, and then go forward twice.
- Use the RACCOON to take the FEATHERS (H).
- Combine the ARROWS and the FEATHERS to make the ARROWS.
- Use the MAGIC FEATHER on the ARROWS to make the LANCE.
- Select the canoe.
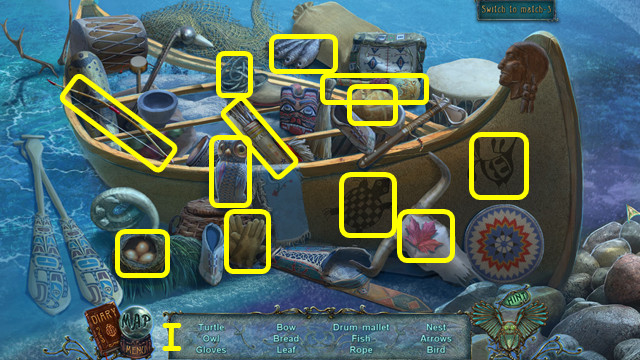
- Play the HOP to earn the ROPE (I).
- Combine the ROPE and the LANCE to make the LANCE WITH ROPE.
- Walk down twice and go left.
- Use the LANCE WITH ROPE on the bridge (J).
- Walk forward (K).
- Talk to the Shaman (A).
- Take the BONE SYMBOL (B).
- Take the 2/3 GOWN PIECE (C).
- Take the UNPAINTED TOTEM (D).

- Take the WINESKIN (E).
- Walk down.
- Use the WINESKIN on the oil to get the FULL WINESKIN (F).
- Walk down, go forward, and enter the teepee.
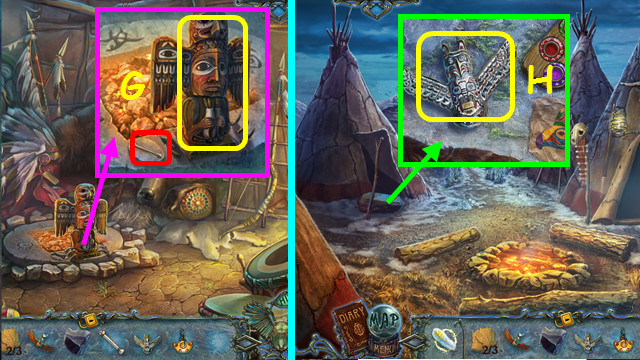
- Place the BONE SYMBOL in the holder and take the 1st TOTEM (G).
- Walk down.
- Place the UNPAINTED TOTEM on the rock to get the 2nd TOTEM (H).
- Walk down, left and forward.
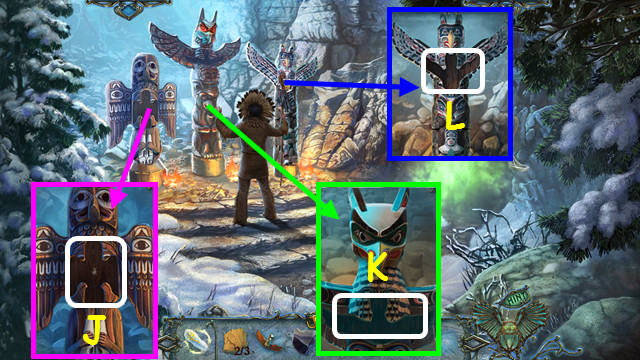
- Place the 1st TOTEM on the left pole (J).
- Place the 2nd TOTEM on the right pole (K).
- Place the TOTEM PIECE on the center pole (L).
- Select the totem poles.
- Complete the totems by moving the pieces (M).
- Swap pieces between poles using the buttons (red).
- Hover over 2 adjacent pieces and select to swap positions.
- Use the FULL WINESACK and then the FLINTSTONE on the cups (N).
- Enter the cave (O).
- Take the PICKAXE (P).
- Walk forward.
- Take the 1/3 HERBS, the FRAME PARTS, and the SCREWDRIVER (Q).
- Talk to SHEENAH (R).
- Walk down.
- Use the SCREWDRIVER to take the SKIN (S).
- Walk down.
- Use the PICKAXE to remove the stone (T).
- Take the OWL FOOT, the LIME, and the KNIFE (U).
- Walk down twice and go forward twice.
- Place the LIME in the bucket; take the BUCKET OF LIME (A).
- Walk down.
- Pour the BUCKET OF LIME in the bowl, followed by the SKIN, and then use the KNIFE to take the TANNED LEATHER (B).
- Use the MAGIC FEATHER on the TANNED LEATHER to make the LEATHER.
- Walk down, go left, and forward twice.
- Use the KNIFE to take the BASKET (D).
- Use the OWL FOOT on the lock (E).
- Take the story and select the bag (F).
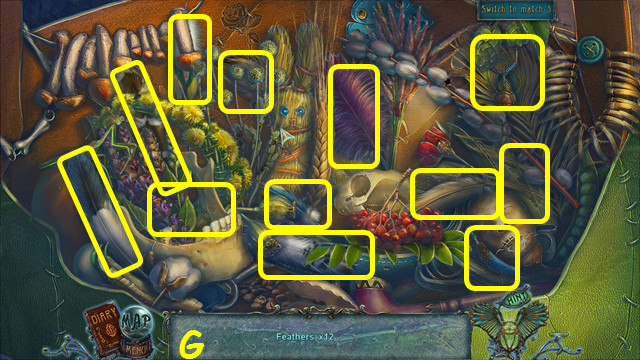
- Play the HOP to earn the FEATHERS (G).
- Walk down twice.
- Use the BASKET on the mushrooms to get the 2/3 HERBS (H).
- Walk down and forward.
- Select the painting rock (I).
- Place, in order, the FEATHERS, the LEATHER, and the FRAME PARTS on the rock (J).
- Form the frame into a circle, and place the leather on the frame (K).
- Use the chalk on the leather to make the outline (L).
- Use the awl to poke 6 holes in the leather (orange), and then add the rope (M).
- Use the paintbrush on the paints (N), select a color, and paint the leather to match the drawing (O).
- Place the feathers on the leather; take the TAMBOURINE (P).
- Walk down, left, go forward twice, and select the bag on the wall.

- Play the HOP (Q).
- You earn the 3/3 HERBS.
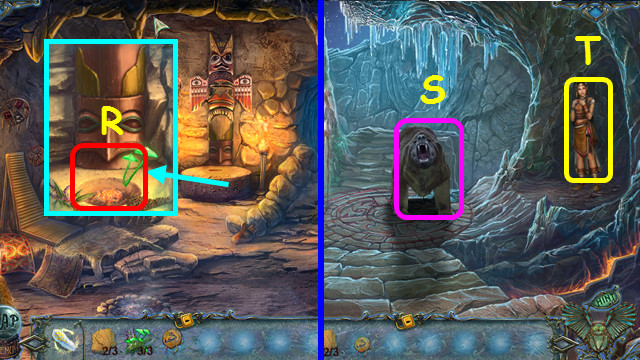
- Place the 3 HERBS on the coals (R).
- Use the TAMBOURINE on the coals to get the MAGIC TAMBOURINE.
- Walk forward.
- Use the MAGIC TAMBOURINE on the bear (S).
- Talk to Sheenah to earn the 3/3 GOWN PIECE (T).
- Walk down 4 times and select the shirt mini-game at the base of the tree.
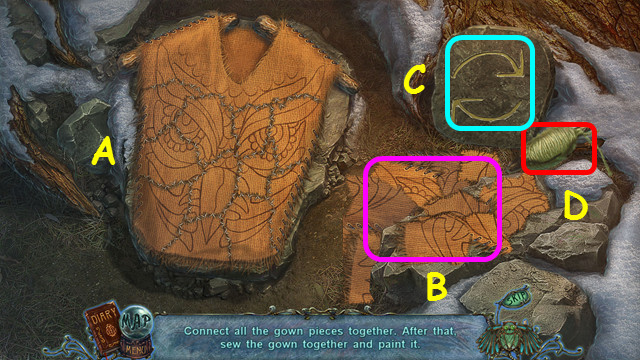
- Place the 3 GOWN PIECES with the other pieces.
- Complete the shirt jigsaw-style (A).
- Take a gown piece from the pile (B), place it on the rock, and select it to rotate the piece (C).
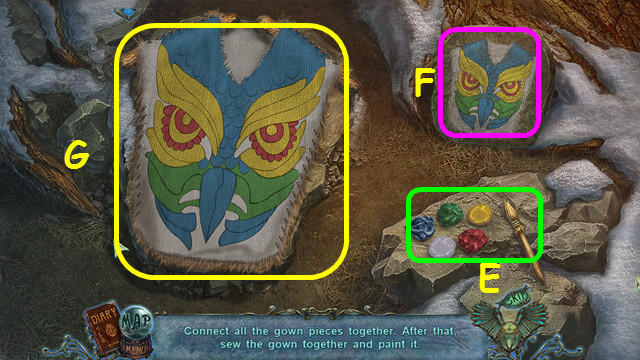
- Use the string to sew up the gown (D).
- Use the paints (E) to color the gown to match the rock (F).
- Select the brush, and then a color; use the brush in the area you want to make that color.
- Take the GOWN (G).
- Walk left and go forward 3 times.
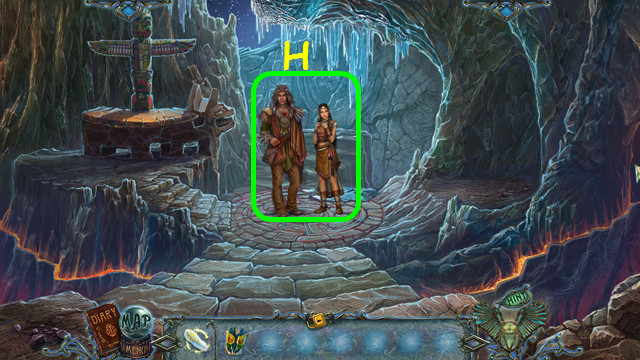
- Give the GOWN to Koturi and Sheenah (H).
- Congratulations on completing Redemption Cemetery: Bitter Frost.
Bonus Chapter: