Follow Me!
Dark Tales: Edgar Allan Poe – The Gold Bug
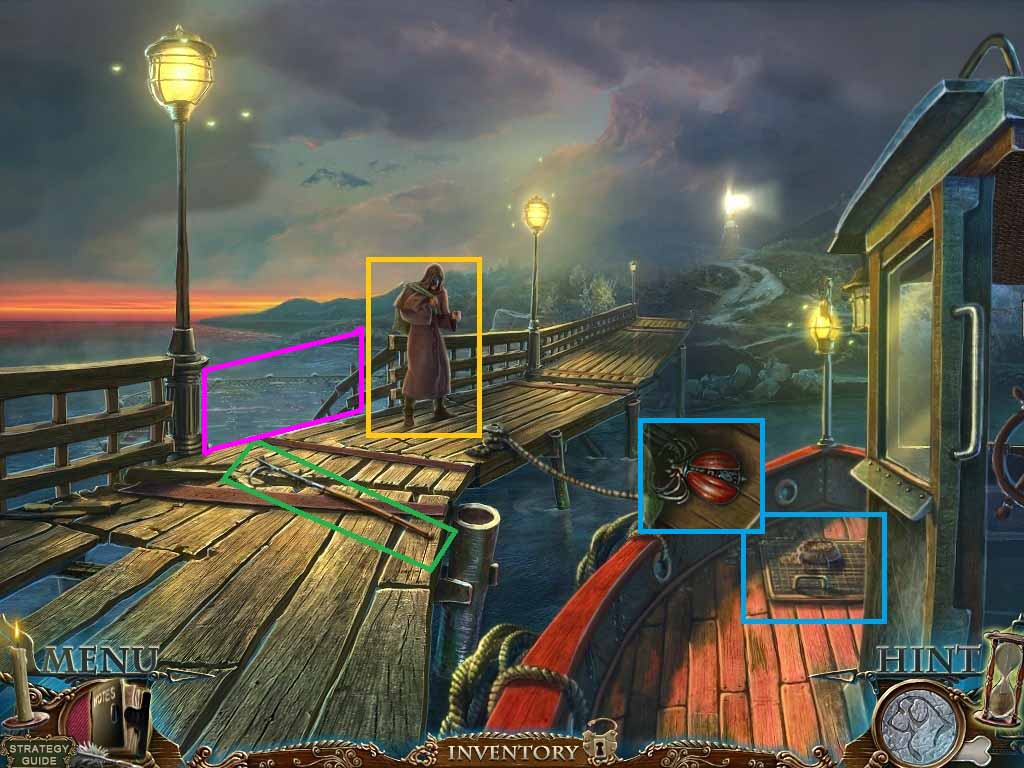
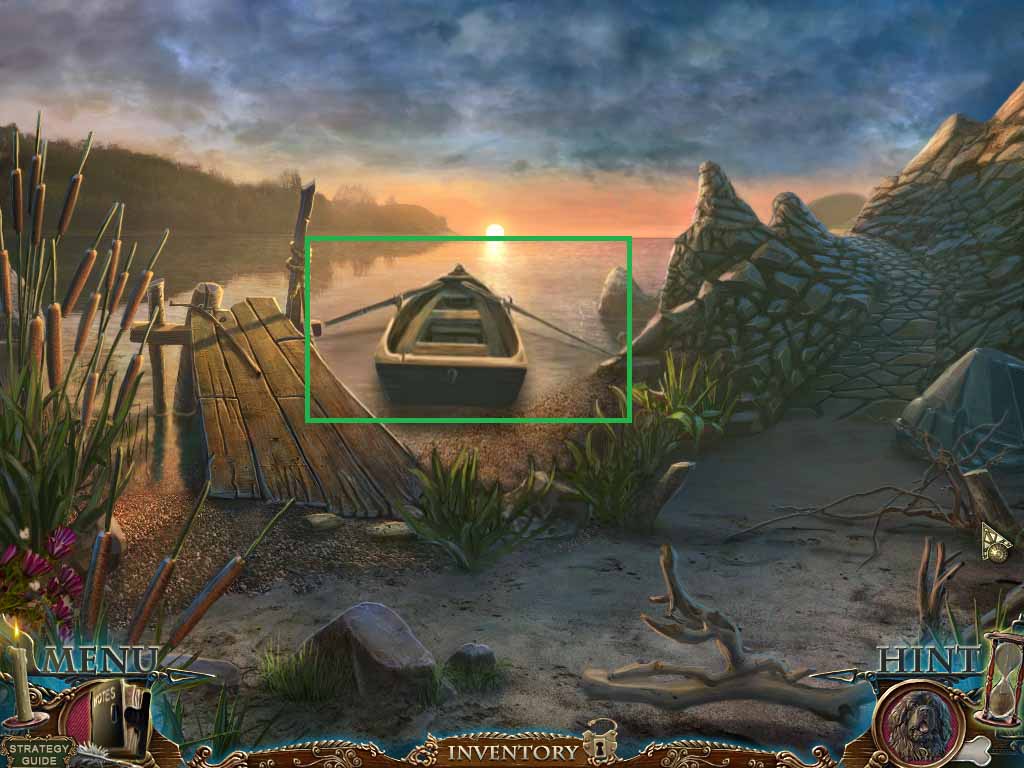
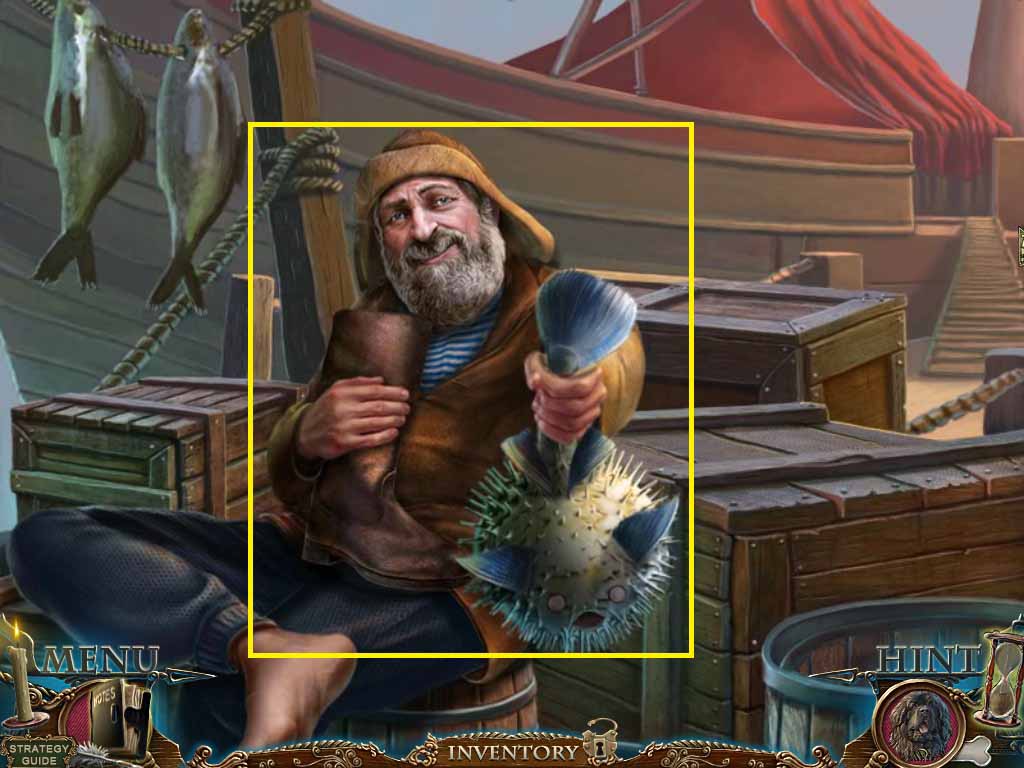
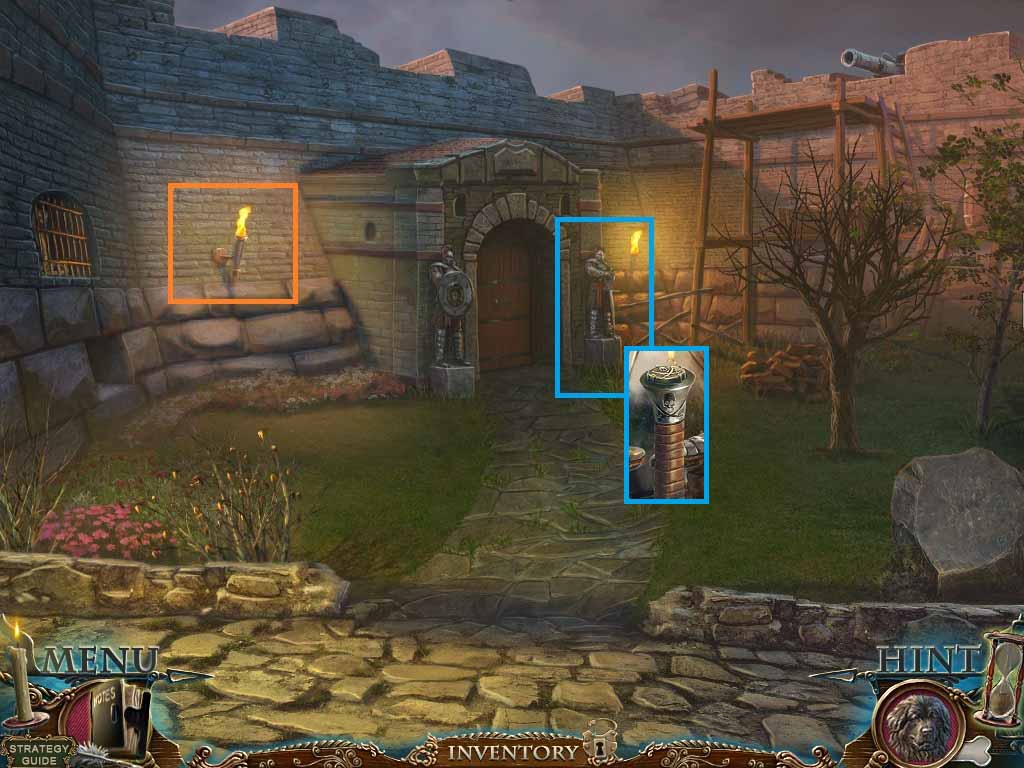
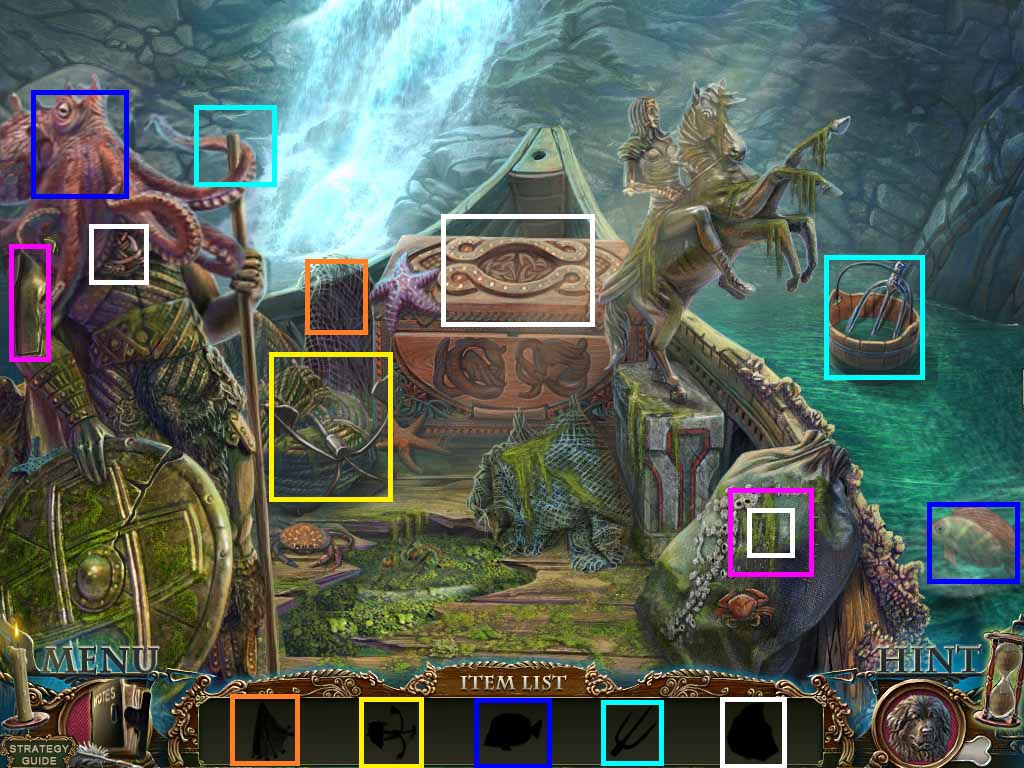
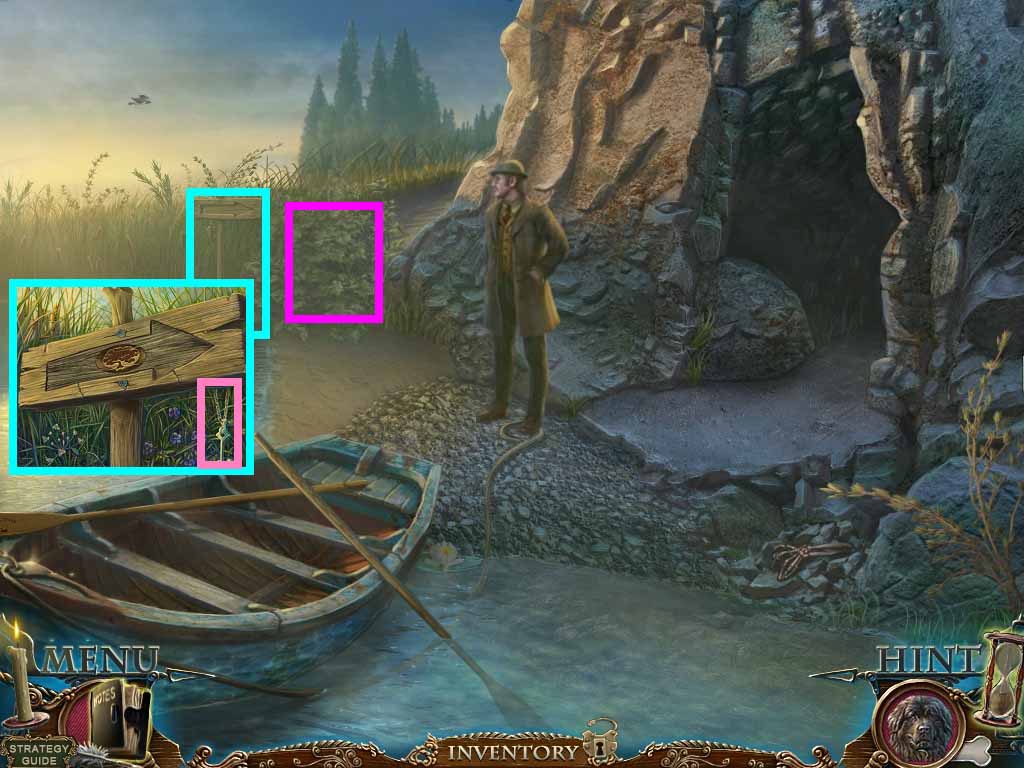
- Click the man on the boat to speak to him.
- Click to speak to the masked man.
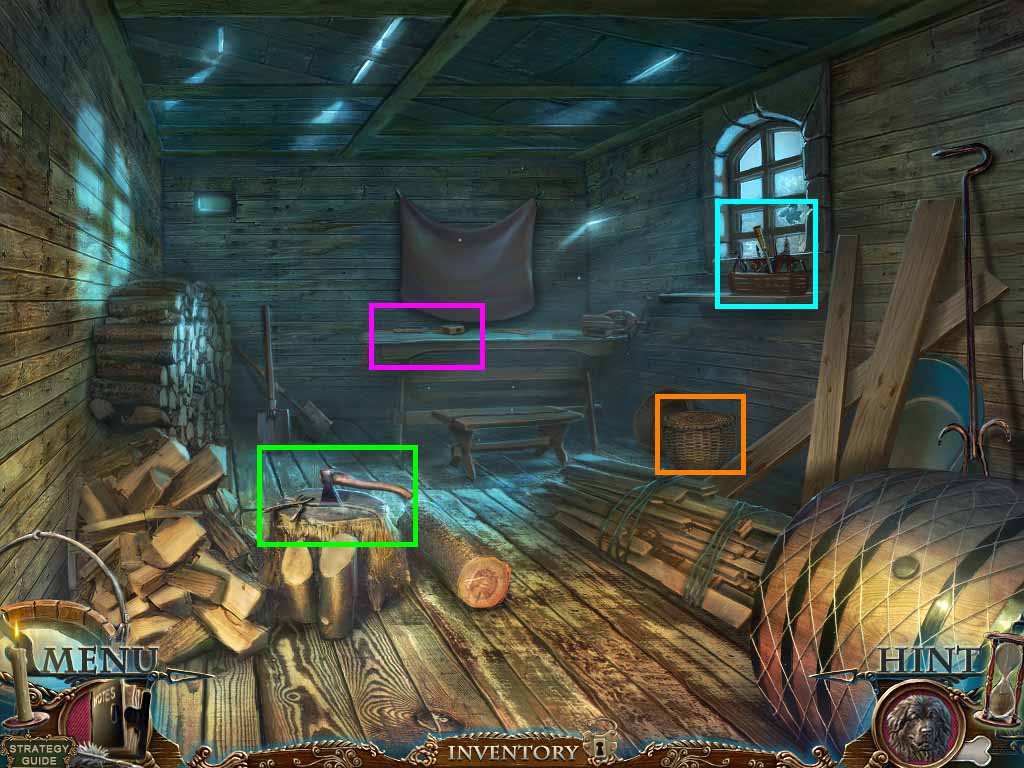
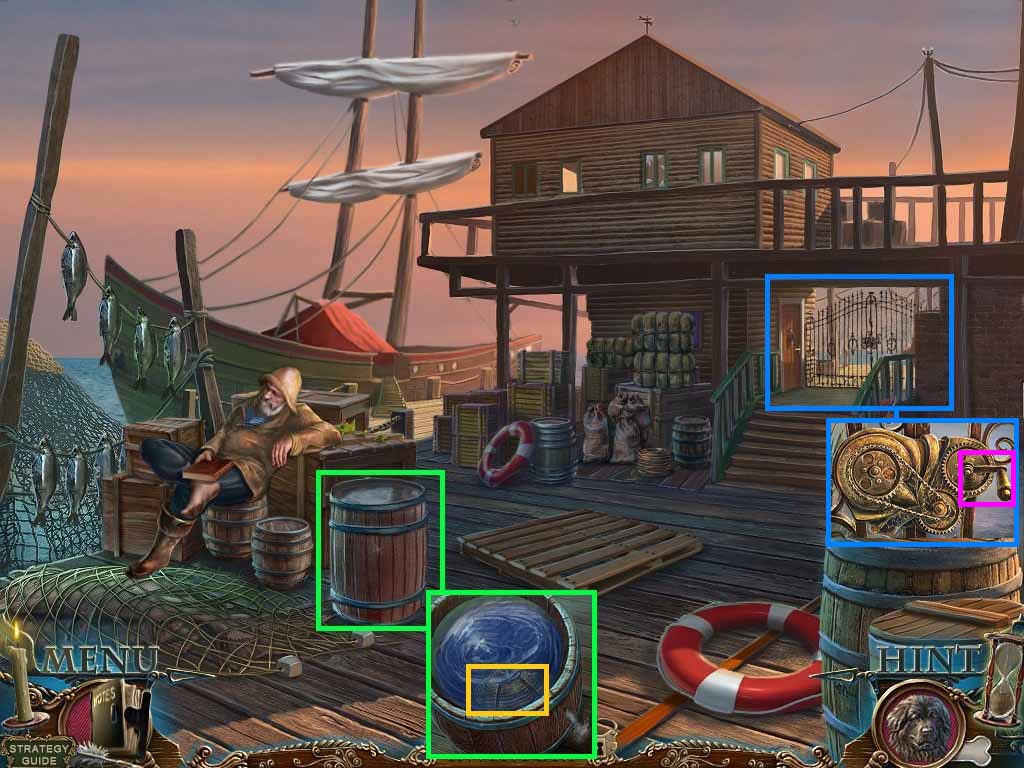
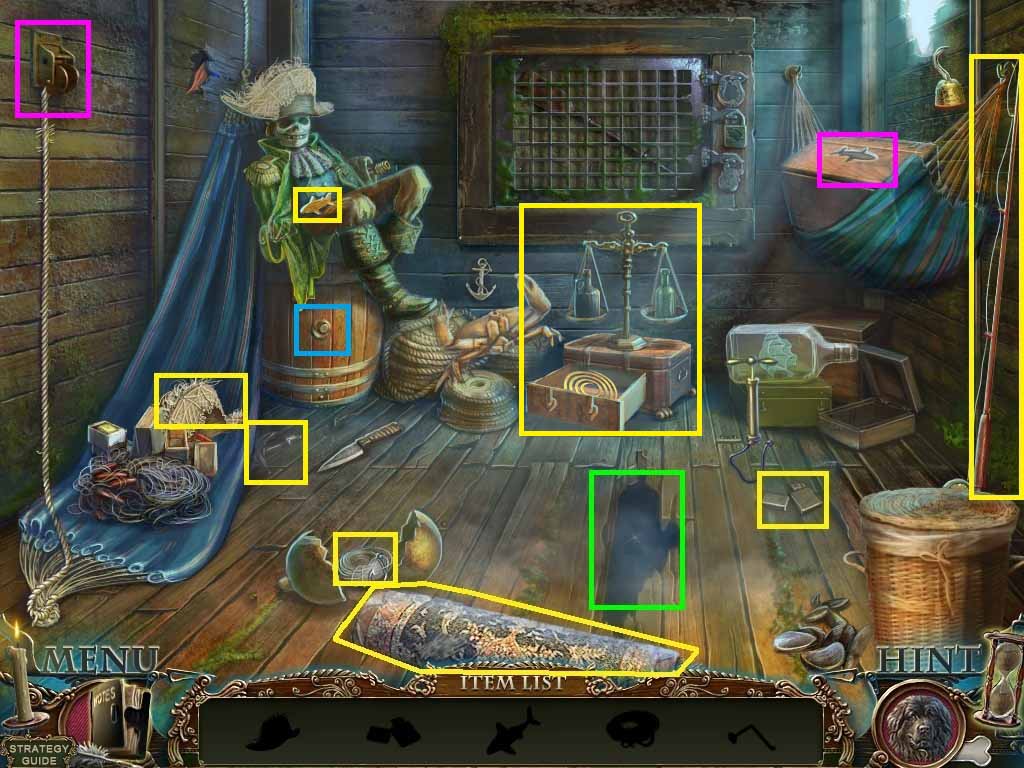
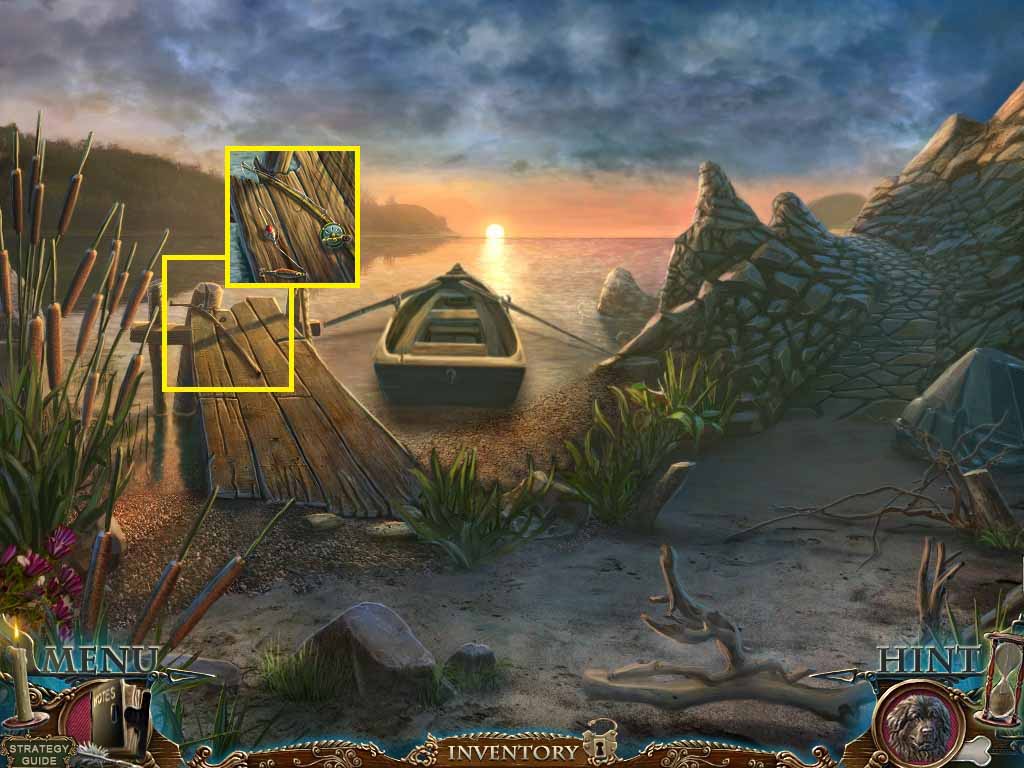
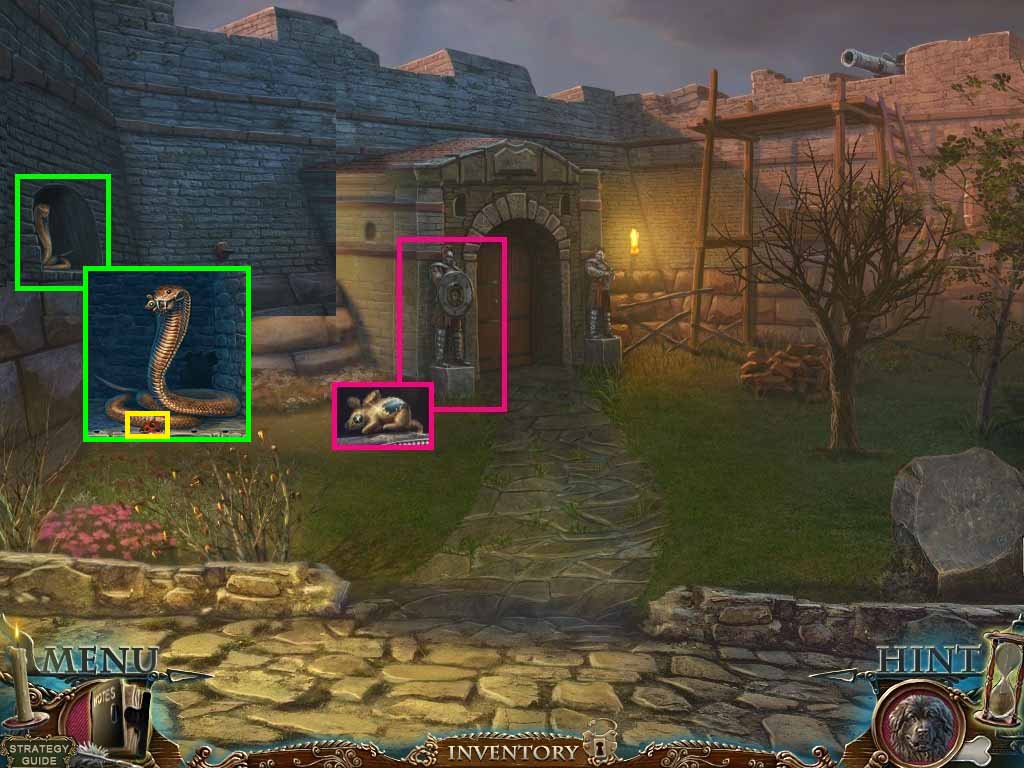
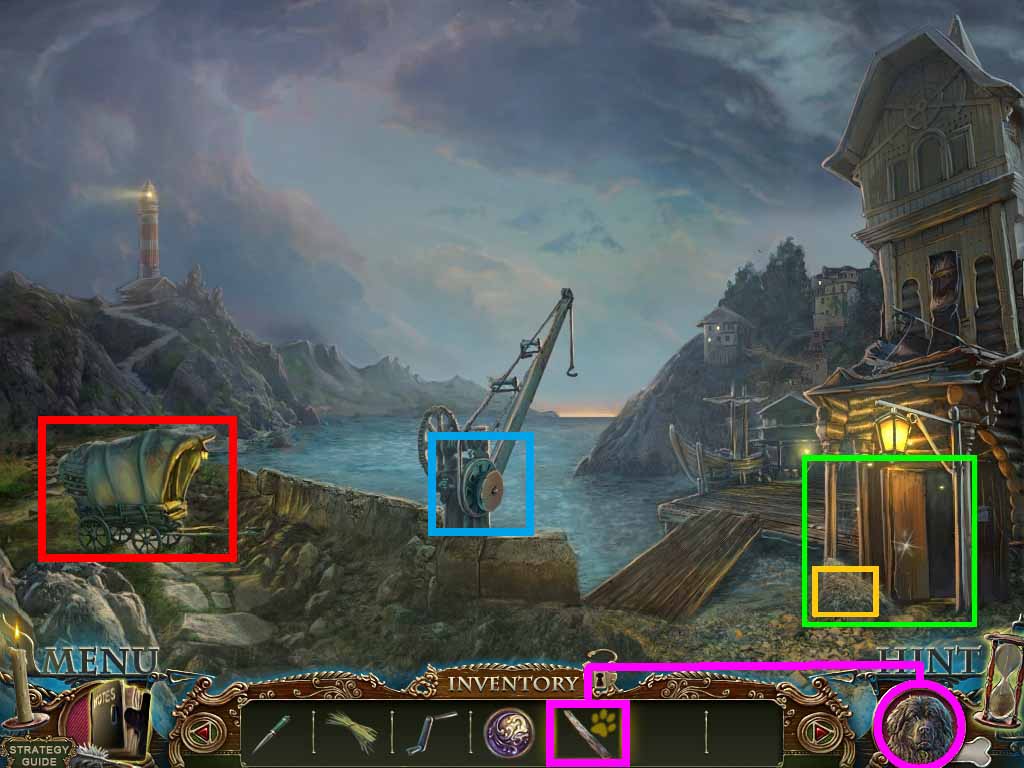
- Collect the boathook.
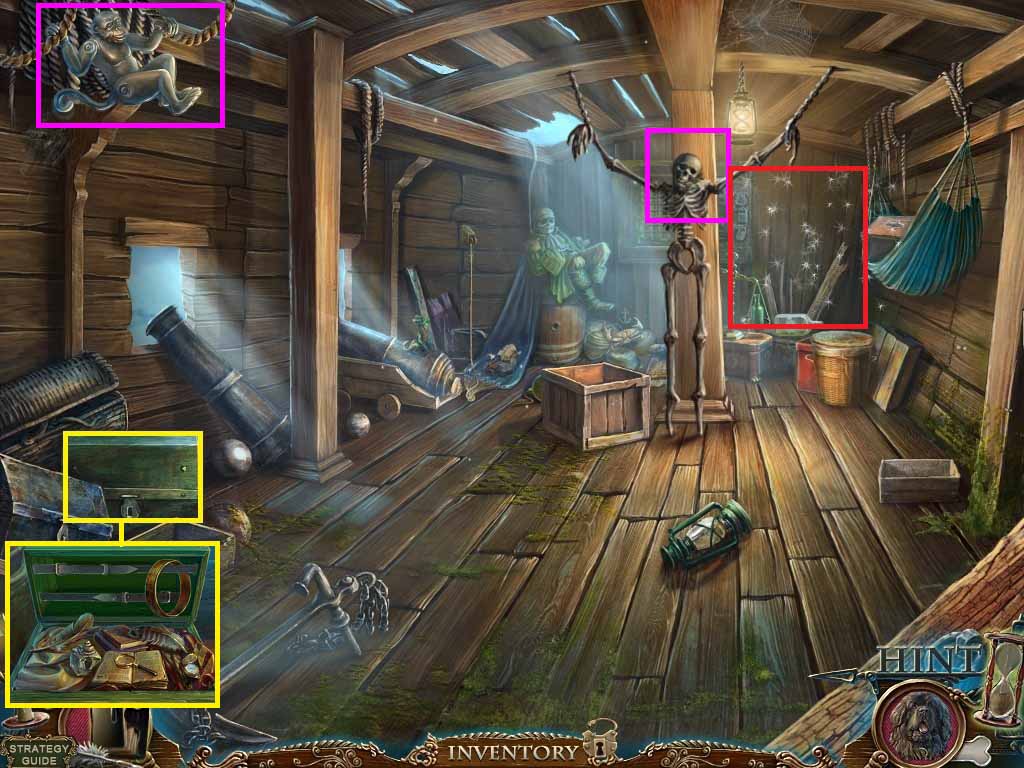
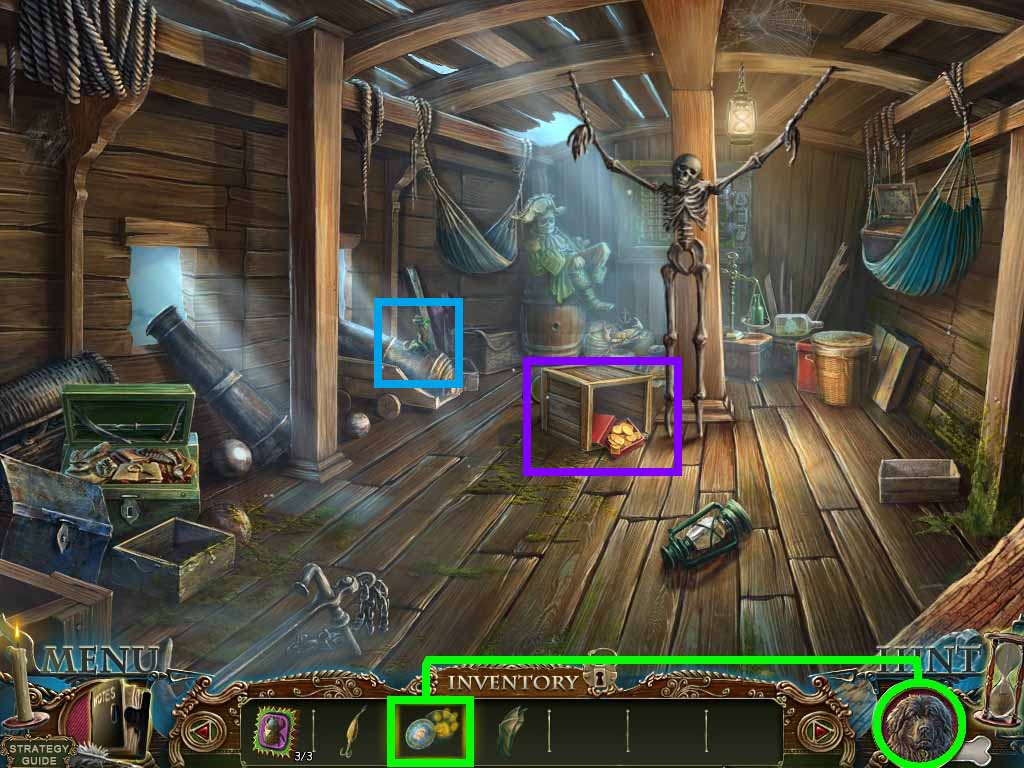
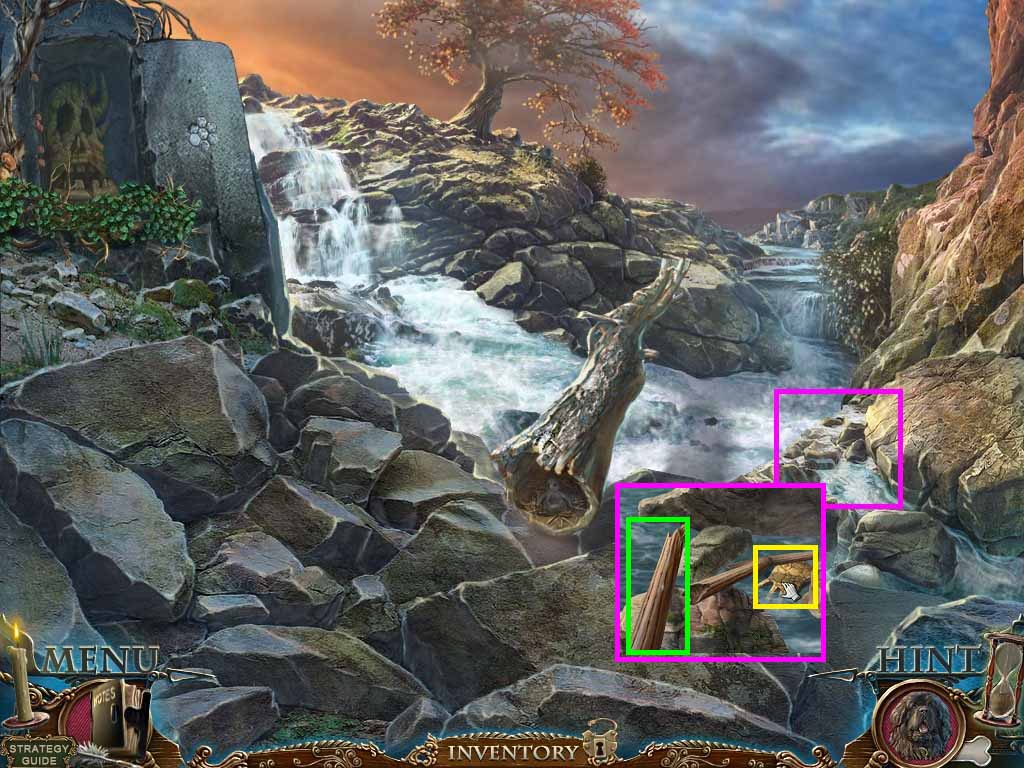
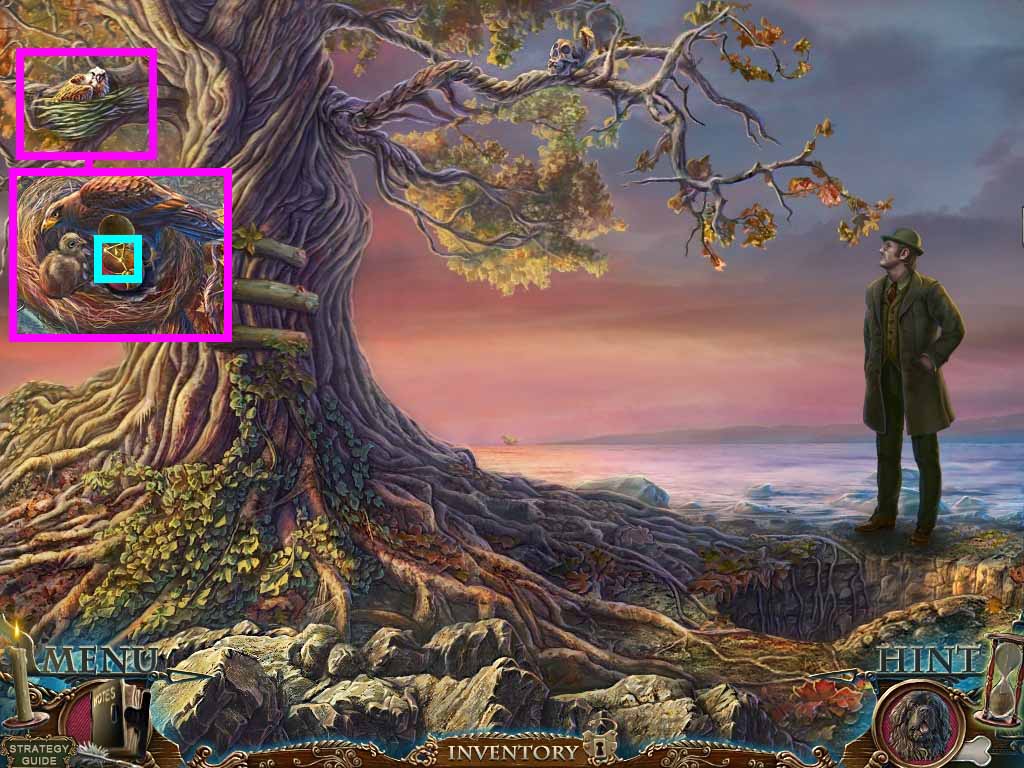
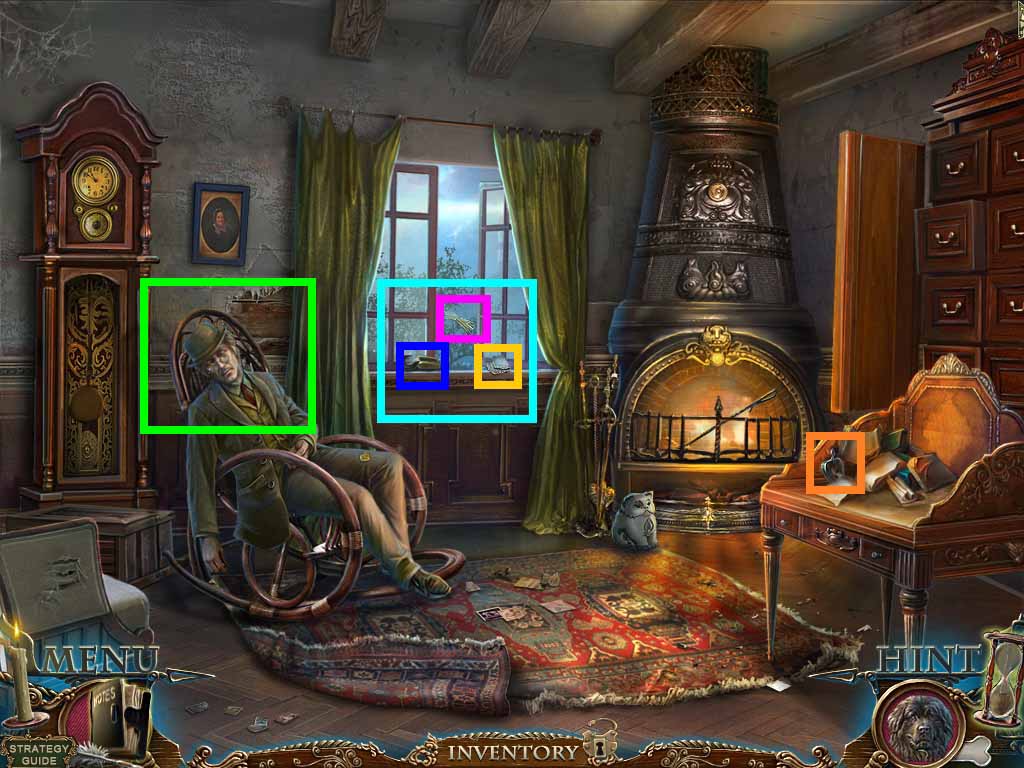
- Zoom into the hatch; collect the bag of millet.
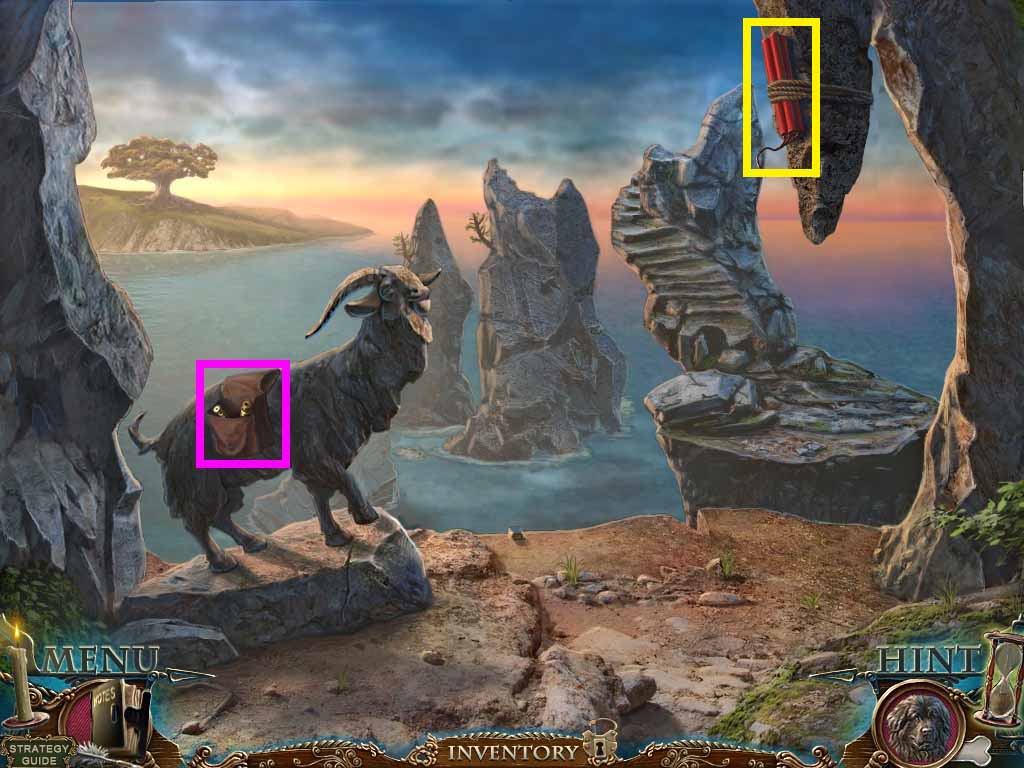
- Click the hatch; collect the red mechanical bug.
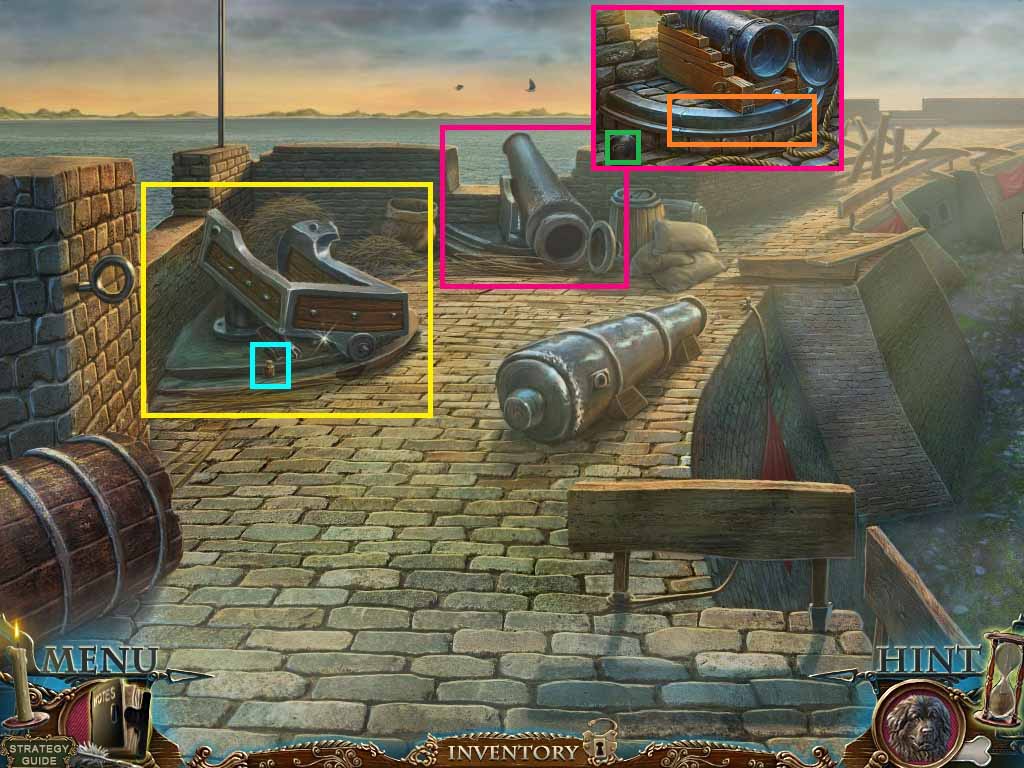
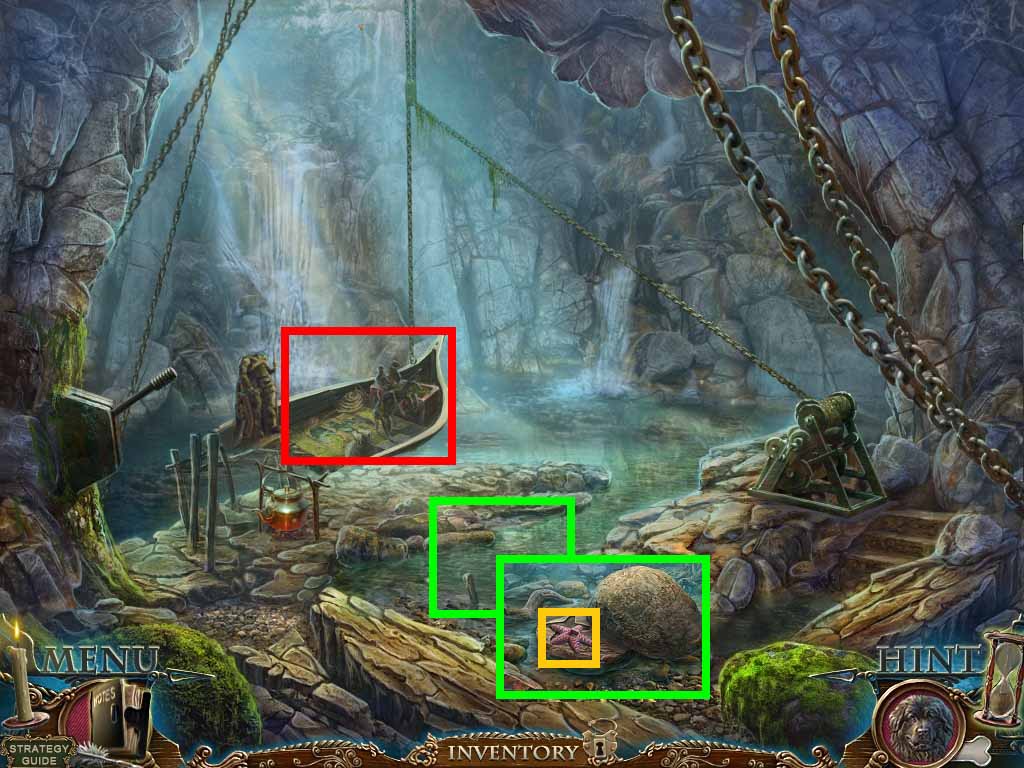
- Zoom into the opening on the pier.

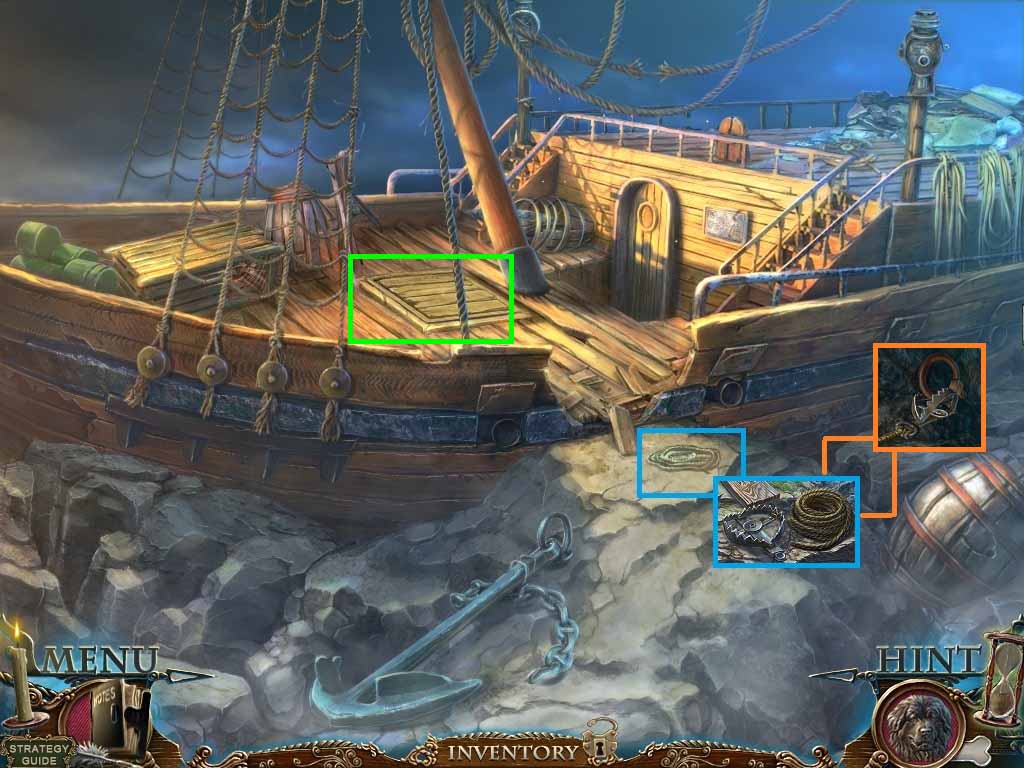
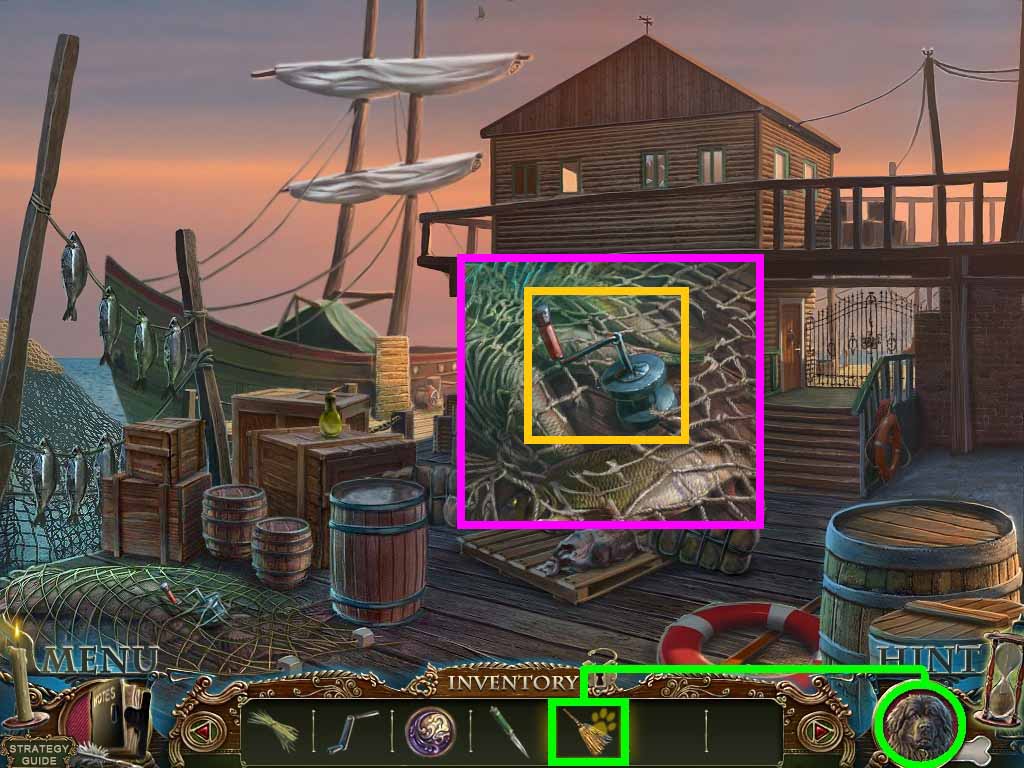
- Hook the boat using the boathook.
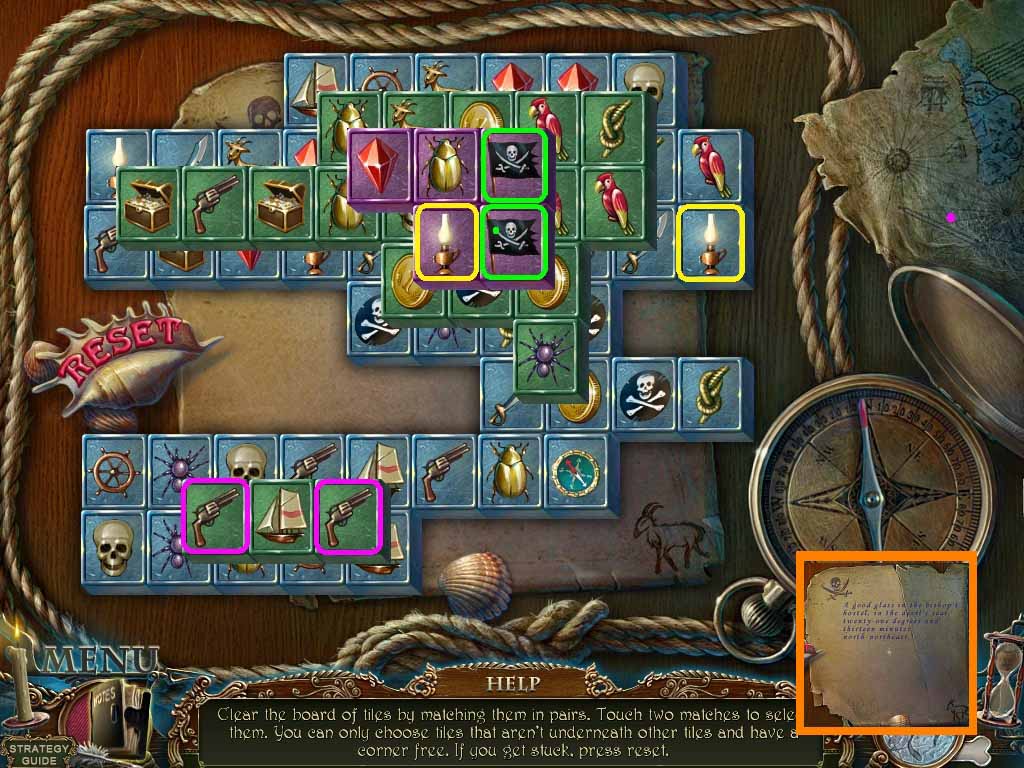
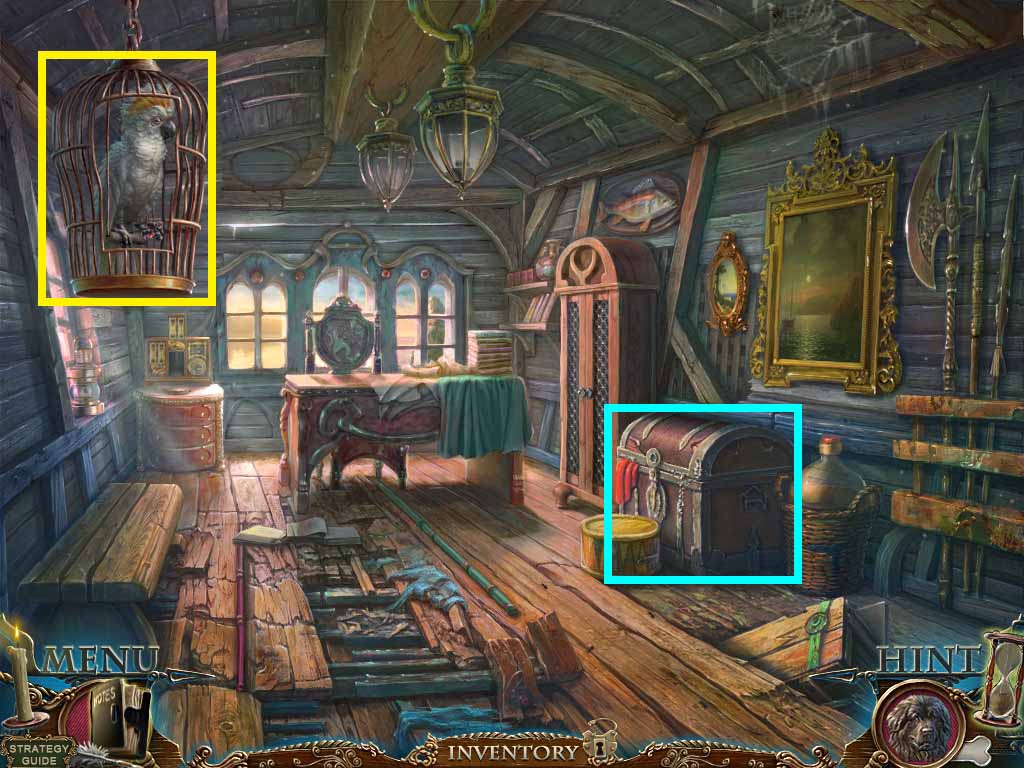
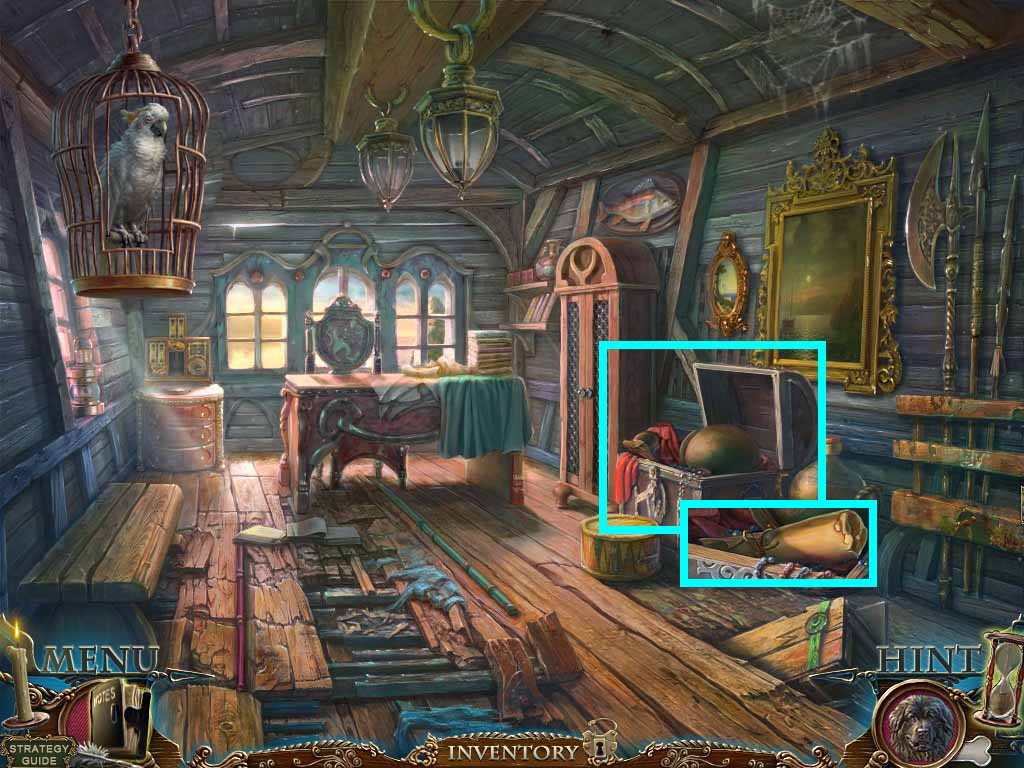
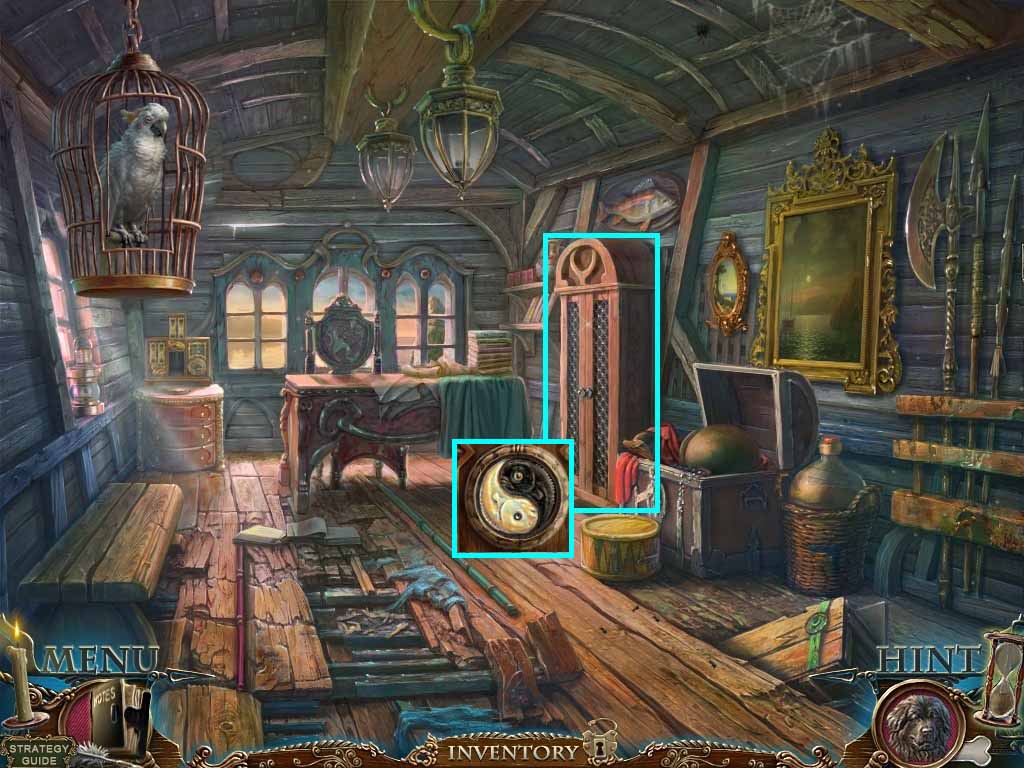
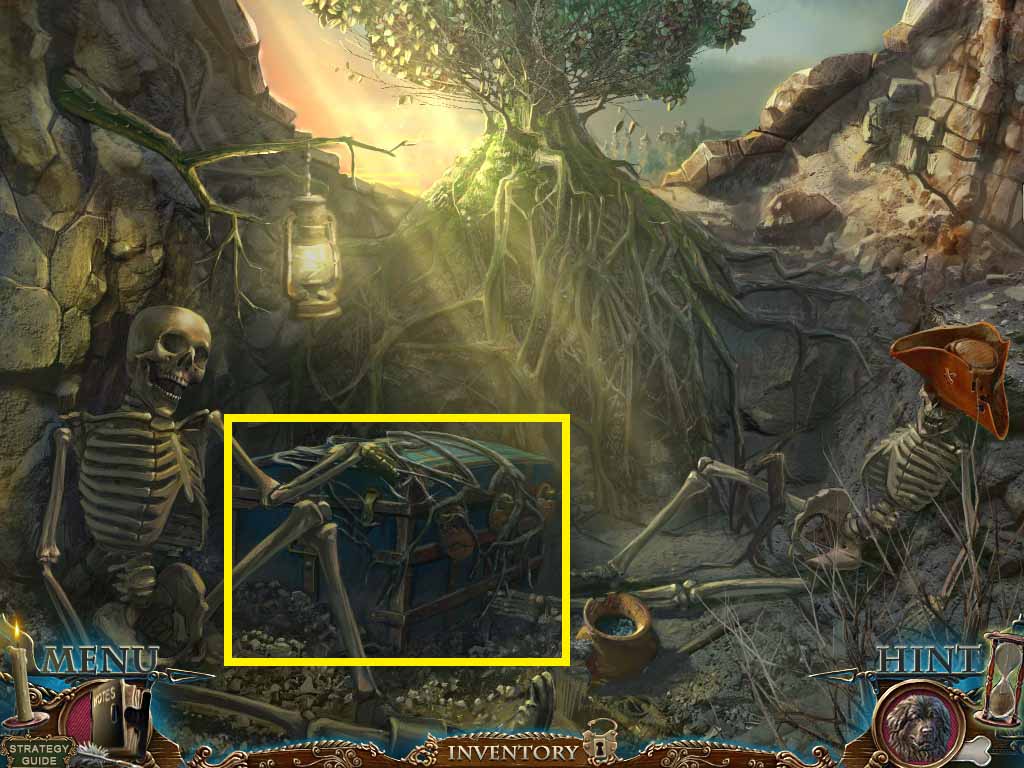
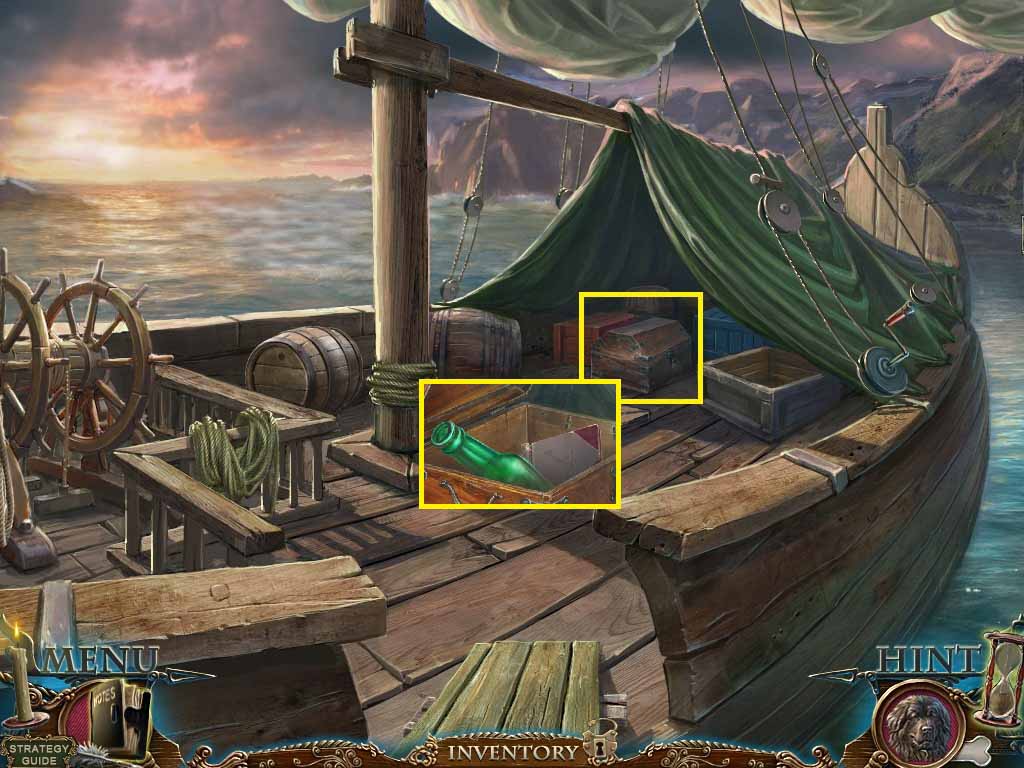
- Click the chest and zoom in.
- Dust the sand using the brush.
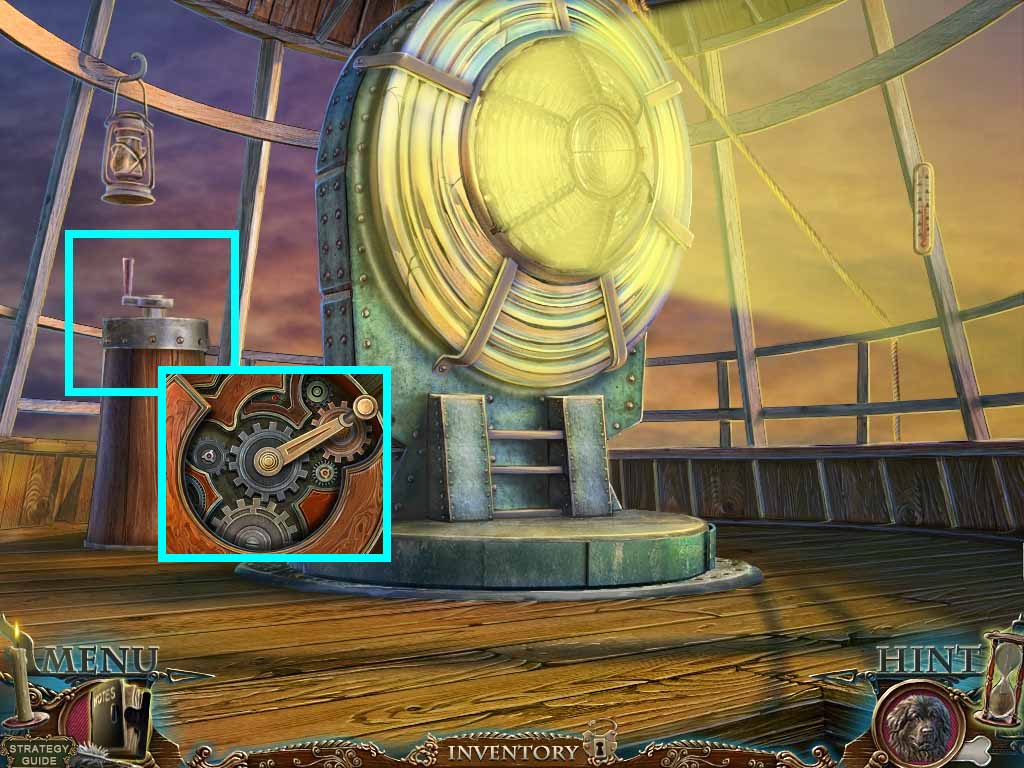
- Remove the cork from the glass container.
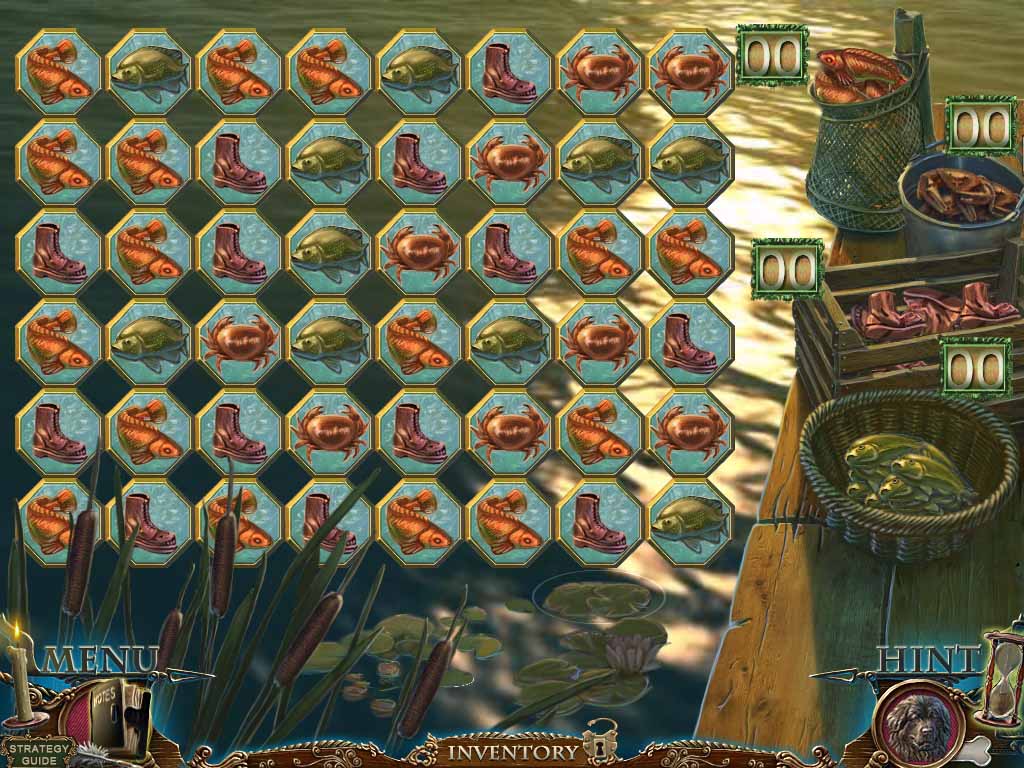
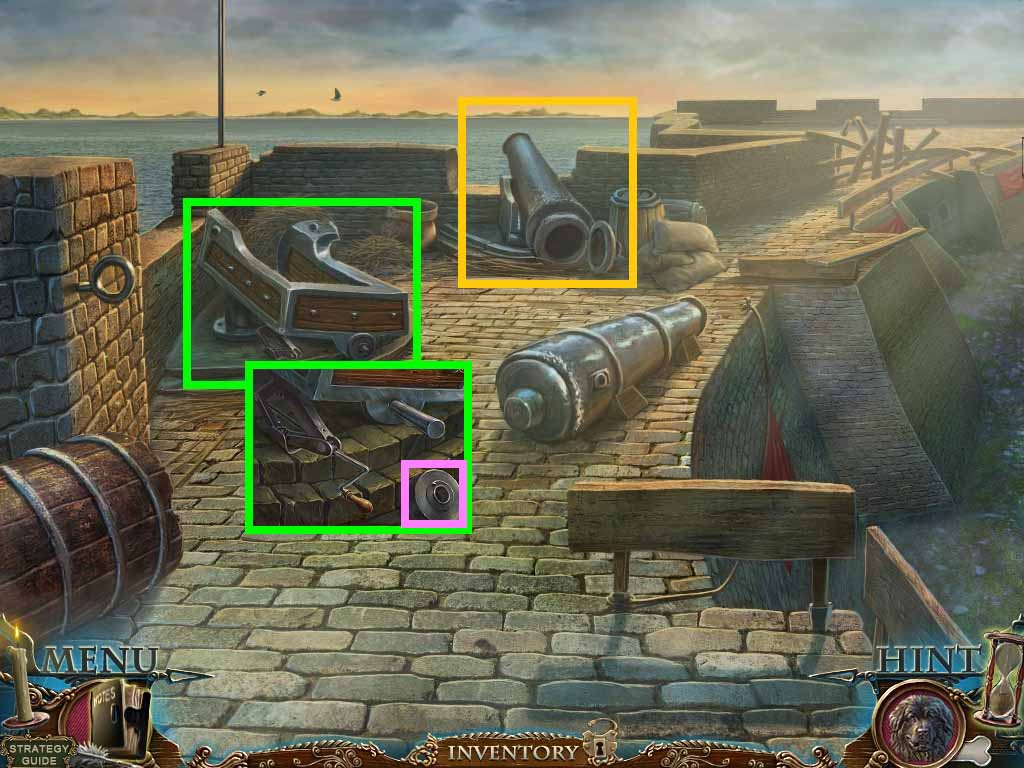
- Click the objects on the top left.
- Insert the tumbler in the middle slot.
- Click the left arrow.
- Click and drag the objects.
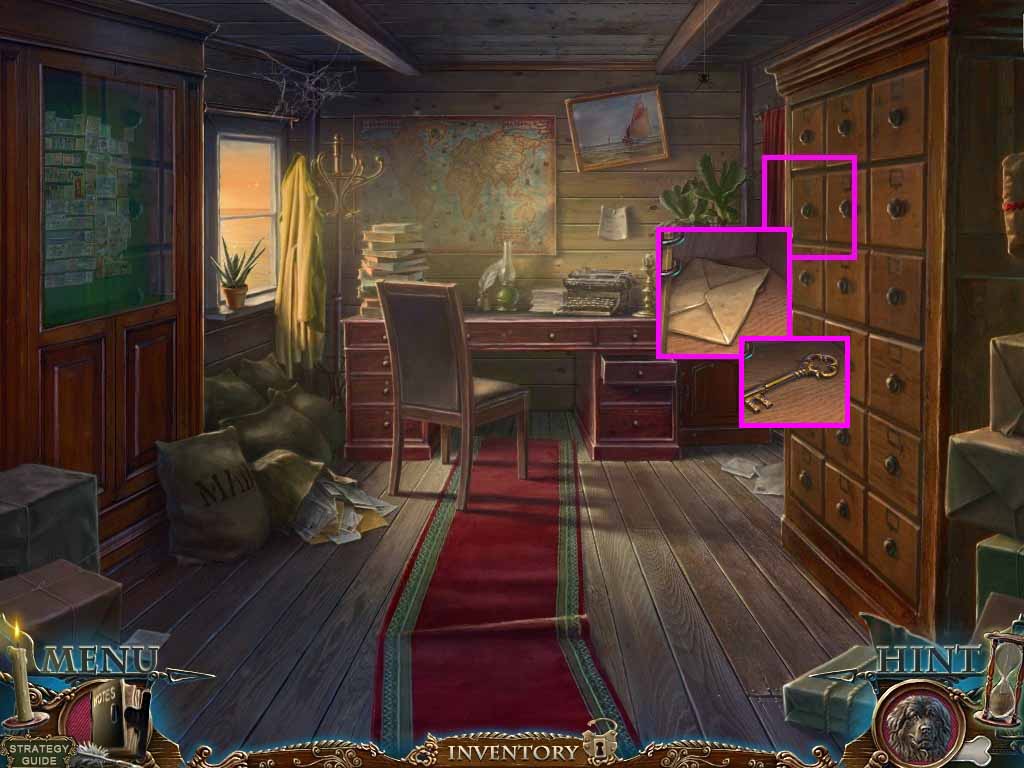
- Attach the key parts together.
- Collect the key; insert tit on the right lock and click the right arrow.
- Click the paper to get the code: 6 – 8 – 4.
- Use the code to open the middle lock.
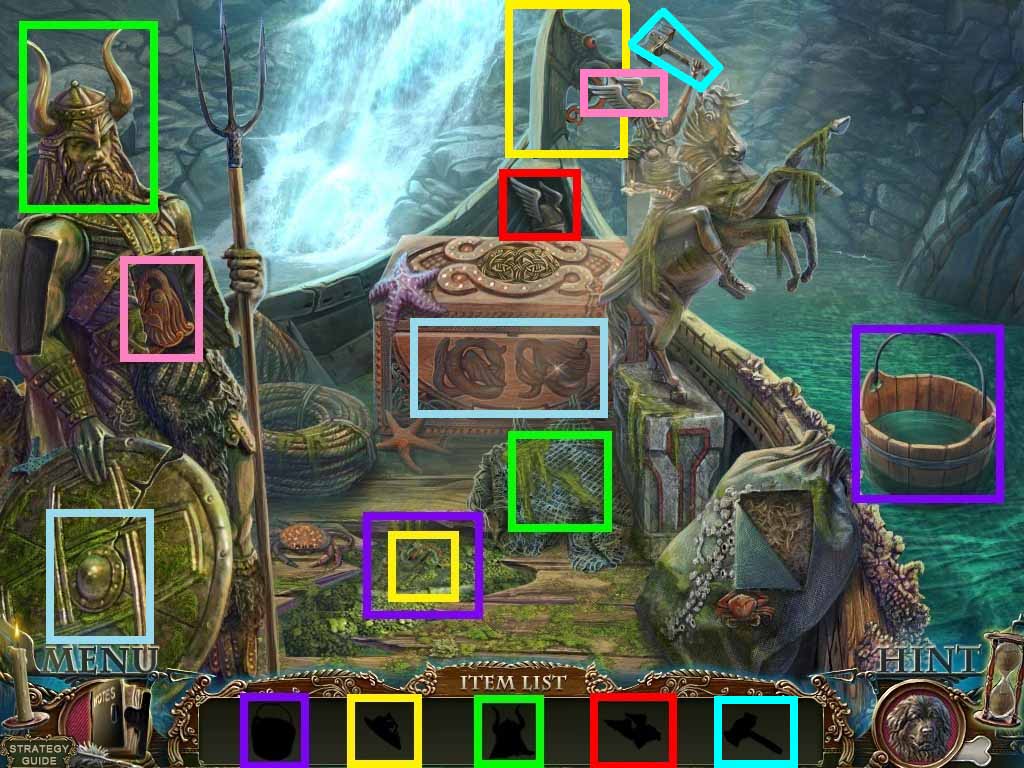
- Collect the sharp shell.
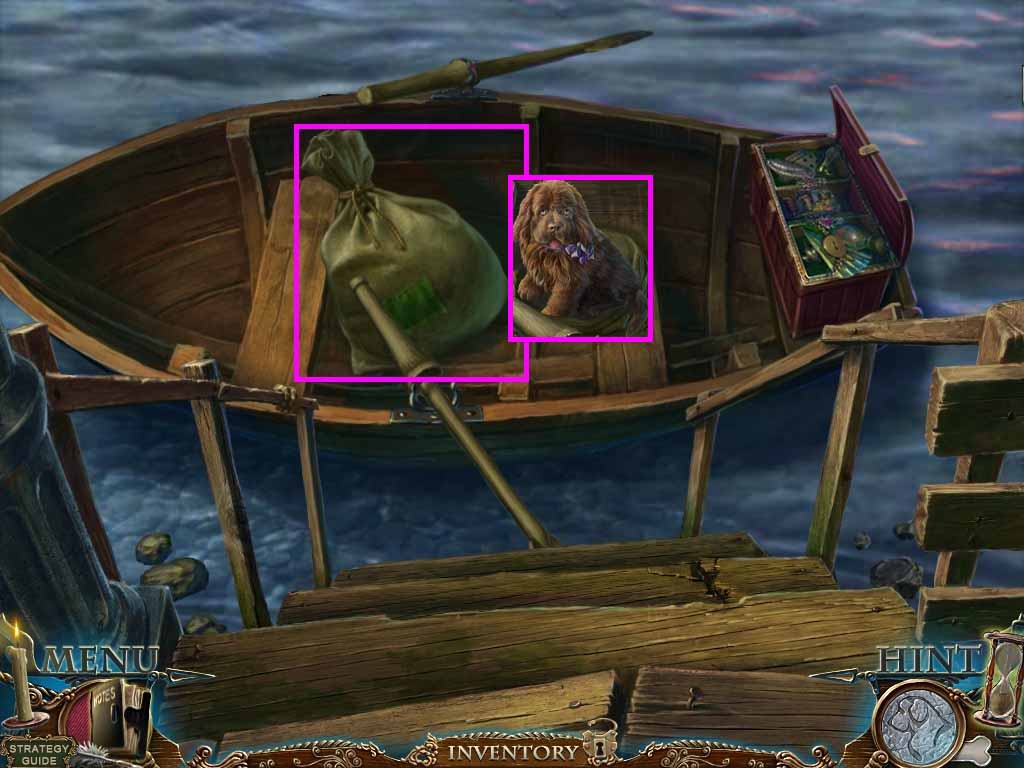
- Zoom into the sack.
- Cut the rope using the shell.
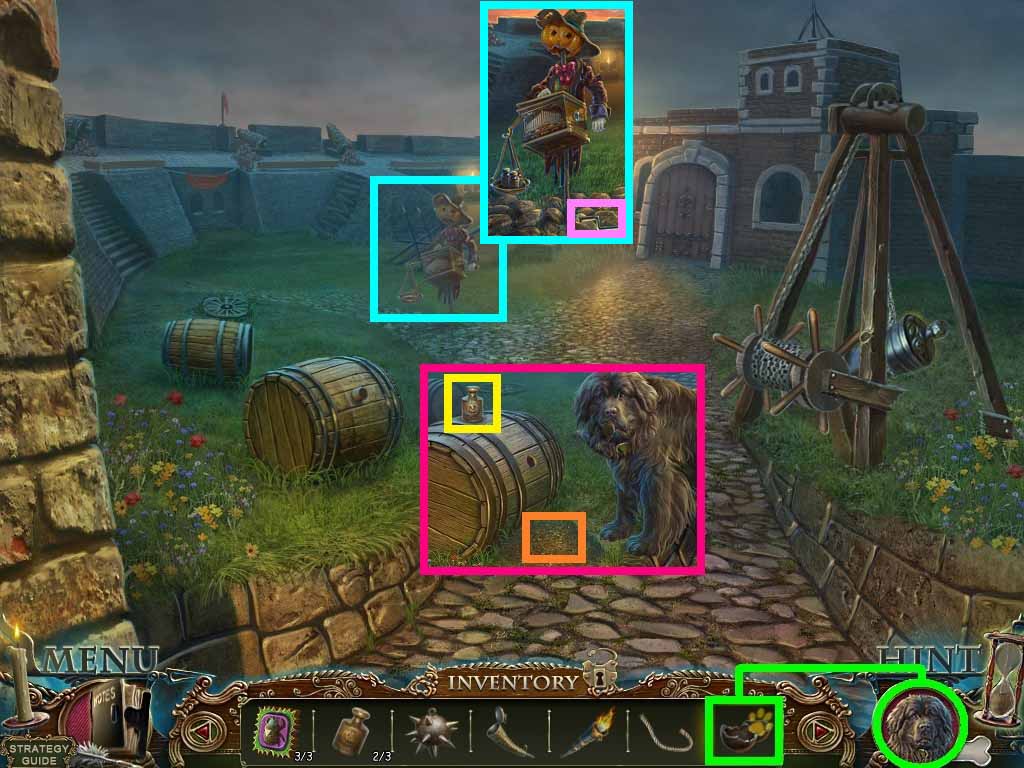
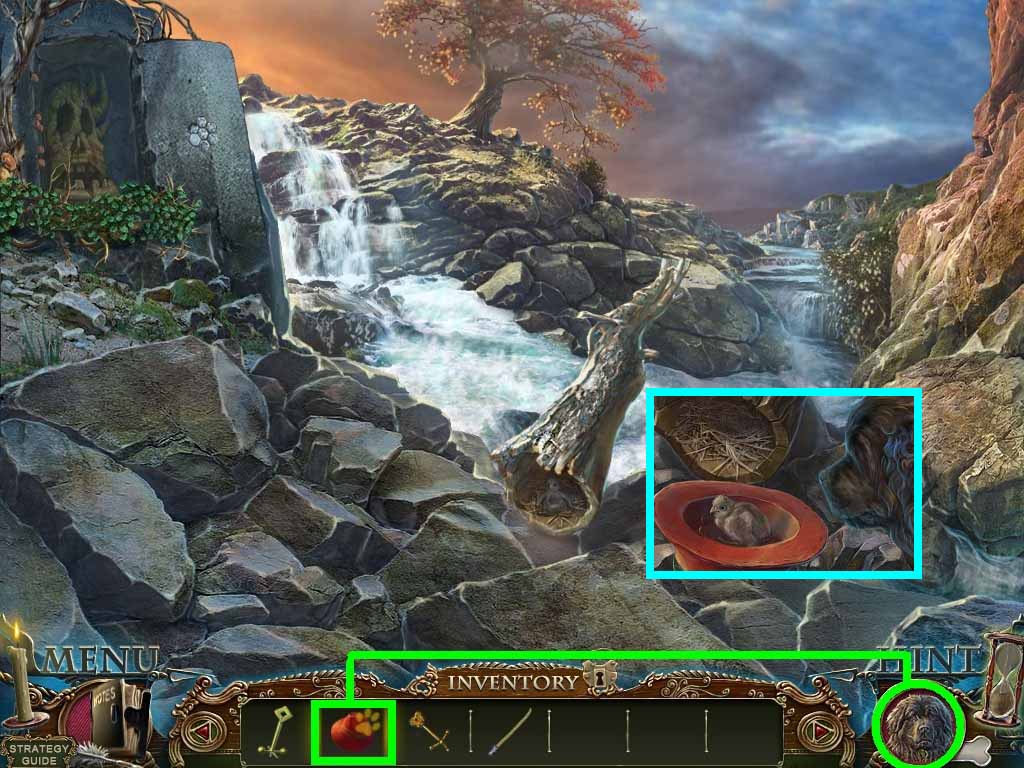
- Collect the puppy and the yellow gecko.
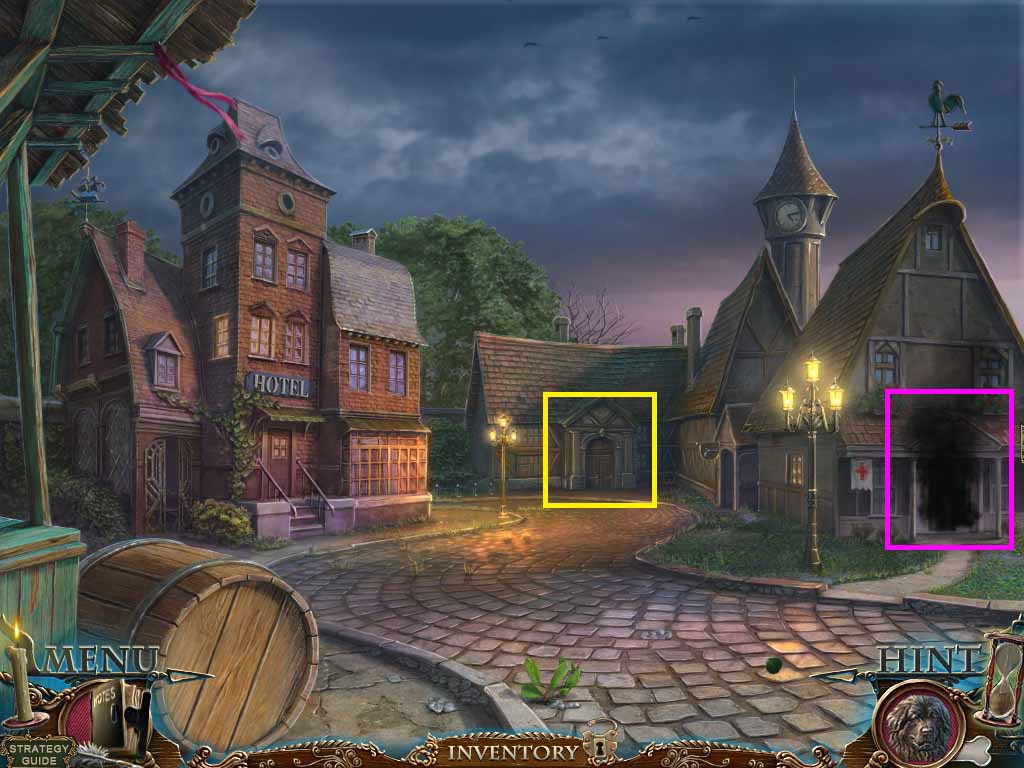
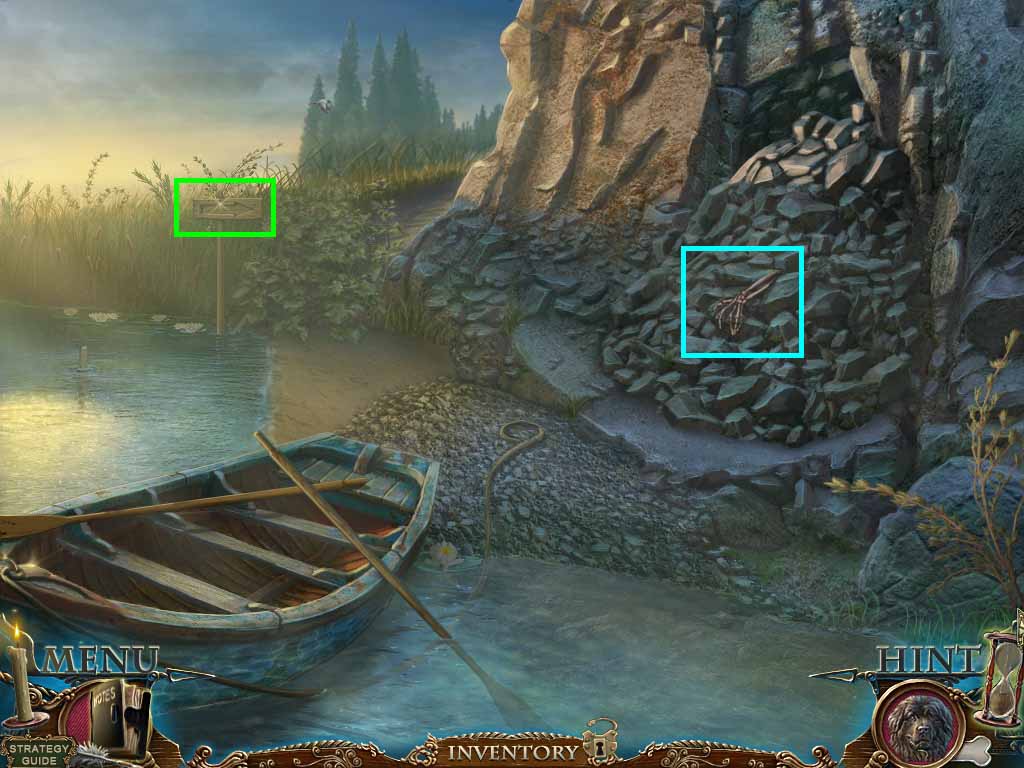
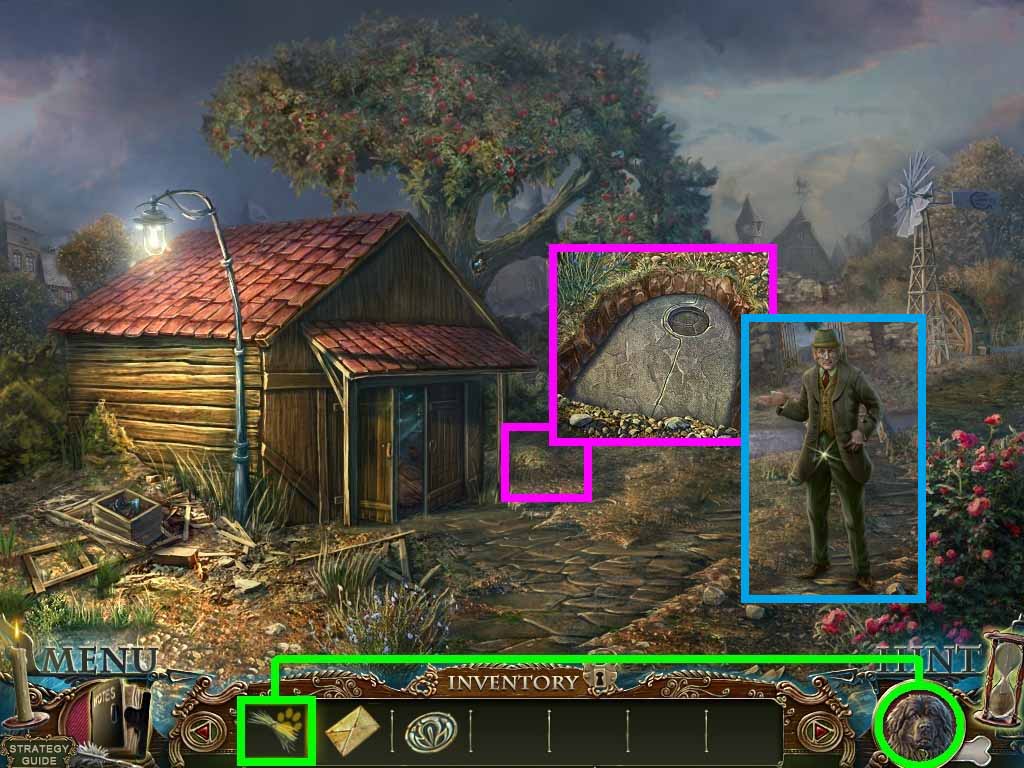
- Go back one scene and move forward
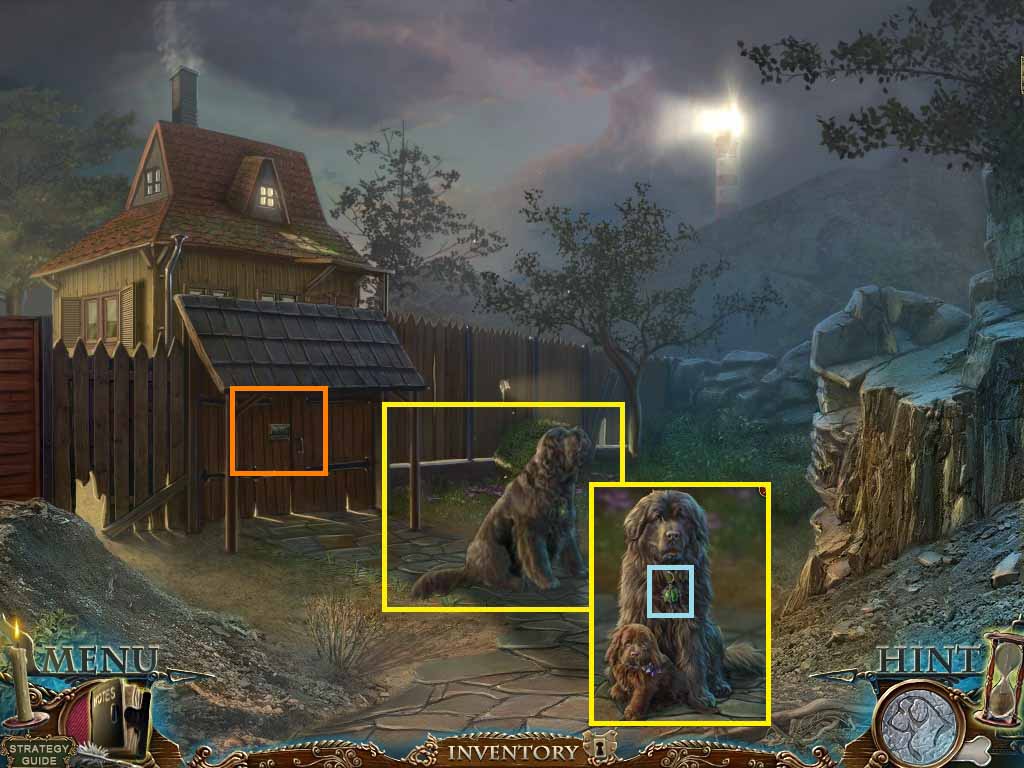
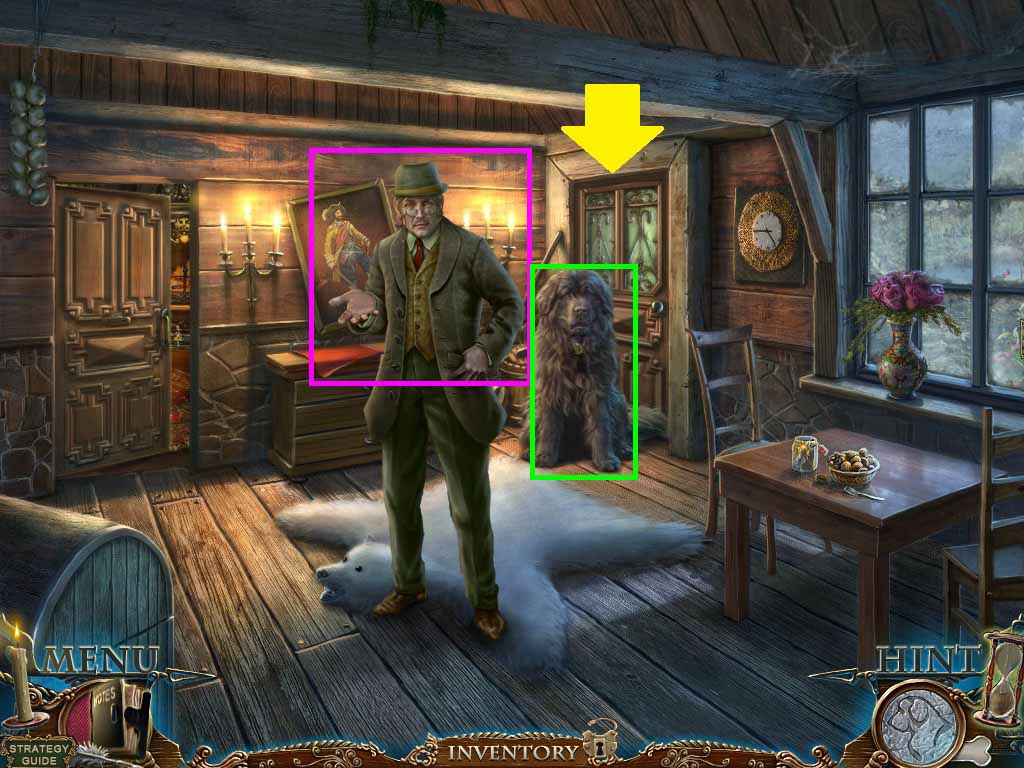
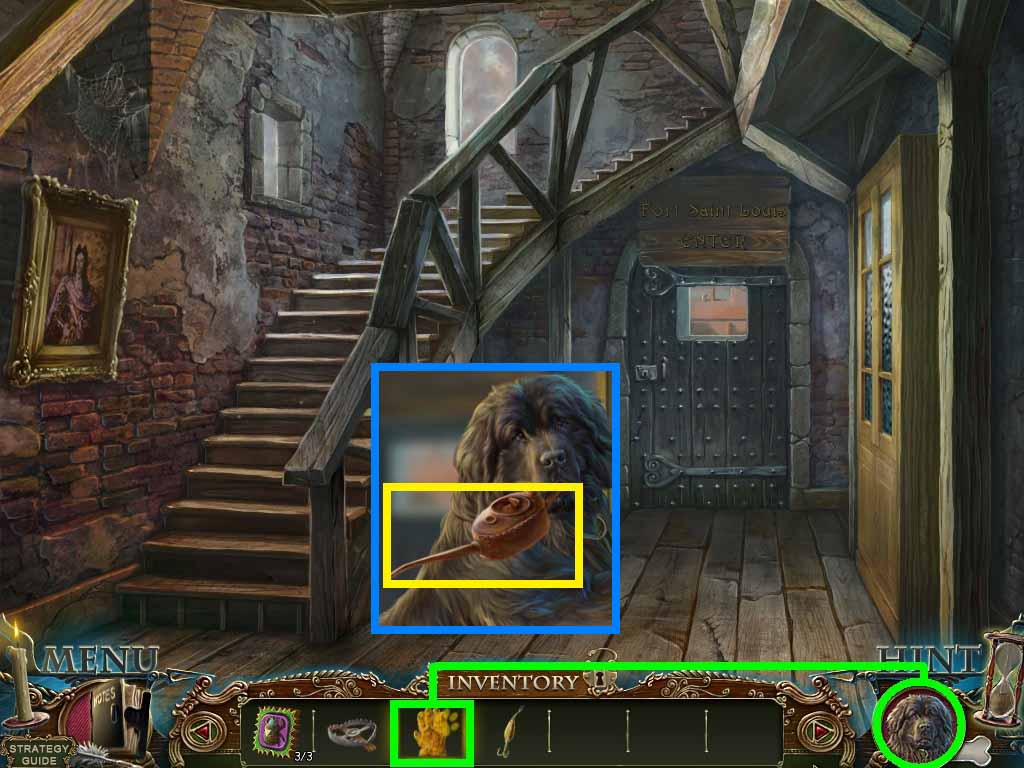
- Zoom into the dog.
- Give puppy to the dog.
- Collect the green mechanical bug.
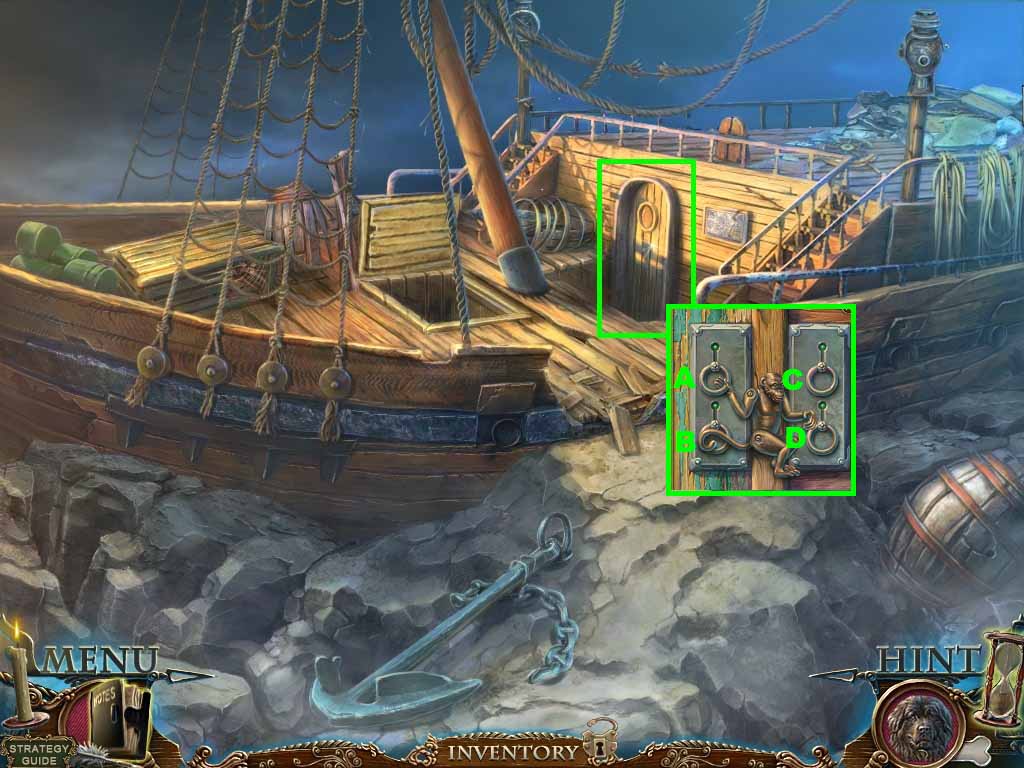
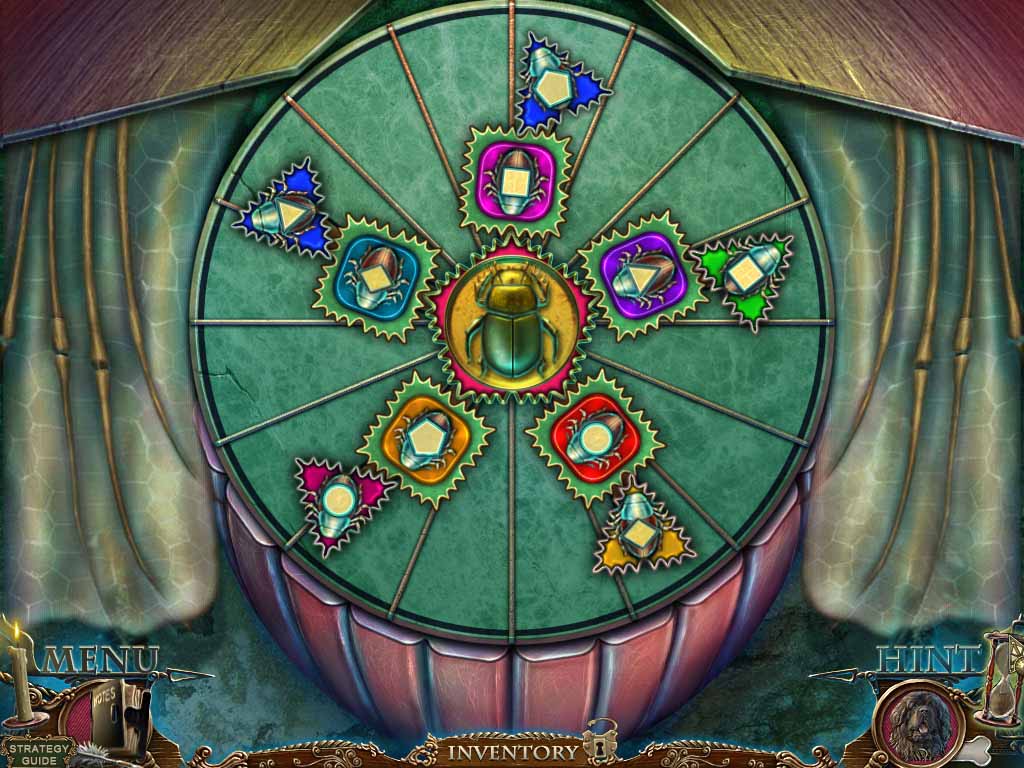
- Zoom into the gate.
- Insert the red and green mechanical bugs to trigger a puzzle.

- Move the bug to its color matched slot.
- To solve follow this sequence:
- Red: right – up – left
- Green: up – left – down – left – up
- Red: right – up – right – down – right – up – right – up – left
- Green: left – down- left – up
- Red: right – up
- Enter through the gate.
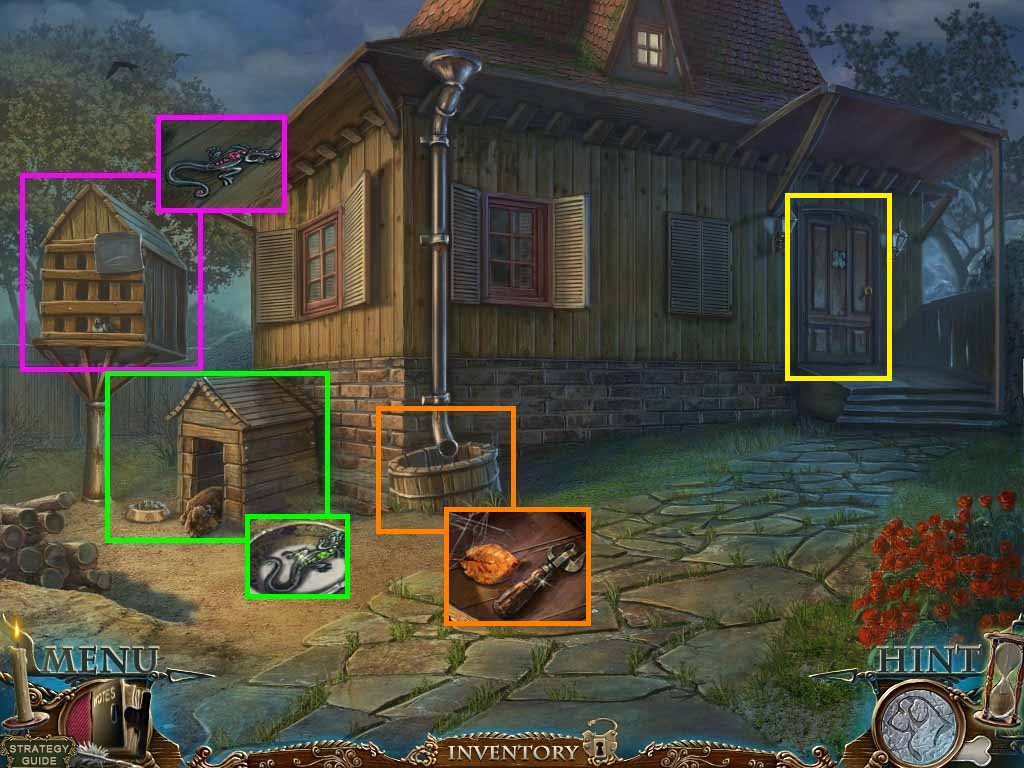
- Zoom into the bird house; place the bag of millet onto it.
- Collect the red gecko.
- Zoom into the dog house.
- Click the bowl; collect the green gecko.
- Zoom into the drain pipe; click the leaf.
- Collect the can opener.
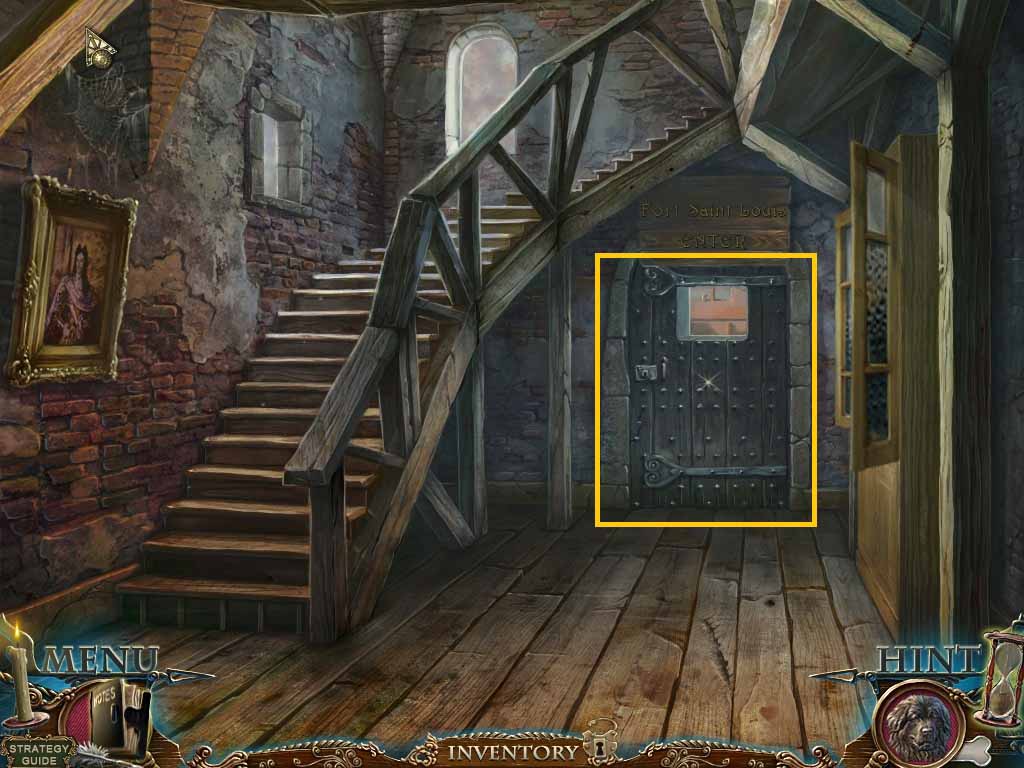
- Zoom into the front door.
- Insert the green, red and yellow gecko into it to trigger a puzzle.
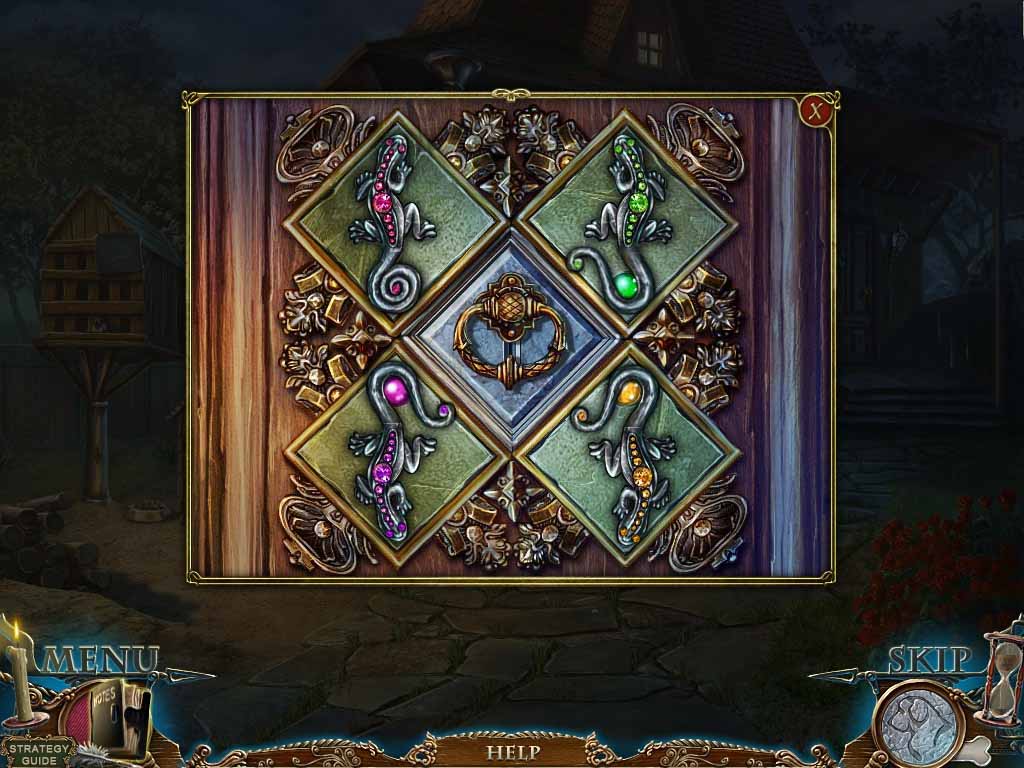
- To solve the puzzle use the following sequence of gecko selection:
- Red – Green – Pink
- Click the middle door knocker.
- Go inside the house.
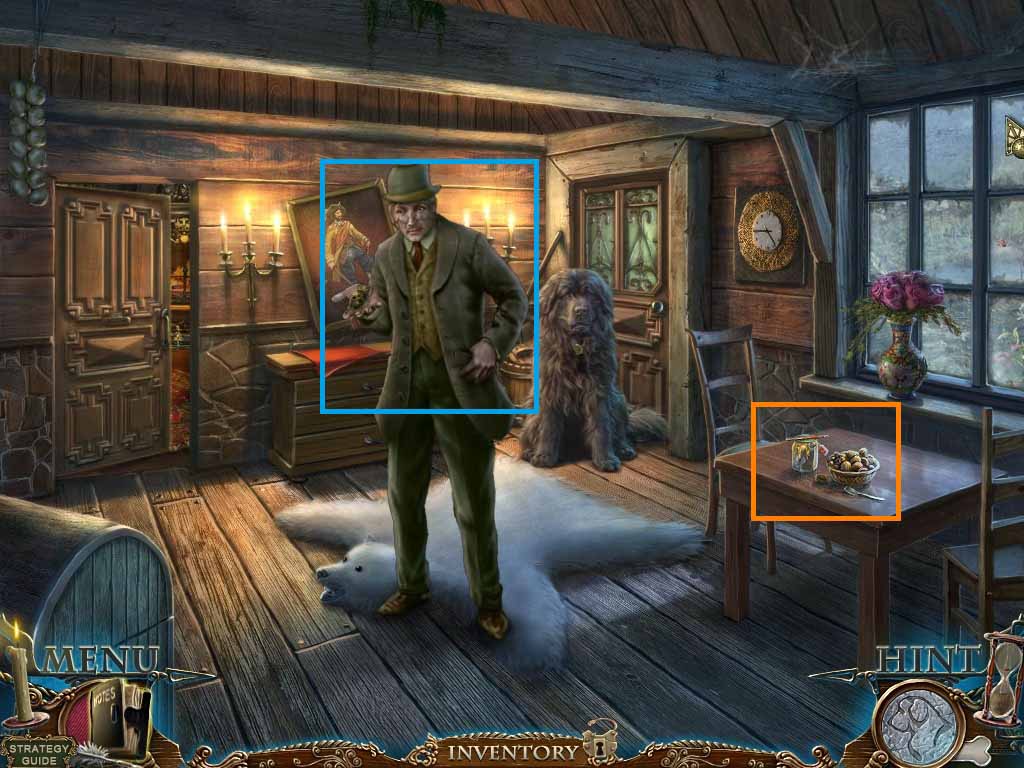
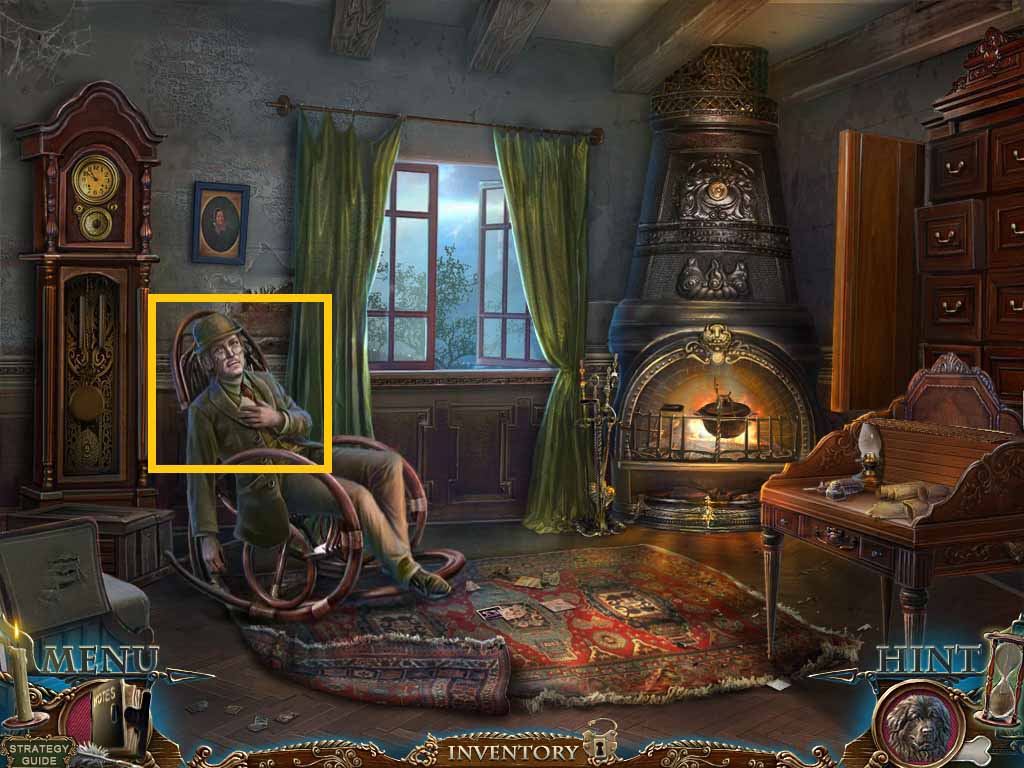
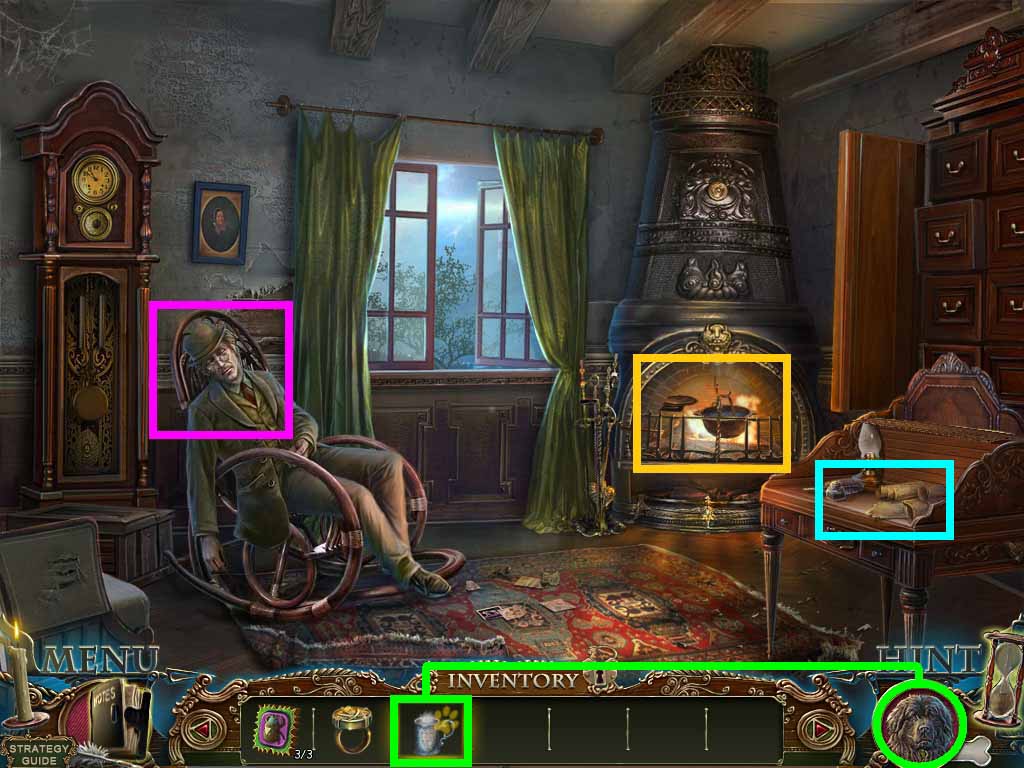
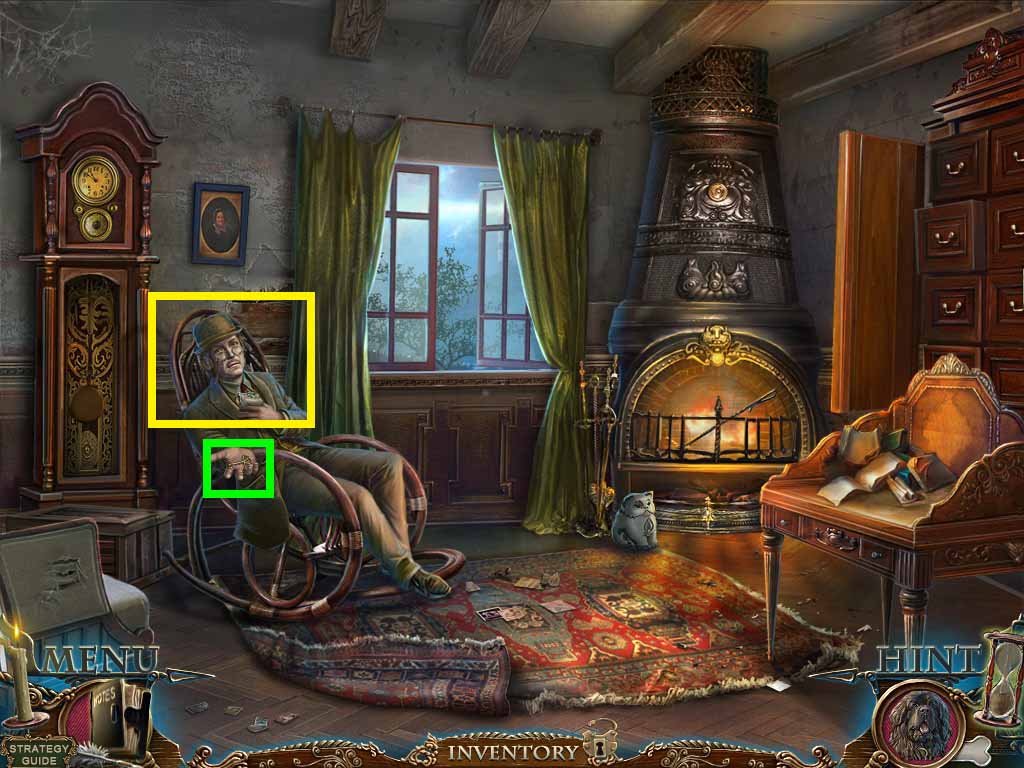
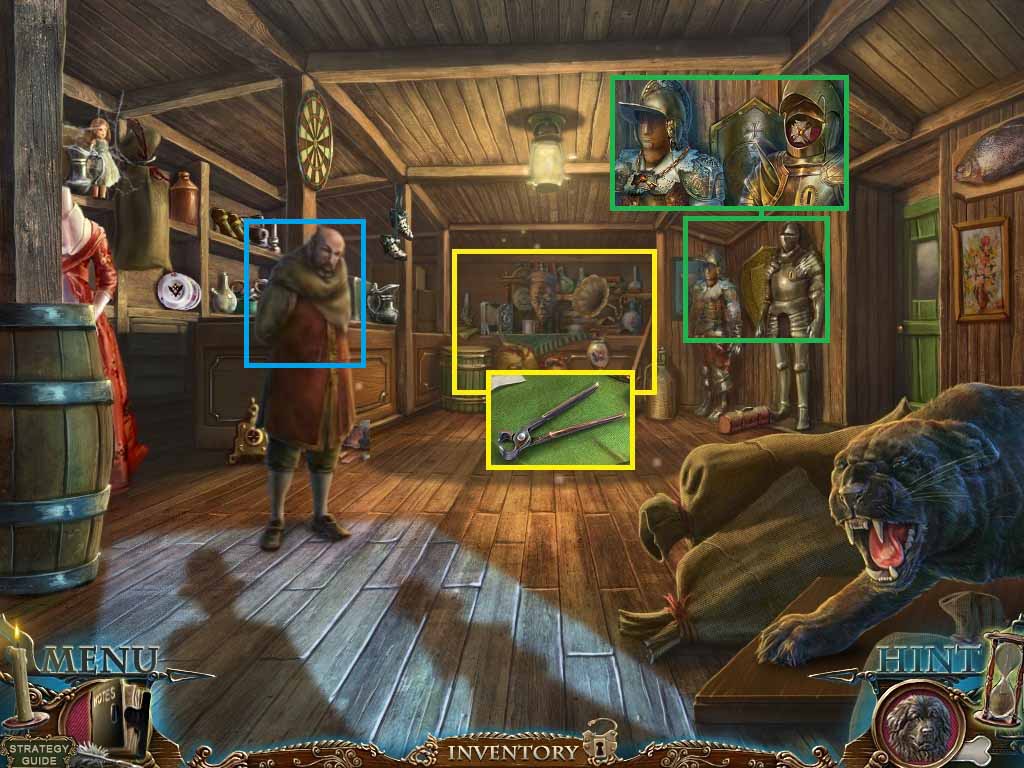
- Click Mr. Le Grand.
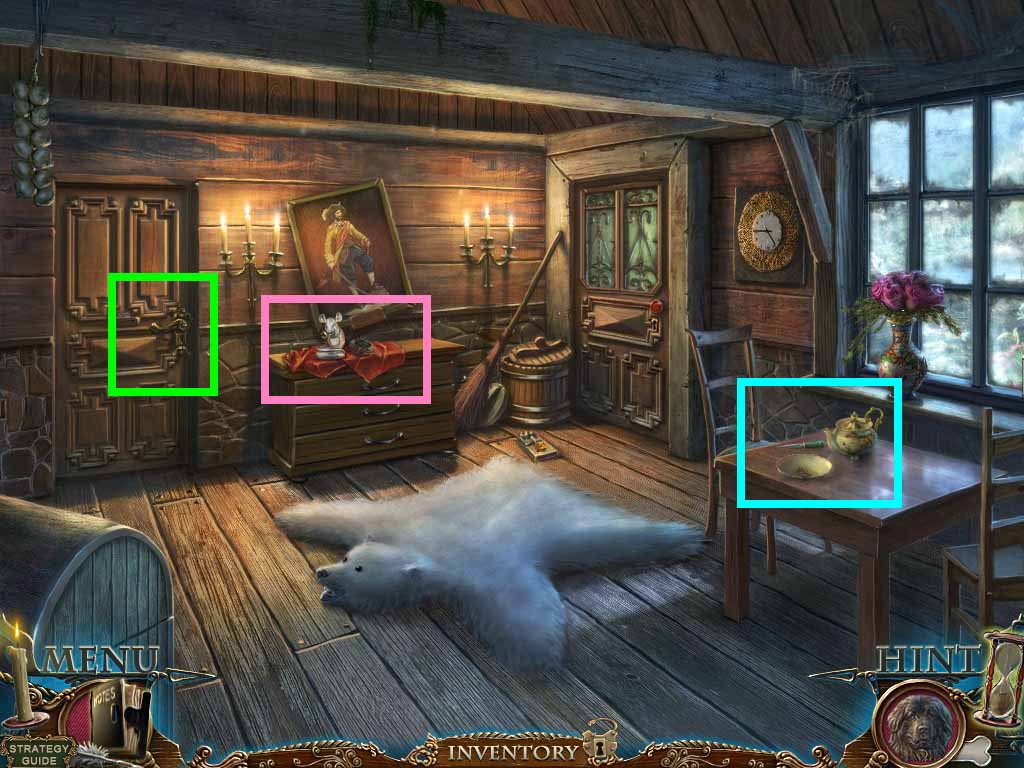
- Zoom into the table; collect the pencil.
- Open the jar lid using the can opener.
- Collect the pliers.
- Move through the door on the rear left.
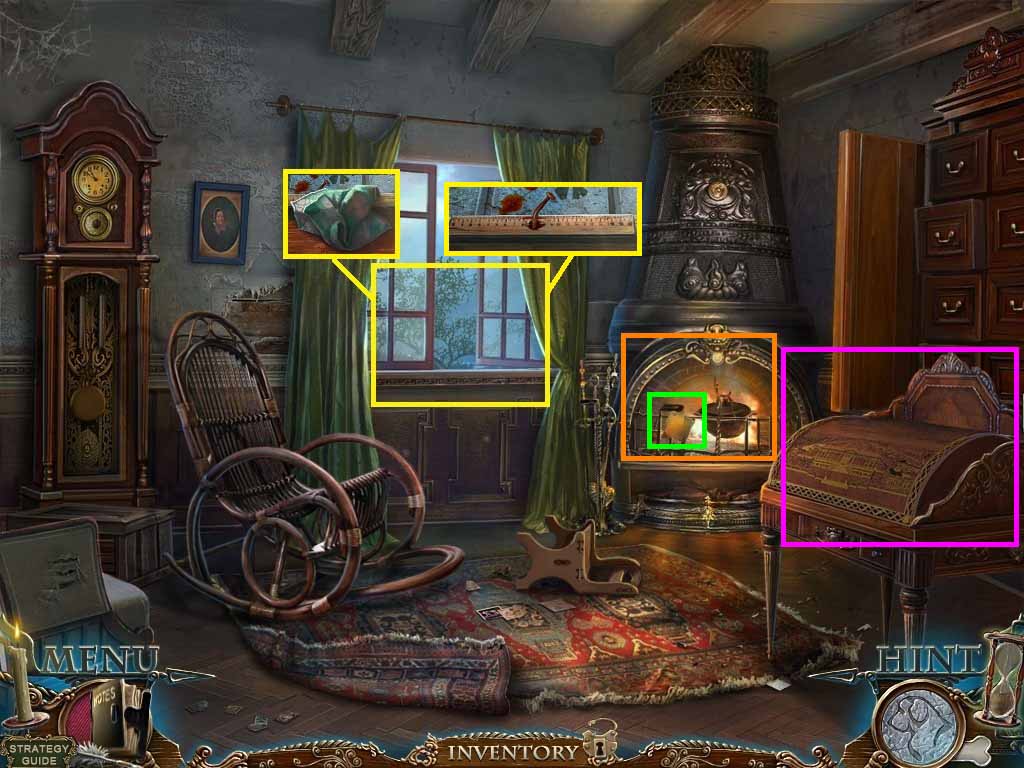
- Zoom into the window.
- Collect the handkerchief.
- Collect the bloody nail using the pliers.
- Collect the ruler.
- Zoom into the fireplace; collect the parchment.
- Zoom into the roll top desk.
- Use the ruler on the lid.
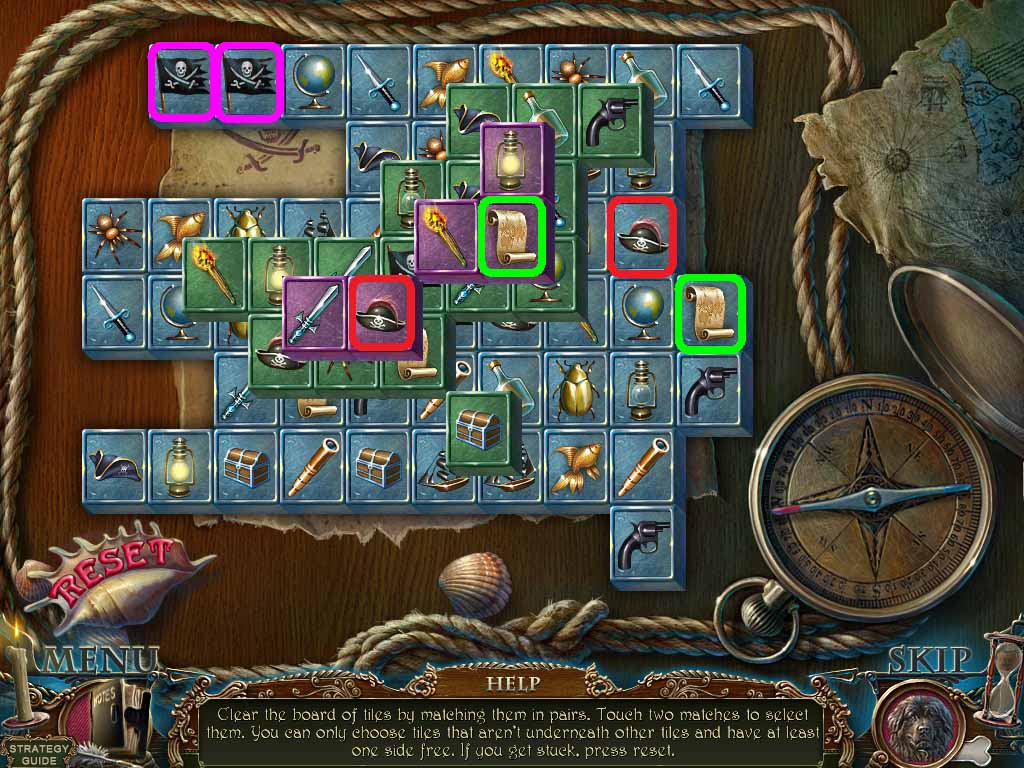
- Zoom into the desk; put the parchment onto it to trigger a puzzle.
- Find the matching pairs.
- Collect the deciphered parchment.
- Move back one scene.
- Give Mr. Le Grand the deciphered parchment.
- Pet the dog, Arthur.
- Move through the door on the right.
- Chapter-1-12-Gardener
- Click the gardener.
- Collect the barn door handle.
- Click and drag the handkerchief to Arthur.
- Zoom into the barn door; place the barn door handle onto it.
- Click the handle.
- Collect the insect gear 1/ 3.
- Zoom into the gate; collect the rope.
- Zoom into the broken ladder.
- Place the boards onto the ladder.
- Secure them using the rope.
- Collect the repaired ladder.
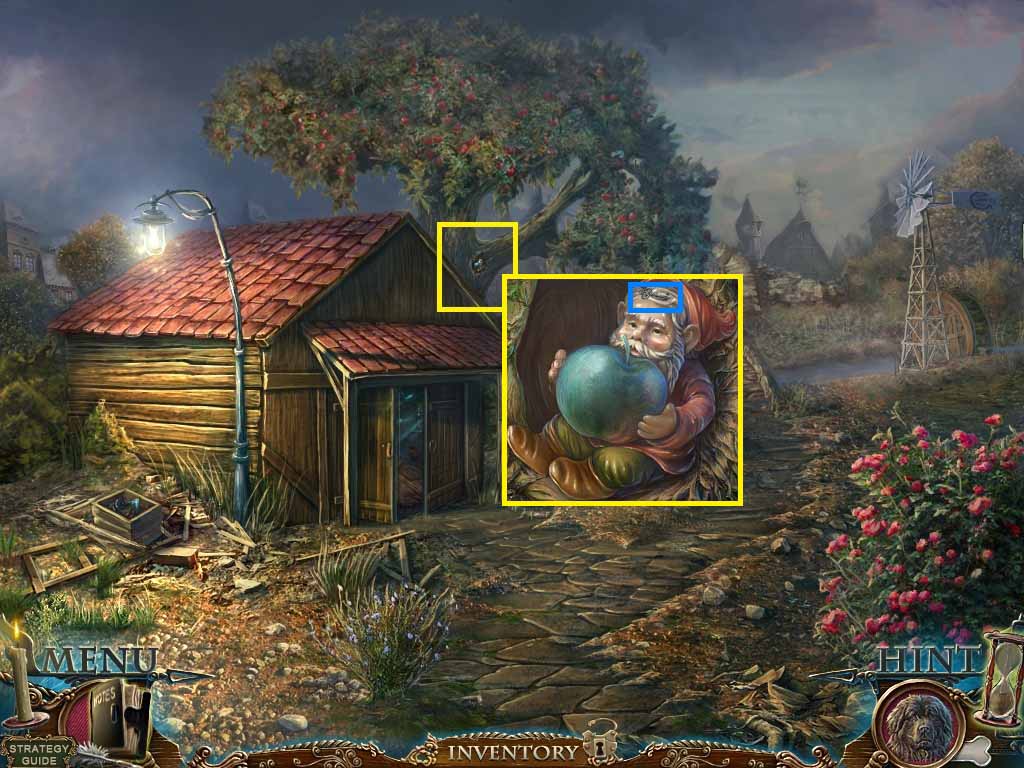
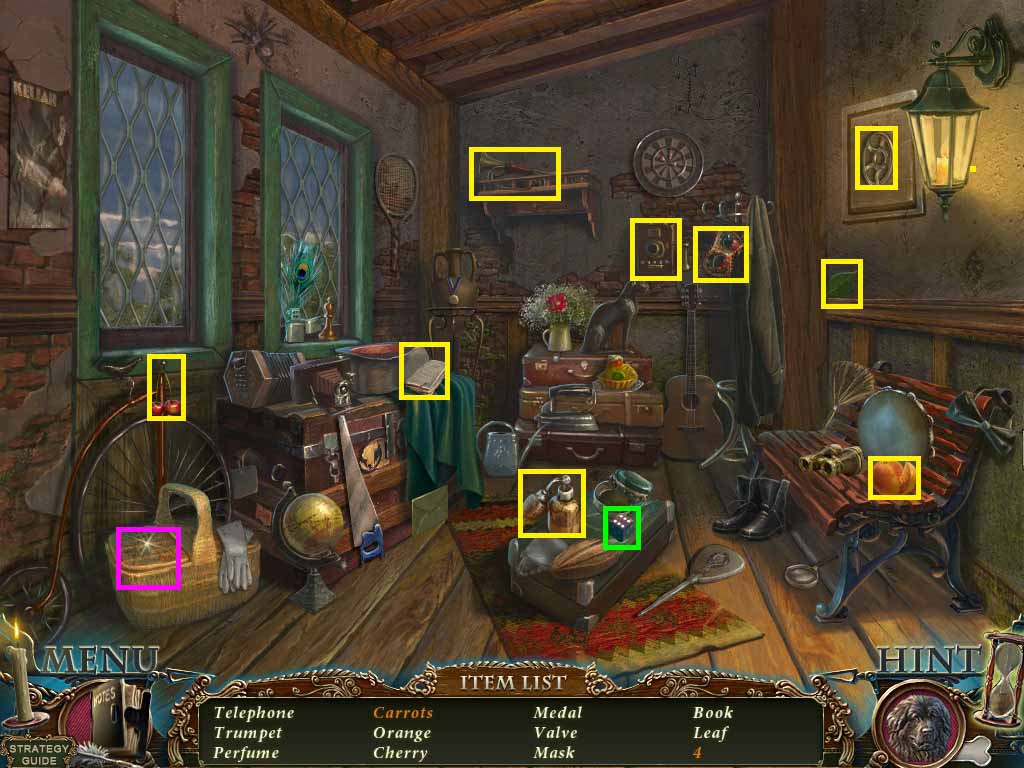
- Zoom into the gnome to access the hidden objects area.
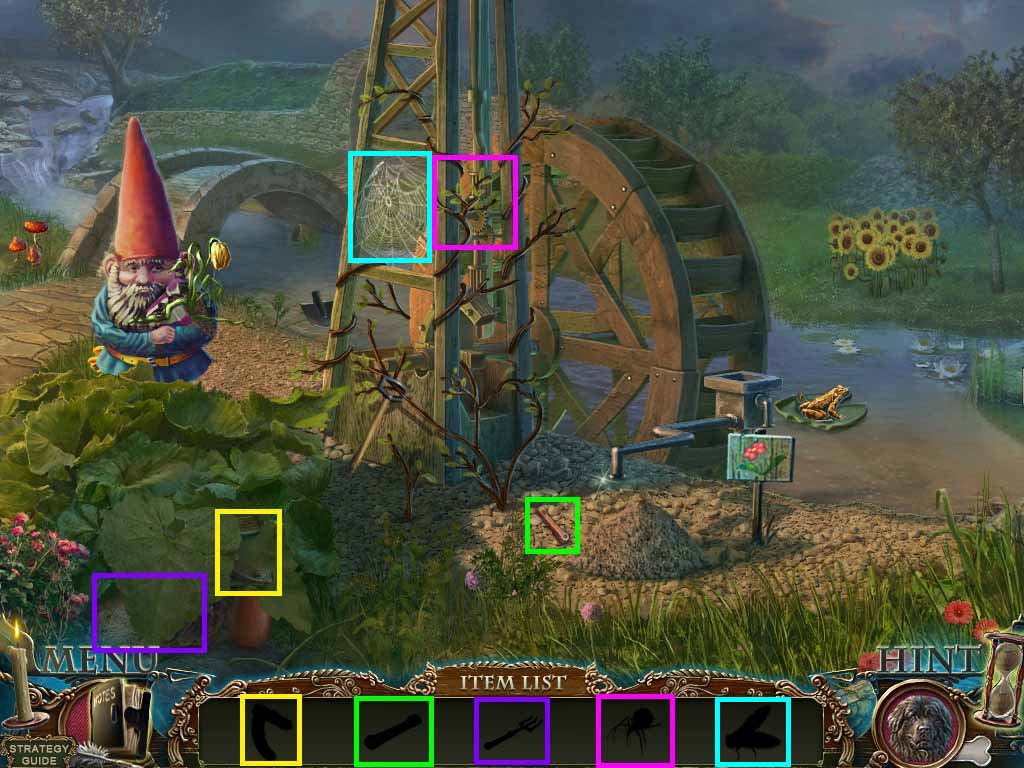
- Find the pictured items.
- Click the leaf; collect the wheel segment.
- Zoom into the sand pile; collect the rake handle.
- Click the leaf where the wheel segment was found.
- Click the mushroom pile.
- Zoom into the rake head; connect the rake handle onto it.
- Collect the rake,
- Zoom into the shovel handle.
- Use the rake on the ivy; collect the spider and the valve.
- Zoom into the web; put the spider onto it to trigger a puzzle.
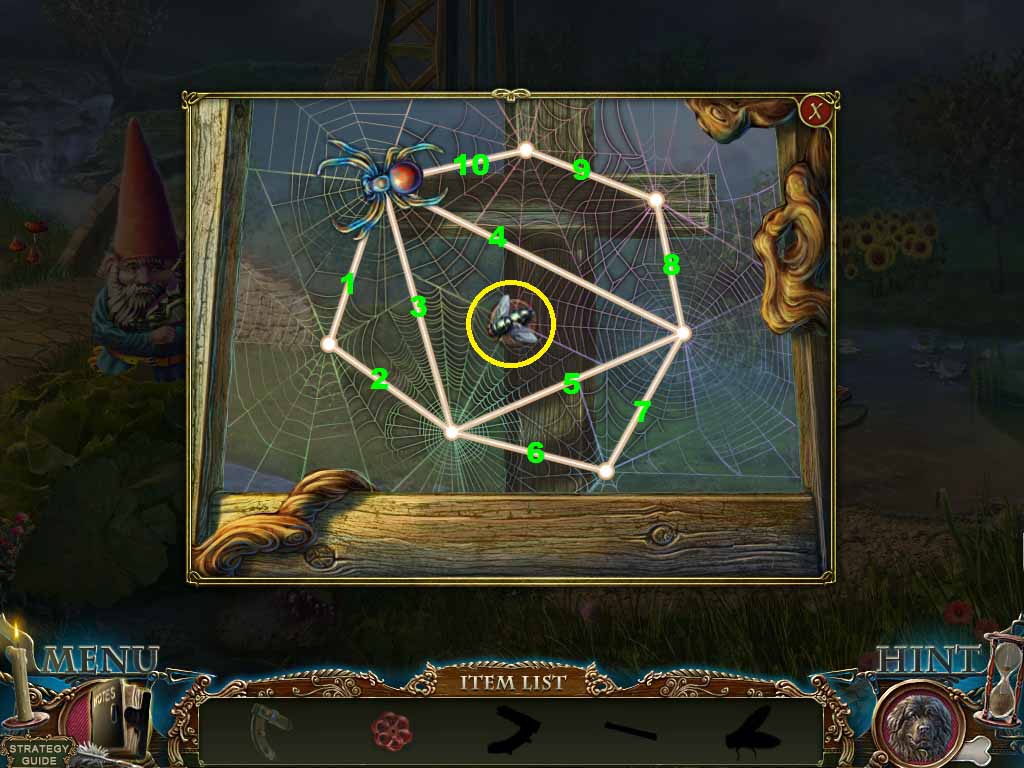
- Move the spider so that it goes over each line one time.
- Follow the pattern shown.
- Collect the fly.
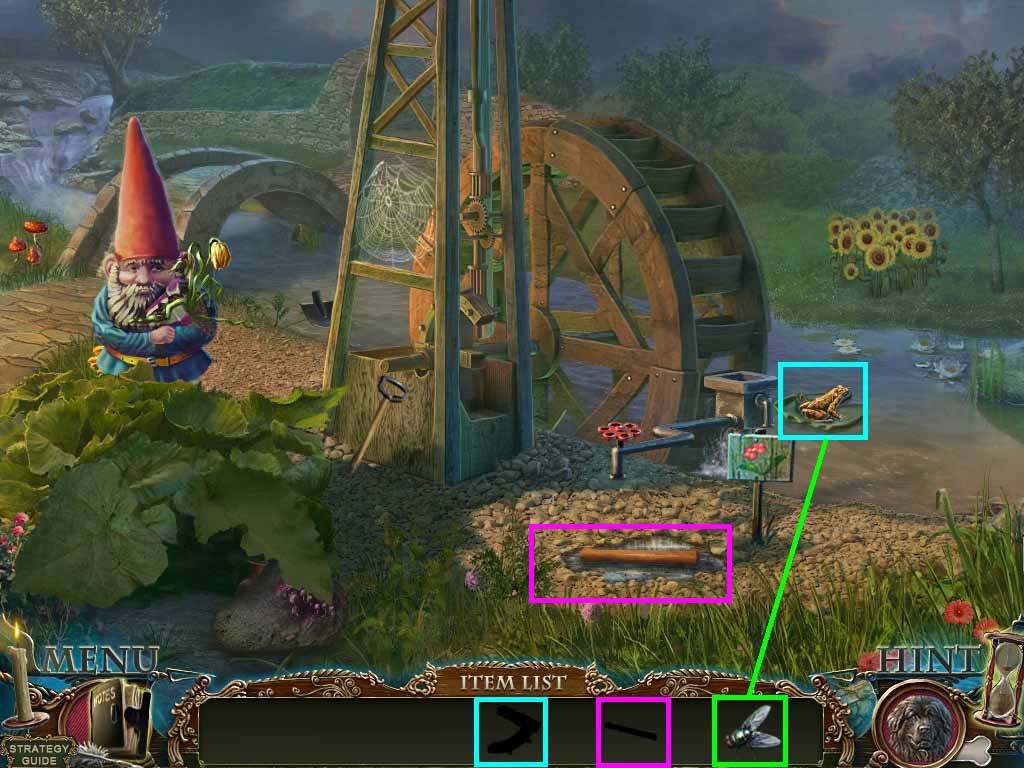
- Give the frog the fly; collect the 2nd wheel segment.
- Zoom into the spindle.
- Insert the 2 wheel segments onto the broken wheel.
- Zoom into the pipe; place the valve onto it.
- Click the valve.
- Collect the hammer handle.
- Go into the barn.
- Zoom into the workbench.
- Put the hammer head onto the hammer handle; collect the hammer.
- Zoom into the basket; collect the leather belt.
- Zoom into the window shelf.
- Place the leather belt onto the chisel handle; collect the chisel.
- Zoom into the axe.
- Collect the bloody pruner.
- Put the chisel into the slit; use the hammer on it.
- Collect the axe.
- Leave this scene.
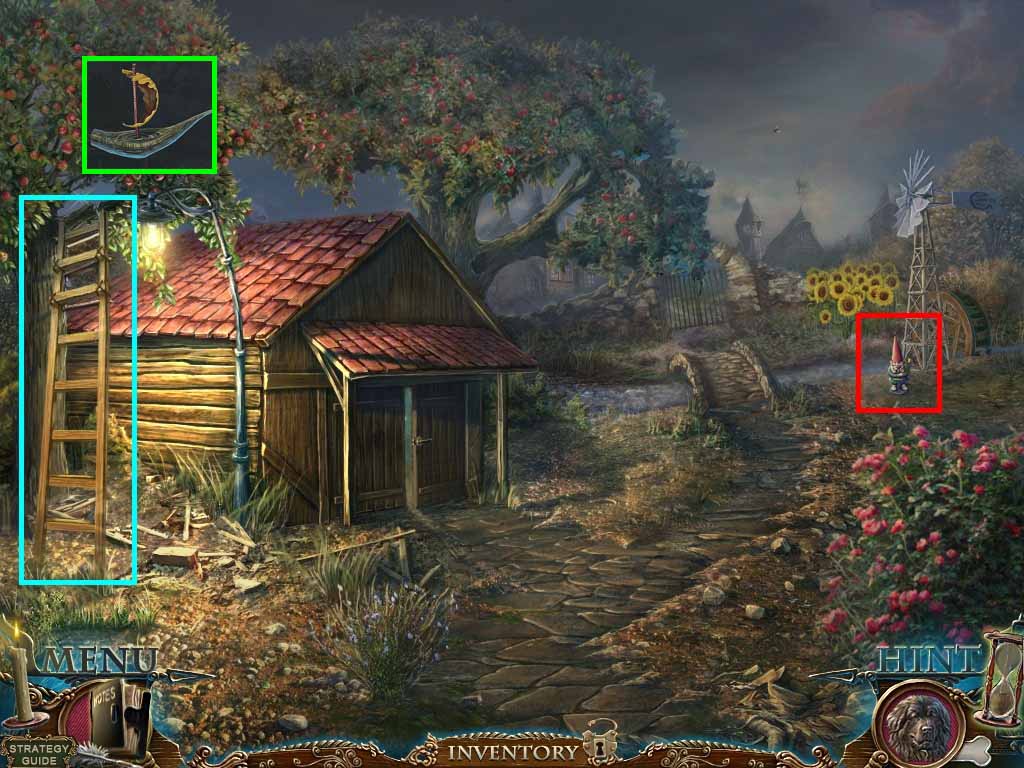
- Put the ladder against the tree.
- Zoom into the tree branch.
- Put the pencil onto the branch; place the leaf onto the pencil
- Chop the branch with the axe; collect the ship.
- Zoom into the gnome to access a hidden objects area.
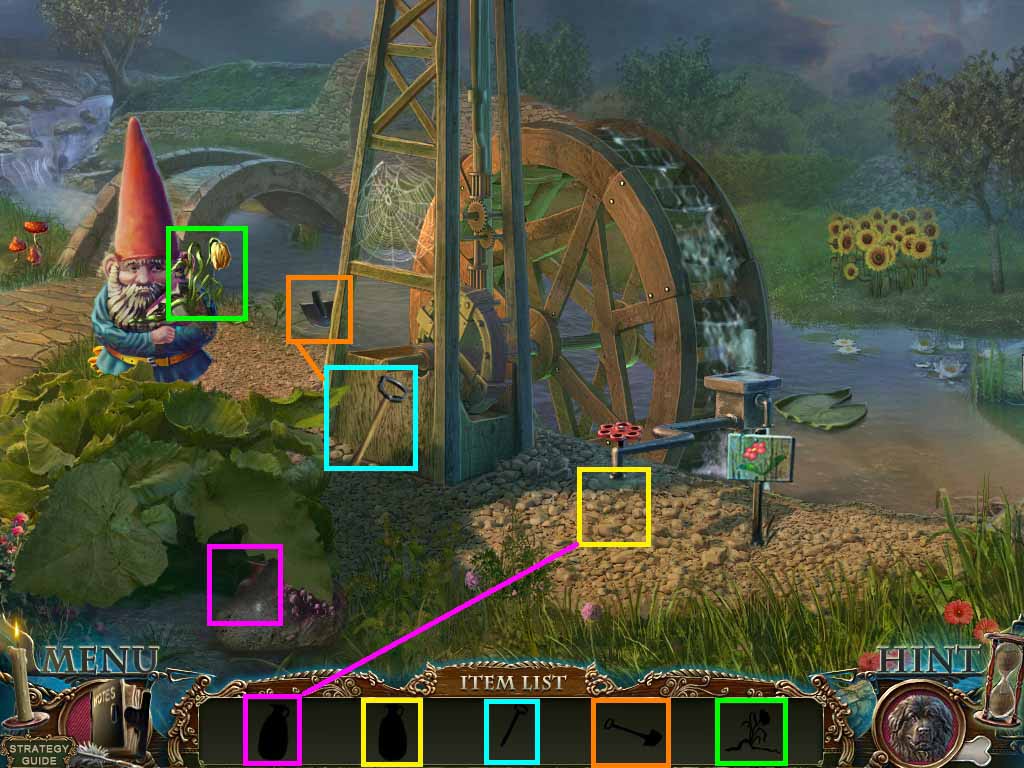
- Click the mushroom pile; collect the jug.
- Zoom into the faucet; put the jug under it.
- Click the valve and collect the jug with water.
- Collect the shovel handle.
- Zoom into the shovel head; attach the shovel handle.
- Collect the handle.
- Collect the flower.
- Use the shovel to dig near the sign.
- Insert the flower into the hole.
- Water the flower using the jug of water.
- Zoom into the frog to trigger a puzzle.
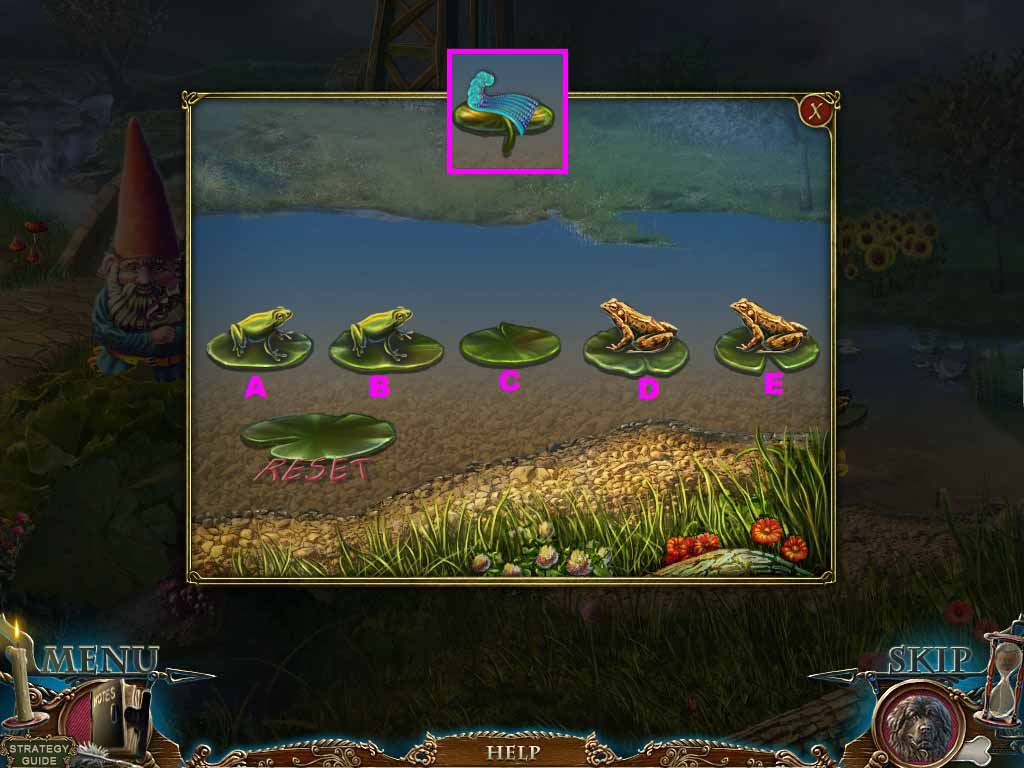
- Move the frogs around.
- Use the following pattern to solve:
- B – D – E – C – A – B- D –C
- Collect the wave piece.
- Zoom into the gate.
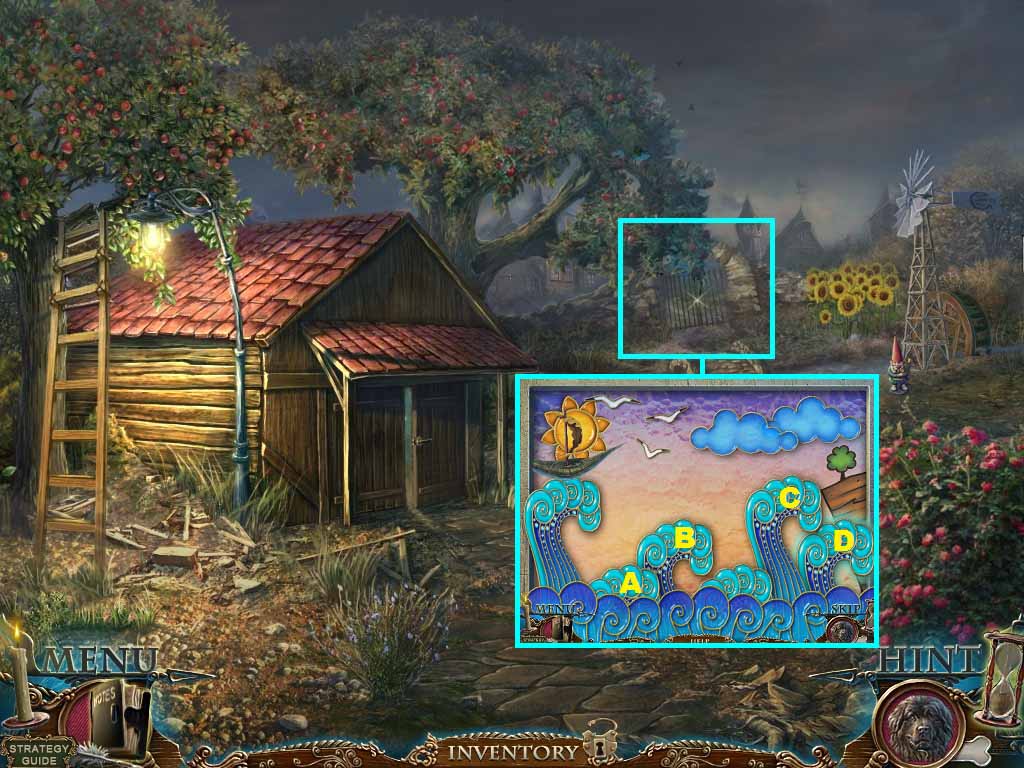
- Zoom into the lock.
- Insert the ship and wave piece to trigger a puzzle.
- To solve the puzzle use the following sequence:
- A: 2 x’s
- B: 2 x’s
- B: 1 x
- C: 2 x’s
- D: 2 x’s
- Go through the gate.
Author: Date: Jan-22-2013
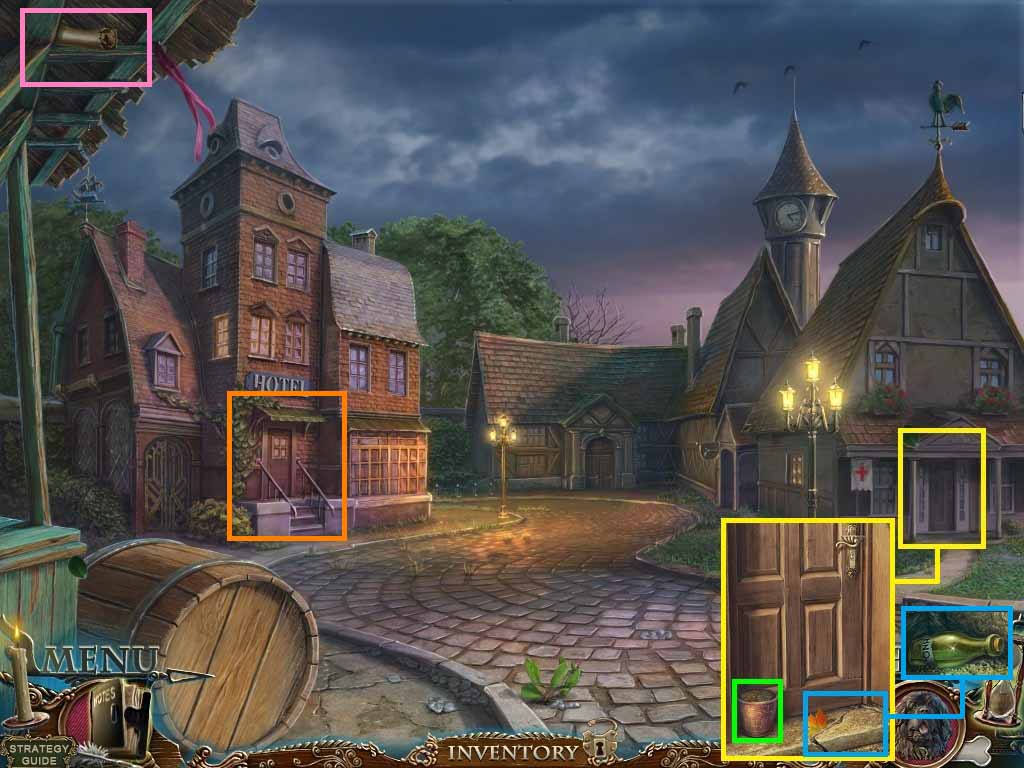
- Zoom into the clinic door; collect the flowerpot.
- Click the broken stair.
- Zoom into the bottle.
- Collect the acid.
- Click the scroll and collect it from Dupin.
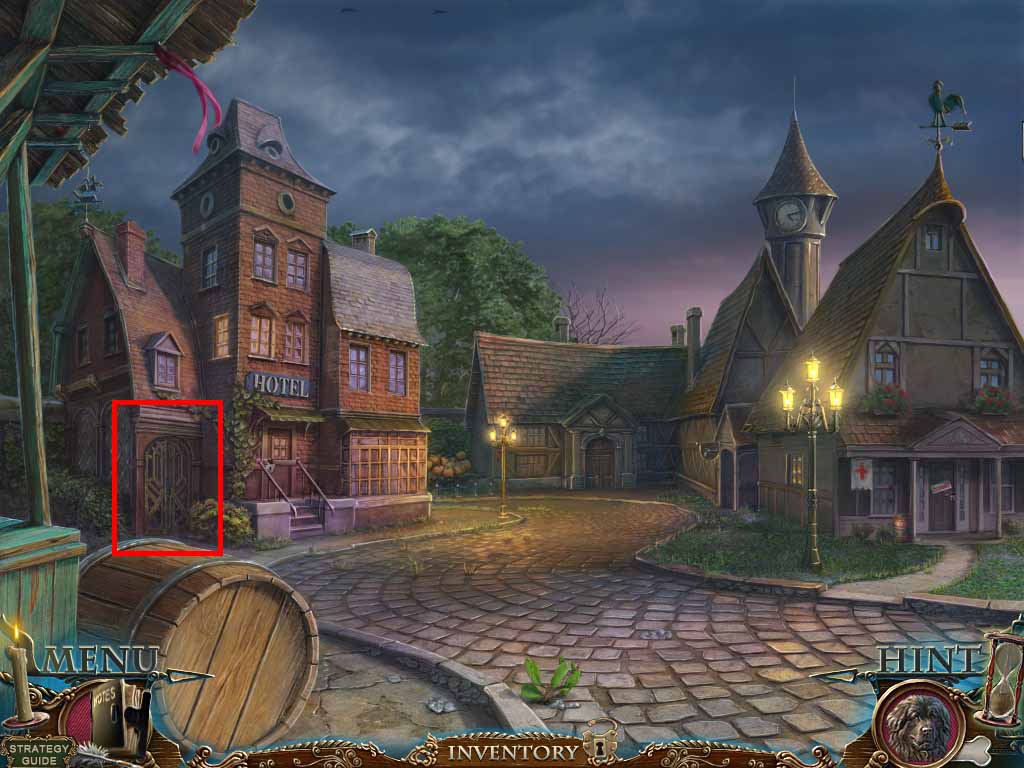
- Move into the hotel.
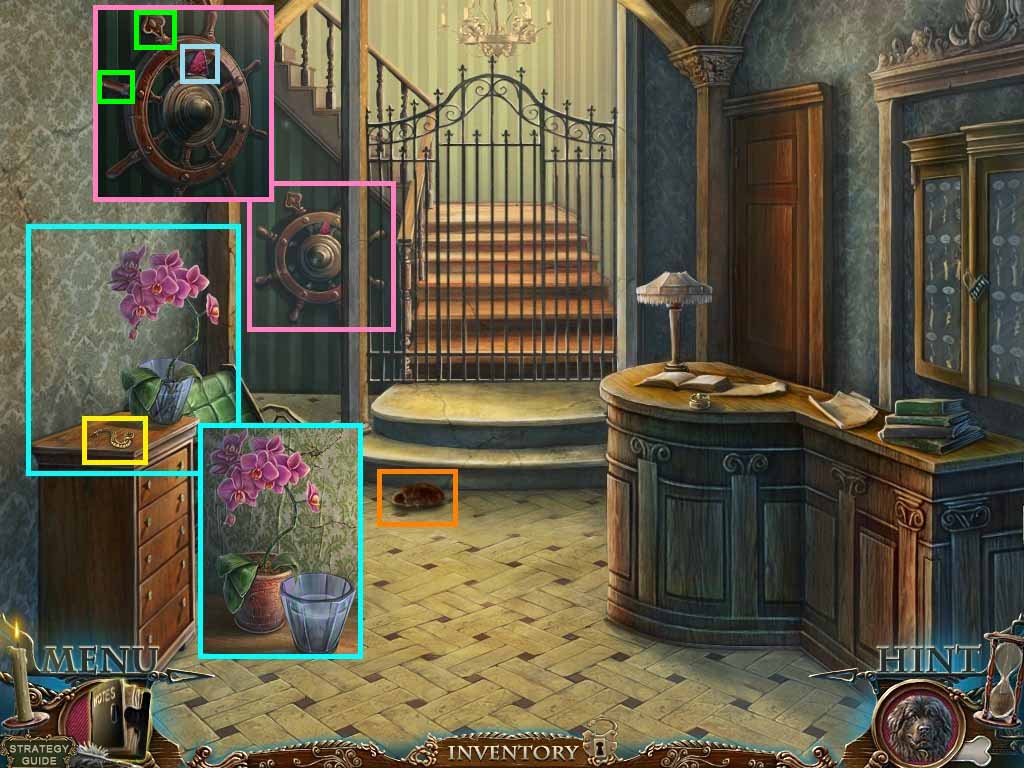
- Zoom into chest of drawers; collect the snake.
- Move the flowerpot next to the vase.
- Place the flowers into the flowerpot; collect the vase with water.
- Collect the shoe.
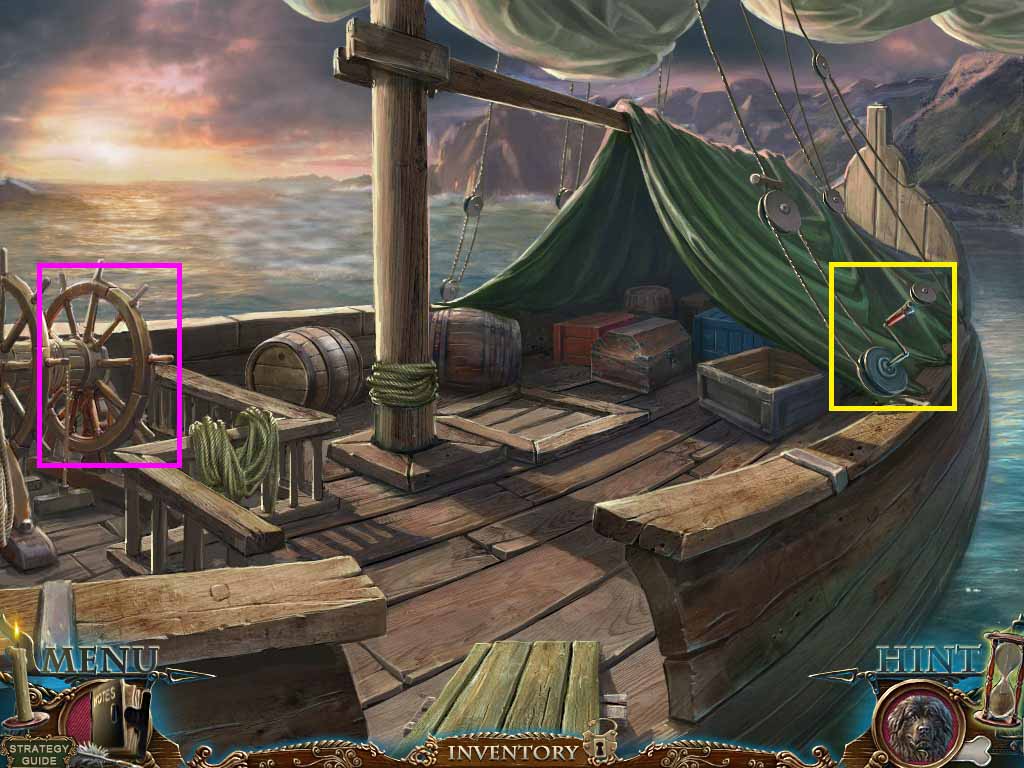
- Zoom into the ship’s wheel; collect the stained glass piece, and the 1st and 2nd weights.
- Move back once.
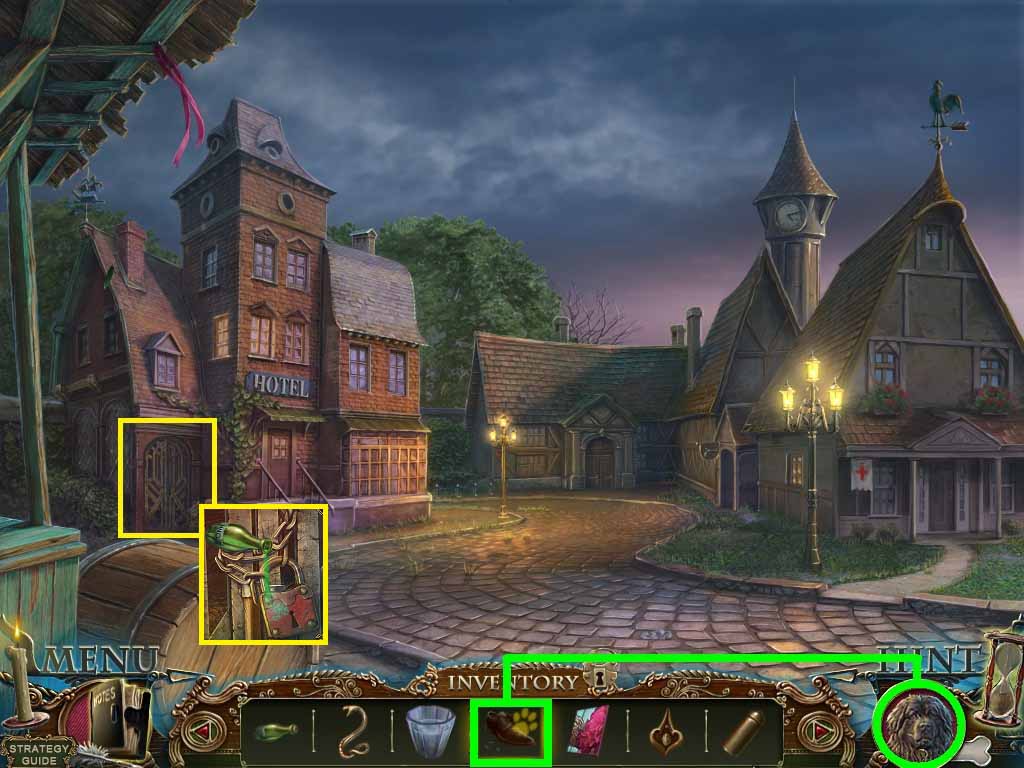
- Give Arthur the shoe.
- Zoom into the lock and pour the acid onto it.
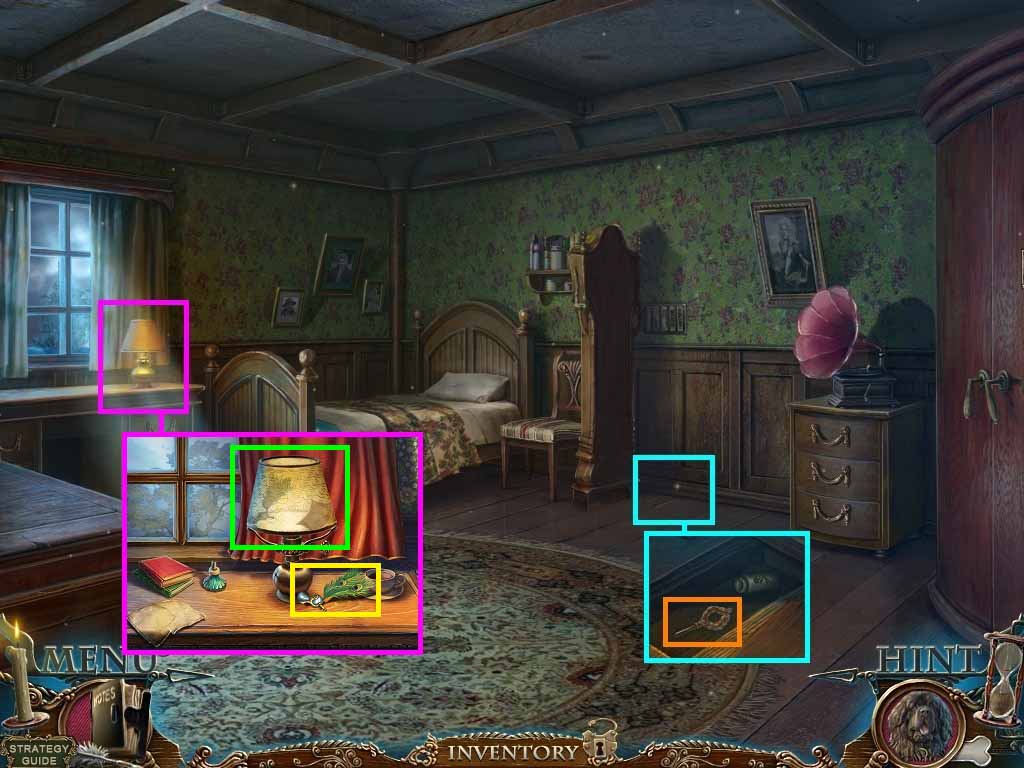
- Go into the room.
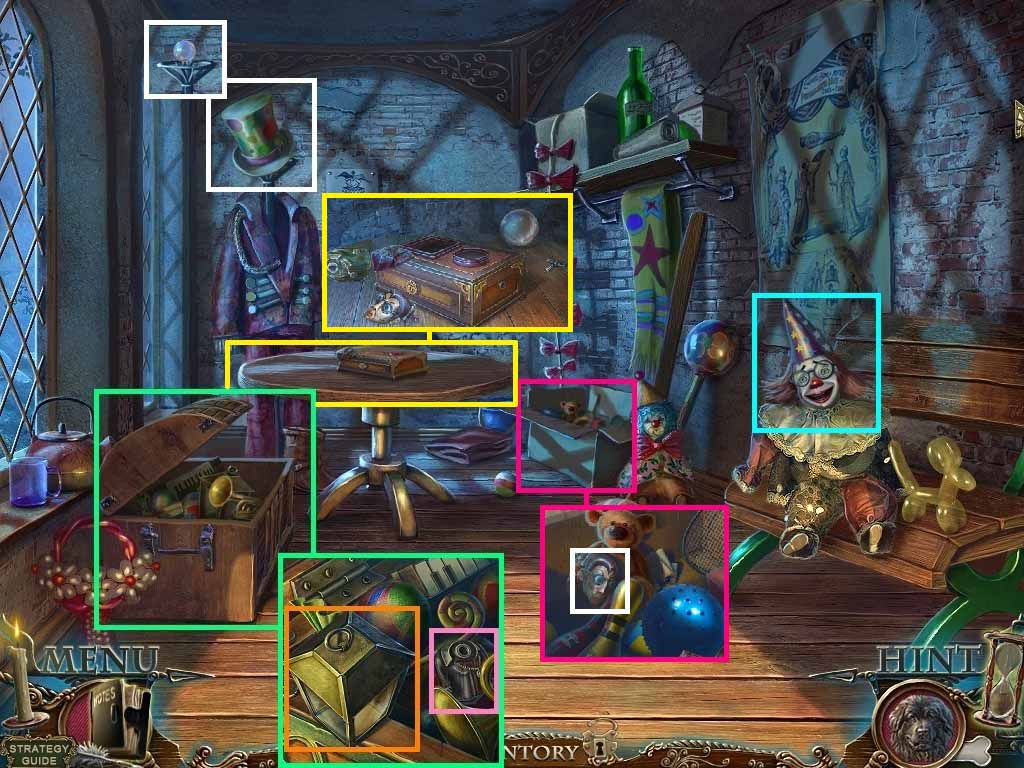
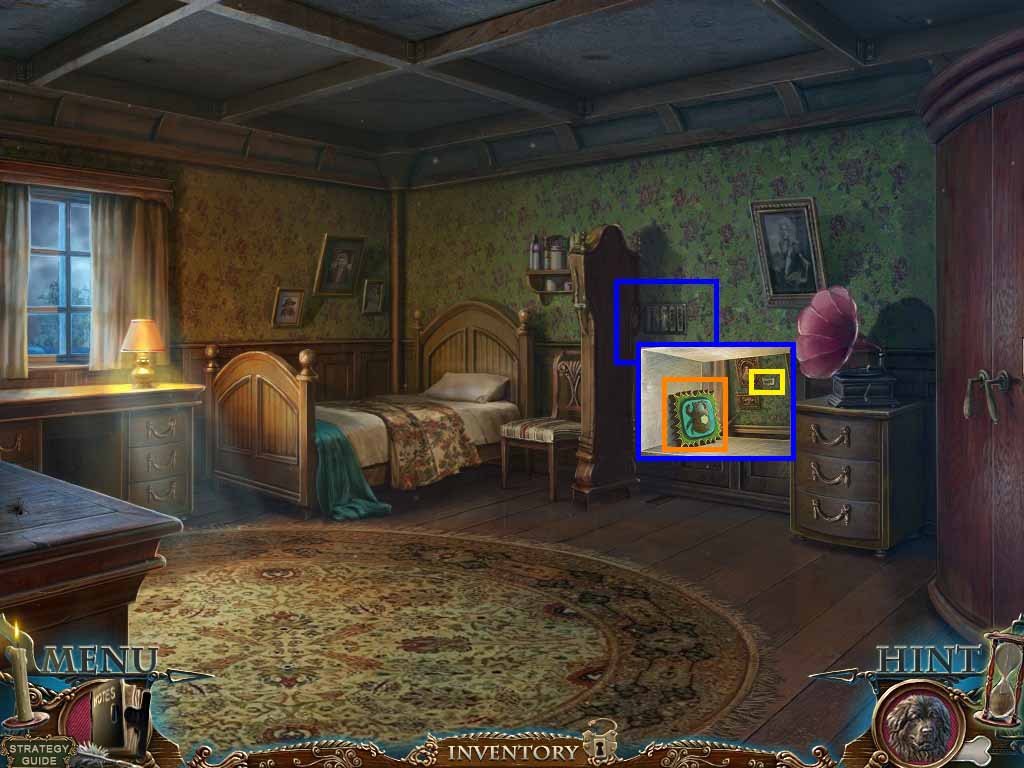
- Click the chest and zoom in.
- Click the lantern; collect the fortune teller’s body.
- Zoom into the hat; click it.
- Collect the magic ball.
- Zoom into the clown; collect the wind up key.
- Zoom into the box; click the blue ball.
- Collect the fortune tellers head.
- Zoom into the table.
- Place the wind up key, the fortune tellers head and body and magic ball onto the table.
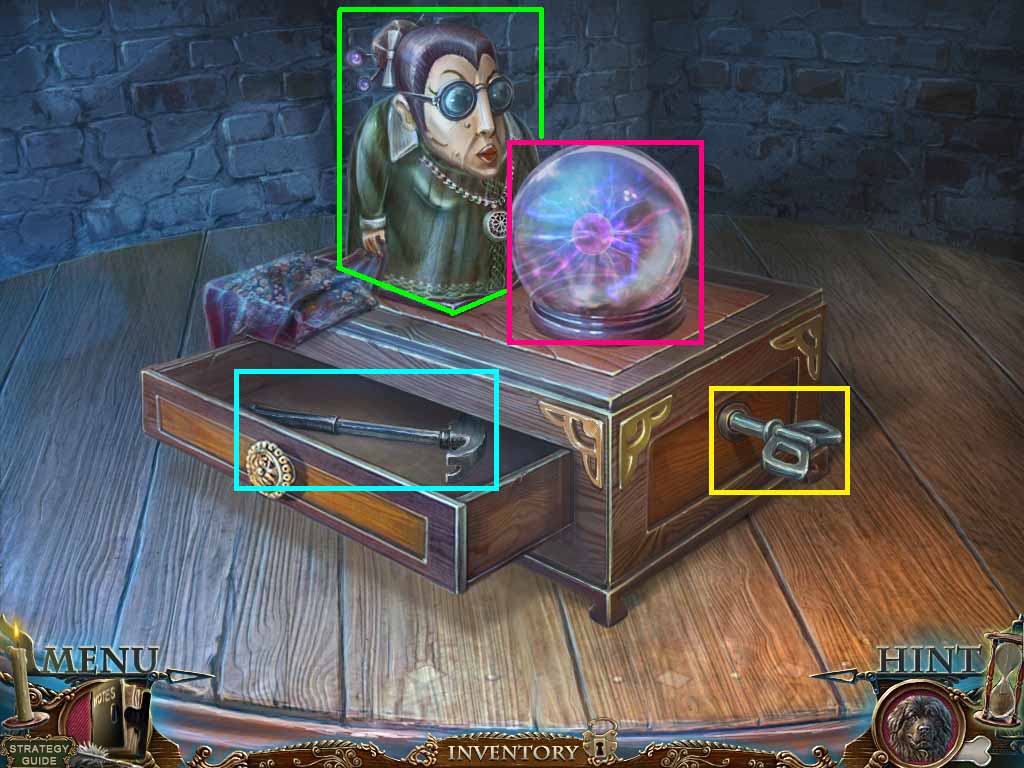
- Put the body, head and the ball on top of the box.
- Insert the key into the hole and click it.
- Collect the hammer.
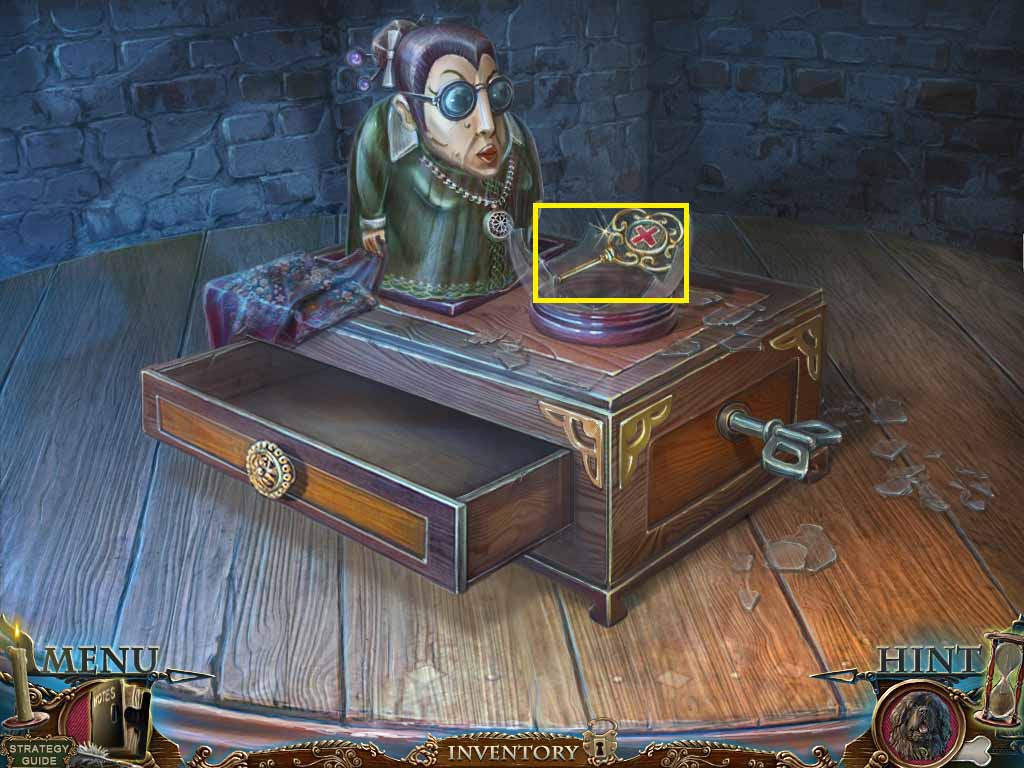
- Smash the ball using the hammer.
- Collect the doctor’s key.
- Move back one time.
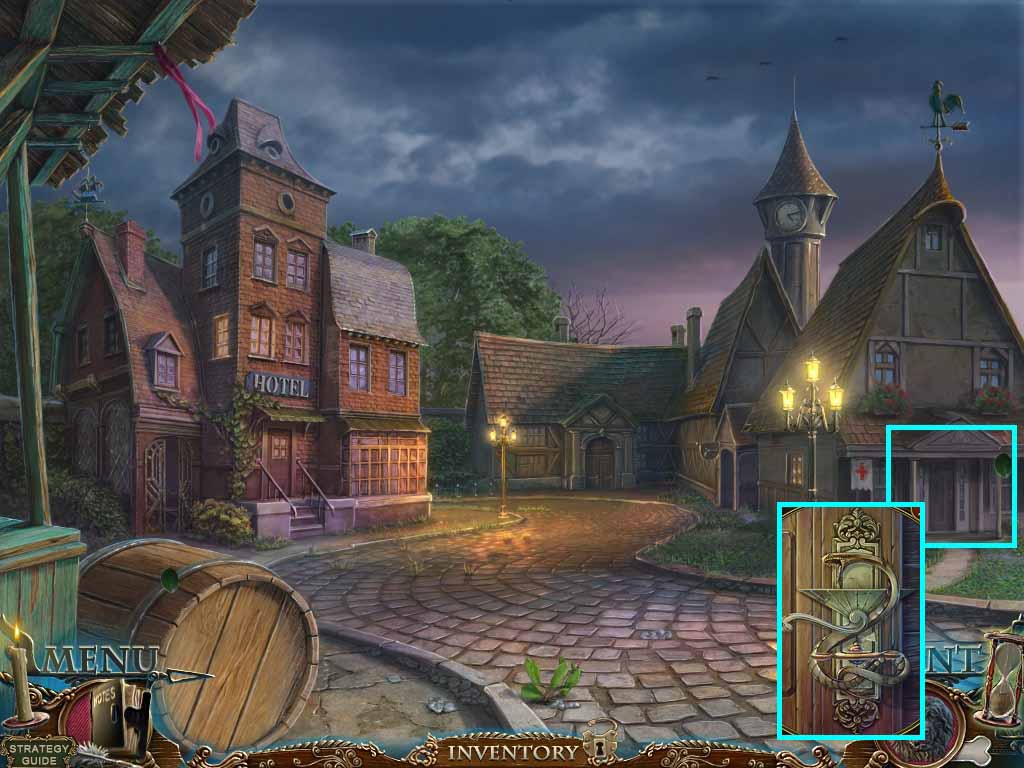
- Zoom into the clinic’s door lock.
- Insert the snake.
- Insert the doctor’s key and click it.
- Go through the door.
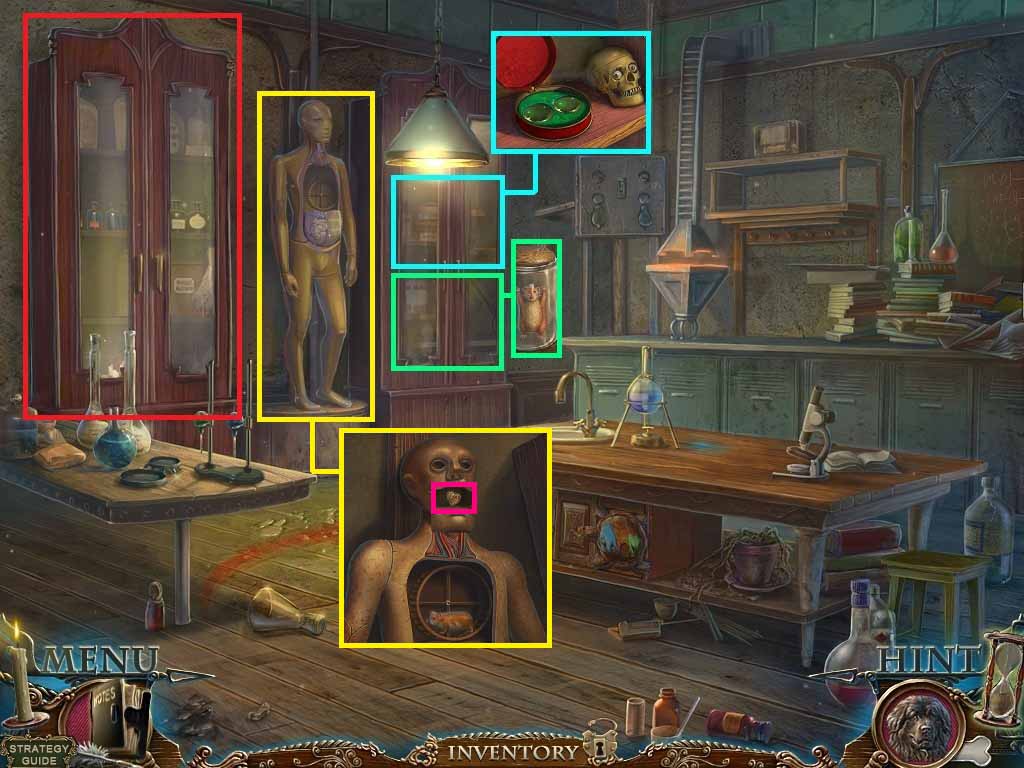
- Click the cabinet; zoom in.
- Click the container; collect the lenses.
- Zoom into the shelf.
- Click the jar lid and collect the hamster.
- Zoom into the dummy.
- Inset the hamster into the wheel; collect the rusty heart.
- Click the cabinet to access a hidden objects area.
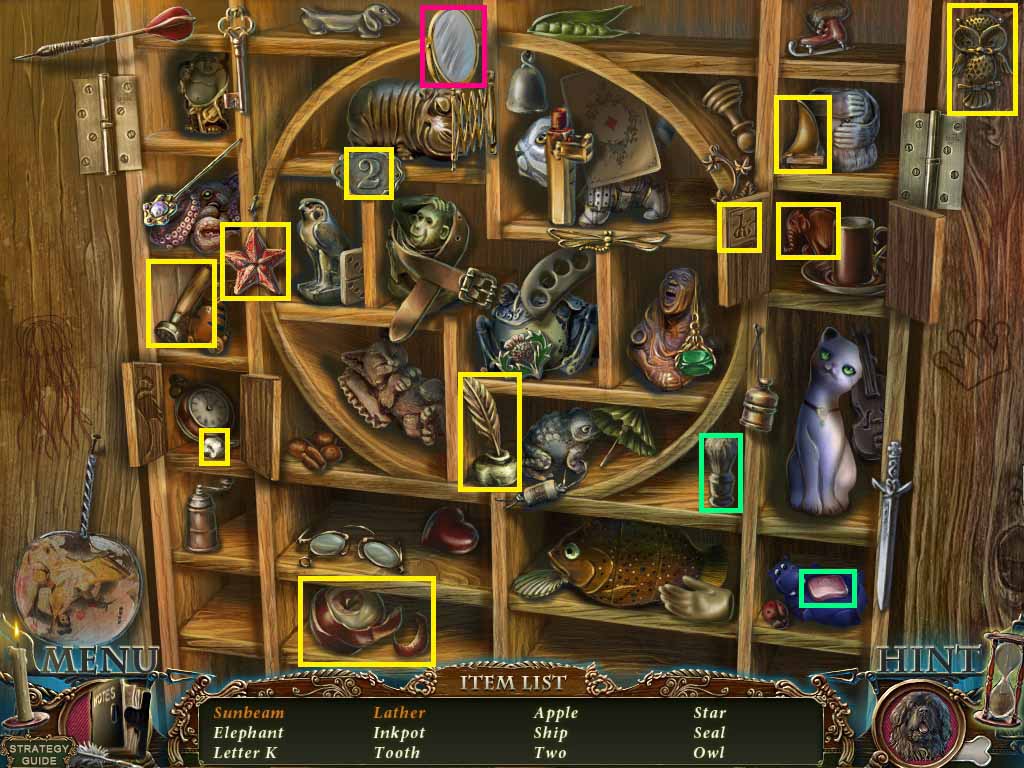
- Find the listed items.
- Click the cabinet doors to collect the elephant, the letter K and the tooth.
- Click the mirror two times to collect the sunbeam.
- Place the brush onto the soap to collect the foam.
- Collect the elephant.
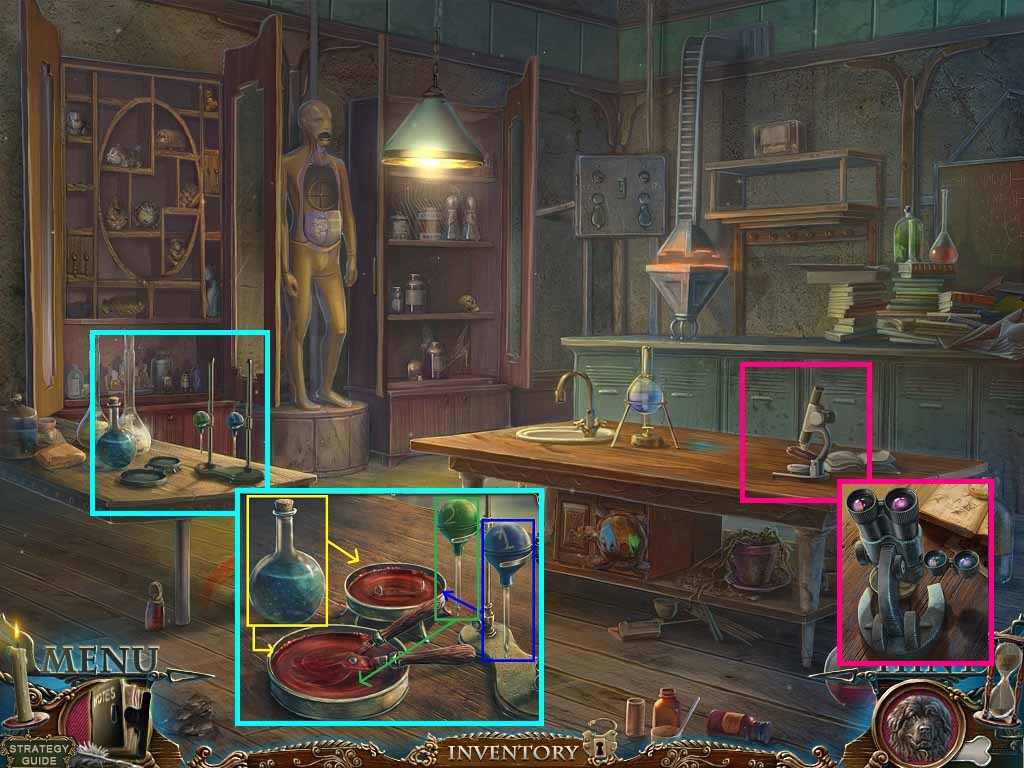
- Zoom into the table.
- Place the bloody nail and the bloody pruner into the dishes.
- Click the cork from the beaker.
- Pour the liquid into the dishes.
- Pump pipette 1 onto the nail dish.
- Pump pipette 2 onto the pruner dish.
- Collect the 2 pipettes with blood.
- Zoom into the microscope; pump the 2 pipettes with blood into the dish.
- Put the lenses into the holder and click them.
- Put the dish onto the tray; click the tray.
- Examine the scope to trigger a puzzle.

- Match the color samples.
- To solve follow this sequence:
- B – A – G- D – E – F – A –B – C – D – E – F – A – G – J – I – H – M – L – K- J – I – H – M – L – K – J – I – H
- Collect the instructions.
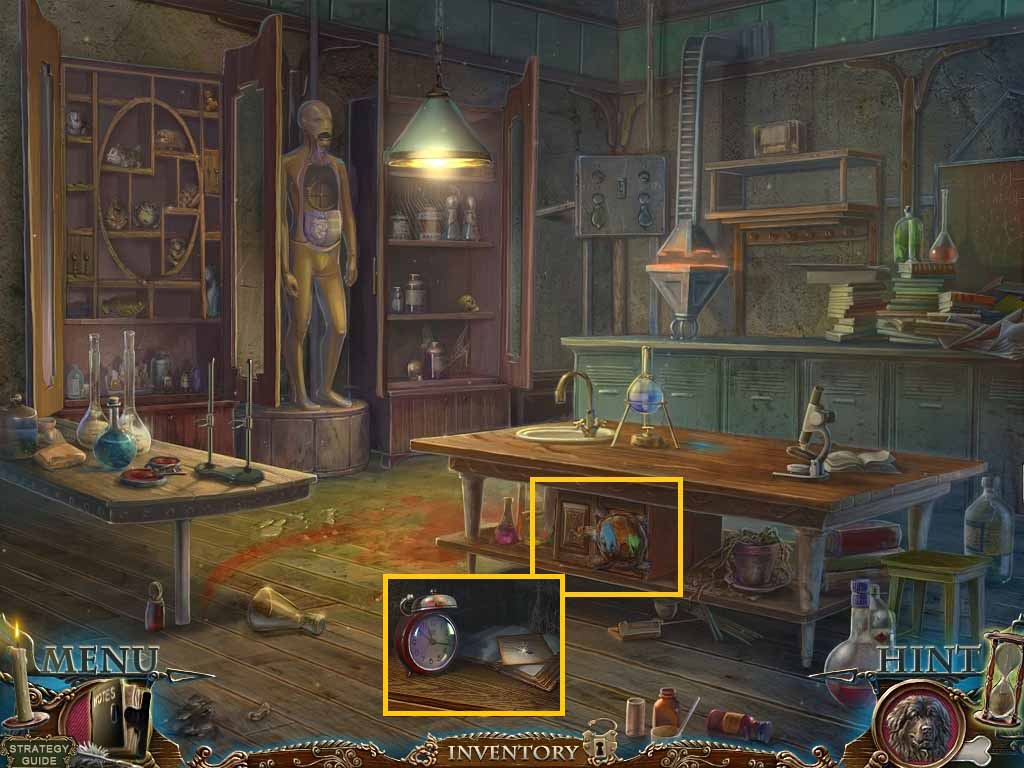
- Zoom into the cabinet.
- Place the instructions on the left and insert the elephant into the slot.
- Click and drag the elephant heads to match the instructions.
- Click the cabinet and collect the note.
- Click the alarm clock; collect the bell.
- Move back one time and go into the hotel.

- Zoom into the front desk.
- Put the bell onto the bell bottom.
- Click and drag the bell button on the top.
- Ring the bell.
- Hand the concierge the note.
- Move upstairs.
- Collect the veil.
- Zoom into the table to access a hidden objects area.

- Find the listed items.
- Collect the matches by moving the flowers.
- Click the popper to create the snow.
- Collect the matches.
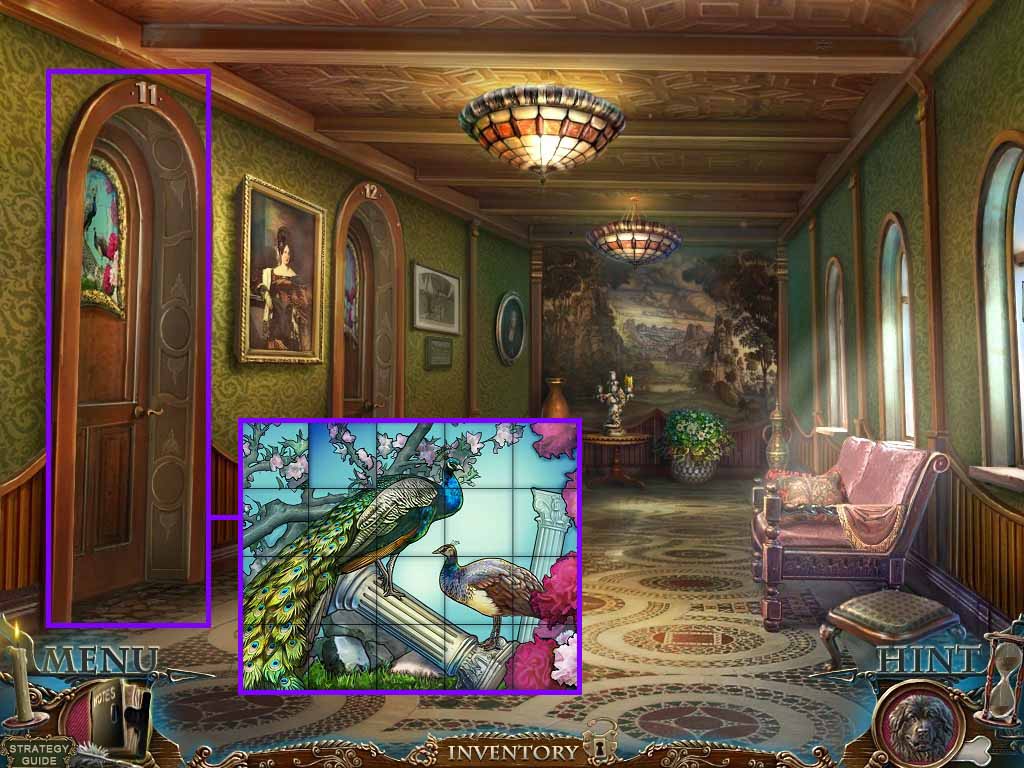
- Zoom into the door; insert the piece of stained glass to trigger a puzzle.
- Click and drag the pieces into the correct arrangement.
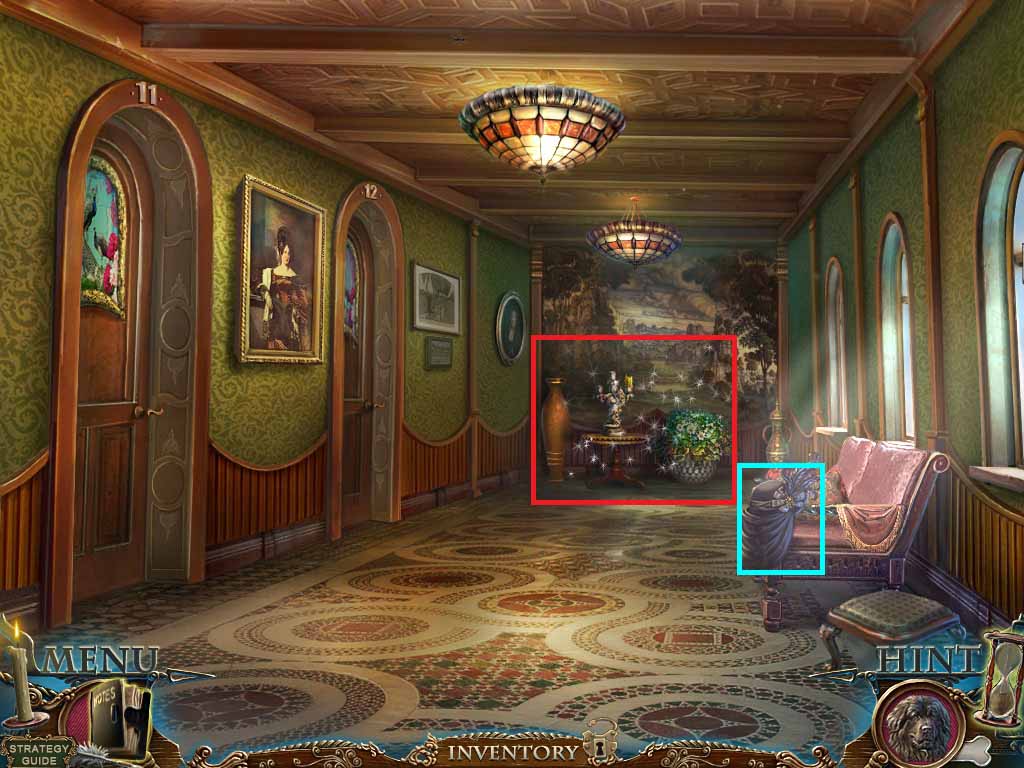
- Move left and into room 11.
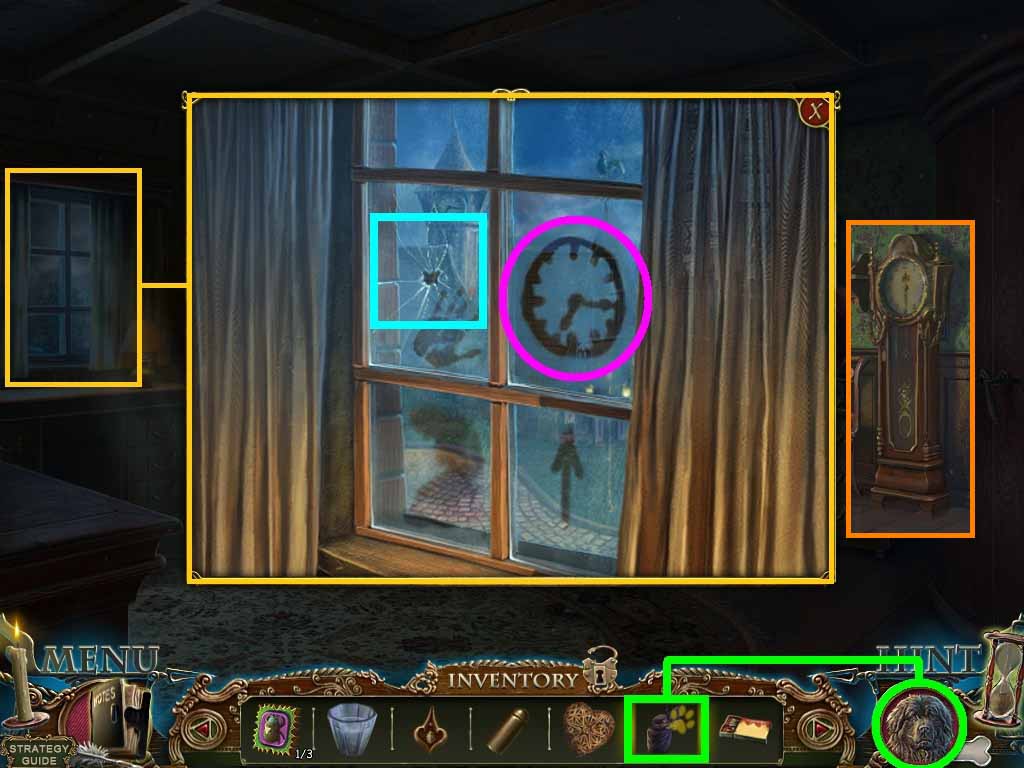
- Zoom into the top most window panes.
- Click the hole in the glass.
- Notice the time 7:15.
- Hand Arthur the veil.
- Close the close-up.
- Zoom into the clock face; insert the 2 weights onto the chains to trigger a puzzle.
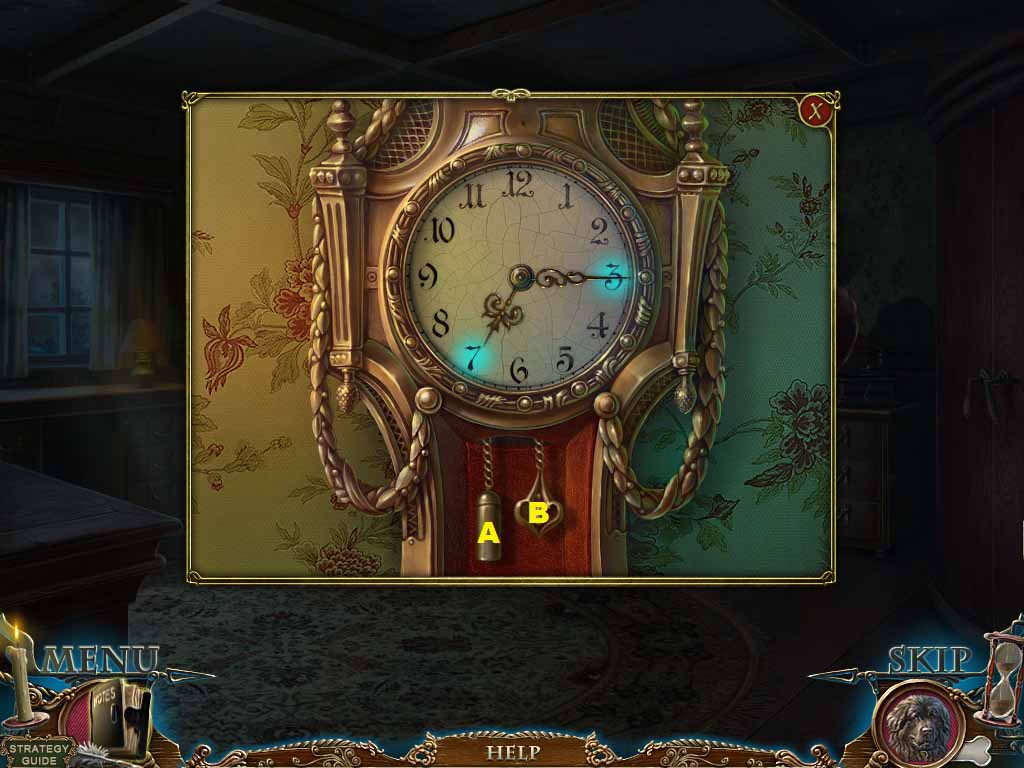
- Solve as follows:
- B: 3 x’s
- A: 8 x’s
- Zoom into the floor.
- Click the floor board; collect the lamp valve.
- Notice the poison bottle.
- Zoom in two times to the lamp on the desk.
- Insert the lamp valve into the hole; click the valve.
- Click the lamp shade; collect the note.
- Collect the ringer bird’s head.
- Move back three times.
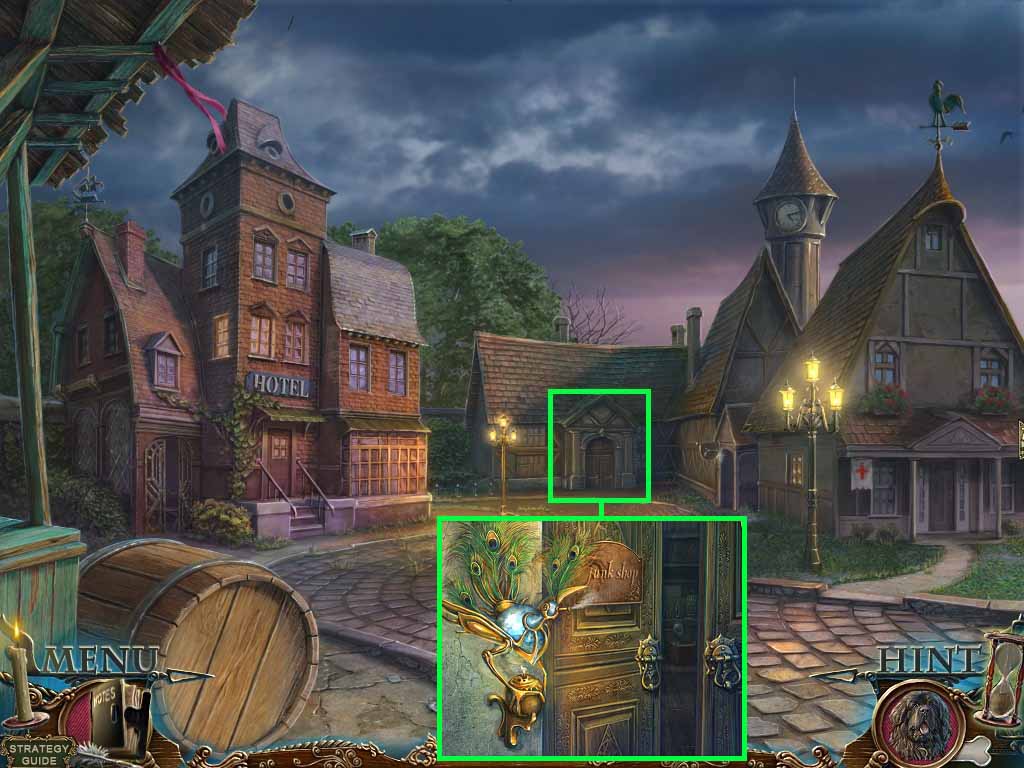
- Zoom into the junk shop door.
- Pour the vase with water into the ringer.
- Place the ringer bird’s head onto the top of the ringer.
- Use the matches on the burner.
- Go into the junk shop.
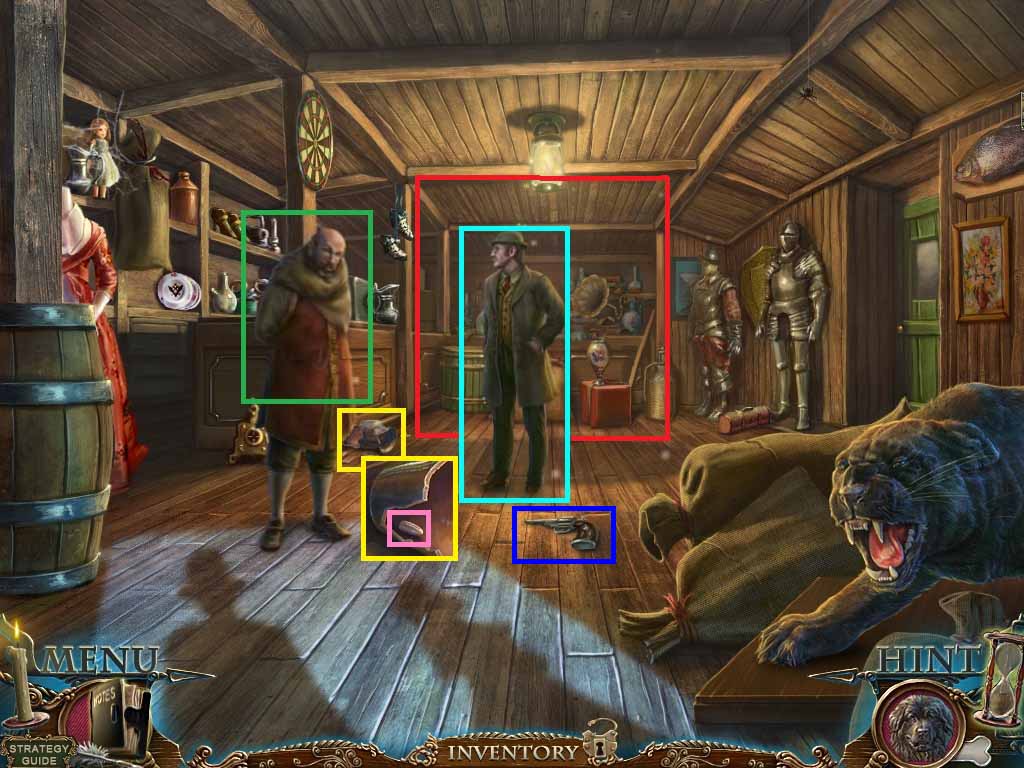
- Click Le Grand.
- Hand the junk dealer the note.
- Zoom into the broken vase; collect the bullet 1/ 2.
- Collect the gun.
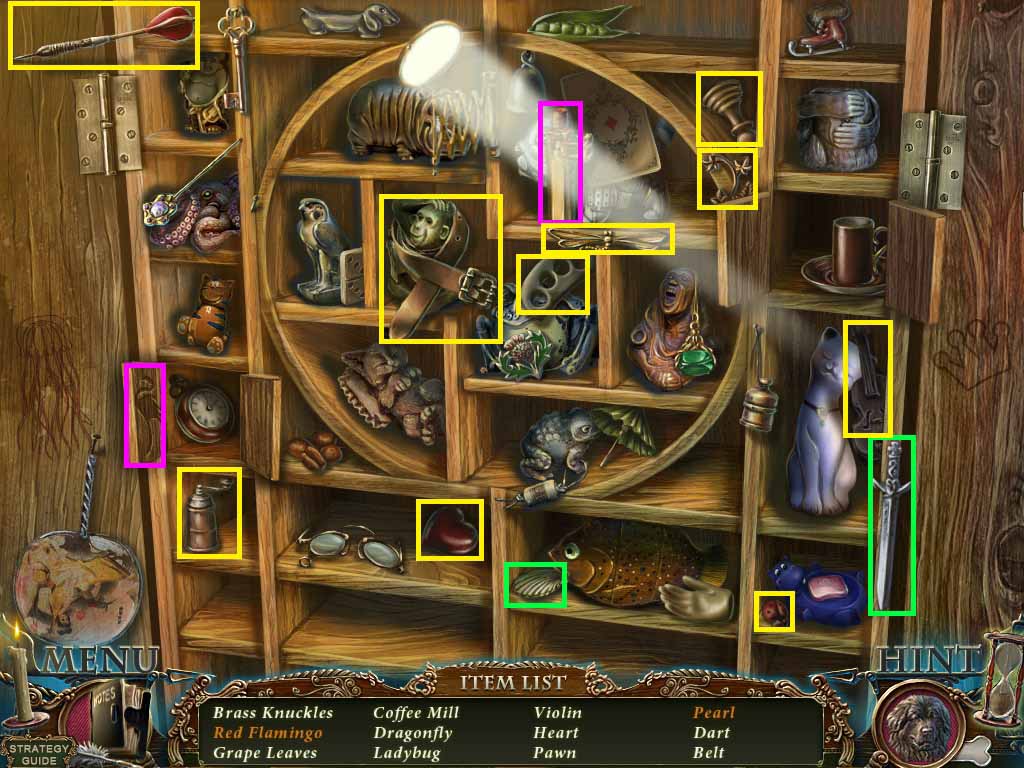
- Zoom into the back wall to access a hidden objects area.
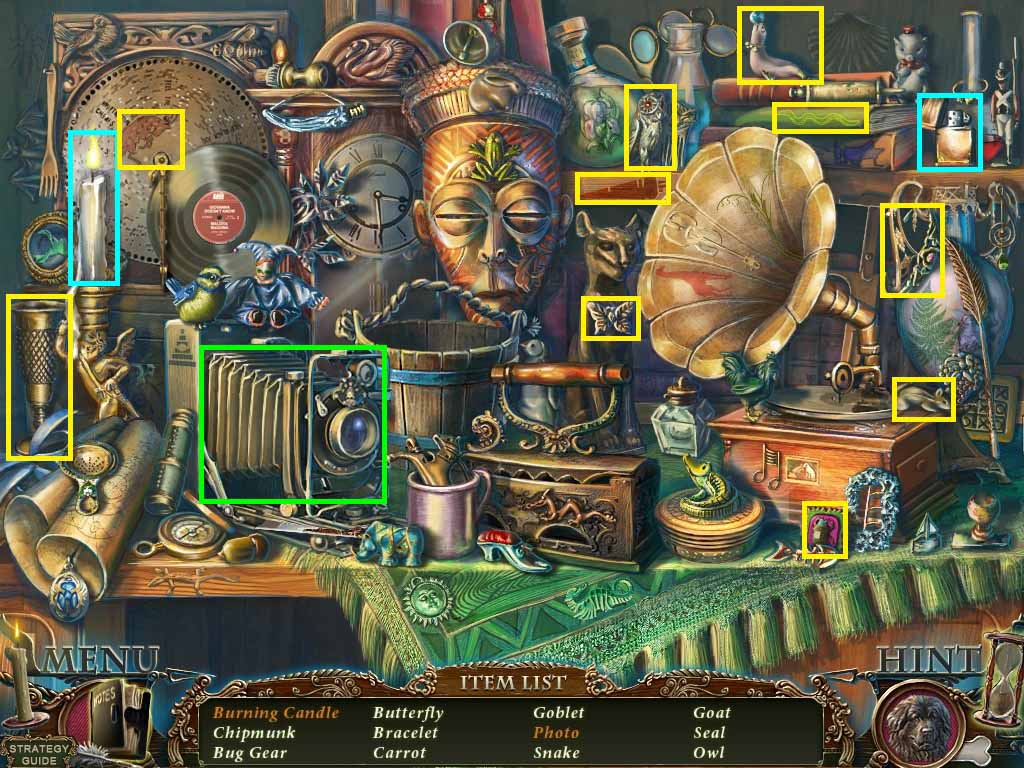
- Find the listed items.
- Click the camera to collect the photo.
- Light the candle using the lighter; collect the burning candle.
- Collect the insect gear 2/ 3.
- Move out the door on the right.
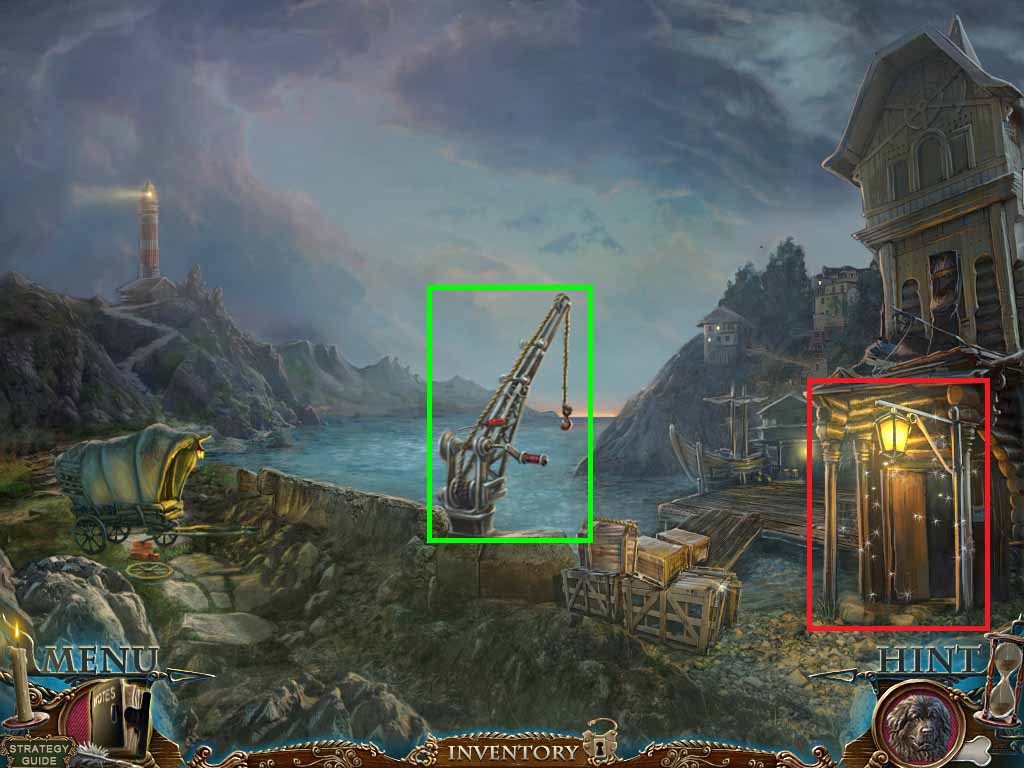
- Zoom into the crane; collect the screwdriver.
- Zoom into the building entrance to access a hidden objects area.
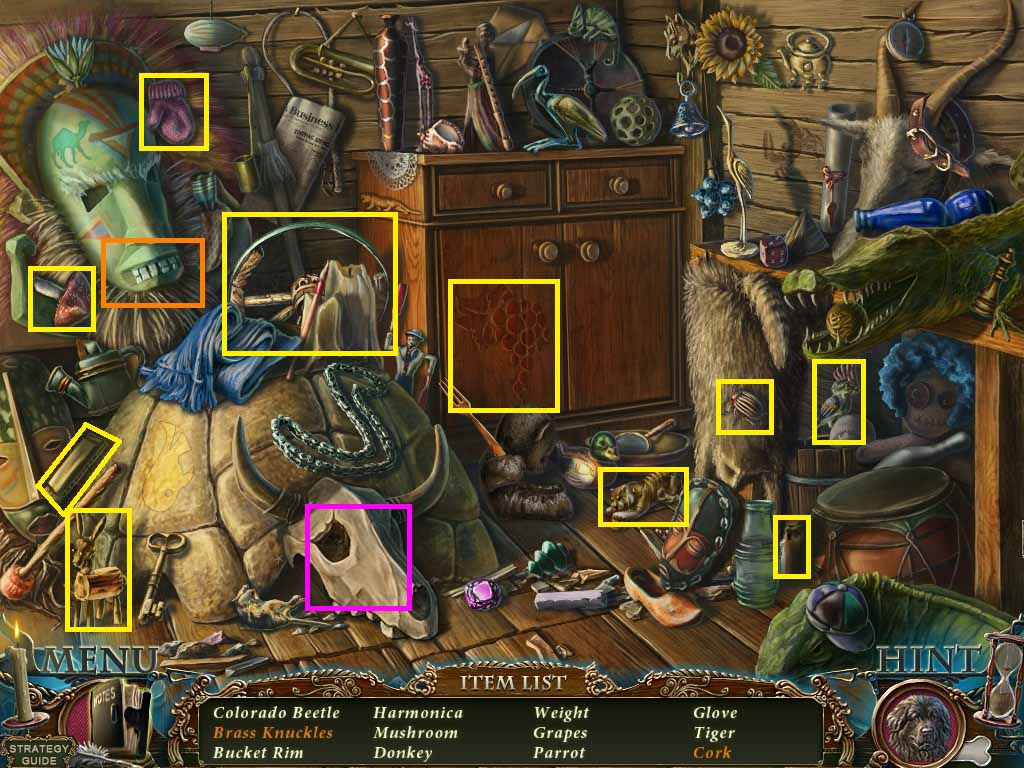
- Find the listed items.
- Click the skull; collect the brass knuckles.
- Click the mask jaw; collect the cork.
- Collect the iron rim.
- Move back two times and go into the hotel; move upstairs.
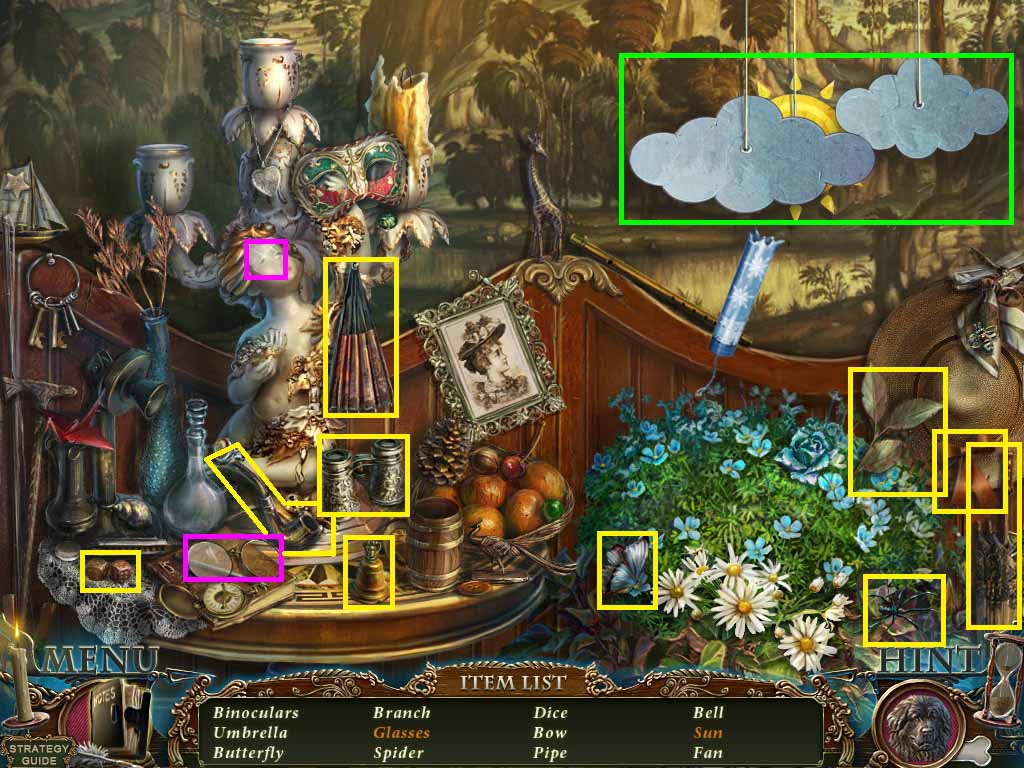
- Zoom into the end of the hallway to access a hidden objects area.
- Find the listed items.
- Click the clouds; collect the sun.
- Place the lens into the frame; collect the glasses.
- Collect the binoculars,
- Move left into the room 11.
- Zoom into the wall grate.
- Use the screwdriver on it; collect the insect gear 3 /3.
- Use the binoculars on the code.
- Move back two times.
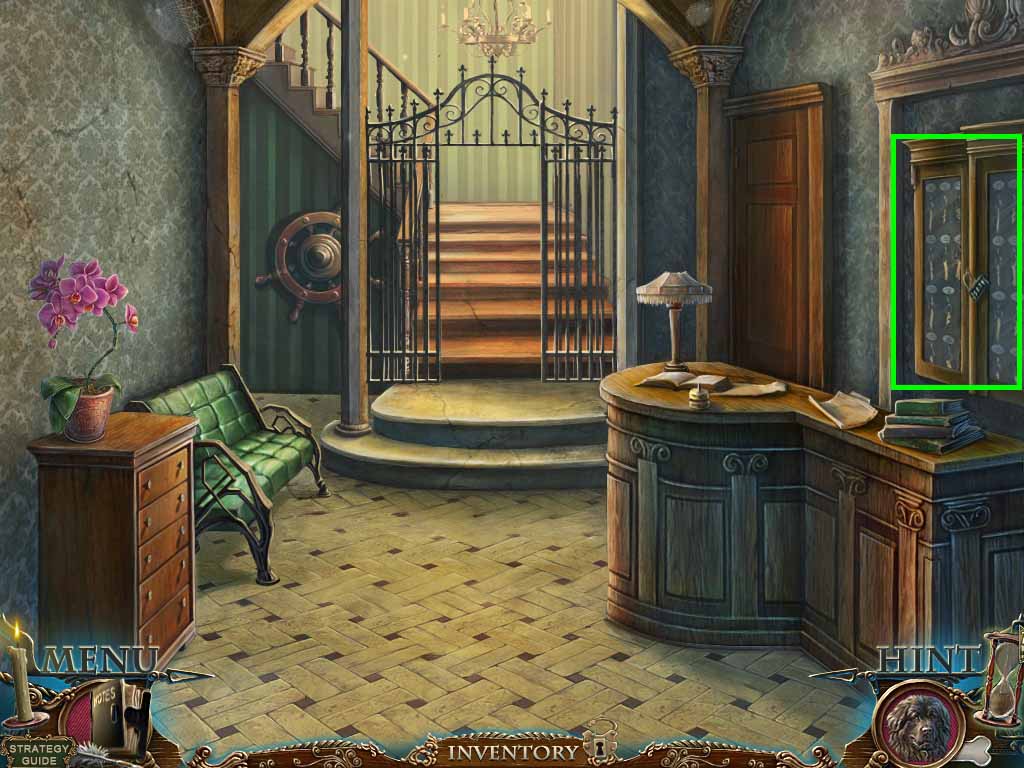
- Zoom into the key cabinet two times.
- Use the code from upstairs: 4895.
- Click the cabinet to trigger a puzzle.
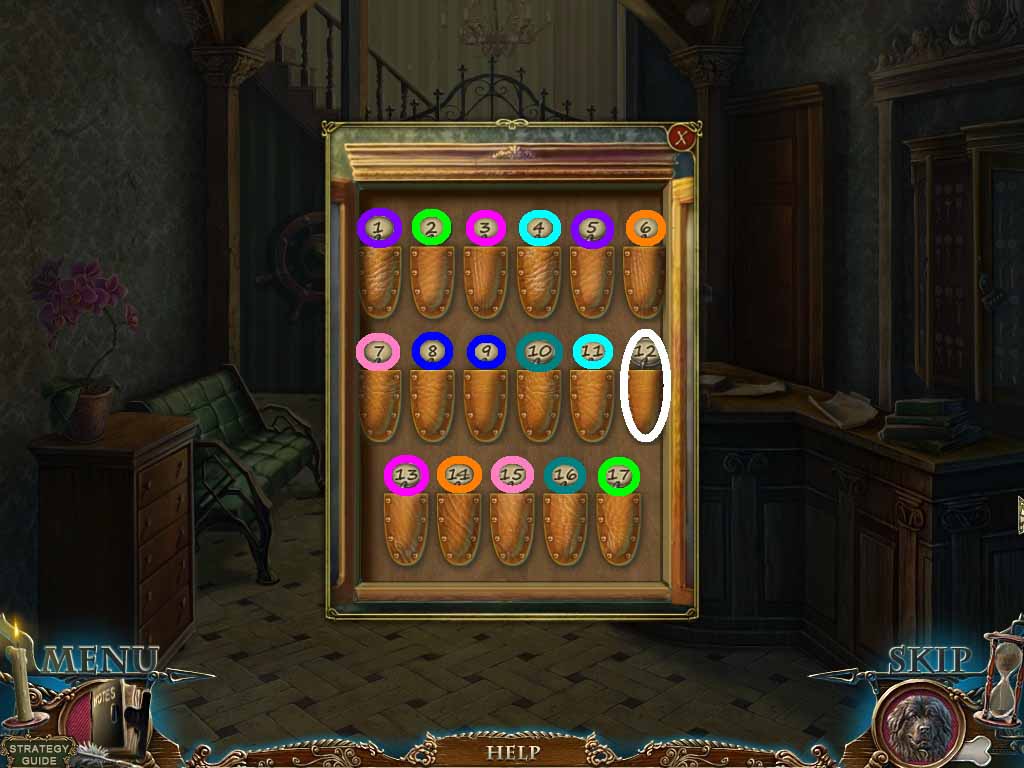
- Find the matching pairs of keys.
- Collect the head waiter’s key.
- Move up the stairs.
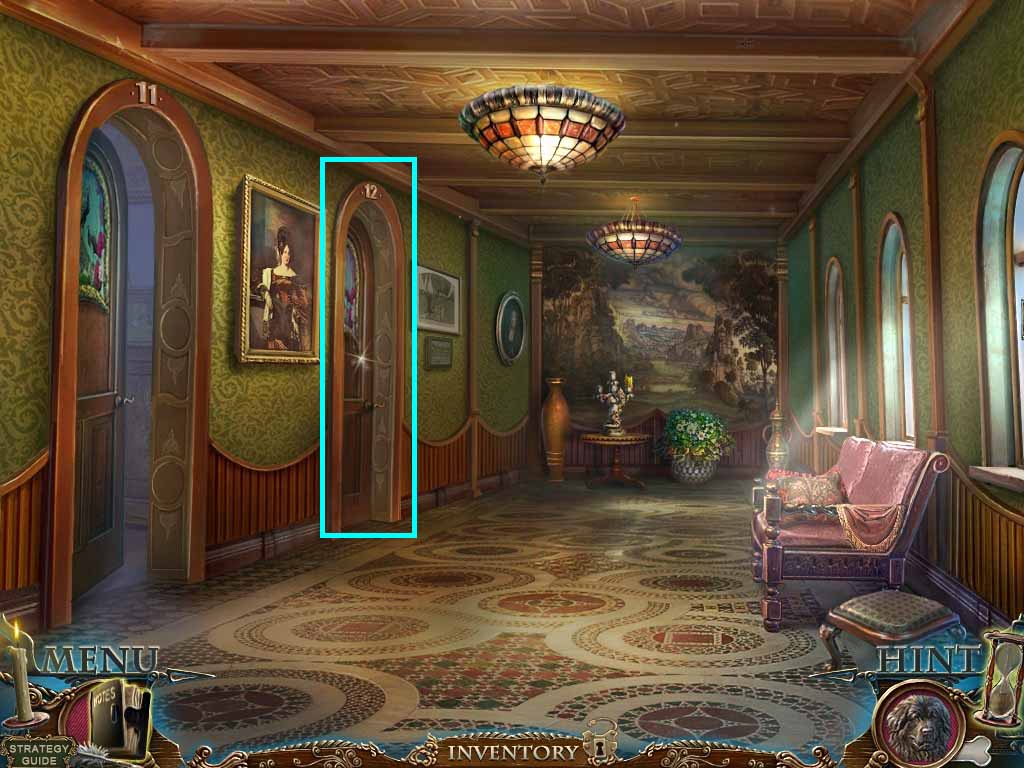
- Zoom into the room 12 door.
- Insert the head waiter’s key into the lock; click it.
- Move into room 12.
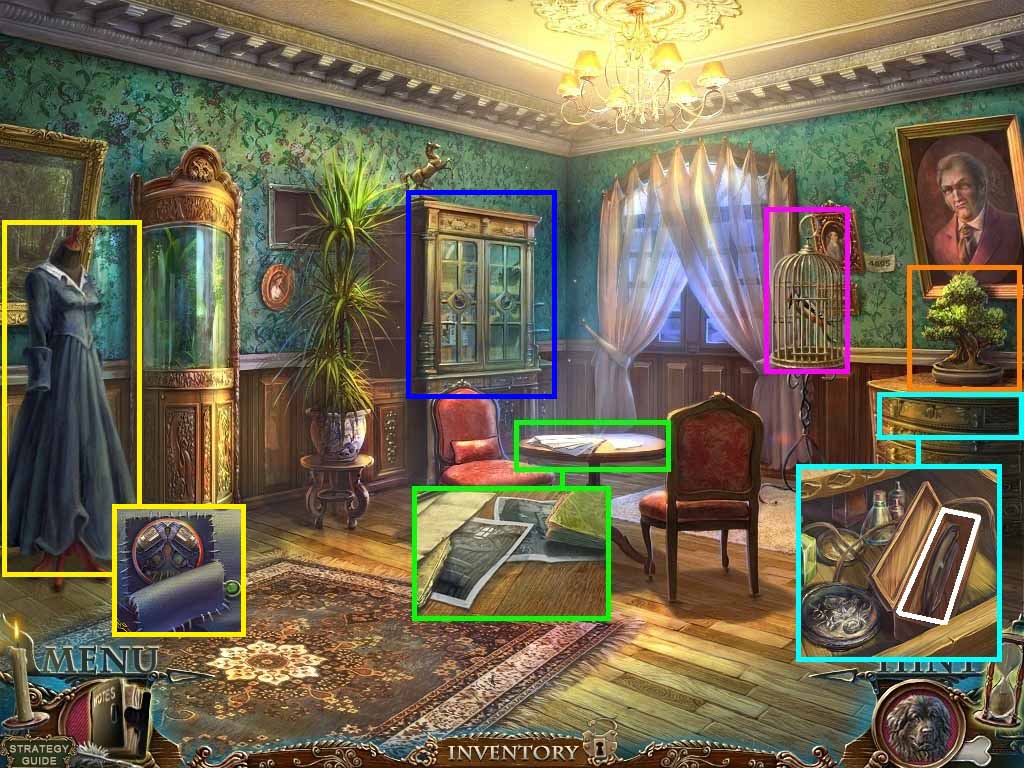
- Zoom into the table; collect the pictures and bullet 2/ 2.
- Zoom into the bonsai tree; collect the pin.
- Zoom into the birdcage; insert the pin into the lock and collect the woodpecker.
- Click the drawer and zoom in.
- Click the box and collect the razor.
- Zoom into the dress.
- Cut the patch using the razor; collect the gun shop part.
- Click the right cabinet and zoom in.
- Move back three times.
- Zoom into the smoking doorway.
- Move forward into the junk shop.
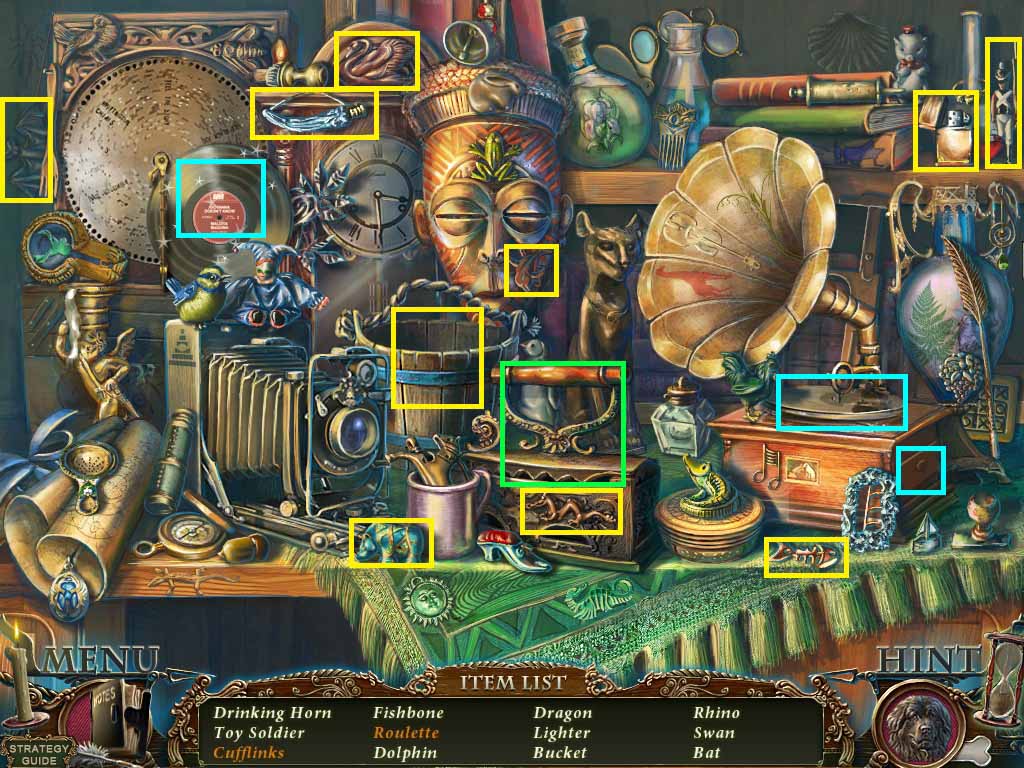
- Zoom into the back wall to access a hidden objects area.
- Find the listed items.
- Click the iron; collect the roulette.
- Put the record on the phonograph; collect the cufflinks.
- Collect the empty bucket.
- Move out of the door in the right.
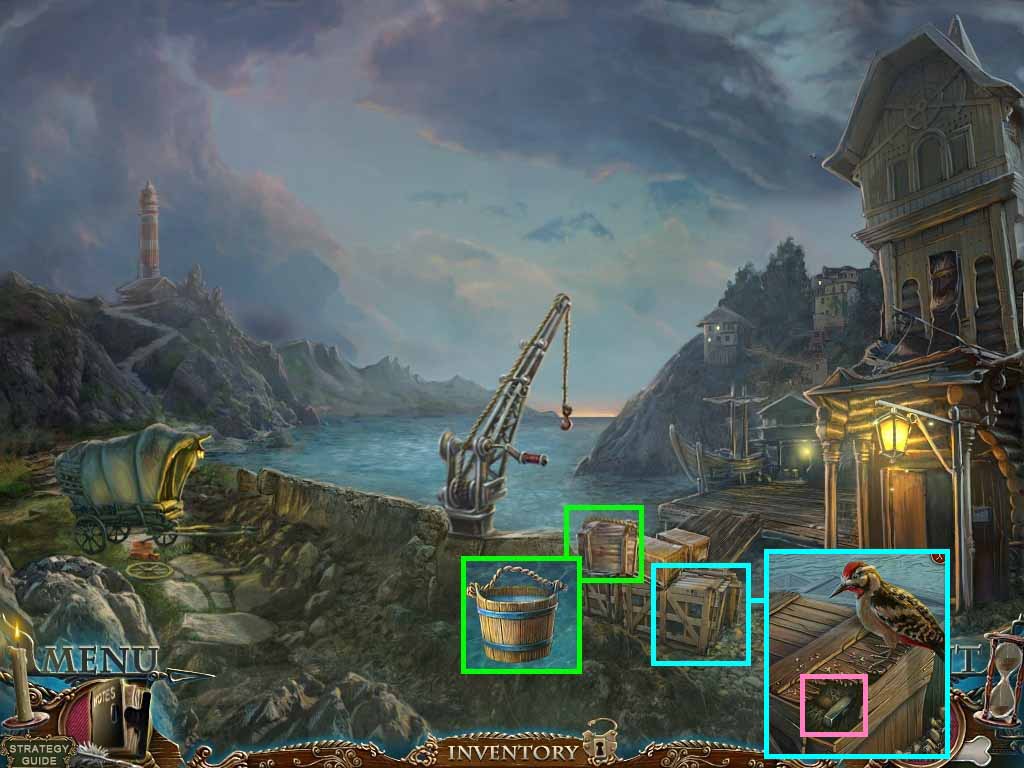
- Zoom into the top crate.
- Dip the bucket into the water; collect the bucket with water.
- Zoom into the bottom right crate.
- Place the woodpecker onto it.
- Collect the hammer.
- Move back two times.
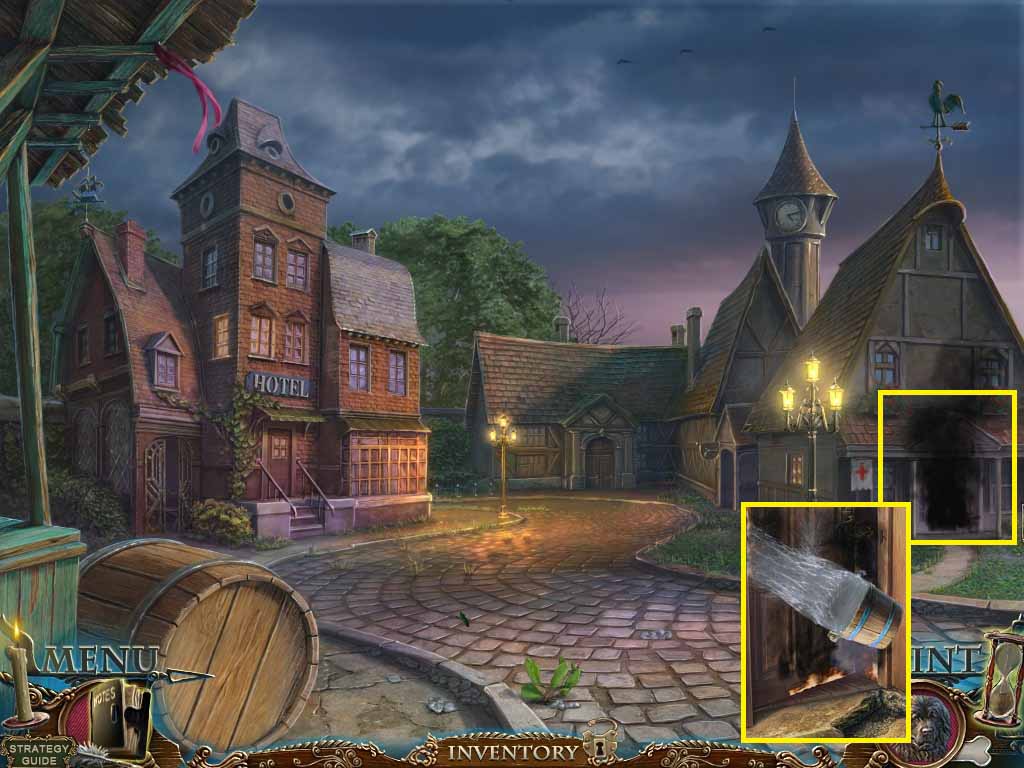
- Zoom into the smoking doorway.
- Pour the bucket with water onto the flames.
- Move into the doctor’s lab.
- Zoom into the left cabinet to access a hidden objects area.
- Find the listed items.
- Collect the pearl by using the knife on the shell.
- Paint the flamingo using the red lipstick to collect the red flamingo.
- Collect the belt.
- Move back one time.
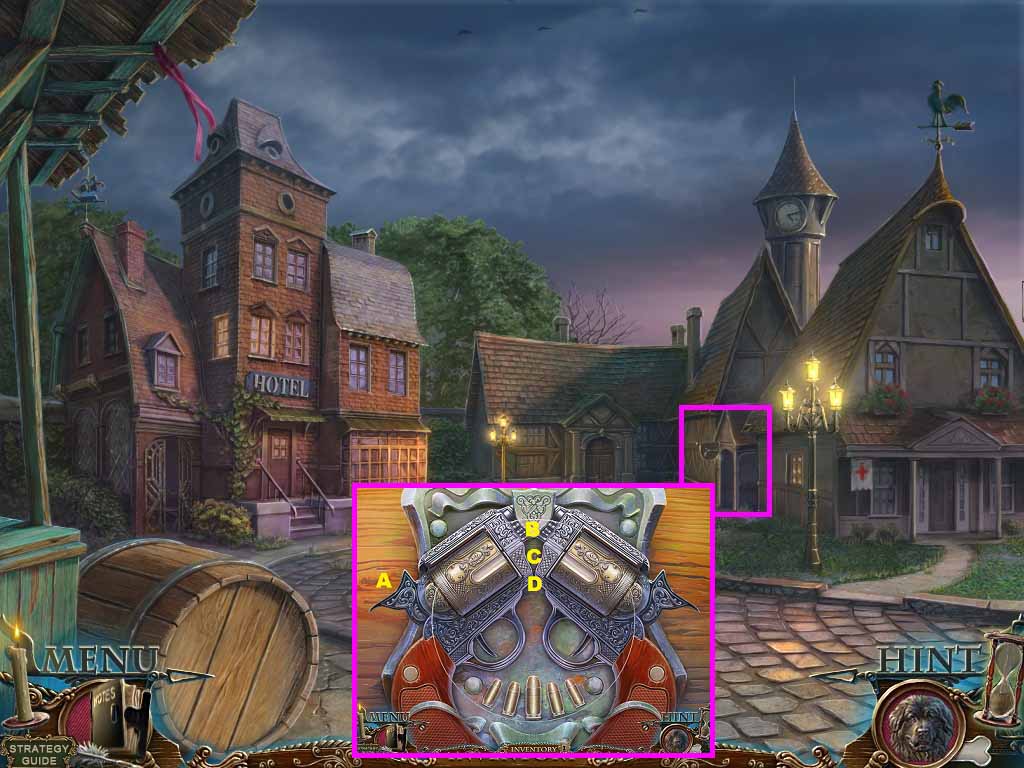
- Zoom into the gun shop door two times.
- Insert the gun shop part into the lock; a puzzle will trigger.
- To solve the puzzle use this formula:
- B: 1x
- A: 2 x’s
- C: 1x
- A: 6 x’s
- D: 1x
- A: 2x’s
- Move into the gun shop.
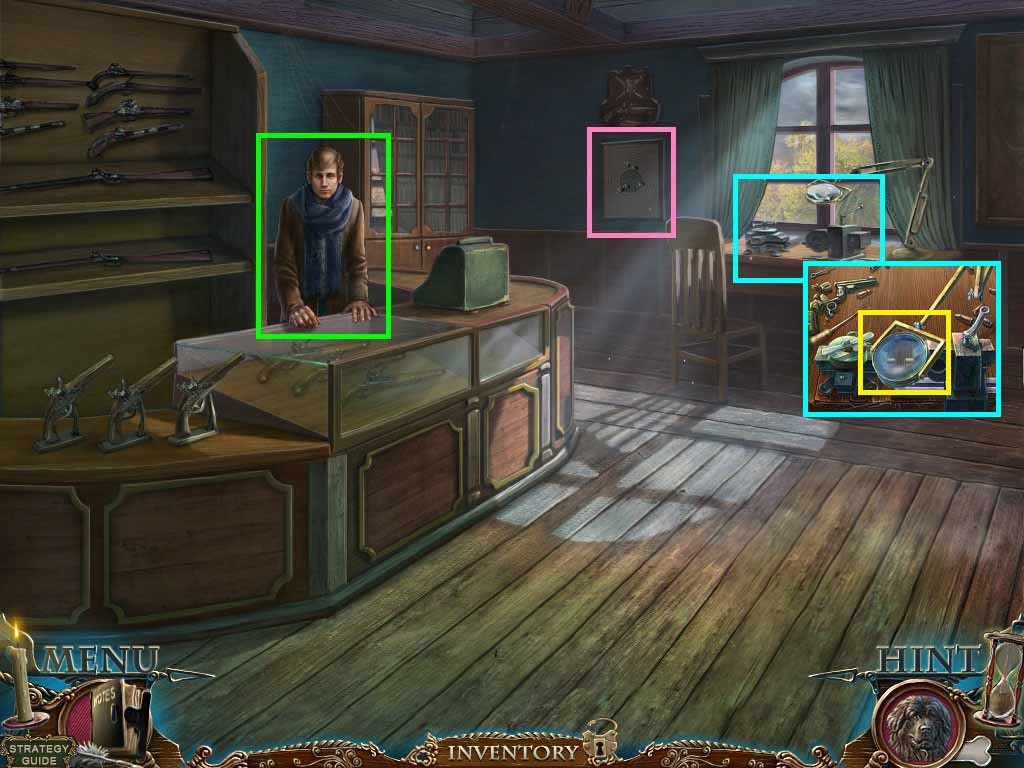
- Give Mike the gun.
- Zoom into the picture; collect the nails.
- Zoom into the desk.
- Put the 2 bullets into the vise; click the magnifying glass to trigger a puzzle.
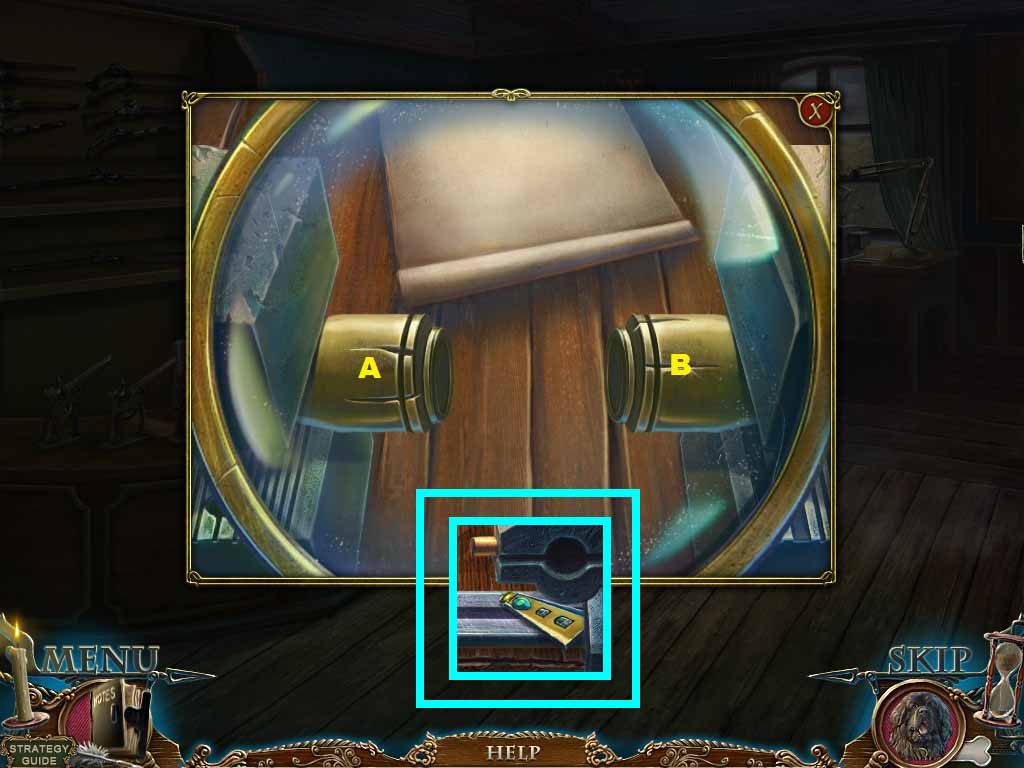
- Match the bullets grooves.
- Rotate the bullets as follows
- A –A – B – B – A – B
- Collect the lighthouse door part 1/ 2.
- Move back once; go forward through the junk shop and then right out the door.
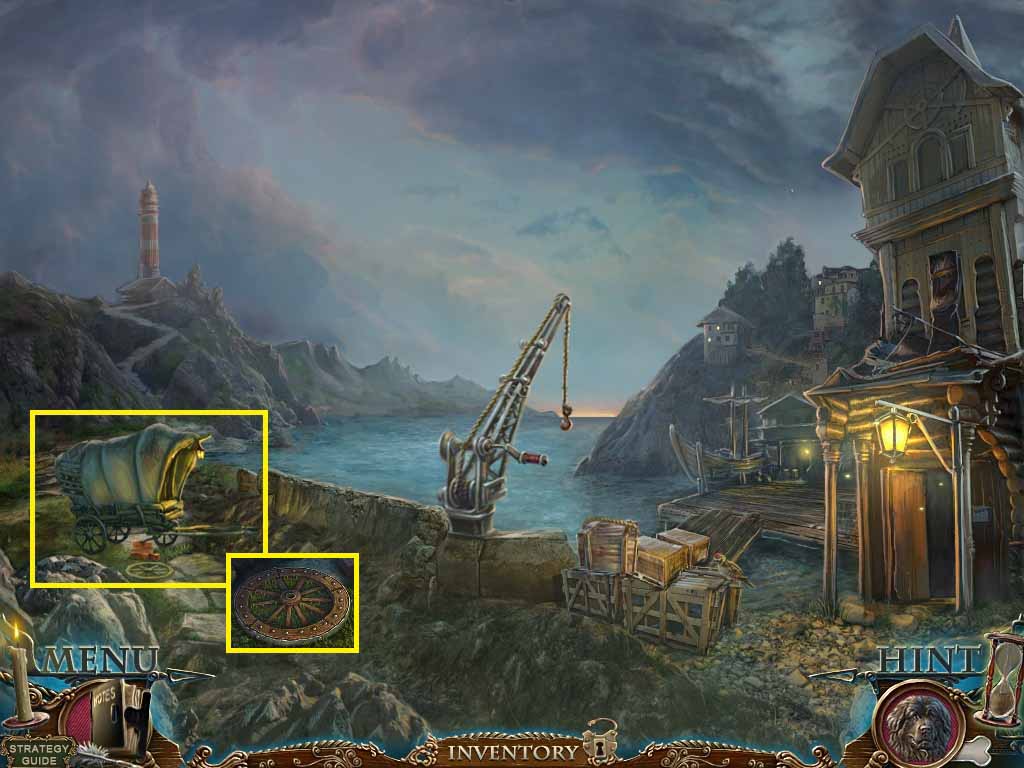
- Zoom into the wagon.
- Use the iron rim, nails and the hammer to fix the broken wheel; collect the wheel.
- Put the wheel onto the axle.
- Collect the wheel.
- Move up the cleared path.
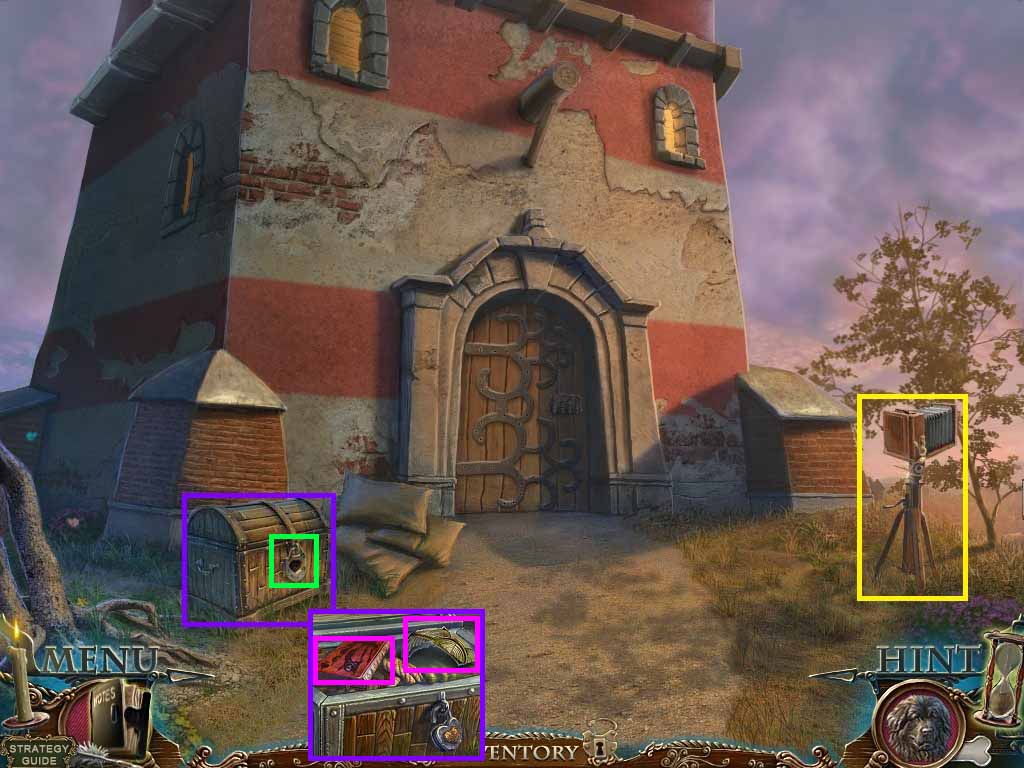
- Zoom into the camera; collect the crane instructions.
- Zoom into the chest.
- Insert the rusty heart into the lock; collect the pirate book and the lighthouse lens part 1/ 3.
- Move back once.
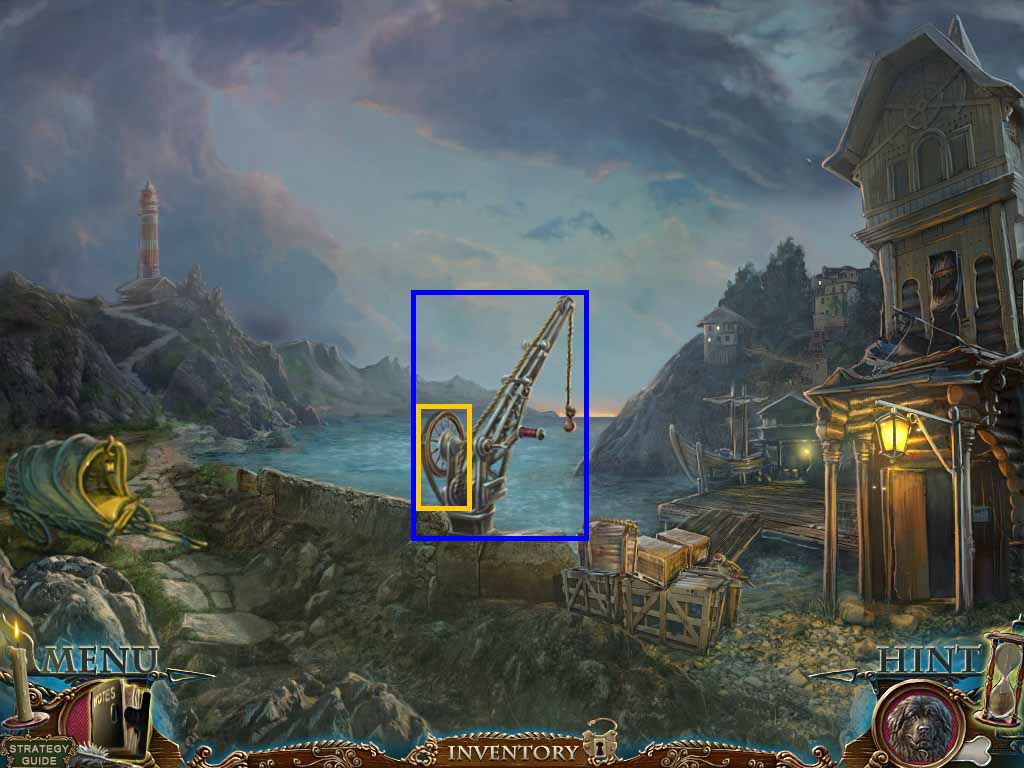
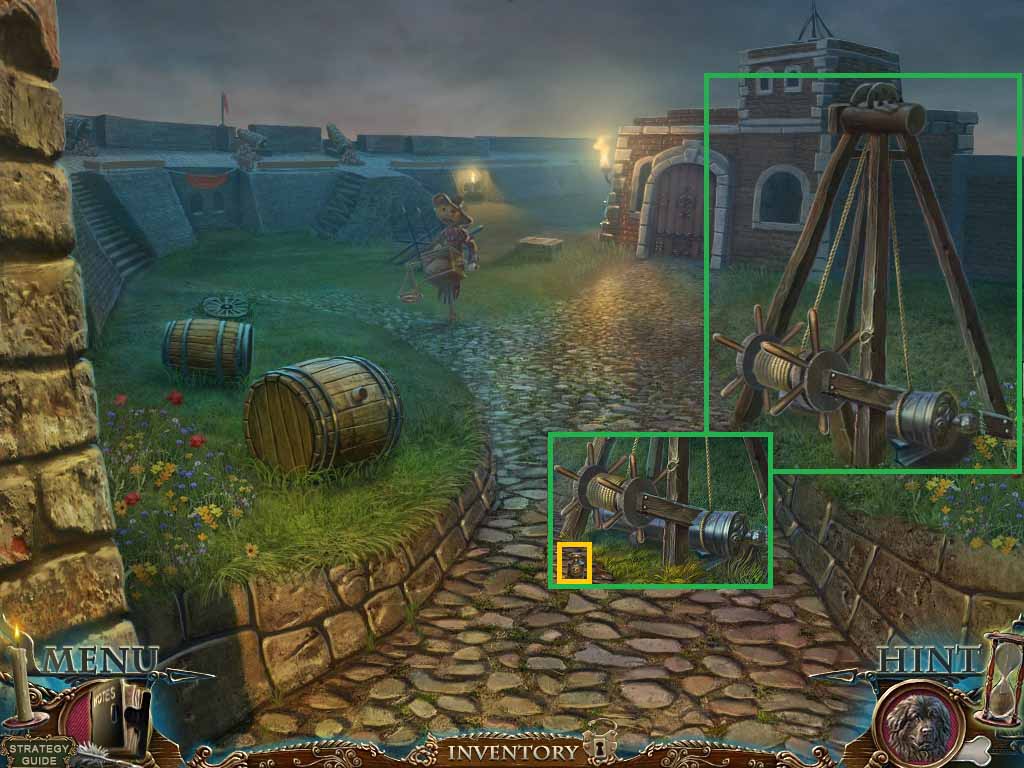
- Zoom into the crane.
- Place the wheel and belt onto it to trigger a puzzle.
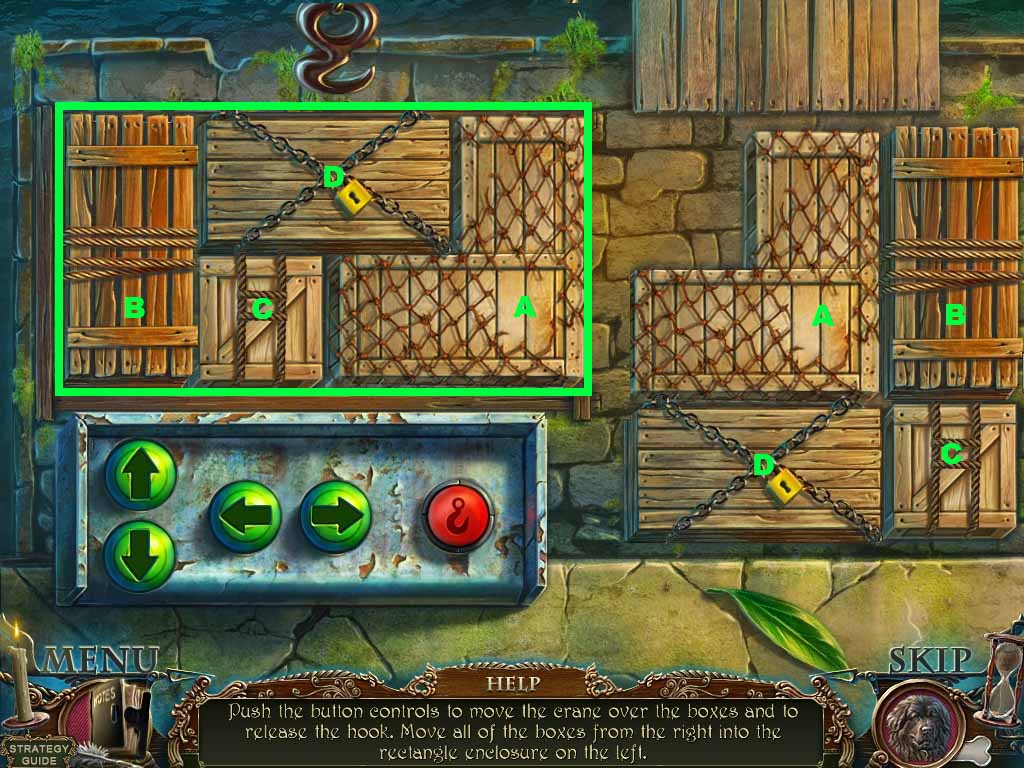
- Move the crates using the arrows and the hook.
- Solve as shown (A-D).
- Move across the planks.
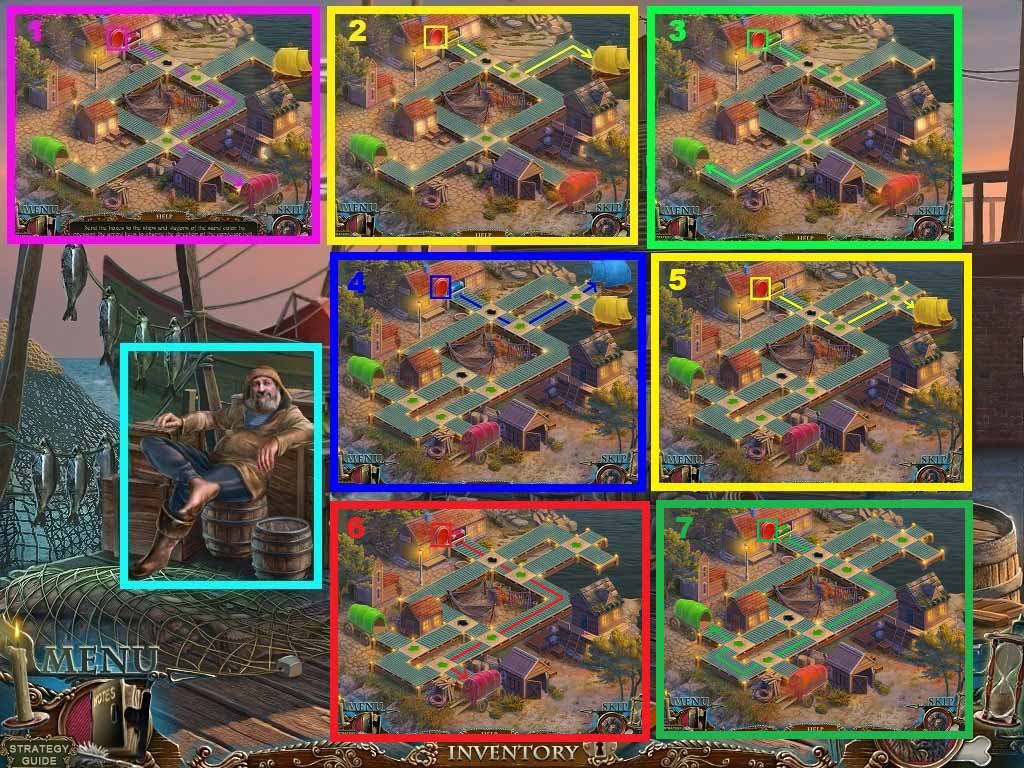
- Give the fisherman the pirate book.
- A puzzle will trigger.
- Move the packages to the color matched areas.
- Collect the lighthouse door part 2/ 2.
- Move back once and go up the left path to the lighthouse.
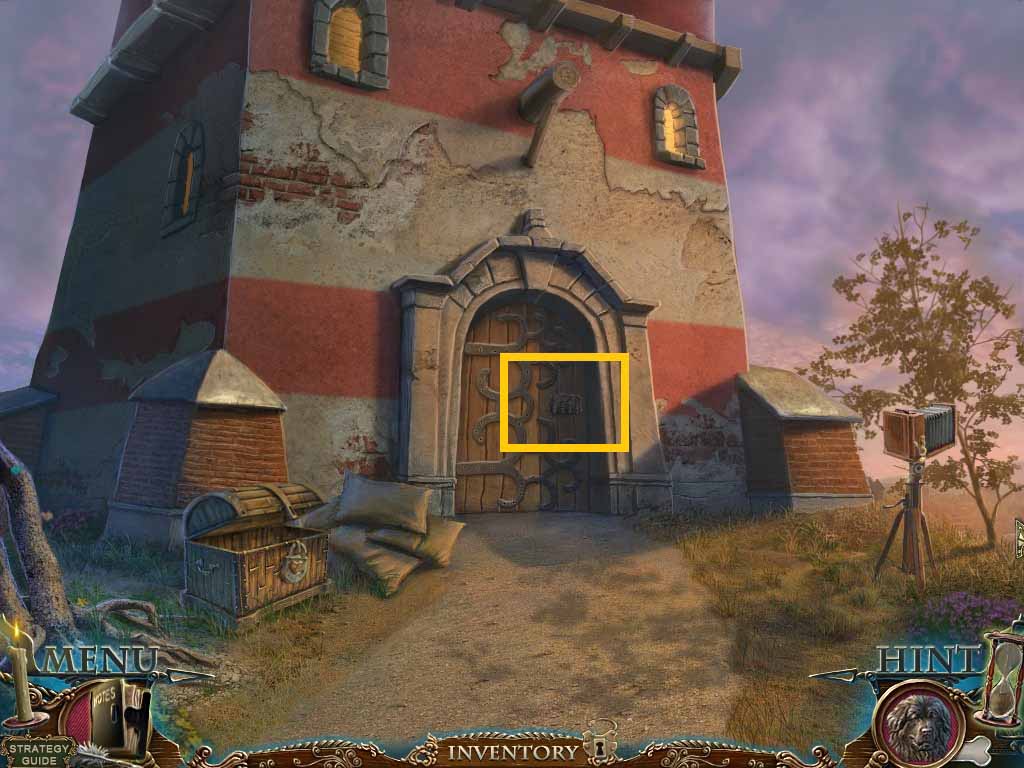
- Zoom into the lighthouse door.
- Insert the 2 lighthouse door parts to trigger a puzzle.
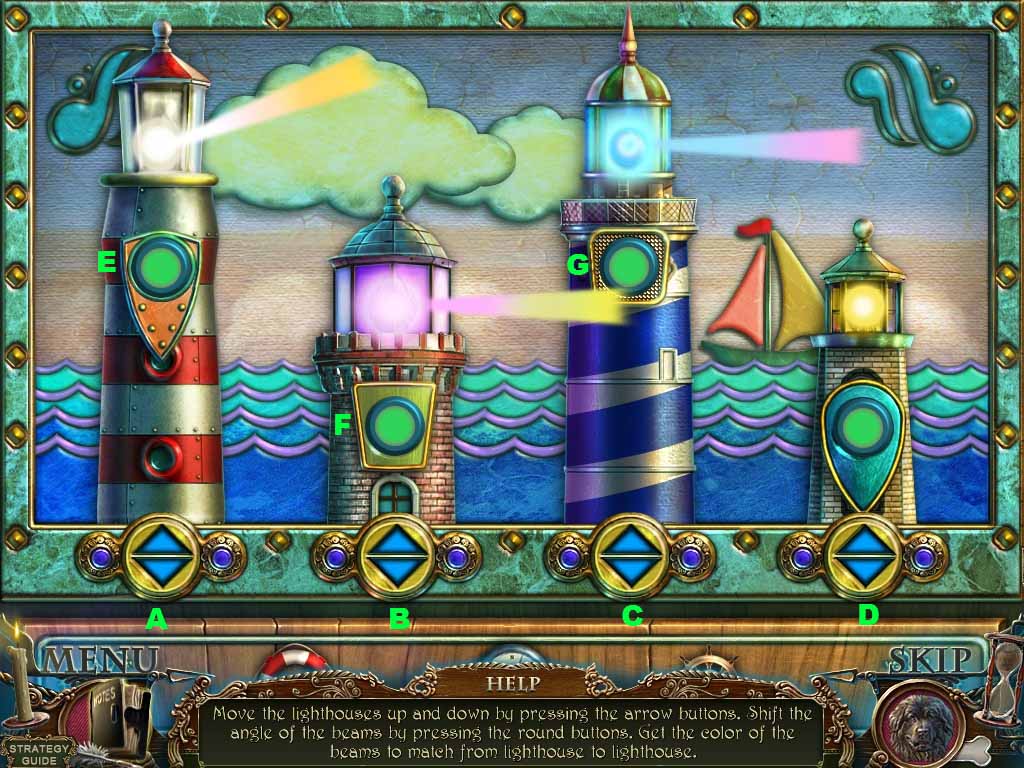
- Adjust the lighthouses to the color matched beams.
- Solve as follows:
- E: 2 x’s – B: up – A: up – C: down – D: down – F: 1x – G: 2x’s
- Move forward into the lighthouse.
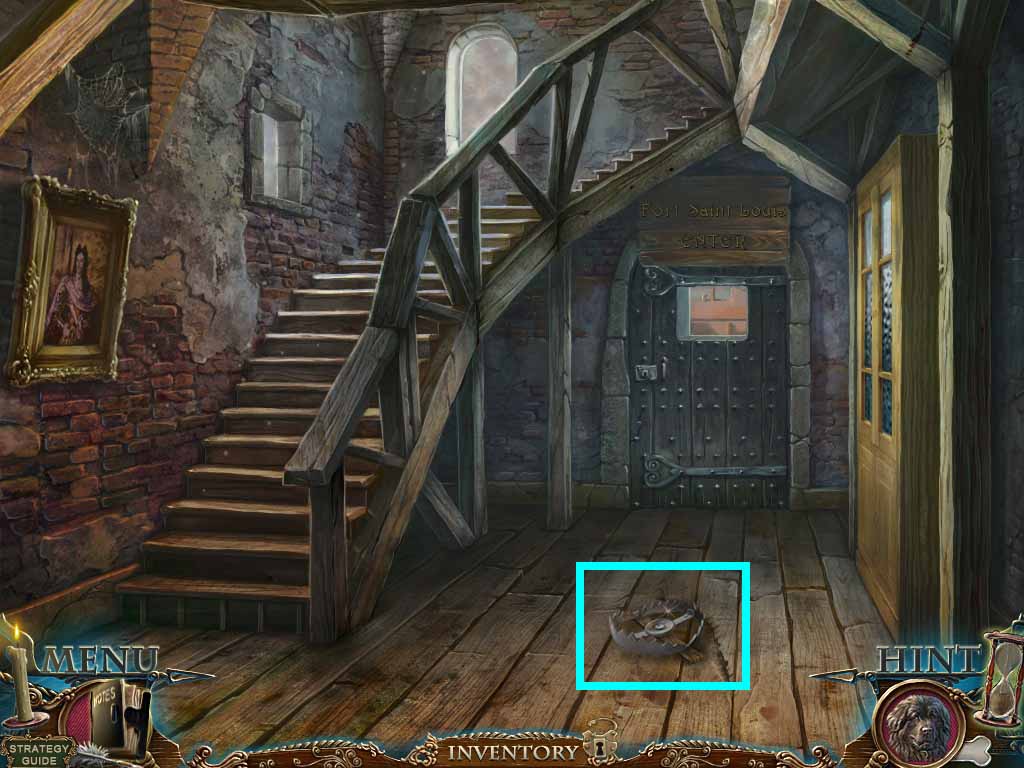
- Click the trap; collect it.
- Move upstairs.
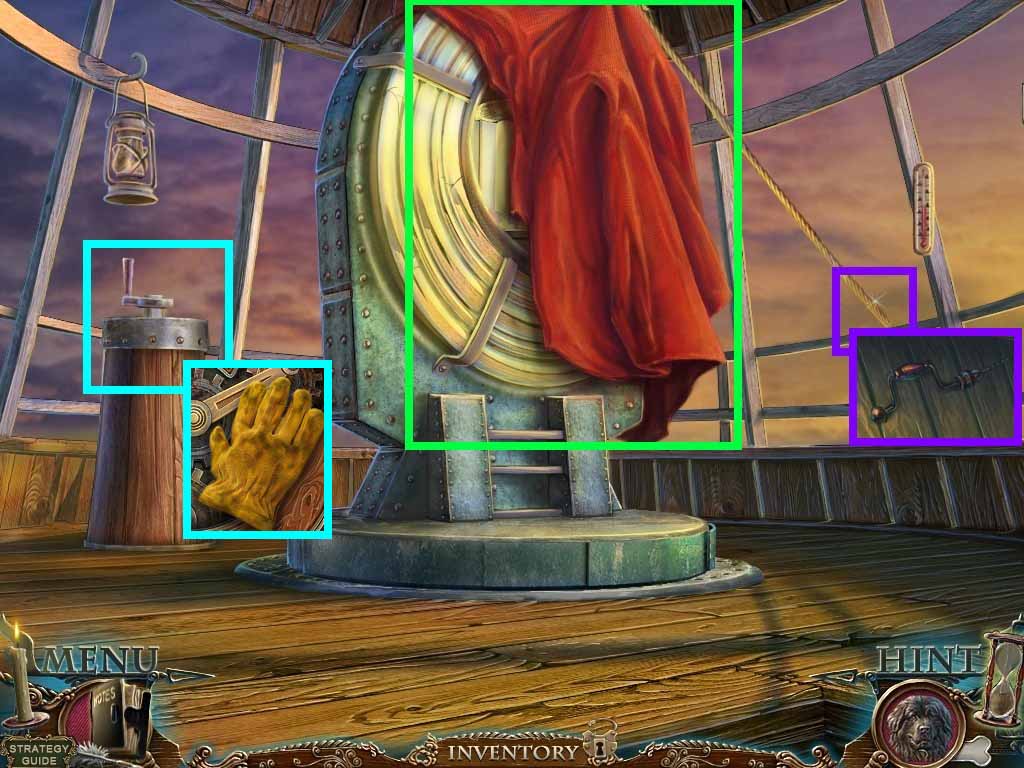
- Zoom into the rope; collect the drill.
- Collect the thick cloth; zoom into the lens beneath it.
- Zoom into the pedestal; collect the dirty glove.
- Move back two times.
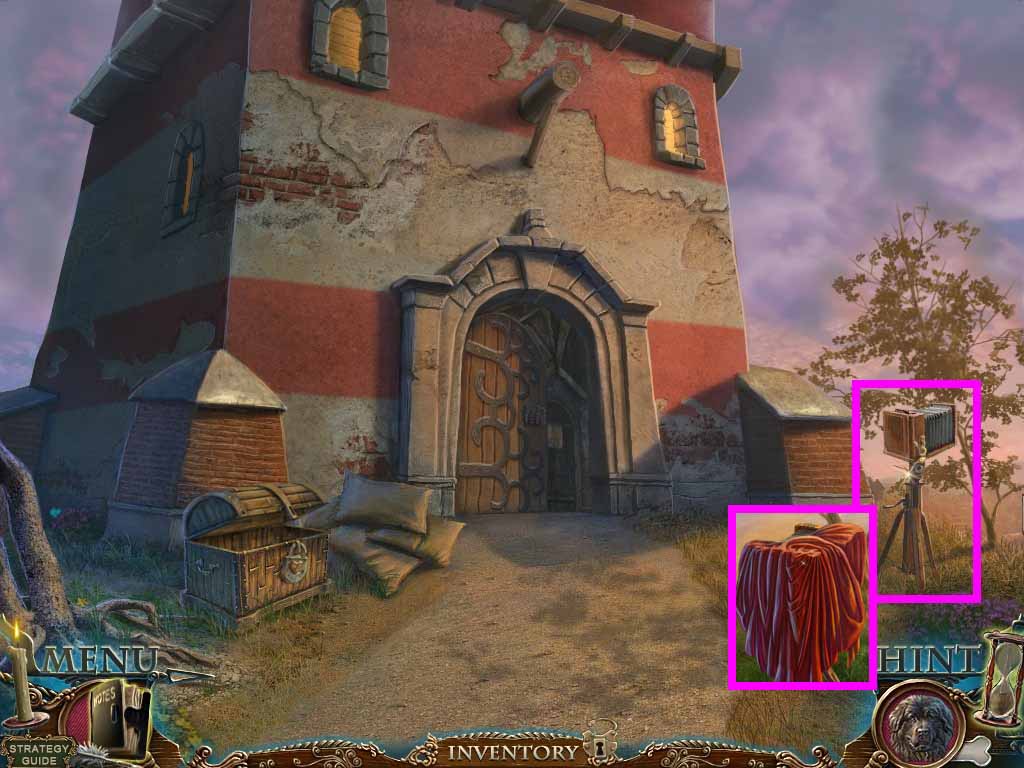
- Zoom into the camera; put the thick cloth over it.
- Click the thick cloth; collect the photo plate.
- Move back one time.
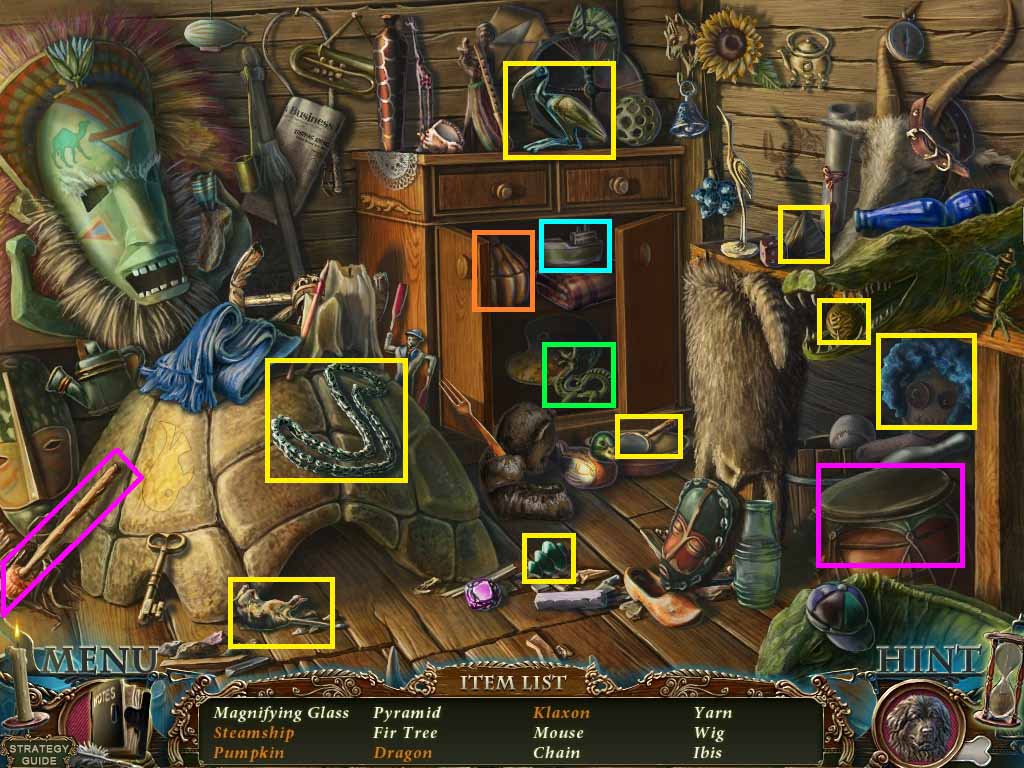
- Zoom into the doorway to access a hidden objects area.
- Find the listed items.
- Click the cabinet; collect the steamship, pumpkin and dragon.
- Use the drumstick on the drum.
- Collect the klaxon.
- Collect a chain.
- Move into room 12 in the hotel.
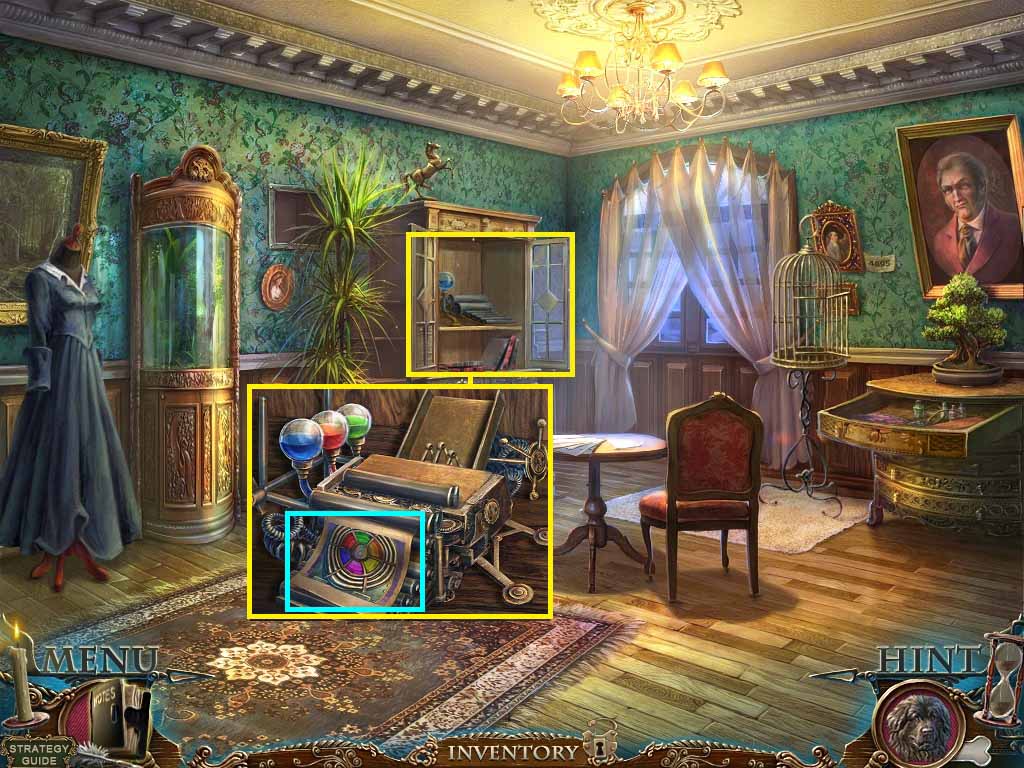
- Zoom into the cabinet.
- Put the photo plate into the developer.
- Collect the lighthouse instructions.
- Go to the crane; cross the plank to the fisherman.
- Zoom into the barrel; use the drill on it.
- Collect the lighthouse lens 2/ 3.
- Zoom into the gate; place the chain onto it.
- Click the handle.
- Move forward through the gate.
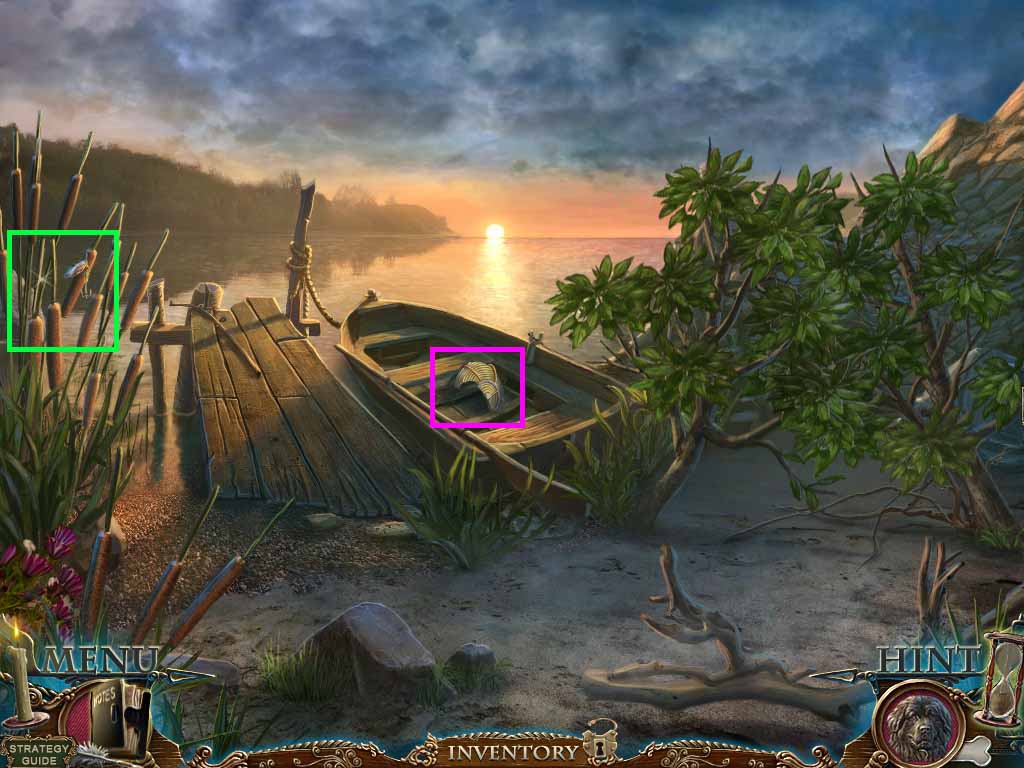
- Zoom into the cattails; click them and collect the bait.
- Zoom into the boat; collect the lighthouse lens part 3/ 3.
- Move back two times; go towards the lighthouse and move up stairs.
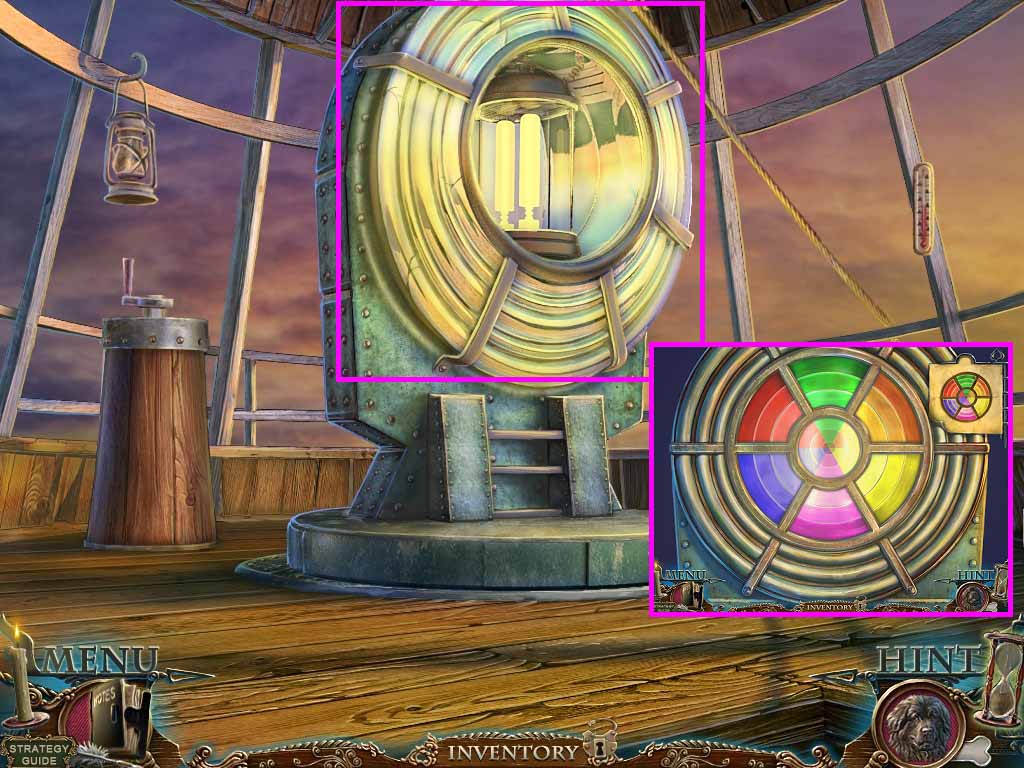
- Zoom into the lens.
- Put the lighthouse lens parts and the lighthouse instructions onto it to trigger a puzzle.
- Create the lens to match the instructions.
- Hand the dirty glove to Arthur.
- Collect the oil can.
- Move upstairs.
- Zoom into the pedestal; use the oil can on the gears.
- Click the handle.
- Collect the machete.
- Move back three times; move forward two times to the fishing pier.
- Cut the bushes using the machete.
- Move up the right path.
Author: Date: Jan-22-2013
- Zoom into the rope and place the trap on it.
- Click the rope to fasten it; collect the trap rope.
- Zoom into the crevice; place the trap rope into it.
- Click the rope to collect a ring handle.
- Zoom into the hatch; place the ring handle onto it.
- Move down the hatch.
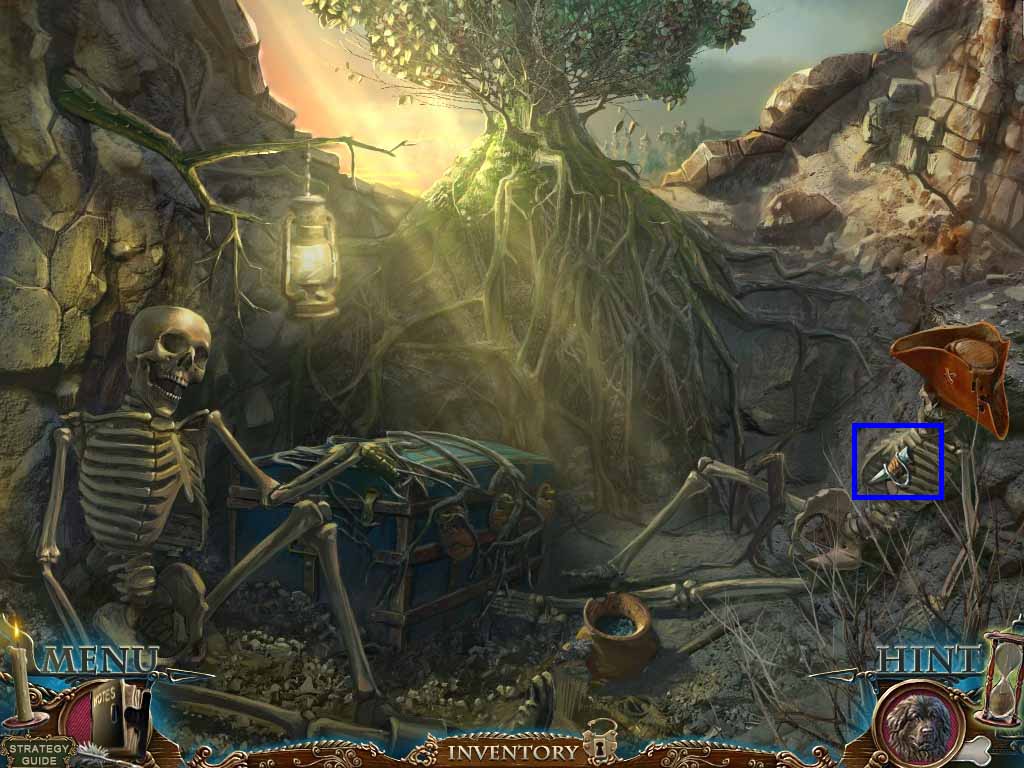
- Zoom into the trunk; open it.
- Unbuckle the belt; collect the ring with symbols.
- Collect the iron monkey.
- Zoom into the skeleton; collect the feather.
- Zoom into the right rear to access the hidden objects area.
- Find the pictured items.
- Click the carpet.
- Collect the lighter.
- Light the bomb using the lighter; collect the fishing line.
- Place the fishing line onto the pole; collect the rod.
- Zoom into the hole in the floor; use the rod to collect the bottle.
- Collect the tricorn.
- Put the tricorn onto the pirate’s head; collect the shark.
- Put the shark onto the box; collect the winch.
- Put the winch onto the pulley; collect the rapier.
- Place the rapier and the bottle onto the barrel; collect the full bottle.
- Put the full bottle onto the scales.
- Collect the spring.
- Move back once.
- Zoom into the door; insert the iron monkey to trigger a puzzle.
- Turn all the rings green.
- Solve by selecting the following rings:
- A – D – C – B
- Move into the captain’s quarters.
- Give Arthur the feather.
- Zoom into the desk.
- Click open the tin and collect the cracker box.
- Zoom into the game; insert the ring with symbols into the left slot and the spring by the key.
- Click the key; collect the wings.
- Move back and move down the hatch on the ship.
- Give Arthur the cracker box.
- Collect a cracker.
- Zoom into the cannon.
- Put the wings onto the dragon; collect the emerald.
- Move back once and go into the captain’s quarters.
- Zoom into the birdcage.
- Give Polly the cracker; collect the ruby.
- Zoom into the trunk two times.
- Insert the ruby and the emerald into the lock to trigger a puzzle.
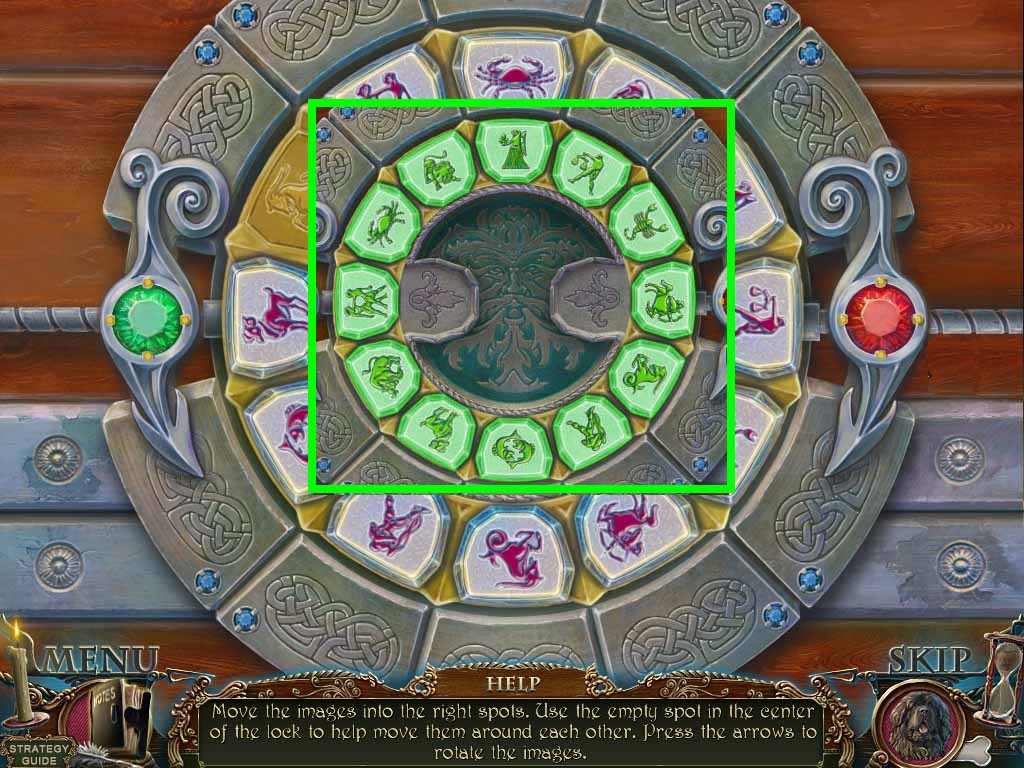
- Move the astrology signs above their matching symbols.
- Zoom into the chest; collect the parchment.
- Move back 8 times; go into Le Grand’s office.
- Give Le Grand the parchment.
- Collect the antidote recipe.
- Move back once.
- Zoom into the table; collect the mug.
- Move to the fisherman on the dock.
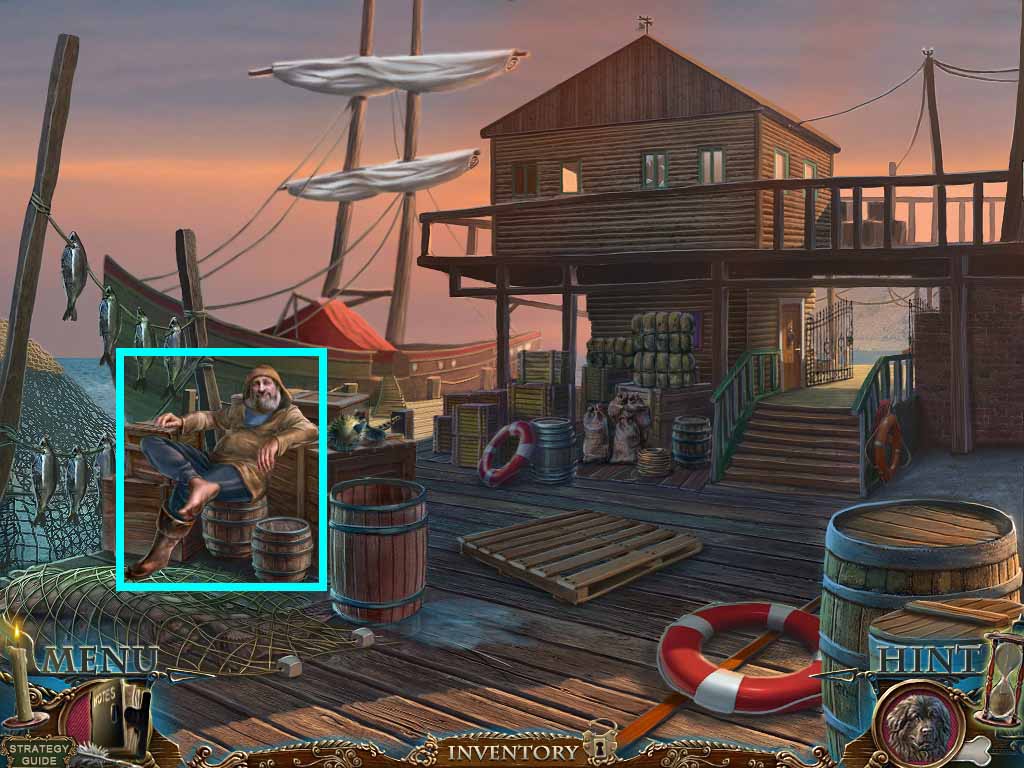
- Give the fisherman the antidote recipe.
- Move to the ship and go down the hatch into the hold.
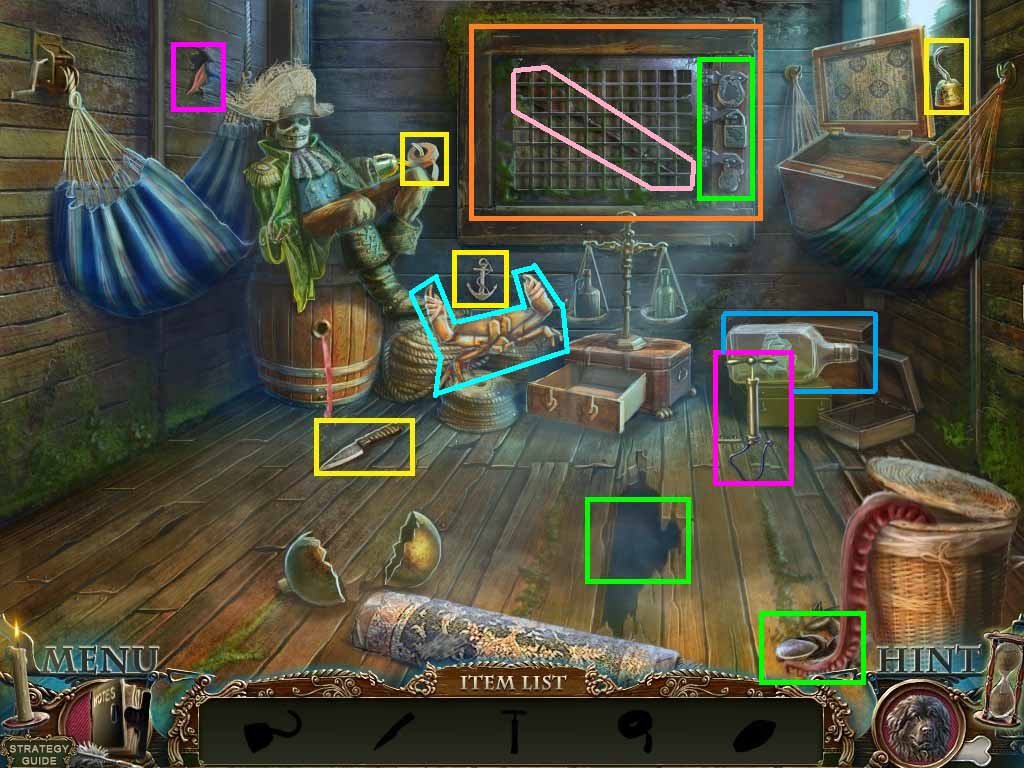
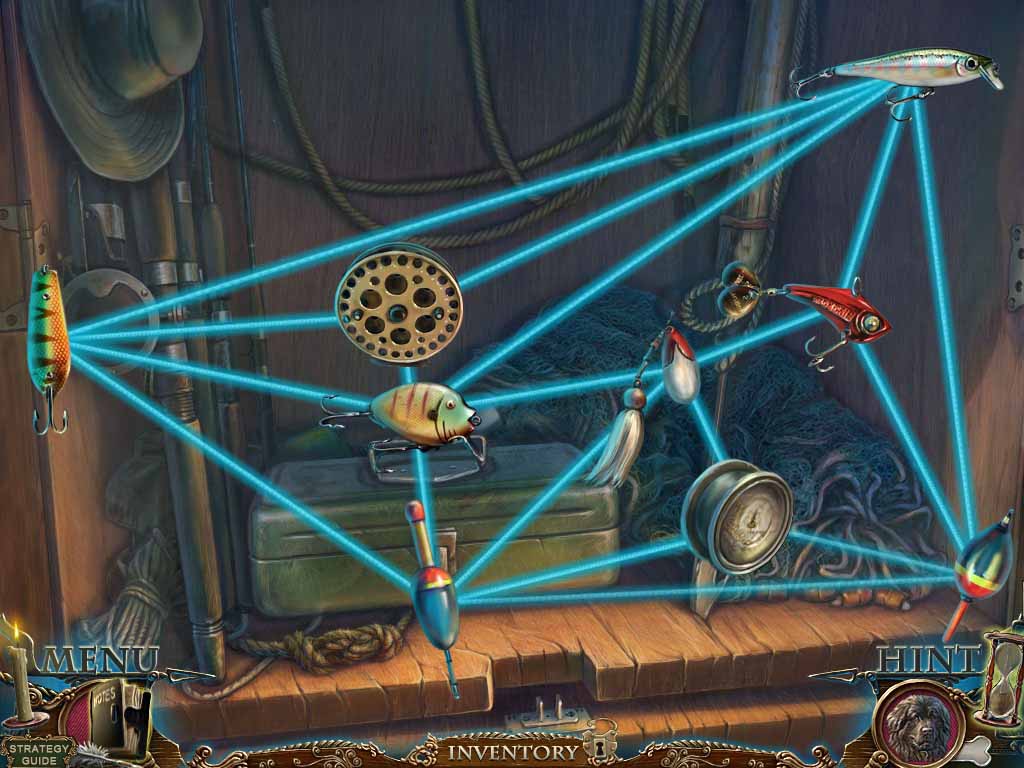
- Zoom into the far right corner to access a hidden objects area.
- Find the pictured objects.
- Collect the knife.
- Zoom into the hole; collect the mussel by using the knife.
- Collect the hook.
- Give the pirate the hook; collect the patch.
- Place the path onto the crab; collect the anchor.
- Collect the pump.
- Zoom into the cracked wall; use the pump on the balloon.
- Collect the crystal.
- Give the octopus the mussel; collect the fish.
- Use the crystal on the ship in the bottle; collect the ship.
- Zoom into the grate locks.
- Put the anchor, ship and the fish onto the matching locks.
- Collect the oar.
- Move back twice.
- Zoom into the boat; place the oar into it.
- Move forward.
- Zoom into the sign; collect the fish amulet.
- Zoom into the skeleton hand; collect the pirate ring.
- Move back to the captain’s quarters.
- Zoom into the cabinet.
- Insert the fish amulet into the lock,
- Zoom into the fishing line to trigger a puzzle.
- Untangle the fishing line.
- Collect the fishing line.
- Back down twice.
- Zoom into the dock.
- Put the gait and fishing line onto the pole.
- Click the pole to trigger a puzzle.
- Create sets of three until the right only displays all zeros.
- Collect the boot.
- Back out once.
- Give the fisherman the boot.
- Collect the fish.
- Move to LeGrand’s office.
- Zoom into the fireplace; remove the pot lid.
- Put the fish into the pot.
- Use the mug on the potion; collect the hot antidote.
- Give Arthur the hot antidote.
- Collect the antidote and give it to Le Grande.
- Collect a parchment.
- Zoom into the desk.
- Put the parchment onto it to trigger a puzzle.
- Match the pairs.
- Collect the deciphered parchment.

- Give Le Grande the deciphered parchment.
- Collect the cane.
- Move into the first floor of the lighthouse.
Author: Date: Jan-22-2013
- Zoom into the door.
- Use the cane to unlock the latch on the door lock.
- Move into the doorway.
- Zoom into the torch; click it to light it.
- Collect the lit torch.
- Zoom into the guard.
- Put the pirate ring onto the sword; collect the sword.
- Move through the doors.
- Zoom into the cannon; collect the weight 1/ 3.
- Click the winch.
- Move forward into the armory.
- Zoom into the cannon; click the cannon.
- Collect the cannonball.
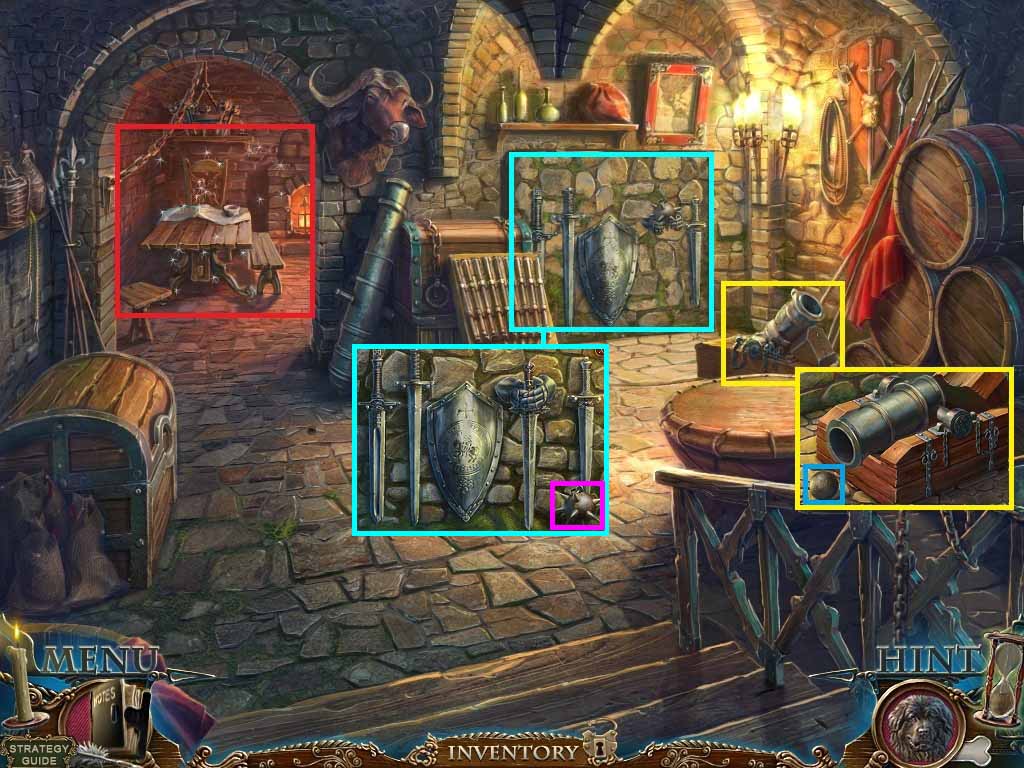
- Zoom into the swords.
- Put the sword into the hands and collect the mace.
- Zoom into the table to access a hidden objects area.
- Find the pictured items.
- Click the book; collect the lion.
- Insert the lion into the crest; collect the gargoyle.
- Put the gargoyle onto the mantle.
- Collect the horn.
- Place the horn onto the bison; collect the snake.
- Put the snake onto the chest; collect the dynamite.
- Insert the dynamite onto the crack.
- Zoom into the belt; collect the bullet.
- Zoom into the gun; insert the bullet into it and collect the revolver.
- Shoot the lock using the revolver.
- Collect the matches.
- Light the dynamite using the matches; collect the chain.
- Move back one time.

- Zoom into the cannon; place the chain onto the roller.
- Collect the rail and the moon amulet.
- Move into the armory.
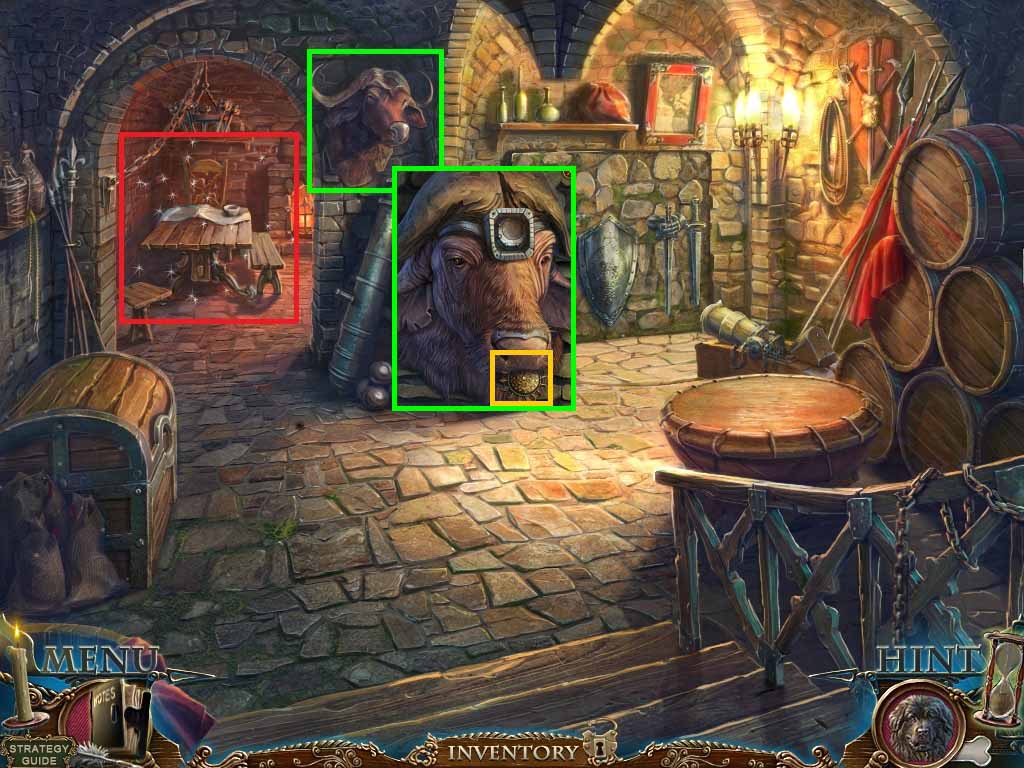
- Zoom into the buffalo; insert the moon amulet into the slot.
- Collect the sun amulet.
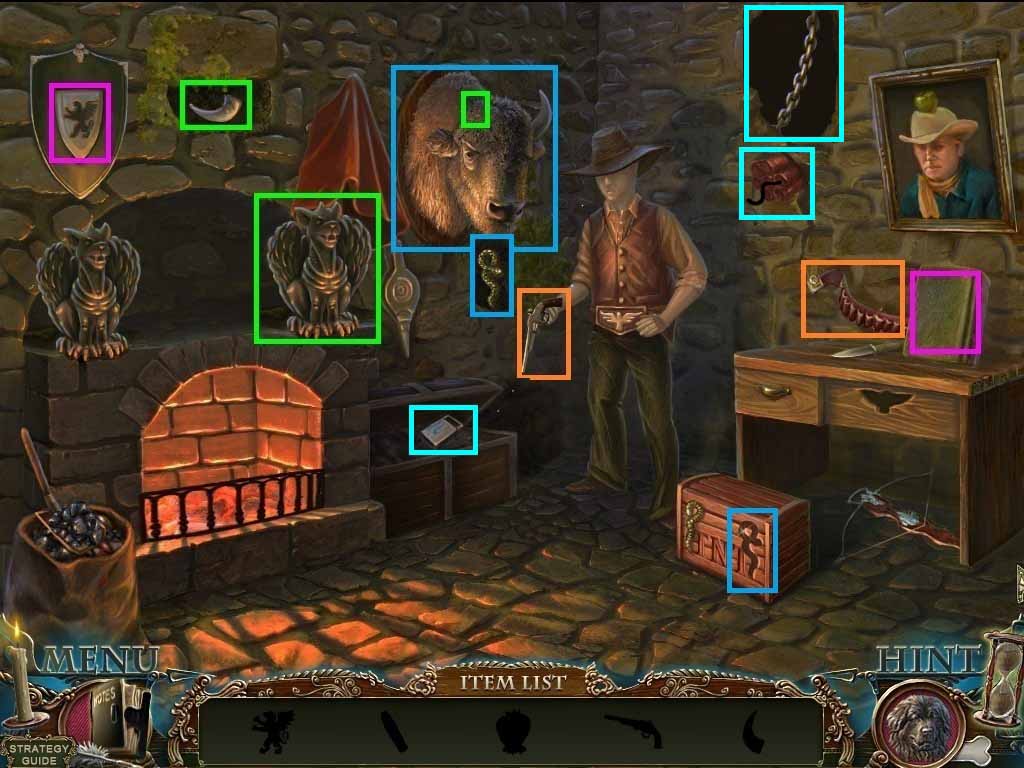
- Zoom into the hidden objects area.
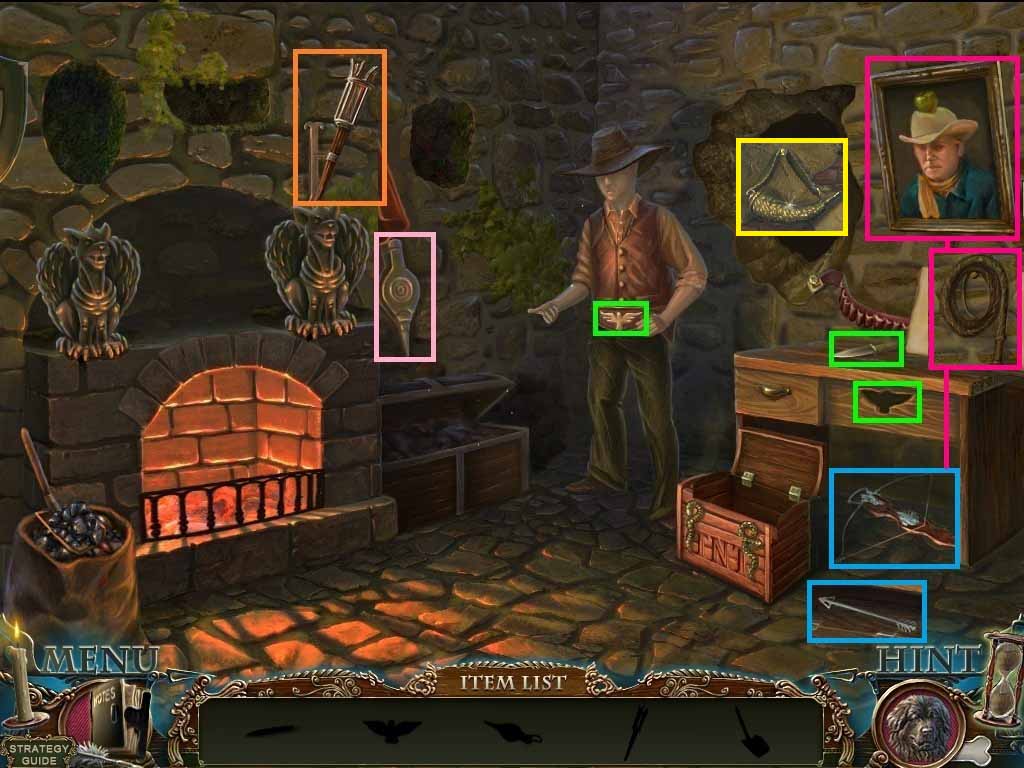
- Find the pictured items.
- Collect the knife.
- Cut the belt with the knife to collect the eagle.
- Collect the bellows.
- Click the cloth; collect the torch.
- Put the eagle on the drawer; collect the arrow.
- Insert the arrow onto the crossbow; collect the arbalest.
- Collect the coal shovel.
- Use the coal shovel, bellows and the torch into the fireplace; collect the torch fire.
- Use the arbalest on the apple; collect the whip.
- Zoom into the hole; put the torch fire into the holder.
- Use the whip to collect the gunpowder.
- Move back two times.
- Zoom into the left guard; insert the sun amulet into the shield.
- Collect the toy mouse.
- Zoom into the snake; give it the toy mouse.
- Collect the half ladybug.
- Move forward two times into the armory.

- Zoom into the chest; insert the ladybug into the lock.
- Collect the fuse.
- Move back once and go forward between the two steps.
- Zoom into the gun carriage; collect the weight 2/ 3.
- Zoom into the cannon; put the rail onto the stones.
- Open and collect the broken cannonball.
- Move back once.
- Give Arthur the broken cannonball.
- Use the empty gunpowder horn on the gunpowder; collect the gun powder.
- Collect the weight 3 /3.
- Zoom into the hurdy-gurdy and place the 3 weights onto the scale.
- Collect the handle.
- Move forward to the cannons.
- Zoom into the broken gun carriage.
- Use the handle on the jack; collect the wheel.
- Zoom into the cannon.
- Insert the fuse, cannonball, gunpowder and the wheel onto the cannon.
- Light the fuse with the torch.
- Move to the rowboat; go forward to the cave entrance.
- Go into the cave.
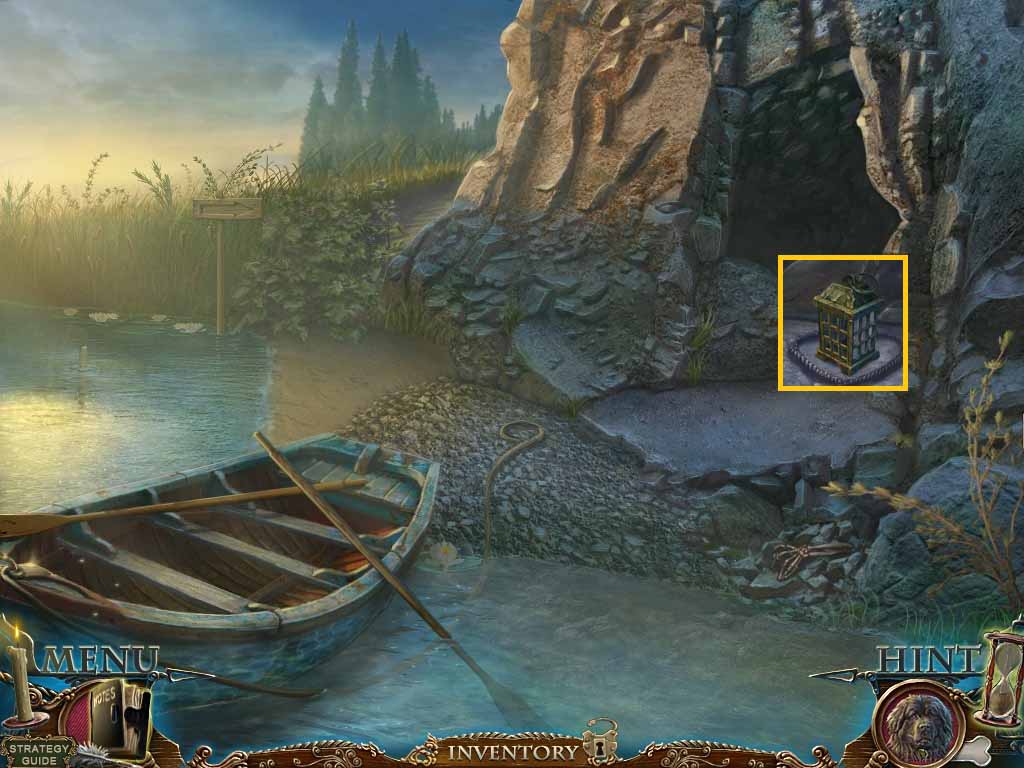
- Zoom into the lantern; collect the empty lamp.
- Move back one time.
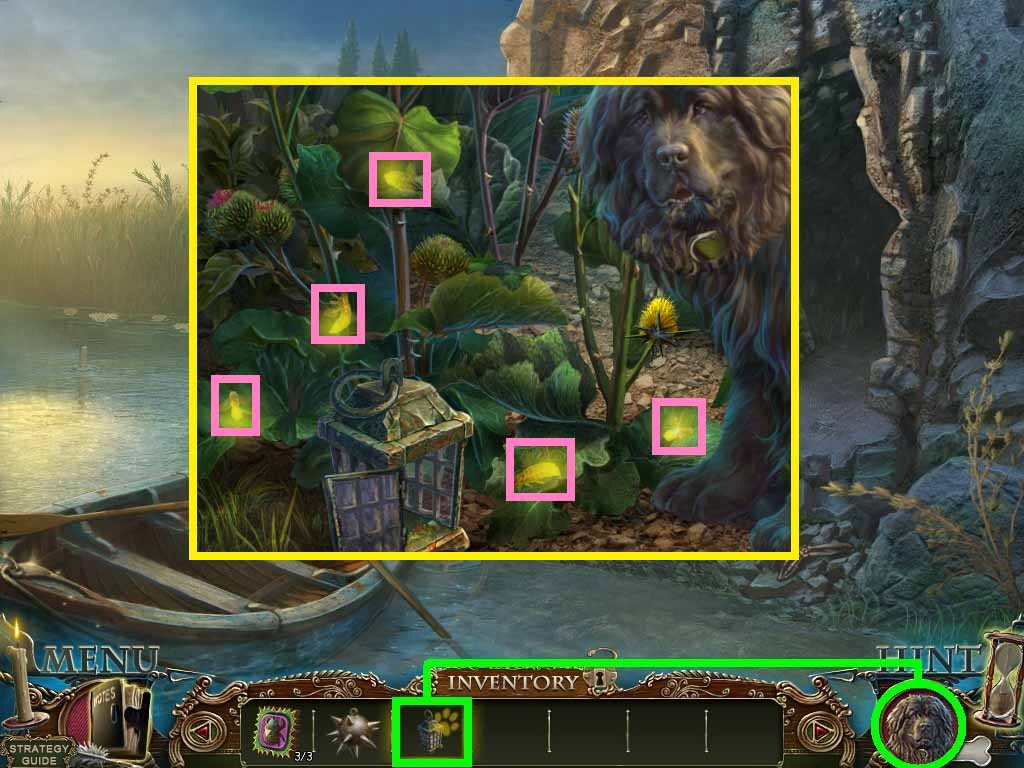
- Give Arthur the empty lamp.
- Put the 5 fireflies into the empty lamp.
- Collect the lamp with fireflies.
- Go into the cave.
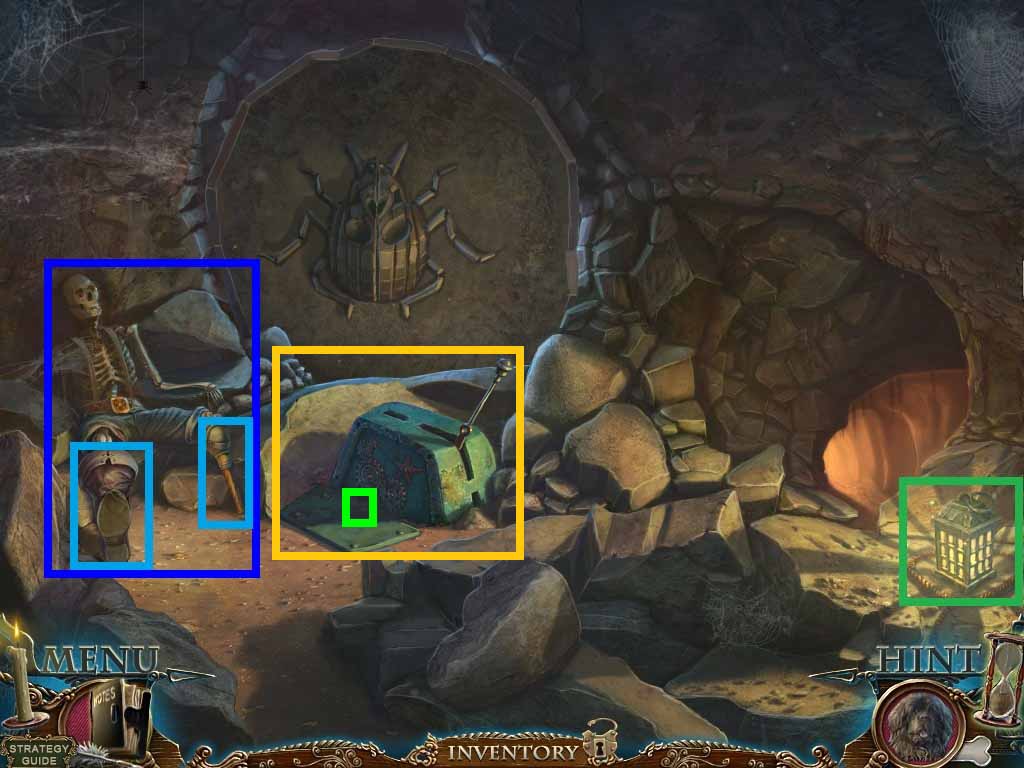
- Zoom into the lamp with fireflies; place it down on the stone where it was found.
- Zoom into the skeleton; collect the boot and the stick.
- Zoom into the lever; click the panel and collect the bolt.
- Move to the right and go further into the cave.
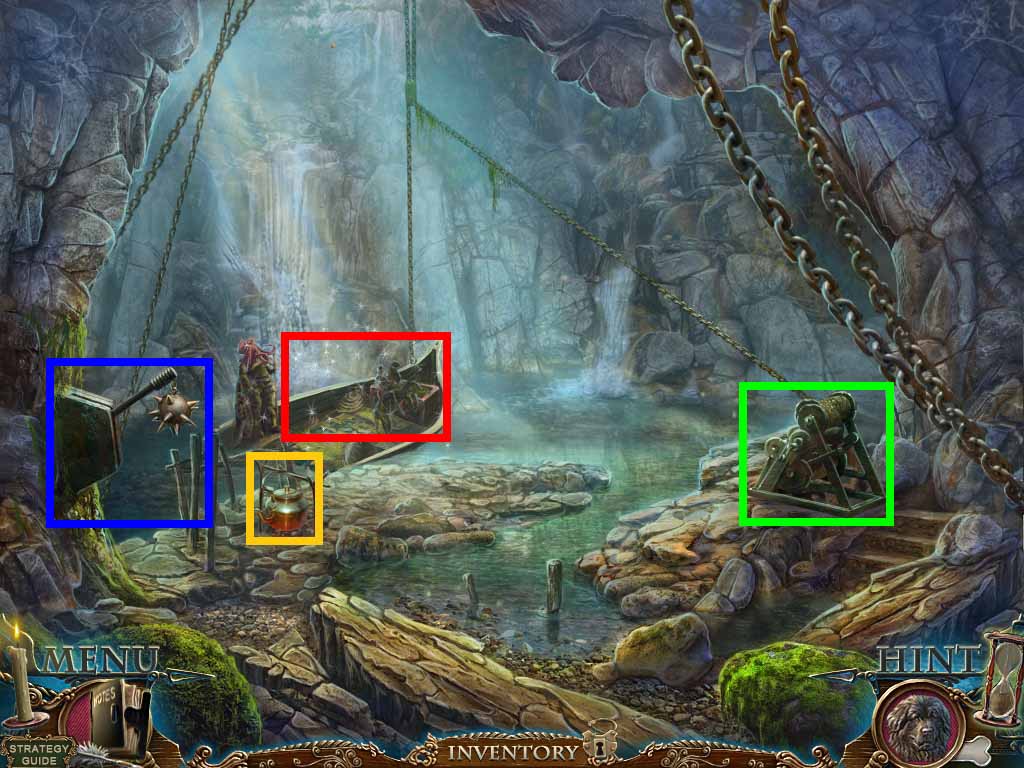
- Zoom into the kettle; collect the smoldering ember.
- Zoom into the winch; collect the pirate flag.
- Put the bolt on the chain.
- Zoom into the lever; hang the mace on the hook.
- Zoom into the raised boat access to access a hidden objects area.
- Find the pictured items.
- Collect the hook.
- Use the hook to collect the bucket; collect the trident.
- Collect the net.
- Place the trident onto the pole.
- Collect the knife.
- Cut the sack using the knife; collect the rune.
- Throw the net onto the fish.
- Use the fish on the octopus.
- Collect the 2nd rune.
- Insert the 2 runes onto the chest; collect the ice axe.
- Zoom into the water, click the stone.
- Use the ice axe on the starfish; collect the stone starfish.
- Zoom into the raised boat to access a hidden objects area.
- Find the pictured items.
- Collect the bucket.
- Use the bucket on the algae.
- Collect the dragon head.
- Click the net; collect the head.
- Place the head onto the warrior; collect the dragon.
- Put the dragon head on the front of the boat.
- Collect the helmet.
- Put the helmet onto the Valkyrie; collect the hammer.
- Hit the shield with the hammer; collect the 2nd dragon.
- Insert the 2 dragons onto the front of the chest; collect the dynamite.
- Move back one time.
- Zoom into the lever; insert the stone starfish into the slot.
- Click the lever.
- Zoom into the bug; insert the 3 insect gears onto it to trigger a puzzle.
- Place the bugs onto the matching shapes.
- Move the platform to fit the shapes.
- Move forward to the new opening.
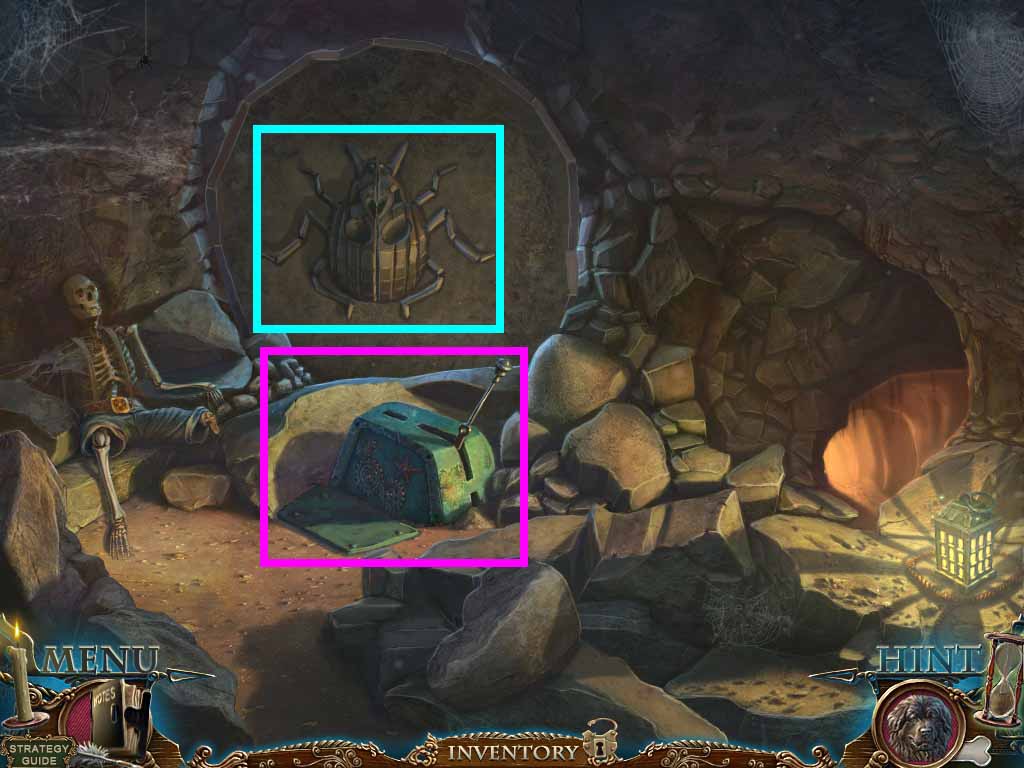
- Zoom into the pack and open it.
- Put the small lens onto the larger one; collect the spyglass.
- Zoom into the overhanging rock, place the dynamite onto it.
- Use the smoldering ember on the dynamite.
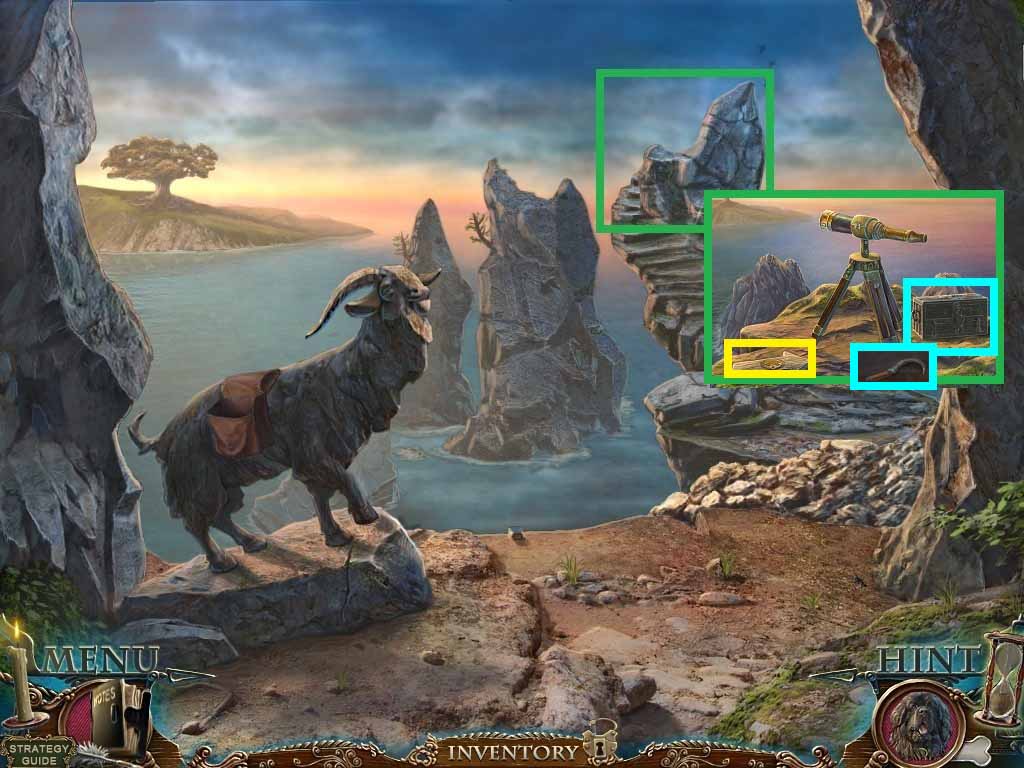
- Zoom into the end of the path.
- Place the spyglass onto the tripod; examine it to obtain the code 354.
- Zoom into the chest and use the code 354 to collect the sickle.
- Collect the sign.
- Move back two times.
- Zoom into the sign post and place the sign onto it.
- Collect the key.
- Zoom into the bushes, cut them using the sickle.
- Move forward two times to the large tree.
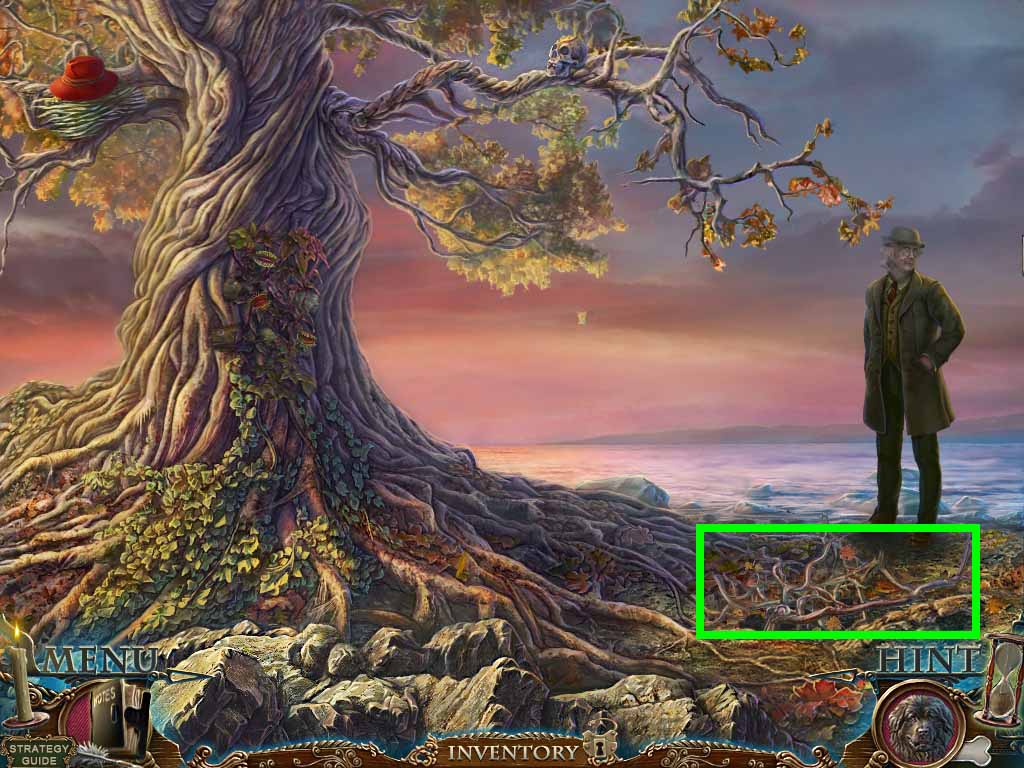
- Zoom into the ground; collect the dry wood.
- Move back two times; move into the cave and down into the chamber.
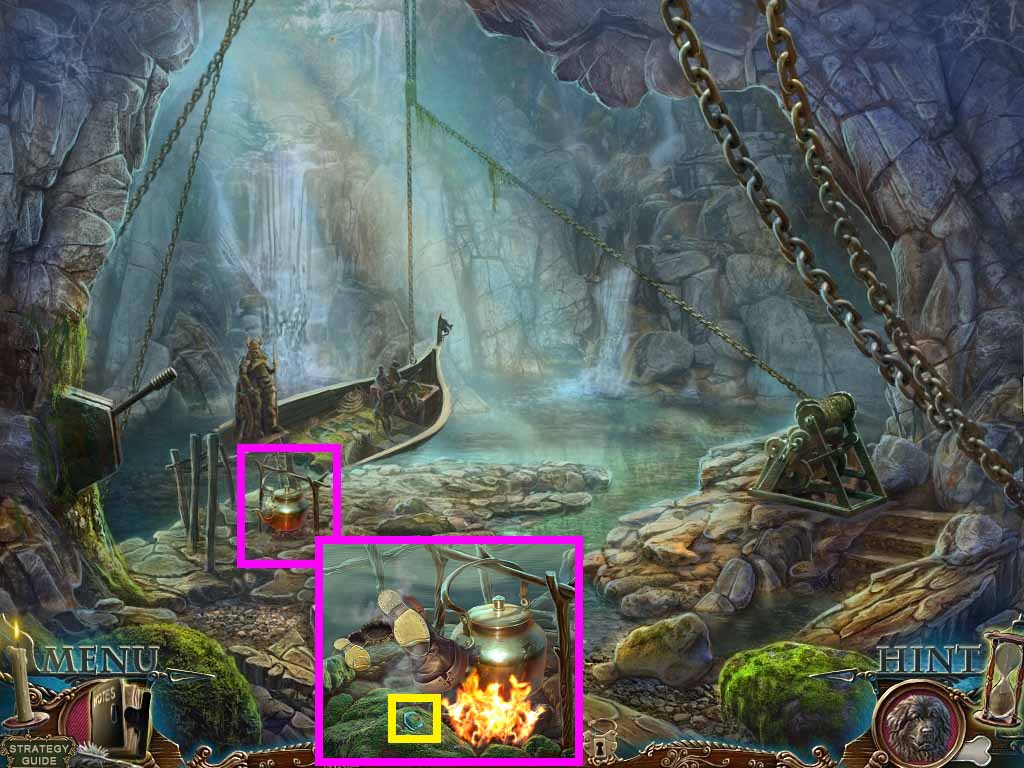
- Zoom into the kettle; put the dry wood beneath it.
- Put the boot by the base of the kettle; collect the amulet.
- Move back two times and go forward.
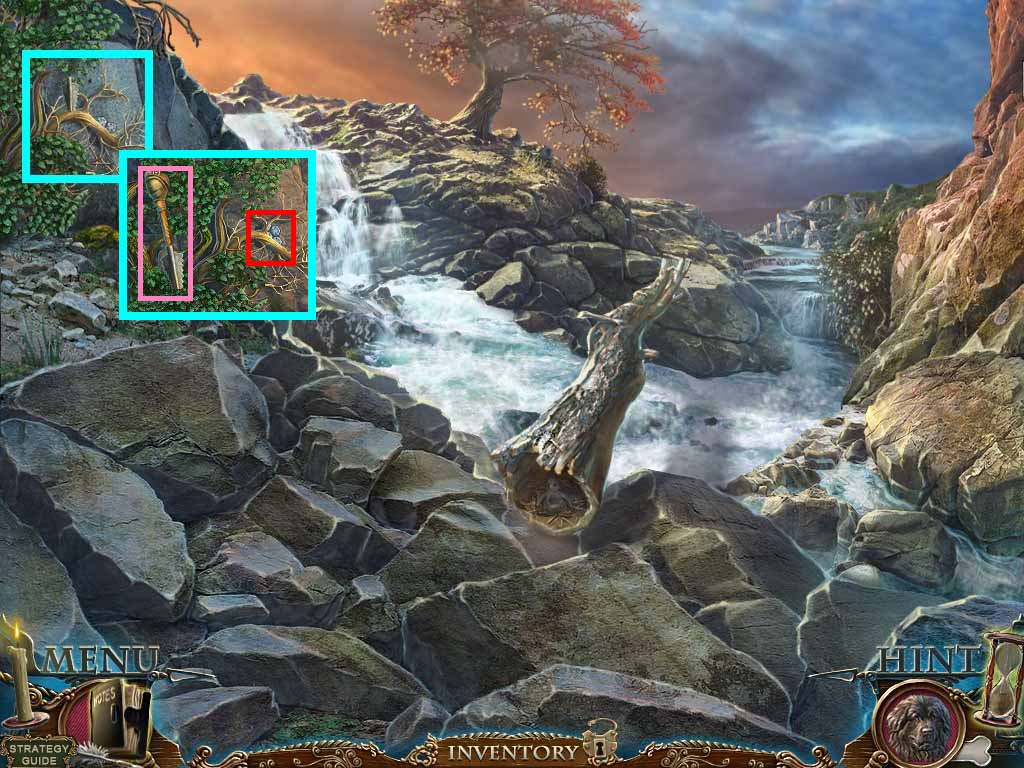
- Zoom into the bush.
- Place the peg leg stick onto the saw blade and collect the saw.
- Use the saw on the branches.
- Zoom into the amulets; place the amulet by them to trigger a puzzle.
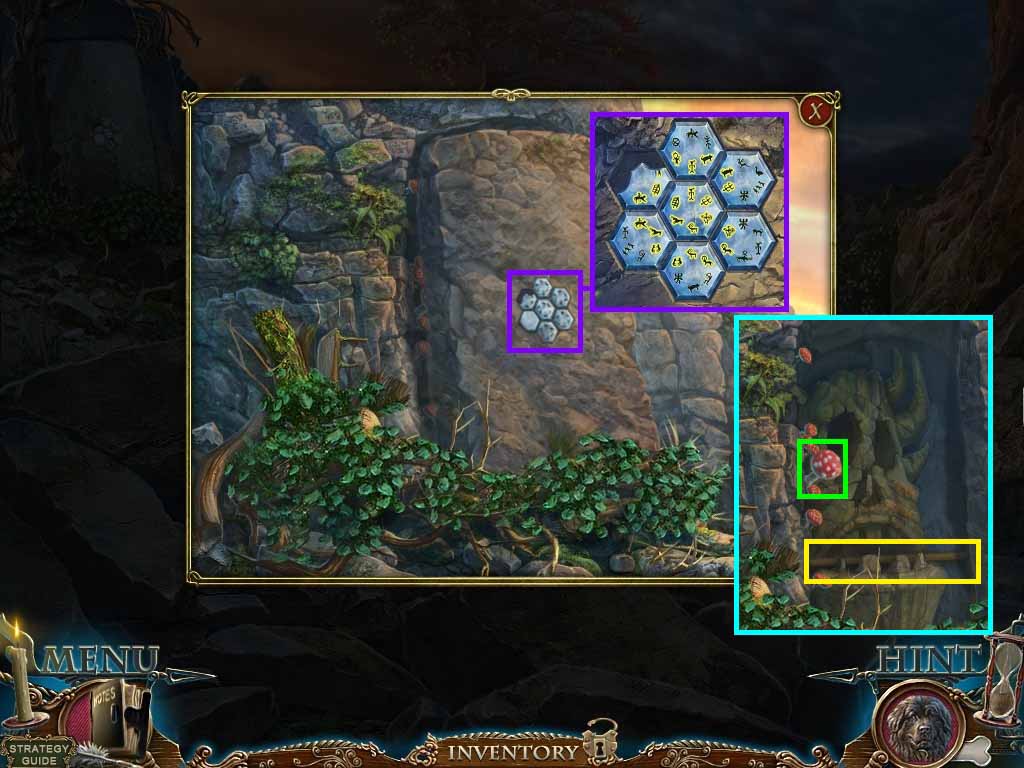
- Move the symbols so that they are matched together.
- Collect the amanita fungus and the mop.
- Zoom into the rocks, mop them using the mop.
- Collect the gold hand and the shovel handle.
- Move forward.
- Zoom into the plants and feed them the amanita fungus.
- Zoom into the hat; collect the old hat.
- Zoom into the skull; place the gold hand onto it.
- Collect the 2nd key.
- Zoom into the hole.
- Place the shovel handle onto the shovel head.
- Dig the hole.
- Zoom into the skeleton on the right; collect the saber.
- Place the pirate flag on the hilt; collect the saber.
- Move back two times.
- Give Arthur the old hat.
- Collect the little bird.
- Move forward to the tree.
- Zoom into the bird; give it the little bird.
- Crack the egg and collect the 3rd key.
- Move into the hole.
- Zoom into the chest; cut the vines using the sabre.
- Insert the 3 keys into the matching locks.
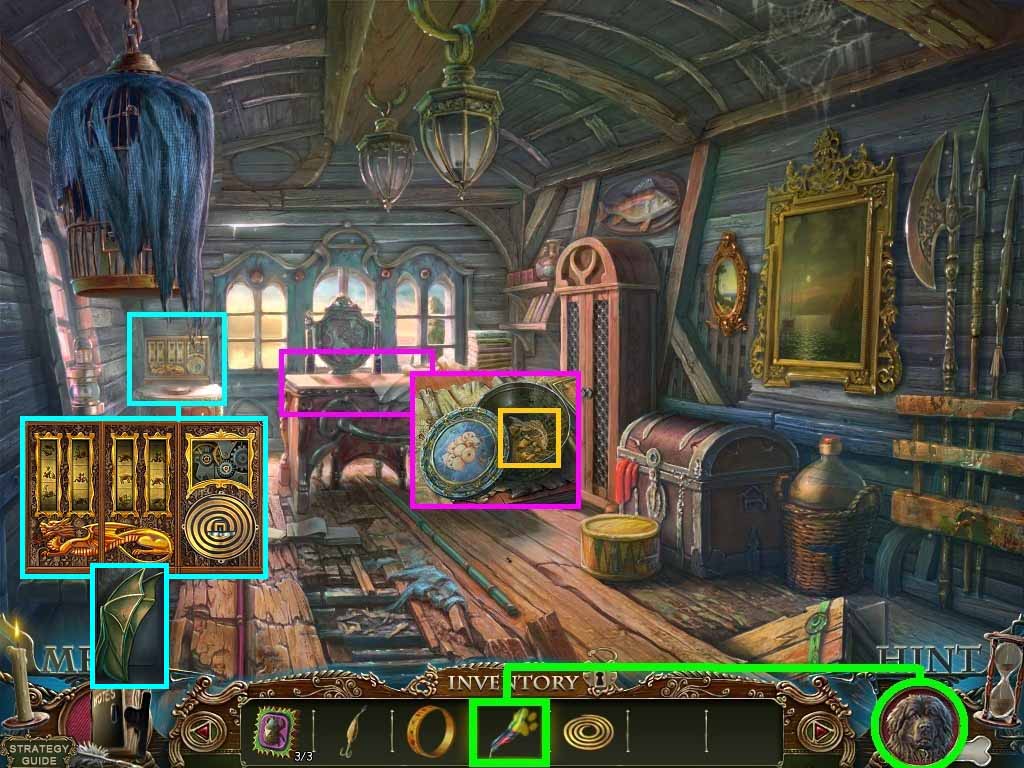
- Zoom into the sack; click the mirror.
Author: Date: Jan-22-2013
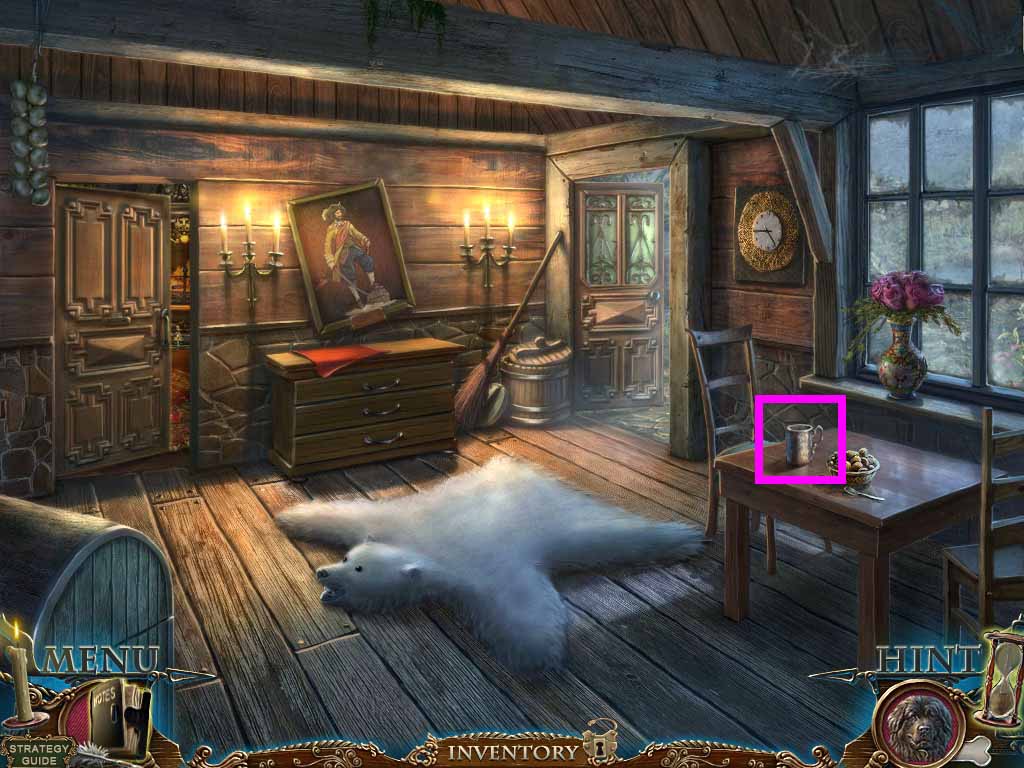
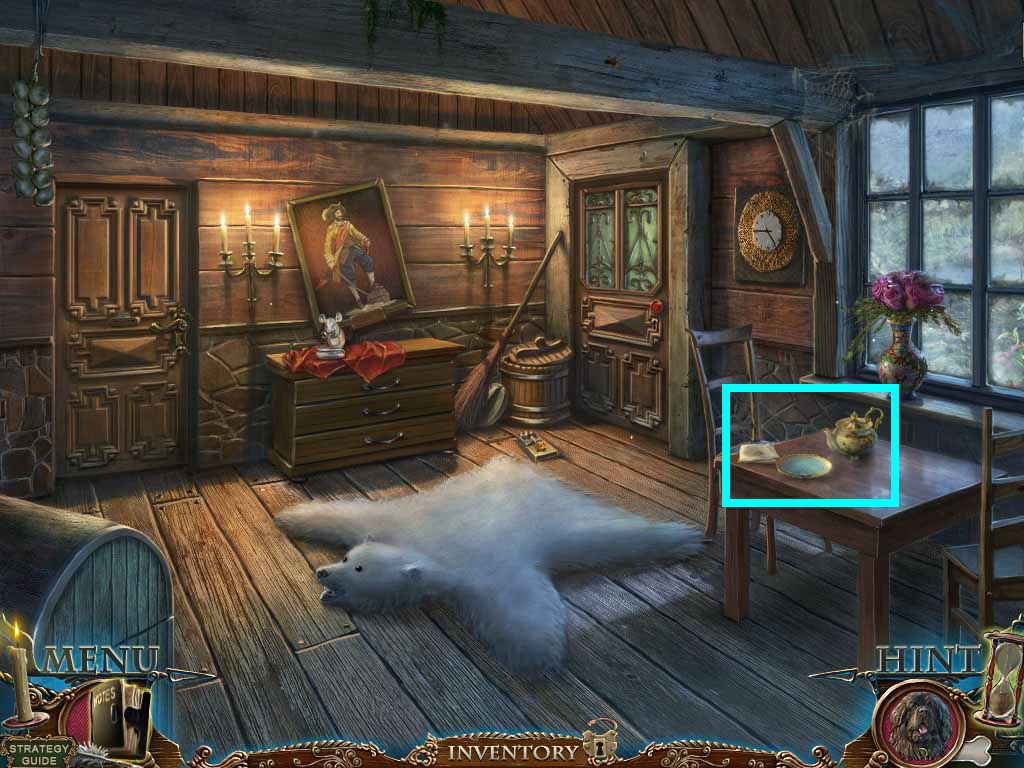
- Zoom into the table; click the teapot.
- Collect the bowl of water; collect the letter opener.
- Zoom into the chest of drawers; collect the copper wire.
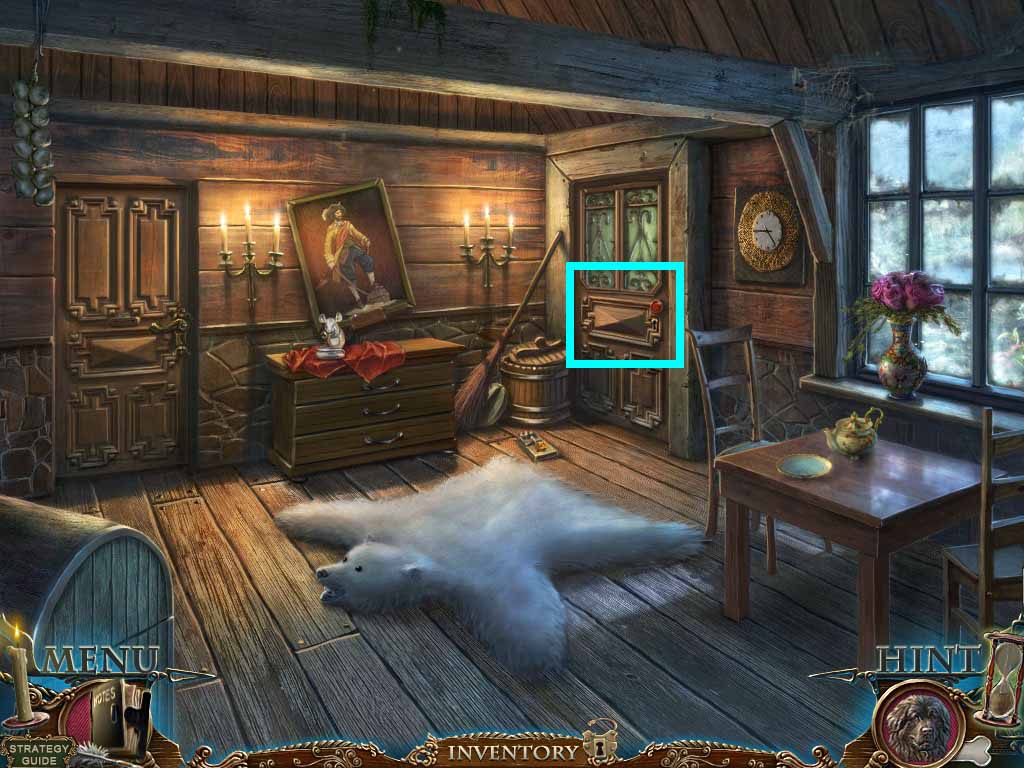
- Zoom into Le Grand’s office door
- Open the latch using the letter opener.
- Click the handle.
- Move through the door.
- Zoom into Le Grand; collect the coin.
- Zoom into the window; collect the bunch of straw, the hook and the handkerchief.
- Zoom into the desk.
- Collect the apple half.
- Move back one time.
- Zoom into the table.
- Place the kerchief onto the table.
- Click and drag it to dip into the bowl.
- Collect the wet kerchief.
- Move back to Le Grand.
- Zoom into Le Grand and use the wet kerchief on him.
- Zoom into Le Grand again; collect the garden key.
- Move back once.
- Zoom into the door; insert the garden key and click the handle.
- Move to the right out of the door.
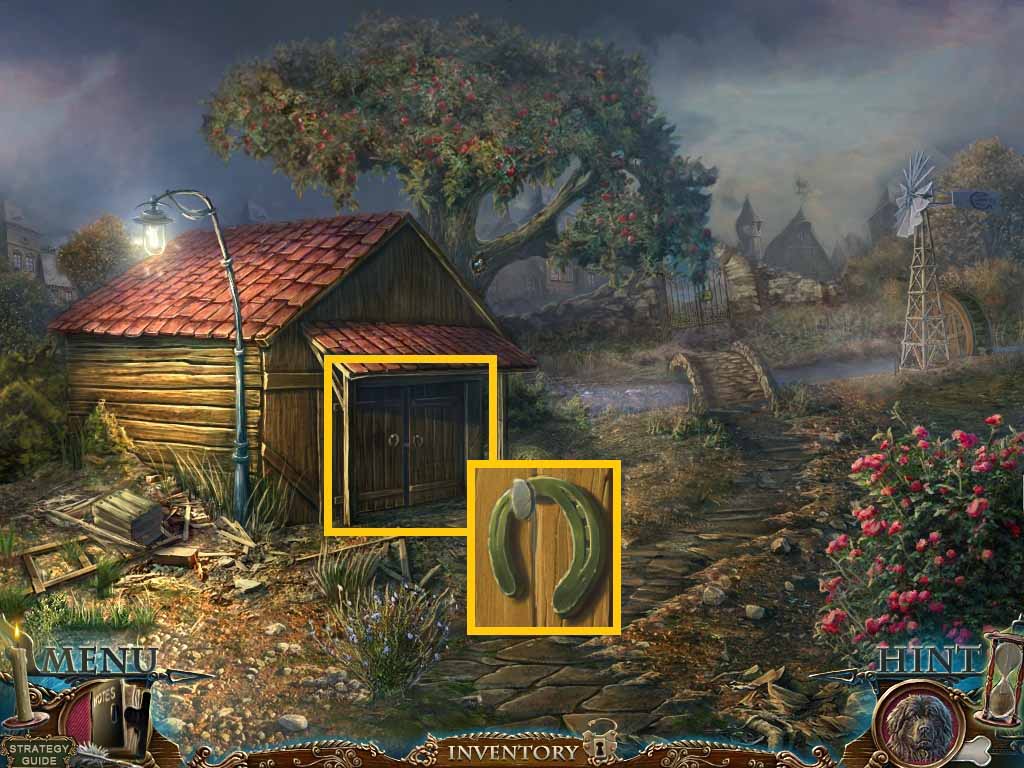
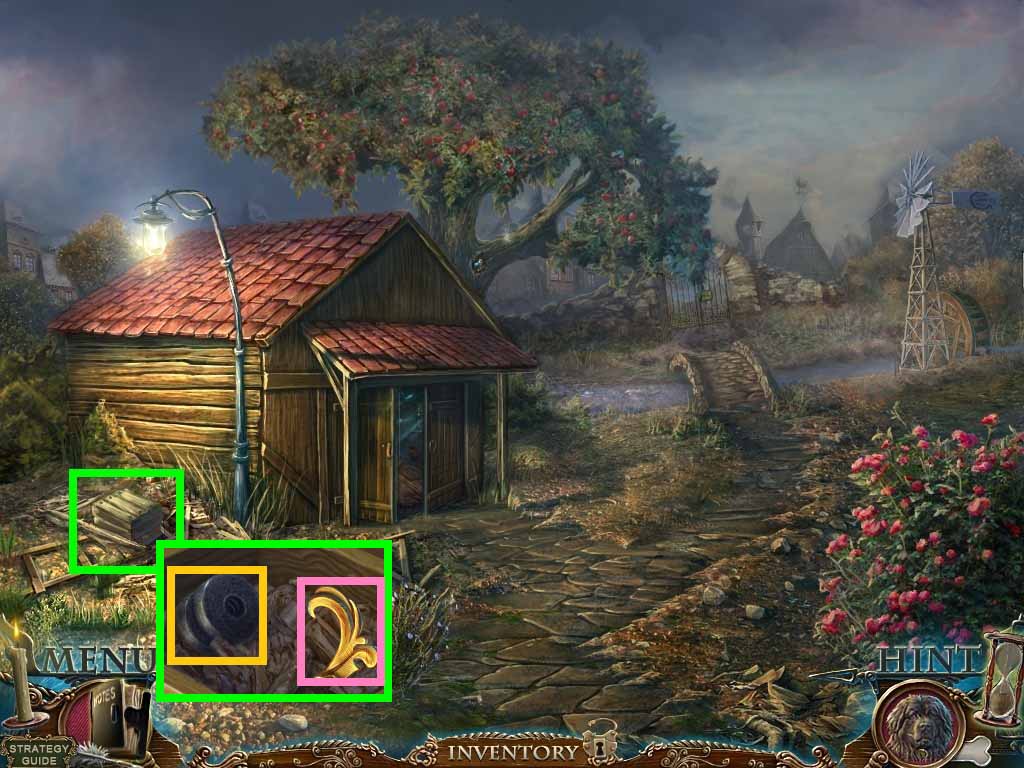
- Zoom into the shed door.
- Collect the horseshoe.
- Move back one time and into Le Grand’s office.
- Zoom into the desk.
- Place the horseshoe and the copper wire onto it.
- Connect the copper wire and the horseshoe; collect the magnet.
- Move to the shed.
- Zoom into the shed; put the magnet onto the metal.
- Go into the shed.
- Collect the oven mitt.
- Move to Le Grand’s office.
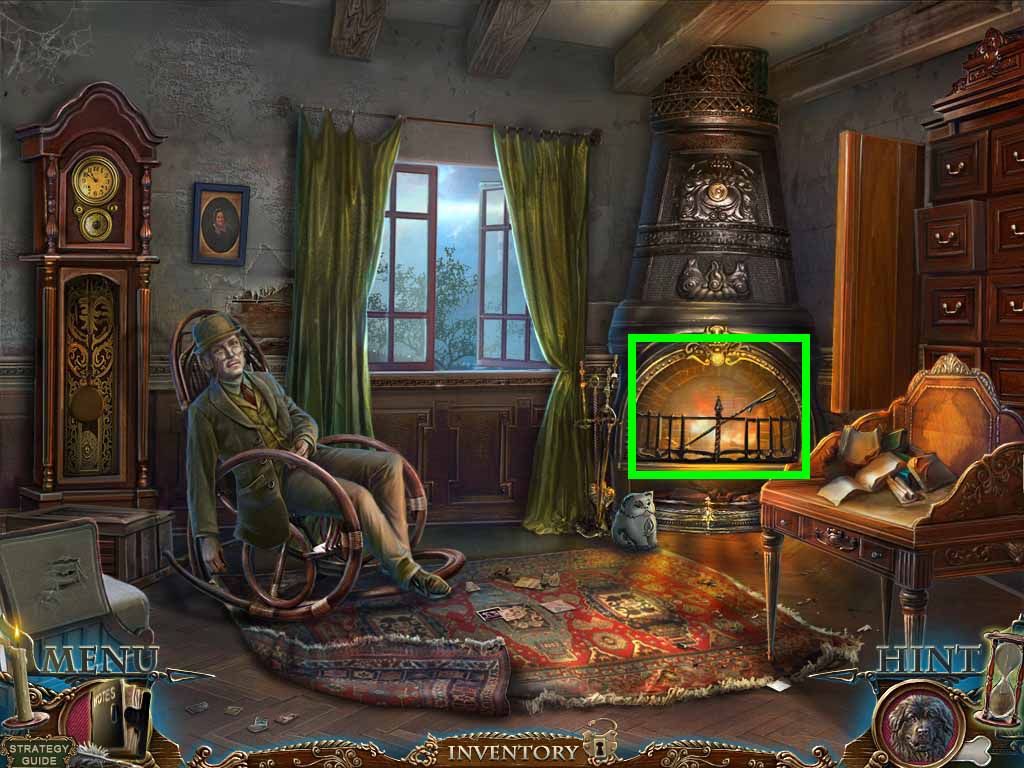
- Zoom into the fireplace.
- Put the oven mitt onto the poker; collect the fire hook.
- Move back once.
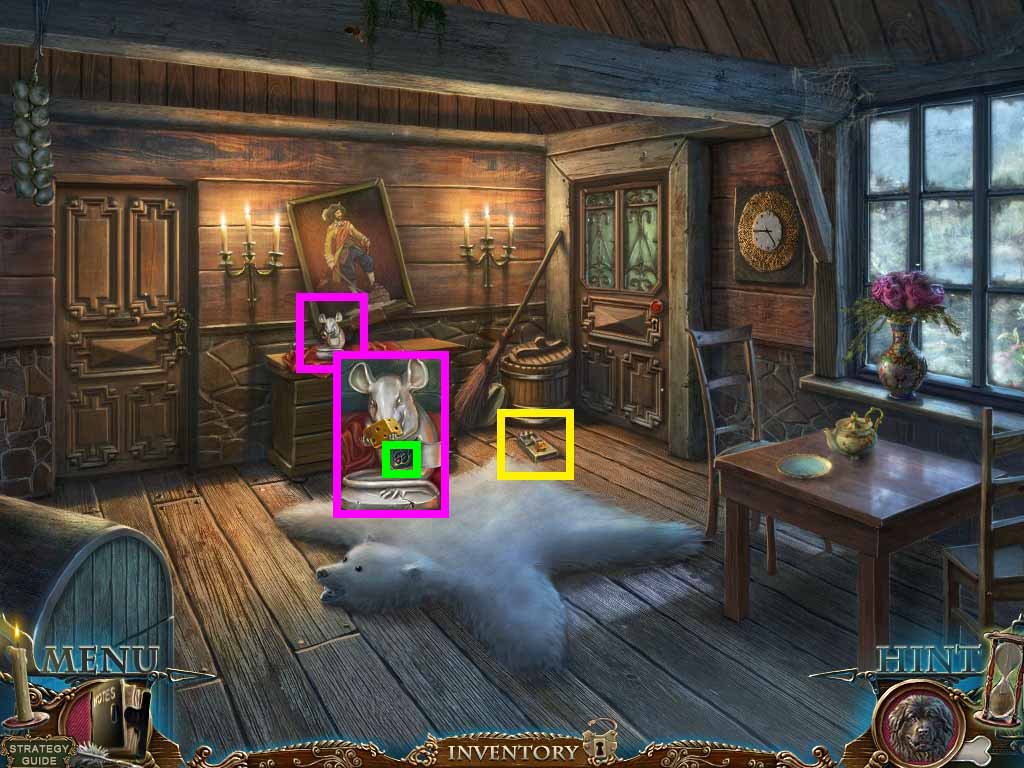
- Zoom into the mouse trap; use the fire hook to snap it.
- Collect the cheese.
- Zoom into the mouse; give him the cheese.
- Collect the fire medallion.
- Move to Le Grand’s office.
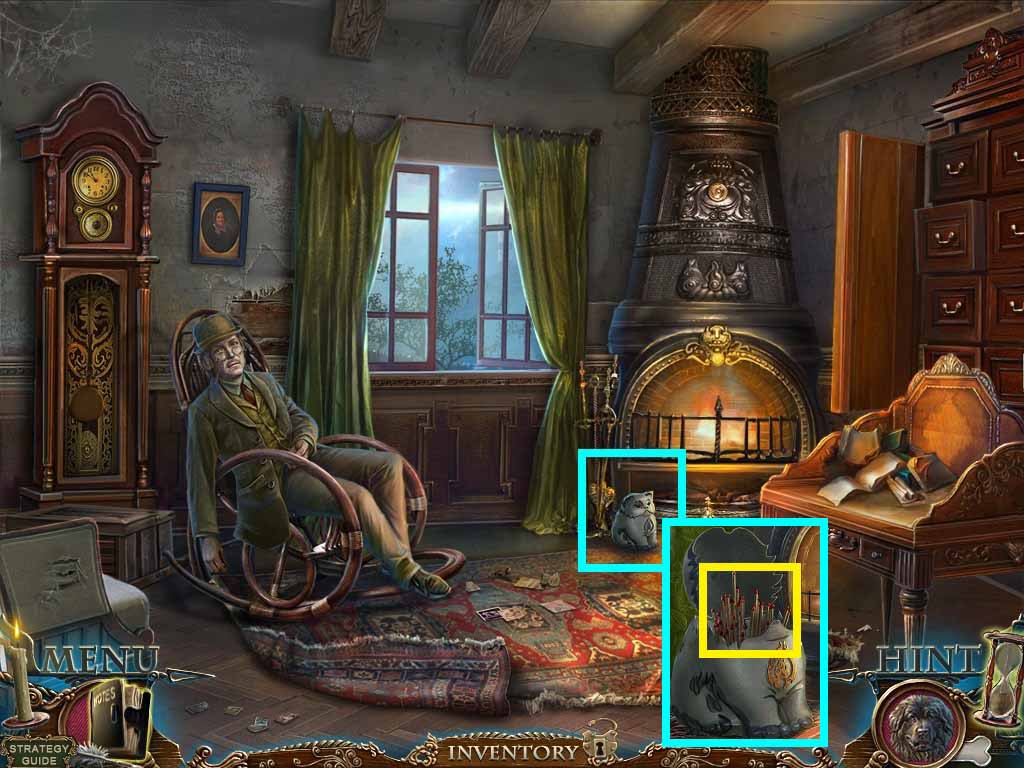
- Zoom into the fireplace.
- Place the fire medallion onto the cat statue.
- Collect the match.
- Move back and exit the house.
- Go into the shed.
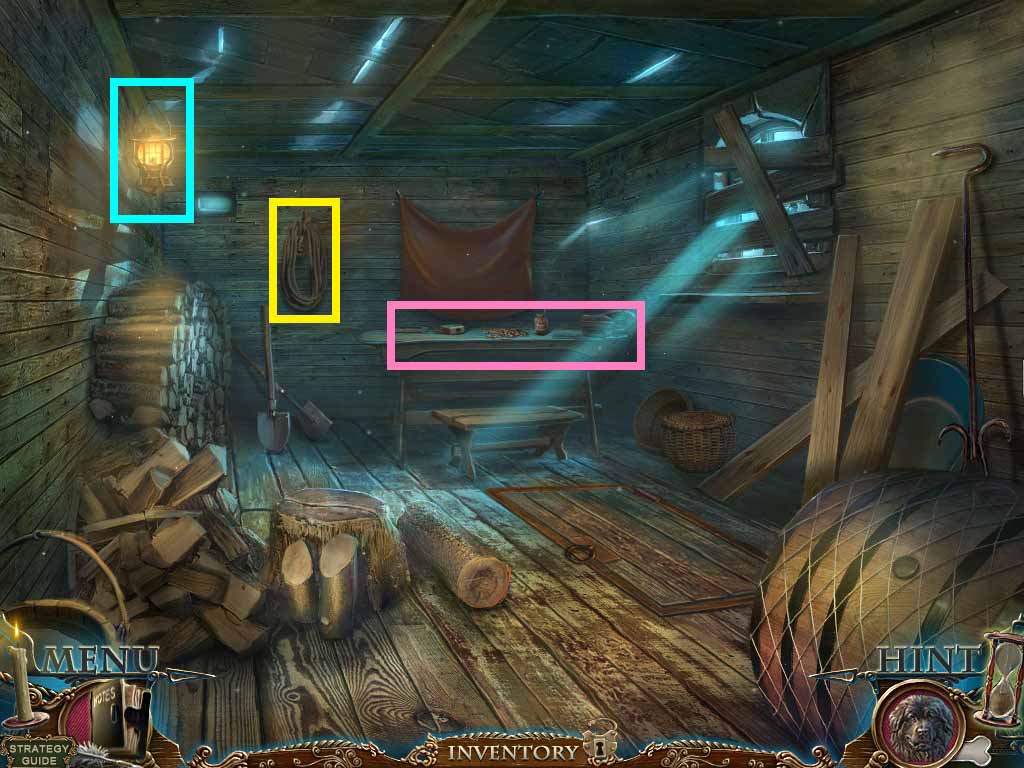
- Zoom into the lantern.
- Click it open.
- Use the match to light it and close the door.
- Collect the rope.
- Zoom into the workbench.
- Clear the wood shavings; collect the gem, crowbar and the glue.
- Move back one time.
- Zoom into the crate; use the crowbar on it.
- Collect the gold foil and the wheel.
- Move into the shed.
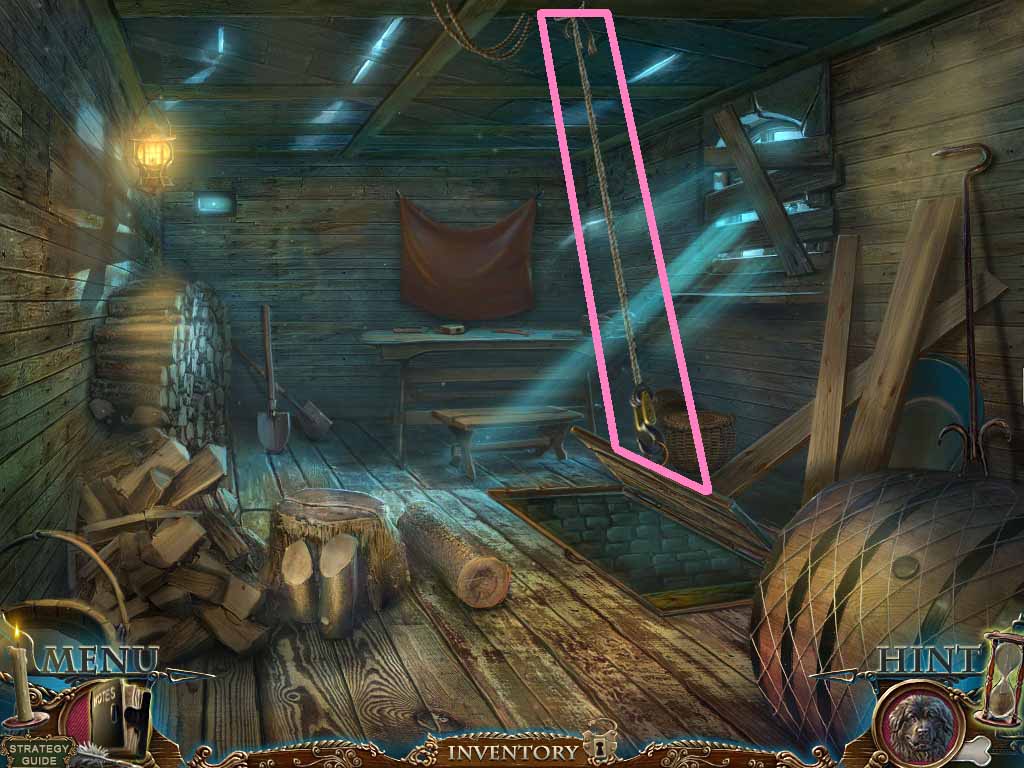
- Zoom into the rafters.
- Attach the rope, wheel and the hook onto the rope; click the hook.
- Zoom into the hatch; connect the hook.
- Move down into the hatch.
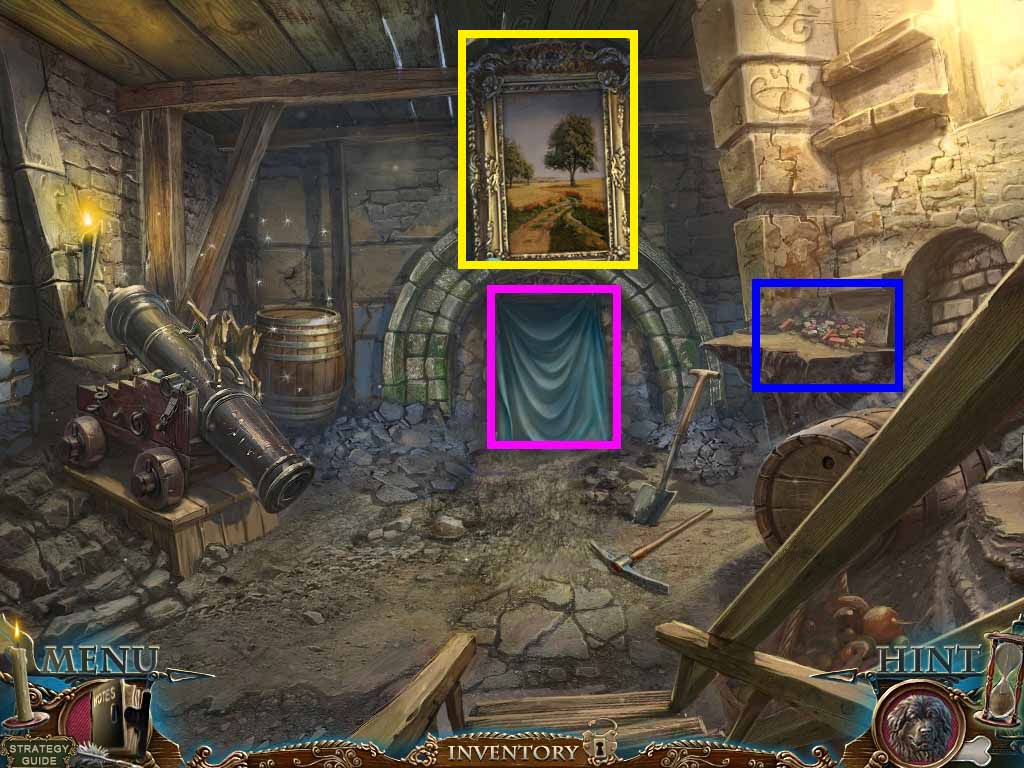
- Zoom into the ledge and click the bricks.
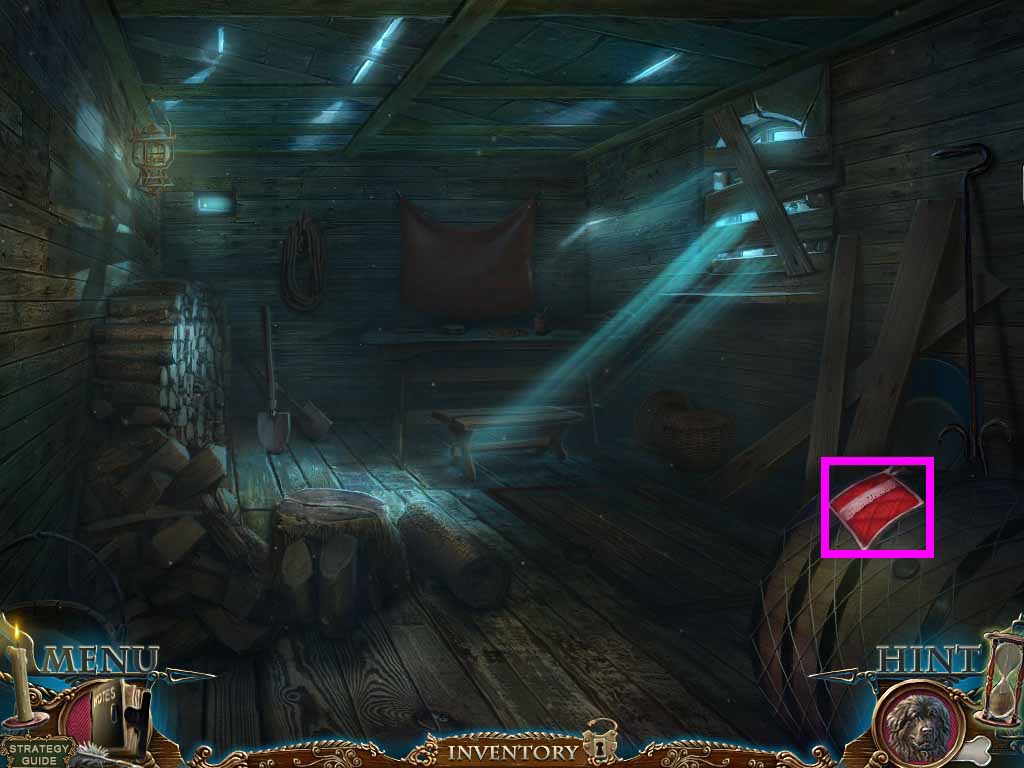
- Collect the spoon.
- Zoom into the curtain; click it and collect the curtain.
- Zoom into the painting; insert the gem and gold foil to trigger a puzzle.
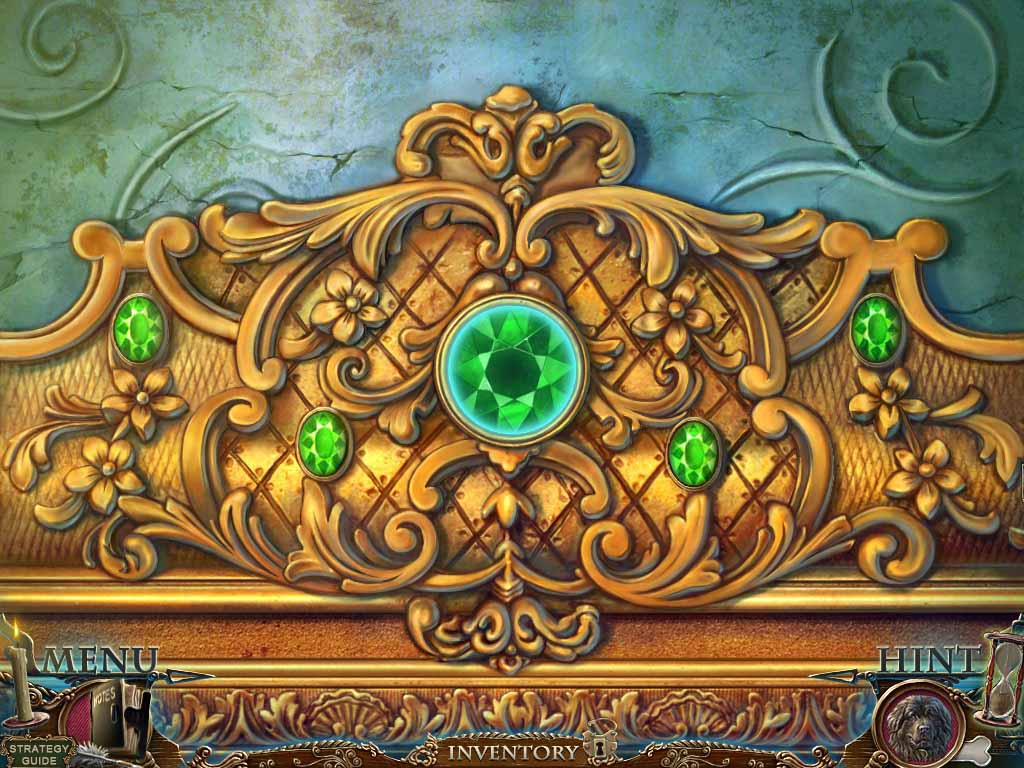
- Insert the missing pieces to complete the picture.
- Click the large gemstone when complete.
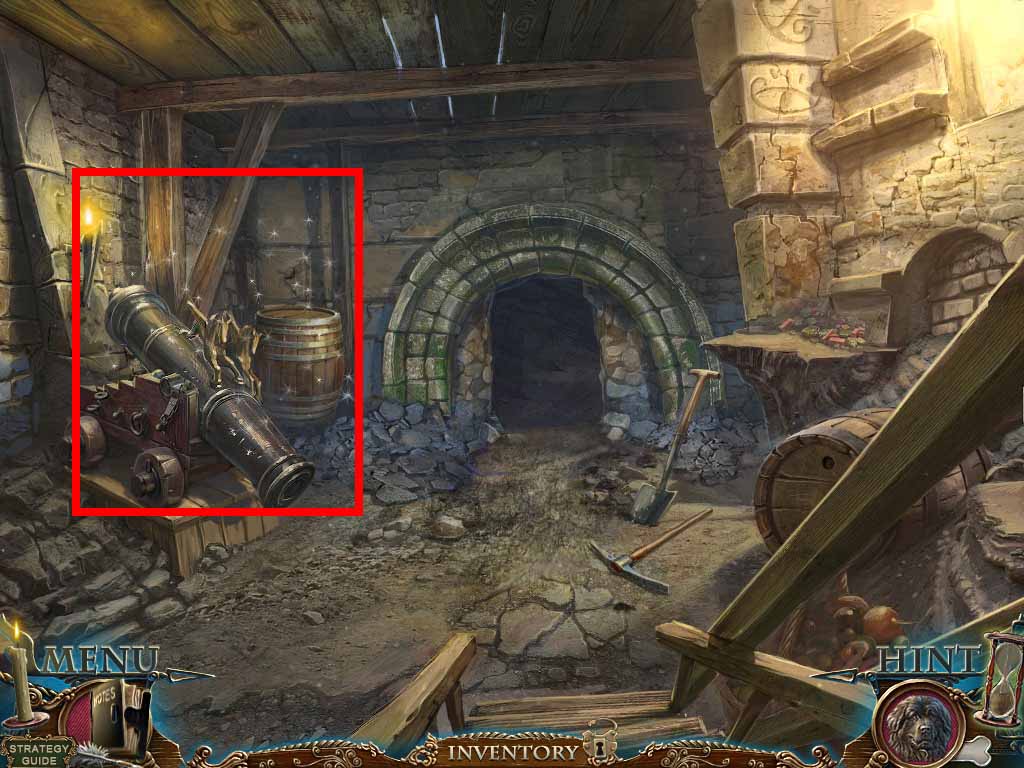
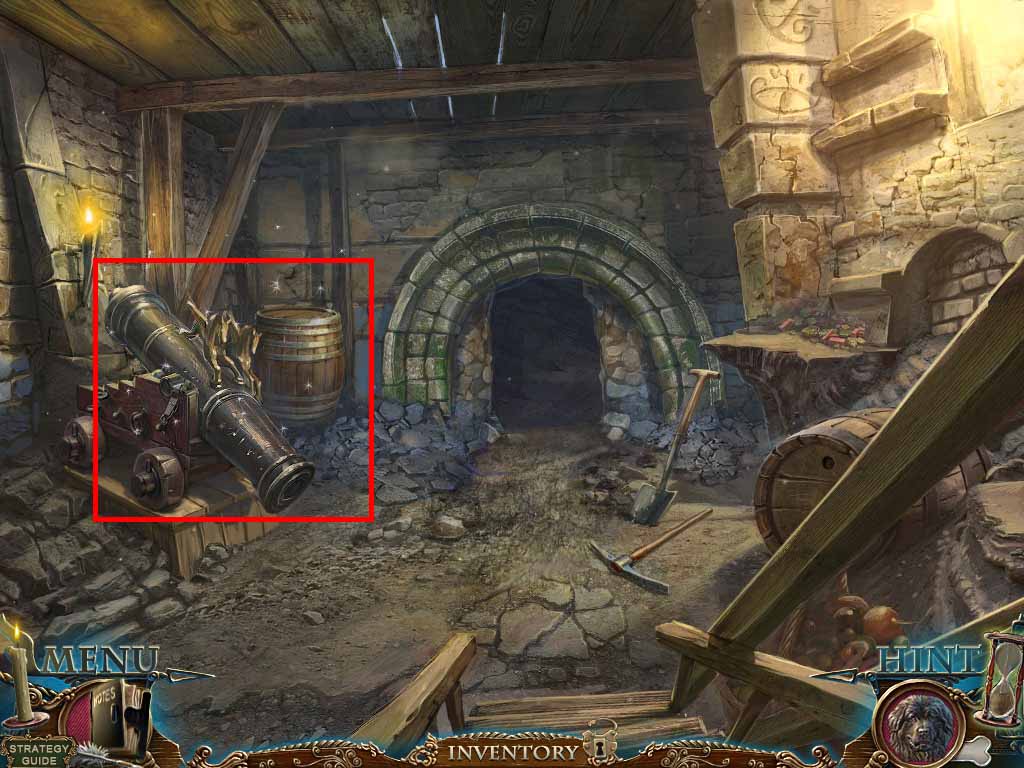
- Zoom into the cannon to access a hidden objects area.
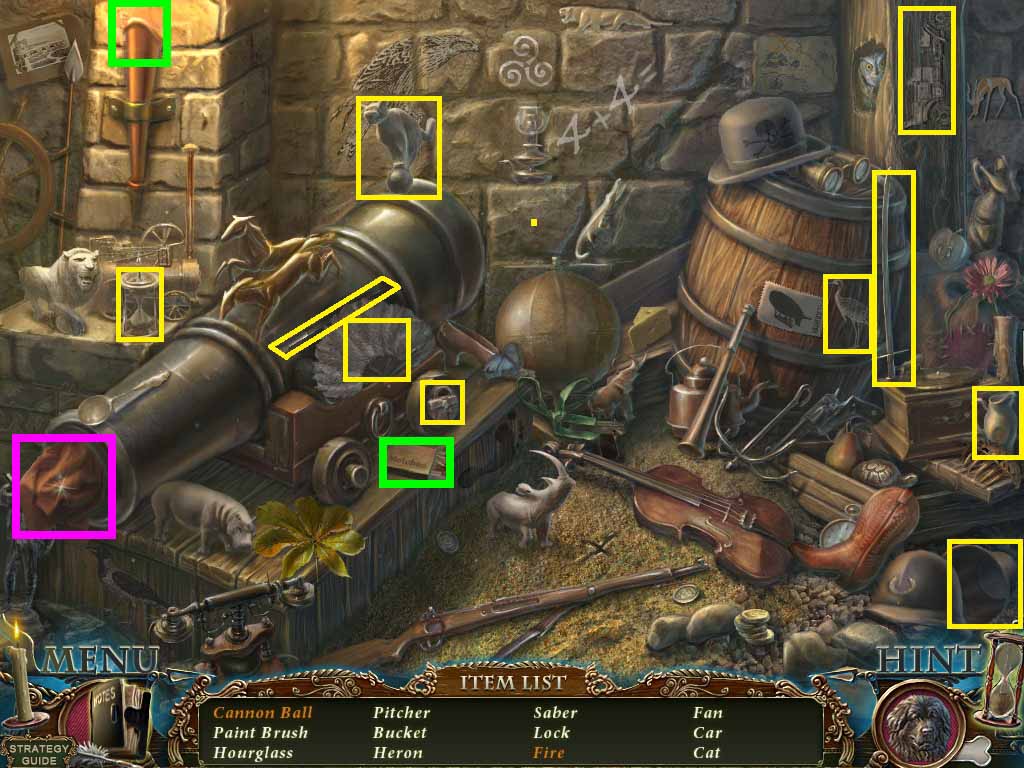
- Find the listed items.
- Click the cloth to collect the core.
- Light the torch with the matches to collect the fire.
- Collect a bucket.
- Move forward to the grotto.
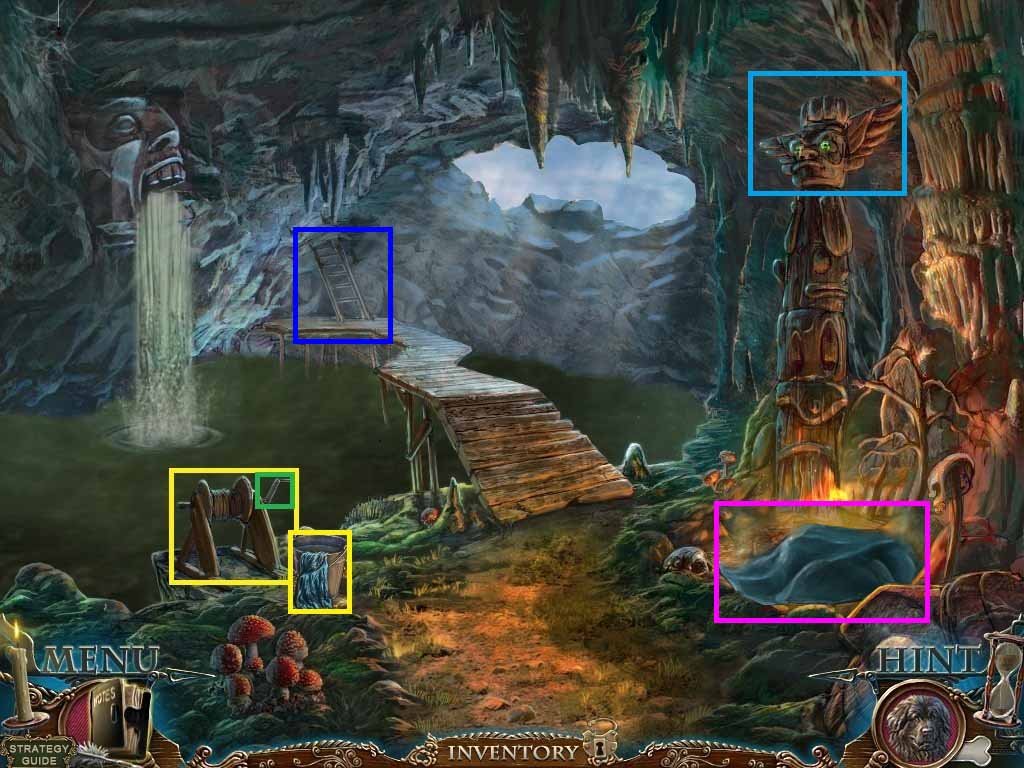
- Zoom into the winch; place the bucket near the rope.
- Click the bucket and turn the handle.
- Put the curtain into the bucket of water.
- Collect the handle and the wet curtain.
- Zoom into the totem head; collect the totem eyes.
- Zoom into the fire; Place the wet curtains onto it.
- Zoom into the ladder; notice we need a key.
- Move back one time.
- Zoom into the cannon to access a hidden objects area.
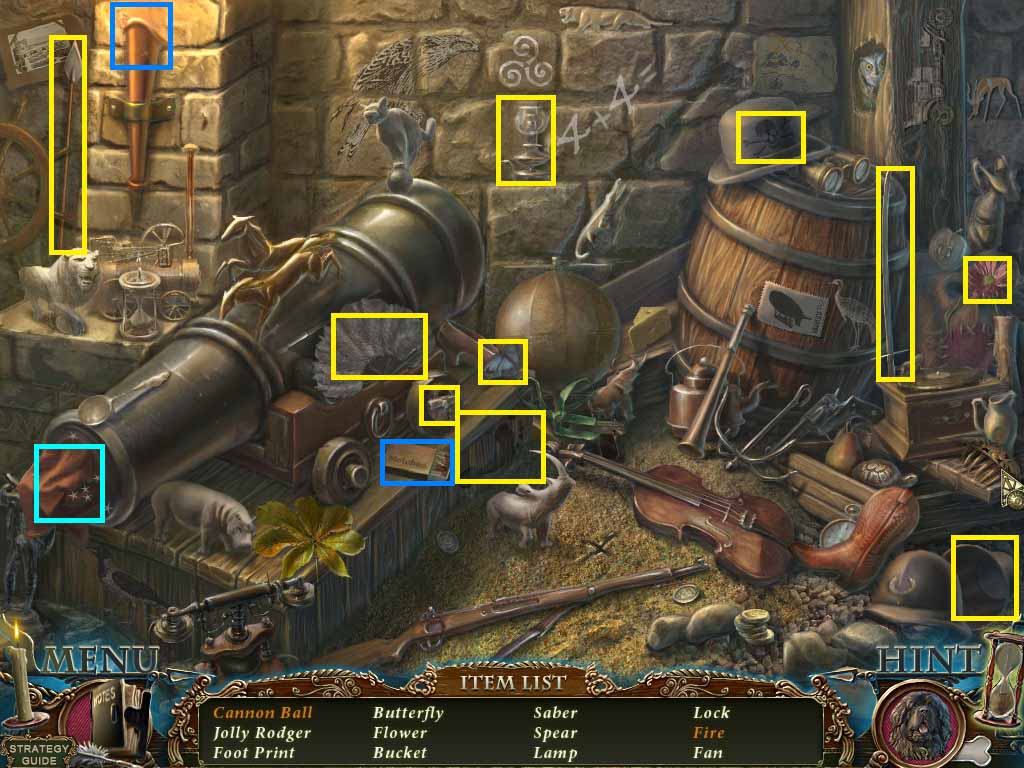
- Find the listed items.
- Use the chalk on the equation to collect the 8.
- Use the shovel on the “X” to collect the shell.
- Collect the 2nd apple half.
- Move back two times.
- Zoom into the top of the tree trunk.
- Give the gnome the 2 apple halves.
- Collect the key.
- Move to the lower level of the shed and move forward to the grotto.
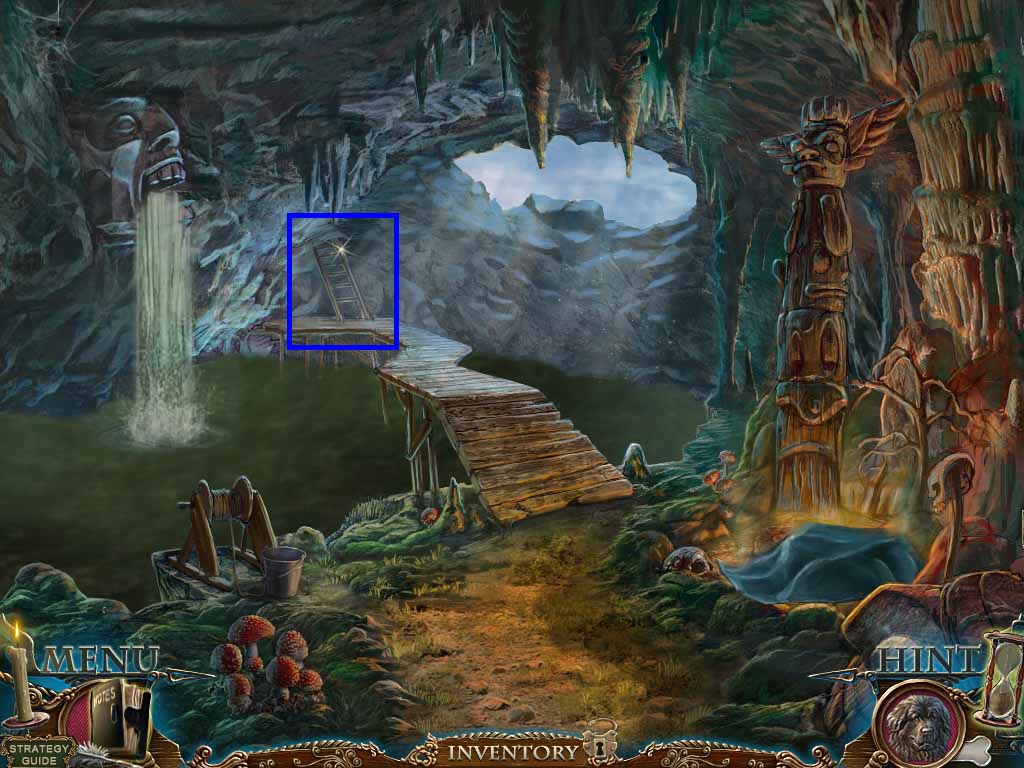
- Zoom into the ladder; insert the key into the hatch.
- Go into the cabin.
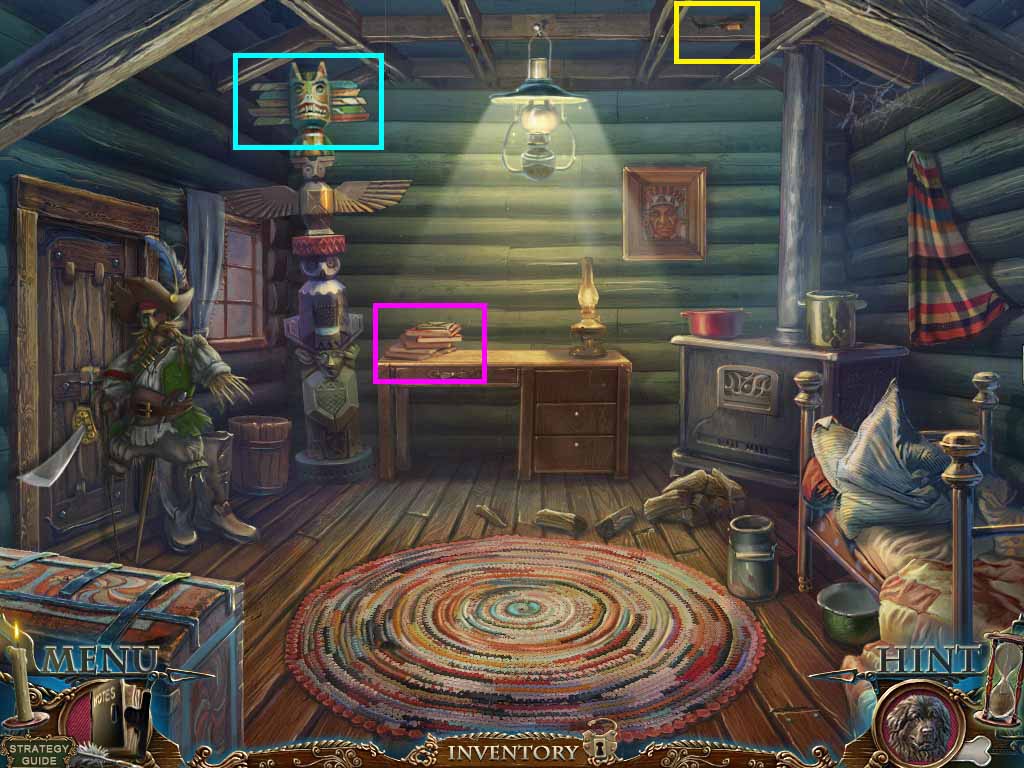
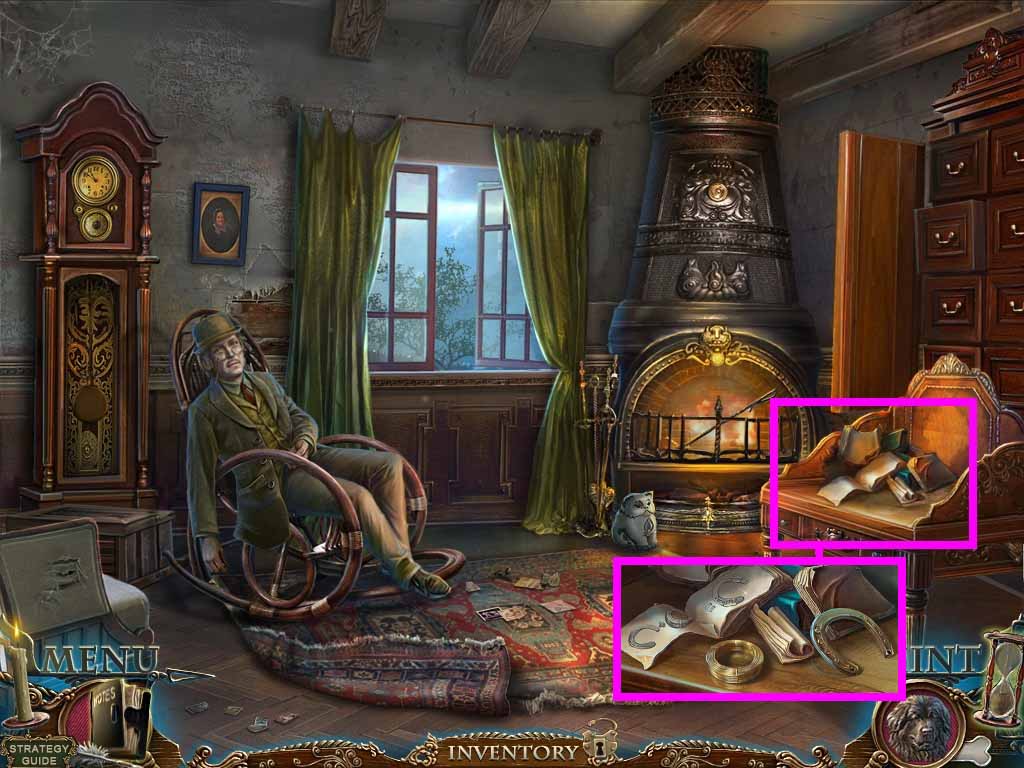
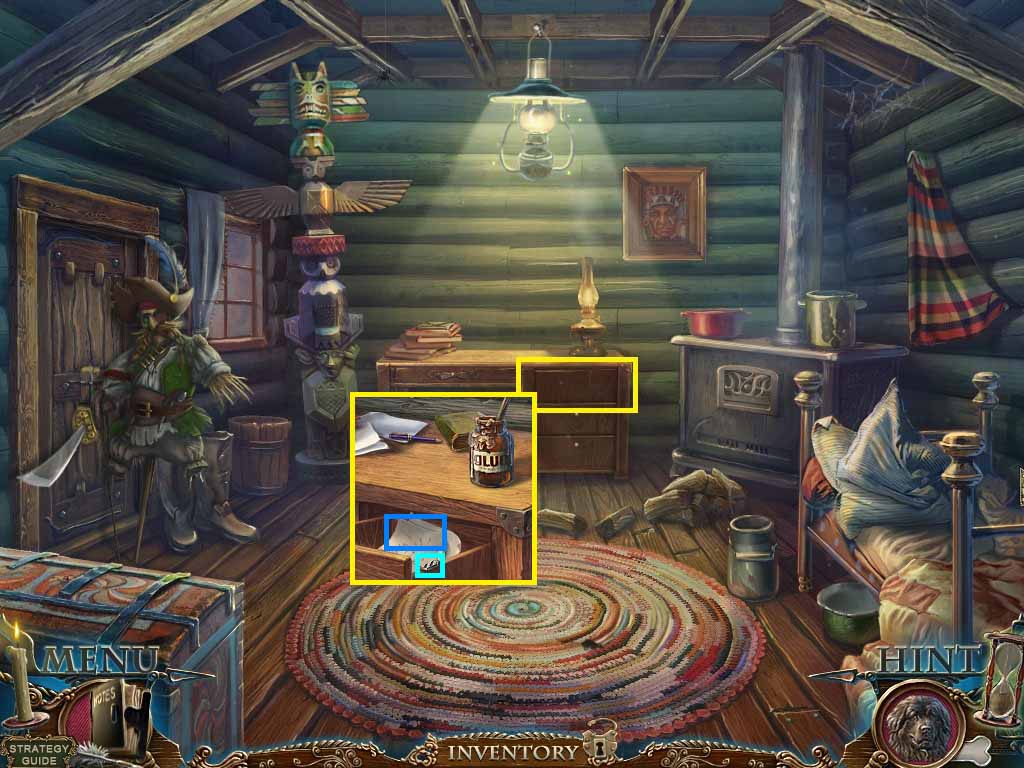
- Zoom into the left side of the desk.
- Click aside the 2 books and the envelope.
- Open the envelope and collect the note.
- Zoom into the rafters; collect the chisel.
- Zoom into the totem top and insert the eyes to trigger a puzzle.
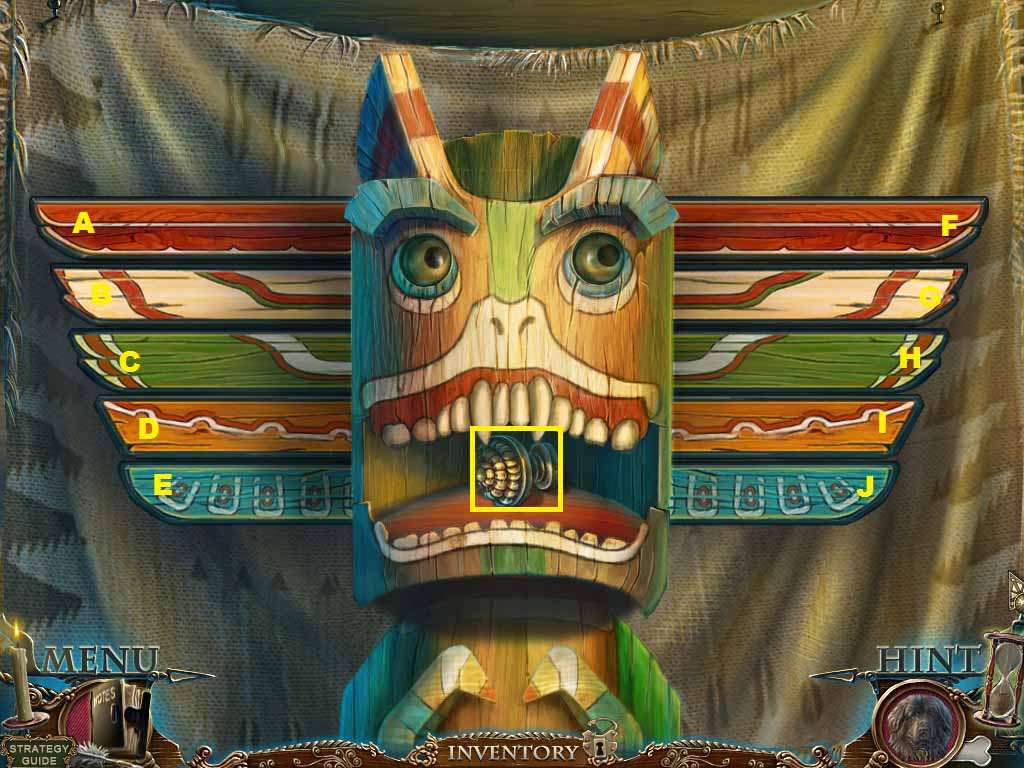
- Assort the wings from widest to narrowest.
- To solve switch the wings in the following pattern:
- J – I , I – H , H-G , G-F, D-C, C-B, B-A, I –H, H-G, G – B , J – E , E – D , D – C , E – D, J – I, I – H , J – I, J – E.
- Collect the drawer handle.
- Zoom into the desk drawers.
- Put the glue and the drawer handle onto it.
- Open the drawer; collect the roller lock and read the letter.
- Move back four times.
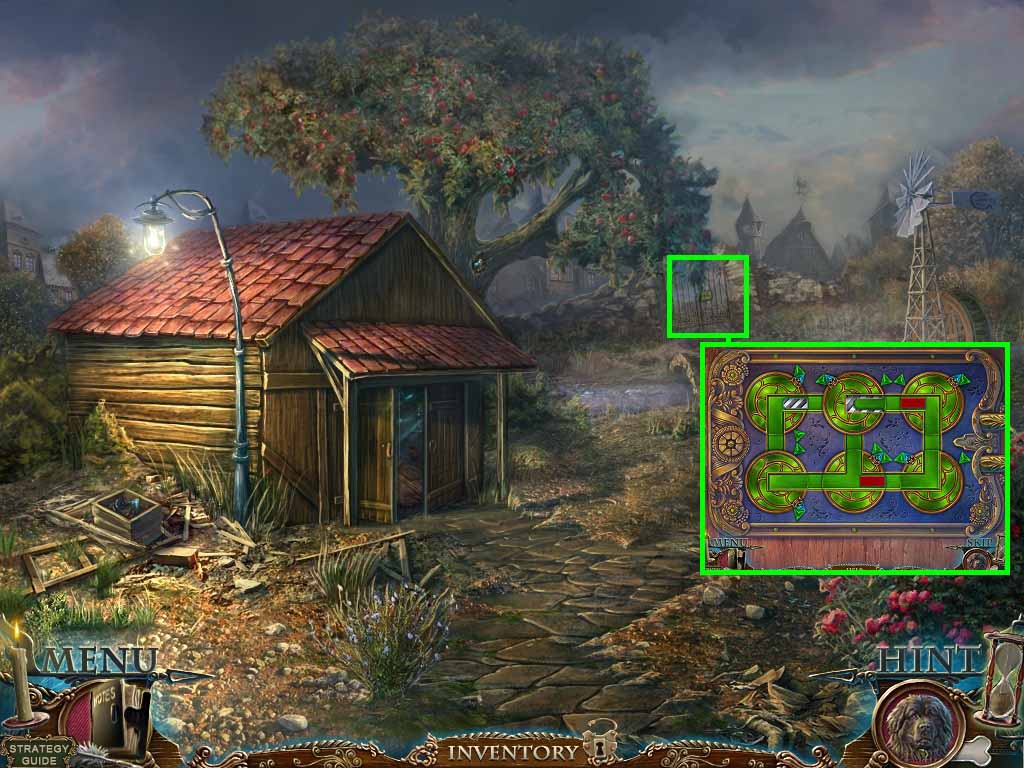
- Zoom into the gate; insert the roller lock to access a puzzle.
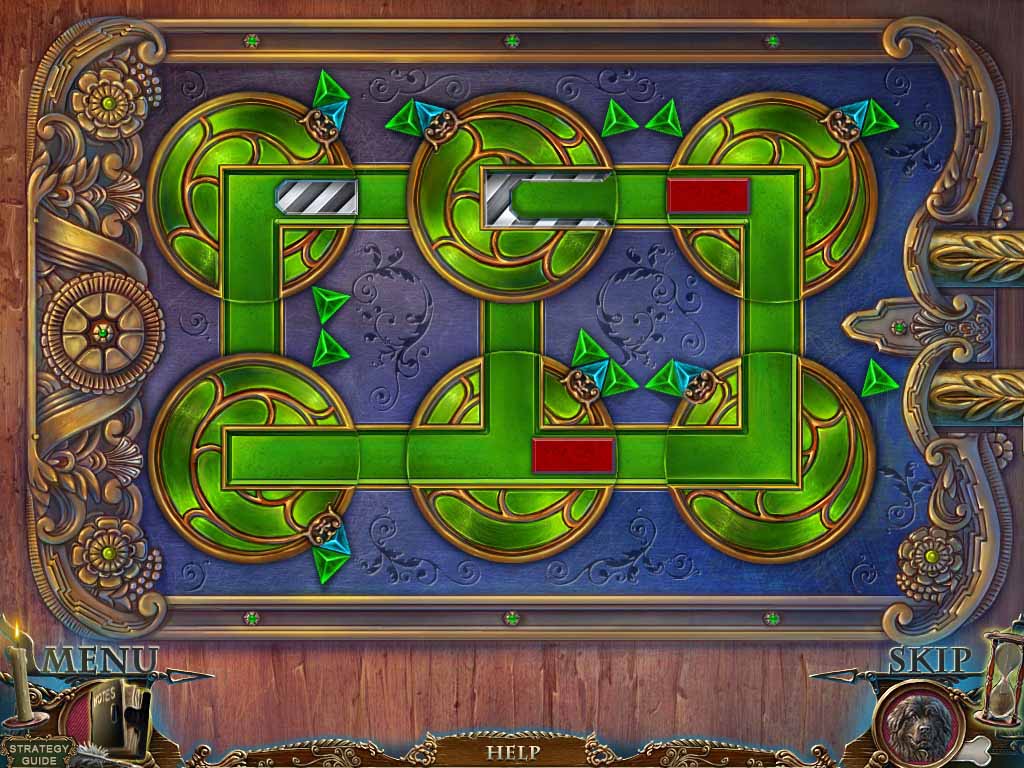
- Move the roller through the maze by rotating the discs.
- Go into the gate.
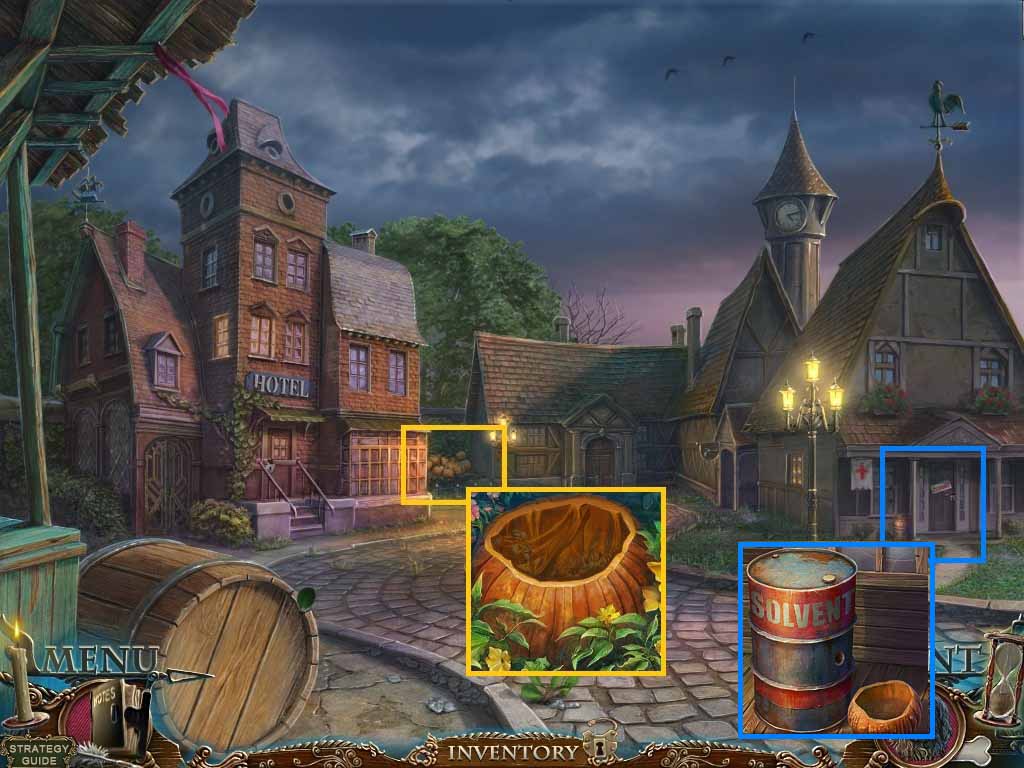
- Zoom into the pumpkins.
- Carve it using the letter opener and the spoon.
- Collect the hollowed pumpkin.
- Zoom into the clinic’s doorway.
- Place the hollowed pumpkin near the barrel.
- Use the chisel on the barrel; collect the solvent.
- Move forward into the junk shop.
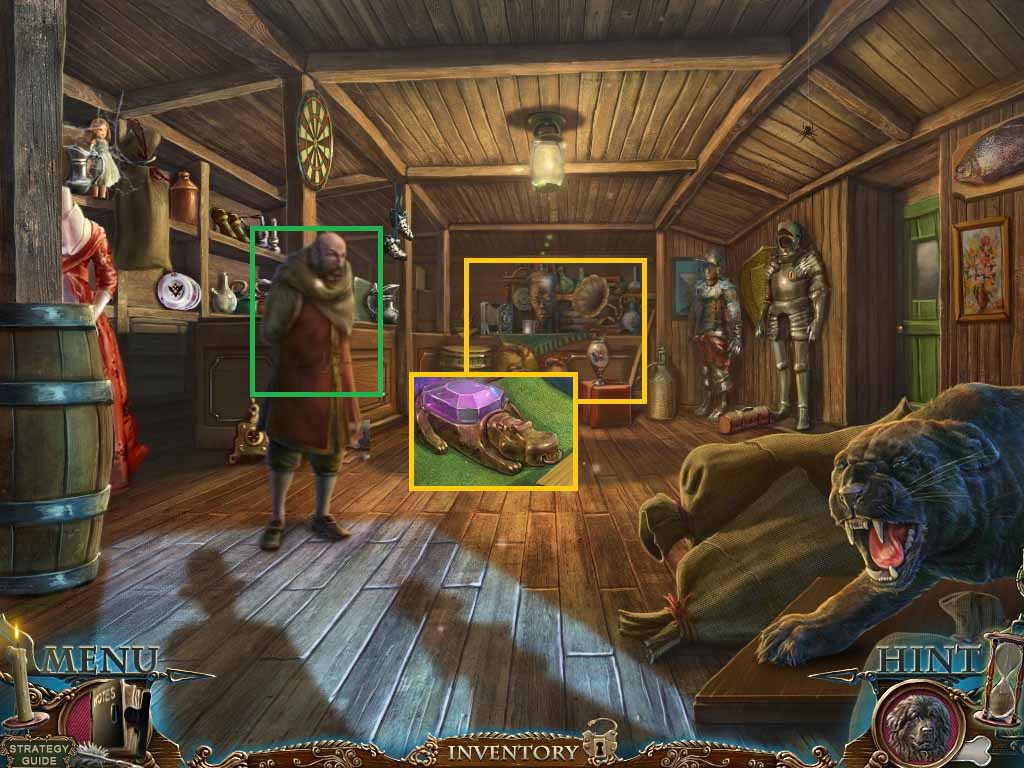
- Zoom into the back counter.
- Click aside the paper; collect the pliers.
- Zoom into the armor; insert the coin into the slot.
- Put the emblem on the left armor.
- Collect the medallion.
- Speak to the junk dealer.
- Move back once.
- Zoom into the gate.
- Use the solvent and pliers on the lock.
- Zoom into the gate again to access a hidden objects area.
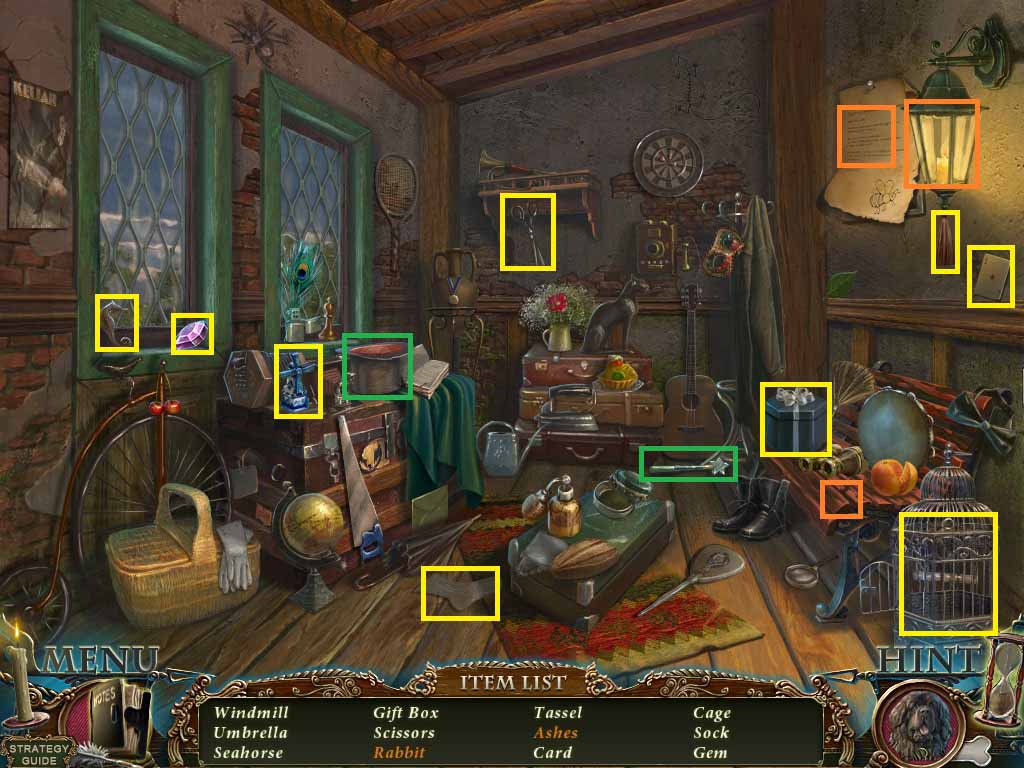
- Find the listed items.
- Use the wand on the hat; collect the rabbit.
- Use the paper on the lamp to collect the ashes.
- Collect the hippo gem.
- Move forward.
- Zoom into the back counter.
- Put the hippo gem into the hippo; collect the hippo brooch.
- Give the junk dealer the hippo brooch.
- Move out the door on the right.
- Zoom into the doorway; click the hay.
- Collect the piece of iron.
- Give Arthur the piece of iron.
- Use the letter opener on the wet stone.
- Collect the sharp knife.
- Zoom into the wagon.
- Cut the cover using the sharp knife to access a hidden objects area.

- Find the listed items.
- Click the coffee grinder to get the coffee.
- Use the nail puller to collect the nail.
- Collect the broom.
- Move forward.
- Give Arthur your broom.
- Cut the net using the sharp knife.
- Collect the half rigging.
- Move back three times.
- Zoom into the room on the left to access the hidden objects area.
- Find the listed items.
- Open the basket to collect the carrots.
- Click the die until you roll a 4.
- Collect the valve.
- Go to the shipping dock.

- Zoom into the gangplank.
- Place the valve and the handle on the winch, click the handle.
- Move forward onto the boat.
- Zoom into the tarp.
- Place the half rigging onto the ropes.
- Crank the rigging to pull the tarp.
- Zoom into the ships wheel to trigger a puzzle.
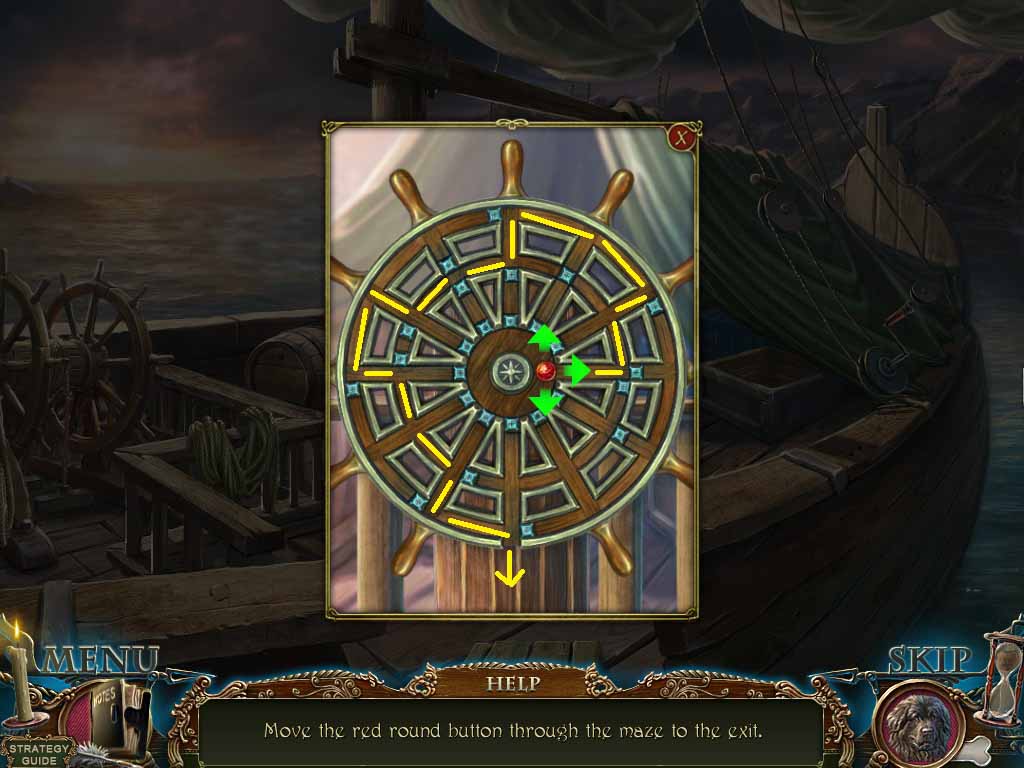
- Move the red button through the maze.
- Solve the puzzle using the following sequence of arrows:
- Right – up – right – up – left – down – left 3 times – down – right – down 3 times – right – down.
- Collect the 2nd medallion.
- Move back once.
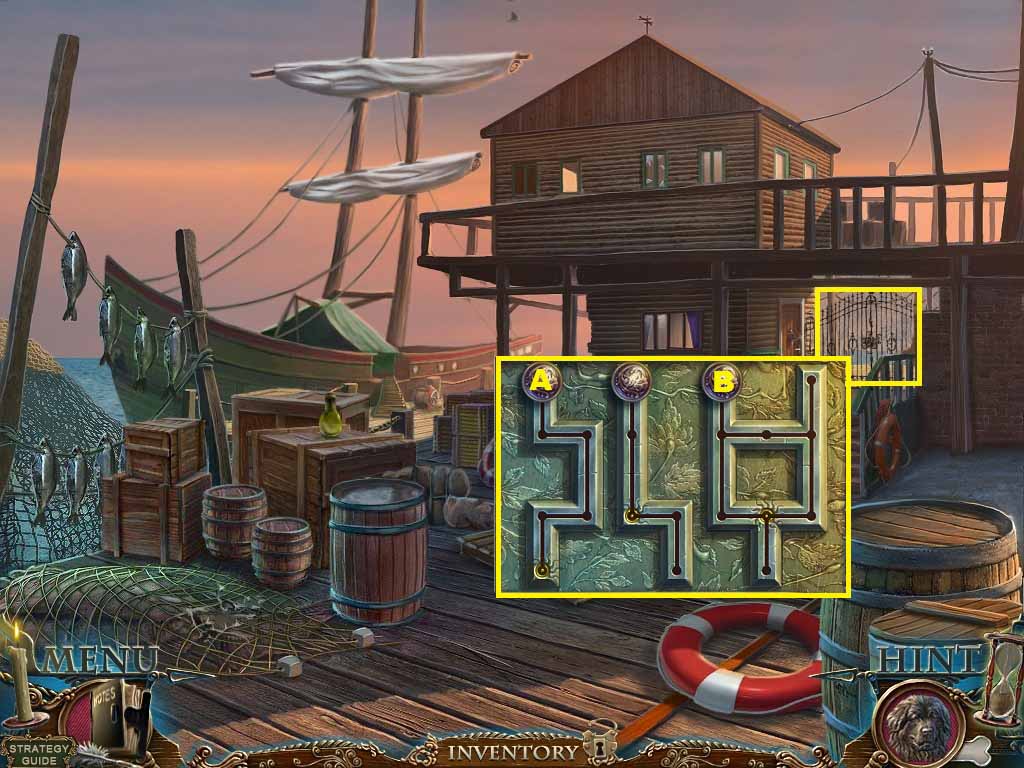
- Zoom into the gate.
- Insert the 2 medallions into the lock to trigger a puzzle.
- Move the levers to the suns.
- Click the levers as follows:
- A: down – right – down – left – down
- B: 2 x’s right – left
- Go upstairs into the post office.
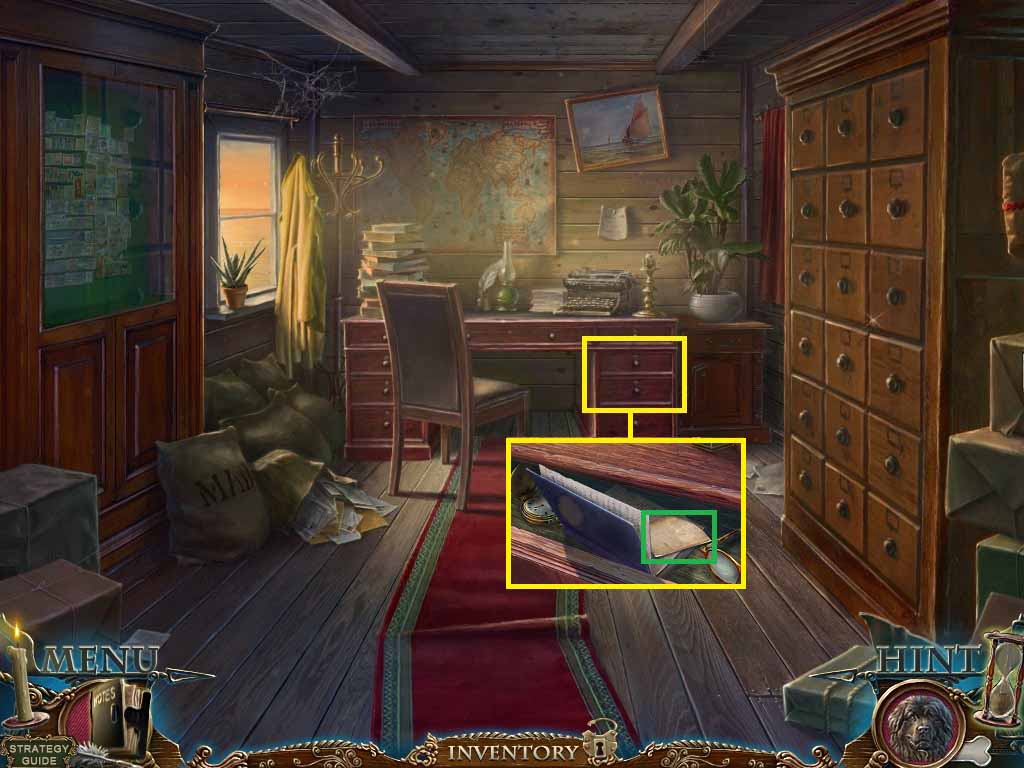
- Zoom into the drawer and open it.
- Open the book and letter to get a clue.
- Move back two times.
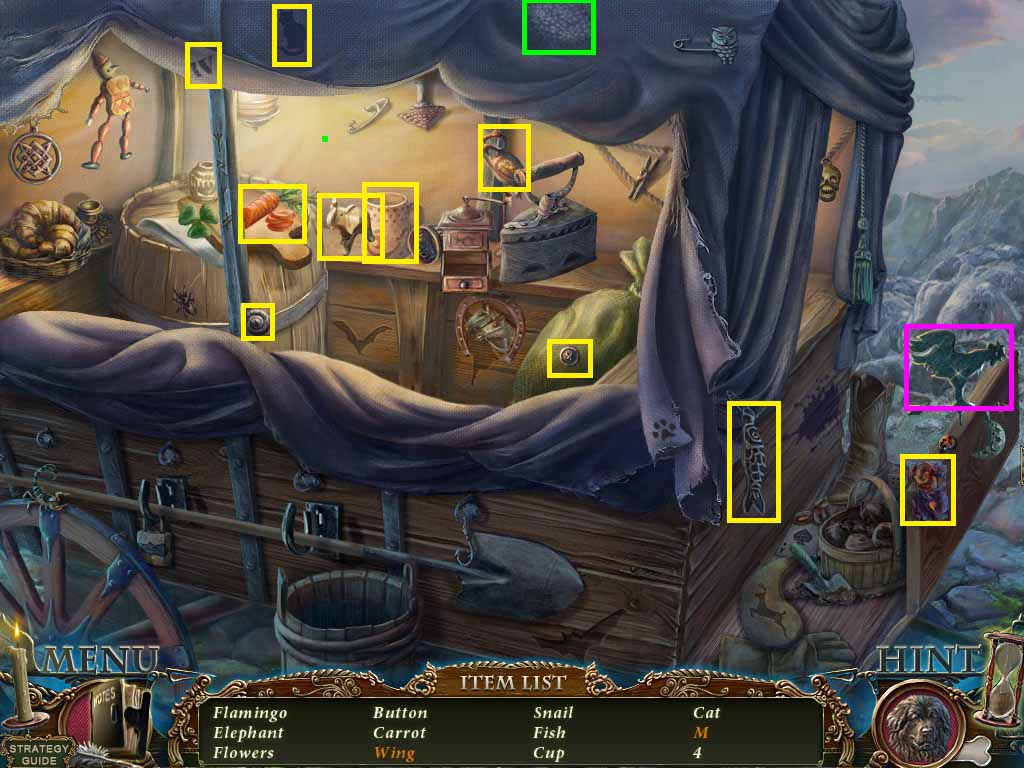
- Zoom into the wagon to access a hidden objects area.
- Find the listed items.
- Rip the patch to collect the “M”
- Click the weather vane to collect the wing.
- Collect the typewriter button.
- Move back to the post office.
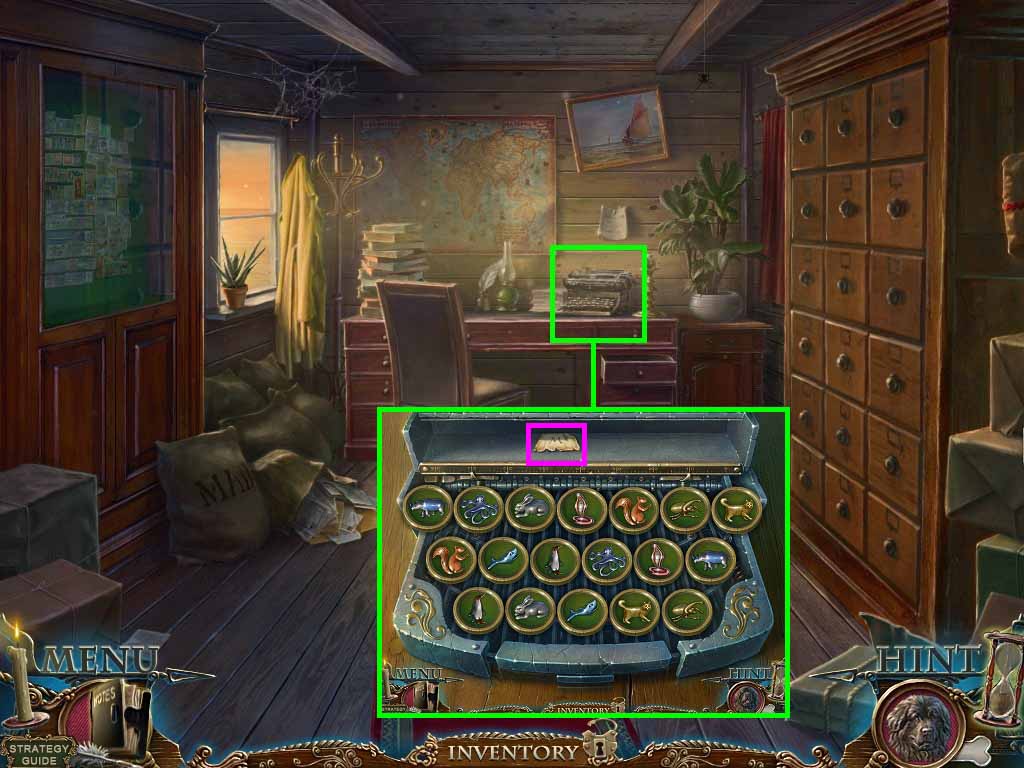
- Zoom into the desk.
- Place the typewriter button onto the typewriter to trigger a puzzle.
- Find the matching pieces;
- Collect the post office box label.
- Zoom into the mailboxes.
- Place the post office box label onto the upper left box.
- Collect Mike’s letter and Mike’s key.
- Move back once and go onto the boat.
- Zoom into the chest; insert Mike’s key into the lock.
- Click the bottle and the book; collect the amulet.
- Move back five times.
- Give Arthur the bunch of straw.
- Insert the amulet into the slot.
- Give Mr. Le Grand Mike’s letter.
- Move forward.
Congratulations! You have successfully completed: Dark Tales: Edgar Allan Poe’s The Gold Bug Collector’s Edition!