Murder She Wrote 2 – Return To Cabot Cove
Book 1: Masterpiece of Murder
· Watch the cutscene.
· Select your difficulty.
· If you are playing on Casual Mode, play the tutorial, it will explain important game elements.

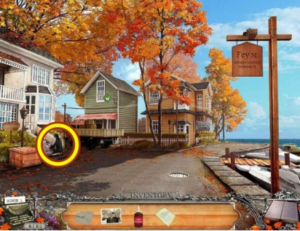
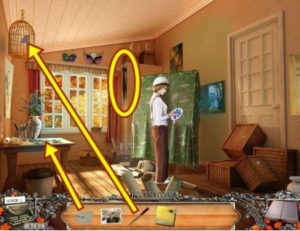
· Click on the mailbox. Take MILTON’S HOUSE KEY.
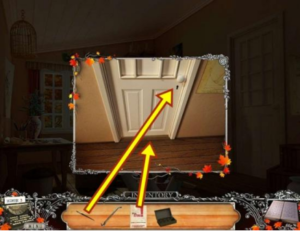
· Click on the door and use MILTON’S HOUSE KEY to unlock the door.
· Enter Milton’s house.
· Click through the dialogue.


· If you are playing the tutorial, you will have to play the hidden object hunt. If you are not playing the tutorial, the hidden object hunt is not yet available.
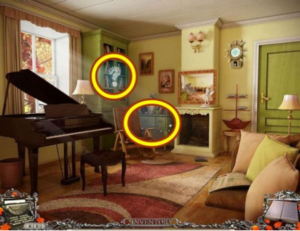
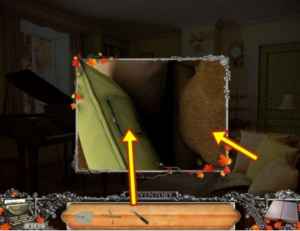
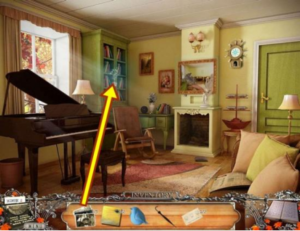
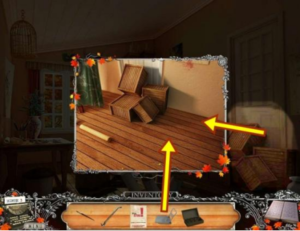
· Click on the couch cushions.
· Take the LID PROP.
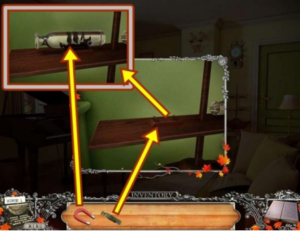
· Click on the piano.
· Use the LID PROP on the piano.
· Take the HARP.

· Click on the bookshelf to learn you need to find photographs. Click down to leave the photo album.
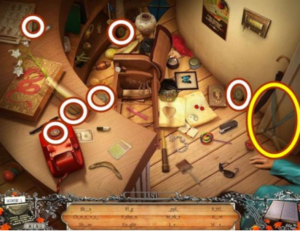
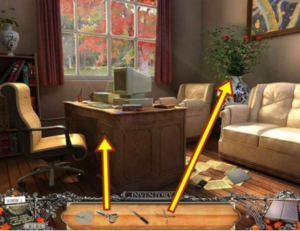
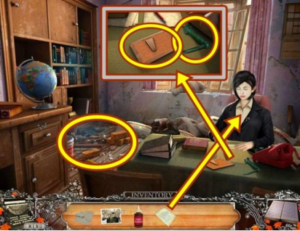
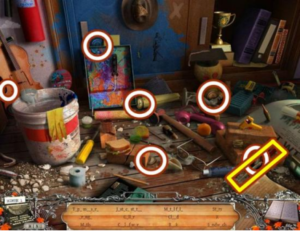
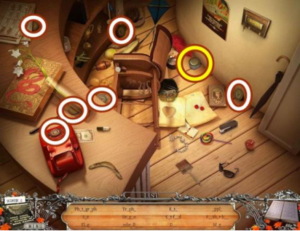
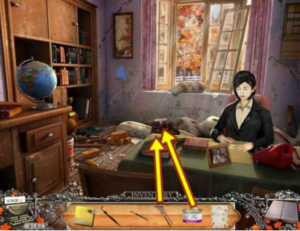
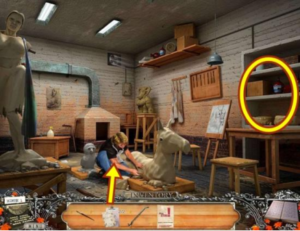
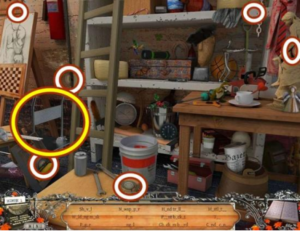
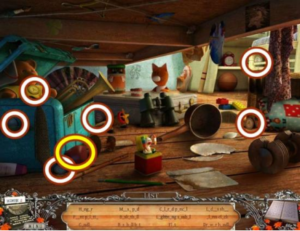
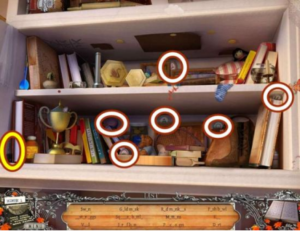
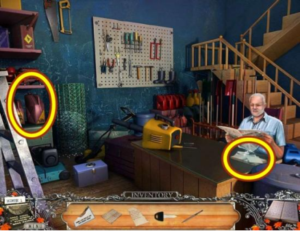
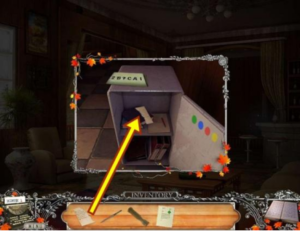
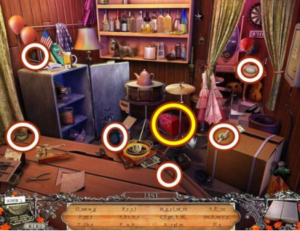
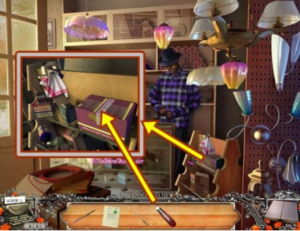
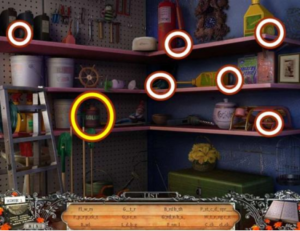
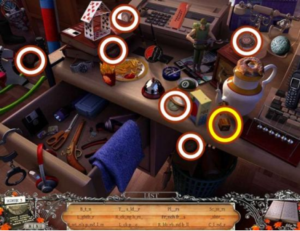
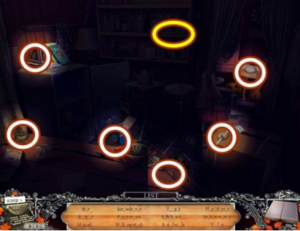
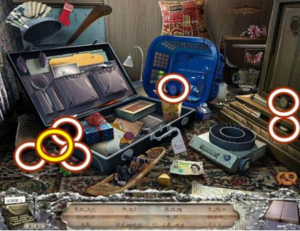
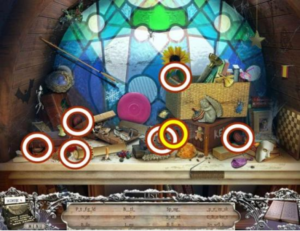
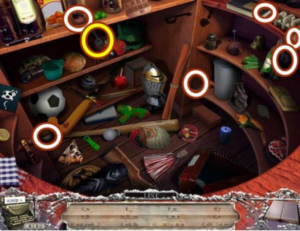
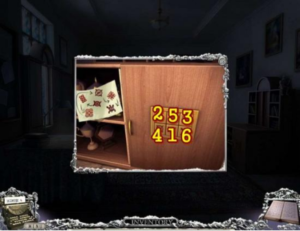
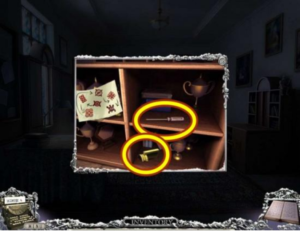
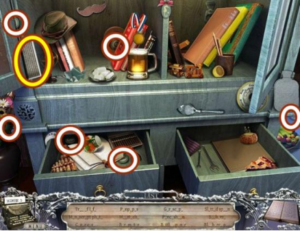
· Click on the table to start a hidden object hunt.

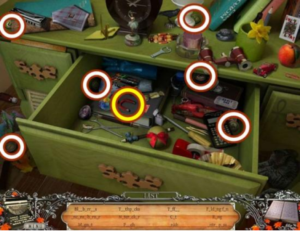
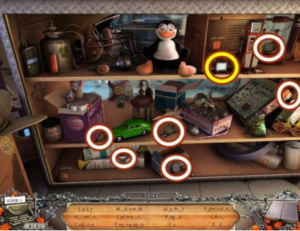
· Find all the typewriter keys (white highlights), then find all the objects. A MAGNET is added to your inventory.

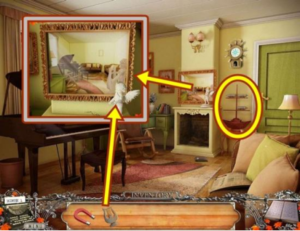
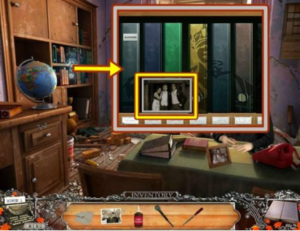
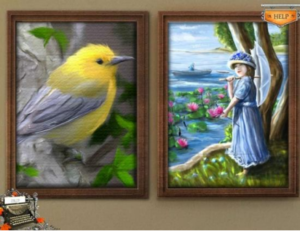
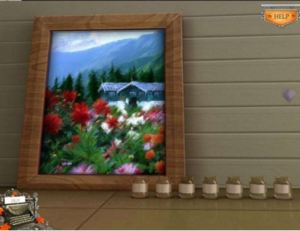
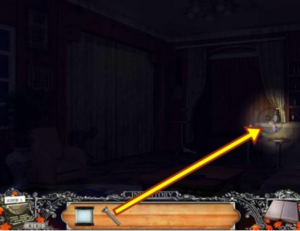
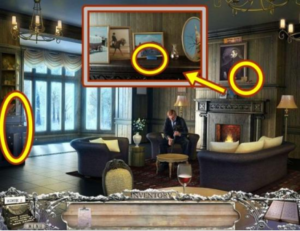
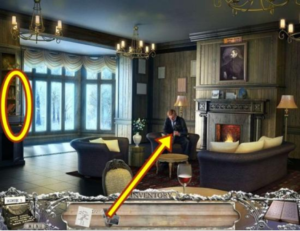
· Click on the painting.
· Give the HARP to the cherub.
· When the painting rises, take the BOTTLE.
· Click on the ship display.

· Place the BOTTLE.
· Use the MAGNET on the bottle to extract the key.
· Take the ARTGALLERY KEY.
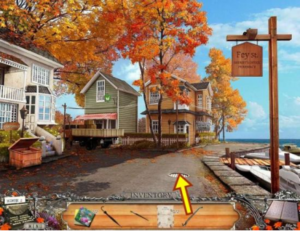
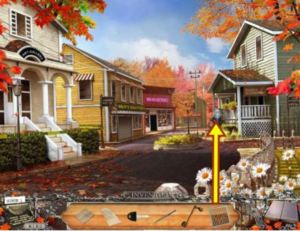
· Leave the house and return to Edgeworth Lane.
· Move up the street to Wright Lane.

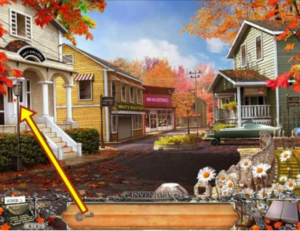
· Click on the ArtGallery door.
· Unlock the door with the ART GALLERY KEY.
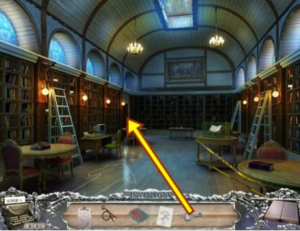
· Enter the ArtGallery hall.
· Watch the cutscene.

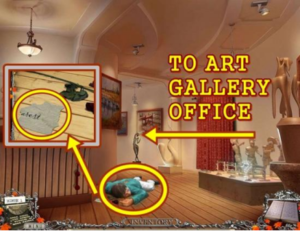
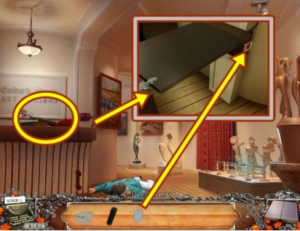
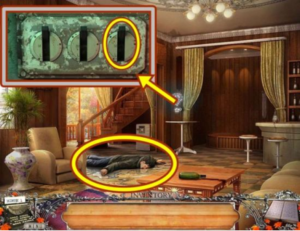
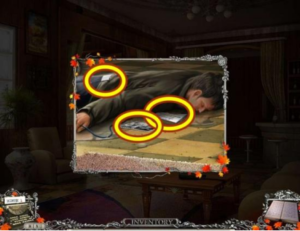
· Click on Milton’s outstretched hand.
· Take the TORN CARD.
· Click on Milton’s body again to get clues about Milton’s murder. Click through the dialogue.
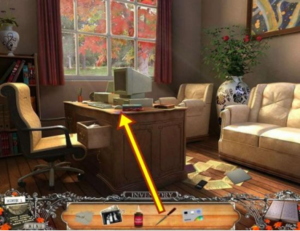
· Enter the ArtGallery office.

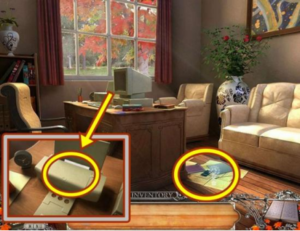
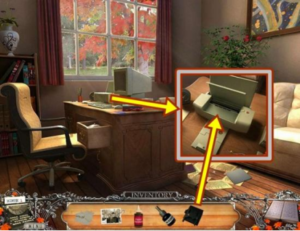
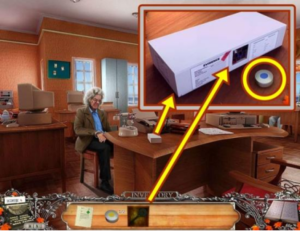
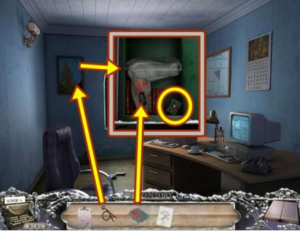
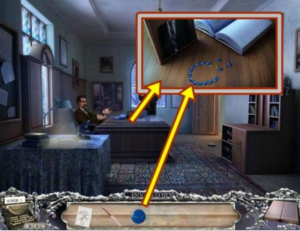
· Click on the computer.
· Take the paper from the printer.
· Read the write-up. Click anywhere outside the window to close it.
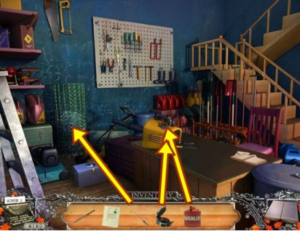
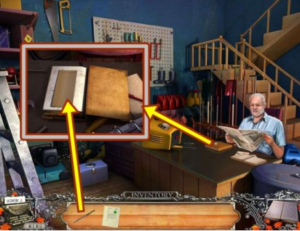
· Lift the printer cover.
· Take the KNIFE HANDLE. Click anywhere outside the window to close it.
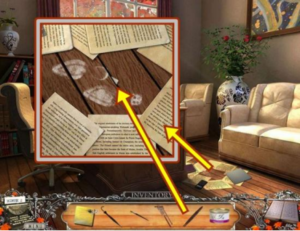
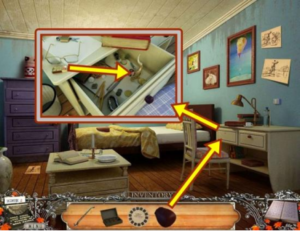
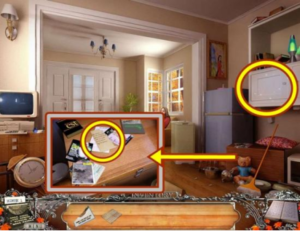
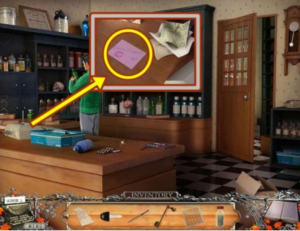
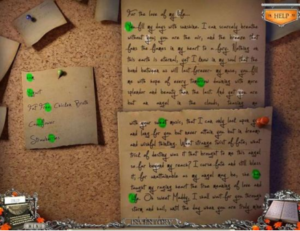
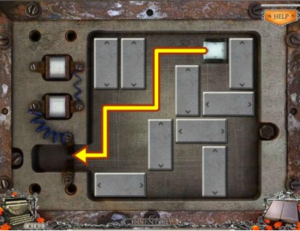
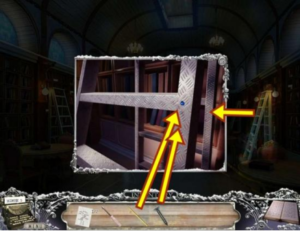
· Click on the papers on the floor. A mini-puzzle starts.
· Move the items to reveal the blue note. Start by moving the topmost items. Hover your cursor over items; when it turns into a hand, you can move the item. To move an item, click on it and drag it to a far corner of the area (you don’t have to hold down the left-mouse button). Continue to move items until you reveal the blue note.
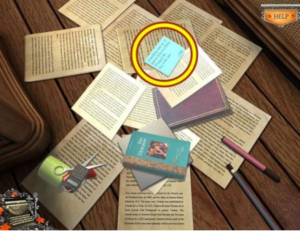

· Read the blue note, then click anywhere outside the window to close it. Continue to move items. If you are having difficulty moving items, leave the puzzle by moving your cursor to the bottom of the scene. When it turns into a downward pointing hand, click. When asked if you want to do this, click Yes. Then return to the puzzle.


· Take the KEY CARD.
· Click on the shoeprints to note the clue.
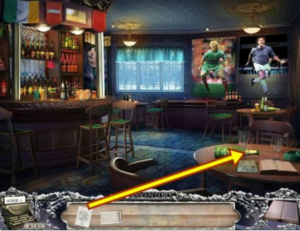
· Leave and return to Edgeworth Lane.

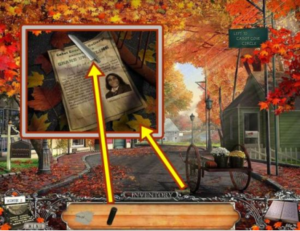
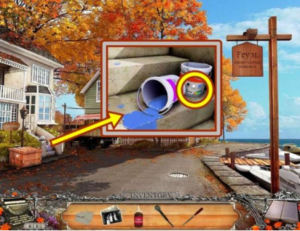
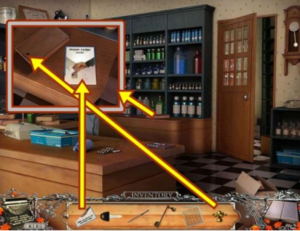
· Click on the paper under the cart’s left wheel.
· Add the KNIFE HANDLE.
· Take the KNIFE.
· Enter Milton’s house.

· Click on the couch pillows.
· Use the KNIFE to cut open the patch.
· Take the WINDING KEY.
· Leave the house and return to ArtGallery hall.

· Click on the counter.
· Use the KEY CARD to open the counter.
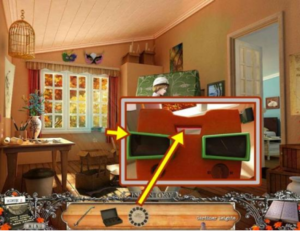
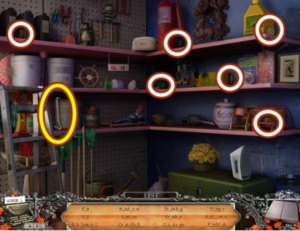
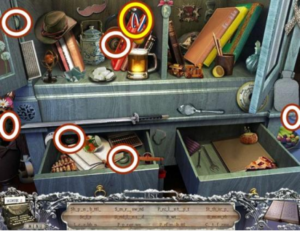
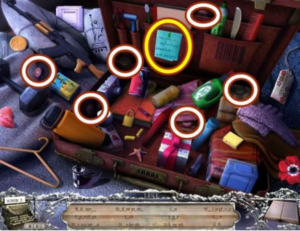
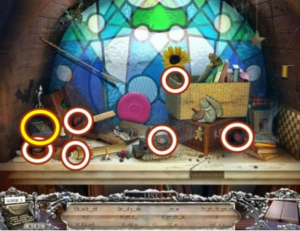
· Click on the counter to start a hidden object hunt.

· Find all the typewriter keys, then find all the objects. SHEARS are added to your inventory.
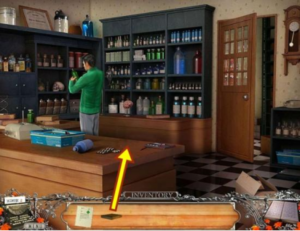
· Return to the ArtGallery office.

· Click on the vase of roses.
· Use the SHEARS on the roses (two clicks).
· Take the DRAWER KEY.
· Use the DRAWER KEY to unlock the drawer.

· Take the CURTAIN ROPE.
· Put the WINDING KEY in the jewelry box.
· Take the PHOTOGRAPH (1/3).
· Move down.

· Click on the curtain.
· Add the CURTAIN ROPE.
· Click on the curtain.
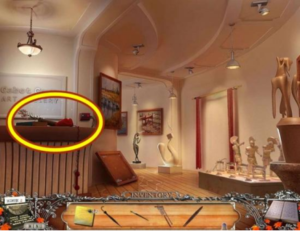
· Click on the missing painting to add clues to your journal.
· Click anywhere outside the window to close it.
· Return to the Edgeworth Lane.


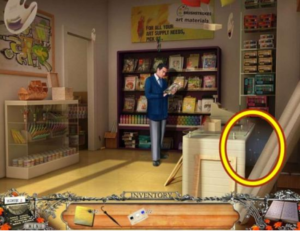
· Enter Bushstrokes Art Supplies.

· Click on Donny.
· Click through the dialogue.
· Use the KNIFE to take the RED BALLOON (1/2).
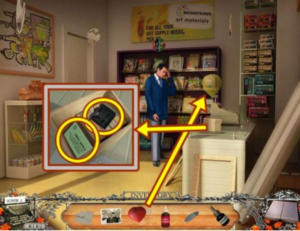
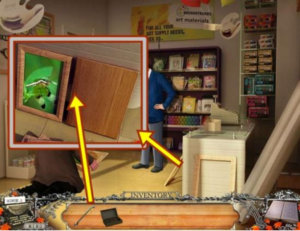
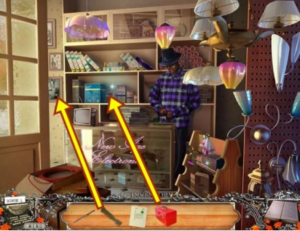
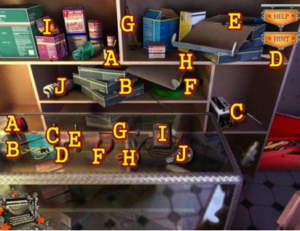
· Click behind the cash register to start a hidden object hunt.


· Find all the typewriter keys, then find all the objects. PAINT THINNER is added to your inventory.
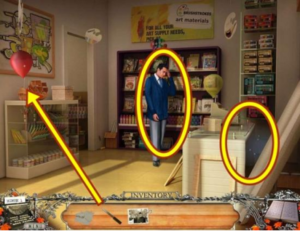
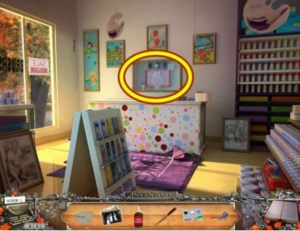
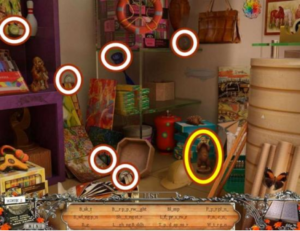
· Go inside the Shop.
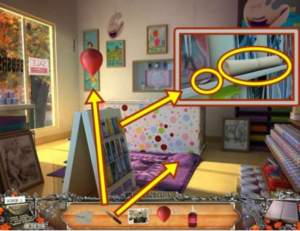

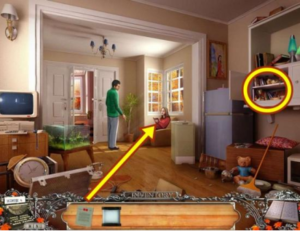
· Use the KNIFE to take the RED BALLOON (2/2). You must take the red balloon before you can click on the centre display.
· Click on the centre display.
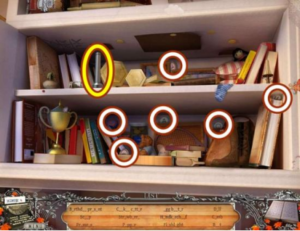
· Take the ZIPPER and the paint mixing instructions.
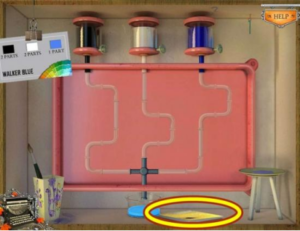
· Click on the rug.
· Cut the rug with the KNIFE and take the INK RECOVERY LIQUID.
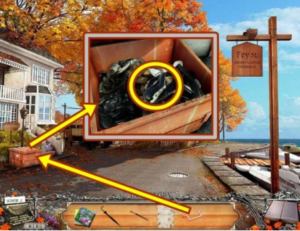
· Move down.

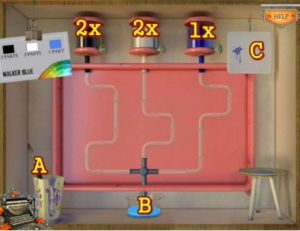
· Put the two RED BALLOONS with the yellow balloon to make the box’s lid rise.
· Look inside the box.
· Take the PRINTER HEAD.
· Take Sabrina Arsenau’s card as a clue.
· Return to the ArtGallery office.

· Click on the computer.
· Add the PRINTER HEAD to the printer.
· Take the printout to add it to your journal.
· Return to Bushstrokes Art Supplies.

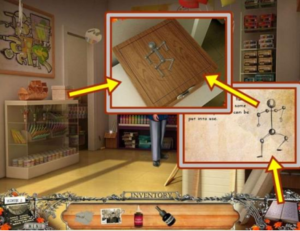
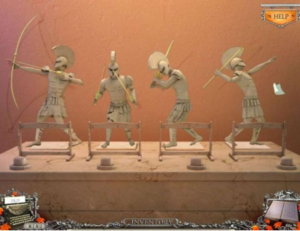
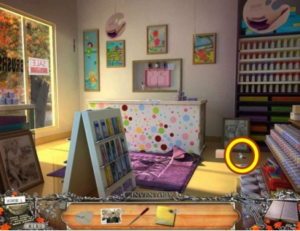
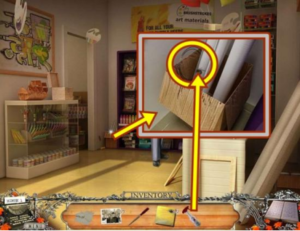
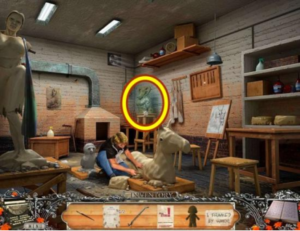
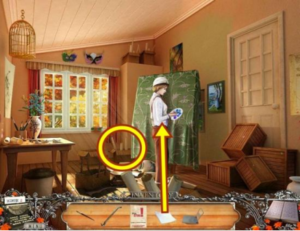
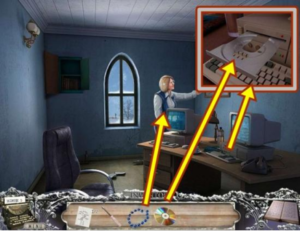
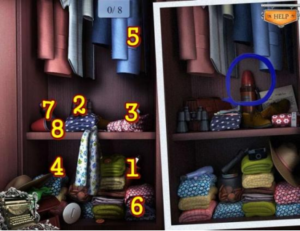
· Click on the box on the shelf.
· Arrange the stick figure to match the printout you took from the printer (check your journal).
· The proper arrangement for the stick figure is shown in the screenshot above.
· Take the HELMET.
· Return to the ArtGallery hall.

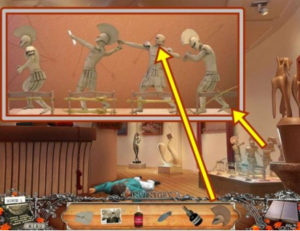
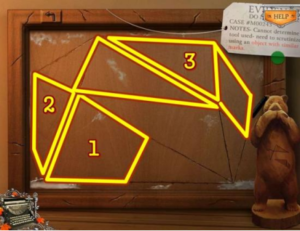
· Click on the Roman soldiers.
· Add the HELMET. A mini-puzzle starts.
· Begin by distributing the weapons to each soldier (the weapon locks when it’s with the correct soldier).
· Once all the weapons are distributed, rearrange the order of the soldiers using the wall drawings for a guide.
· Once they are correctly ordered, press the button in front of each soldier to position them, again according to the wall drawings behind each.
· Solution:


· Use the INK RECOVERY LIQUID on the paper.
· Take the LETTER. You have found evidence.
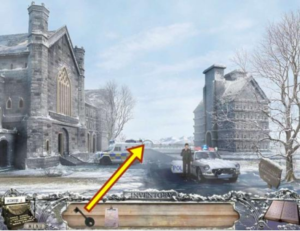
· Return to Wright Lane.

· Click on the boat.
· Put the ZIPPER on the bag, then take the CONNECTOR.
· Attach the CONNECTOR to the trailer hitch.
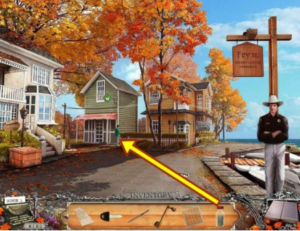
· When the boat moves, move right to Fey Street.

· Click on the Sabrina Arsenau.
· Click through the dialogue.
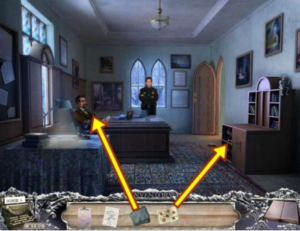
· Enter the Law Office.

· Talk to Sabrina. Click through the dialogue.
· Give her the LETTER. Click through the dialogue.
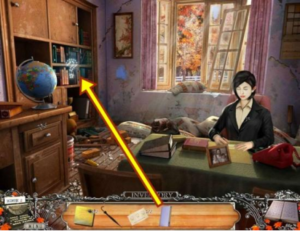
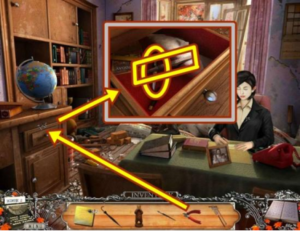
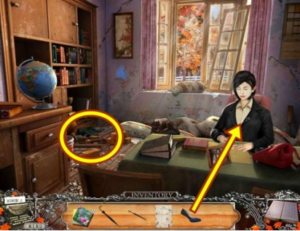
· Click on the desk.
· Take the CRANK.
· Lift up the frame. Click through the dialogue. Click anywhere outside the window to close it.
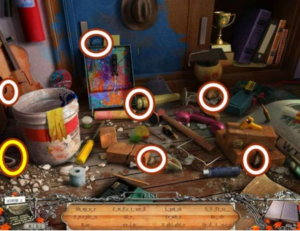
· Click on the debris to start a hidden object hunt.

· Find all the typewriter keys, then find all the objects. A METAL FILE is added to your inventory.

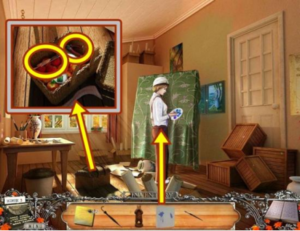
· Click on the bookshelf.
· Take the PHOTOGRAPH (2/3).
· Move down two scenes to Fey Street.

· Click on the steps.
· Take the PAINT CODE.
· Return to the ArtGallery office.

· Use the METAL FILE on the paint.
· Take the PAINT SAMPLE.
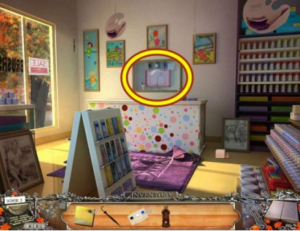
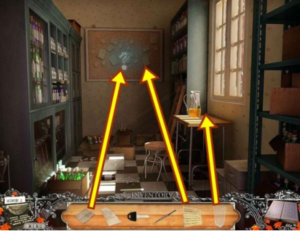
· Return to Brushstrokes Art Supplies and go into the backroom.

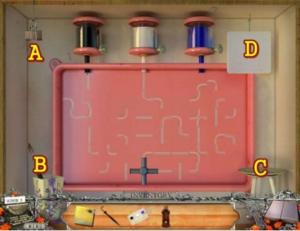
· Click on the wall display.

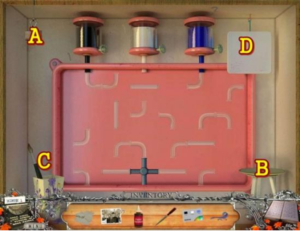


· Put the PAINT CODE in the clip at the top left (A).
· Put the PAINT SAMPLE on the saucer on the bottom right (B).
· Add the PAINT THINNER to the paint sample (B).
· Take the paintbrush (C) and dip it into the paint sample (B) and wipe the brush on the white card at the top right (D).
· A mini-puzzle starts. Click on the tubes to arrange them so a continuous flow from each paint jar can flow into the jar at the bottom.
· Solution:

· Using the paint code as a guide, turn the dial on the black can twice, turn the dial on the white can twice and turn the dial on the blue can once.
· After the paint runs into the jar at the bottom, again take the paintbrush (A) and dip it into the jar (B), then wipe it on the white card at the top right (C).
· Click through the dialogue.

· Take the PAINTING PIECE (1/2).

· Take the SPIDER REPELLENT.
· Move down.

· Click on the box in the corner.
· Use the SPIDER REPELLENT to chase away the spider.
· Take the WIRE WITH HOOK.
· Leave the store, move forward to Wright Lane and continue forward to GardinerHeights.


· Click on the Natalie.
· Click through the dialogue.
· Click on the studio’s window.
· Use the WIRE WITH HOOK to get the keys. Take NATALIE’S KEYS.
· Give NATALIE’S KEYS to Natalie.
· Enter Natalie’s studio.

· Click through the dialogue.
· Take the UMBRELLA.
· Click on the bird cage.
· Use the METAL FILE on the cage, then take the WOODEN BIRD.
· Click on the table.
· Add the TORN CARD.
· A mini-puzzle starts. Rearrange the torn note.
· Solution:


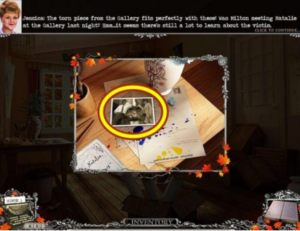
· Take the PHOTOGRAPH (3/3).
· Note the rejection letters. Click anywhere outside the window to close it.
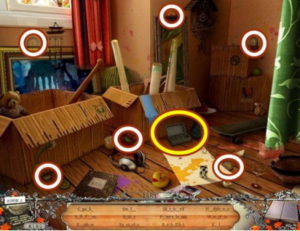
· Click on the boxes in the corner to start a hidden object hunt.

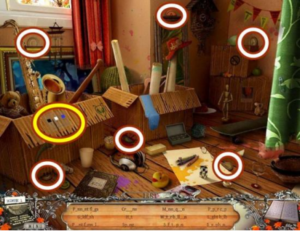
· Find all the typewriter keys, then find all the objects. A PAINT MIXING FORMULA (1/2) is added to your inventory.
· Return to Milton’s house.

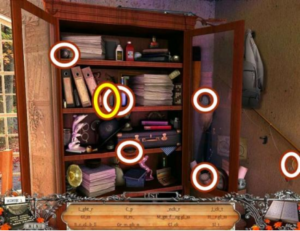
· Click on the bookshelf.
· Add the three PHOTOGRAPHS.
· A mini-puzzle starts. Rearrange the photographs so they match the captions. To rearrange the photos, click on two to swap their positions. When a photograph is in the correct position, it locks and cannot be moved.
· Solution:

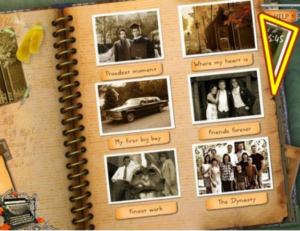
· Take the card that slips out of the album. Note the time (6:45).


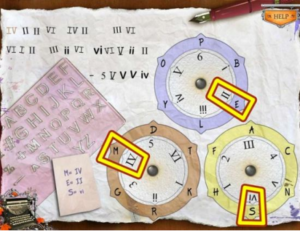
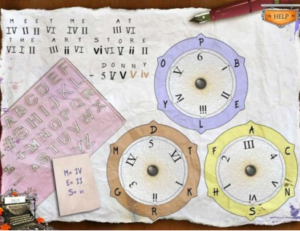
· Click on the wall clock.
· Add the WOODEN BIRD.
· Turn the clock hands to make the clock read 6:45.
· When the clock face opens, take the LEGAL DOCUMENTS.
· Return to the Law Office (off Fey Street).

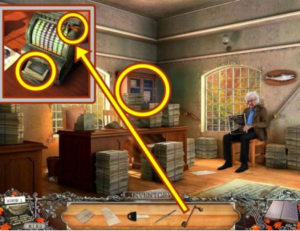
· Click on the bookshelf.
· Add the LEGAL DOCUMENTS.
· A mini-puzzle starts. Rearrange the folders to recreate the design. To rearrange the folders, click on two to swap their positions.
· Solution:

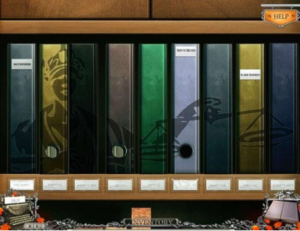
· A HEART is added to your inventory.
· Return to Milton’s house.

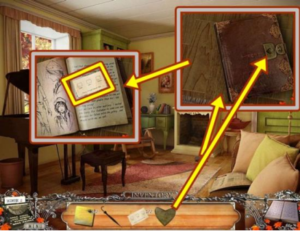
· Click on Milton’s diary in front of the fireplace.
· Add the HEART into the inset.
· Take the PAINT MIXING FORMULA (2/2). You have found evidence.
· Click on the diary. Click anywhere outside the window to close it.
· Return to Brushstrokes Art Supplies.

· Click through the dialogue.
· Click behind the counter to start a hidden object hunt.

· Find all the typewriter keys, then find all the objects. A BEAR is added to your inventory.
· Click through the dialogue.
· Move inside the shop.

· Click on the wall display.

· Add the PAINT MIXING FORMULA to the clip in the top left corner (A).
· Take the paintbrush (B) and dip it into the paint sample (C), then wipe the paintbrush on the white card (D) at the top right.
· Click on the tubes to arrange them so a continuous flow from each paint jar can flow into the jar at the bottom.
· Solution:
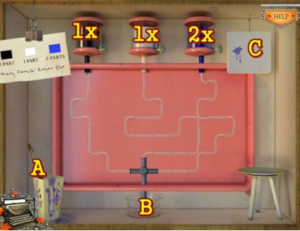

· Using the paint code as a guide, turn the dial on the black can once, turn the dial on the white can once and turn the dial on the blue can twice.
· After the paint runs into the jar at the bottom, again take the paintbrush (A) and dip it into the jar (B), then wipe it on the white card at the top right (C).
· Take the PAINT ANALYSIS RESULT. The PAINTBRUSH is added to your inventory.
· Return to Natalie’s Studio (on GardinerHeights).

· Click through the dialogue.
· Give the PAINT ANALYSIS RESULT to Natalie.
· Click through the dialogue.
· Click on the basket.
· Lift the lid.
· Take the PLIERS and CAN OPENER. Click anywhere outside the window to close it.
· Return to the Law Office.

· Click on the desk drawer.
· Use the PLIERS to remove the nails. You must start with the topmost nail and work your way down (in other words, remove the nails in order from left to right).
· Look in the drawer.
· Take the TWEEZERS and PEN KNIFE.
· Return to the ArtGallery hall.


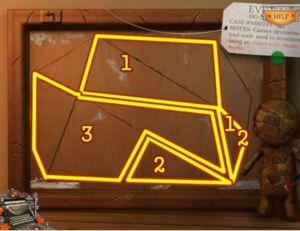
· Click on the empty frame.
· Place the BEAR, then add the PEN KNIFE.
· A mini-puzzle starts. Use the pen knife to carve out the shape that is flashing on the bear’s chest. To do so, start in one corner of the shape, then click and drag the pen knife to the next corner. If the line is good, it will be highlighted in yellow.
· Solutions:

· Click through the dialogue.

· Click on the counter to start a hidden object hunt.

· Find all the typewriter keys, then find all the objects. CAT FOOD is added to your inventory.
· Go into the ArtGallery office.

· Click on the papers on the floor.
· Use the TWEEZERS to get the EVIDENCE AGAINST SHAWN.
· Return to the Law Office.

· Click on the cat.
· Add the CAT FOOD, then open it with the CAN OPENER.
· Take the DUMPSTER HANDLE and the PAINTING PIECE (2/2).
· Leave the Law Office.

· Click on the dumpster.
· Add the DUMPSTER HANDLE to open the dumpster.
· Open the garbage bag and take the BROKEN SHOE.
· Go back into the Law Office.

· Click through the dialogue.
· Give the BROKEN SHOE to Sabrina.
· Click through the dialogue.
· Click on the debris to start a hidden object hunt.

· Find all the typewriter keys, then find all the objects. A CROWBAR is added to your inventory.
· Move down.

· Click on the sewer grate.
· Use the CROWBAR on the grate.
· Take the GREASE.
· Move down to Wright Lane.

· Click on the gate in front of Haley’s Sculptures.
· Watch the cutscene.
· Add the CRANK, then use the GREASE.
· Enter Shawn’s studio.

· Click through the dialogue.
· Take the POSTER.
· Click on the crate table on the left.
· Click through the dialogue.
· Use the UMBRELLA to get the GLUE SOLVENT from under the table. Click anywhere outside the window to close it.
· Click on the chisels display.
· A mini-puzzle starts. Match the chisel handle to the chisel blade, then place the completed chisel into its appropriate slot. Take a chisel handle and hover it over a blade, then click to release. If it doesn’t light up, take the handle and try another blade. When it lights up, it’s correct. Then take the completed chisel and place it in its appropriate slot. It can only be place in the correct slot.
· Solution:


· Take note of the symbols (added to your journal).
· Click through the dialogue.
· Return to Natalie’s studio.

· Click on the garbage pail under the table.
· Use the GLUE SOLVENT to remove the lid.
· Take the SCOOP. Take the picture.
· Click on the paintings on the wall.
· Add the two PAINTING PIECES.
· A mini-puzzle starts. Rearrange the painting pieces to recreate the paintings. When a piece is properly positioned, it locks and cannot be moved.
· Solution:

· Take the STATUE.
· Return to the Shawn’s studio.


· Click on the oven pit.
· Use the SCOOP on the ashes.
· Press the symbols in the order shown on the wall behind the chisels (check your journal).
· When the panel opens, take the CODE.

· Click on the minotaur.

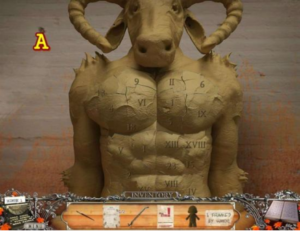
· Put the CODE in the top left corner (A).
· A mini-puzzle starts. Using the code as a guide, remove the pieces from the statue’s torso in the proper order. The code reads, “I FRAMED BY WHO?” Determine the numeric equivalent of each letter and remove the pieces from the torso in that order. For example, A=1, B=2, C=3, etc. The first pieces to move contain the number 9. Remove the piece with the number 9 and the roman number IX.
· Remove the pieces in the following order: 9-IX, 6-VI, 18-XVIII, 1-I, 13-XIII, 5-V, 4-IV, 2-II, 25-XXV, 23-XXIII, 8-VIII, 15-XV.
· Remove the cloth, then take the CHISEL.
· Click through the dialogue.
· Return to the ArtGallery hall.


· Click on the empty frame.
· Add the STATUE and CHISEL.
· A mini-puzzle starts. This is the same puzzle as the one with the bear statue and pen knife.
· Solutions:

· Click through the dialogue.
· Take the EVIDENCE AGAINST SHAWN.
· Click through the dialogue.
· Return to Shawn’s studio.

· Click through the dialogue.
· Present Shawn with the EVIDENCE AGAINST SHAWN.
· Click through the dialogue.
· A DOCTOR’S NOTE is added to your inventory.
· Click on the shelves to start a hidden object hunt.

· Find all the typewriter keys, then find all the objects. A TROLLEY is added to your inventory.
· Return to Natalie’s studio.

· Click through the dialogue.
· Give Natalie the DOCTOR’S NOTE.
· Click through the dialogue.
· Click on the boxes to start a hidden object hunt.

· Find all the typewriter keys, then find all the objects. PAINT SOLVENTS are added to your inventory.

· Click on the crates in front of the door.
· Place the TROLLEY.
· Put the four crates on the trolley, then move the trolley.
· Click on the door.

· Slide the POSTER under the door.
· Put the PAINT BRUSH in the keyhole.
· Pull the poster out and take the SIDE ROOM KEY.
· Use the SIDE ROOM KEY on the side room door, then enter the side room.

· Click on the light switch.

· Click on the dresser drawers.
· Move the towel and take the PAPER DISC.
· Click under the bed to start a hidden object hunt.

· Find all the typewriter keys, then find all the objects. A DRAWER HANDLE is added to your inventory.
· Click on the desk.

· Add the DRAWER HANDLE.
· Take a match and light the pipe.
· Click through the dialogue.
· Move down.

· Click on the disc viewer on the window sill.
· Add the PAPER DISC.
· A mini-puzzle starts. Adjust the colour and focus of each slide to reveal a part of the code.
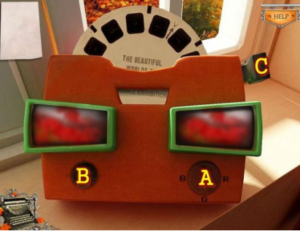

· Adjust the colour with the colour dial (A).
· Adjust the focus with the round focus dial (B).
· Change the slide with the lever (C).
· Solutions:


· The CIPHER is added to your inventory.
· Return to the store room.

· Click on the table.
· Add the CIPHER.
· A mini-puzzle starts. Match each symbol to its appropriate letter. Each disc contains one letter from the cipher. Rotate the inner disc so the correct symbol is adjacent to its letter. See screenshot below for the correct positioning:

· Once the discs are properly positioned, you can then decipher the code at the top left. Click on the first symbol (when a symbol is active, it becomes light brown). Then on the alphabet stencil, click on the letter you want to assign to the code. Click on the next symbol and assign a letter to it, etc.
· Solution:

· Click through the dialogue.
· Return to Brushstrokes Art Supplies.

· Click through the dialogue.
· Click on Donny and Maurice for more dialogue.
· Click on the frame in front of the counter.
· Use the CROWBAR to remove the top painting. Click anywhere outside the window to close it.
· Click on the frame again.

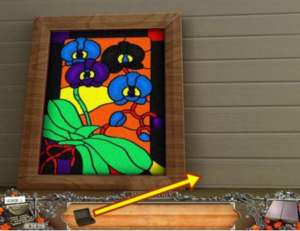
· Add the PAINT SOLVENTS.
· A mini-puzzle starts. Each bottle is labelled with a word that represents a colour (hover your cursor over a bottle to see its label). Click on a bottle and then click on its corresponding colour on the painting. Click on all sections of the corresponding colour. Continue until you reveal the painting underneath.
· Cowardice = yellow, melancholy = blue, royalty = purple, anger = red, midnight = black, gluttony = orange, envy = green.
· If you are having a hard time finishing this puzzle, click on the “midnight” bottle and click around the edges of the painting and on the house.
· Solution:

· Click through the dialogue.
End of Book 1
Book 2: Moose Lodge Murder
· Click on Moose Lodge Murder.
· Click Play.
· Click through the dialogue.

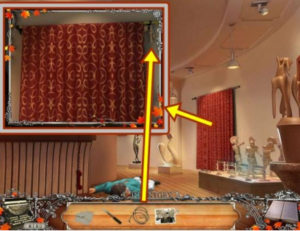
· Click on the wall switches by the curtain.
· A mini-puzzle starts. Flip the switches so all the lights are red. Flip the switch at the far right all the way down.
· Click on the body of Daniel Lane.

· Take the PAPER PIECE and photograph.
· Take the TORN LETTER PIECE 1 from Daniel’s back pocket.
· Leave Moose Lodge and enter the Lane house living room.

· Click through the dialogue.
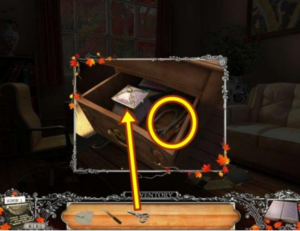
· Click on the wooden chest.
· Move the magazines and take the CONTRACTOR LIST. Click through the dialogue.
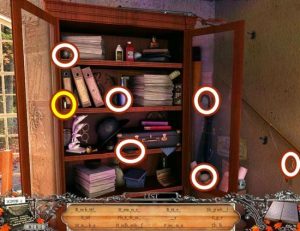
· Click on the cupboards to start a hidden object hunt.

· Find all the typewriter keys, then find all the objects. A SMALL KEY is added to your inventory.
· Click through the dialogue.
· Move down two scenes to Wright Lane.

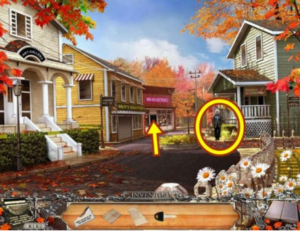
· Click on the Perley. Click through the dialogue.
· Enter New Age Electronics.

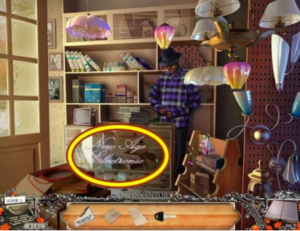
· Click through the dialogue.
· Click on the counter to start a hidden object hunt.

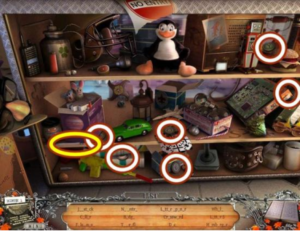
· Find all the typewriter keys, then find all the objects. A LETTER OPENER is added to your inventory.
· Move down two scenes to Edgeworth Lane, then enter Vern’s Hardware.

· Click through the dialogue.
· Click on the clipboard on the counter.
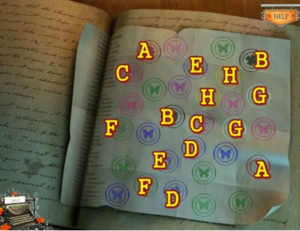
· A mini-puzzle starts. Click on a dolphin, then click on its matching clover. Match both the colour and the pattern of the symbols (either lined or dotted). Ignore the butterflies.
· Solution:

· Click through the dialogue.
· Click on the shelves to start a hidden object hunt.

· Find all the typewriter keys, then find all the objects. A CROWBAR is added to your inventory.
· Return to the Lane house living room.


· Click on the metal chest.
· Pry it open with the CROWBAR.
· Take the LEVER, ABACUS FRAME and MEDICINE BOTTLE.
· Click through the dialogue.
· Return to Wright Lane and go right to Fey Street.

· Talk to Mort.
· Click on the Ted. Click through the dialogue.
· Give Ted the MEDICINE BOTTLE. Click through the dialogue.
· Enter the Pharmacy cashier.

· Click through the dialogue.
· Click on the far counter.
· Click on the invoices to stack them. Continue until you reveal the purple note. Read the note and then it goes into your journal.
· Go into the Pharmacy storeroom.

· Click on the left shelves.
· Add the MEDICINE BOTTLE.
· A mini-puzzle starts. Rearrange the pill bottles so the bottles match the symbols on the shelves. Each shelf section holds three bottles and has three symbols. The first symbol shows if the bottle should be full or empty (filled-in square means fill, clear square means empty), the next symbol indicates the label of the bottle, either a heart, an eye or a tooth. The third symbol shows the type of pill, either tablet or capsule. When a bottle is in its correct position, it’s highlighted in yellow and cannot be moved.
· Solution:
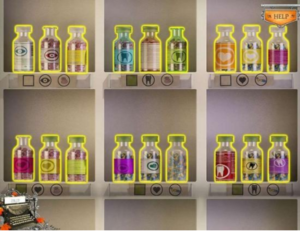


· Take the KNOB.
· Return to the Pharmacy cashier.

· Click on the back counter.
· Add the PAPER PIECE to the flyer.
· Add the KNOB to the wooden box.
· Take the ABACUS.
· Move down two scenes to Wright Lane.

· Give the ABACUS to Perley.
· Click through the dialogue.
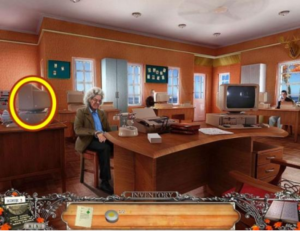
· Enter Sensible Accounting.

· Click through the dialogue.
· Click on the cash register.
· Add the LEVER.
· Pull the two levers, then take the cheque, then the TORN LETTER PIECE 2.
· Click through the dialogue.
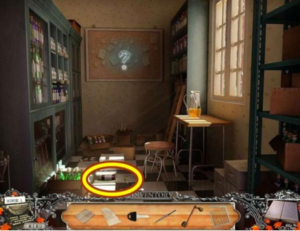
· Click on the cabinet to start a hidden object hunt.

· Find all the typewriter keys, then find all the objects. A GLASS is added to your inventory.
· Return to the Pharmacy store room.

· Click on the table.
· Place the GLASS on the table.
· Pour the lemonade into the glass.
· Click on the pitcher, then take the HOOK HANDLE.
· Click on the bulletin board.
· Add the two TORN LETTER PIECES.
· A mini-puzzle starts.
· Use the handwriting sample on the left to match the handwriting in the letter. On the sample, click on a highlighted piece of text, then find its match in the letter. If it turns green, it’s a correct match, if it turns red, it’s incorrect. If it turns red, select text on the left and keep looking for its match.
· Solution:

· HANDWRITTEN NOTES are added to your inventory.
· Return to the Lane house living room.

· Click through the dialogue.
· Give Maddy the HANDWRITTEN NOTES.
· Click through the dialogue.
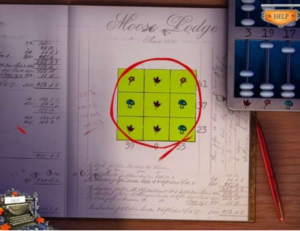
· Click on the computer.
· A mini-puzzle starts.
· Enter the password. The password can be learned by the amount of ink on the various keys. Some keys have more ink on them than others. Start with the key with the most ink and work down. Ignore the keys that have ink in the corners, etc., focus on fingerprints.
· Solution:

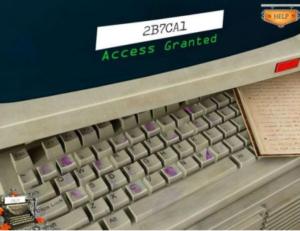
· The PASSWORD NOTE and PRINT OUT are added to your inventory.
· Click through the dialogue.
· Return to Moose Lodge.

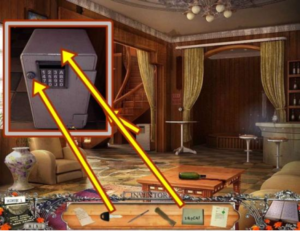
· Click on the safe.
· Add the PASSWORD NOTE and insert the SMALL KEY.
· Enter the password.

· Add the CONTRACTOR LIST.
· Click through the dialogue.
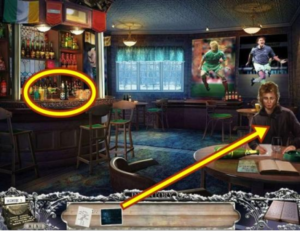
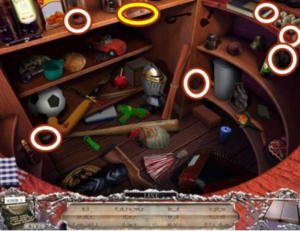
· Click on the bar to start a hidden object hunt.

· Find all the typewriter keys, then find all the objects. A TOOL BOX is added to your inventory.
· Return to New Age Electronics.

· Click through the dialogue.
· Click on the photograph on the wall.
· Add the HOOK PART.
· Pull out the HOOK.
· Click on the back shelf.
· Put the TOOL BOX on the counter.
· A mini-puzzle starts. Match the tools on the counter with their matching tools on the shelves.
· Solution:

· Click through the dialogue.
· A UTILITY KNIFE is added to your inventory.

· Click on the display.
· Use the UTILITY KNIFE to cut open the box of gloves.
· Take the GLOVE.
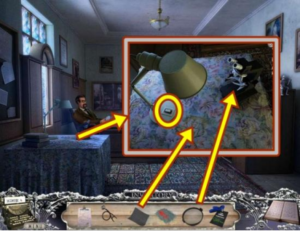
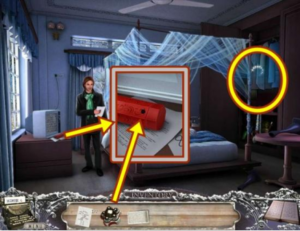
· Return to the Lane house and enter the bedroom.

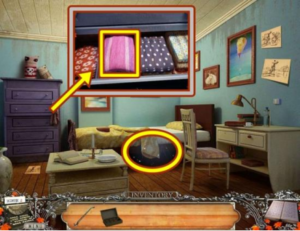
· Click on the dresser.
· Use the GLOVE to take the GLASS SHARD.
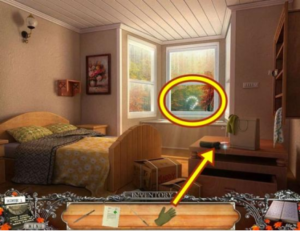
· Click on the window.
· Add the GLASS SHARD.
· A mini-puzzle starts. Put the window back together.
· Solution:
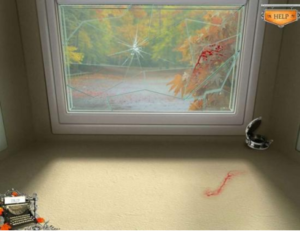

· The GAS CAP is added to your inventory.
· Return to Vern’s hardware.

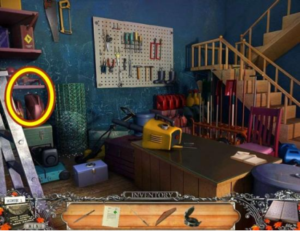
· Click on the shelves to start a hidden object hunt.

· Find all the typewriter keys, then find all the objects. GASOLINE is added to your inventory.

· Put the GAS CAP on the leaf blower, then add GASOLINE.
· Click on the metal basket.
· Use the HOOK to pick up the jeans.
· Click through the dialogue.

· Give the GLASS SHARD to Vern.
· Click through the dialogue.
· Click on the ledger.
· Open the ledger.
· Use the LETTER OPENER on the ledger.
· Take the evidence.
· The LEDGER is added to your inventory.
· Click through the dialogue.
· Return to the Pharmacy cashier.

· Put the LEDGER on the counter.
· Click on the ledger.
· A mini-puzzle starts. Adjust the abacus beads so each indicates the numeric value of each symbol, using the grid as a guide. Click on a bead and move it up or down and note the number above the bead’s column.
· Solution:

· The LEDGER EXPOSED is added to your inventory.
· Return to Sensible Accounting.


· Click through the dialogue.
· Give the LEDGER EXPOSED to Perley.
· Click through the dialogue.
· Click on the cabinet to start a hidden object hunt.

· Find all the typewriter keys, then find all the objects. A BATTERY is added to your inventory.

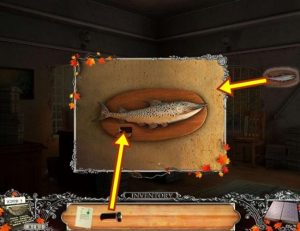
· Click on the fish on the wall.
· Add the BATTERY.
· Take the BUTTONS (1/2) from its mouth.
· Click through the dialogue.
· Return to Fey Street and enter the Sheriff’s office.

· Click through the dialogue.
· Click on the computer to start a hidden object hunt.

· Find all the typewriter keys, then find all the objects. A LOCK PIECE is added to your inventory.

· Click on the box on the desk.
· Take the BUTTONS (2/2). Click through the dialogue.
· Put the LOCK PIECE on the small safe.
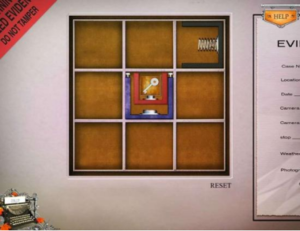
· A mini-puzzle starts. Use the lock piece to move the brackets. To move the lock piece, click on it and click on an adjacent tile. The lock piece can only move one space at a time. It cannot move diagonally. Using the lock piece, move the red bracket into the blue receptacle. To move a bracket or receptacle, put the lock piece inside it. Brackets and the receptacle can only be moved by the lock piece pushing against a side.

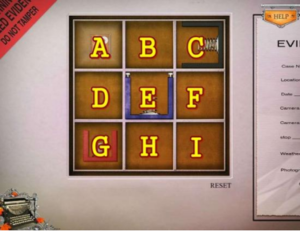
· Using the screenshot above as a guide, assume the tiles are labelled from A-I. Click Reset (if necessary) and move the lock piece to the following tiles: B-E-D-A-B-C-F-I-H-E-B-A-D-E-B-A-D-G-H-I-F-C-B.
· Solution:

· Take the POLICE REPORT
· Click through the dialogue.
· Return to Vern’s hardware.

· Click on the icebox.
· Add the two BUTTONS.
· Click on the buttons in the order seen in your journal, green-blue-red-yellow.
· Click through the dialogue.
· Give the POLICE REPORT to Vern.
· Click through the dialogue.

· Take the CLAMP SCREW.
· Return to New Age Electronics.

· Click through the dialogue.
· Click on the display.
· Add the CLAMP SCREW to the clamp and take the DRY RAG.
· Click through the dialogue.
· Give the DRY RAG to Rick.
· Click through the dialogue.
· Click on the counter.
· Add the POLICE REPORT.
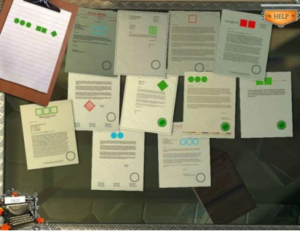
· A mini-puzzle starts. Find three sets of printouts. Each set will either have a common theme (colour of symbols, shape of symbols) or will have nothing in common. Click inside the circle on a printout to select it. Select three. If they are incorrect, the circles will turn red. Click on a circle to clear the checks. If they are correct, the circles will turn green and the symbols will appear on the paper in the top left.
· Solution:


· Click through the dialogue.
· The EMAIL PRINTOUT is added to your inventory.
· Click on the counter to start a hidden object hunt.

· Find all the typewriter keys, then find all the objects. A FUSE is added to your inventory.
· Return to the Lane house living room.

· Click through the dialogue.
· Give the EMAIL PRINTOUT to Maddy.
· Click through the dialogue.
· Click on the cupboard to start a hidden object hunt.

· Find all the typewriter keys, then find all the objects. A FLASHLIGHT is added to your inventory.
· Return to Moose Lodge.

· Use the FLASHLIGHT anywhere on the screen.
· Click on the bar to start a hidden object hunt.

· You will have to use the flashlight to find items. Find all the typewriter keys, then find all the objects. A SCREWDRIVER is added to your inventory.

· Click on the grill.
· Use the SCREWDRIVER to remove the grill.
· Add the FUSE.
· A mini-puzzle starts. Move the blocks out of the way to allow the fuse to slide out the entryway on the left. Click on the arrow at either end of a block to move it in that direction.

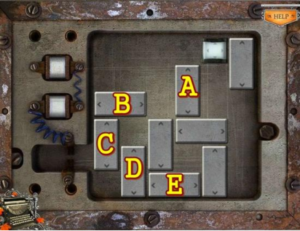
· Using the screenshot above as a guide, move block A all the way up, then move Block B all the way to the right. Move block A back down and move block C and D all the way up, then move block E all the way to the left.

· Guide the fuse out the entryway.
· Watch the cutscene.
End of Book 2.
Book 3 – Finnegan’s Fake
· Click on Finnegan’s Fake.
· Click Play.
· Click through the dialogue.

· Click on the book.
· Move the book and take the LIST.
· Click through the dialogue.
· Leave to the college grounds and go right into Shamus’s office.
· Click through the dialogue.
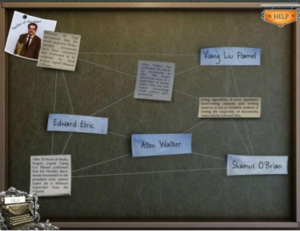
· Click on the bulletin board.
· Add the LIST.
· A mini-puzzle starts. Arrange the clippings and pictures so the strings don’t overlap.
· Solution:

· Click on the picture of Shamus.
· Click through the dialogue.

· Click on the floor beside the desk to start a hidden object hunt.

· Find all the typewriter keys, then find all the objects. A GATE KEY is added to your inventory.
· Move down to the college grounds.

· Click through the dialogue. Continue to click on the Inspector to hear all his comments.
· Click on the gate.
· Unlock the gate with the GATE KEY.
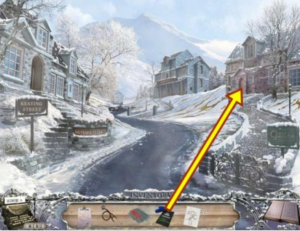
· Move forward to Keating Street, then go left into the Ulysses Club.

· Click through the dialogue.
· Click on the painting over the mantle.
· Take the MAGNET.
· Click anywhere outside the window to close it.
· Click on the photos on the mantle.
· Move the photos and take the BATTERY.
· Click through the dialogue.
· Click on the cabinet to start a hidden object hunt.

· Find all the typewriter keys, then find all the objects. A STETHOSCOPE is added to your inventory.
· Return to Shamus’s office.

· Click on the fisherman statue.
· Add the MAGNET to get the WIRE CUTTERS.
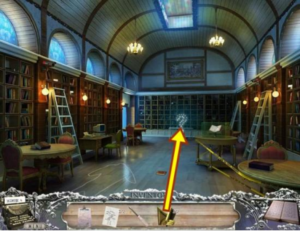
· Return to the College library.

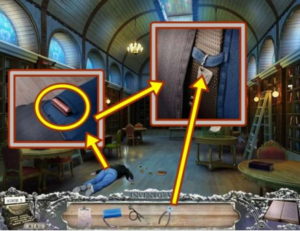
· Click on the body.
· Take the wallet and look at the ticket stub.
· Use the WIRE CUTTERS to get the HOTEL KEY.
· Return to Keating Street.


· Click on the hotel door.
· Unlock the door with the HOTEL KEY.
· Enter the hotel room.

· Click through the dialogue.
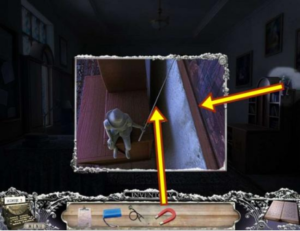
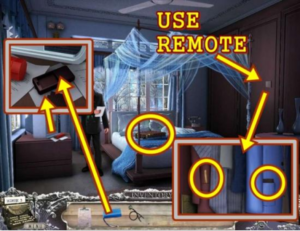
· Click on the television.
· Put the BATTERY in the remote, then replace the cover.
· Take the REMOTE.
· Note the number 8059. Click anywhere outside the window to close it.
· Use the REMOTE to open the closet.
· Look in the closet.
· Take the TWEEZERS.
· Take the CRUMPLED SHEET from the pocket.
· Click through the dialogue.
· Click on the briefcase on the bed.
· A mini-puzzle starts. Enter the combination 8059. From left to right, dial 1 controls itself and dial 2, dial 2 cannot be controled, dial 3 controls only itself and dial 4 controls itself and dial 1. Dial 4 moves three numbers with each turn and dial 1 moves two numbers with each turn.
· Solution:

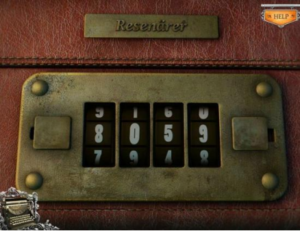
· To solve this puzzle, start from the beginning (leave the puzzle, if necessary), then (from left to right), move dial 4 until it shows a 9, then move dial 1 until it shows an 8 and dial 2 shows a 0, then move dial 3 to 5.
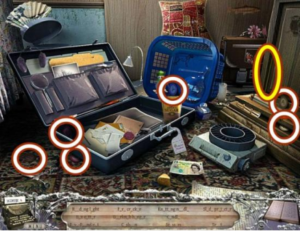
· Click on the suitcase to start a hidden object hunt.

· Find all the typewriter keys, then find all the objects. A STUDENT MEMO is added to your inventory.
· Return to the College library.

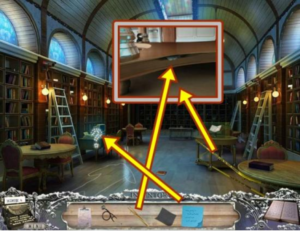
· Click on the table with the encased book on it.
· Use the TWEEZERS to get the TORN CLOTH.
· Click on the computer.
· Add the STUDENT MEMO.
· A mini-puzzle starts. Use the clues to eliminate students until you find the one you are looking for. There are four steps to this puzzle.
· Click on the Search Student button and wait for the student IDs to appear.
· Use the clues in the top left to eliminate student IDs. Click on a student ID to eliminate it.
· First clue: Eliminate all students who are studying Science and Technology (all students with an orange square before their ID number). Once you’ve done this, the next clue will appear.
· Second clue: Eliminate all students who’s ID does NOT start with a Q.
· Third clue: Eliminate all students who’s second ID letter is NOT a vowel.
· Fourth clue: Eliminate all students who have an even number in their ID.

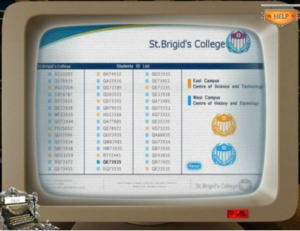
· When you are finished, click on student ID QE73935.
· Click OK. Take the clue.
· Click through the dialogue.

· Click on the left top shelf to start a hidden object hunt.

· Find all the typewriter keys, then find all the objects. A LENS is added to your inventory.
· Return to Shamus’s office.

· Click through the dialogue.
· Shamus gives you a PASS.
· Click on the table.
· Put the LENS on the microscope.
· Turn on the lamp.
· Put the CRUMPLED SHEET on the table.
· Click on the microscope’s lens.
· A mini-puzzle starts. Arrange the lens’ so the lightbeam hits the crumpled sheet.
· Solution:

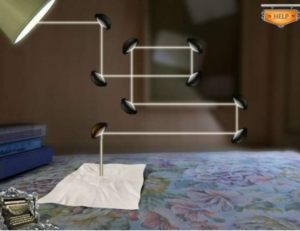
· Take the MEMO (1/2).
· Return to Keating Street.

· Click through the dialogue.
· Use the PASS on the Green Gaelic Pub.
· Enter the Gaelic Pub.


· Click through the dialogue.
· Click on the bar to start a hidden object hunt.

· Find all the typewriter keys, then find all the objects. An IRON KEY is added to your inventory.
· Return to the College library.

· Click on the door on the far left.
· Unlock the door with the IRON KEY, then turn the handle.
· Enter the security room.

· Click through the dialogue.
· Click on the wall painting to reveal the safe.
· Click on the safe.
· Add the STETHOSCOPE.
· Turn the safe’s dial until the safe opens.
· Take the SYMBOLS.
· Put the TORN CLOTH on the sweater, then take the SWEATER.
· Return to Shamus’s office.

· Click through the dialogue.
· Give the SWEATER to Shamus.
· Click through the dialogue.
· Click on the credenza.
· Add the SYMBOLS.
· A mini-puzzle starts. Click on the symbols in the order shown on the card.
· Solution:

· Click on the symbols in the order shown in the screenshot above.

· Take the SCREWDRIVER and TROPHY FRAGMENT (1/2).
· Return to the College library.

· Click on the left top shelf to start a hidden object hunt.

· Find all the typewriter keys, then find all the objects. A TROPHY FRAGMENT (2/2) is added to your inventory.

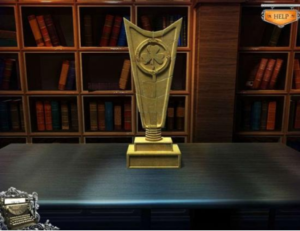
· Click on the back table.
· Add the two TROPHY FRAGMENTS.
· A mini-puzzle starts. Reconstruct the trophy. Click on a piece to select it, then click somewhere on the trophy frame to release it. If it’s the correct position, it will stay, if not, it will return back to the table. You don’t need to start from the bottom.
· Solution:

· Click through the dialogue.
· The UPDATED REPORT is added to your inventory.
· Return to Shamus’s office.

· Click through the dialogue.
· Give Shamus the UPDATED REPORT.
· Click through the dialogue.
· Click on the floor beside the desk to start a hidden object hunt.

· Find all the typewriter keys, then find all the objects. A KNITTING NEEDLE is added to your inventory.
· Return to the Ulysses Club (off Keating Street).


· Click on the painting above the mantle.
· Use the SCREWDRIVER to remove the note and get the SCREW.
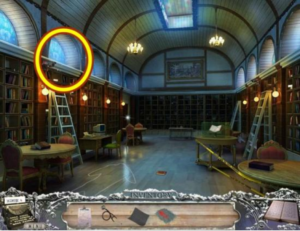
· Return to the College library.

· Click on the ladder.
· Adjust the rung, then use the KNITTING NEEDLE on the rung.
· Take the BEAD.
· Add the SCREW, then fasten it with the SCREWDRIVER.
· Click on the security camera and take the SURVEILLANCE DISC.
· Return to Shamus’s office.

· Click on the desk.
· Add the BEAD, then take the BRACELET.
· Return to the College library and go into the security room.

· Click through the dialogue.
· Give Colleen the BRACELET.
· Click through the dialogue.
· Click on the computer.
· Open the CD-Rom drive and add the SURVEILLANCE DISC.
· Click on the computer.
· A mini-puzzle starts. Arrange the screens in chronological order. Click on two screens to swap their positions. When a screen is in the correct position, it is locked and cannot be moved.
· Solutions:

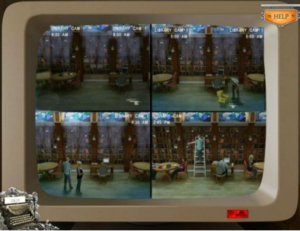


· The SURVEILLANCE SHOT is added to your inventory.
· Return to the Gaelic Pub.

· Click through the dialogue.
· Give Ian the SURVEILLANCE SHOT.
· Click through the dialogue.
· Click on the bar to start a hidden object hunt.

· Find all the typewriter keys, then find all the objects. A BROCHURE is added to your inventory.
· Click through the dialogue.
· Return to the Ulysses Club.

· Click on the photos on the mantle.
· Add the BROCHURE.
· A mini-puzzle starts. Find matches between the brochure and the photograph. Click on a picture in the brochure, then click on its match in the photograph. Correct matches turn green.
· Solution:

· MATCHING PICTURES have been added to your inventory.
· Click through the dialogue.

· Give Conor the MATCHING PICTURES.
· Click through the dialogue.
· He gives you a PENDANT.
· Click on the cabinet to start a hidden object hunt.

· Find all the typewriter keys, then find all the objects. A MANUSCRIPT PHOTO is added to your inventory.
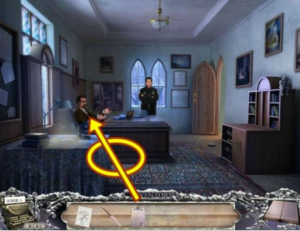
· Return to the Hotel room.

· Click through the dialogue.
· Click on the television.
· Put the PENDANT on the tube.
· Take the MEMO (2/2).
· Click through the dialogue.
· Click on the closet.
· A mini-puzzle starts. Spot the differences between the photo on the right and the actual closet on the left. An item will be highlighted in the photo (right), find that item in the closet (left).
· Solution:

· You will find the items in the order shown in the screenshot above.
· Click through the dialogue.
· Return to the Gaelic Pub.

· Click on the table.
· Add the MEMO.
· A mini-puzzle starts. Crack the code. Determine the first letter of each symbol. In this case, moustache = M, unicorn = U, eagle = E, etc. When a symbol is highlighted (i.e., clicked on), click on its letter tab.
· Solution:

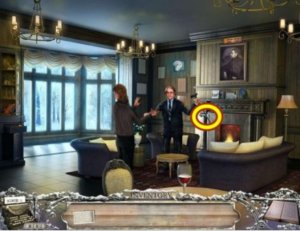
· Return to the Ulysses Club.

· Click on Conor.
· Click through the dialogue.
· Take the cane from Conor (click on the cane below his hand).
· Click through the dialogue.

· Click on the frames on the wall.
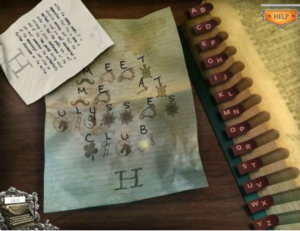
· Add the MANUSCRIPT PHOTO.
· A mini-puzzle starts. A search-a-word puzzle. In the puzzle grid, find the words listed below it. Click on any letter within a listed word to highlight it.
· Solution:

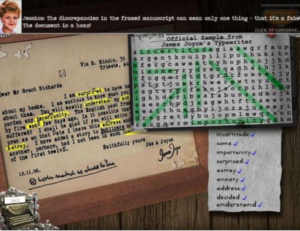
· Watch the cutscene.
End of Book 3.
Congratulations!