Follow Me!
Dark Tales: Edgar Allan Poe – Metzengerstein
Chapter 1: Ravensoul Mansion
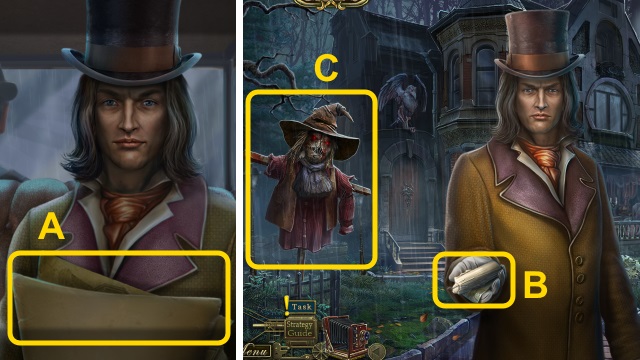
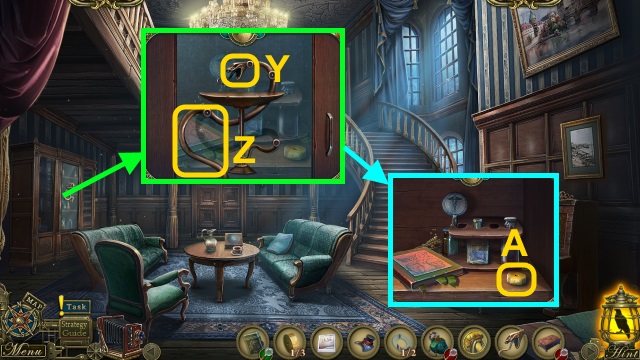
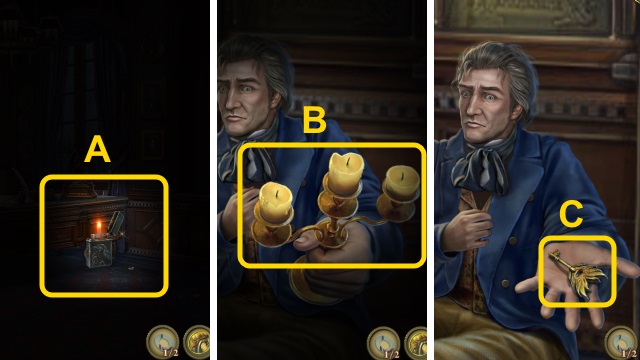
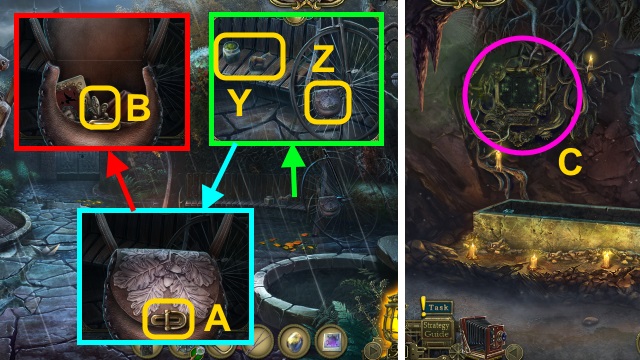
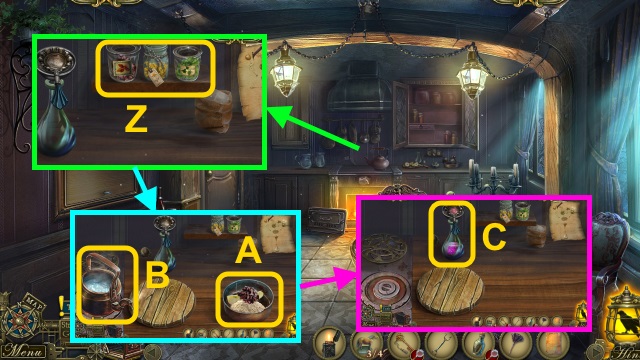
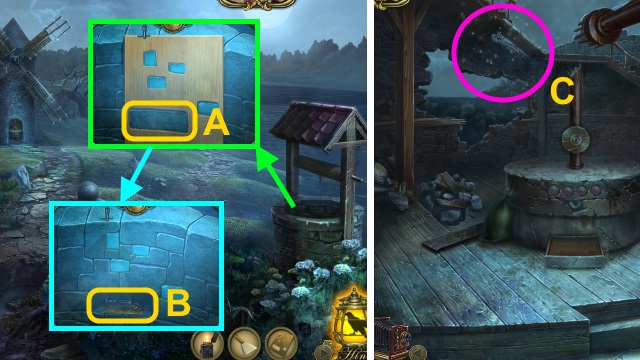
- Read the papers (A).
- Take the CANDLE (B).
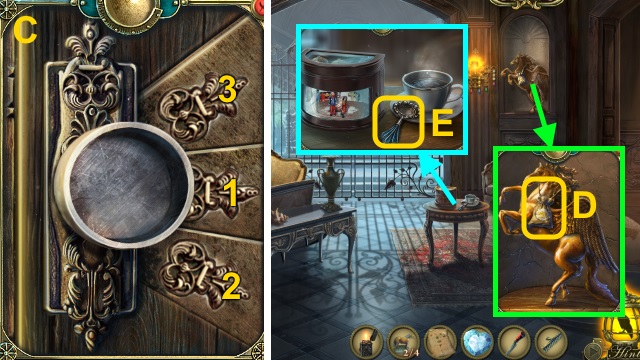
- Examine the scarecrow (C).
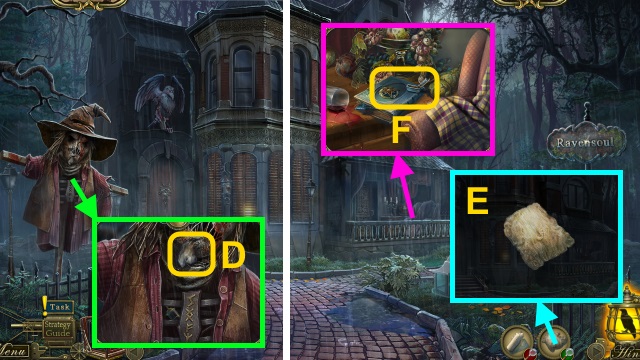
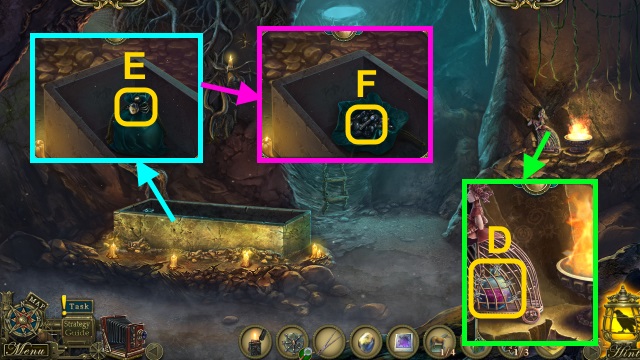
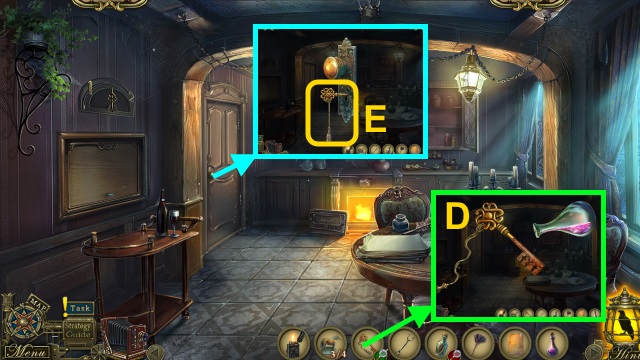
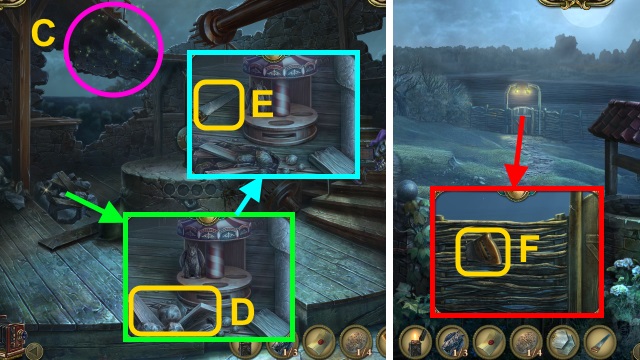
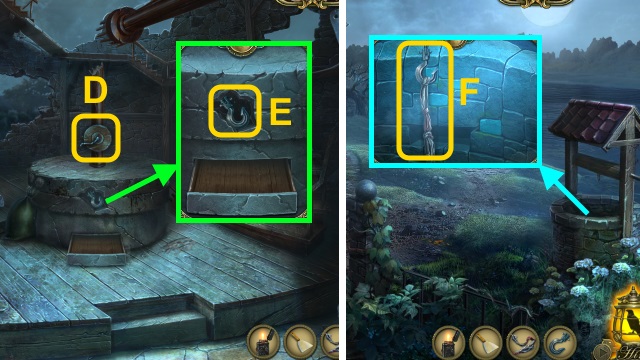
- Take the LIGHTER PACK (D).
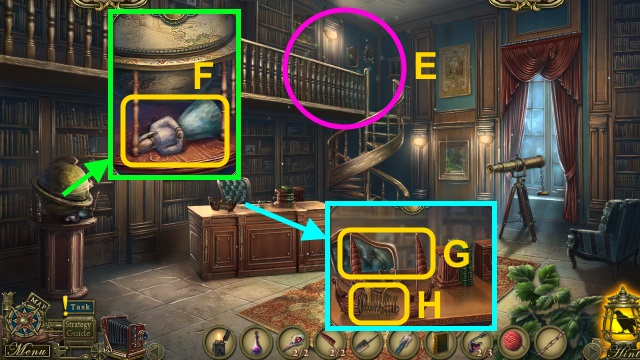
- Examine the LIGHTER PACK 3x; take the LIGHTER PACK (E).
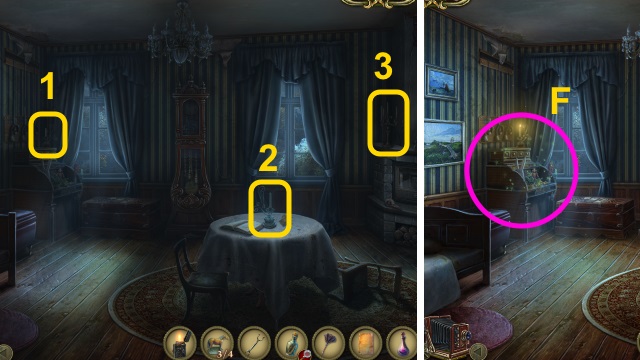
- Take the LIGHTER CAP and Map (F).
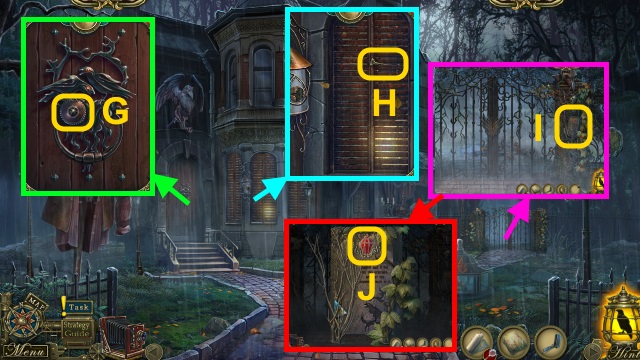
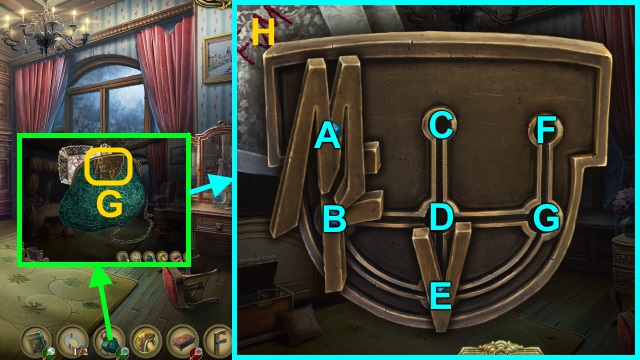
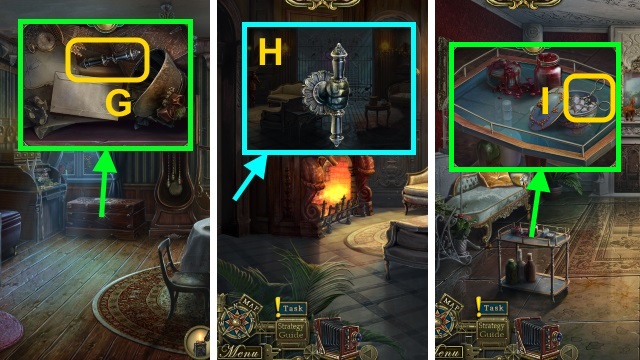
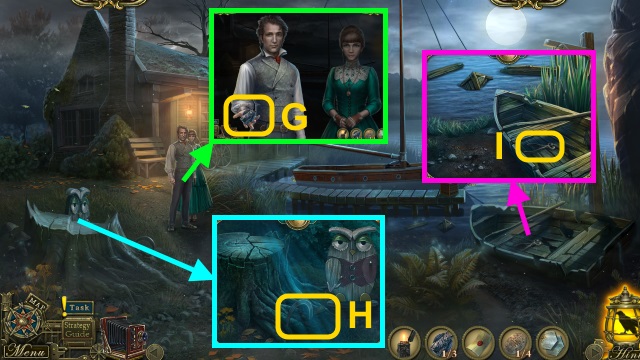
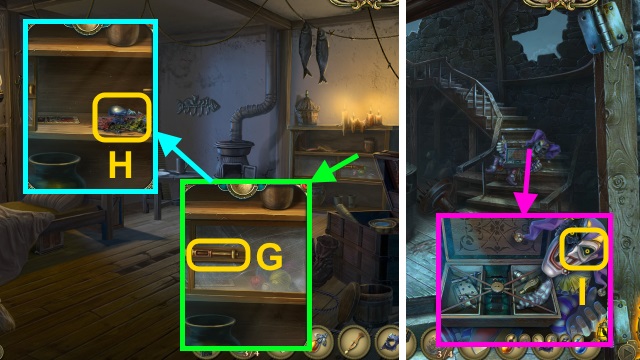
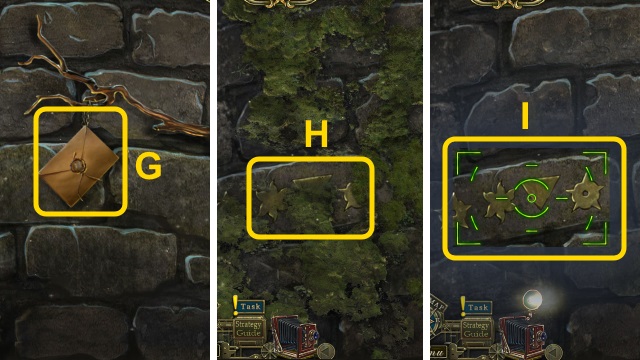
- Take the LIGHTER GEAR (G).
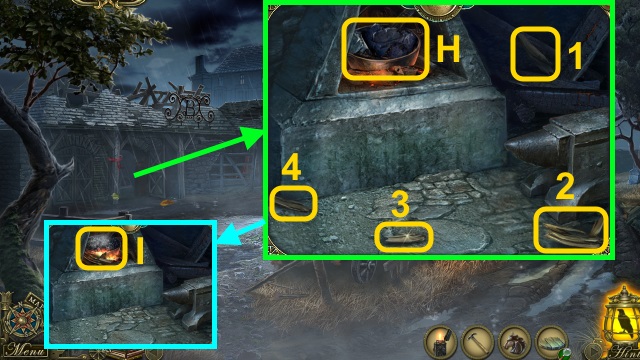
- Take the PLUNGER (H).
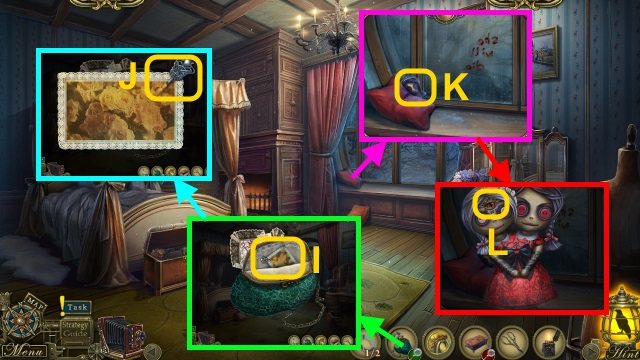
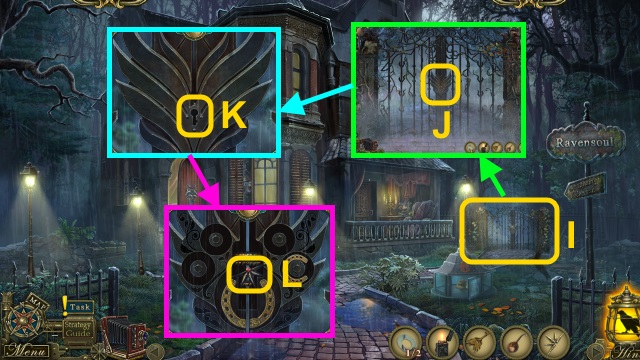
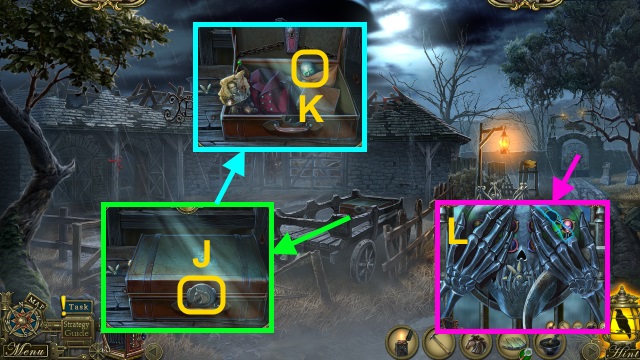
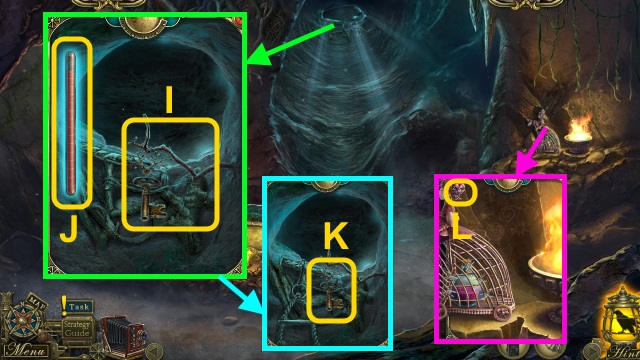
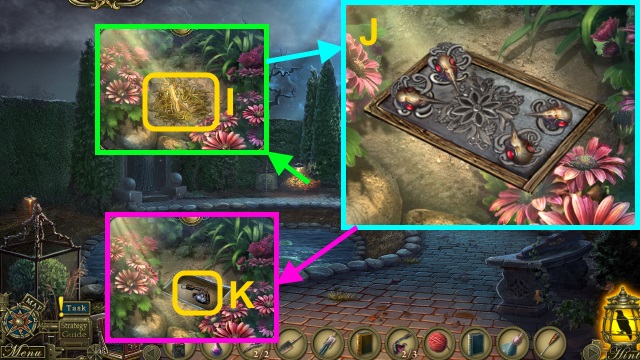
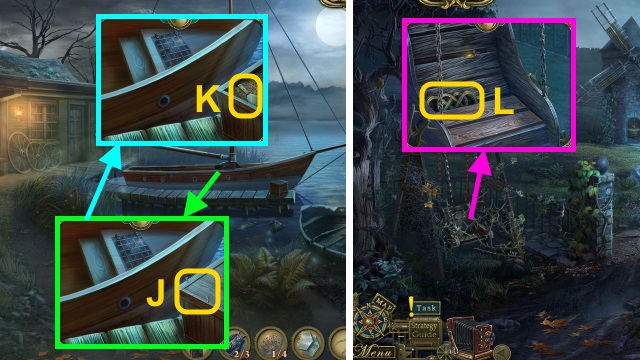
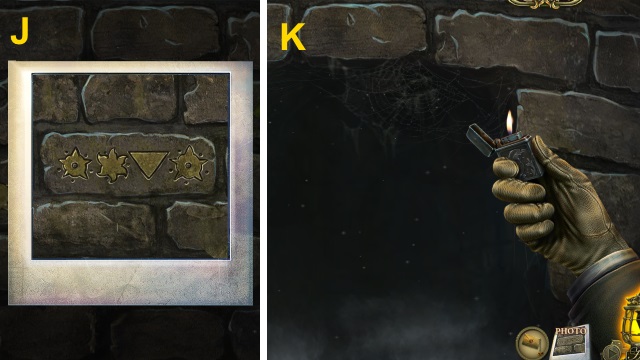
- Examine the sign (I); take the LIGHT KEY (J).
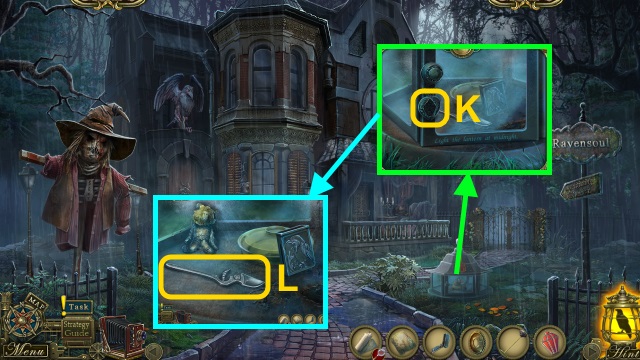
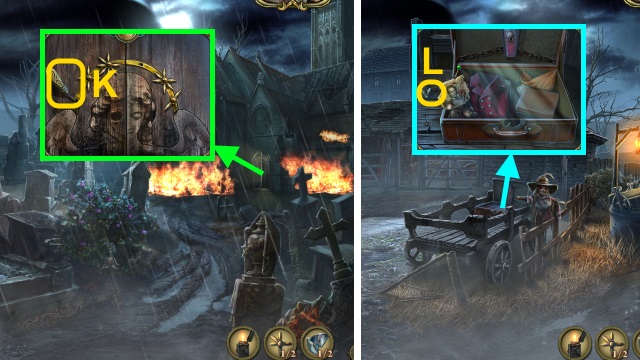
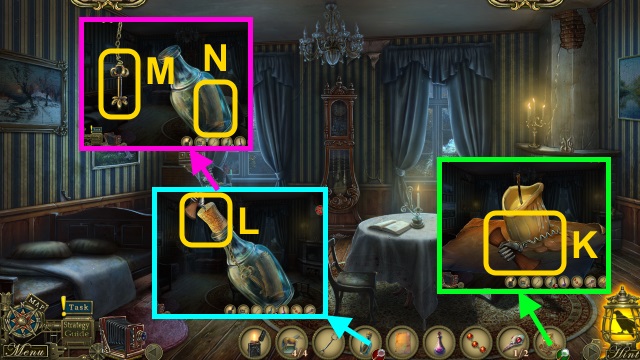
- Place the LIGHT KEY (K); open the door.
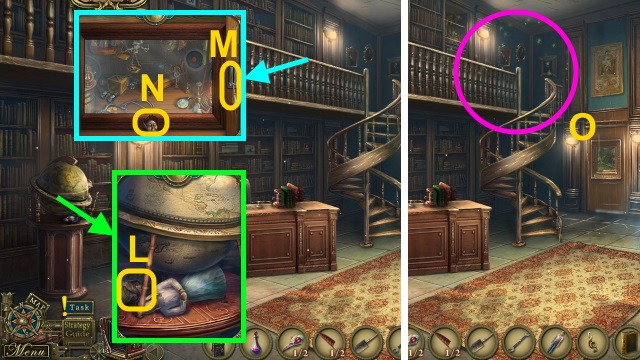
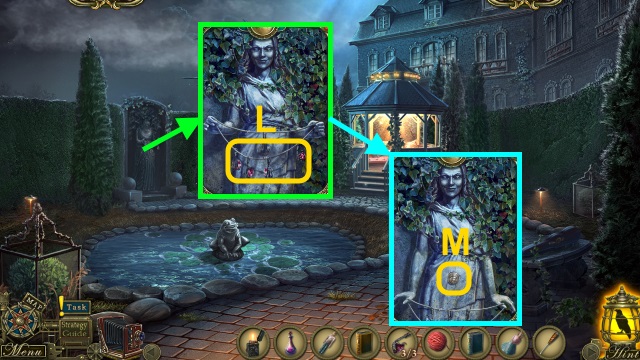
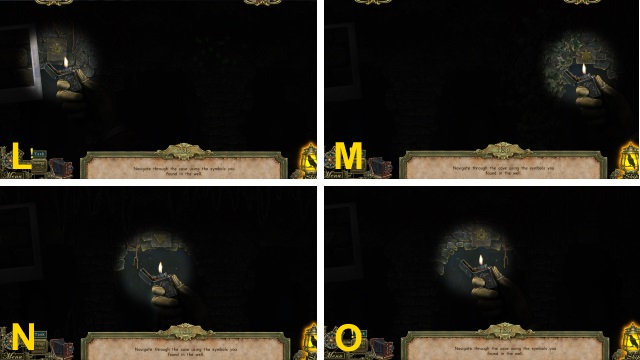
- Take the SCISSORS PIECE (L).
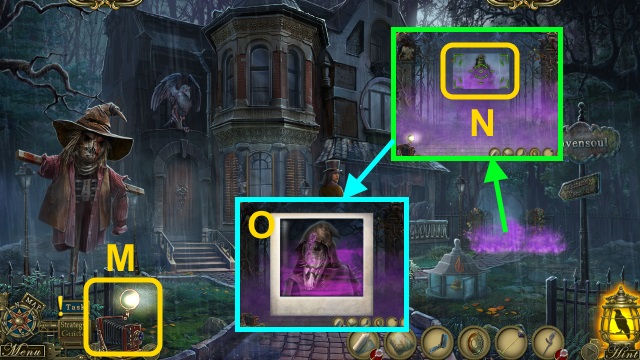
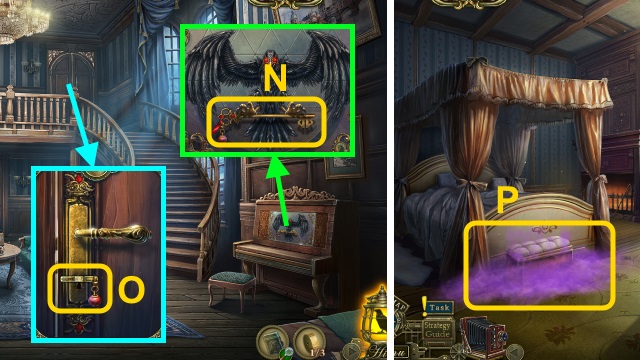
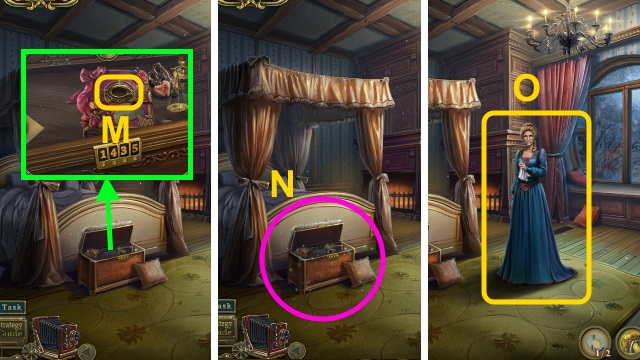
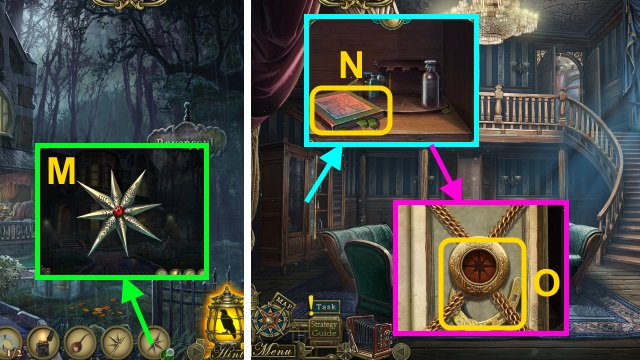
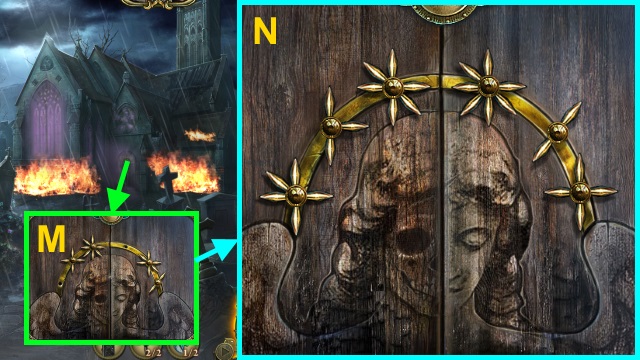
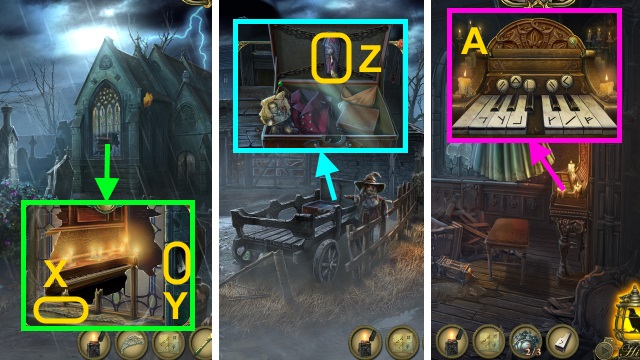
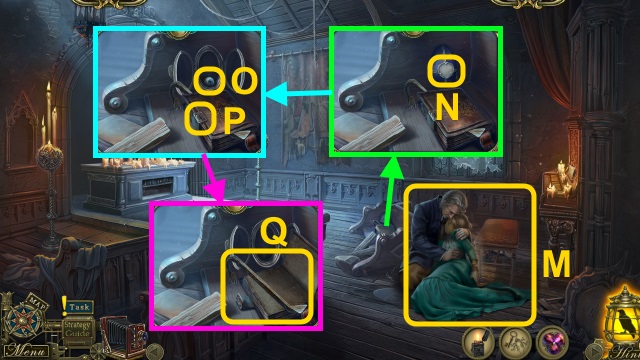
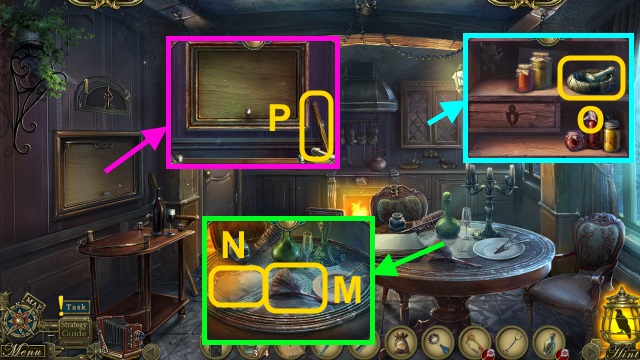
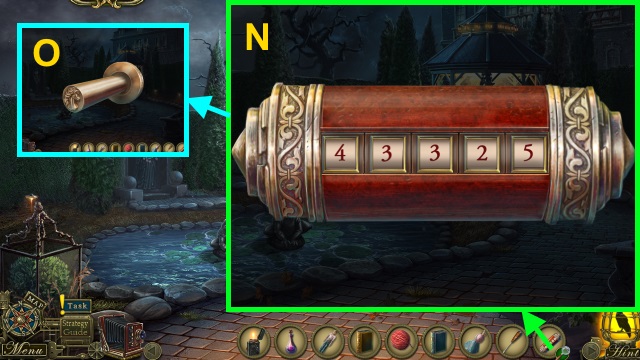
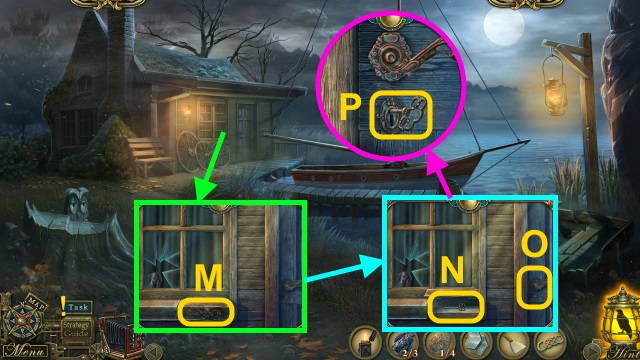
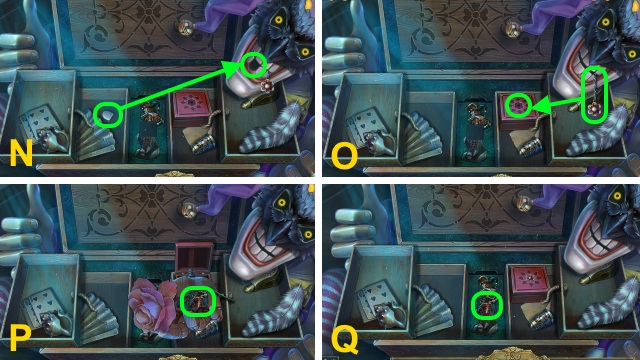
- Use the CAMERA (M) to take a photo (N).
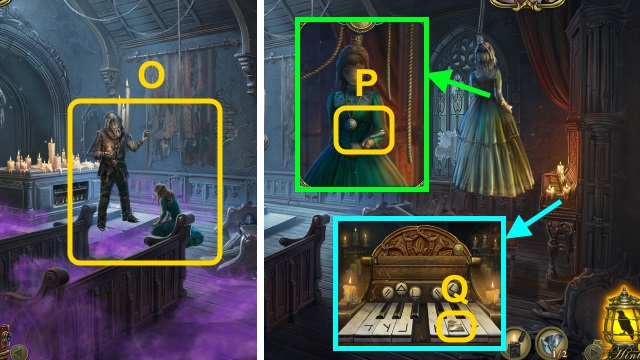
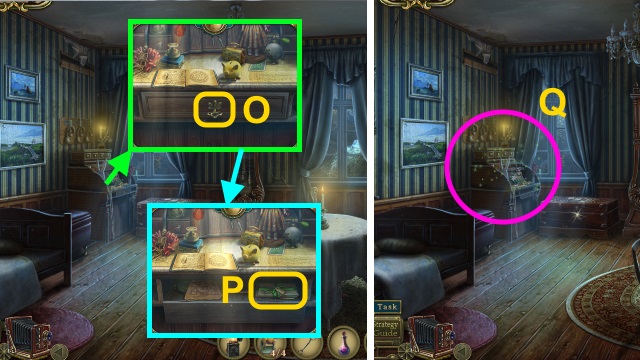
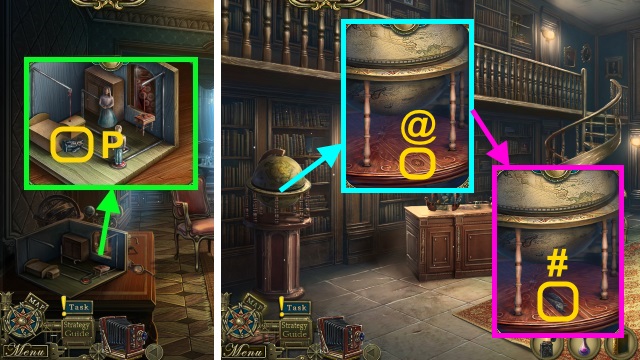
- Take the PHOTO (O).
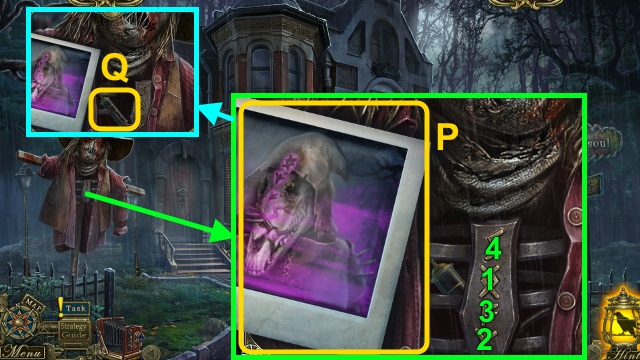
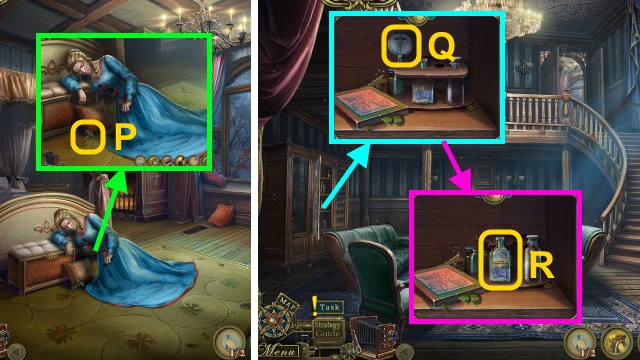
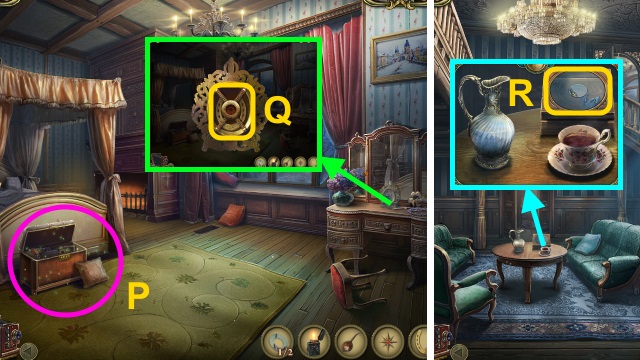
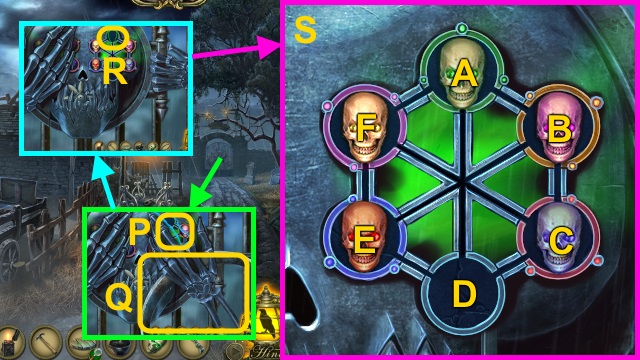
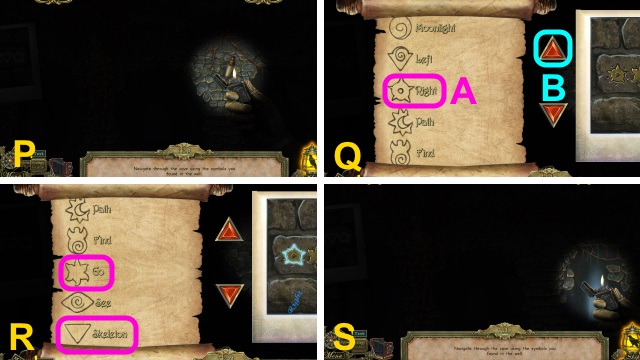
- Place the PHOTO (P); select the symbols in order (1-4).
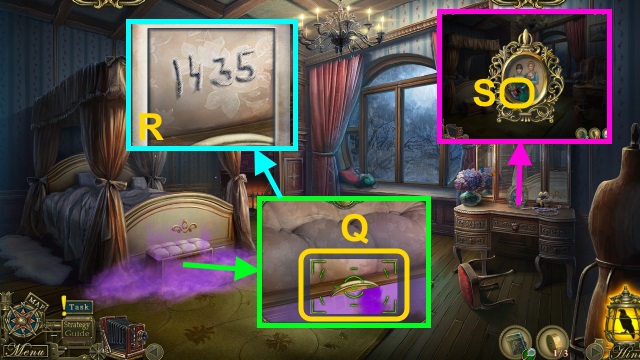
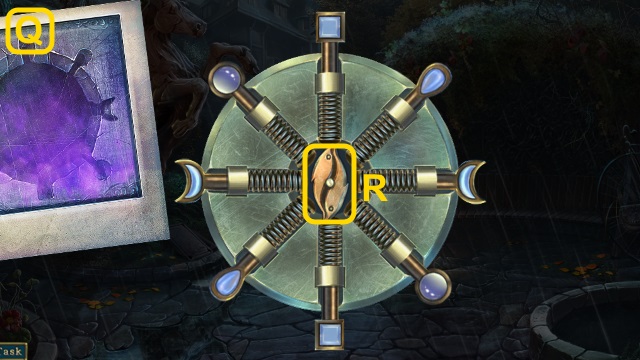
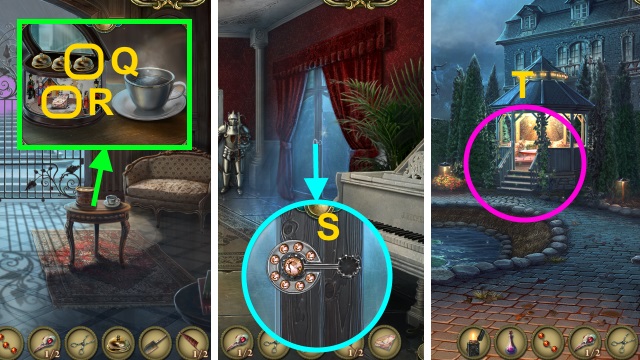
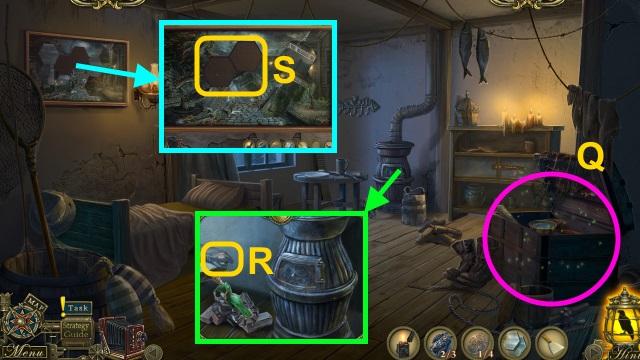
- Take the SYRINGE (Q).
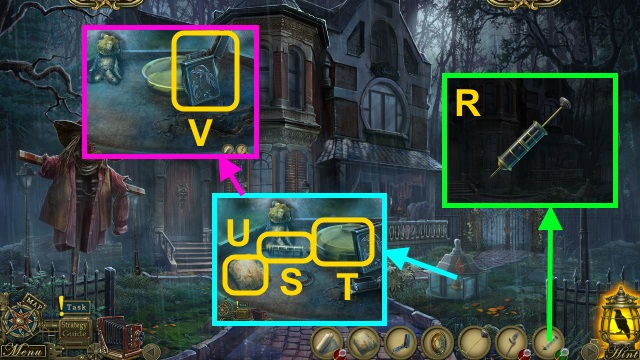
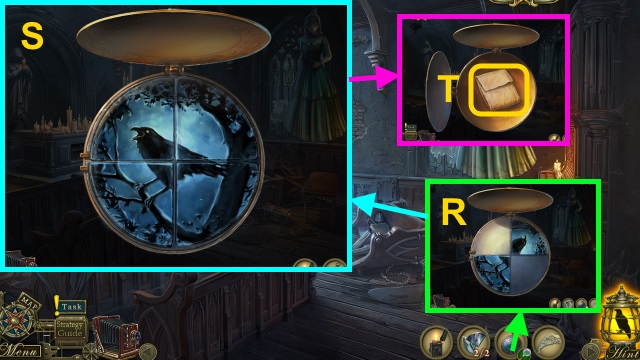
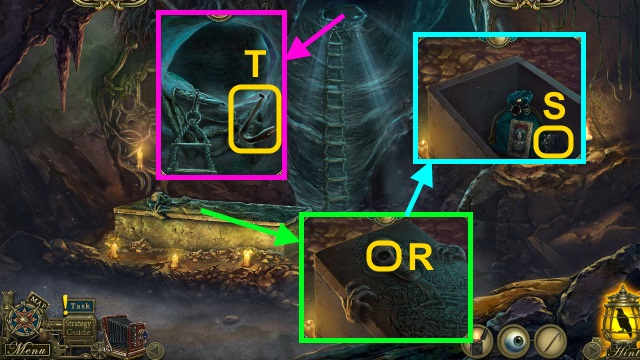
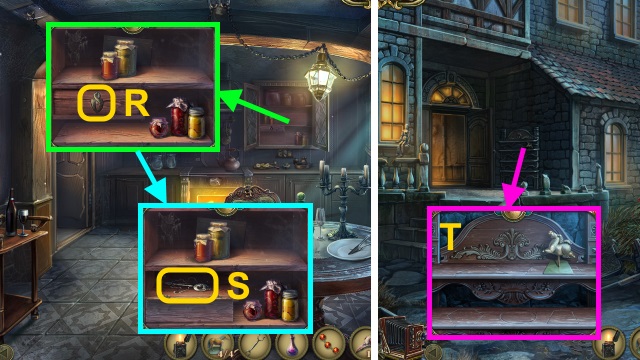
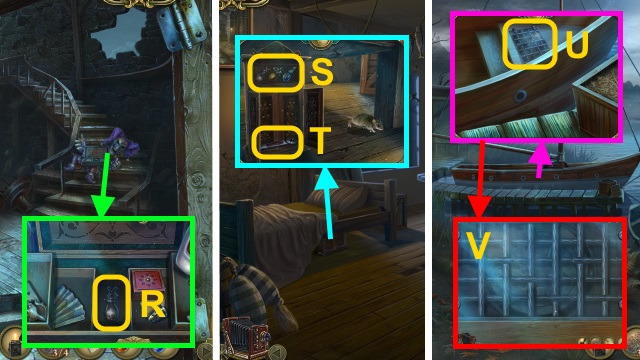
- Combine the SYRINGE and PLUNGER (R); take the SYRINGE.
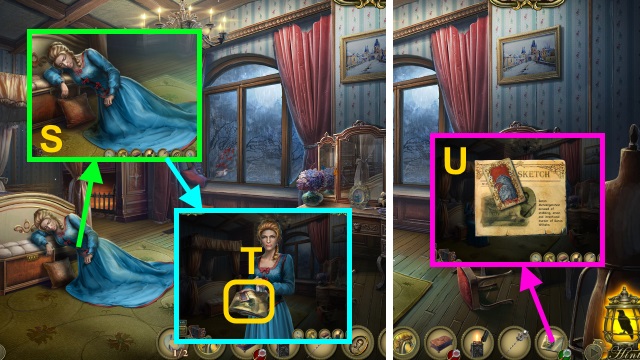
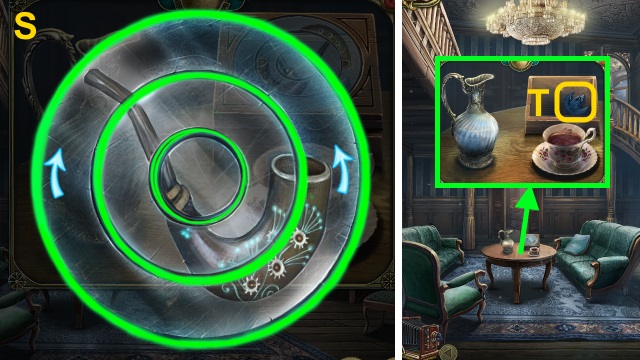
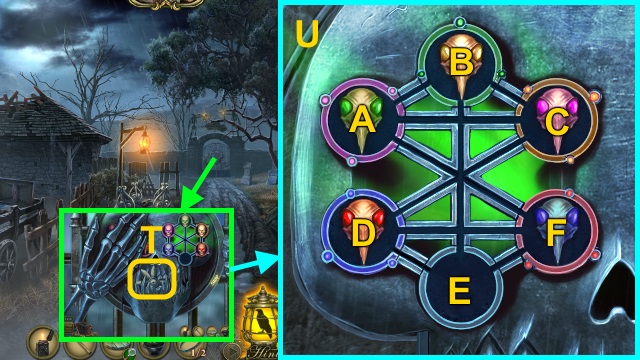
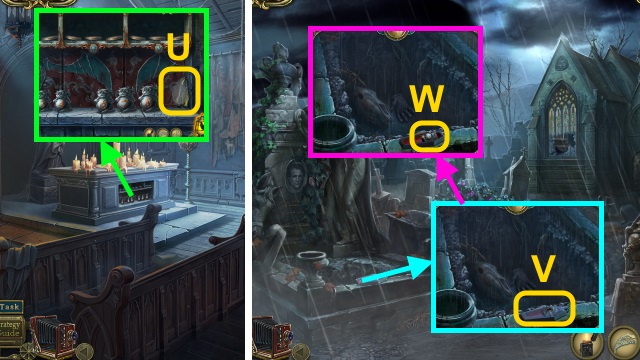
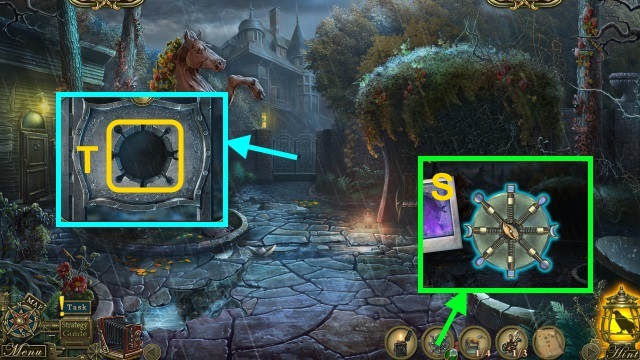
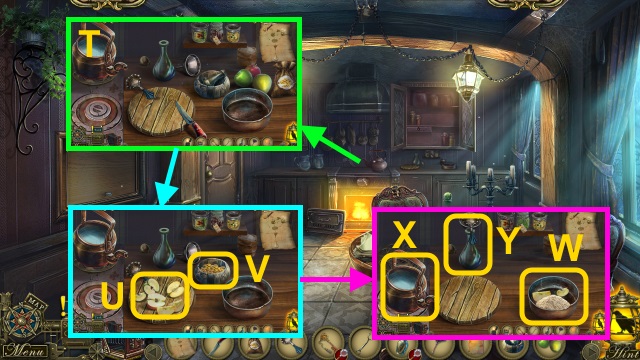
- Place the LIGHTER PACK, LIGHTER CAP, LIGHTER GEAR, and SYRINGE; use the syringe (S) on the fluid (T) and then on the pack (U).
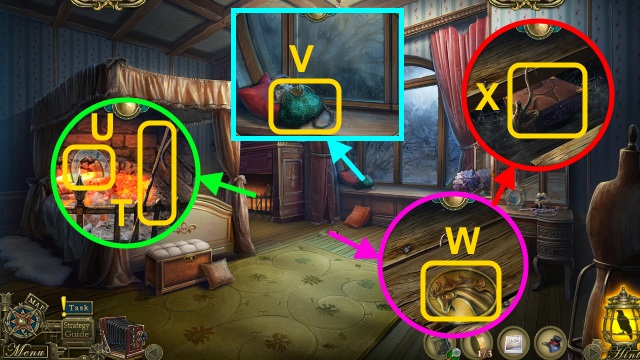
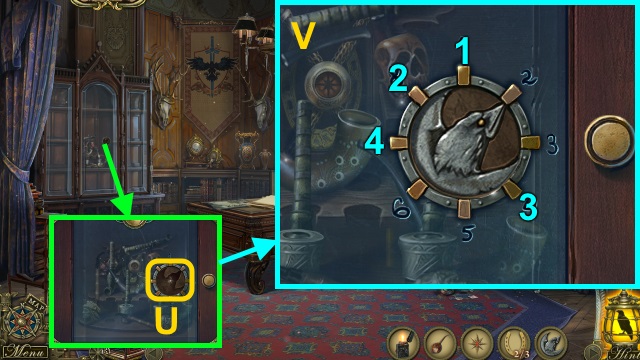
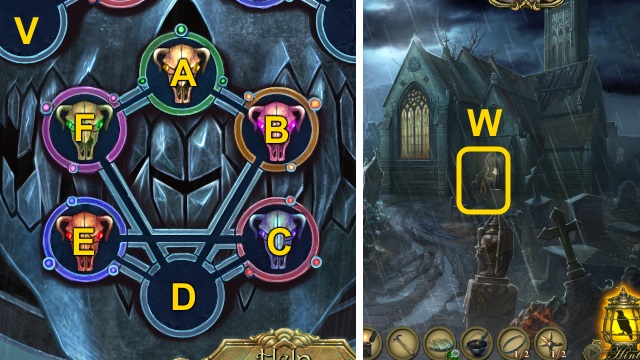
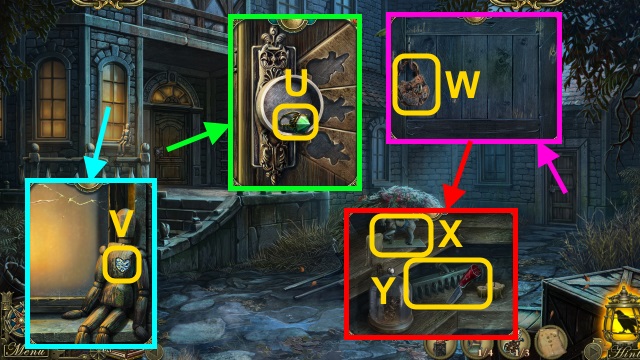
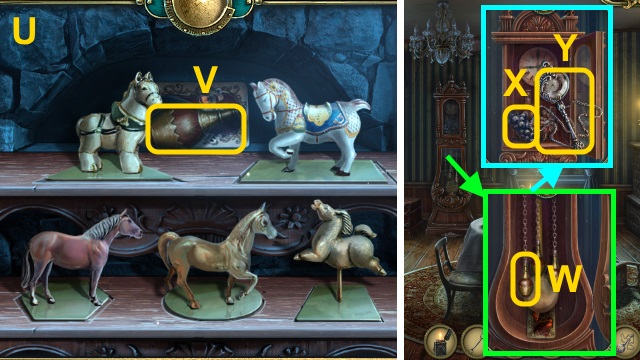
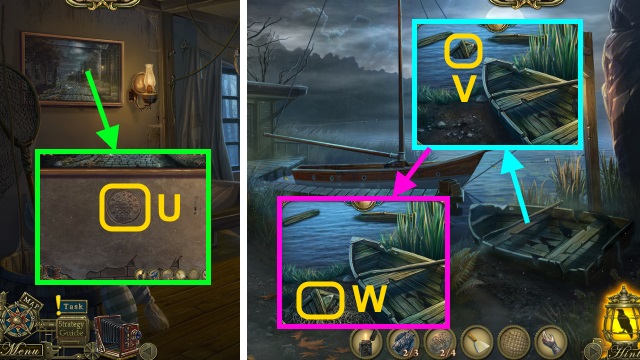
- Place the pack, gear, and cap (V); take the LIGHTER.
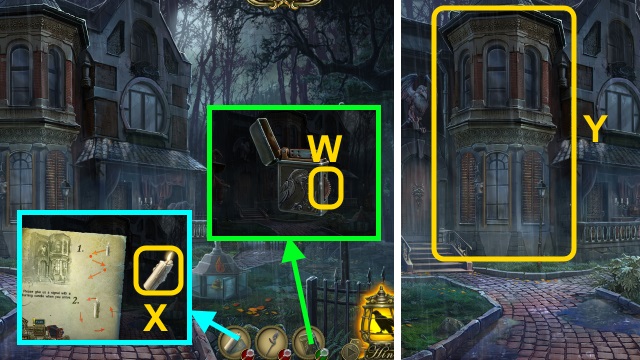
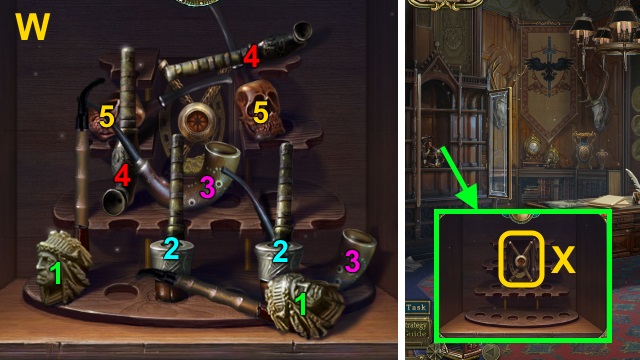
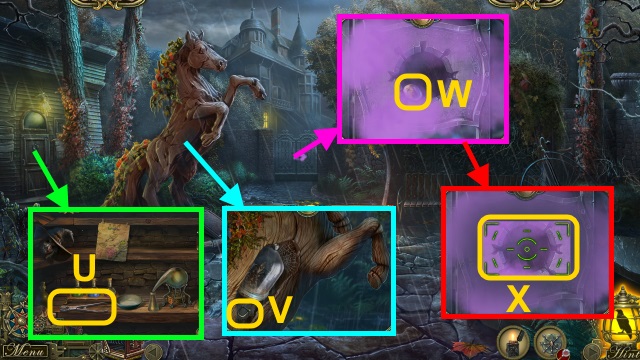
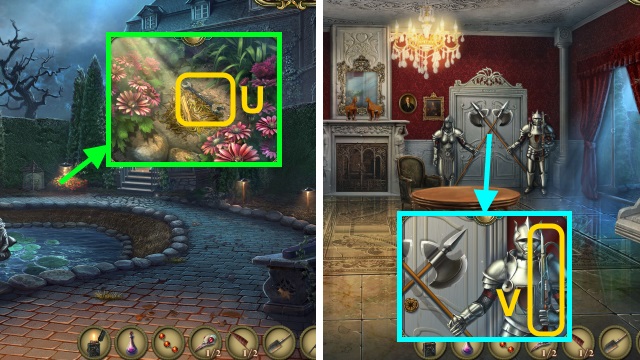
- Open the LIGHTER; examine the gear 2x (W). Take the LIT LIGHTER.
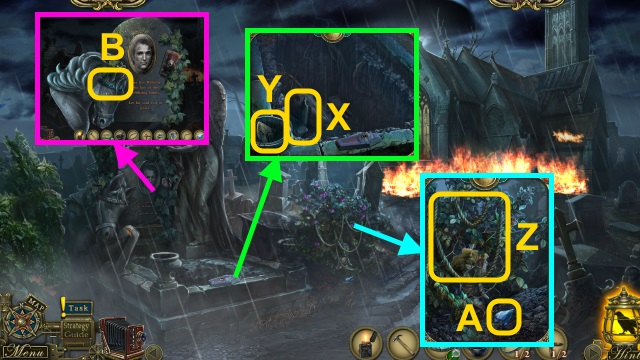
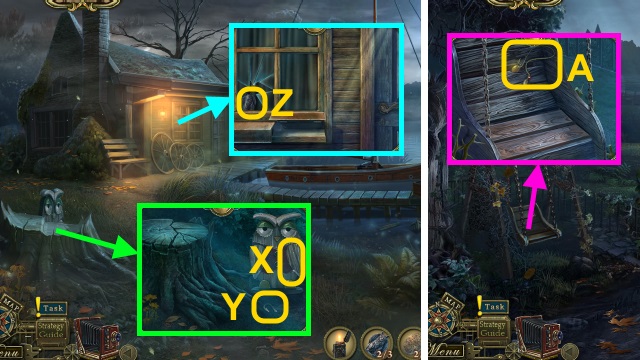
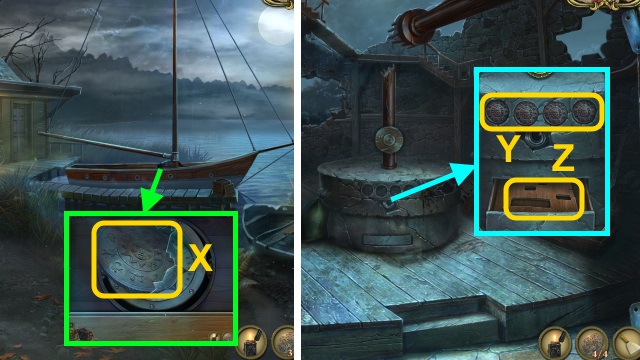
- Combine the CANDLE and LIT LIGHTER; take the LIT CANDLE (X).
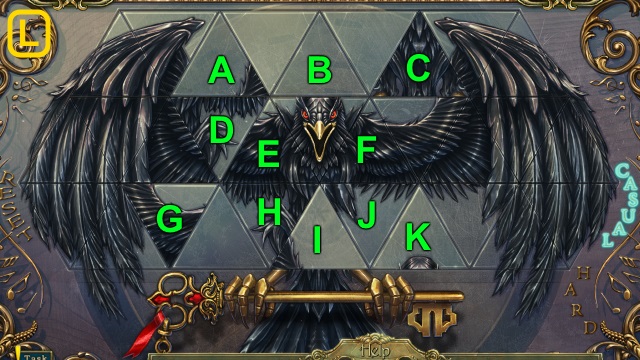
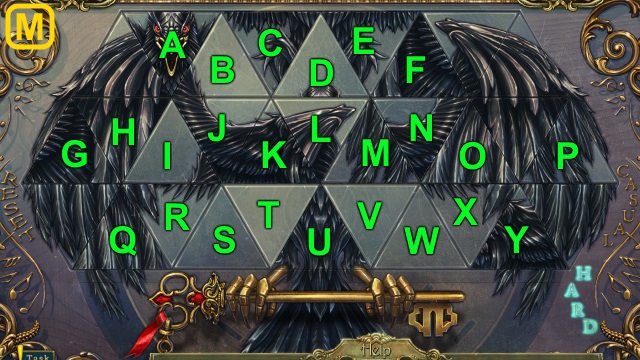
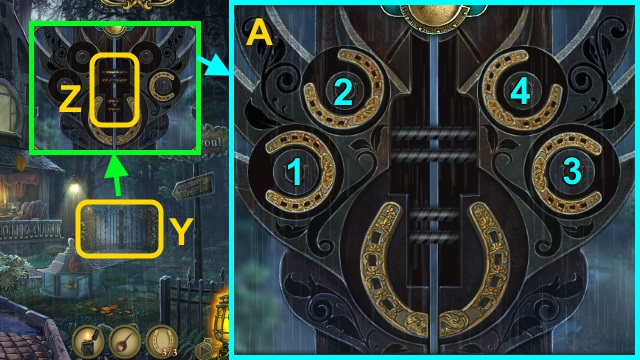
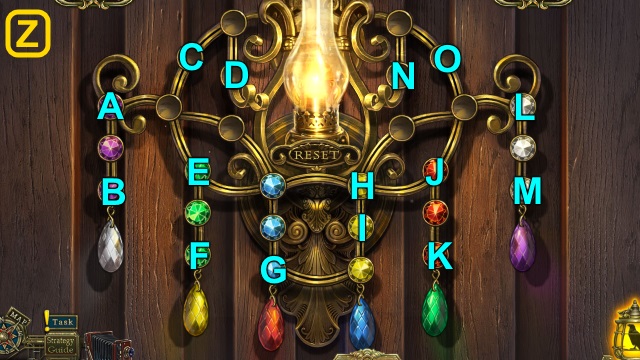
- Use the LIT CANDLE for a mini-game (Y).
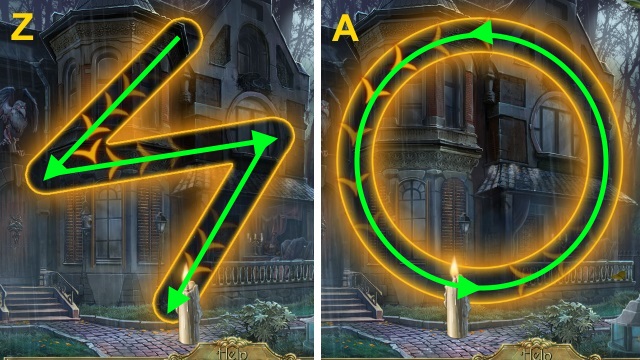
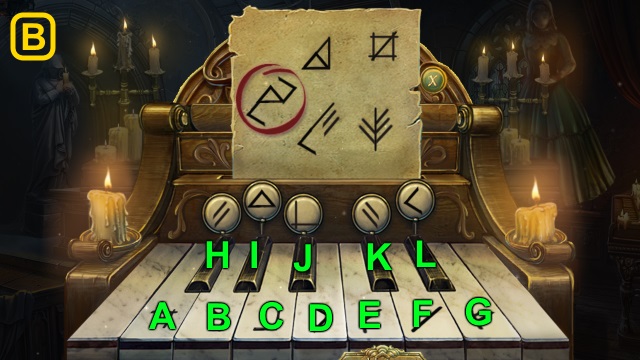
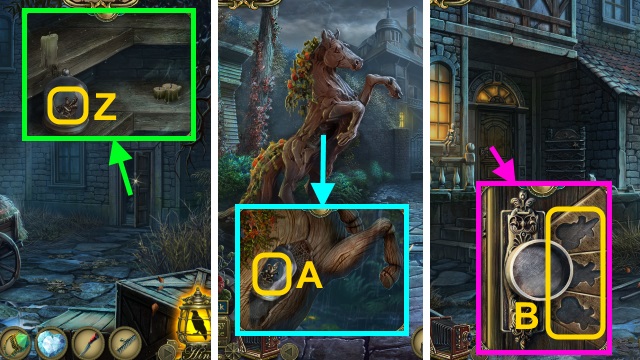
- Solution (Z-A).
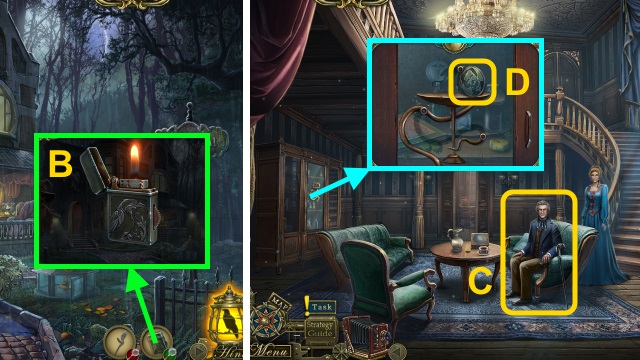
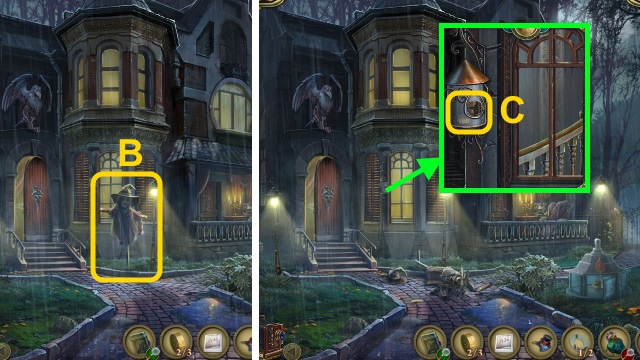
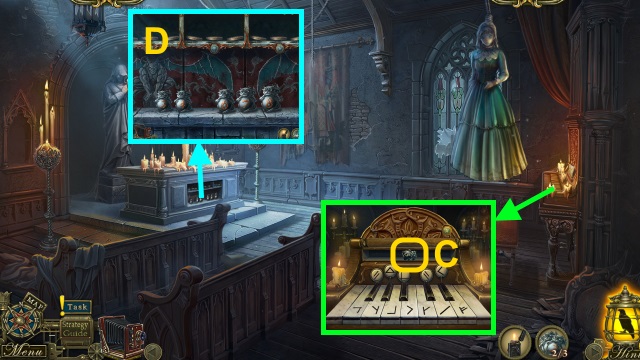
- Open the LIGHTER; examine the gear. Take the LIT LIGHTER (B).
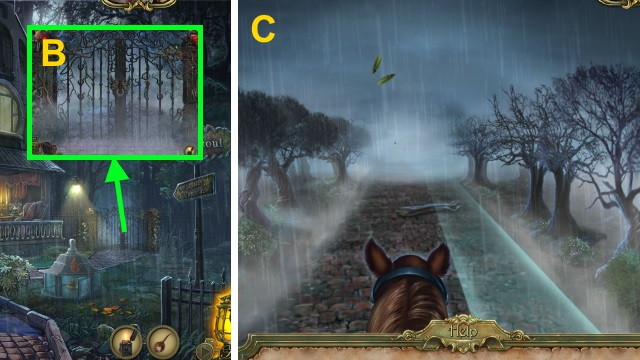
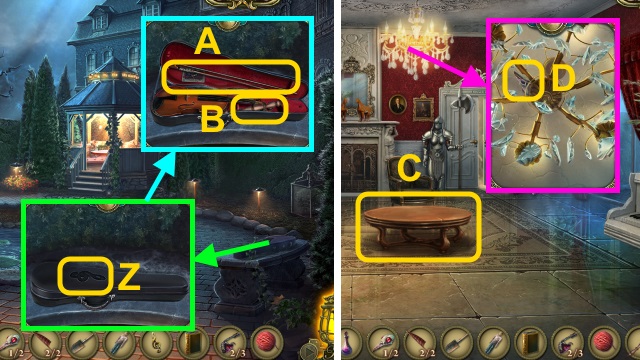
- Walk left.
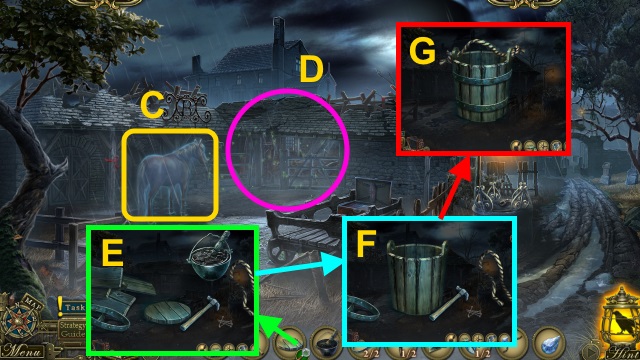
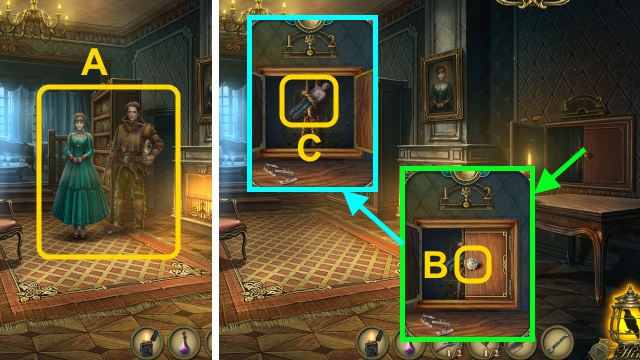
- Talk to Karl (C).
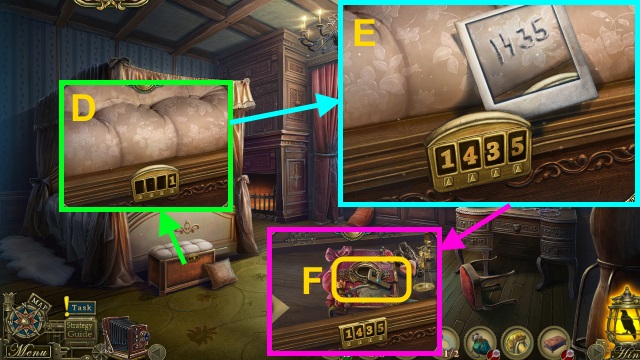
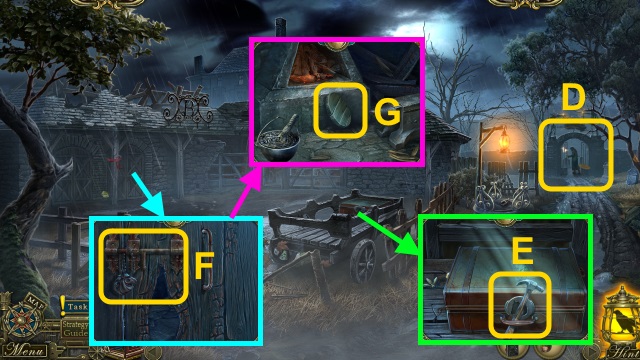
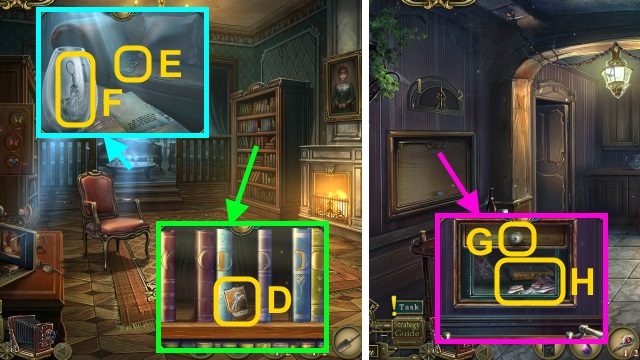
- Take the BOOK KEY (D).
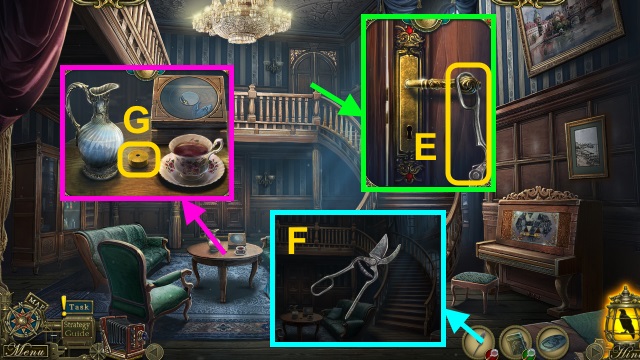
- Examine the door; take the SCISSORS PIECE (E).
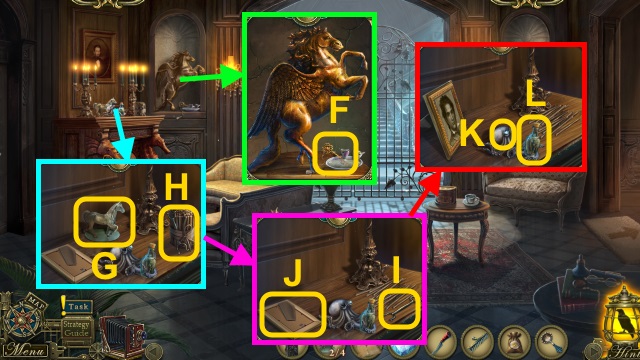
- Combine the 2 SCISSORS PIECES (F); take the SCISSORS.
- Take the LOCK CYLINDER (1/3) (G).
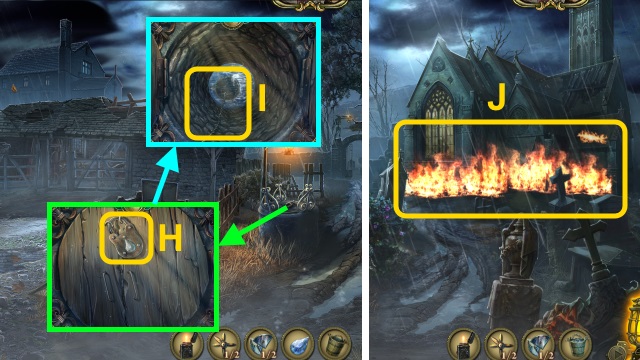
- Walk down.
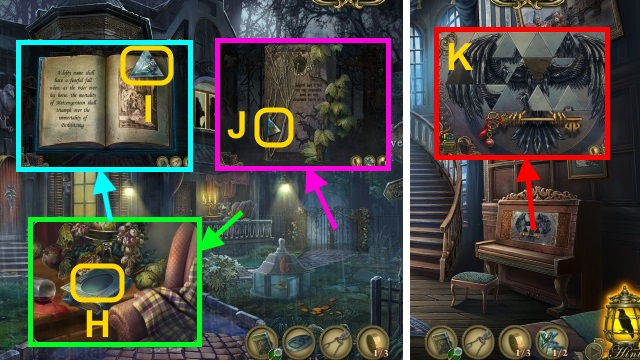
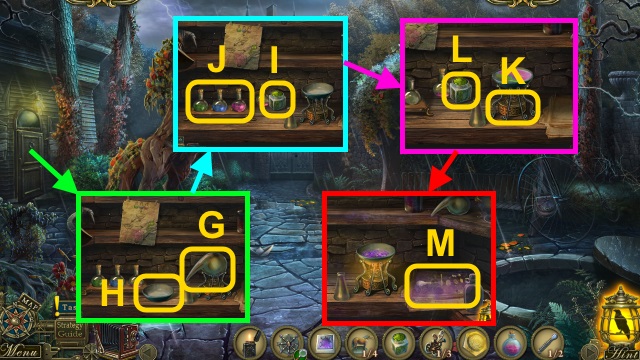
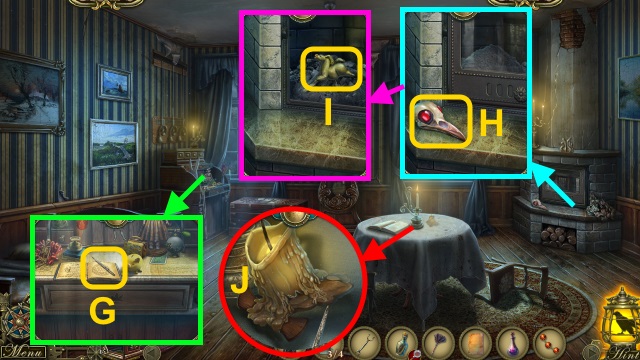
- Place the BOOK KEY (H); read the book.
- Take the GLASS PIECE (1/2) (I).
- Use the SCISSORS; take the GLASS PIECE (2/2) (J).
- Walk left.
- Place the GLASS PIECE (2/2) for a mini-game (K).
- Casual solution (L): (A-B)-(B-C)-(I-E)-(E-A)-(K-F).
- (F-B)-(D-H)-(H-J)-(D-H)-(K-F)-(I-E)-(K-I)-(G-D).
- Hard solution (M): (Q-S)-(S-U)-(U-W)-(W-Y)-(Y-P).
- (O-W)-(W-U)-(U-S)-(S-I)-(I-G)-(I-S)-(S-U)-(U-M).
- (M-O)-(U-W)-(W-Y)-(W-U)-(U-S)-(S-Q)-(I-B)-( F-D).
- (D-B)-(B-I)-(L-C)-(L-T)-(E-L)-(L-V)-(D-F)-(A-C)-(C-L).
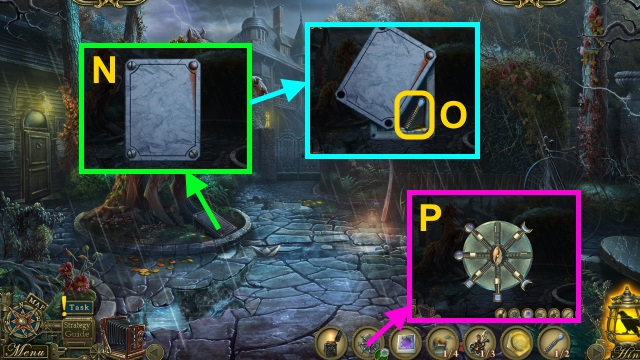
- Take FREDERICA’S KEY (N).
- Use FREDERICA’S KEY (O); open the door.
- Walk forward.
- Examine the chest (P).
- Use the Camera (Q).
- Take the CODE (R).
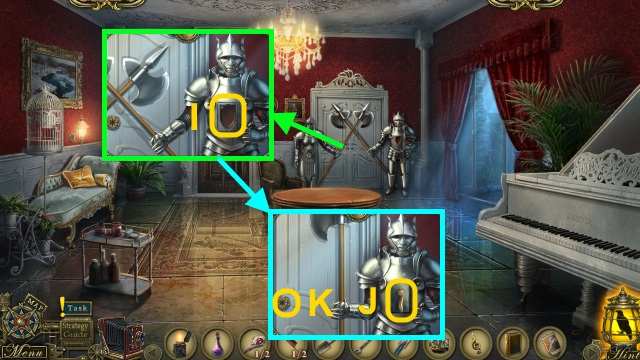
- Take the BIRD (S).
- Take the POKER (T).
- Use the POKER; receive the DISK (1/2) (U).
- Take the HANDBAG (V).
- Take the BERLIFITZING COIN (W); use the POKER.
- Take the SNAKE HEAD and CHEST (X).
- Walk down.
- Place SNAKE HEAD (Y); examine the part (Z).
- Open the cupboard; take the LOCK CYLINDER (2/3) (A).
- Walk down.
- Examine the scarecrow (B).
- Place the BIRD; take the LOCK CYLINDER (3/3) (C).
- Walk left, then forward.
- Place the CODE and LOCK CYLINDER (3/3) (D).
- Enter the code (E).
- Open the chest; take the LETTER F and SCISSORS (F).
- Combine the HANDBAG and LETTER F; examine the lock for a mini-game (G).
- Solution (H): (E-D-C)-(B-E)-(A-B-D-G-F)-(E-B-A).
- Open the handbag; examine the handkerchief (I).
- Take the PIN (J).
- Examine the doll (K).
- Use the SCISSORS; take the GLASS EYE (L).
- Place the GLASS EYE (M); read the diary.
- Play the HOP; receive the PHOTO (N).
- Talk to Mary (O).
Chapter 2: Wilhelm
- Take the CADUCEUS (P).
- Walk down.
- Place the CADUCEUS (Q); move the lock.
- Take the SMELLING SALTS (R).
- Walk forward.
- Use the SMELLING SALTS (S).
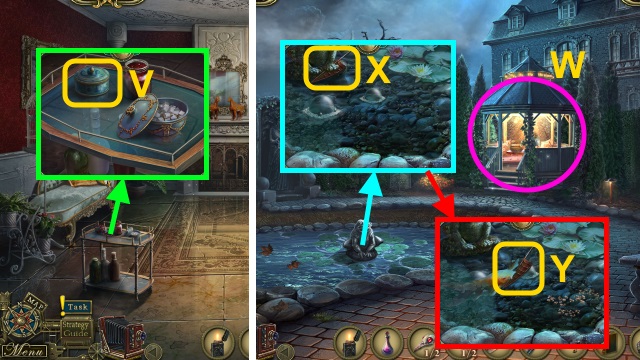
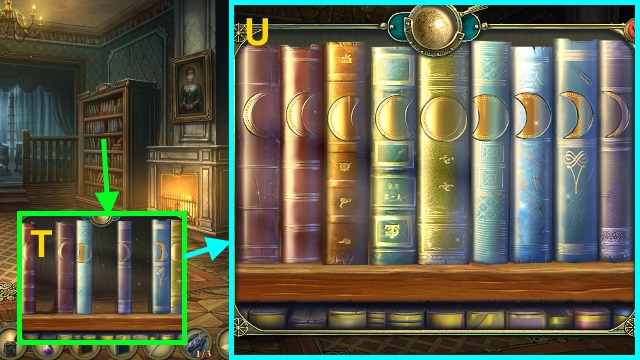
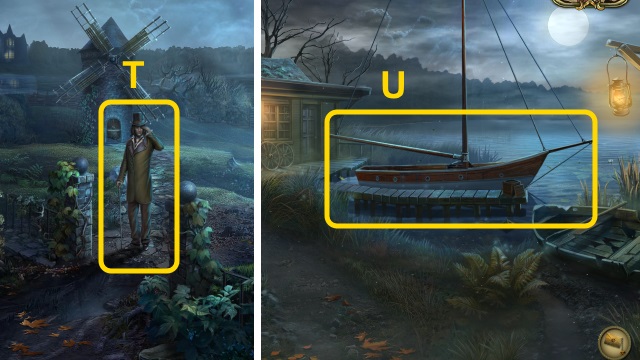
- Give the PHOTO; take the FOLDED NEWSPAPER (T).
- Examine the FOLDED NEWSPAPER (U); take the NEWSPAPER.
- Walk down.
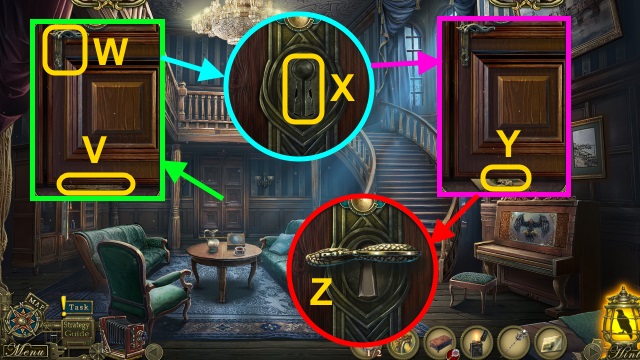
- Examine the door; place the NEWSPAPER (V).
- Examine the keyhole (W); use the PIN (X).
- Take the KEY (Y).
- Use the KEY (Z).
- Walk forward.
- Use the LIT LIGHTER to view the scene (A).
- Use the LIT LIGHTER (B).
- Give the BERLIFITZING COIN; take the GATE KEY (C).

- Take the OIL (D); read the newspaper (E).
- Remove the cover; take the DEER SKULL (F).
- Combine the CHEST and DEER SKULL (G); open the chest. Take the KEY PART (H).
- Walk down twice.
- Examine the gate (I).
- Examine the lock (J); use the GATE KEY (K).
- Take the KEY PART (L).
- Combine the 2 KEY PARTS (M); take the SPECIAL KEY.
- Walk left.
- Open the book (N).
- Use the SPECIAL KEY; take the HORSESHOE (1/3) (O).
- Go to Frederica’s Room.
- Play the HOP; receive the DISK (2/2) (P).
- Turn the frame. Use the SPECIAL KEY; take the HORSESHOE (2/3) (Q).
- Walk down.
- Place the DISK (2/2); examine the box for a mini-game (R).
- Solution (S).
- Open the lid; take the RAVEN (T).
- Go to the Baron’s Office.
- Place the RAVEN (U).
- Enter the code (V); open the door for a mini-game.
- Solution (W).
- Place the SPECIAL KEY; take the HORSESHOE (3/3) (X).
- Walk down twice.
- Examine the gate (Y).
- Use the OIL (Z); place the HORSESHOE (3/3) for a mini-game.
- Solution (A).
- Examine the gate (B).
- Walk forward for a mini-game.
- Dodge the debris (C).
- Examine the gate (D).
- Take the HAMMER (E).
- Use the OIL; examine the latch (F). Take the HORSE SYMBOL.
- Open the door; take the BUCKET BOTTOM (G).
- Place the bowl (H); collect the wood (1-4).
- Use the LIT LIGHTER; take the LIQUID TAR (I).
- Place the HORSE SYMBOL (J); open the case.
- Take the SKULL (K).
- Examine the gate (L).

- Talk to Dupin (M).
- Play the HOP; receive the LETTER (N).
- Read the LETTER; take the FINGER (O).
- Place the FINGER (P); take the BUCKET RIM (Q).
- Place the SKULL for a mini-game (R).
- Solution (S): C-F-E-D-A-B-C-F-A-D.
- Take the METAL FLOWER (1/2) for a mini-game (T).
- Solution (U): D-C-B-E-D-F-A-B-E-F-A-B-E.
- Solution (V): B-A-F-D-E-C-D.
- Walk right.
- Examine the church (W).
- Take the PLANKS (X) and LOCKET PART (1/2) (Y).
- Take the ROPE (Z) and DROPLET GEM (A).
- Take the BUCKET RIM (2/2) (B).
- Walk down.
- Examine the horse (C).
- Play the HOP; receive the NAILS (D).
- Combine the BUCKET BOTTOM, LIQUID TAR, HAMMER, BUCKET RIM (2/2), PLANKS, NAILS, and ROPE (E).
- Place the planks; use the tar (F). Place the rims; use the nails and hammer.
- Place the rope; tie it. Take the BUCKET (G).
- Place the DROPLET GEM (H); remove the cover.
- Use the BUCKET (I); receive the WATER BUCKET.
- Walk right.
- Use the WATER BUCKET (J).
- Take the AWL (K).
- Walk down.
- Use the AWL; receive the METAL FLOWER (2/2) (L).
- Walk right.
- Place the METAL FLOWER (2/2) for a mini-game (M).
- Solution (N).
- Walk forward.
Chapter 3: The Chapel
- Examine the scene (O).
- Turn the doll; take the LOCKET and WING (P).
- Take the LOCKET PART (2/2) (Q).
- Open the LOCKET; place the LOCKET PART (2/2) (R).
- Arrange the parts (S); open the pendant.
- Take the TUNE (T).
- Use the LIT LIGHTER (U); take the COFFIN KEY.
- Walk down.
- Use the COFFIN KEY (V); open the coffin.
- Take the GARGOYLE (1/3) (W).
- Place the WING (X); take the PIANO KEY (Y).
- Walk down.
- Use the COFFIN KEY; open the coffin (Z). Take the GARGOYLE (2/3).
- Walk right, then forward.
- Place the PIANO KEY and TUNE for a mini-game (A).
- Solution (B): (I-D-L)-(I-C-F)-(A-J-F)-(H-F-L)-(H-E-K).
- Take the GARGOYLE (3/3) (C).
- Place the GARGOYLE (3/3) for a mini-game (D).

- Solution (E).
- Walk left.

- Play the HOP; receive the LADDER (F).
- Open the LADDER; take the ROPE LADDER (G).
- Examine the opening (H).
- Use the ROPE LADDER for a mini-game (I).
- Solution: stop the meter when it’s full (J).
- Take the ELK KEY (K).
- Take the FLOWER (L).
- Walk down.
- Examine Karl (M).
- Place the FLOWER (N); take the SKELETON EYE (O).
- Use the ELK KEY (P); take the CROWBAR (Q).
- Walk left.
- Place the SKELETON EYE (R).
- Take the INCOMPLETE AMULET (S).
- Use the CROWBAR (T); move the stone 3x.
- Go up.
- Take the PLIERS (U).
- Move the wood; take the BAG HANDLE (V).
- Take the SPIDER STONE (W).
- Use the Camera; take the PHOTO (X).
- Take the HORSE FIGURE (1/4) and REAGENT (Y).
- Examine the bag (Z); place the BAG HANDLE (A).
- Open the bag; take the ORNAMENT FRAGMENT (1/3) (B).
- Walk down.
- Play the HOP; receive the HEXAGONAL COIN (C).
- Use the PLIERS; open the cage (D). Take the FLASK.
- Examine the bag; place the SPIDER STONE (E).
- Open the bag; take the AMULET PART (1/2) (F).
- Go up.
- Move the flask (G); place the bowl (H).
- Use the REAGENT (I) and FLASK; pour the flasks (J).
- Use the burner (K) and reagent (L).
- Take the SOLVENT RECIPE (M).
- Use the HEXAGONAL COIN (N).
- Take the AMULET PART (2/2) (O).
- Combine the INCOMPLETE AMULET, PHOTO, and AMULET PART (2/2) for a mini-game (P).
- Solution (Q).
- Turn the handle (R).
- Take the AMULET (S).
- Place the AMULET (T).
- Walk forward.
- Turn the handle 2x; take the RING (U).
- Take the HEART (V).
- Examine the lock 3x (W); open the door.
- Use the LIT LIGHTER; take the HORSE FIGURE (X), KNIFE, and RAKE TEETH (Y).
- Use the RING; take the ORNAMENT FRAGMENT (2/3) (Z).
- Walk down.
- Use the RING; take the ORNAMENT FRAGMENT (3/3) (A).
- Walk forward.
- Place the ORNAMENT FRAGMENT (3/3) (B).
- Select the fragments in order (C).
- Walk left.
- Take the SEEDS (D).
- Take the SIEVE (E).
- Take the RUSTY KEY (F).
- Take the HORSE FIGURE (3/4) (G); examine the string (H).
- Take the CAGE POST (I); move the frame (J).
- Place the HEART (K); take the MESSAGE IN A BOTTLE (L).
- Walk right.
- Take the DUSTER (M) and PAPER SHEET (N).
- Open the cupboard; take the MORTAR (O).
- Take the RAKE HANDLE (P).

- Combine the RAKE HANDLE and RAKE TEETH (Q); take the RAKE.
- Walk down twice.
- Use the RAKE for a mini-game (R).
- Solution is random (S); receive the APPLES.
- Walk left, then right.
- Place the SOLVENT RECIPE, KNIFE, MORTAR, SEEDS, SIEVE, and APPLES (T).
- Place the apples; use the knife (U). Place the seeds (V).
- Place the powder and apples (W).
- Place the pot (X); place the funnel and sieve (Y).
- Arrange the herbs (Z).
- Place the red herbs (A); pour the water (B) into the bowl.
- Pour the mixture; take the SOLVENT (C).
- Combine the RUSTY KEY and SOLVENT (D); take the SERVANT’S KEY.
- Examine the keyhole; use the SERVANT’S KEY (E).
- Walk left.
Chapter 4: Finding Frederica
- Use the LIT LIGHTER 3x (1-3).
- Play the HOP; receive the RED GEMS (F).
- Take the NAIL FILE (G).
- Take the CROW SKULL (1/2) (H); open the door.
- Use the DUSTER; take the HORSE FIGURE (4/4) (I).
- Use the NAIL FILE; take the BURNT CANDLE (J).
- Combine the BURNT CANDLE, PAPER SHEET, and LIT LIGHTER; take the CORKSCREW (K).
- Combine the MESSAGE IN A BOTTLE and CORKSCREW (L); take the DESK KEY (M) and note (N).
- Use the DESK KEY (O); open the drawer.
- Examine the letters 3x (P).
- Play the HOP; receive the CUPBOARD KEY (Q).
- Walk down.
- Place the CUPBOARD KEY (R); open the drawer.
- Take the MAGNIFIER (S).
- Walk down twice.
- Place the HORSE FIGURE (4/4) (T).
- Arrange the figures (U); take the WEIGHT (V).
- Walk forward, right, then left.
- Scroll down; open the clock. Place the WEIGHT (W).
- Examine the clock; scroll up. Take the GRAPES (X).
- Use the MAGNIFIER; take the TIME CLUE (Y).


- Place the TIME CLUE (Z); turn the hands for a mini-game (A).
- Solution (B-F).
- Take the GRIP (G).
- Walk down twice.
- Place the GRIP; turn the handle (H).
- Walk left.
- Take the TONGS (I).

- Open the piano (J).
- Move the shawl (K); place the GRAPES (L).
- Take the BELL (M).
- Use the CAGE POST (N); take the SAIL (1/2) (O) and SCOOP (P).
- Walk down.
- Open the cover; place the BELL (Q). Take the CRYSTAL (R).
- Walk left.
- Place the CRYSTAL (S). Turn the lock; examine the crystal.
- Walk right.
- Play the HOP; receive the GAFF TIP (T).
- Take the WRENCH (U).
- Walk down.
- Place the GAFF TIP; take the GAFF (V).
- Walk right.
- Examine the chain; use the GAFF (W).
- Open the cage; take the BLUE GEMS (X).
- Walk down twice.
- Place the RED GEMS and BLUE GEMS for a mini-game (Y).
- Solution (Z): (H-N)-(G-I)-(L-D)-(A-M)-(C-B)-(J-D)-(E-K)-(O-F)-(I-H)-(C-G).
- Walk forward.
- Talk to Frederica (A).
- Examine the handle; take the HANDLE (B).
- Open the door; take the BOY STATUE (C).
- Take the COAT OF ARMS (D).
- Take the TREBLE CLEF (E); use the TONGS (F). Receive the SHIP.
- Walk down, then right.
- Place the HANDLE (G); open the door.
- Move the dishes; take the YELLOW BOOK (H).
- Walk down, then left.
- Place the COAT OF ARMS (I).
- Place the handle (J) on the door (K).
- Walk forward.
- Take the RAG (L).
- Pull the lever (M). Take the SUN FACE; place the SHIP (N).
- Play the HOP; receive the CROW CLAW (1/3) (O).

- Use the WRENCH (P); receive the CROW CLAW (2/3).
- Take the BOOK (Q).

- Combine the BOOK and SUN FACE (R).
- Open the book; take the LENS (S).
- Place the LENS; examine it for a mini-game (T).
- Solution (U).
- Walk down.
- Use the RAG; take the FISH FOOD (V).
- Walk right.
- Play the HOP; receive the SILK THREAD (W).
- Examine the sail; use the FISH FOOD (X).
- Take the SAIL (2/2) (Y).
- Place the TREBLE CLEF (Z); open the case.
- Take the BOW (A) and GLOBE LEG (B).
- Walk down.
- Move the table twice (C).
- Use the BOW (D); receive the CROW SKULL (2/2).
- Walk forward.
- Play the HOP; receive the GREEN BOOK (E).
- Place the GLOBE LEG; take the DOLL (F).
- Place the SAIL (2/2) (G); take the SCREWDRIVER (H).
- Walk down, then right.
- Move the hay; use the SCOOP (I).
- Place the CROW SKULL (2/2); turn the skulls (J).
- Take the CROW CLAW (3/3) (K).
- Place the CROW CLAW (3/3) (L).
- Take the CRYPTEX (M).
- Examine the CRYPTEX; enter the code (N).
- Take the STAMP KEY (O).
- Walk down twice, then forward.
- Place the BOY STATUE, DOLL, and SILK THREAD; take the GLOBE KEY (P).
- Go to the Library.
- Place the GLOBE KEY (@); take the WINGED CAT (#).
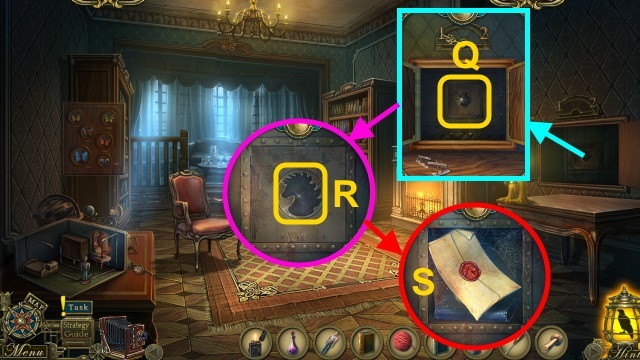
- Examine the safe (Q).
- Use the STAMP KEY (R).
- Examine the safe; take the LETTER TO WILHELM, STONE DISK (1/4), and BLUE BOOK (S).
- Place the YELLOW BOOK, GREEN BOOK, and BLUE BOOK for a mini-game (T).
- Solution (U).
- Walk forward.
Chapter 5: The Curse
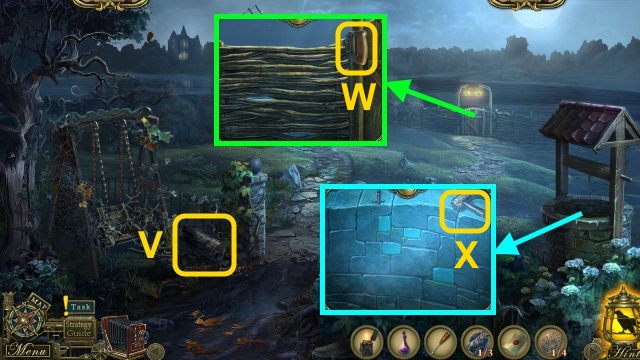
- Take the LOG (V).
- Take the SAW HANDLE (W).
- Take the HAMMER (X).

- Use the SOLVENT 4x; use the SCREWDRIVER 3x (Y).
- Examine the door 2x; use the LOG (Z).
- Walk forward.
- Place the door (A) on the walkway (B).
- Play the HOP; receive the PICTURE TILES (C).
- Move the debris and blade (D).
- Use the HAMMER and SAW HANDLE; take the SAW (E).
- Walk down.
- Use the SAW (F).
- Go forward.
- Talk to Wilhelm; give the LETTER TO WILHELM (G). Take the WINGED CAT (2/3).
- Take the SICKLE (H).
- Take the PLIERS (I).
- Use the PLIERS (J).
- Open the crate; take the SCRAPER (K).
- Walk down.
- Use the SICKLE; take the SYMBOL (L).
- Walk right.
- Use the SCRAPER; place the SYMBOL (M).
- Examine the symbol; take the OLD KEY (N).
- Examine the door (O). Use the OLD KEY (P); open the door.
- Walk forward.
- Play the HOP; receive the FISHING NET (Q).
- Take the GLOVE (R).
- Place the PICTURE TILES for a mini-game (S).
- Solution (T).
- Move the painting; take the STONE DISK (2/4) (U).
- Walk down.
- Use the FISHING NET (V); take the OWL WING (W).
- Place the OWL WING (X); take the HOOK (Y).
- Use the GLOVE; take the WINGED CAT (3/3) (Z).
- Walk down.
- Use the HOOK; receive the BEE MEDALLION (A).
- Walk forward.

- Place the WINGED CAT (3/3) (B); take the STONE DISK (3/4) (C).
- Walk down, right, then forward.
- Play the HOP; receive the VALVE (D).
- Place the VALVE (E); open the door.
- Take the LATCH and MASK HALF (F).
- Use the LATCH (G).
- Examine the yarn; take the FISH MEDALLION (H).
- Walk down twice, then forward.
- Place the MASK HALF for a mini-game (I).

- Solution (J-Q).
- Take the MILL MEDALLION (R).
- Walk down, right, then forward.
- Place the BEE MEDALLION, FISH MEDALLION, and MILL MEDALLION (S); take the SHAPED KEY (T).
- Walk down.
- Examine the grate (U).
- Use the SHAPED KEY (V); examine the glass for a mini-game.

- Solution (W): Ax3-C-Ex2-F-I-B-A-B-D-F.
- D-J-Kx3-Lx2-Px3-Nx2-G-Q-R-H.
- Take the STONE DISK (4/4) (X).
- Walk down, then forward.
- Place the STONE DISK (4/4) (Y); take the STENCIL (Z).
- Walk down.
- Use the STENCIL; examine the stone (A).
- Examine the letter; take the LEVER ARM (B).
- Walk forward.
- Play the HOP; receive the ROPE (C).
- Use the LEVER ARM (D).
- Take the METAL HOOK (E).
- Walk down.
- Place the METAL HOOK and ROPE; examine them (F).
- Scroll right.
- Take the letter and FAMILY STONE (G).
- Scroll right.
- Use the SCRAPER (H).
- Use the Camera (I).
- Take the PHOTO (J).
- Scroll right.
- Use the LIT LIGHTER and PHOTO (K).
- Walk forward for a mini-game.
- Solution (L-S).
- Solution (Q): A-Bx3.
- Talk to Dupin (T).
- Walk right.
- Examine the boat (U).

- Talk to Mary; give the FAMILY STONE (V).
- Select ‘Yes’ or ‘No.’
- Congratulations! You have completed Dark Tales: Edgar Allan Poe’s Metzengerstein.