Nancy Drew – The Silent Spy
Gameplay: This is a first person point and click game.
The main menu has new game, load game, options, help, extras, more ND and quit selections.
The options menu has voice, effects and music volume adjustments. Full screen and windowed game screen selection and Fast convo selection are here also.
Help shows the different cursors and navigation arrows used in the game. The interface description is shown at bottom of screen.
Extras have awards, credits, outtakes and teaser. Outtakes and teaser are locked until the end of the game.
More ND shows the other Nancy Drew casual and adventure games released by Her Interactive; as well as links to Facebook, twitter, You Tube and Pinterest.
Select to play either Amateur or Master Sleuth difficulty mode. Amateur Sleuth has regular puzzles; hints available and detailed task list. Master Sleuth has more challenging puzzles; no hints and has basic task list.
The game screen has menu at bottom left of the page. It has main menu, save game, load game, options, help and resume game links.
The main menu frame has a trophy cup icon at right side. Clicking it will show the trophies that can be achieved in doing certain actions in the game.
The cell phone is beside the menu link. It has phone, camera, games, settings and hints.
The phone has pictures and names of available characters that can be called. Click on the name or picture to get another frame that has a “call” button.
The camera can take 30 shots. Photos that are taken can be viewed. The focus can be zoomed in-out.
There are 7 games installed on the phone.
Settings have wallpaper selections as well as ring back and message sound tones selections.
The envelope icon show messages received.
The power button closes the cell phone.
At the center of the bottom bar is where the items collected are seen. Use the slider tab at top of the bar to go through the items.
The frames for Tasks and Journal are right of the inventory bar.
The tasks list has the to do things in the game. The question mark beside the task gives hints to help the gamer fulfill the task. If you do not use the hint system, you will get an award.
The journal has observations and suspects.
The dialogue frame has a double arrow at right; it is used to hasten the dialogue.
The game is non-linear. The walkthrough below is just one way to get through the game.
Phone charms are only for the games with bonus. The notes about them are in parentheses.
Read the papers on Nancy’s desk – letter, ticket, The Glaucus Lodge keycard and Kate’s picture.
Nancy receives a letter from Security Service branch of the MI-5, Cathedral. The Office of International Affairs – MI5 asks Nancy for help in solving the mysterious death in a single automobile crash of her mother, Kate Drew. They believe that she was killed by the group she was investigating in Glasgow.
Looking at Kate Drew’s picture at a train station invokes a memory of seeing her mom answer the phone call from a certain Moira in the living room of their home.
Wyvern Gate Station:
Someone steals Nancy’s suitcase. Alec Fell, a skiptracer tries to catch the thief but fails. Nancy has a lot of important papers about her mom in that suitcase.
The Glaucus Lodge:
Use the hotel keycard to open Nancy’s hotel room 727 door.
Answer the cell phone call from Ewan MacLeod, the Cathedral contact.
Look around the room. There is a power cord on the mirrored table and a safe in the closet.
Look out the window to see rooms across the courtyard.
Find the case file:
Open the left side table drawer. Take 21 coins. Pick up any coins seen. If you find 25 coins, you might get an achievement.
Additional coin locations not mentioned in the walkthrough – Thanks to Holomorph.
There are coins in the following places:
1) At Moira’s house, in the bookcase — upper right corner above the books.
2) Between two yellow stickies on tray in building beside safe house.
3) Building beside safe house, facing dummy, upper right corner of window in the V.
4) Building beside safe house, above bow in case, there are towels with coins in between.
5) At right most monitor of Ewan’s desk.
6) In Moira’s kitchen where toaster and coffee pot plug in.
Read the “eyes only” case file. Learn that Nancy w as brought here under false pretense. Learn that Kate stopped the Revenant cell that planned to attack Glasgow. The plot was called Colony Operation. Revenant is planning to mount another attack and maybe instrumental in bringing Nancy here for unknown reasons. Moira Chisholm is a reporter and a person of interest.
Cathedral is an organization under MI5 that protects Glasgow and surrounding areas. Colony Operation was a non-lethal biological attack. Kate supposedly destroyed the formula of the difficult to produce biological element. Revenant is believed to be behind terrorist and counterterrorist activities around the globe. (Pick up the dinosaur cell phone charm behind the lamp. If you find all the charms in the bonus version of the game, you might get an achievement.)
Go to the round table. Click on the flowers on the vase to get 10 coins.
Bridget: Exit the room and meet Bridget. She wants to meet Nancy outside.
Turn right and click on lamp at left to get 10 coins. (Click on right lamp to get unicorn horn charm.)
Turn left from room and forward. Click on plant across from elevator to get 2 coins.
Enter the elevator and go to ground floor (G). Exit the hotel.
Talk to Bridget:
In front of lodge, click on the right plant on second floor balcony to get 20 coins.
Bridget Shaw: Go towards the deli or Bridget. Talk to Bridget. Bridget left to get the Scotland tour book from her room.
Explore the hotel courtyard:
Newspaper: Read the Glasgow Daily Standard newspaper.
Learn about the Colony Operation virus. At right, read what happened the day the attack was thwarted at the last minute. The sirens blared; the Revenant logo took over the TV broadcast and the chemical bomb-propellant was pulled offline at the last second.
Get coins from seat of the table with newspaper.
Plaque: Read the Robert Burns plaque on the bench. (Pick up owl phone charm from left leg of the bench beside Bridget.)
Trash bin: Go to trash bin at left. In close up, take 5 coins right of the trash bin.
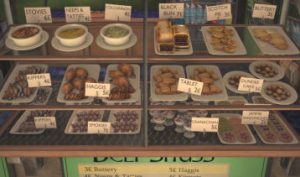
Deli Shuss: Look around the deli.
Buy any of the local items on the case. If you tried all the snacks, you might get an achievement.
Click on the yellow thing on the pipe at back wall to get 5 coins.
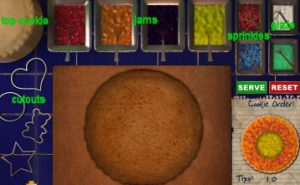
Make a Cookie: Click on the “help wanted” sign to start to make cookies. Earn coins in tips.
If you ever need money during the game, make cookies or look for coins.
Make a cookie by following the makings of the cookie at right.
The serve and reset button is above the cookie design.
Start from the base to the top decoration. The base is already on the working tray.
There are 4 jams at top of prep area. Check the color of the jam on the design.
There are 4 sprinkles and glazes at top right. Check the color of the sprinkles or glazes of the design.
Study the design to see if there are any jam, top cookie, cutout or none.
When complete, click on “serve”.
If error is made press reset but doing this lowers the tip given.
If correctly done and in time; Nancy will make a favorable comment.
Explore the train station:
Go right in front of the hotel to be at the train station.
Souvenirs: Check the souvenirs at left. Buy any souvenir that strikes your fancy. If you buy all the souvenirs, you might earn an achievement.
Station: Look at right and see the different side doors to the train platforms.
2 exits for Loch Lomond and 2 for Giffnock are at left and 4 exits for Bearsden are at right.
At far end under the clock and planked by 2 yellow with red wyvern flags are the storage lockers.
See Alec at right.
Tickets: Turn around and see the ticket counter.
Check the leaflets for the Scotland Rail, Glaucus Lodge and Scotland Wild Side (Loch Lomond and Ness).
You can buy train tickets on the automated machine at left.
Get 2 coins from under the left chair on the first Bearsden door.
Alec: Talk to Alec. Ask him to find Moira Chisolm.
Alec leaves. An “occupied” sign is on the chair. His bag is gone also.
Storage lockers: Go right from Alec’s location and check the 2 walls of storage lockers.
Open locker 33 (cost 2 coins) to get 2 coins. Open all the lockers and you might get an achievement.
Open locker 44 3 times to get the Scotch Easter Egg. If you find the Easters egg, you get an award.
Maintenance room: Go through the double doors and check out the maintenance room.
Drop off the envelope as instructed:
Mysterious phone call: Go back to the front and get a phone call from a mysterious caller with the R and claw logo.
Answer the cell phone. Nancy is given a test. She is to open locker 49; get an envelope and deliver it to the Ten Raven pub in Giffnock.
Locker 49: Open locker 49 and take the envelope.
Open the envelope to see a – save the date – invitation for July14th.
Go to the other end and buy ticket from the automated wall machine. You can always buy more if you need them. 15 tickets were enough for this gameplay.
Giffnock mail box: Exit through Giffnock platform door.
See a mailbox in front of the Ten Raven pub. Place the save a date envelope in the red mailbox.
Get a phone call that is pleased you passed. Listen to Kate’s recording about her being followed by Revenant. She left clues – there is a pattern to her travels. Card is for Cathedral.
Take the shears right of the mailbox.
Check the door of the pub. Take a menu from right of door and the screwdriver on the window shelf.
Get coins from top of the window.
Track down Moira Chisolm:
Go to the train station and automatically be at the Glasgow train station.
Alec: Talk to Alec. He found Moira at Bearsden. Moira hit him.
Talk to Alec again and exchange information. He would not admit to shadowing Nancy.
Talk to him again and after learning about Nancy’s mom; he stopped talking.
Bearsden: Go to Bearsden train platform and ride the train again.
Moira’s cottage: Knock on door. Recognizing Nancy’s accent; Moira wants food. Moira gives the American description of what she wants – oatmeal parfait, turnip and potatoes, haddock and fudge.
Find and deliver food that Moira wanted:
We saw those food items at the deli. Go back to the train station.
Carson Drew: Exit the train station. Get a phone call from dad. He is scared and wants Nancy to come home.
He shredded Kate’s papers when Nancy picked the locked of his cabinet.
Bridget: Talk to Bridget in front of hotel. Get the Scotland: A Traveler’s Guide book. Read the book.
Deli: Look close at the display case.
Study the menu taken from the Ten Raven pub for clues.
Haddocks are Smokies.
Turnip and potatoes are Neeps and Tatties.
Oatmeal parfait is Cranachan.
Fudge is Tablet.
Buy the food delivery requested. If you need money, make more cookies.
Moira: Go back to the train station and travel to Bearsden.
Knock on door and meet Moira. Learn that Moira and Kate were both reporters and that Nancy was a terror when she was a child. Nancy gleefully broke all the teacups; only the teapot remained.
A knock is heard. Moira tells Nancy to hide.
Hide in the closet right of the refrigerator in the kitchen.
Moira tells about the safe under the breaker and gives directions for getting to a safe house. Hear Moira greet the gentlemen that abduct her.
Follow Moira’s instructions to escape to the safe house:
Living room: Moira says there’s a safe under the breakers. Exit the closet. Look around the house.
Go to the living room and with back to door; turn to right to see the table. Take the Tartan book.
Turn to the left and look close at book shelves. Check Kate and baby Nancy’s picture.
Check the teapot and see 185 (amateur) or 164 (Master) taped at bottom of the teapot.
You can play records to hear various theme. (Look close at fireplace mantel to get Celtic symbol phone charm from the vase at right side of mantel.)
Wardrobe: Open the wardrobe left of the couch. Take clips under the top folded clothes.
Closet: Go back to the closet where Nancy hid.
Check the fuse box behind the hanging clothes.
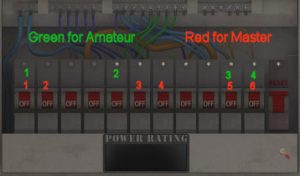
Open the Fuse box: Nancy says to place the fuses to equal the number seen under the teapot – 185.
Amateur: Flip a switch and see numbers. From left to right: 85 – 75 – 10 – less 30 – 40 – less 60 – 15 – 55 – less 20 – less 10 – 70. The rightmost is a reset switch.
Flip switches in order to end up 185.
Master: Flip a switch and see numbers. From left to right: 28 – 33 – less 18 – 75 – less 53 – less 22 – 43 – 66 – less 30 – 47 – 35. The rightmost is a reset switch.
Flip switches in any order to end up 164.
A secret compartment opens. Take the safehouse key to the Loch Lomond retreat.
Letters: Read the folder that has Kate’s letters to Moira. Learn that Kate brought Moira into “that life” and that Carson is not pleased with Moira.
Kate left her notes at the safehouse. Pattern? Date? R?
There is a TV drawn at last page – “Tune in to the Declaration of Arbroath” (Amateur) or “Tune in to the Acts of Union” (Master).
Locked box: See a box with letters A – G and 3 green bulbs. There is not enough clues to solve this yet.
Cell phone: Call Carson Drew on the phone and find out that his passport was blocked and he can’t travel to Scotland.
Call Ned and he is worried. Learn that inside Nancy’s suitcase is Kate’s Jabberwocky poem. It has notations on it.
Exit the house and go to the train station.
Loch Lomond: Go through the Loch Lomond platform door.
On the way, Nancy recalls an argument between Carson and Kate before Kate left for Scotland.
Explore the cabin:
Safehouse: Go to the house at left. Use the key from the fuse box to unlock the door.
Upon entering, check the top bunk at left to get 5 coins.
Check the fireplace.
Turn right and check the wall cabinet above the dining room table to get 5 coins.
TV corner: Turn to the corner where the TV is located.
Check the Mary Queen of Scots history book. Read the book and see the ciphers used as codes by Mary and her conspirators. A written notation states Fireplace – plastic (amateur) or Fireplace – observant (master).
Get coins from left side where you got Queen Mary’s book.
TV: This looks like the drawing in Moira’s folder – “Tune in to the Declaration of Arbroath” (Amateur) or “Tune in to the Acts of Union” (Master).
Read the Scotland Travel book given by Bridget. At the last page see that the Declaration of Arbroath was in April 1320 (Amateur) or Acts of Union was in May 1707 (Master).
On the keypad of the TV press 041320 for Amateur or 051707. WOW! See the dining area change to space age workstation.
Check out the cabin’s secret computer:
Computer: Click on the monitor across from the chair and get the Cathedral insignia.
The phone rings. Answer the phone to hear Ewan say that he placed a keycard in Nancy’s room safe. The password is the room number multiplied by the price of haggis at the deli.
The cell phone flashes again. Check the text message sent by Moira – she’s safe at home now. If you haven’t yet; read the text message sent by Bridget – she knows your phone number now.
Check the computer.
Folder: Click on the folder at top left and see Kate’s notes. Learn that the Jabberwock poem is important. Kate is trying to solve the name Colony.
Learn that the biological weapon has the ability to make groups of strangers react in predictable manner.
The last note states that Kate placed the scientist and family on plane and she’s on the run. She states to play the pipes and read the letters as they appear – left to right. She was at the cafe that Moira hates and says: Live or Die, this is goodbye.
Cell phone: Call Ned on the cell phone. Talk to him completely. Be sure to ask him to get the original color coded Jabberwocky poem, scan it and send it to her.
Figure out how to use mom’s note in the Queen Mary’s book:
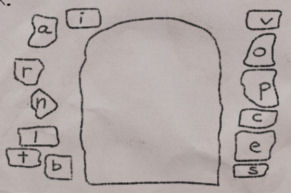
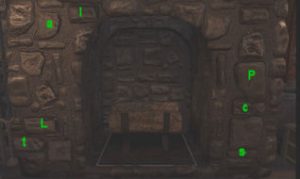
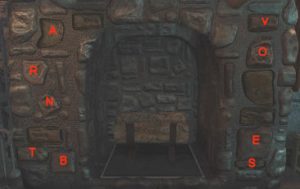
Look close at the fireplace. Remember the notation on the Mary Queen of Scot book: fireplace – plastic (amateur) or Fireplace – observant (master).
Use the fireplace drawing seen in the letters of Kate to Moira. See that the stones have letters on them
Click on the stones to spell plastic (amateur) or Fireplace – observant (master).
A vault rises. We need a password for this.
 |
 |
| Amateur | Master |
Explore the training building – Brae Arena:
Exit and then turn around. Go to the building at right. (Check the Brae Arena sign left of door to get a bow and arrow phone charm.)
Enter and turn around.
Information: Check the information desk.
Read the Mastering the Bow book to learn the 3 bow types: longbow, recurve and compound. The longbow is for target practice, the recurve is for target shooting events because of its improved accuracy. The compound is used for hunting or bowfishing.
Read the Great Highland Bagpipe book. Learn the parts of the bagpipe and the 9 notes commonly played on the chanter. The drones produce continuous note while the chanter provides the melody.
Target practice: Turn right and see stacked of hay at back of room.
There’s a locked compound bow at left. Take the 5 coins under the table with arrows on top.
See the high score black frame. It has scores made by Kate and Moira based on variations of Kate and Moira Chilsom’s name.
Bagpipe: Turn to the right under the windows and see a bagpipe that is missing a part.
Punching bag: Hit the human training punching bag at right. See training swords left of the punching bag.
Archery: Turn around to face the stacks of hay. Go to the right corner to start the archery practice.
Click-hold the left mouse button to pull the bow.
Position the crosshair right of the target based on the speed and size of the moving target and then release.
The aim is to get the highest score. The high score is 37 (amateur) or 55 (master).
When done, the bow case is opened. Take the compound bow from the case.
If you play the archery puzzle often enough, you might get an award.
Get the key from room and check with Ewan:
Exit the training building and go to the station. (Upon exiting the Loch Lomond platform, take the dragon phone charm from the chair at right.)
Deli: Exit the station and check the deli. Look at the display case to find out that a haggis cost 5 pounds.
Talk to Bridget. She thinks Nancy was with Alec at the cabin.
Nancy’s room: Enter the hotel.
Get a phone call from Ned and Carson. Ned was caught burgling Nancy’s house. After some conversation. Carson understands the situation and tells Ned where the poem is located.
Be at the elevator. Press 7 for Nancy’s floor. Enter room 727 at left hallway.
Luggage: Go to the closet. See Nancy’s luggage. Nancy sees that mom’s stuff is gone. Best to ask Alec.
Get coins from the shiny circle at right side of suitcase.
Safe: Open the safe using the room number 727 multiplied by the price of a haggis 5 = 3635.
Take the Glaucus Lodge – Cathedral keycard.
Face the mirror on the table and see a bright reflection.
Nancy checks the window to see Bridget acting weird. Nancy wants to check her room.
Elevator: Go to the elevator and use the Cathedral keycard on the slot on the panel.
Press the large button above the slot on the panel.
Ewan: Enter the Cathedral command center. Talk to Ewan. He will check Alec Fell.
Ewan gives a zipline and arrow to go with the bow taken at the Brae Arena. This will get Nancy to Bridget’s room across the hotel courtyard.
Learn about Revenant. Nancy is given basic clearance to work in the computer.
Track down more information about mom’s past with cathedral:
Cathedral Archives: Climb the steps and go right.
Turn right again. Get coins from the case at end of the aisle. Look close at the monitor computer. It is Nancy’s personal portal to the archives.
Green cards: Read the file on Kate Drew-Katherine Austin. Learn that her internal name is harrier; Moira is lark, Carson is condor and Nancy is kestrel.
See the records of George – swift, Bess – magpie and Ned – robin. Joe and Frank Hardy are trusted operative but their records are mostly blanked out.
Read Nancy’s record. Learn that Moira was dishonorably discharged.
White papers: Read about Kate’s non-standard hire practice. Kate was believed to have run the Colony operation off-line on her last visit to Scotland. Read about Colony operations. Learn about the Colony scientists.
Other papers: See 3 brown files and 2 green files that need passwords to unlock. The Revenant symbol is a red R and a bird claw.
Symbols: Look at the paper with 6 sets of symbols. Take a picture of this with your camera.
Explore the Cathedral’s field agent command center:
Face the corner and take the coins on the floor between the 2 machines.
Spy gears: Look around. Go to the corner glass case. Check the locked spy gears in the case. The keypad is on the left. It is offline.
Go around to the other side.
Firewall controls: Before entering the server room; check the firewall control box at right wall. From left to right: B4, B3, B2 and B1 buttons.
Server room: Enter the back room and see banks of servers. Each servers are labeled with a tartan. There are 5 sets of labeled servers on 3 aisles.
The main computer server is on the right wall of the front right aisle – B1.
Get coins from the vent at top of wall at right corner of room – B2.
Go to the left corner at B3 and see the thermostat control which is presently at 69.
Firewall controls + aisle: Open the firewall control panel.
Press B1 and see that the front aisle on the left has a physical firewall dropped to block entry.
B2 is for the far right aisle. B3 is for the back left aisle and B4 is for the front left aisle.
Another Revenant test:
Exit the Cathedral center and go down to the ground floor.
Outside the hotel, get another call from the mysterious caller. Nancy gets another test – cut the lines the trash compactor at station.
Go to the station and go to the maintenance room at end of the hallway.
Use the shears taken from Giffnock on the red tube hanging on top of the trash compactor.
Go to the door and answer the phone. Hear Kate’s voice again. She wants a message sent to her family but the recording was cut off.
Alec: Talk to Alec twice. He didn’t find the poem in the luggage. Nancy tells him that the poem has notations on it.
Bridget: Exit the station and talk to Bridget.
Track down a color copy of the Jabberwocky poem:
Go back to the room 727. See an envelope on the door. Get the colored copy of mom’s poem – the Jabberwocky that Ned sent.
Find a way to cross the courtyard over to Bridget’s room:
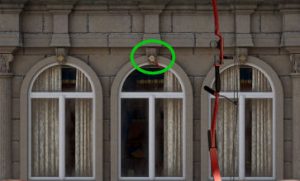
Shoot the bow and arrow with zipline: Go to the window. Use the bow and arrow on Bridget’s room.
See the circle crosshair. The aim is to hit the small circle on top of the middle arched window.
Do as practiced at the Brae Arena. Click hold the left mouse button.
Place the crosshair on or right of the target, wait just before the spinning disk stops (slows down) and release.
Nancy zips across the courtyard and enters Bridget’s room. If you use the zipline a lot, you might get an achievement.
Search Bridget’s room:
Read the notebook on left side table. Bridget is tracking Nancy’s movements. There’s a MacLorthen noted on the side of the page.
(Take the crown phone charm from the armrest of the blue chair at left).
Check the painting left of the blue chair. There’s nothing behind it.
Check the flowers at center of the coffee table. Hmm…
Cell phone: Pick up the cell phone from the yellow ceramic on table at back of the couch.
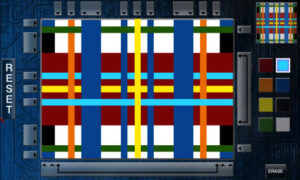
Tartan: See a tartan at top right. It is the MacLorthen plaid as shown in Bridget’s notebook and Moira’s Tartan book.
The aim is to copy the tartan colored lines. Begin by coloring from the bottom – up.
The gray arrows at sides of the frame are locations of lines.
The colors are the squares at right of frames.
Select-click a color and then click on the gray arrow(s) where you want it placed.
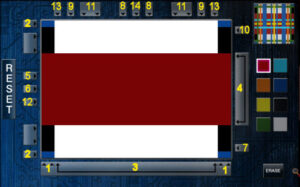
| Color and number of lines | Location placed
shown in picture |
| 2 black | 1 |
| 2 dark blue | 2 |
| white | 3 |
| red | 4 |
| light blue | 5 |
| yellow | 6 |
| green | 7 |
| 2 dark blue | 8 |
| 2 orange | 9 |
| green | 10 |
| 2 dark blue | 11 |
| light blue | 12 |
| 2 green | 13 |
| yellow | 14 |
Read the text messages that shows that Bridget is following her around and knows about the Cathedral connection. She is being paid by Owl eyes and the next order is behind the Burns words on the plaque at the front of the hotel.
Exit through the window to zip line back to Nancy’s hotel room.
Open the compartment hidden in the bench by the deli:
Go outside of hotel. Talk to Bridget. She says she’s been robbed. They took money. Nancy diverts her with story of spies going to her room.
Bridget leaves.
Check the plaque on the bench. Use the screwdriver taken from the pub in Giffnock on the screws.
5 sliding plates: The aim is to slide the 5 plates out at right side.
Click to rotate and click-drag to move the plates.
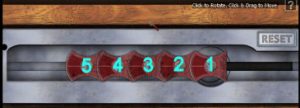
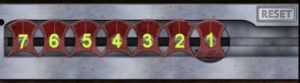
Slide Turn plate # Slide Turn plate # Slide Turn plate # Slide Turn plate # The label is from right to left. – 1 right 7 right 4 right 5 right 3 left 1 left 1 left 1 left 1 right 2 right 2 right 2 right 2 left 1 left 1 left 1 left 1 right 3 right 3 right 3 right 5 left 1 left 1 left 1 left 1 right 2 right 2 right 2 right 2 left 1 left 1 left 1 left 1 right 4 right 6 right 4 right 3 left 1 left 1 left 1 left 1 right 2 right 2 right 2 right 2 left 1 left 1 left 1 left 1 right 3 right 3 right 3 right 4 left 1 left 1 left 1 left 1 right 2 right 2 right 2 right 2 left 1 left 1 left 1 left 1 right 5 right 4 right Slide out for Master right 3 left 1 left 1 left 1 right 2 right 2 right 2 left 1 left 1 left 1 right 3 right 3 right Slide out for Amateur left 1 left 1 Continue on for Master right 2 right 2 left 1 left 1
Turn the knob and read the message: “Fill a blue bag with the final payment of 35 pounds. Place the bag inside the trash bin next to this bench. Exit the area and return later. Your equipment will be waiting for you in the trash bin”.
Nancy screws the plate back to original position.
Check the trash bin left of the bench. Nancy needs a bag.
Find out what Alec is hiding:
Go to train station and check the place where Alec usually stands. He’s not here and has the occupied sign up.
Turn around and see a blue paper on the plants across the aisle.
Take the paper and read it. It states “—erneath occupied seat cushion –only to be used as last resort in case I am caught by th—.”
Chair: Look on the seat cushion of the chair with occupied sign.
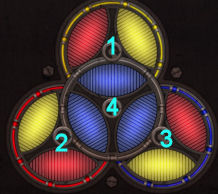
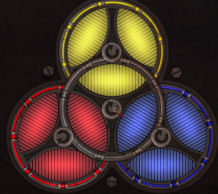
Colored circle: See circles partitioned into blue, red and yellow.
The aim is to place the same colors inside the similar colored rings: Top is yellow, bottom right is blue and bottom left is red.
| Turn #3 once.
Turn #4 once. Turn #3 once. Turn #4 once. Turn #2 once. Turn #4 once. Turn #1 twice. Turn #4 twice. |
 |
 |
See a note: “We have eyes and ears on you in the station. Stand by for our call. Her life depends on it.” Someone is threatening Alec.
Follow through on the instructions from Bridget’s texts:
Souvenir shop at train station: The instruction states to place money inside a blue bag.
Go to the train station’s souvenir shop. Buy the blue bag at bottom right display for 12 coins. If you need money, make cookies at the deli again.
Get a text message from Bess. Read other unread messages. Get 20 coins from the ticket window.
Bridget: Go to the deli and see Bridget standing there. Talk to Bridget. She asks Nancy’s phone and hid what she’s doing to it.
Nancy confronts Bridget. After the confrontation, Bridget loses her accent and leaves.
Trash Can: Place the blue bag in the trash can left of the bench. The money is automatically placed in there. If you need money, make cookies at the deli again.
Leave as the instruction stated.
Ewan at Cathedral: Go to Ewan at the Cathedral control room. Enter the elevator and push the large button on the bottom of panel.
Talk to Ewan completely to learn about Alec, the attack, Colony and Revenant. If Revenant has the correct formula and the people to make it the attack; it will happen instantaneously. The glass case is offline and the lock is half fixed only.
Spy glasses: Go back to the trash can by the deli. Pick up the odd glasses.
See that it was made for Zoe Wolfe.
Go back to Ewan at the Cathedral control room.
Give the glasses to Ewan. They are augmented reality glasses.
Zoe Wolfe: Go to front of hotel. Talk to Zoe aka Bridget. She knows that Nancy has the glasses but she remote wiped the drive already.
Nancy has to trust only Zoe; no one else. She knows about Carson’s passport. Zoe warns Nancy about the danger.
Carson Drew: Use the cell phone to call dad-Carson. Nancy and Carson start opening up about Kate. Kate threw a wrench in the Colony attack by looking for the scientist that worked the formula. Based on Carson’s sources, Zoe might be the real deal.
Ned Nickerson: Call Ned on the cell phone. Nancy asks Ned to get all info about Revenant.
Call Ned again after a while to learn about Revenant. Learn that Revenant is thought of as a parent.
Open fireplace using clues in journal.
Moira: Go to train station and then Bearsden. Talk to Moira twice. Learn about her relationship with Kate, Carson and Cathedral. Get Kate’s case book.
The people that wants Kate’s secret wants Nancy here to see if she can find out what Kate hid. She admits that she got Kate to come here and lead her to her death all because of a lie.
Kate’s case book: Read Kate’s case book completely. Learn about her theory that Glasgow was a test run. People all around the country were primed to do one thing like standing on Tuesday noon in large groups at the city centers.
Kate: Go to train station. On the way, another mom memory is triggered. Child Nancy is upset at her mom. Nancy doesn’t understand why she has to leave. Nancy refuses to practice piano with Kate.
Safehouse: Go to Loch Lomond safehouse.
Vault in fireplace: Look close at the vault that was exposed earlier using the pattern on the fireplace stones.
Review the white paper inside Kate’s case book.
Amateur clues: If you’re doing this puzzle by the clues below, the letters-numbers can be entered as the clues are decoded.
Enter the numbers using the arrows left or right of each alphabet or number.
Alphabets and numbers to enter: A to J (no I) and 1-9
No letter or number appears more than once.
The top row contains BEF in that order. (Therefore enter BEF on top row.)
The vowels are in the middle column in the top 2 rows. (Therefore 2nd row is -A-.)
In the same column, E is above H which is above 6. (Therefore – EH6 are in the middle column in certain order)
In the same column, J is above D, which is directly above 3, which is above 1. (Therefore – JD31 are in rows 2-5.)
The fifth row contains 1, 2 and 9 in some order.
8 is before 6 in one row and 2 is after 9 in another. (So 86 and 92 in 2 rows.)
In one column G is directly below C and above 2. CG2. So 2 is at right column.
(So – JD31 of rows 2-5 are in left column and the order of row 5 is 192. H is third row middle column. C and G are in rows 2 and 3 at right column.)
The fourth row contains only odd numbers. (So – 357 in some order).
7 is before 5 in one row.
(So fourth row is 375 and 6 is middle column at bottom row. The bottom row is then 864.)
The vault opens.
When the vault opens, a text message from Ned arrives